M.2 NVMe Boot Drive Replacement
M.2 NVMe Boot Drive Replacement Overview
- With the help of NVIDIA Enterprise Support, determine which M.2 drive needs to be replaced.
- Get replacement from NVIDIA Enterprise Support.
- Power down the system.
- Label all cables and unplug them from the motherboard tray.
- Remove the motherboard tray and place on a solid flat surface.
- Remove the motherboard tray lid.
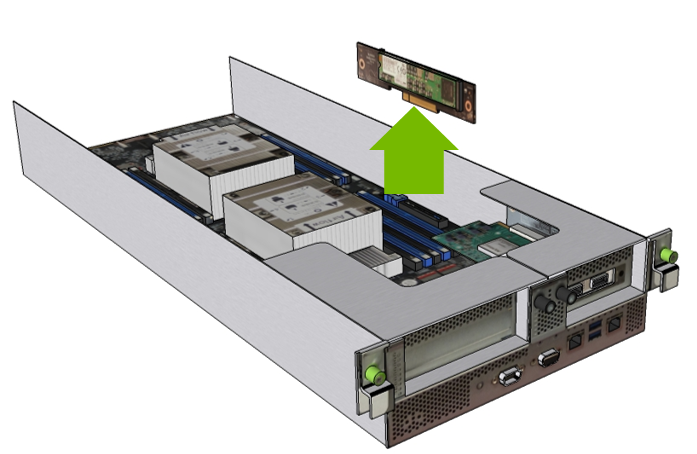
- Pull out the M.2 riser card with both M.2 disks attached.
- Replace the failed M.2 device on the riser card.
- Install the M.2 riser card with both M.2 disks.
- Close the lid on the motherboard tray.
- Insert the motherboard tray into the system.
- Plug in all cables using the labels as a reference.
- Power on the system.
- Confirm the RAID 1 array is being rebuilt.
Identifying the Failed M.2 NVMe
- From the console, run the following command to identify the failed drive.
$ sudo mdadm -D /dev/md0
Normally, the output would show both drives (nvme0 and nvme1) in an active sync state. The following example output shows only nvme1 in active sync, indicating that nvme0 is the failed drive.Number Major Minor RaidDevice State 0 259 2 0 active sync /dev/nvme1n1p2 - 0 0 1 removed
- Make a note of the device name for the failed drive (nvme0 or nvme1) and the device name for the good drive (nvme0 or nvme1). You will need this information when rebuidling the RAID 1 array after replacing the drive.
- Run the following command to determine the location of the failed boot drive,
replacing X with the number corresponding to the device name of the failed
drive.
$ ls -l /dev/disk/by-path |grep nvmeX |cut -d':' -f3
The output will be either '01' or '05'. Be sure to note this number as you will need it when performing the replacement. - Identify the manufacturer and model for the M.2 drive by running the following
command on the healthy drive, where X corresponds to the healthy drive,
and inspecting the Manufacturer = and Model =
line.
$ sudo nvsm show /systems/localhost/storage/drives/nvmeXn1
- Provide the vendor name for the drive when ordering the replacement and then obtain the replacement from NVIDIA Enterprise Support.
Replacing the M.2 NVMe Drive
- Determined the location ID of the faulty M.2 NVMe drive.
- Obtained the replacement M.2 NVMe drive and have saved the packaging for use when returning the faulty drive.
- Back up any critical data to a network shared volume or some other means of backup.
- Power down the system.
- Label all cables connected to the motherboard tray for easy identification when reconnecting.
- Remove the motherboard tray.
Refer to the instructions in the section Removing the Motherboard Tray.
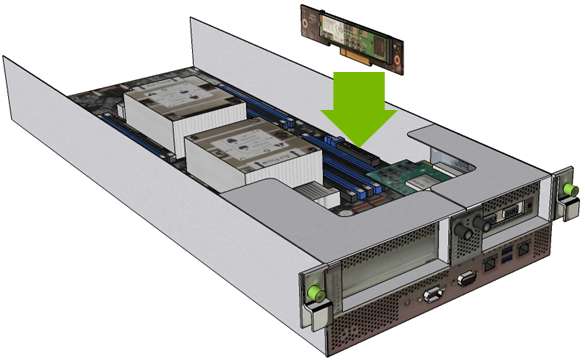
- Remove the M.2 modules and the riser card from the motherboard tray by pushing on the clip to release the riser.
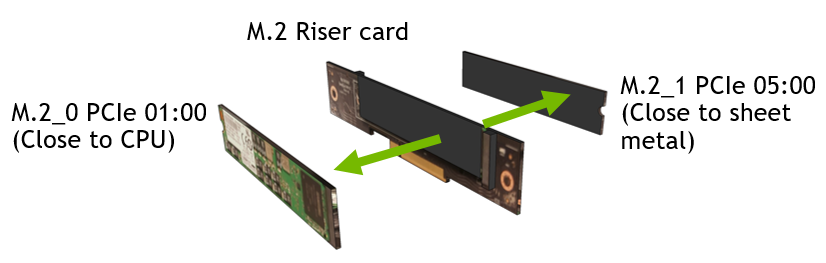
- Identify the failed M.2 module and remove it from the riser card by loosening
the screw with a Philips #2 screwdriver.
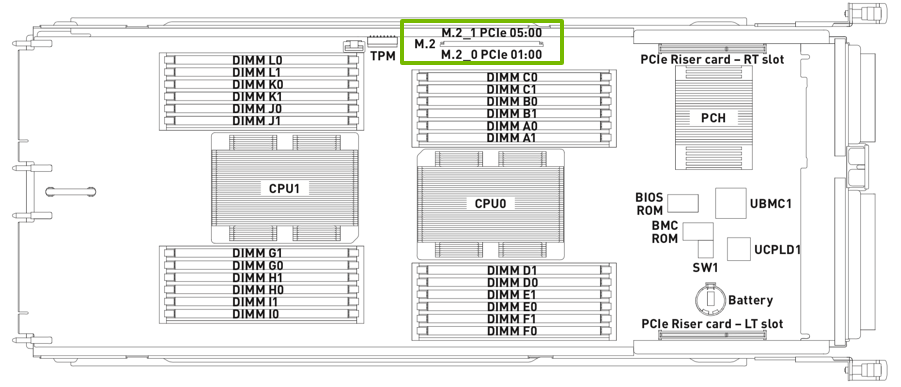
Use the label on the motherboard tray lid to help identify the M.2_0 module and the M.2_1 module.
- Insert the new M.2 module and secure it with the screw to the riser card.
- Install the assembled module on the motherboard by inserting the the riser card in its slot.
- Install the motherboard tray lid and then install the motherboard tray.
Refer to the instructions in the section Installing the Motherboard Tray.
- Connect all the cables to the motherboard tray.
Rebuilding the Boot Drive RAID 1 Volume
- Turn the DGX-2 System on. The rebuilding process should begin automatically upon system boot.
- Log in and then confirm that the RAID 1 array is being rebuilt.
$ sudo mdadm -D /dev/md0
- If the RAID 1 array is still in the process of being rebuilt, the output
will include the following line.
Rebuilt Status : XX% complete
- If the RAID 1 array rebuilding process is completed, the output will show both drives in 'active sync' state and you can skip the remaining steps.
- If the RAID 1 array is still in the process of being rebuilt, the output
will include the following line.
- If the rebuilding process did not start automatically, then rebuild the array
manually.
In the following steps, replace X with the number that corresponds to the
replaced drive, and Y with the number that corresponds to the drive that was not
replaced (the surviving drive). If you did not note this information when
identifying the failed drive, then follow the instructions in the first step of
Identifying the Faile M.2
Drive.
- Start an NVSM CLI interactive session and switch to the storage
target.
$ sudo nvsm
nvsm-> cd /systems/localhost/storage
- Start the rebuilding process and be ready to enter the device name of
the replaced drive.
nvsm(/systems/localhost/storage)-> start volumes/md0/rebuild
PROMPT: In order to rebuild this volume, a spare drive
        is required. Please specify the spare drive to
        use to rebuild md0.
Name of spare drive for md0 rebuild (CTRL-C to cancel): nvmeXn1
WARNING: Once the volume rebuild process is started, the
         process cannot be stopped.
Start RAID-1 rebuild on md0? [y/n] y
After entering y at the prompt to start the RAID 1 rebuild, the "Initiating rebuild ..." message appears./systems/localhost/storage/volumes/md0/rebuild started at 2018-10-12 15:27:26.525187 Initiating RAID-1 rebuild on volume md0... 0.0% [\ ]
After about 30 seconds, the "Rebuilding RAID-1 ..." message should appear./systems/localhost/storage/volumes/md0/rebuild started at 2018-10-12 15:27:26.525187 Rebuilding RAID-1 rebuild on volume md0... 31.0% [=============/ ]
If this message remains at "Initiating RAID-1 rebuild" for more than 30 seconds, then there is a problem with the rebuild process. In this case, make sure the name of the replacement drive is correct and try again.
The RAID 1 rebuild process should take about 1 hour to complete.
- Start an NVSM CLI interactive session and switch to the storage
target.