U.2 NVMe Cache Drive Replacement
U.2 NVMe Cache Drive Replacement Overview
- Identify the failed Non-Volatile Memory Express (NVMe) drive.
- Get replacement from NVIDIA Enterprise Support.
- Power down the system and then remove the failed NVMe drive.
- Insert the new NVMe drive.
- Power on the DGX-2 System.
- Rebuild the RAID volume and remount the /raid partition.
Identifying the Failed U.2 NVMe
Identifying the Failed NVMe from the Front
If physical access to the system is available, you can identify a failed drive by the blinking red LED as illustrated in the following example.

Identifying the Failed NVMe from the Console
To identify the failed NVMe drive from the DGX-2 console, enter the following and then look for a missing entry from the output.
$ sudo mdadm -D /dev/md1
Number   Major   Minor   RaidDevice State
          0     259        8        0      active sync   /dev/nvme9n1
          1     259       13        1      active sync   /dev/nvme5n1
          2     259        7        2      active sync   /dev/nvme6n1
          3     259       10        3      active sync   /dev/nvme3n1
          4     259       12        4      active sync   /dev/nvme2n1
          5     259       11        5      active sync   /dev/nvme7n1
          6     259        9        6      active sync   /dev/nvme8n1
          7     259        6        7      active sync   /dev/nvme4n1
The list should include device names from nvme2n1 through nvme9n1 for systems with 8 NVMe drives, and from nvme0n1 through nvme15n1 for systems with 16 NVMe drives.
To map the device name to the physical slot ID, enter the following, where X corresponds to the missing device name.
$ ls -l /dev/disk/by-path |grep nvmeX |cut -d'|' -f3
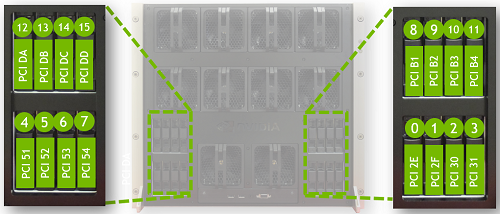
The command returns the PCIe bus ID. Refer to the following figure to find the slot ID that corresponds to the PCIe bus ID for the faulty drive.
Identifying the NVMe Manufacturer and Model
Enter the following, replacing X with the number corresponding to the Linux device name for the failed drive.
$ sudo nvsm show /systems/localhost/storage/drives/nvmeXn1
Example output:
/systems/localhost/storage/drives/nvme5n1
Properties:
    Capacity = 3840755982336
    BlockSizeBytes = 7501476528
    SerialNumber = 174719FCF9F1
    PartNumber = N/A
    Model = Micron_9200_MTFDHAL3T8TCT
    Revision = 100007H0
    Manufacturer = Micron Technology Inc
    Status_State = Enabled
    Status_Health = OK
    Name = Non-Volatile Memory Express
    MediaType = SSD
    IndicatorLED = N/A
    EncryptionStatus = N/A
    HotSpareType = N/A
    Protocol = NVMe
    NegotiatedSpeedsGbs = 0
    Id = 5
Determine the manufacturer and model from the 'Model' entry in the output, and then request a replacment NVMe from NVIDIA Enterprise Support, specifying this information.
Replacing the U.2 NVMe Drive
- Be sure you have obtained the replacement drive.
- Back up any critical data to a network shared volume or some other means of backup.
- Power off the system using the power button.
- Remove the NVMe drive by squeezing the levers on the handle and pulling the drive out.
- Replace the new NVMe drive in the same slot by fully inserting it and making sure it clicks into place.
- Power on the system.