Power Supply Replacement
This chapter describes how to replace one of the DGX-2 System power supplies (PSUs).
Power Supply Replacement Overview
- Identify failed power supply through the BMC and submit a service ticket.
- Get replacement power supply from NVIDIA Enterprise Support.
- Identify the power supply using the diagram as a reference and the indicator LEDs.
- Remove the power cord from the power supply that will be replaced.
- Remove the failed power supply.
- Insert new power supply.
- Insert the power cord and make sure both LEDs light up green (IN/OUT).
- Use the BMC to confirm that the power supply is working correctly.
Identifying the Failed Power Supply
Identifying the Failed Power Supply from the Back
If physical access to the system is available, you can identify a failed PSU by the inspecting the LEDs on the power supply.
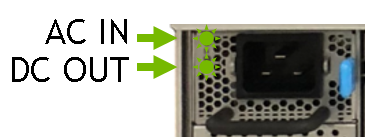
Both LEDs should be solid green. If either of the LEDs are not green or if they are blinking, contact NVIDIA Enterprise Support to troubleshoot the issue.
Identifying the Failed Power Supply from the Console
- Use the NVSM CLI as follows.
$ sudo nvsm show psus
The output shows information for each PSU. Look for any that do not report Status_Health=OK.
- You can also log into the BMC, then click Sensor from the left side menu and inspect the PSU information from the Normal Sensors section.
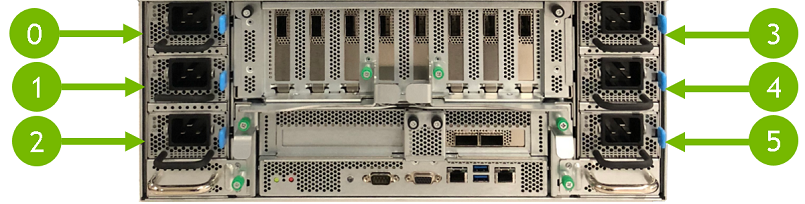
Both NVSM and the BMC identify each power supply as PSUx, where x is from 0 to 5. The following diagram shows the physical location of each PSU.
Identifying the Power Supply Manufacturer
$ sudo nvsm show psus |grep Manufacturer
Request a replacment PSU from NVIDIA Enterprise Support, specifying this information.
Replacing the Power Supply
- Be sure you have obtained the replacement PSU and that you have saved the packaging to use when sending back the failed PSU.
- Determine whether you need to shut down the system.
- If the five remaining PSUs are working and energized, then you do not need to shut down power to the DGX-2 System..
- If fewer than five PSUs are working and energized, then you do need to shut down power to the DGX-2 System.
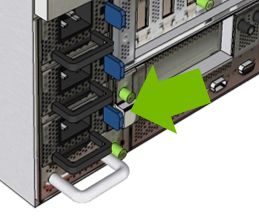
- Unplug the power cable from the PSU to be replaced. You may need to dislodge the power cord from the retaining clip.
- Remove the PSU.
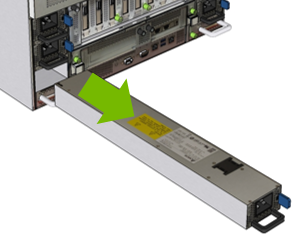
- Install the new power supply.
- Insert the new power supply into the chassis and push it all the way in, making sure that the blue locking mechanism engages.
- Plug in the power cord and attach the retaining clip.
- If needed, power on the system.
- Confirm the installation by
- Viewing the PSU status from the BMC dashboard->Sensors page.
- Running nvsm show health to confirm the health of the system.