AJA Video Systems
AJA provides a wide range of proven, professional video I/O devices, and thanks to a partnership between NVIDIA and AJA, Holoscan supports the AJA NTV2 SDK and device drivers as of the NTV2 SDK 16.1 release.
The AJA drivers and SDK now offer RDMA support for NVIDIA GPUs. This feature allows video data to be captured directly from the AJA card to GPU memory, which significantly reduces latency and system PCI bandwidth for GPU video processing applications as sysmem to GPU copies are eliminated from the processing pipeline.
The following instructions describe the steps required to setup and use an AJA device with RDMA support on Holoscan Developer Kits. Note that the AJA NTV2 SDK support for Holoscan includes all of the AJA Developer Products, though the following instructions have only been verified for the Corvid 44 12G BNC and KONA HDMI products, specifically.
The addition of an AJA device to a Holoscan Developer Kit is optional. The Holoscan SDK has elements that can be run with an AJA device with the additional features mentioned above, but those elements can also run without AJA. For example, there are Holoscan sample applications that have an AJA live input component, however they can also take in video replay as input. Similarly, the latency measurement tool can measure the latency of the video I/O subsystem with or without an AJA device available.
This section describes how to install the AJA hardware on the Clara AGX Developer Kit. Note that the AJA Hardware is also compatible with the NVIDIA IGX Orin Developer Kit.
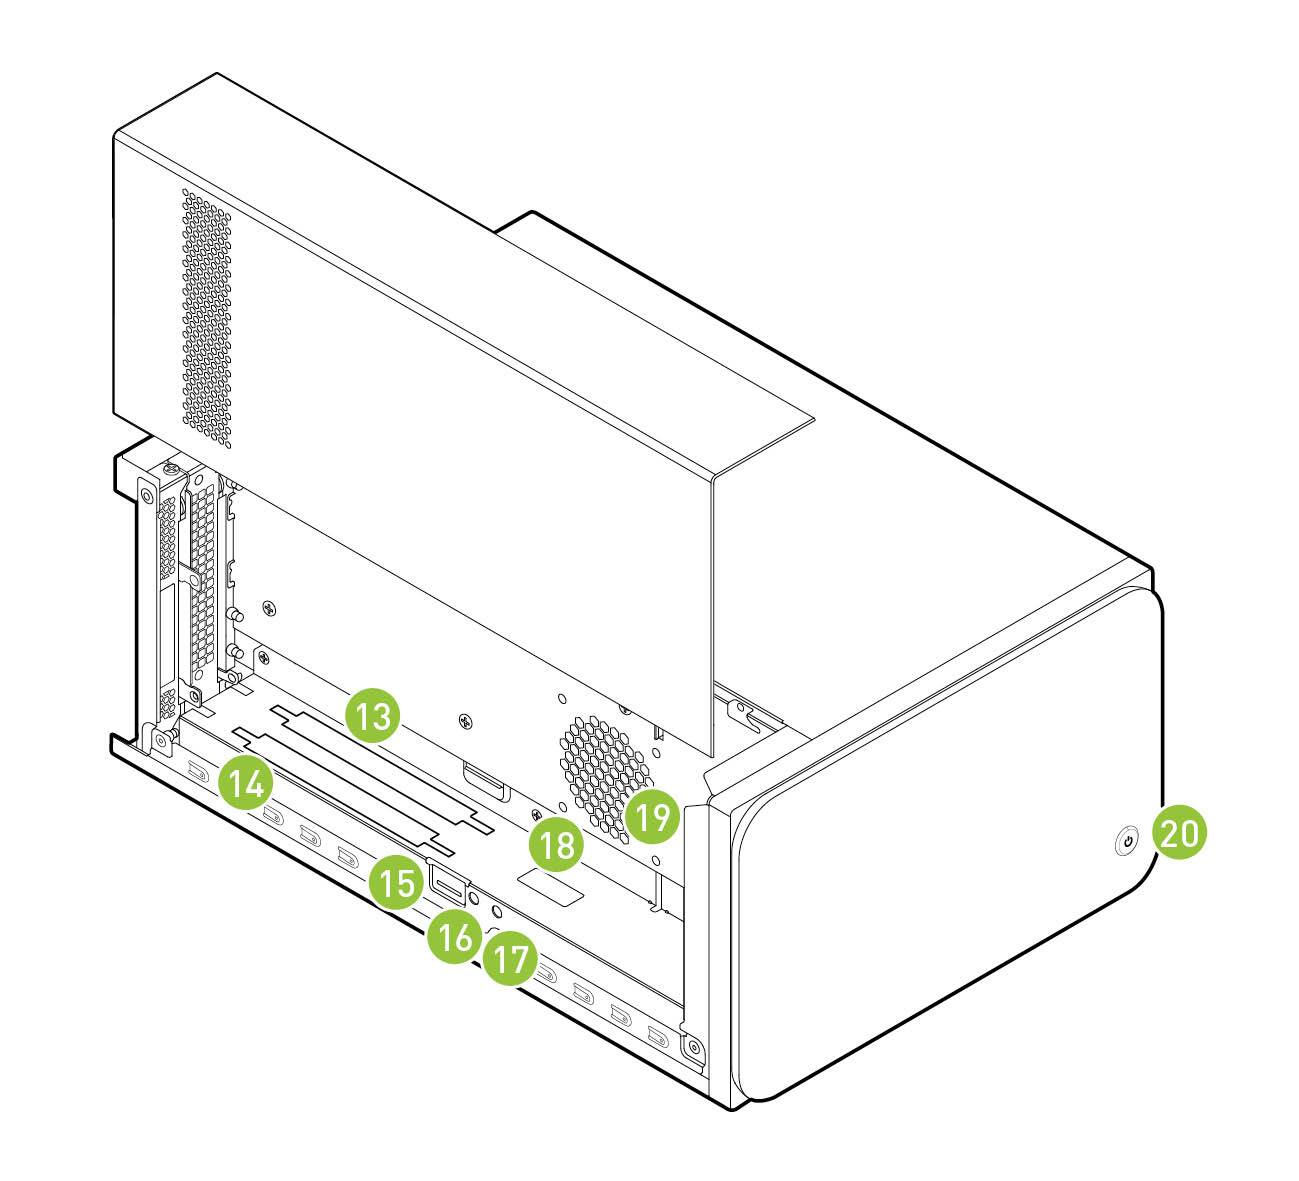
To install an AJA Video Systems device into the Clara AGX Developer Kit, remove the side access panel by removing two screws on the back of the Clara AGX. This provides access to the two available PCIe slots, labelled 13 and 14 in the Clara AGX Developer Kit User Guide:

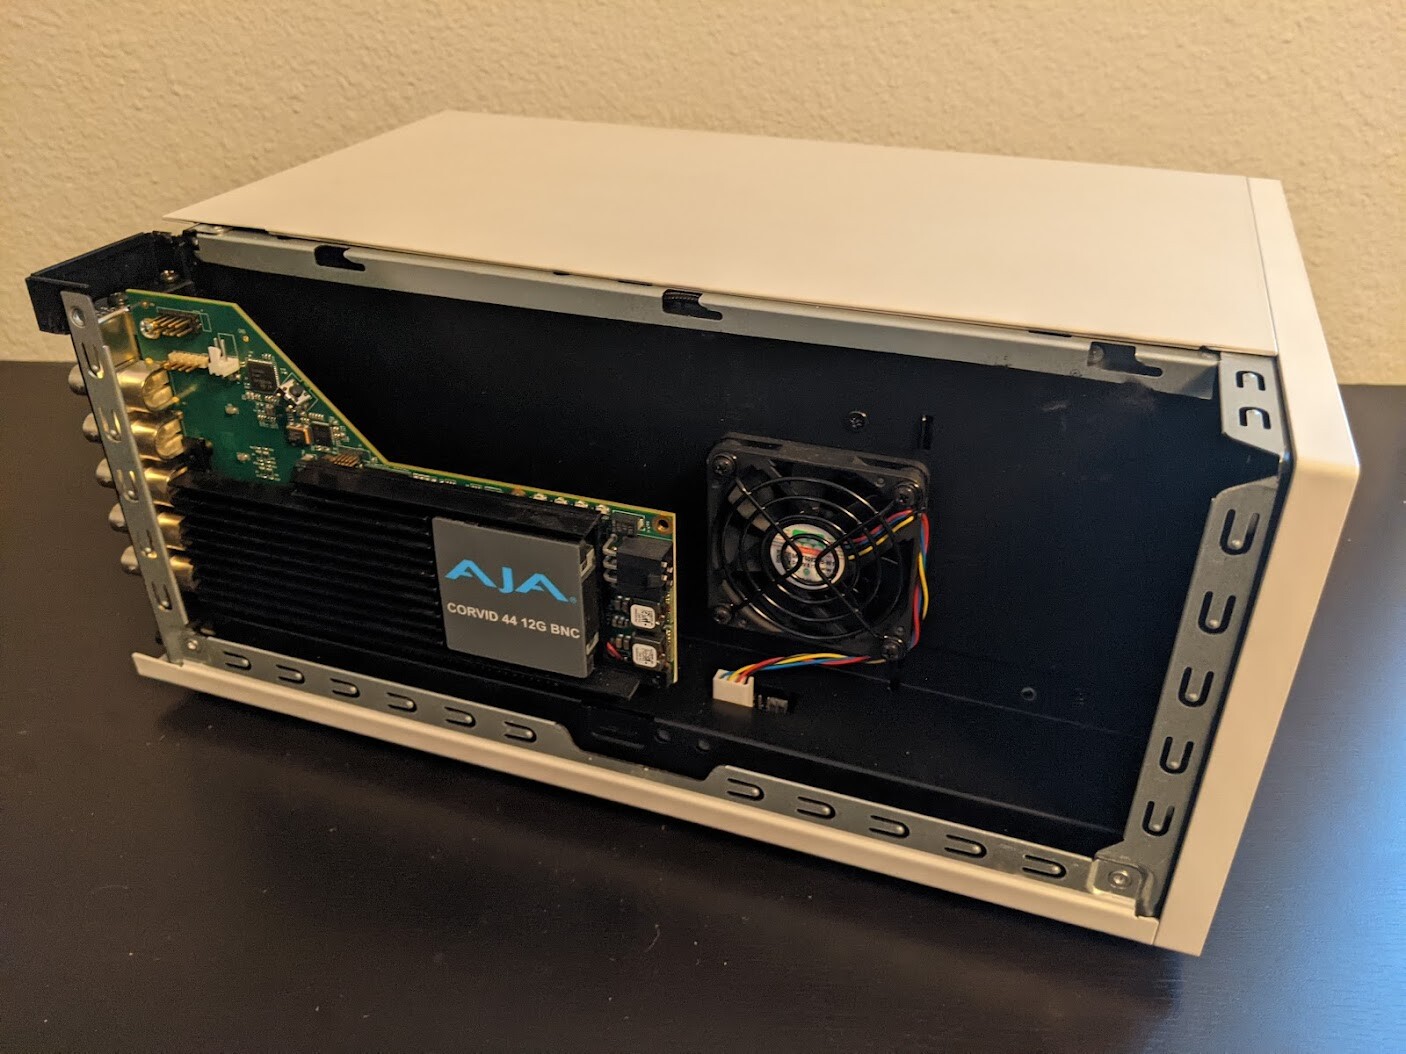
While these slots are physically identical PCIe x16 slots, they are connected to the Clara AGX via different PCIe bridges. Only slot 14 shares the same PCIe bridge as the RTX6000 dGPU, and so the AJA device must be installed into slot 14 for RDMA support to be available. The following image shows a Corvid 44 12G BNC card installed into slot 14 as needed to enable RDMA support.

The AJA NTV2 SDK includes both the drivers (kernel module) that are required in order to enable an AJA device, as well as the SDK (headers and libraries) that are used to access an AJA device from an application.
The drivers must be loaded every time the system is rebooted, and they must be loaded natively on the host system (i.e. not inside a container). The drivers must be loaded regardless of whether applications will be run natively or inside a container (see Using AJA Devices in Containers).
The SDK only needs to be installed on the native host and/or container that will be used to compile applications with AJA support. The Holoscan SDK containers already have the NTV2 SDK installed, and so no additional steps are required to build AJA-enabled applications (such as the reference Holoscan applications) within these containers. However, installing the NTV2 SDK and utilities natively on the host is useful for the initial setup and testing of the AJA device, so the following instructions cover this native installation.
To summarize, the steps in this section must be performed on the native host, outside of a container, with the following steps required once:
The following steps required after every reboot:
And the following steps are optional (but recommended during the initial setup):
Downloading the AJA NTV2 SDK Source
Navigate to a directory where you would like the source code to be downloaded, then perform the following to clone the NTV2 SDK source code.
            $ git clone https://github.com/nvidia-holoscan/ntv2.git
$ export NTV2=$(pwd)/ntv2
These instructions use a fork of the official AJA NTV2 Repository that is maintained by NVIDIA and may contain additional changes that are required for Holoscan SDK support. These changes will be pushed to the official AJA NTV2 repository whenever possible with the goal to minimize or eliminate divergence between the two repositories.
Building the AJA NTV2 Drivers
The following will build the AJA NTV2 drivers with RDMA support enabled. Once
built, the kernel module (ajantv2.ko) and load/unload scripts
(load_ajantv2 and unload_ajantv2) will be output to the
${NTV2}/bin directory.
            $ export AJA_RDMA=1 # Or unset AJA_RDMA to disable RDMA support
$ unset AJA_IGPU # Or export AJA_IGPU=1 to run on the integrated GPU of the IGX Orin Devkit (L4T >= 35.4)
$ make -j --directory ${NTV2}/ajadriver/linux
Loading the NVIDIA P2P RDMA Drivers (iGPU Only)
When RDMA support is enabled for the iGPU configuration, the nvidia-p2p kernel module must be loaded before the AJA NTV2 drivers (Requires HoloPack 2.0 DP or JetPack 5.1.2+).
Ensure you can load it manually first:
$ sudo modprobe nvidia-p2p
Then, you can load it automatically during boot by adding it to /etc/modules:
$ echo nvidia-p2p | sudo tee -a /etc/modules
Ensure you have upgraded to JetPack 5.1.2 or newer if loading the nvidia-p2p kernel module fails, to address symbol conflicts with the nvidia kernel module. The following error will appear in dmesg otherwise:
exports duplicate symbol nvidia_p2p_dma_map_pages
Loading the AJA NTV2 Drivers
Running any application that uses an AJA device requires the AJA kernel drivers to be loaded, even if the application is being run from within a container. The drivers must be manually loaded every time the machine is rebooted using the load_ajantv2 script:
            $ sudo sh ${NTV2}/bin/load_ajantv2
loaded ajantv2 driver module
created node /dev/ajantv20
The NTV2 environment variable must point to the NTV2 SDK path
where the drivers were previously built as described in
Building the AJA NTV2 Drivers.
Secure boot must be disabled in order to load unsigned module. If any errors occur while loading the module refer to the Troubleshooting section, below.
Building and Installing the AJA NTV2 SDK
Since the AJA NTV2 SDK is already loaded into the Holoscan containers, this step is not strictly required in order to build or run any Holoscan applications. However, this builds and installs various tools that can be useful for testing the operation of the AJA hardware outside of Holoscan containers, and is required for the steps provided in Testing the AJA Device.
            $ sudo apt-get install -y cmake
$ mkdir ${NTV2}/cmake-build
$ cd ${NTV2}/cmake-build
$ export PATH=/usr/local/cuda/bin:${PATH}
$ cmake ..
$ make -j
$ sudo make install
Testing the AJA Device
The following steps depend on tools that were built and installed by the previous step, Building and Installing the AJA NTV2 SDK. If any errors occur, see the Troubleshooting section, below.
To ensure that an AJA device has been installed correctly, the
ntv2enumerateboardsutility can be used:$ ntv2enumerateboards AJA NTV2 SDK version 16.2.0 build 3 built on Wed Feb 02 21:58:01 UTC 2022 1 AJA device(s) found: AJA device 0 is called 'KonaHDMI - 0' This device has a deviceID of 0x10767400 This device has 0 SDI Input(s) This device has 0 SDI Output(s) This device has 4 HDMI Input(s) This device has 0 HDMI Output(s) This device has 0 Analog Input(s) This device has 0 Analog Output(s) 47 video format(s): 1080i50, 1080i59.94, 1080i60, 720p59.94, 720p60, 1080p29.97, 1080p30, 1080p25, 1080p23.98, 1080p24, 2Kp23.98, 2Kp24, 720p50, 1080p50b, 1080p59.94b, 1080p60b, 1080p50a, 1080p59.94a, 1080p60a, 2Kp25, 525i59.94, 625i50, UHDp23.98, UHDp24, UHDp25, 4Kp23.98, 4Kp24, 4Kp25, UHDp29.97, UHDp30, 4Kp29.97, 4Kp30, UHDp50, UHDp59.94, UHDp60, 4Kp50, 4Kp59.94, 4Kp60, 4Kp47.95, 4Kp48, 2Kp60a, 2Kp59.94a, 2Kp29.97, 2Kp30, 2Kp50a, 2Kp47.95a, 2Kp48a
To ensure that RDMA support has been compiled into the AJA driver and is functioning correctly, the
testrdmautility can be used:$ testrdma -t500 test device 0 start 0 end 7 size 8388608 count 500 frames/errors 500/0
Accessing an AJA device from a container requires the drivers to be loaded
natively on the host (see Loading the AJA NTV2 Drivers), then the device that is
created by the load_ajantv2 script must be shared with the container using
the --device docker argument, such as –device /dev/ajantv20:/dev/ajantv20.
Problem: The
sudo sh ${NTV2}/bin/load_ajantv2command returns an error.Solutions:
Make sure the AJA card is properly installed and powered (see 2.a below)
Check if SecureBoot validation is disabled:
            $ sudo mokutil --sb-state
  SecureBoot enabled
  SecureBoot validation is disabled in shim
If SecureBoot validation is enabled, disable it with the following procedure:
$ sudo mokutil --disable-validation
Enter a temporary password and reboot the system.
Upon reboot press any key when you see the blue screen MOK Management
Select Change Secure Boot state
Enter the password your selected
Select Yes to disable Secure Book in shim-signed
After reboot you can verify again that SecureBoot validation is disabled in shim.
Problem: The
ntv2enumerateboardscommand does not find any devices.Solutions:
Make sure that the AJA device is installed properly and detected by the system (see Installing the AJA Hardware):
            $ lspci
0000:00:00.0 PCI bridge: NVIDIA Corporation Device 1ad0 (rev a1)
0000:05:00.0 Multimedia video controller: AJA Video Device eb25 (rev 01)
0000:06:00.0 PCI bridge: Mellanox Technologies Device 1976
0000:07:00.0 PCI bridge: Mellanox Technologies Device 1976
0000:08:00.0 VGA compatible controller: NVIDIA Corporation Device 1e30 (rev a1)
Make sure that the AJA drivers are loaded properly (see Loading the AJA NTV2 Drivers):
            $ lsmod
Module                  Size  Used by
ajantv2               610066  0
nvidia_drm             54950  4
mlx5_ib               170091  0
nvidia_modeset       1250361  8 nvidia_drm
ib_core               211721  1 mlx5_ib
nvidia              34655210  315 nvidia_modeset
Problem: The
testrdmacommand outputs the following error:error - GPU buffer lock failed
Solution: The AJA drivers need to be compiled with RDMA support enabled. Follow the instructions in Building the AJA NTV2 Drivers, making sure not to skip the
export AJA_RDMA=1when building the drivers.