UEFI Secure Boot#
UEFI Secure Boot uses digital signatures (RSA) to validate the authenticity and integrity of the codes that it loads.
UEFI Secure Boot implementations use PK, KEK, and db keys:
Platform Key (PK) : Top-level key, is used to sign KEK.
Key Exchange Key (KEK) : Keys used to sign Signatures Database.
Signature Database (db) : Contains keys to sign UEFI payloads.
Before enabling UEFI Secure Boot, users have to prepare their own PK, KEK and db keys.
Then, users can enable Secure Boot either:
At flashing time; Or,
At the target from Ubuntu prompt.
The following diagram illustrates how PK/KEK/db keys are used to sign and validate UEFI’s payloads:
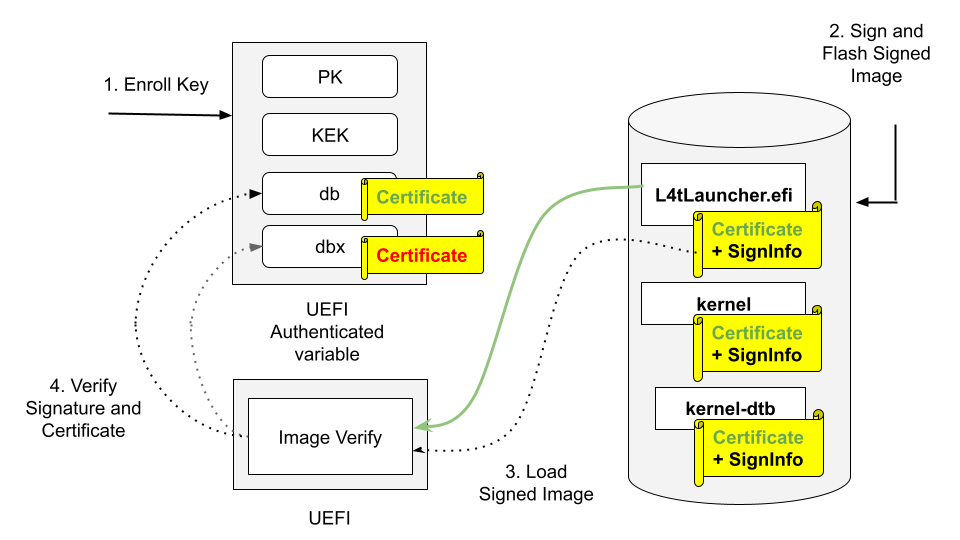
Enroll PK, KEK, and db keys in the form of UEFI authenticated variable.
Sign UEFI payloads such as L4tLauncher (as OS Loader), kernel, kernel-dtb with private key and flash signed images (on Host).
UEFI loads signed images.
UEFI Verifies image signature by using the associated certificate/public key, and verifies the certificate/public key existing in db but not in dbx.
Here is a high-level process to enable UEFI Secure Boot:
Generate the secure boot artifacts: the PK, KEK, and db key pairs, their certificates, and the EFI signature list files.
Enable UEFI Secure Boot using one of the following three methods:
During flashing, using a command option:
Create a UEFI keys config file.
Generate
UefiDefaultSecurityKeys.dtboand the auth files.Use option
--uefi-keys <keys_conf>to provide signing keys and enable UEFI secure boot.
After flashing, using Capsule update:
Create a UEFI keys config file.
Generate
UefiDefaultSecurityKeys.dtbo.Generate the Capsule payload with
UefiDefaultSecurityKeys.dtbo.Generate signed UEFI payloads on the host.
Download and install the Secure Boot artifacts.
Trigger a Capsule update.
Check UEFI Secure Boot status.
After flashing, using UEFI utilities from an Ubuntu prompt:
Generate the auth files.
Generate signed UEFI payloads on the host.
Download the PK, KEK, and db auth files from the host.
Enroll the KEK and db keys.
Download and write the signed UEFI payloads.
Enroll the PK key.
Update the db/dbx Keys with a Capsule update
Prepare the update keys.
Generate the Capsule payload with UEFI Secure Boot enabled.
Trigger a Capsule update.
Check and verify the update keys.
Note
When UEFI Secure Boot is enabled during the flashing process, it cannot be disabled unless you flash again.
However, if UEFI Secure Boot is enabled through UEFI utilities running from the Ubuntu prompt, you can disable it by accessing the UEFI Menu and selecting
Reset Secure Boot Keys, provided you have the necessary permissions. UEFI Secure Boot can also be disabled by enrolling noPK.auth at runtime.
Assuming only an admin has access to noPK.auth, they can disable UEFI Secure Boot on next boot by running the kernel utility efi-updatevar with noPK.auth.
Prerequisites#
- Ensure that the following utilities are installed in your host:
openssl
device-tree-compiler
efitools
uuid-runtime
References#
Prepare the PK, KEK, db Keys#
Generate the PK, KEK, and DB RSA Key Pairs, Certificates and EFI Signature List Files#
To generate the PK, KEK, and db RSA key pairs, their certificates, and the EFI signature list files, run the following commands:
$ cd to <LDK_DIR>
$ mkdir uefi_keys
$ cd uefi_keys
$ GUID=$(uuidgen)

### Generate PK RSA Key Pair, Certificate, and EFI Signature List File
$ openssl req -newkey rsa:2048 -nodes -keyout PK.key  -new -x509 -sha256 -days 3650 -subj "/CN=my Platform Key/" -out PK.crt
$ cert-to-efi-sig-list -g "${GUID}" PK.crt PK.esl

### Generate KEK RSA Key Pair, Certificate, and EFI Signature List File
$ openssl req -newkey rsa:2048 -nodes -keyout KEK.key  -new -x509 -sha256 -days 3650 -subj "/CN=my Key Exchange Key/" -out KEK.crt
$ cert-to-efi-sig-list -g "${GUID}" KEK.crt KEK.esl

### Generate db_1 RSA Key Pair, Certificate, and EFI Signature List File
$ openssl req -newkey rsa:2048 -nodes -keyout db_1.key  -new -x509 -sha256 -days 3650 -subj "/CN=my Signature Database key/" -out db_1.crt
$ cert-to-efi-sig-list -g "${GUID}" db_1.crt db_1.esl

### Generate db_2 RSA Key Pair, Certificate, and EFI Signature List File
$ openssl req -newkey rsa:2048 -nodes -keyout db_2.key  -new -x509 -sha256 -days 3650 -subj "/CN=my second Signature Database key/" -out db_2.crt
$ cert-to-efi-sig-list -g "${GUID}" db_2.crt db_2.esl
Caution
The generated .crt files are self-signed certificates and are used for demonstration purposes only. For production, follow your official certificate generation procedure.
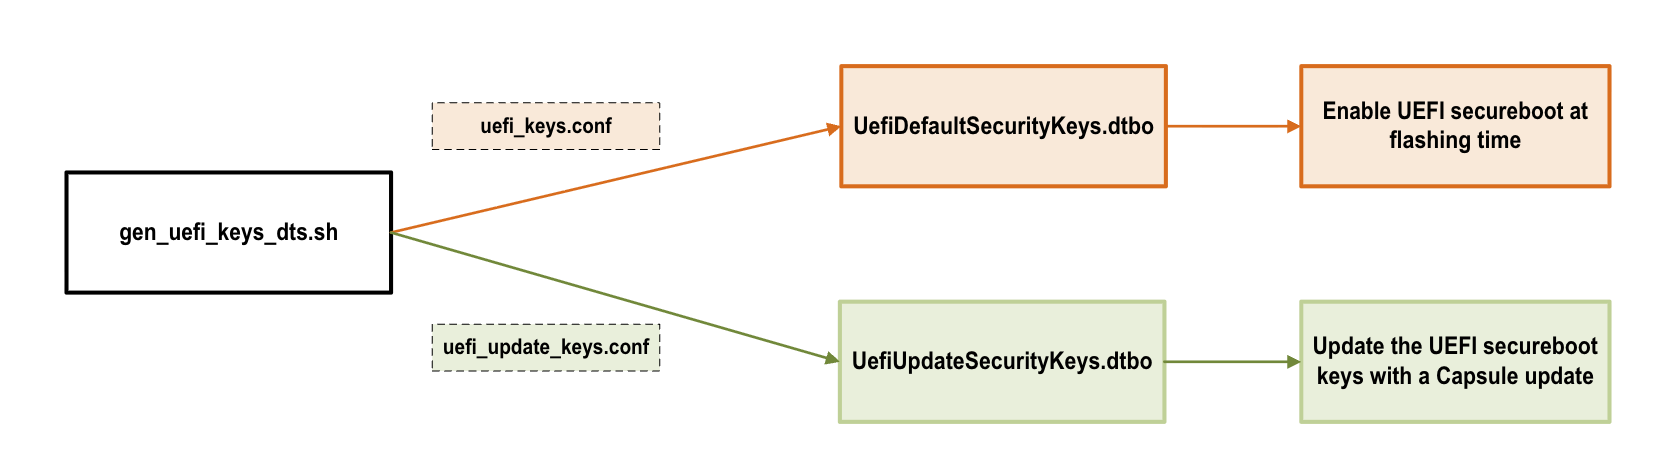
Generate the UEFI Secure Boot DTBO#
The figure shows the process of generating the UEFI Secure Boot DTBO:
Generate
UefiDefaultSecurityKeys.dtboto enable UEFI Secure Boot and enroll keys at flashing time or with a Capsule update.Generate
UefiUpdateSecurityKeys.dtboto update the UEFI Secure Boot keys with a Capsule update.
Enable the UEFI Secure Boot#
Method One: Enable UEFI Secure Boot at Flashing Time#
Note
We strongly recommend to use this method for production devices.
Create a UEFI Keys Config File#
To create a UEFI keys config file with the generated keys, run the following command:
$ vim uefi_keys.conf
Insert the following lines to uefi_keys.conf file:
UEFI_DB_1_KEY_FILE="db_1.key";  # UEFI payload signing key
UEFI_DB_1_CERT_FILE="db_1.crt"; # UEFI payload signing key certificate

UEFI_DEFAULT_PK_ESL="PK.esl"
UEFI_DEFAULT_KEK_ESL_0="KEK.esl"

UEFI_DEFAULT_DB_ESL_0="db_1.esl"
UEFI_DEFAULT_DB_ESL_1="db_2.esl"
Note
The minimum number of
UEFI_DEFAULT_DB_ESLis 1. TheUEFI_DEFAULT_DB_ESL_1entry shown above is optional.UEFI_DB_1_KEY_FILEandUEFI_DB_1_CERT_FILEare used to sign UEFI payloads, such as kernel, kernel-dtb, and initrd. As a result,UEFI_DB_1_KEY_FILEandUEFI_DB_1_CERT_FILEmust be specified inuefi_keys.conf.Microsoft has two DB certificates and one KEK certificate, and these certificates can be used based on your requirement. Refer to Microsoft’s certificates for more information.
The UEFI revocation list file, which is used to update the Secure Boot Forbidden Signature Database (dbx). Download the revocation list file from UEFI Revocation List File for arm64.
For a system installed with a UEFI option ROM, and that is signed with a Microsoft db, you must enroll the Microsoft db, the KEK, and the UEFI dbx certificates. Assign the corresponding key esl files to the variables
UEFI_DEFAULT_KEK_ESL_X(up to 3),UEFI_DEFAULT_DB_ESL_X(update to 3), andUEFI_DEFAULT_DBX_ESL_X(up to 3) in theuefi_keys.conffile.
Generate UefiDefaultSecurityKeys.dtbo#
To enable UEFI Secure Boot at flashing time, the UEFI default security keys need to be flashed to target. The UEFI default security keys are embedded in UefiDefaultSecurityKeys.dtbo and are used during flashing.
UefiDefaultSecurityKeys.dtbo and the auth files are generated by using the gen_uefi_keys_dts.sh script.
Run the following commands:
$ cd ..
$ sudo tools/gen_uefi_keys_dts.sh uefi_keys/uefi_keys.conf
Use the –uefi-keys Option to Provide Signing Keys and Enable UEFI Secure Boot#
Note
Although UEFI Secure Boot can be independently enabled from a low-level bootloader secure boot, we strongly recommended that users enable bootloader secure boot so that the root-of-trust can start from the BootROM.
Issue the following commands with the --uefi-keys <keys.conf> option:
For the Jetson AGX Thor series:
$ sudo ./l4t_initrd_flash.sh -u <pkc_keyfile> [-v <sbk_keyfile>] --uefi-keys uefi_keys/uefi_keys.conf jetson-agx-thor-devkit internal
For the Jetson AGX Orin series:
Use eMMC as rootfs storage:
$ sudo ./l4t_initrd_flash.sh -u <pkc_keyfile> [-v <sbk_keyfile>] --uefi-keys uefi_keys/uefi_keys.conf jetson-agx-orin-devkit internal
Use NVMe as rootfs storage:
$ sudo ./l4t_initrd_flash.sh --external-device nvme0n1p1 -u <pkc_keyfile> [-v <sbk_keyfile>] --uefi-keys uefi_keys/uefi_keys.conf -p "-c ./bootloader/generic/cfg/flash_t234_qspi.xml" -c ./tools/kernel_flash/flash_l4t_t234_nvme.xml jetson-agx-orin-devkit external
For the Jetson Orin NX series and the Orin Nano series:
$ sudo ./l4t_initrd_flash.sh --external-device nvme0n1p1 -u <pkc_keyfile> [-v <sbk_keyfile>] --uefi-keys uefi_keys/uefi_keys.conf -p "-c ./bootloader/generic/cfg/flash_t234_qspi.xml" -c ./tools/kernel_flash/flash_l4t_t234_nvme.xml jetson-orin-nano-devkit external
For more information about pkc_keyfile and sbk_keyfile, refer to Sign and Flash Secured Images.
Once flashing is finished, your target has UEFI Secure Boot enabled.
Method Two: Enable UEFI Secure Boot Using Capsule Update#
This section is for the targets that were not flashed with UEFI Secure Boot enabled.
Generate UefiDefaultSecurityKeys.dtbo#
Refer to Create a UEFI Keys Config File and Generate UefiDefaultSecurityKeys.dtbo to
generate a UefiDefaultSecurityKeys.dtbo file.
Copy the generated UefiDefaultSecurityKeys.dtbo to the bootloader directory:
$ cd to <LDK_DIR>
$ cp uefi_keys/UefiDefaultSecurityKeys.dtbo bootloader/
Generate a Capsule Payload with UEFI Secure Boot Keys#
The uefi_keys/UefiDefaultSecurityKeys.dtbo generated earlier is packed into Capsule payload with cpu-bootloader. Refer to
Generating the Capsule Update Payload for more information.
To generate a Capsule payload, complete one of the following tasks:
Generate a Capsule payload for the Jetson AGX Thor devkits:
$ sudo ADDITIONAL_DTB_OVERLAY="UefiDefaultSecurityKeys.dtbo" ./l4t_generate_soc_bup.sh -u <pkc_keyfile> [-v <sbk_keyfile>] -e t26x_3834_bl_spec t26x
$ ./generate_capsule/l4t_generate_soc_capsule.sh -i bootloader/payloads_t26x/bl_only_payload -o ./TEGRA_AGX_THOR.Cap t264
Generate a Capsule payload for the Jetson AGX Orin devkits:
$ sudo ADDITIONAL_DTB_OVERLAY="UefiDefaultSecurityKeys.dtbo" ./l4t_generate_soc_bup.sh -u <pkc_keyfile> [-v <sbk_keyfile>] -e t23x_agx_bl_spec t23x
$ ./generate_capsule/l4t_generate_soc_capsule.sh -i bootloader/payloads_t23x/bl_only_payload -o ./TEGRA_AGX.Cap t234
Generate a Capsule payload for the Jetson AGX Orin Industrial:
$ sudo ADDITIONAL_DTB_OVERLAY="UefiDefaultSecurityKeys.dtbo" ./l4t_generate_soc_bup.sh -u <pkc_keyfile> [-v <sbk_keyfile>] -e t23x_agx_ind_bl_spec t23x
$ ./generate_capsule/l4t_generate_soc_capsule.sh -i bootloader/payloads_t23x/bl_only_payload -o ./TEGRA_AGX_IND.Cap t234
Generate a Capsule payload for the Jetson Orin Nano devkits:
$ sudo ADDITIONAL_DTB_OVERLAY="UefiDefaultSecurityKeys.dtbo" ./l4t_generate_soc_bup.sh -u <pkc_keyfile> [-v <sbk_keyfile>] -e t23x_3767_bl_spec t23x
$ ./generate_capsule/l4t_generate_soc_capsule.sh -i bootloader/payloads_t23x/bl_only_payload -o ./TEGRA_Nano.Cap t234
Generate Signed UEFI Payloads for Jetson Thor#
All UEFI payloads must be signed using UEFI security keys. If the --uefi-keys option is specified during flashing, the UEFI payloads are signed during flashing images generation. The UEFI secure boot is enabled after flashing.
To enable UEFI Secure Boot via Capsule update, the UEFI payloads must be signed from the host. Before starting Capsule update, the signed payloads must be preinstalled to the target.
The UEFI payloads are
extlinux.conf,
initrd,
kernel images (in rootfs, and in recovery partitions),
kernel-dtb images (in rootfs and in recovery-dtb partition), and
BOOTAA64.efi.
Create a directory named <LDK_DIR>/uefi_signed/ to store the signed UEFI payloads:
$ cd <LDK_DIR>
$ mkdir -p uefi_signed
$ cd uefi_signed
Note
The following steps assume that you have copied the required unsigned UEFI payloads to the <LDK_DIR>/uefi_signed/ folder.
You can replace db.crt and db.key with the db_1.* or db_2.* key.
To sign extlinux.conf using db:
$ openssl cms -sign -signer ../uefi_keys/db.crt -inkey ../uefi_keys/db.key -binary -in extlinux.conf -outform der -out extlinux.conf.sig
To sign initrd using db:
$ openssl cms -sign -signer ../uefi_keys/db.crt -inkey ../uefi_keys/db.key -binary -in initrd -outform der -out initrd.sig
To sign the kernel Image in rootfs using db:
$ cp Image Image.unsigned
$ sbsign --key ../uefi_keys/db.key --cert ../uefi_keys/db.crt --output Image Image
To sign kernel-dtb in rootfs using db:
$ openssl cms -sign -signer ../uefi_keys/db.crt -inkey ../uefi_keys/db.key -binary -in kernel_tegra264-p4071-0000+p3834-0008-nv.dtb -outform der -out kernel_tegra264-p4071-0000+p3834-0008-nv.dtb.sig
Note
The preceding command uses the Jetson Thor SKU 8 kernel-dtb filename. Replace it with the appropriate kernel-dtb filename of your target.
To sign recovery.img flashed to recovery partition using db:
$ ../bootloader/mkbootimg --kernel Image --ramdisk ../bootloader/recovery.ramdisk --output recovery.img --cmdline <rec_cmdline_string>
$ cp recovery.img recovery.img.unsigned
$ openssl cms -sign -signer ../uefi_keys/db.crt -inkey ../uefi_keys/db.key -binary -in recovery.img -outform der -out recovery.img.sig
$ truncate -s %4096 recovery.img
$ cat recovery.img.sig >> recovery.img
In the first command,
<rec_cmdline_string>for the Jetson Thor series is as follows:root=/dev/initrd rw rootwait mminit_loglevel=4 console=ttyTCU0,115200 firmware_class.path=/etc/firmware fbcon=map:0 net.ifnames=0
Note
The kernel
Imageinsiderecovery.imgmust also be signed. Use theImagesigned earlier in step 3.
To sign recovery kernel dtb flashed to recovery-dtb partition using db:
$ cp tegra264-p4071-0000+p3834-0008-nv.dtb.rec tegra264-p4071-0000+p3834-0008-nv.dtb.rec.unsigned
$ openssl cms -sign -signer ../uefi_keys/db.crt -inkey ../uefi_keys/db.key -binary -in tegra264-p4071-0000+p3834-0008-nv.dtb.rec -outform der -out tegra264-p4071-0000+p3834-0008-nv.dtb.rec.sig
$ truncate -s %4096 tegra264-p4071-0000+p3834-0008-nv.dtb.rec
$ cat tegra264-p4071-0000+p3834-0008-nv.dtb.rec.sig >> tegra264-p4071-0000+p3834-0008-nv.dtb.rec
Note
The preceding commands use the Jetson Thor SKU 8 kernel-dtb filename. Replace it with the appropriate kernel-dtb filename of your target. The images signed earlier in steps 5 and 6 are stored into the partition. For those images, the signing certificate and signature are appended to the original image after being aligned to a 4-KB boundary.
To sign BOOTAA64.efi using db:
$ cp BOOTAA64.efi BOOTAA64.efi.unsigned
$ sbsign --key ../uefi_keys/db.key --cert ../uefi_keys/db.crt --output BOOTAA64.efi BOOTAA64.efi
Generate Signed UEFI Payloads for Jetson Orin#
All UEFI payloads must be signed using UEFI security keys. If the --uefi-keys option is specified during flashing, the UEFI payloads are signed during flashing images generation. The UEFI secure boot is enabled after flashing.
To enable UEFI Secure Boot via Capsule update, the UEFI payloads must be signed from the host. Before starting Capsule update, the signed payloads must be preinstalled to the target.
The UEFI payloads are
extlinux.conf,
initrd,
kernel images (in rootfs, and in kernel and recovery partitions),
kernel-dtb images (in rootfs and in kernel-dtb and recovery-dtb partitions), and
BOOTAA64.efi.
Create a directory named <LDK_DIR>/uefi_signed/ to store the signed UEFI payloads:
$ cd <LDK_DIR>
$ mkdir -p uefi_signed
$ cd uefi_signed
Note
The following steps assume that you have copied the required unsigned UEFI payloads to the <LDK_DIR>/uefi_signed/ folder.
The signing keys (db.crt and db.key) are located in the <LDK_DIR>/uefi_keys/ folder.
You can replace db.crt and db.key with the db_1.* or db_2.* key.
To sign extlinux.conf using db:
$ openssl cms -sign -signer ../uefi_keys/db.crt -inkey ../uefi_keys/db.key -binary -in extlinux.conf -outform der -out extlinux.conf.sig
To sign initrd using db:
$ openssl cms -sign -signer ../uefi_keys/db.crt -inkey ../uefi_keys/db.key -binary -in initrd -outform der -out initrd.sig
To sign the kernel Image in rootfs using db:
$ cp Image Image.unsigned
$ sbsign --key ../uefi_keys/db.key --cert ../uefi_keys/db.crt --output Image Image
To sign kernel-dtb in rootfs using db:
$ openssl cms -sign -signer ../uefi_keys/db.crt -inkey ../uefi_keys/db.key -binary -in kernel_tegra234-p3701-0004-p3737-0000.dtb -outform der -out kernel_tegra234-p3701-0004-p3737-0000.dtb.sig
Note
The preceding commands use the Concord SKU 4 kernel-dtb filename. Replace it with the appropriate kernel-dtb filename of your target.
To sign boot.img of kernel partition using db:
$ ../bootloader/mkbootimg --kernel Image --ramdisk initrd --board <rootdev> --output boot.img --cmdline <cmdline_string>
$ cp boot.img boot.img.unsigned
$ openssl cms -sign -signer ../uefi_keys/db.crt -inkey ../uefi_keys/db.key -binary -in boot.img -outform der -out boot.img.sig
$ truncate -s %4096 boot.img
$ cat boot.img.sig >> boot.img
In the first command,
<cmdline_string>, when generated inflash.shto flash eMMC/SD, is as follows:root=/dev/mmcblk0p1 rw rootwait rootfstype=ext4 mminit_loglevel=4 console=ttyTCU0,115200 console=ttyAMA0,115200 firmware_class.path=/etc/firmware fbcon=map:0 net.ifnames=0
When generated in
l4t_initrd_flash.shto flash NVMe,<cmdline_string>is as follows:root=/dev/nvme0n1p1 rw rootwait rootfstype=ext4 mminit_loglevel=4 console=ttyTCU0,115200 console=ttyAMA0,115200 firmware_class.path=/etc/firmware fbcon=map:0 net.ifnames=0
Note
The
Imageinsideboot.imgmust also be signed. Use theImagesigned earlier in step 3.
To sign kernel-dtb of kernel-dtb partition using db:
$ cp tegra234-p3701-0004-p3737-0000.dtb tegra234-p3701-0004-p3737-0000.dtb.unsigned
$ openssl cms -sign -signer ../uefi_keys/db.crt -inkey ../uefi_keys/db.key -binary -in tegra234-p3701-0004-p3737-0000.dtb -outform der -out tegra234-p3701-0004-p3737-0000.dtb.sig
$ truncate -s %4096 tegra234-p3701-0004-p3737-0000.dtb
$ cat tegra234-p3701-0004-p3737-0000.dtb.sig >> tegra234-p3701-0004-p3737-0000.dtb
Note
The preceding commands use the Concord SKU 4 kernel-dtb filename. Replace it with the appropriate kernel-dtb filename of your target.
To sign recovery.img flashed to recovery partition using db:
$ ../bootloader/mkbootimg --kernel Image --ramdisk ../bootloader/recovery.ramdisk --output recovery.img --cmdline <rec_cmdline_string>
$ cp recovery.img recovery.img.unsigned
$ openssl cms -sign -signer ../uefi_keys/db.crt -inkey ../uefi_keys/db.key -binary -in recovery.img -outform der -out recovery.img.sig
$ truncate -s %4096 recovery.img
$ cat recovery.img.sig >> recovery.img
In the first command,
<rec_cmdline_string>is as follows:root=/dev/initrd rw rootwait mminit_loglevel=4 console=ttyTCU0,115200 firmware_class.path=/etc/firmware fbcon=map:0 net.ifnames=0
Note
The kernel
Imageinsiderecovery.imgmust also be signed. Use theImagesigned by the step 3 above.
To sign recovery kernel dtb flashed to recovery-dtb partition using db:
$ cp tegra234-p3701-0004-p3737-0000.dtb.rec tegra234-p3701-0004-p3737-0000.dtb.rec.unsigned
$ openssl cms -sign -signer ../uefi_keys/db.crt -inkey ../uefi_keys/db.key -binary -in tegra234-p3701-0004-p3737-0000.dtb.rec -outform der -out tegra234-p3701-0004-p3737-0000.dtb.rec.sig
$ truncate -s %4096 tegra234-p3701-0004-p3737-0000.dtb.rec
$ cat tegra234-p3701-0004-p3737-0000.dtb.rec.sig >> tegra234-p3701-0004-p3737-0000.dtb.rec
Note
The preceding commands use the Concord SKU 4 kernel-dtb filename. Replace it with the appropriate kernel-dtb filename of your target. The images signed earlier in step 5 to 8 are stored into the partition. For those images, the signing certificate and signature are appended to the original image after being aligned to 4-KB boundary.
To sign BOOTAA64.efi using db:
$ cp BOOTAA64.efi BOOTAA64.efi.unsigned
$ sbsign --key ../uefi_keys/db.key --cert ../uefi_keys/db.crt --output BOOTAA64.efi BOOTAA64.efi
Download and Install the Secure Boot Artifacts for Jetson Thor#
Download the signed UEFI payloads from the host to the payloads’ corresponding target folder as shown in the following table.
File in Host’s <LDK_DIR>/uefi_signed/ Folder |
Target Folder |
Type |
|---|---|---|
extlinux.conf and extlinux.conf.sig |
/boot/extlinux/ |
rootfs |
initrd and initrd.sig |
/boot/ |
rootfs |
kernel_tegra264-p4071-0000+p3834-0008-nv.dtb, and kernel_tegra264-p4071-0000+p3834-0008-nv.dtb.sig (for Jetson Thor SKU 8) |
/boot/dtb/ |
rootfs |
Image |
/boot/ |
rootfs |
BOOTAA64.efi |
/uefi_signed/ |
esp partition |
recovery.img |
/uefi_signed/ |
recovery partition |
tegra264-p4071-0000+p3834-0008-nv.dtb.rec (for Jetson Thor SKU 8) |
/uefi_signed/ |
recovery-dtb partition |
Note
You might want to save copies of the original files.
For the UEFI payload files with the rootfs type, the target folder listed in the table is their final destination. The other files need to be copied to their destination partitions. To copy a file to its destination partition, copy the file to a block device that is mapped to that partition.
Note
The EFI System Partition (esp) is mounted to the /boot/efi/ directory automatically. To verify, use the command df -h in kernel.
If the esp is not mounted, find the partition by using the command sudo fdisk -l | grep "EFI" and then mount the partition to the /boot/efi/ directory manually.
To determine which block devices are mapped to a particular partition, use blkid:
$ sudo blkid | grep <part_name>
The value of <part_name> is one of the following:
recoveryrecovery-dtb
Note
If multiple block devices are mapped to a partition, choose the boot device.
Beginning with JetPack 7.1, the
kernelandkernel-dtbpartitions are removed for Jetson Thor. If UEFI fails to boot the file system kernel (Attempting Direct Boot) after three attempts, it boots from therecoverypartition.
To write the signed BOOTAA64.efi to
esppartition:$ cp /uefi_signed/BOOTAA64.efi /boot/efi/EFI/BOOT/BOOTAA64.efi $ sync
To write the signed recovery.img to
recoverypartition:### Ex: recovery partition is mapped to /dev/nvme0n1p2 $ dd if=/uefi_signed/recovery.img of=/dev/nvme0n1p2 bs=64k
To write the signed recovery kernel-dtb to
recovery-dtbpartition:### Ex: recovery-dtb partition is mapped to /dev/nvme0n1p3 $ dd if=/uefi_signed/tegra264-p4071-0000+p3834-0008-nv.dtb.rec of=/dev/nvme0n1p3 bs=64k
Download and Install the Secure Boot Artifacts for Jetson Orin#
Download the signed UEFI payloads from the host to the payloads’ corresponding target folder as shown in the following table.
File in Host’s <LDK_DIR>/uefi_signed/ Folder |
Target Folder |
Type |
|---|---|---|
extlinux.conf and extlinux.conf.sig |
/boot/extlinux/ |
rootfs |
initrd and initrd.sig |
/boot/ |
rootfs |
kernel_tegra234-p3701-0004-p3737-0000.dtb, and kernel_tegra234-p3701-0004-p3737-0000.dtb.sig (for Concord SKU 4) |
/boot/dtb/ |
rootfs |
Image |
/boot/ |
rootfs |
BOOTAA64.efi |
/uefi_signed/ |
esp partition |
boot.img |
/uefi_signed/ |
A/B_kernel partition |
tegra234-p3701-0004-p3737-0000.dtb (for Concord SKU 4) |
/uefi_signed/ |
A/B_kernel-dtb partition |
recovery.img |
/uefi_signed/ |
recovery partition |
tegra234-p3701-0004-p3737-0000.dtb.rec (for Concord SKU 4) |
/uefi_signed/ |
recovery-dtb partition |
Note
You might want to save copies of the original files.
For the UEFI payload files with the rootfs type, the target folder listed in the table is their final destination. The other files need to be copied to their destination partitions. To copy a file to its destination partition, copy the file to a block device that is mapped to that partition.
Note
The EFI System Partition (esp) is mounted to the /boot/efi/ directory automatically. To verify, use the command df -h in kernel.
If the esp is not mounted, find the partition by using the command sudo fdisk -l | grep "EFI" and then mount the partition to the /boot/efi/ directory manually.
To determine which block devices are mapped to a particular partition, use blkid:
$ sudo blkid | grep <part_name>
The value of <part_name> is one of the following:
A_kernelB_kernelA_kernel-dtbB_kernel-dtbrecoveryrecovery-dtb
Note
If multiple block devices are mapped to a partition, choose the boot device.
If UEFI fails to boot the file system kernel, it boots from the
kernelpartition.
To write the signed BOOTAA64.efi to
esppartition:$ cp /uefi_signed/BOOTAA64.efi /boot/efi/EFI/BOOT/BOOTAA64.efi $ sync
To write the signed boot.img to
A_kernelpartition:### Ex: A_kernel partition is mapped to /dev/mmcblk0p2 $ dd if=/uefi_signed/boot.img of=/dev/mmcblk0p2 bs=64k
To write the signed boot.img to
B_kernelpartition:### Ex: B_kernel partition is mapped to /dev/mmcblk0p5 $ dd if=/uefi_signed/boot.img of=/dev/mmcblk0p5 bs=64k
To write the signed kernel-dtb to
A_kernel-dtbpartition:### Ex: A_kernel-dtb partition is mapped to /dev/mmcblk0p3 $ dd if=/uefi_signed/tegra234-p3701-0004-p3737-0000.dtb of=/dev/mmcblk0p3 bs=64k
To write the signed kernel-dtb to
B_kernel-dtbpartition:### Ex: B_kernel-dtb partition is mapped to /dev/mmcblk0p6 $ dd if=/uefi_signed/tegra234-p3701-0004-p3737-0000.dtb of=/dev/mmcblk0p6 bs=64k
To write the signed recovery.img to
recoverypartition:### Ex: recovery partition is mapped to /dev/mmcblk0p8 $ dd if=/uefi_signed/recovery.img of=/dev/mmcblk0p8 bs=64k
To write the signed recovery kernel-dtb to
recovery-dtbpartition:### Ex: recovery-dtb partition is mapped to /dev/mmcblk0p9 $ dd if=/uefi_signed/tegra234-p3701-0004-p3737-0000.dtb.rec of=/dev/mmcblk0p9 bs=64k
Trigger a Capsule Update#
To trigger a Capsule update, complete the steps in Manually Trigger the Capsule Update
Note
After the Capsule update is complete, the system boots from the newly updated slot.
Check the Enrolled Keys#
After the Capsule update is complete, check the enrolled keys:
To install
mokutilon the target device, run the following commands:$ sudo apt-get update $ sudo apt-get install mokutil
To check the UEFI Secure Boot status, run the following command:
$ mokutil --sb-state
Note
The command should output “SecureBoot enabled”.
To check the enrolled PK, run the following command:
$ mokutil --pk
Note
The PK.crt file is in the output key list.
To check the enrolled KEK, run the following command:
$ mokutil --kek
Note
The KEK.crt file is in the output key list.
To check the enrolled db, run the following command:
$ mokutil --db
Note
The db_1.crt and db_2.crt files are in the output key list.
Method Three: Enable UEFI Secure Boot Using UEFI Utilities from an Ubuntu Prompt#
This section is for the targets that were not flashed with UEFI Secure Boot enabled.
Note
We recommend using this method for development only. For production devices, use Method One: Enable UEFI Secure Boot at Flashing Time.
Prerequisites#
Install the UEFI utilities:
efitoolsandefivar:$ apt update $ apt install efitools $ apt install efivar
Ensure that Secure Boot is not enabled:
$ efivar -n 8be4df61-93ca-11d2-aa0d-00e098032b8c-SecureBoot
Note
The above command should return with a value of 0. If it returns with a value of 1, you cannot continue.
Generate the Auth files#
The PK, KEK, and db auth files are used to enroll the PK, KEK and db keys from target when enabling UEFI Secure Boot through UEFI utilities running from an Ubuntu prompt.
Run the following commands:
$ cd <LDK_DIR>/uefi_keys/

### Generate PK Auth File
$ sign-efi-sig-list -k PK.key -c PK.crt PK PK.esl PK.auth

### Generate KEK Auth File
$ sign-efi-sig-list -k PK.key -c PK.crt KEK KEK.esl KEK.auth

### Generate db Auth Files
$ cat db_1.esl db_2.esl > db.esl
$ sign-efi-sig-list -k KEK.key -c KEK.crt db db.esl db.auth
Generate the Signed UEFI Payloads#
For Jetson Thor, refer to Generate Signed UEFI Payloads for Jetson Thor.
For Jetson Orin, refer to Generate Signed UEFI Payloads for Jetson Orin.
Download and Enroll the Secure Boot Artifacts Using the Ubuntu Prompt#
- This section describes the following steps to be performed on the target:
Download the PK, KEK, and db auth files from the host.
Enroll the KEK and db keys.
Download and write the signed UEFI payloads.
Enroll the PK key.
Download the PK, KEK, and db auth files from the host.
To get the PK, KEK, and db auth files, run the following commands:
$ mkdir /uefi_keys
$ cd /uefi_keys
$ scp <host_ip>:<LDK_DIR>/uefi_keys/*.auth .
Enroll the KEK and db keys on the target.
To enroll the KEK and db, run the following commands:
$ efi-updatevar -f /uefi_keys/db.auth db
$ efi-updatevar -f /uefi_keys/KEK.auth KEK
Download and write the signed UEFI payloads.
To download and write the signed UEFI payloads:
For Jetson Thor, refer to Download and Install the Secure Boot Artifacts for Jetson Thor.
For Jetson Orin, refer to Download and Install the Secure Boot Artifacts for Jetson Orin.
Enroll the PK key.
To enroll the PK key last to enable UEFI Secure Boot:
$ efi-updatevar -f /uefi_keys/PK.auth PK
Check If UEFI Secure Boot Is Enabled#
Reboot the target and run the efivar command to verify:
$ efivar -n 8be4df61-93ca-11d2-aa0d-00e098032b8c-SecureBoot
Note
The command above should return with a value of 01.
Update the db/dbx Keys with a Capsule Update#
This section provides information about how to use Capsule to update the KEK, the db, and the dbx keys after enabling the UEFI Secure Boot. Here is the high-level process to update UEFI Secure Boot keys:
Prepare the update keys.
Generate the KEK, the db, and the dbx keys auth file for update.
Create a UEFI update keys config file with the generated keys auth file.
Generate the
UefiUpdateSecurityKeys.dtbofile.
Generate the Capsule payload with UEFI Secure Boot enabled.
Trigger a Capsule update.
Check and verify update keys.
Check the UEFI Secure Boot status.
Check the updated KEK.
Check the updated db.
Check the updated dbx.
When UEFI Secure Boot is enabled, you can use Capsule update to update the KEK, the db, and the dbx keys. Refer to Generating the Capsule Update Payload for more information about Capsule update.
Prepare the Update Key Auth Files#
You must provide the KEK/db/dbx keys certificates in signed the esl (.auth) format, and you can update one, two, or all three key types.
The next section is an example that shows you how to generate self-signed certificates to test updates to the all three types of keys.
Note
In a production environment, complete your official certificate generation procedure.
Generate the KEK, the db, and the dbx Key Auth Files for an Update#
To generate the KEK, the db, and the dbx key auth files:
Run the following commands to prepare to generate the update keys:
$ cd to <LDK_DIR>/uefi_keys
$ GUID=$(uuidgen)
Run the following commands to generate the KEK RSA keypair and certificate for the update:
$ openssl req -newkey rsa:2048 -nodes -keyout update_kek_0.key  -new -x509 -sha256 -days 3650 -subj "/CN=Update KEK 0/" -out update_kek_0.crt
$ cert-to-efi-sig-list -g "${GUID}" update_kek_0.crt update_kek_0.esl
$ sign-efi-sig-list -a -k PK.key -c PK.crt KEK update_kek_0.esl update_kek_0.auth
Note
This step is needed only when a KEK update is required.
The PK.key and PK.crt are the PK private key and PK certificate that were generated when you enrolled the default keys in Generate the PK, KEK, and DB RSA Key Pairs, Certificates and EFI Signature List Files.
Run the following commands to generate the db RSA keypair and certificate for the update:
$ openssl req -newkey rsa:2048 -nodes -keyout update_db_0.key  -new -x509 -sha256 -days 3650 -subj "/CN=Update DB 0/" -out update_db_0.crt
$ cert-to-efi-sig-list -g "${GUID}" update_db_0.crt update_db_0.esl
$ sign-efi-sig-list -a -k update_kek_0.key -c update_kek_0.crt db update_db_0.esl update_db_0.auth
Note
The signing private key (update_kek_0.key) and the certificate (update_kek_0.crt) are generated by running the previous command.
They can also be the KEK private key and certificate when you enroll the default keys in Generate the PK, KEK, and DB RSA Key Pairs, Certificates and EFI Signature List Files.
Run the following commands to generate another db RSA keypair and certificate for the update:
$ openssl req -newkey rsa:2048 -nodes -keyout update_db_1.key  -new -x509 -sha256 -days 3650 -subj "/CN=update DB 1/" -out update_db_1.crt
$ cert-to-efi-sig-list -g "${GUID}" update_db_1.crt update_db_1.esl
$ sign-efi-sig-list -a -k KEK.key -c KEK.crt db update_db_1.esl update_db_1.auth
Run the following commands to generate db_2 auth for the dbx update:
$ cert-to-efi-sig-list -g "${GUID}" db_2.crt db_2.esl
$ sign-efi-sig-list -a -k update_kek_0.key -c update_kek_0.crt dbx db_2.esl dbx_db_2.auth
Note
The db_2 certificate is generated when you enroll the default keys in Generate the PK, KEK, and DB RSA Key Pairs, Certificates and EFI Signature List Files.
Caution
The generated .crt files are self-signed certificates and are used for demonstration purposes only. In a production environment, complete your official certificate generation procedure.
Create a UEFI Update Keys Config File#
To create a UEFI keys config file with the generated key auth files:
Run the following command to create the
uefi_update_keys.conffile:$ vim uefi_update_keys.conf
Add the following lines to the
uefi_update_keys.conffile:UEFI_DB_1_KEY_FILE="update_db_0.key"; # UEFI payload signing key UEFI_DB_1_CERT_FILE="update_db_0.crt"; # UEFI payload signing key certificate UEFI_UPDATE_PRE_SIGNED_KEK_0="update_kek_0.auth" UEFI_UPDATE_PRE_SIGNED_DB_0="update_db_0.auth" UEFI_UPDATE_PRE_SIGNED_DB_1="update_db_1.auth" UEFI_UPDATE_PRE_SIGNED_DBX_0="dbx_db_2.auth"
Note
The UEFI_DB_1_KEY_FILE and UEFI_DB_1_CERT_FILE are used to sign UEFI payloads such as L4TLauncher, kernel, and kernel-dtb. If the UEFI payloads are resigned with update_db_x key, which is shown in this example, you can use the same signing key (db_1.key and db_1.crt) that was used when you initially enabled UEFI secure boot or the update key update_db_x that was defined in this update key conf.
Users can specify up to 50 UEFI_UPDATE_PRE_SIGNED_KEK_n, UEFI_UPDATE_PRE_SIGNED_DBX_n, or UEFI_UPDATE_PRE_SIGNED_DB_n.
If the following standard keys are not enrolled yet, they can be used here according to your requirement:
Microsoft’s certificates (two DB certificates and one KEK certificate). Refer to the Microsoft’s certificates for more information.
The UEFI revocation list file, which is used to update the Secure Boot Forbidden Signature Database (dbx). Download the revocation list file from UEFI Revocation List File for arm64. To update the revocation list file to dbx, assign the
arm64_DBXUpdate.binfile to the UEFI_UPDATE_PRE_SIGNED_DBX_n variable inuefi_update_keys.conf.
Generate the UefiUpdateSecurityKeys.dtbo File#
To update the UEFI Secure Boot keys, the update UEFI security keys auth files are embedded in the UefiUpdateSecurityKeys.dtbo file,
which is generated by using the gen_uefi_keys_dts.sh script.
Run the following commands:
$ cd ..
$ sudo tools/gen_uefi_keys_dts.sh uefi_keys/uefi_update_keys.conf
$ sudo chmod 644 uefi_keys/*.auth
Copy the generated UefiUpdateSecurityKeys.dtbo to the bootloader directory:
$ cd to <LDK_DIR>
$ cp uefi_keys/UefiUpdateSecurityKeys.dtbo bootloader/
Generate a Capsule Payload with UEFI Secure Boot Enabled#
The UefiUpdateSecurityKeys.dtbo generated above is packed into Capsule payload with cpu-bootloader.Refer to
Generating the Capsule Update Payload for more information.
To generate a Capsule payload, complete one of the following tasks:
Generate a Capsule payload for the Jetson AGX Thor devkits:
$ sudo ADDITIONAL_DTB_OVERLAY="UefiUpdateSecurityKeys.dtbo" ./l4t_generate_soc_bup.sh -u <pkc_keyfile> [-v <sbk_keyfile>] -e t26x_3834_bl_spec t26x
$ ./generate_capsule/l4t_generate_soc_capsule.sh -i bootloader/payloads_t26x/bl_only_payload -o ./TEGRA_THOR.Cap t264
Generate a Capsule payload for the Jetson AGX Orin devkits:
$ sudo ADDITIONAL_DTB_OVERLAY="UefiUpdateSecurityKeys.dtbo" ./l4t_generate_soc_bup.sh -u <pkc_keyfile> [-v <sbk_keyfile>] -e t23x_agx_bl_spec t23x
$ ./generate_capsule/l4t_generate_soc_capsule.sh -i bootloader/payloads_t23x/bl_only_payload -o ./TEGRA_AGX.Cap t234
Generate a Capsule payload for the Jetson AGX Orin Industrial:
$ sudo ADDITIONAL_DTB_OVERLAY="UefiUpdateSecurityKeys.dtbo" ./l4t_generate_soc_bup.sh -u <pkc_keyfile> [-v <sbk_keyfile>] -e t23x_agx_ind_bl_spec t23x
$ ./generate_capsule/l4t_generate_soc_capsule.sh -i bootloader/payloads_t23x/bl_only_payload -o ./TEGRA_AGX_IND.Cap t234
Generate a Capsule payload for the Jetson Orin Nano devkits:
$ sudo ADDITIONAL_DTB_OVERLAY="UefiUpdateSecurityKeys.dtbo" ./l4t_generate_soc_bup.sh -u <pkc_keyfile> [-v <sbk_keyfile>] -e t23x_3767_bl_spec t23x
$ ./generate_capsule/l4t_generate_soc_capsule.sh -i bootloader/payloads_t23x/bl_only_payload -o ./TEGRA_Nano.Cap t234
Trigger a Capsule Update#
To trigger a Capsule update, refer to Trigger a Capsule Update.
Check and Verify the Update Keys#
After the Capsule update is complete, to check and verify the update keys:
Run the following commands to install
mokutilon the target device:$ sudo apt-get update $ sudo apt-get install mokutil
Run the following command to check the UEFI Secure Boot status:
$ mokutil --sb-state
Note
The command should output “SecureBoot enabled”.
Run the following command to check the updated KEK:
$ mokutil --kek
Note
The update_kek_0.crt file is in the output key list.
Run the following command to check the updated db:
$ mokutil --db
Note
The update_db_0.crt and update_db_1.crt files are in the output key list.
Run the following command to check the updated dbx:
$ mokutil --dbx
Note
The db_2.crt file is in the output key list.