Step #3: Create VS Code Container with a Dockerfile
Now that we have verified that we are authenticated with NGC, we can use a Dockerfile to build a reusable container image that includes VS Code and some helpful extensions.
To create a Dockerfile, open a new file named “Dockerfile” (make sure it uses a capital “D” and no extension) in the local directory using a text editor. For more information on the Dockerfile syntax and usage, reference the official documentation from Docker.
First, we need to specify the base image that will be used. We will use the latest PyTorch container as our base container. Other containers can be used instead to leverage different frameworks by using the appropriate base image from NGC.
FROM nvcr.io/nvidia/pytorch:22.10-py3
Next, we will use a “RUN” instruction to download a specific version of VS Code Server, install the package, and delete the package in order to keep the image size to a minimum.
            RUN wget https://github.com/coder/code-server/releases/download/v4.8.3/code-server_4.8.3_amd64.deb && \
    dpkg -i code-server_4.8.3_amd64.deb && \
    rm -f code-server_4.8.3_amd64.deb
Next, we will add a pair of “RUN” instructions to install the ms-python extension and cpptools-linux extensions, cleaning up any downloaded files.
            RUN code-server --install-extension ms-python.python

RUN wget https://github.com/microsoft/vscode-cpptools/releases/download/v1.9.8/cpptools-linux.vsix && \
    code-server --install-extension cpptools-linux.vsix && \
    rm -f cpptools-linux.vsix
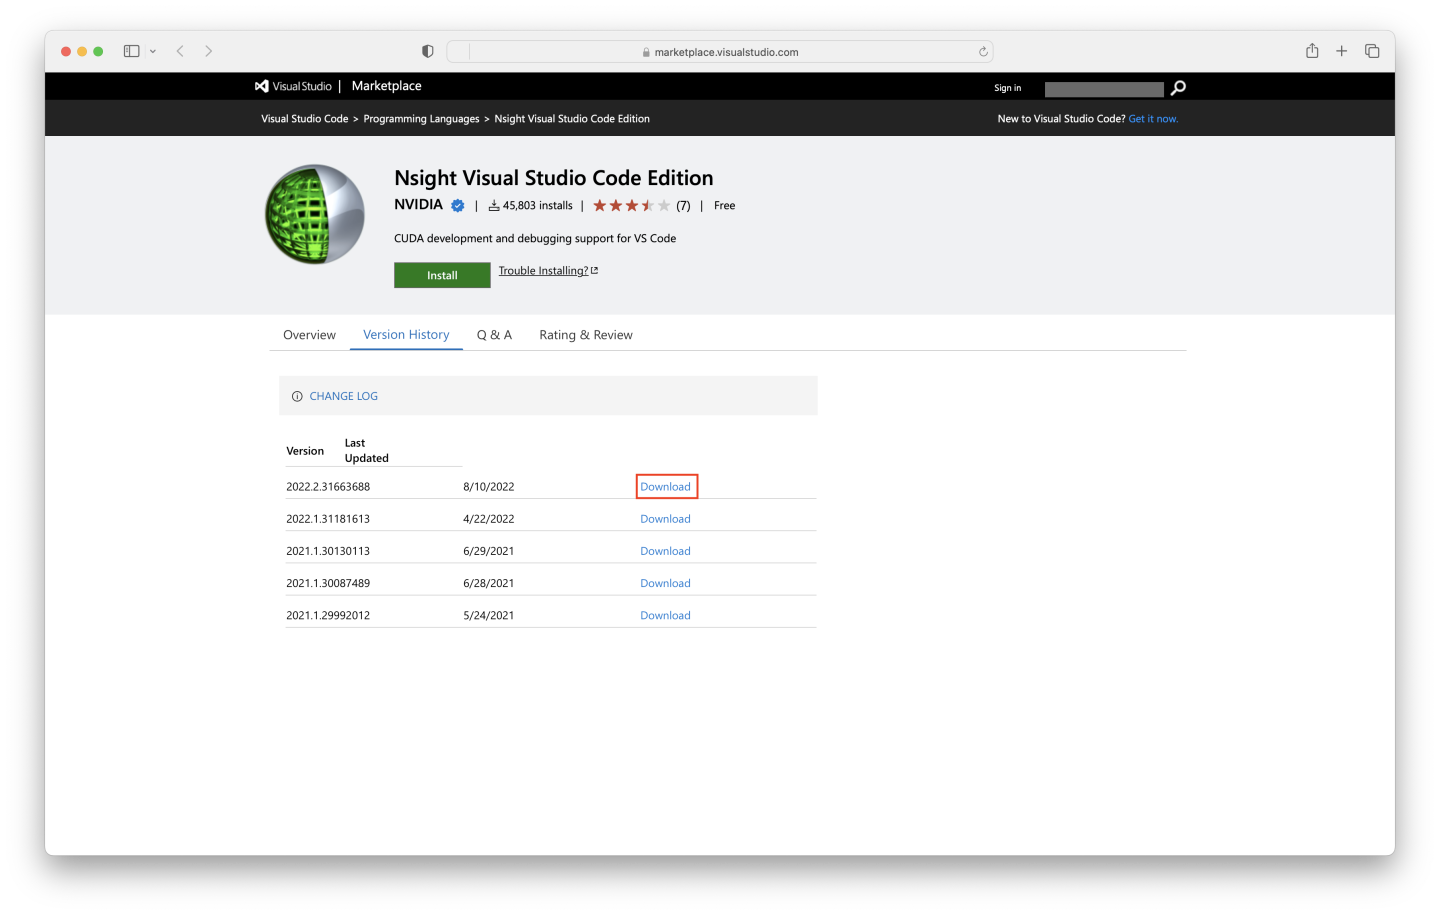
Finally, navigate to the Visual Studio Marketplace through a web browser local to your development environment, and download the VS Code Edition of the NSight plugin here.
For the example documented here, we have used the 2022.2.31663688 version. Navigate to the Version History tab, and click Download on that version.
Once downloaded, copy the package to the same directory as the Dockerfile that is being edited. We will add a “COPY” instruction to put the local file into the container image, and a “RUN” instruction to install it, removing the package after installation is complete.
            COPY NVIDIA.nsight-vscode-edition-2022.2.31663688.vsix NVIDIA.nsight-vscode-edition.vsix
RUN code-server --install-extension NVIDIA.nsight-vscode-edition.vsix && \
    rm -f NVIDIA.nsight-vscode-edition.vsix
The Dockerfile in its entirety is documented below.
            FROM nvcr.io/nvidia/pytorch:22.10-py3

RUN wget https://github.com/coder/code-server/releases/download/v4.8.3/code-server_4.8.3_amd64.deb && \
    dpkg -i code-server_4.8.3_amd64.deb && \
    rm -f code-server_4.8.3_amd64.deb

RUN code-server --install-extension ms-python.python

RUN wget https://github.com/microsoft/vscode-cpptools/releases/download/v1.9.8/cpptools-linux.vsix && \
    code-server --install-extension cpptools-linux.vsix && \
    rm -f cpptools-linux.vsix

COPY NVIDIA.nsight-vscode-edition-2022.2.31663688.vsix NVIDIA.nsight-vscode-edition.vsix
RUN code-server --install-extension NVIDIA.nsight-vscode-edition.vsix && \
    rm -f NVIDIA.nsight-vscode-edition.vsix
Now that our Dockerfile is complete, we can build the image which will run through the steps that we specified in the file and save a copy of the image to your local workstation. To do so, run the following command which will build a new image named “nvcr.io/lp-org-name/lp-team-name/vscode-server” and the tag “1.0”. The full image name is specified after the “-t” flag and is everything before the first colon with the tag being everything specified after the first colon. Note that your organization and team name (lp-org-name and lp-team-name in this case, respectively) will likely be different and should be updated to reflect the provided org and team accessible from your account. Otherwise, you are free to change the image name (“vscode-server” in this case) and tag as desired (don’t forget the “.” at the end of the command).
docker build -t nvcr.io/lp-org-name/lp-team-name/vscode-server:1.0 .
If you used the same Dockerfile as shown above, this will generate text similar to the following:
            [+] Building 74.5s (11/11) FINISHED
  => [internal] load build definition from Dockerfile                                                                           0.0s
  => => transferring dockerfile: 729B                                                                                           0.0s
  => [internal] load .dockerignore                                                                                              0.0s
  => => transferring context: 2B                                                                                                0.0s
  => [internal] load metadata for nvcr.io/nvidia/pytorch:22.10-py3                                                              0.5s
  => CACHED [1/6] FROM nvcr.io/nvidia/pytorch:22.10-py3@sha256:7ad18fc3d2b9cdc35f9e5f0043987e8391fcf592c88177fdd9daa31b3b886be  0.0s
  => [internal] load build context                                                                                              0.0s
  => => transferring context: 248B                                                                                              0.0s
  => [2/6] RUN wget https://github.com/coder/code-server/releases/download/v4.8.3/code-server_4.8.3_amd64.deb &&     dpkg -i   19.2s
  => [3/6] RUN code-server --install-extension ms-python.python                                                                34.7s
  => [4/6] RUN wget https://github.com/microsoft/vscode-cpptools/releases/download/v1.9.8/cpptools-linux.vsix &&     code-ser  15.3s
  => [5/6] COPY NVIDIA.nsight-vscode-edition-2022.2.31663688.vsix NVIDIA.nsight-vscode-edition.vsix                             0.0s
  => [6/6] RUN code-server --install-extension NVIDIA.nsight-vscode-edition.vsix &&     rm -f NVIDIA.nsight-vscode-edition.vsi  2.5s
  => exporting to image                                                                                                         2.2s
  => => exporting layers                                                                                                        2.1s
  => => writing image sha256:ef6c4eb75d04c292d2b27bc9cac93222c8c574df6db21b1c14a1d98293951ce5                                   0.0s
  => => naming to nvcr.io/lp-org-name/lp-team-name/vscode-server:1.0                                                            0.0s
To verify that the image is associated with the expected repository and tag, run docker image list, and look at the top line of output, below the column labels:
            REPOSITORY                                                TAG         IMAGE ID       CREATED         SIZE
nvcr.io/lp-org-name/lp-team-name/vscode-server            1.0         ef6c4eb75d04   2 minutes ago   17.7GB
Now that we have the desired VS Code Server image built locally, we can push it to NGC so we can use it on other machines and collaborate with teammates. Assuming you are logged into NGC locally by following the previous steps, run this command, updating the image name and tag as necessary:
docker push nvcr.io/lp-org-name/lp-team-name/vscode-server:1.0
While the image is being pushed, you will see output similar to the following:
            The push refers to repository [nvcr.io/lp-org-name/lp-team-name/vscode-server]
5956863a580b: Pushed
ad459ea18ba1: Pushed
f733cb88d938: Pushed
3cfe55382f56: Pushed
588a40280de9: Pushed
...
1.0: digest: sha256:8cda8cd5a1b1d7f632027860f977cd35967793c66b1b950b16d1f51af0090894 size: 11699
Once the image has been fully pushed, it should be available on NGC for use in Base Command as well as allowing the image to be pulled down locally on different systems.