

Project Setup#
For this module, we’ll start with a working Isaac Lab project rather than build on the Isaac Lab Basics workspace. We’ll explore the Isaac Lab Tutorial together, one piece at a time.
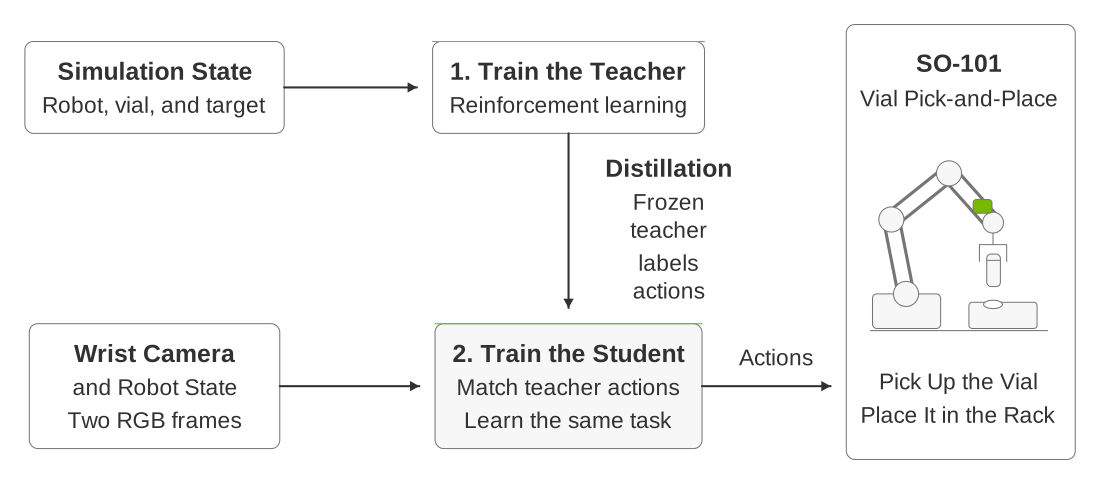
A state teacher supplies action targets for a wrist-camera student on the same vial task.#
Tip
Refer back to Development Workflow for Isaac Lab for remote development, editor and container setup, and ways to preserve your changes as you complete each lesson.
Clone the Isaac Lab Tutorial#
The Isaac Lab Tutorial repository
uses two branches for this course: main is the completed reference, and
learning-path contains the scaffold you will complete. Stay on learning-path
throughout the lessons and copy each lesson’s code into its marked locations.
Clone the repository on your GPU workstation or remote GPU host:
git clone --branch main https://github.com/isaac-sim/IsaacLabTutorial.git
cd IsaacLabTutorial
Take a look around the
IsaacLabTutorialdirectory. You’ll recognize a project structure similar to the cartpole project, with a few more pieces to support the more challenging vial-placement task.Switch to the branch created for this module:
git switch learning-path
Each lesson adds a few key components to this branch. Keep your changes on this branch, and run
git diff main -- src/to compare your current code with the complete reference without switching branches.Ensure Git LFS is installed on the GPU host, then download the assets and sync the dependencies:
git lfs install --local
git lfs pull
uv sync --locked
Optional Packages for Recording and Experiment Tracking#
To record videos and track your training runs, you’ll need a few additional
packages. The commands in these lessons use
uv run --with
to make additional packages available when you run the command:
Use
--with 'moviepy<2'to save videos withrecord_videoor--video. These recording commands need MoviePy 1.x.Use
--extra ovrtxwith--visualizer newton_rtxto render an RTX view of your robot.Use
--with wandb==0.26.1to track training runs with Weights & Biases in Managing Experiments.
You’ll record your first scenes and simple agents with --visualizer newton. We’ll also provide instructions for recording with RTX, but it is optional.
See the RTX recording note before trying it.
The Project Layout#
Here is an overview of the tutorial project layout. Several functional pieces of
code were removed in the learning-path branch to give you a chance to
implement them, but all files and implementations are present in the main
branch.
src/isaaclab_tutorial/
├── tasks/place_vial/
│   ├── config/so101/
│   │   ├── __init__.py       # Task registration
│   │   ├── env_cfg.py        # Scene and teacher task
│   │   ├── camera_env_cfg.py # Student camera observations
│   │   └── agents/           # PPO and distillation settings
│   ├── mdp/                  # Task behavior
│   └── reset/                # Reset data and curriculum
└── utils/                    # Supporting utilities
This lesson and the remaining lessons in this module build on each other as follows:
We’ll register the SO-101 vial-placement task with Gymnasium.
We’ll add the robot to an otherwise empty scene.
We’ll add a vial, rack, desk, and contact sensors to the scene.
We’ll add the actions and observations needed for simple agents.
We’ll train a teacher policy using privileged information from simulation.
We’ll train a student policy using only readily available observations.
Full diff of the learning-path and main branches
The diff below was generated using diff2html. You can
skim through it to see the changes made across the lessons, or you can run git diff main -- src/ in your local clone of the repository. Here is a link to open
the diff in a separate browser tab:
learning-path and main branch diff.
The Robots and Tasks#
Like the cartpole template from the previous module, the tutorial project is an external Isaac Lab project: it lives in its own repository outside the Isaac Lab framework repository. Over the next several lessons, you’ll turn it into a vial-placement task, check that it runs, and then train two policies.
This section describes the robot and task you’ll be working with. You will not need to copy and paste any code until the Start With the Task ID section below.
The following snippets explain the configuration built across these lessons;
you do not need to paste these overview snippets into learning-path.
You’ll paste the complete registration in Start With the Task ID below. Once added,
gym.register() in /so101/__init__.py tells Isaac Lab where to find the task
configuration.
1_PACKAGE = "isaaclab_tutorial.tasks.place_vial.config.so101"
2
3gym.register(
4    ...
5    kwargs={
6        ...
7        "env_cfg_entry_point": f"{_PACKAGE}.env_cfg:SO101VialEnvCfg",
8    },
9)
The env_cfg_entry_point points to the SO101VialEnvCfg class inside the
so101 package, which holds the SO-101 robot configuration for the place_vial task.
This Gymnasium registration tells Isaac Lab which Python class to load when
you request the task.
SO101VialEnvCfg is a
ManagerBasedRLEnvCfg
object. It contains the SO-101 scene, joint observations, a reset event, and
simulation settings. Here is a simplified view of the configuration in env_cfg.py:
1class SO101VialEnvCfg(ManagerBasedRLEnvCfg):
2    scene       : SO101SceneCfg    = ...
3    actions     : ActionsCfg       = ...
4    observations: ObservationsCfg  = ...
5    events      : EventsCfg        = ...
6    rewards     : RewardsCfg       = ...
7    terminations: TerminationsCfg  = ...
8    sim         : SimulationCfg    = ...
These classes implement the MDP concepts from Problem Specification:
ActionsCfg defines what the policy controls, ObservationsCfg defines its
inputs, and RewardsCfg defines its training feedback. EventsCfg prepares
resets and TerminationsCfg defines when an episode ends. The scene uses the
SO-101 asset configuration supplied by Isaac Lab.
1from isaaclab_assets.robots.so101 import SO101_CFG
2
3class SO101SceneCfg(InteractiveSceneCfg):
4    robot   = SO101_CFG.replace(...)
5    vial    = ...
6    rack    = ...
7    desk    = ...
8    sensors = ...
The SO101_CFG is an ArticulationCfg object that contains the robot’s
articulation root, joint axes and limits, mass and inertia, collision geometry,
and drives. The asset and its actuator settings must match the action interface:
our SO-101 policy sends relative joint-position targets, while cartpole’s
policy sends joint effort. For another robot, choose gains and limits that
match its mechanics, actuator model, and physics backend. See Isaac Lab’s
asset-import
guide
for the conversion workflow.
How the Task Configuration Fits Together#
The manager-based
workflow
assembles the scene and task pieces in one ManagerBasedRLEnvCfg. Each piece
answers a different question:
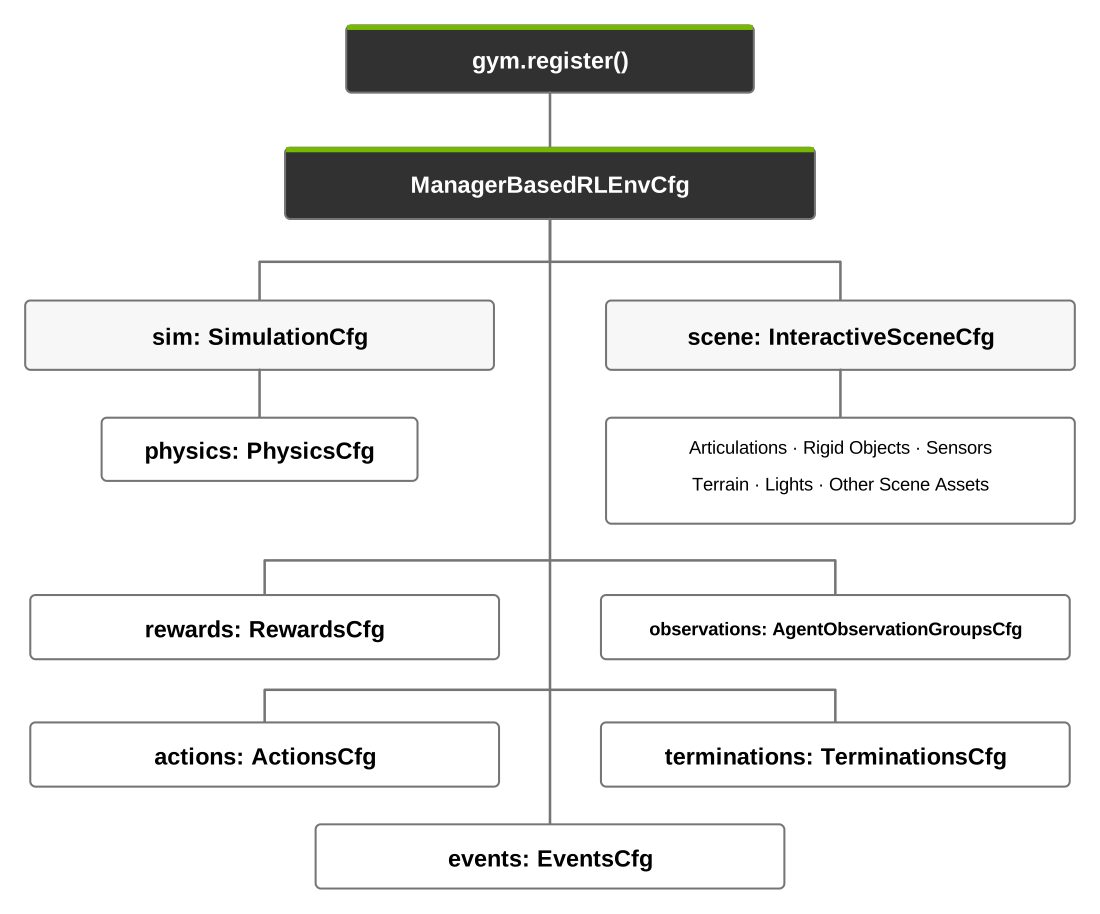
Gymnasium registration names the task; ManagerBasedRLEnvCfg connects its
simulation, scene, and task terms. These terms are added across lessons 2–5.#
Use the configuration to answer concrete questions about the vial task:
Scene: Which robot, vial, rack, and sensors exist?
Actions and observations: How does a policy output move a joint, and what measurements come back to the policy?
Rewards and terminations: What counts as progress, success, failure, or a timeout?
Events: Where do the robot and vial start on each attempt?
Simulation: Which physics backend advances the scene, and how often?
You will add these pieces as each lesson needs them. The environment’s physics
time step multiplied by decimation gives the interval between policy actions.
The separate agent configuration controls how PPO or distillation trains a
policy from the resulting experience.
Start With the Task ID#
The project’s pyproject.toml exposes isaaclab_tutorial.tasks through the
isaaclab.tasks entry-point group:
# pyproject.toml
[project.entry-points."isaaclab.tasks"]
so101-vial-place = "isaaclab_tutorial.tasks"
Importing the package loads the robot-specific configuration, where
gym.register() connects a task ID to Isaac Lab’s ManagerBasedRLEnv and our
SO101VialEnvCfg:
Replace the contents
File:
src/isaaclab_tutorial/tasks/place_vial/config/so101/__init__.pyMarkers:
# BEGIN lesson-01-registrationand# END lesson-01-registration
Paste the code below between the markers. Keep both marker comments.
gym.register(
    id="IsaacTutorial-Place-Vial-SO101",
    entry_point="isaaclab.envs:ManagerBasedRLEnv",
    disable_env_checker=True,
    kwargs={
        "env_cfg_entry_point": f"{_PACKAGE}.env_cfg:SO101VialEnvCfg",
        "rsl_rl_cfg_entry_point": f"{_PACKAGE}.agents.rsl_rl_ppo_cfg:SO101StatePPORunnerCfg",
        "default_agent": "rsl_rl",
    },
)
The id is the name you’ll pass to the command-line agents once the
configuration has the actions and episode rules needed to run env.step().
The SO101VialEnvCfg configuration describes the task, including the robot. It
gathers the scene, observations, events, and simulation timing.
The supplied inspection_env_cfg.py connects SO101SceneCfg to a
ManagerBasedRLEnvCfg with empty actions, joint observations, and a reset event.
Use its IsaacTutorial-Inspect-SO101 task after adding the robot in the next lesson.
The placement task registration above will be used once you add controls in
Running Simple Agents.
Prepare Joint Observations#
The robot inspection task uses Isaac Lab’s supplied mdp.joint_pos and
mdp.joint_vel observation terms. They are re-exported through the tutorial’s
mdp package; no custom joint-velocity implementation is needed.
Use SceneEntityCfg to select the robot and joint order when defining observations.
Task-specific observations, such as placement features and wrist images, live in
mdp/observations.py.
The initial checkout fails configuration validation because the robot is missing; this is expected. After the SO-101 Robot lesson, use the supplied inspection task to run the robot scene with empty actions. The Vial and Rack lesson then adds the vial and rack. Running Simple Agents then adds policy actions and episode rules. Later lessons replace the same environment configuration with the teacher task and add the camera student. The project’s tests check the completed task, so run the full test suite after completing the distillation lesson.
Review#
Check Your Understanding#
What does task registration connect a task ID to?
Answer
Task registration connects a task ID to environment and agent configuration entry points. Those configurations may still be incomplete.
Apply What You Learned#
Starting from learning-path, what pieces must be added before a simple agent can step the SO-101 task? Distinguish the existing scaffold from the registration, scene, actions, observations, resets, and ending conditions needed for a runnable task.
Agent Tutor Prompt
Copy this prompt and include your answer:
Review my answer to this question: Starting from
learning-path, what pieces must be added before a simple agent can step the SO-101 task? Distinguish the existing scaffold from the registration, scene, actions, observations, resets, and ending conditions needed for a runnable task.My answer: [paste your answer here].
Check my reasoning about scaffold versus implemented behavior, registration, scene, actions, observations, resets, and endings. Ask for missing context rather than assuming it. Identify what I explained well, point out one gap or misconception, and ask a follow-up question that helps me improve my answer. Let me revise it before supplying a complete answer.
Key Takeaways#
Stay on
learning-pathand compare your progress with the completed reference onmain.Paste the task registration into its marked region during this lesson.
Scene and MDP configuration connect the robot to observations, actions, rewards, and resets.
The inspection scene runs after adding the robot; simple agents need the later controls and episode rules.