
Distill a Student Policy#
We’ve reached the final stage in training the SO-101 to pick up a vial and place it in a rack. The teacher policy learned to do this using privileged information from the simulation. A real robot cannot read the vial’s position directly from the simulator, so let’s train a student policy that uses a wrist-camera image and the robot’s joint state, both of which are readily available on the SO-101.
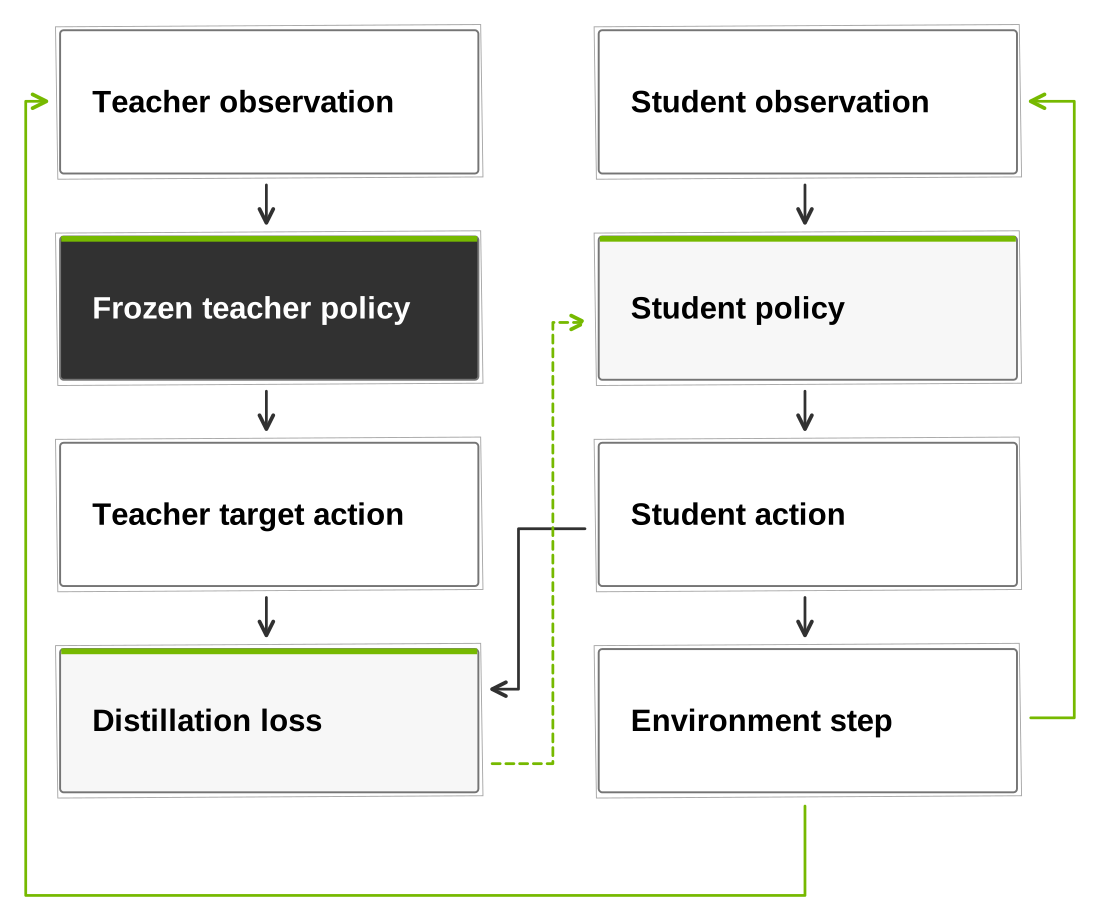
During distillation, the student acts and visits new states. The frozen teacher labels those same states, and only the student is updated.#
Stay on learning-path with the preceding lesson’s changes in place. Replace
only the marked regions named below; imports and supporting code are supplied.
You can compare your working copy with the completed reference at any time:
git diff main -- src/
Adding Camera Observations#
The following configuration belongs in camera_env_cfg.py. This configuration
could be placed in env_cfg.py, but separating the camera-specific
configuration keeps each file focused.
The camera is attached to the gripper and renders an 80 by 60 overscan. The observation term projects it to a 64 by 48 red, green, and blue (RGB) image at the same 30 Hz rate as the robot actions. Its view changes as the wrist moves. The recording below shows the raw 80 by 60 wrist view before projection. The policy receives a history of two processed 64 by 48 RGB frames.
Raw wrist-camera output from the student rollout, before the policy observation transform.#
Isaac Lab has built-in support for cameras. Here we specify the camera’s characteristics.
Replace the contents
File:
src/isaaclab_tutorial/tasks/place_vial/config/so101/camera_env_cfg.pyMarkers:
# BEGIN lesson-06-SO101CameraSceneCfgand# END lesson-06-SO101CameraSceneCfg
Paste the code below between the markers. Keep both marker comments.
@configclass
class SO101CameraSceneCfg(SO101SceneCfg):
    """SO-101 scene with the rectified pinhole wrist camera and handles to the randomized visual materials."""

    wrist_camera = CameraCfg(
        prim_path="{ENV_REGEX_NS}/Robot/gripper/wowrobo_2MP_camera/pinhole",
        spawn=PinholeCameraCfg(focal_length=_FOCAL_LENGTH, horizontal_aperture=_HORIZONTAL_APERTURE),
        offset=CameraCfg.OffsetCfg(convention="opengl"),
        data_types=["rgb"],
        width=80,
        height=60,
        update_period=1.0 / 30.0,
        update_latest_camera_pose=True,
        renderer_cfg=_camera_renderer_cfg(),
        background_color=(0.3, 0.3, 0.3),
    )

    # The Newton renderer only reads material color.
    robot_visual = VisualMaterialCfg(prim_path="{ENV_REGEX_NS}/Robot/Looks/material_a_d_printed", spawn=None)
    desk_visual = VisualMaterialCfg(prim_path="{ENV_REGEX_NS}/Desk/Looks/Wood", spawn=None)
    rack_visual = VisualMaterialCfg(prim_path="{ENV_REGEX_NS}/Rack/WorkshopVisual/Looks/OmniPBR", spawn=None)
    vial_body_visual = VisualMaterialCfg(prim_path="{ENV_REGEX_NS}/Vial/Looks/Vial_plastic", spawn=None)
    vial_cap_visual = VisualMaterialCfg(prim_path="{ENV_REGEX_NS}/Vial/Looks/Vial_cap", spawn=None)
    vial_label_visual = VisualMaterialCfg(prim_path="{ENV_REGEX_NS}/Vial/Looks/Label", spawn=None)

    def __post_init__(self):
        self.robot.spawn.hide_camera_housing = True
        self.vial.spawn.usd_path = str(VIAL_LABELED_USD)
As we do with physical characteristics (e.g., randomly adjusting the mass of the vial), we can also randomize a camera’s characteristics. This process is called domain randomization. It helps the student policy learn to ignore irrelevant details in the camera image, such as lighting and color balance, so that it can focus on the task of picking up the vial and placing it in the rack.
Replace the contents
File:
src/isaaclab_tutorial/tasks/place_vial/config/so101/camera_env_cfg.pyMarkers:
# BEGIN lesson-06-WristImageCfgand# END lesson-06-WristImageCfg
Paste the code below between the markers. Keep both marker comments.
@configclass
class WristImageCfg(ObsGroup):
    """Two-frame wrist RGB history with episode-consistent photometric (and, for sim2real, intrinsics) variation."""

    image = ObsTerm(
        func=mdp.wrist_rgb,
        params={
            "sensor_cfg": SceneEntityCfg("wrist_camera"),
            "exposure_range": (0.75, 1.25),
            "contrast_range": (0.85, 1.15),
            "white_balance_range": (0.90, 1.10),
            "brightness_range": (-0.05, 0.05),
            "gamma_range": preset(default=(1.0, 1.0), sim2real=(0.85, 1.15)),
            "blur_range": preset(default=(0.0, 0.0), sim2real=(0.0, 0.5)),
            "history_length": 2,
            "projection_size": POLICY_IMAGE_SIZE,
            "focal_length_pixels": WRIST_FOCAL_LENGTH_PIXELS,
            "focal_scale_range": preset(default=(1.0, 1.0), sim2real=(0.95, 1.05)),
            "principal_point_pixels": preset(default=0.0, sim2real=1.5),
            "radial_distortion_range": preset(default=(0.0, 0.0), sim2real=(-0.04, 0.04)),
        },
        noise=UniformNoiseCfg(n_min=-0.025, n_max=0.025),
    )

    def __post_init__(self):
        self.enable_corruption = True
The student also receives proprioception (the robot’s ability to sense its
own state): joint positions, velocities, targets, and its previous action. Here
we add noise to the joint readings to simulate real sensor noise
(self.enable_corruption = True is needed to add the noise).
Replace the contents
File:
src/isaaclab_tutorial/tasks/place_vial/config/so101/camera_env_cfg.pyMarkers:
# BEGIN lesson-06-ProprioceptionCfgand# END lesson-06-ProprioceptionCfg
Paste the code below between the markers. Keep both marker comments.
@configclass
class ProprioceptionCfg(ObsGroup):
    """Proprioceptive observations available on the real robot, in the encoders' (possibly biased) coordinates."""

    joint_pos = ObsTerm(
        func=mdp.encoder_joint_pos,
        params={"asset_cfg": SceneEntityCfg("robot")},
        noise=UniformNoiseCfg(n_min=-0.01, n_max=0.01),
    )
    joint_vel = ObsTerm(
        func=mdp.joint_vel,
        params={"asset_cfg": SceneEntityCfg("robot")},
        noise=UniformNoiseCfg(n_min=-0.02, n_max=0.02),
    )
    joint_target = ObsTerm(
        func=mdp.encoder_joint_target,
        params={"asset_cfg": SceneEntityCfg("robot")},
        noise=UniformNoiseCfg(n_min=-0.005, n_max=0.005),
    )
    previous_action = ObsTerm(func=mdp.last_action)

    def __post_init__(self):
        self.enable_corruption = True
        self.concatenate_terms = True
For distillation, a separate teacher_state observation
group
is added to the camera environment. It lets the teacher see more than the
student so that it can label the student’s training states. In distillation, we
train the student to match the teacher’s behavior.
Replace the contents
File:
src/isaaclab_tutorial/tasks/place_vial/config/so101/camera_env_cfg.pyMarkers:
# BEGIN lesson-06-CameraObservationsCfgand# END lesson-06-CameraObservationsCfg
Paste the code below between the markers. Keep both marker comments.
@configclass
class CameraObservationsCfg:
    """Deployable student inputs, the state teacher's inputs (distillation labels), and the privileged critic."""

    wrist_rgb: WristImageCfg = WristImageCfg()
    proprioception: ProprioceptionCfg = ProprioceptionCfg()
    teacher_state: PolicyStateGroupCfg = PolicyStateGroupCfg()
    critic: CriticStateGroupCfg = CriticStateGroupCfg()
Replace the contents
File:
src/isaaclab_tutorial/tasks/place_vial/config/so101/camera_env_cfg.pyMarkers:
# BEGIN lesson-06-SO101VialCameraEnvCfgand# END lesson-06-SO101VialCameraEnvCfg
Paste the code below between the markers. Keep both marker comments.
@configclass
class SO101VialCameraEnvCfg(SO101VialEnvCfg):
    """Vial placement from wrist RGB and proprioception, distilled from the state teacher."""

    scene: SO101CameraSceneCfg = SO101CameraSceneCfg(num_envs=1024, env_spacing=0.9, replicate_physics=True)
    observations: CameraObservationsCfg = CameraObservationsCfg()
    events: EventsCfg = preset(default=EventsCfg(), sim2real=CameraSim2RealEventsCfg())

    def play_mode(self):
        from isaaclab_tutorial.utils import evaluation

        super().play_mode()
        if not evaluation.EXACT_EVALUATION_ACTIVE:
            self.scene.num_envs = min(self.scene.num_envs, 8)
Identify Deployable Student Inputs
Before training, list the inputs in wrist_rgb and proprioception that the
student can obtain on the real SO-101. Which information in teacher_state
depends on simulation instead? Explain why teacher_state can label the
student’s training states but cannot be a student input on hardware.
The student receives two consecutive RGB frames, giving it short visual history.
The nominal task applies image and proprioceptive noise. The optional sim2real
preset adds camera mount, intrinsics, appearance, and physical variation; use it
with a teacher trained under the same physical preset.
Distillation Training Configuration#
In rsl_rl_distillation_cfg.py, the student uses a convolutional neural network
(CNN) to process images. CNNs are a common choice for image-based policies. The
teacher model has the same configuration as the state actor from the previous
lesson, including its multilayer perceptron (MLP), so we can load the trained
checkpoint. The CNN and MLP policies produce the same six robot actions.
Replace the contents
File:
src/isaaclab_tutorial/tasks/place_vial/config/so101/agents/rsl_rl_distillation_cfg.pyMarkers:
# BEGIN lesson-06-distillationand# END lesson-06-distillation
Paste the code below between the markers. Keep both marker comments.
@configclass
class SO101CameraDistillationRunnerCfg(RslRlDistillationRunnerCfg):
    """DAgger-style distillation: the student acts, the loaded state teacher labels every visited state."""

    seed = 42
    num_steps_per_env = 32
    max_iterations = 1600
    save_interval = 100
    experiment_name = "so101_vial_camera_distillation"
    run_name = ""
    obs_groups = {"student": ["wrist_rgb", "proprioception"], "teacher": ["teacher_state"]}
    clip_actions = 1.0
    student = RslRlCNNModelCfg(
        # Compact encoder for the 64 x 48 wrist image.
        cnn_cfg=RslRlCNNModelCfg.CNNCfg(
            output_channels=[16, 32, 32], kernel_size=[5, 3, 3], stride=[2, 2, 2], activation="elu"
        ),
        hidden_dims=[256, 128],
        activation="elu",
        obs_normalization=True,
        distribution_cfg=RslRlCNNModelCfg.GaussianDistributionCfg(init_std=0.05, std_type="log"),
    )
    # Must mirror the state actor so its checkpoint loads; the teacher always acts deterministically.
    teacher = RslRlMLPModelCfg(
        hidden_dims=[256, 256, 128],
        activation="elu",
        obs_normalization=True,
        distribution_cfg=RslRlMLPModelCfg.GaussianDistributionCfg(init_std=0.2, std_type="log", std_range=(0.05, 0.3)),
    )
    algorithm = RslRlDistillationAlgorithmCfg(
        class_name=(
            "isaaclab_tutorial.tasks.place_vial.config.so101.agents.rsl_rl_distillation_cfg:BoundedTeacherDistillation"
        ),
        num_learning_epochs=4,
        learning_rate=5.0e-4,
        gradient_length=1,
        max_grad_norm=1.0,
        loss_type="mse",
    )
During training, the student acts in the environment. The teacher sees the state
reached by those actions and provides the action it would choose. The student
learns to match those actions using the mean squared error loss shown in the
configuration (loss_type="mse").
Registering the Camera Task#
Register the camera environment and its distillation configuration with Isaac
Lab so the command-line tools can find them. This registration goes in so101/__init__.py.
Replace the contents
File:
src/isaaclab_tutorial/tasks/place_vial/config/so101/__init__.pyMarkers:
# BEGIN lesson-06-camera-registrationand# END lesson-06-camera-registration
Paste the code below between the markers. Keep both marker comments.
gym.register(
    id="IsaacTutorial-Place-Vial-SO101-Camera",
    entry_point="isaaclab.envs:ManagerBasedRLEnv",
    disable_env_checker=True,
    kwargs={
        "env_cfg_entry_point": f"{_PACKAGE}.camera_env_cfg:SO101VialCameraEnvCfg",
        "rsl_rl_cfg_entry_point": f"{_PACKAGE}.agents.rsl_rl_distillation_cfg:SO101CameraDistillationRunnerCfg",
        "rsl_rl_ppo_cfg_entry_point": f"{_PACKAGE}.agents.rsl_rl_ppo_cfg:SO101CameraPPORunnerCfg",
        "default_agent": "rsl_rl",
    },
)
The camera task supports both distillation and PPO training without a teacher. After completing the snippets, run the project’s tests:
uv run pytest -q
Training the Student#
Now let’s train the student policy. It loads the teacher checkpoint from the previous lesson. Run the commands from the root of your cloned project.
Train the student policy. Use
tmuxas in the previous lesson if you want training to continue when your terminal disconnects. Replace.../MODEL.ptwith the teacher checkpoint path you selected earlier:TEACHER_CHECKPOINT=logs/rsl_rl/so101_vial_state/.../MODEL.pt uv run isaaclab train \ --rl_library rsl_rl \ --task IsaacTutorial-Place-Vial-SO101-Camera \ --num_envs 1024 \ --max_iterations 1600 \ --run_name distillation \ --checkpoint "$TEACHER_CHECKPOINT" \ presets=newton_mjwarp,newton_renderer
Follow the training progress in TensorBoard (use port forwarding if you are running on a remote machine):
uv run tensorboard --logdir logs/rsl_rl/
Viewing the Student#
Let’s watch the student in action to see how well it learned the task.
Find the student checkpoints.
find logs/rsl_rl -path '*.pt' -print
You should see checkpoints for both the teacher and student policies.
Set a student policy checkpoint to view.
STUDENT_CHECKPOINT=logs/rsl_rl/so101_vial_camera_distillation/.../MODEL.pt
Replace
.../MODEL.ptwith the path to the highest-numbered checkpoint in your latest student training run. The sample video below usesmodel_1599.pt.Play the student policy.
uv run --with 'moviepy<2'                      \
  isaaclab play                                \
  --rl_library rsl_rl                          \
  --task IsaacTutorial-Place-Vial-SO101-Camera \
  --num_envs 8                                 \
  --checkpoint "$STUDENT_CHECKPOINT"           \
  --video --video_length 900                   \
  --visualizer newton                          \
  presets=newton_mjwarp,newton_renderer
Playback starts from the home phase, before the SO-101 starts its grasp. Compare its behavior with the teacher: does it miss the vial, lose it during reorientation, or struggle to release it into the rack? Those observations will tell you where the camera policy needs more work.
This command uses Newton GL for the external recording and MoviePy to save
the video. Keep both presets: newton_mjwarp runs the physics, and
newton_renderer supplies the wrist-camera images your student learned from.
For optional RTX recording and its dependency requirements, see the
teacher lesson.
Here’s a reference recording of the student checkpoint model_1599.pt:
Student model_1599.pt in one environment, recorded from home with seed 42
and default physics.#
The command above runs eight environments independently; the example clip shows one. Compare your environments through grasping, lifting, turning, and release into the rack.
Evaluating the Student#
Let’s measure how often the student completes the whole task from home. Use the checkpoint you selected for playback above and run this command from your tutorial project’s root.
Run the evaluation.
mkdir -p evaluation-results
set -o pipefail

uv run isaaclab play                                                             \
  --rl_library rsl_rl                                                            \
  --task IsaacTutorial-Place-Vial-SO101-Camera                                   \
  --num_envs 1024 --seed 42                                                      \
  --checkpoint "$STUDENT_CHECKPOINT"                                             \
  --device cuda:0 --visualizer none                                              \
  --external_callback isaaclab_tutorial.utils.evaluation.install_episode_counter \
  presets=newton_mjwarp,newton_renderer                                          \
  2>&1 | tee evaluation-results/student.log
The command is explained in the previous lesson.
When playback finishes, find the summary in your saved terminal log:
grep '^SO101_EVAL_RESULT=' evaluation-results/student.log
The JSON contains episode and success counts; success, grasp, lift, insertion, timeout, vial-loss, and unsafe-contact rates; mean and maximum peak rack-contact force; and mean time to success over successful episodes. Rates are fractions, so multiply by 100 to get percentages. Save each repeat in a new log file so you can compare runs without overwriting earlier results.
Analyzing the Student’s Results#
This comparison uses tutorial revision 9a4286b, seed 42, and the default
physics preset for both policies. The student trained for 1,600 iterations with
1,024 environments, taking about 28 minutes on an RTX PRO 6000 Blackwell Max-Q.
It learned from the teacher’s final model_799.pt checkpoint.
The student’s model_1599.pt succeeded in 1,014 of 1,024 episodes, an
99.02% success rate. The teacher succeeded 1,020 times, so the student
completed 6 fewer placements: a gap of 0.59 percentage points in this pair
of evaluations.
Metric |
Teacher ( |
Student ( |
|---|---|---|
Episodes evaluated |
1,024 |
1,024 |
Successful placements |
1,020 |
1,014 |
Success rate |
99.61% |
99.02% |
Grasp rate |
100.00% |
100.00% |
Lift rate |
100.00% |
99.32% |
Insertion rate |
99.61% |
99.12% |
Timeout rate |
0.39% (4 episodes) |
0.98% (10 episodes) |
Vial-loss rate |
0.00% (0 episodes) |
0.00% (0 episodes) |
Mean time to success (successful episodes only) |
7.86 s |
8.29 s |
Mean peak rack-contact force |
3.38 N |
1.77 N |
Maximum rack-contact force |
17.61 N |
13.78 N |
Unsafe rack-contact rate (above 20 N) |
0.00% |
0.00% |
Download the evaluation summaries and checkpoint provenance.
The student’s 1,014 successes, 10 timeouts, and zero vial losses account for all 1,024 attempts in this run. Ending flags are counted independently, so an episode can have more than one. All reported failures here were timeouts. Watch both the approach and what happens after grasping: does the student lift the vial, keep hold while turning, and release it into the rack?
The milestones have separate definitions. lift_rate records whether the vial’s
lowest point cleared the top of the rack; insertion and success have their own
conditions. Use these rates to choose what to inspect in a video, rather than
subtracting them to count failures at each stage.
Both policies placed every successful vial in hole 0. The task accepts any of four holes, but these runs do not demonstrate equal coverage of them. The 1,024 episodes repeat 128 home starts eight times; they do not represent 1,024 unique starting poses or multiple independent training seeds.
Successful student attempts took about 0.42 seconds longer on average. That comparison leaves out failures. The student’s lower mean contact force does not establish equivalent handling or hardware safety. Neither run exceeded 20 N; physical robot validation remains a separate step.
The tutorial project also supports training the camera policy from scratch with PPO. This module follows teacher-to-student distillation; camera PPO is an optional alternative described in the tutorial repository.
Review#
Check Your Understanding#
Does changing only the external recording view change the policy’s camera inputs?
Answer
No. The external recording view changes what you can inspect; the policy camera supplies the observations that drive actions. Keep policy inputs fixed when comparing recording views.
Apply What You Learned#
How would you investigate one camera-student failure using teacher comparisons and wrist-camera evidence? Describe the first visible mistake, propose a cause and an alternative, and outline one controlled comparison that could distinguish them.
Agent Tutor Prompt
Copy this prompt and include your answer:
Review my answer to this question: How would you investigate one camera-student failure using teacher comparisons and wrist-camera evidence? Describe the first visible mistake, propose a cause and an alternative, and outline one controlled comparison that could distinguish them.
My answer: [paste your answer here].
Check my reasoning about matching evaluation conditions, available student inputs, preprocessing, first visible failure, and one testable explanation. Ask for missing context rather than assuming it. Identify what I explained well, point out one gap or misconception, and ask a follow-up question that helps me improve my answer. Let me revise it before supplying a complete answer.
What Comes Next#
You’ve taken the SO-101 from a scene with no agent to a teacher that learns from simulation state and a student that acts from a wrist camera and robot joint measurements. The student video is a useful reminder that a working training run is only the start: we still need to check what the robot does from home, through grasping, lifting, turning, and release.
As a next experiment, choose one stage where the student fails more often than the teacher. Watch several attempts that start from home, describe the first visible mistake, and decide what evidence would help explain it. For example, if the student misses the vial, inspect what its wrist camera can see during the approach. This gives you a concrete question to investigate as you keep improving the policy.
For follow-up work on the same vial-placement task, see Train an SO-101 Robot From Sim-to-Real With NVIDIA Isaac. That module uses Isaac Lab for data collection and evaluation of vision-language-action models such as NVIDIA Isaac GR00T, and covers transfer to a physical SO-101.
Key Takeaways#
The student uses wrist-camera images and robot state rather than privileged object state.
Distillation updates the student using a frozen teacher’s action targets.
Evaluate complete student episodes separately and treat hardware transfer as another validation step.