Configuration Management
Configuration Management manages network configurations and provisioning templates.
Network Snapshots manages configuration snapshots of the switches, by creating and restoring snapshots when needed. NVIDIA ® NEO ® takes an automatic snapshot once a day (system snapshots), and maintains the last seven snapshots (taken over the last seven days). Users can also create snapshots (user snapshots), and manage them by performing a number of actions detailed below.
Network snapshots are saved configuration files captured at a certain point of time. These snapshots can be later used to restore a previous state of the network.

Tab Components
Using this tab, users can manage network snapshots by viewing, editing, creating, importing, deleting, copying, and restoring them.
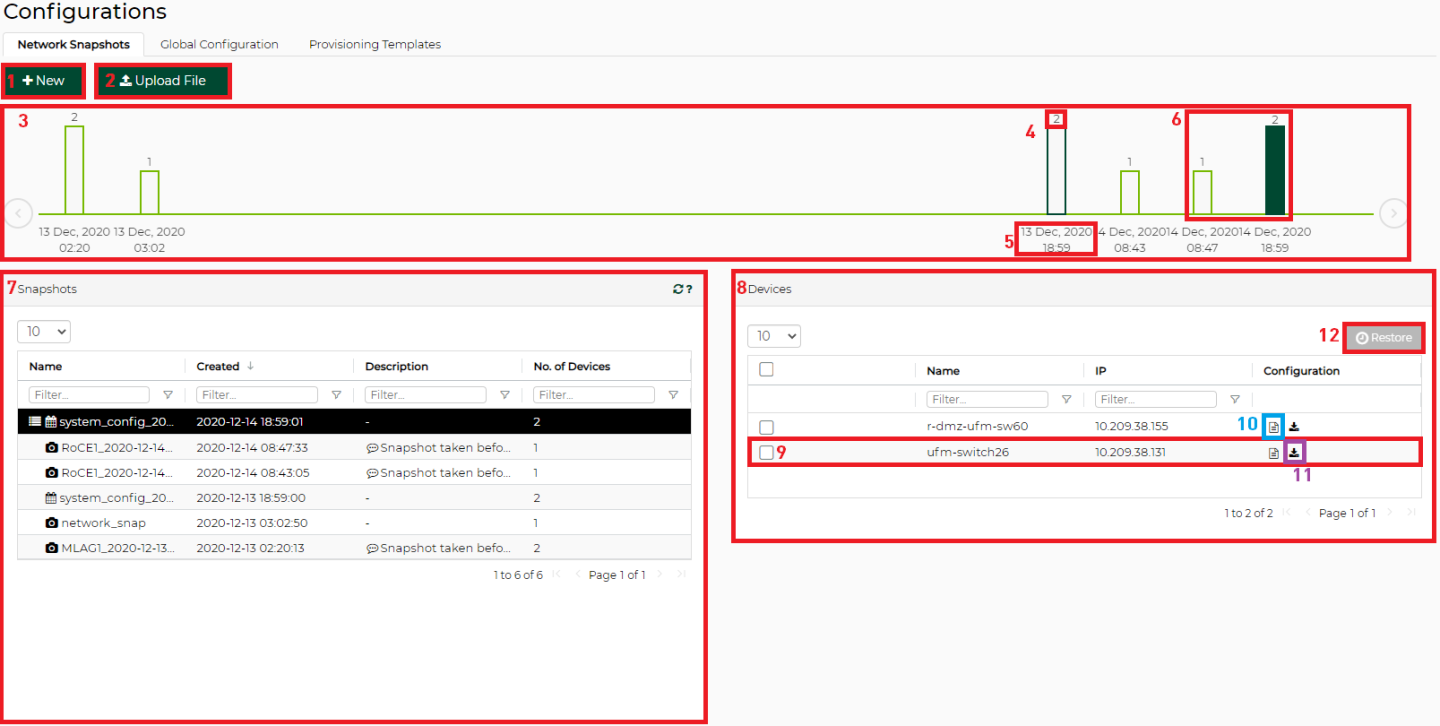
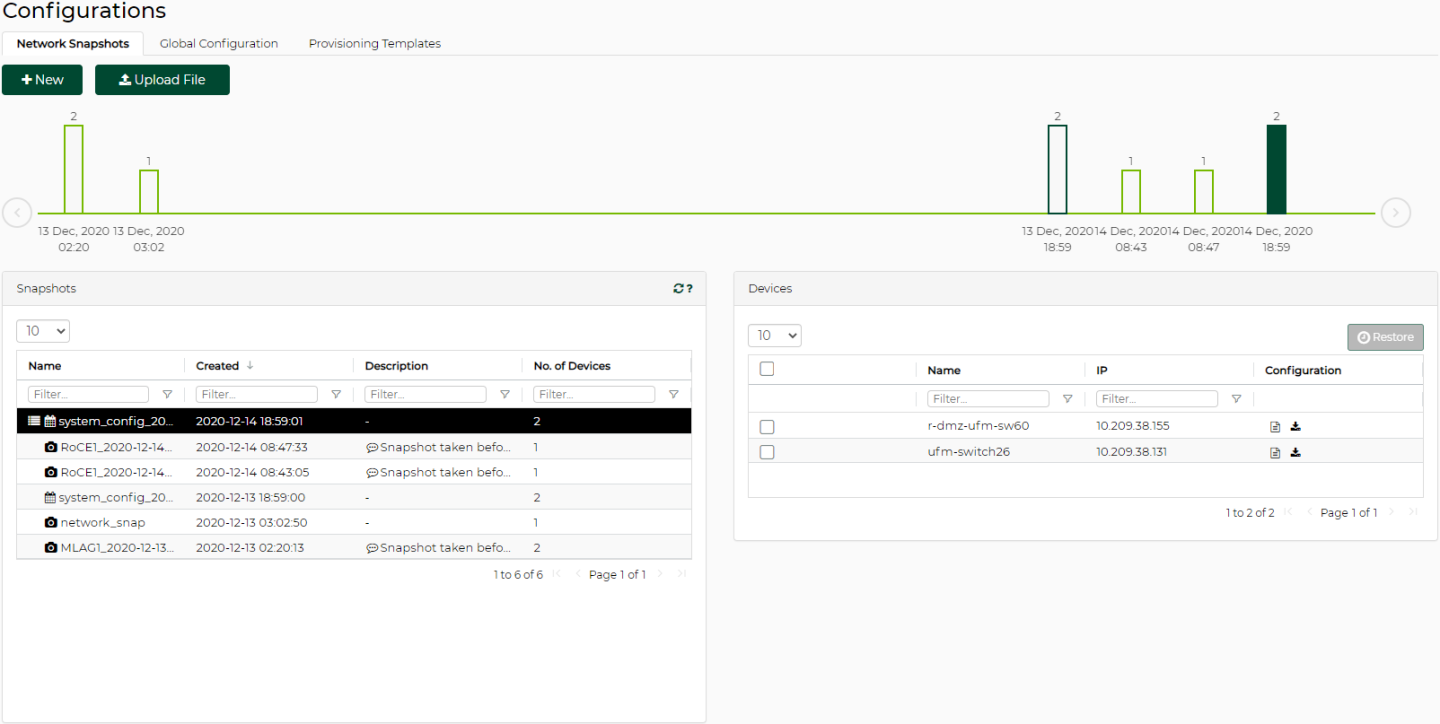
Network Snapshots Tab Components
|
# |
Name |
Description |
|
1 |
New Button |
Enables users to create new user snapshots. |
|
2 |
Upload File Button |
Enables users to upload local tar (compressed) snapshot files. |
|
3 |
Snapshots Timeline |
Displays snapshots in a chronological order in the form of a bar chart. This timeline is linked to the snapshots table, as when a snapshot is selected from the table, it will be highlighted in the timeline, and vice versa. |
|
4 |
Devices Count |
The number of devices that are included within a snapshot. It is also used to represent the height of the bar. |
|
5 |
Snapshot Date |
The date on which the snapshot was taken. Appears below the snapshot. |
|
6 |
Snapshots Colors |
System snapshots are green-colored, while user snapshots are blue-colored. |
|
7 |
Snapshots Table |
Lists all system ( 
) and user ( 
) snapshots. The format of a system snapshot is: "system_config_yyyy-mm-dd_hh-mm-ss". |
|
8 |
Devices Table |
Lists all devices of which configurations have been saved in the selected snapshot from the Snapshots table. |
|
9 |
Disabled Row |
A switch that was once part of the system and was included in the snapshot, but no longer exists. This switch’s configuration cannot be restored, but users can view or download its saved configurations. |
|
10 |
View Icon |
Displays configuration output of the corresponding switch. |
|
11 |
Download Icon |
Downloads the saved configuration of the switch to the user's computer. |
|
12 |
Restore Button |
Enables restoring the configurations of the selected switches. |
To take a new snapshot of specific systems:
Click the "New" button.
Provide a name and description of the snapshot, and move the systems you want to be part of the snapshot to the rightmost table:
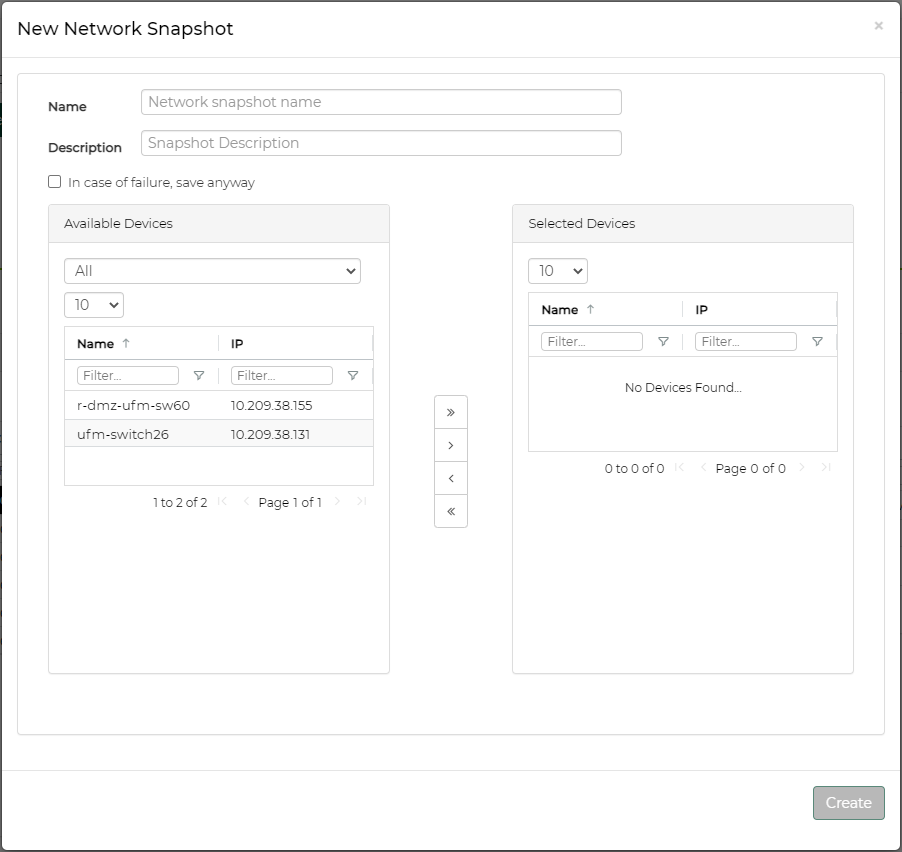
Note the following:
The snapshot name must be a unique non-whitespace name
Snapshot description is optional
When the failure checkbox is checked, snapshots will be created even if not all of the switch's configurations were taken successfully. When it is unchecked, the snapshot will only be created if all of the switches' configurations were taken successfully.
Click "Create". A new bar will be added to the right side of the timeline.
Restoring Snapshots
The main goal of taking network snapshots is to help retrieve certain switches’ configurations in case errors/misconfigurations take place. Previously saved snapshots of switches’ running configurations can be restored and applied on these switches.
To restore a snapshot:
Select the desired snapshot from the Snapshots table.
Select the switches that you would like to store their configurations from the Devices table.
Click "Restore". A pop-up will bring to attention the seriousness of the restoration process, and will prompt choosing either to backup and restore, or to restore only.
Backup snapshots are taken right before restoration and capture the currently running configurations. The name format of these backup snapshots is: system_config_yyyy-mm-dd_hh-mm- ss_Auto_Snapshot. The backup snapshot will immediately be added to the Snapshots table. Once the backup process is successfully completed, the restoration process will take place.
Click "Backup & Restore" or "Restore". The restoration process will start.
Snapshots Actions
A right-click on a snapshot from the Snapshots table will enable performing the following actions:
Save copy – copies the selected snapshot and prompts the user to add a new different name
Download – downloads the selected snapshot to the user's computer as a tar/compressed file
Remove – deletes the selected snapshot. Only user snapshots can be deleted by users. System snapshots are deleted automatically seven days after their creation.
Global Configuration manages global configuration files. These global files are not necessarily associated with a specific system in NEO, and are editable text files to which variables can be added, and contain a list of configurations that can later be applied on specific systems.
Tab Components
Using this tab, users can manage configuration files by viewing, editing, creating, validating, and deleting them and their variables (if applicable).

Global Configurations Tab Components
|
# |
Name |
Description |
|
1 |
Upload File Button |
Enables users to upload local .txt configuration files. |
|
2 |
Configuration Files Menu |
Displays all available global configuration files (files can be filtered for using the Filter field). |
|
3 |
Download Icon |
Enables users to download configuration files to the File System in .txt format. |
|
4 |
Delete Template Icon |
Enables users to delete configuration files from NEO. |
|
5 |
Configuration Text Box |
An editor that enables users to type in a list of configurations in separate lines and add global/specific variables. |
|
6 |
Description Field |
An editable field that describes the configuration file. |
|
7 |
Search Field |
Enables users to search for specific data that will be highlighted in the configuration text box below if any match is found. |
|
8 |
Editor Buttons |
Reset: Clears the text box, description and variables forms. |
|
Save As: Enables saving a newly created configuration file. |
||
|
Save: Keeps the edits on the currently selected file. |
||
|
Validate: Inserting any changes to the text box, description field or variables forms needs to be validated before continuing. |
||
|
9 |
Global Variables Menu |
A global variable is a single value given to all switches in the system. This field is comprised of all global variables defined in the configuration file. These variables appear in the configuration text box in bold, and are enclosed between angle brackets (for example: |
|
10 |
Specific Variables Menu |
A specific variable is a single value given to a single switch in the system. This field is comprised of all specific variables defined in the configuration file. These variables appear in the configuration text box in bold, and are enclosed between two angle brackets (for example: < |
|
11 |
Variable Name Field |
A label before the field denoting the name of the variable. |
|
12 |
Variable Description Field |
An editable field that describes the variable. |
|
13 |
Delete Variable Icon |
Removes the variable from the configuration file. |
To edit an existing configuration file:
Choose the configuration file from the list available on the left pane. It will be loaded into the middle pane, and variables, if found, will be loaded into the right pane.
Make the necessary edits.
Click "Validate".
Click "Save"/"Save As".
To create a new configuration file:
Make sure the editor is cleared by clicking "Reset".
Start typing a list of configurations in separate lines, and provide a description to the new file.
Click "Validate".
[Optional] Add a description to the variables (if applicable), then validate the changes again.
Click "Save As". You will be prompted to add a name and choose a system type. If the system type is "NVIDIA", you may choose a system profile as well.
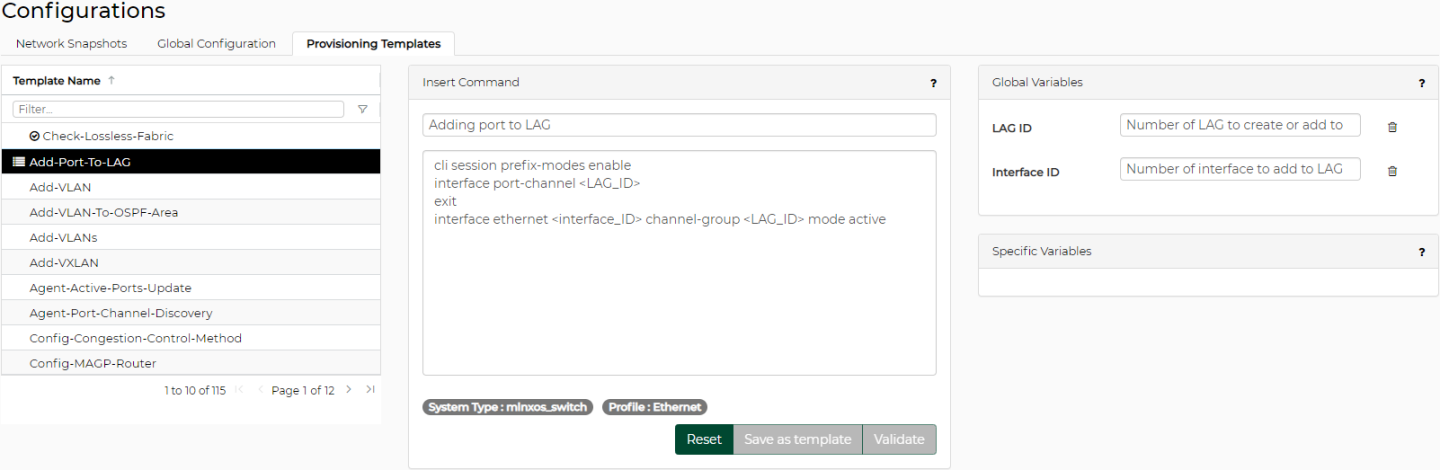
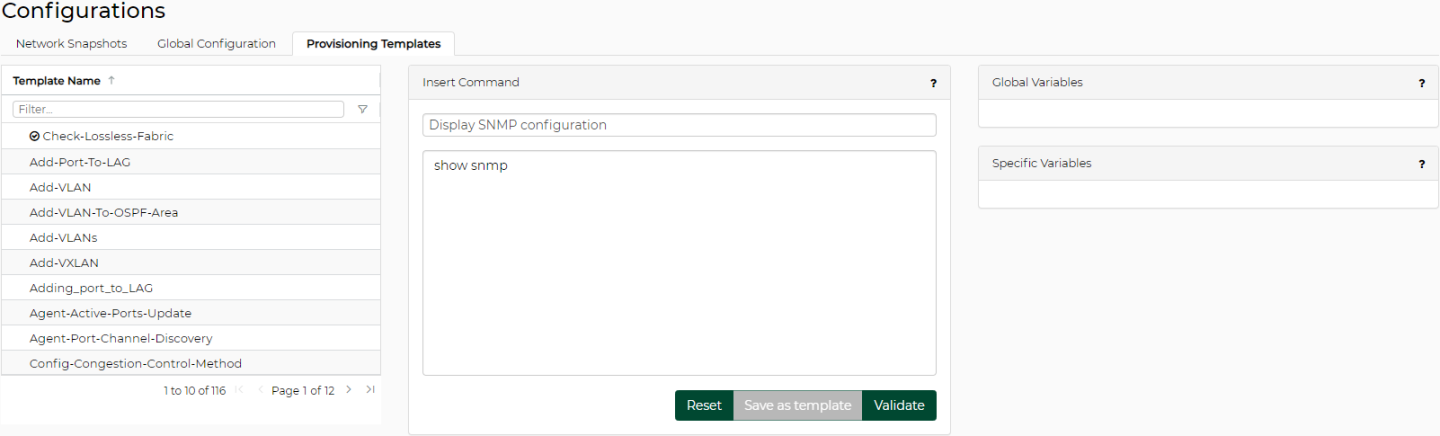
The "Provisioning Templates" view enables you to edit existing commands or create new ones.
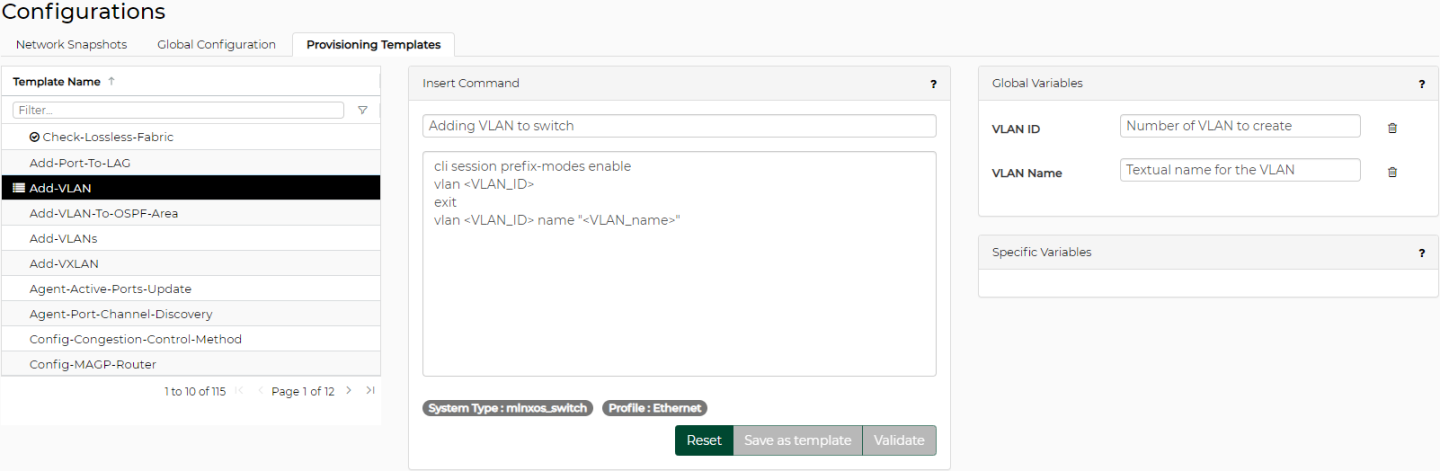
Tab Components
Using this tab, users can manage provisioning templates by viewing, editing, and creating them.

Provisioning Templates Tab Components
|
# |
Name |
Description |
|
1 |
Provisioning Templates Menu |
Displays all available provisioning templates (templates can be filtered for using the Filter field). |
|
2 |
Description Field |
An editable field that describes the provisioning template. |
|
3 |
Templates Text Box |
An editor that enables users to type in a sequence of commands and add global/specific variables. |
|
4 |
Editor Buttons |
Reset: Clears the text box, description and variables forms. |
|
Save as template: Enables saving a newly created provisioning template. |
||
|
Validate: Inserting any changes to the text box, description field or variables forms needs to be validated before continuing. |
||
|
5 |
Global Variables Menu |
A global variable is a single value given to all switches in the system. This field is comprised of all global variables defined in the provisioning template. These variables are enclosed between angle brackets (for example: <variable1>). |
|
6 |
Delete Variable Icon |
Removes the variable from the template. |
|
7 |
Specific Variables Menu |
A specific variable is a single value given to a single switch in the system. This field is comprised of all specific variables defined in the provisioning template. These variables are enclosed between two angle brackets (for example: <<variable1>>). |
In order to edit existing templates:
Choose the Template Name you wish to edit from the list on the left pane of the window, and edit it in the middle pane.
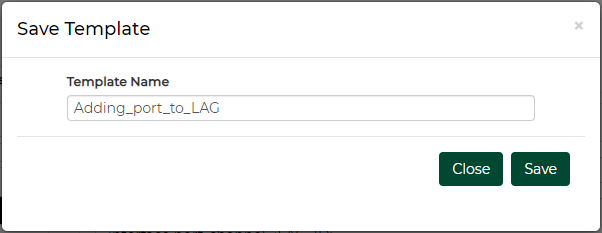
Click "Validate", then "Save as template". You will then be requested to insert a Template Name and System Type.
If your system type is "NVIDIA Switch", you will be asked to select the "System Profile".
To add a new template:
Make sure the editor is cleared by clicking "Reset".
Insert a new command and its description:
Click "Validate", then "Save as template".
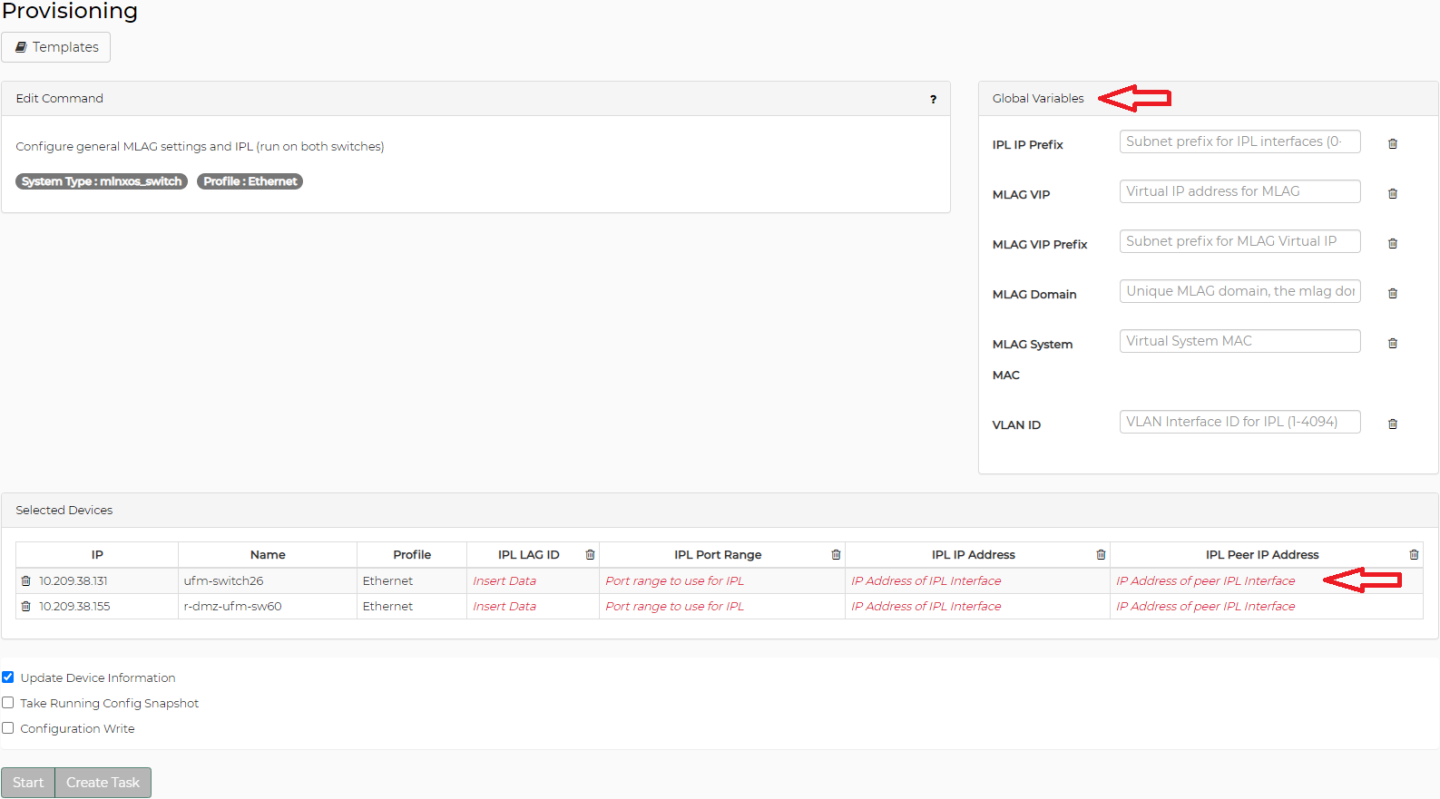
To run a set of commands with certain values on multiple devices in parallel, and/or with different values per device:
Choose the devices you wish to run these commands on from "Devices" under "Managed Elements", right-click on them and click "Provisioning".
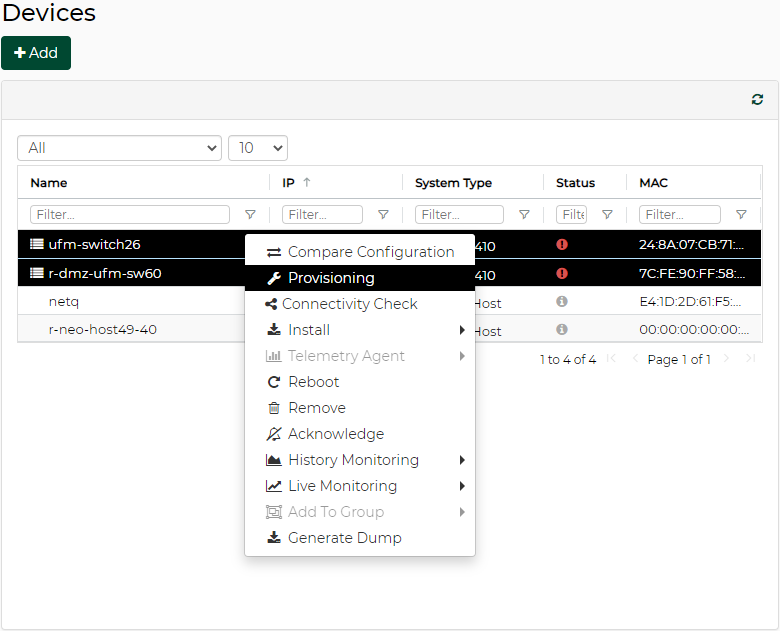
Choose your template by clicking the Templates button at the top left of the Provisioning page.
Set the global and local variables, then click "Start" or "Create Task".