System Health
Providers are the building blocks of NVIDIA ® NEO ® . Each provider runs a specific service such as Managing Device Access, Device Provisioning, and IP Discovery. Providers are controlled by a controller.
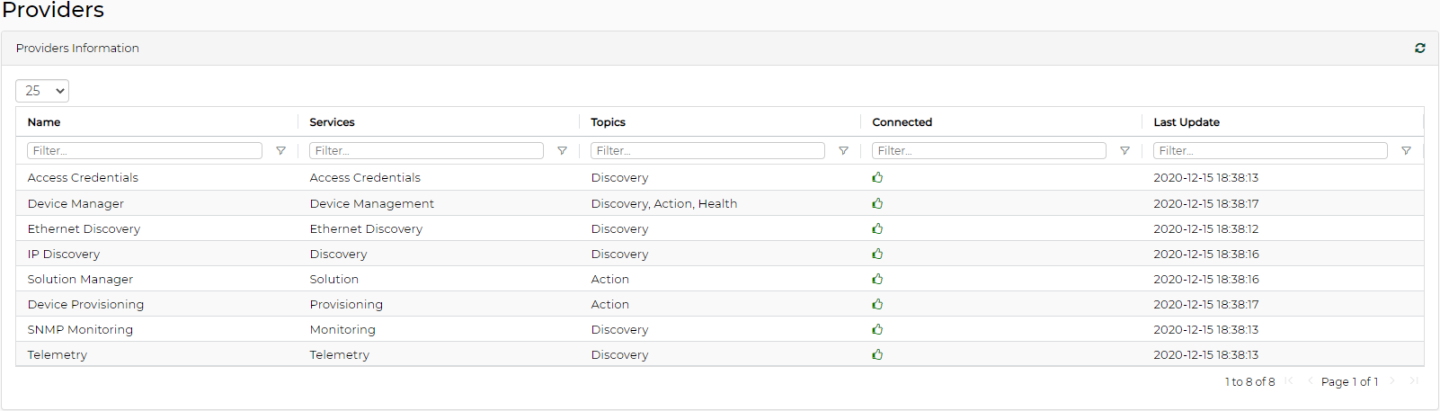
If a provider is disconnected, a small bell icon appears at the top right corner of the screen. To identify the disconnected provider, click on the “Providers” tab, and in the “Connected” column of the “Providers Information” table, look for the red “thumbs down” icon.
Device Manager
NEO will collect Chassis Discovery and information on NVIDIA switches, such as modules, traps, temperature, ports, OS, etc. For the device manager to receive SNMP traps for all managed switches, all systems must be configured accordingly.
Device Access Manager
The Credentials Provider is responsible for managing the access credentials of all managed systems and groups (defaults).
Devices access credential can be managed via NEO at three levels:
Global level (global groups) – relevant for all devices that use a specific protocol (http, ssh or snmp).
Group level – relevant for all devices which belong to a specific user-defined group.
Device level – relevant for a specific device for which credentials were set (once unique device access credentials are set, they overwrite global or group credentials definitions.)
The credentials provider is agnostic to the stored attributes, in order to allow support for any protocol in the future.
For more information about access credentials configuration, see “Configuring Access Credentials within NEO”.
Monitor Manager
Forwards samples of all switch port counters to an internal 3rd party software: InfluxDB
The controller will sample the counters of all the switches in the fabric at a configurable interval (default=5 minutes). The results will be displayed by InfluxDB.
For more information, please refer to "Configuring SNMP on NVIDIA Onyx Switch (for Port Counters Monitoring)"
ETH Discovery
The role of the ETH Discovery Provider is to discover the Ethernet topology type according to the LLDP protocol. In this phase, the LLDP information is collected using SNMP protocol. The controller initiates the periodic discovery process by providing a list of start-points and connection information. The provider sends the discovered data periodically, when it is containing the CIM objects and relations. The controller aggregator integrates the CIM objects and relations into the existing model and adds new devices as necessary.
For ETH discovery to work properly, the user must configure LLDP for all managed devices. For more information, see "Configuring NVIDIA Onyx Switch for LLDP Discovery" and "Configuring Host for LLDP Discovery".
For LLDP Discovery to work properly on NVIDIA switch systems, NVIDIA ® Onyx ® version 3.4.1802 is a minimum requirement.
IP Discovery
IP Discovery provider can operate in 2 optional modes:
Auto-Discovery – automatic discovery of devices found within a specified range of IP addresses using UFM-Agent. In this mode, NEO controller discovers all Onyx switches by sending multicast messages. Every Onyx switch responds to the controller with its IP address. This information is stored in the controller repository.
WarningNEO auto-discovery requires multicast traffic to be enabled on the managed switches.
Manual IP scan – manual discovery of devices of one or more types found within a specified range of IP addresses, run according to the following algorithm:
Checks for connectivity with a ping
If alive, NEO scans all devices and classifies them according to their type, using the following protocols in order:
SNMP classification (SNMP v2, SNMP v3 using global credentials)
SSH connectivity with Linux credentials
WinRM with Windows classification
IP Discovery operates using Manual IP scan which performs manual discovery of devices of one or more types found within a specified range of IP addresses, run according to the following algorithm:
Checks for connectivity with a ping
If alive, NEO scans all devices and classifies them according to their type, using the following protocols in order:
SNMP classification (SNMP v2, SNMP v3 using global credentials)
SSH connectivity with Linux credentials
WinRM with Windows classification
When IP Discovery is loading, it reports the list of configured IP addresses to the controller. The controller stores this information in its repository.
Device Provisioning
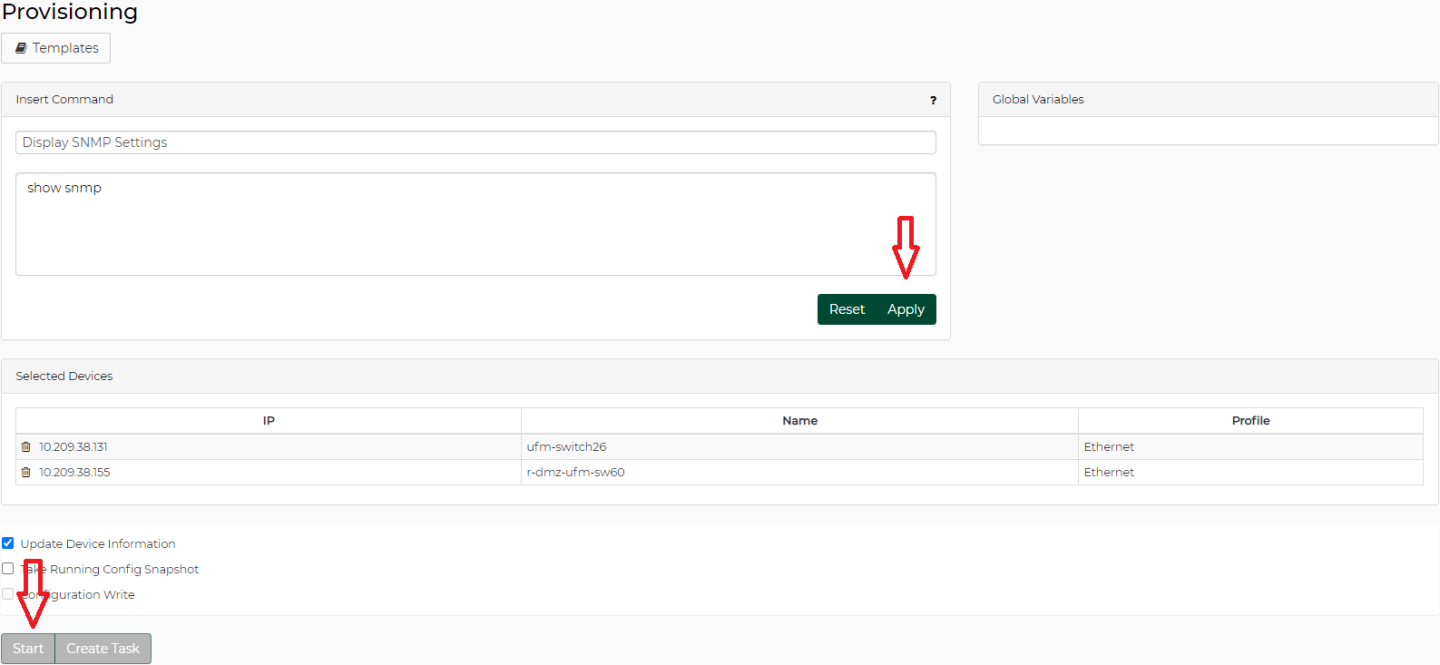
The Device Provisioning function allows the users to play a list of switch CLI commands on a list of NVIDIA switches.
To run a command or a series of commands on one device or more:
Right-click on the desired devices, and select “Provisioning".

In the dialog window, type the switch CLI commands that you wish to run on the selected devices, click the “Apply” button, and then “Start”.
Notes:
Your category selection will determine the template’s availability according to the chosen device protocol type: a template categorized as “General” will be available for all managed devices, a template categorized as “InfiniBand” will be available for Infiniband devices only, and a template categorized as “Ethernet” will be available for Ether- net devices only.
New CLI templates can also be uploaded manually to the NEO templates folder (/opt/neo/controller/templates).
Built-in Linux Cumulus templates are also available
To edit the command or create a new one, refer to "Events Policy Settings".
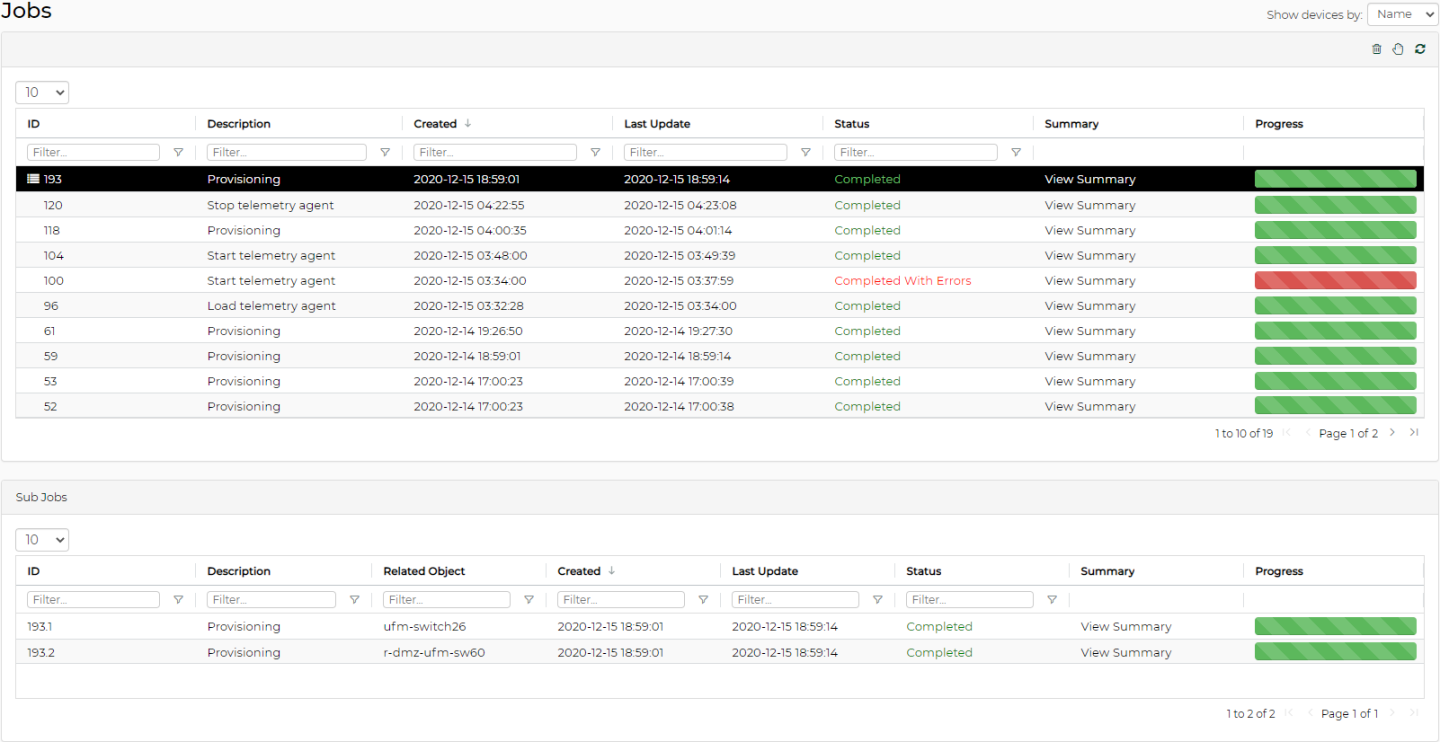
Once the commands are initiated, Jobs and Sub-Jobs will be opened accordingly. To view the commands’ outputs, click on the “View Summary” button.
Configuring Access Credentials within NEO
Using NEO GUI
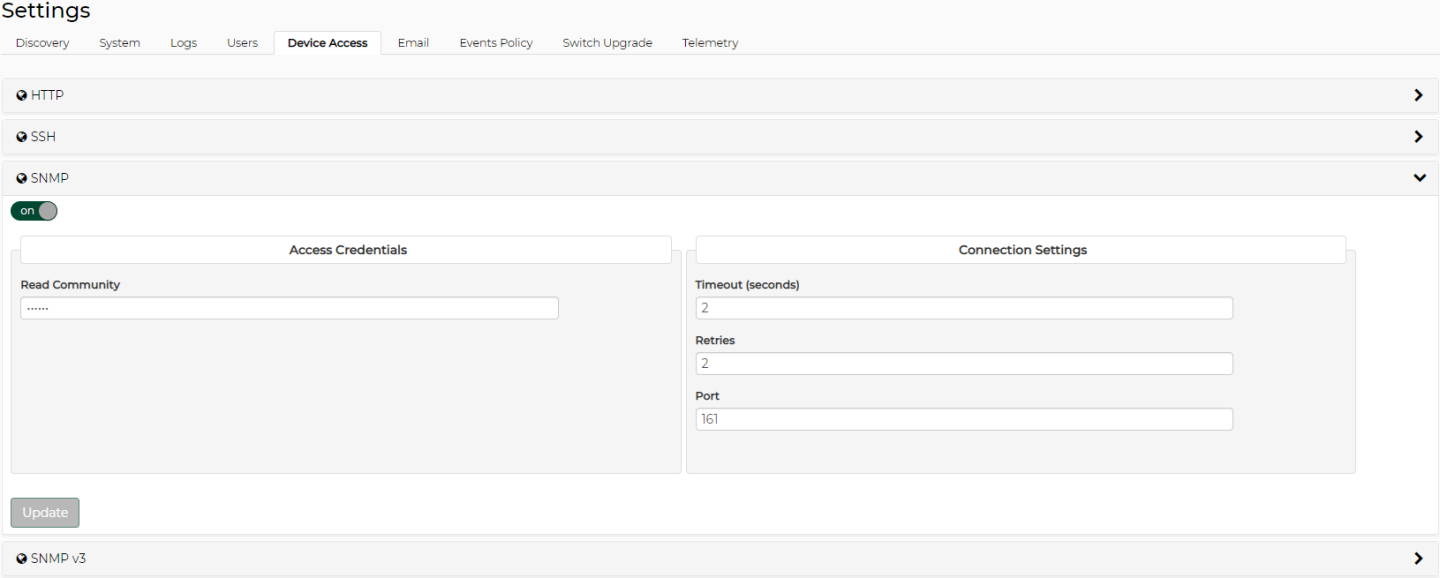
The default global access credentials are detailed in the following table. They can be changed through the “Settings” tab by selecting the “Device Access” view and filling-in the desired credentials for the relevant protocol.
Access Credentials
|
HTTP |
SSH |
SNMP |
SNMP V2 |
SNMP V3 |
SNMP TRAP |
|
Username: admin Password: Admin Secured (HTTPS): true Timeout: 60s Port: 443 |
Username: admin Password: Admin Timeout: 60s Port: 22 |
Read Community: pub- lic |
Port: 161 Timeout: 2 [s] Retries: 2 |
Port: 162 Interface: eth0 Protocol: v2 Community: public |
|
|
--- |
Private authentication protocol password: adminauth123 Privacy protocol password: adminpriv123 |
||||
By default NEO will scan systems via snmpV2c protocol. In order to override specific device protocol setting definitions (for example, changing specific protocol type/protocol port/timeout/number of retries for a specific system), contact NVIDIA Support.
Under HTTP settings, you can select between HTTP and HTTPS, by checking/unchecking the "SSL Secured Connection (HTTPS)" toggle button.
The Protocols section is only shown when the protocols are relevant to the system type. This applies to Global Settings and Unique Device Access.
It is possible to overwrite the defined credentials for a specific group or a specific system in the fabric:
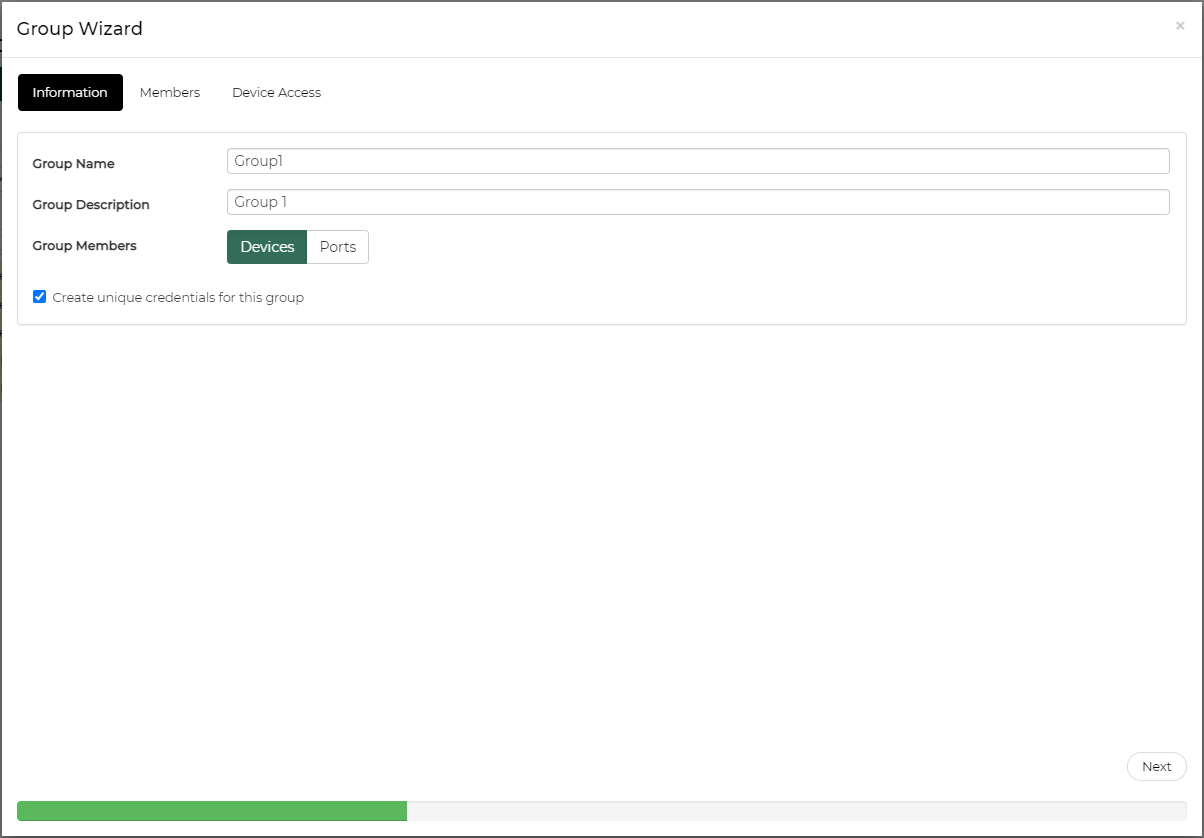
Unique Group Access Credentials
This option can be enabled when creating a new group by checking the “Create Unique Credentials for this Group” checkbox. Once the group is created, its access credentials changeability mode cannot be altered. In case the checkbox is checked, devices for which unique access credentials are defined, will not appear as available for association with this group.
A device cannot be associated with more than one group that allows creating unique access credentials.
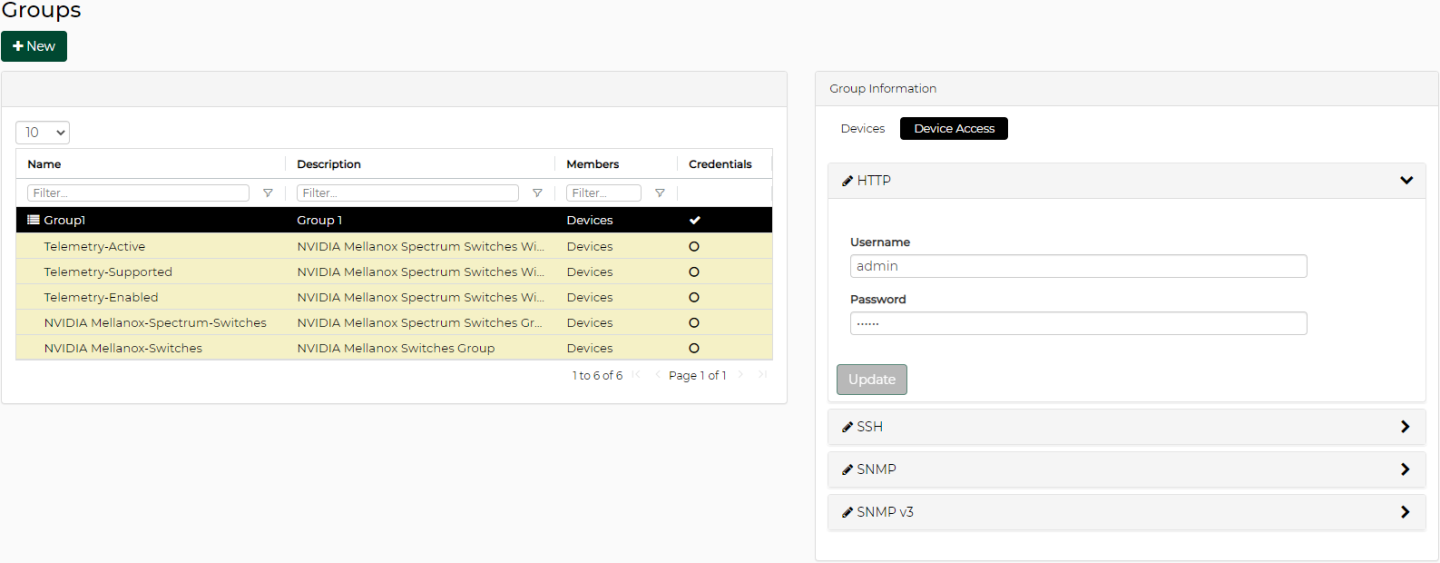
In order to change the access credentials for a specific group, select the desired group, click the “Device Access” tab and edit the credentials for the relevant protocol.
Unique Device Access Credentials
In order to change the access credentials for a specific device, click on the “Devices” sub-menu, select the “Credentials” tab and edit the credentials for the relevant protocol.
In case the selected device is associated with a group for which unique group access credentials are defined, the unique credentials defined for the group will be overwritten by the unique device credentials, for the specific device.
This window is meant to grant more stability to the system. NEO can be installed on three nodes so that if the main node (known as the “active” node) fails, another node which has all NEO persistence data saved will take over, and the system will remain functioning properly. The three nodes form a cluster and will constantly be synchronized. While the main node is the active node, the other two will be in a “standby” mode, set in an order from 2-3, according to priority. The standby node can take over the active node in case of a failover due to an error.
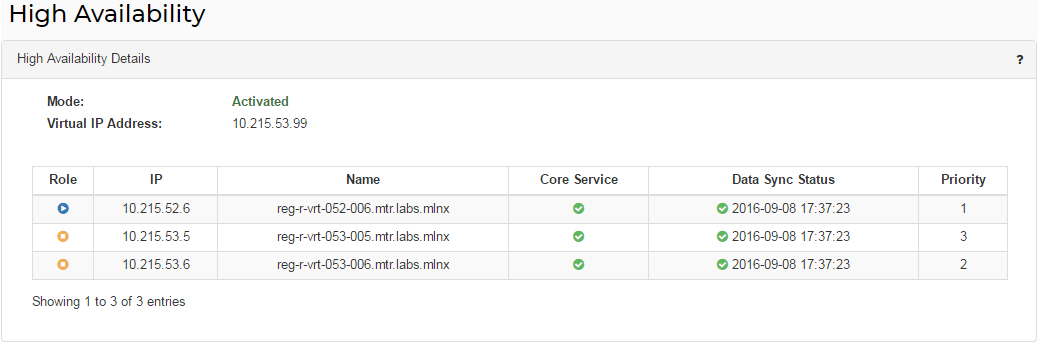
The virtual IP address that appears on top of the table in the figure above is the gateway for the NEO UI in all nodes/physical IP addresses listed in the table.
Each node is identified by its IP address and name.
“Priority” column enumerates the nodes according to their priority:
1- the active node
2- the first node to take over the active node in case of a fail-over
3- the second node to take over the active node in case of a fail-over
The colored icons under the “Role” column indicate the node status:
Blue - active
Orange - stand-by
“Core Service” column indicates the health status of the nodes:
Green - OK
Red - Failure
“Data Sync Status” column indicates the time at which the nodes were last updated/synchronized. This status is configured to update every several minutes.
A right-click on the active node will enable performing a manual fail-over on it. After confirming the action, it might take up to a minute for the stand-by to automatically take over. You might also have to restart the GUI.
A right-click on any of the stand-by nodes will enable performing a manual take-over.
After confirming the action, it might take up to a minute for the active node to be disabled and the stand-by node to take over.
For HA installation and configuration, please refer to section "Installing NEO for High Availability".
Logs View
The Logs window provides a summary of all activities performed by NEO in a list that can be filtered for NEO providers, log types and the number of the last lines.
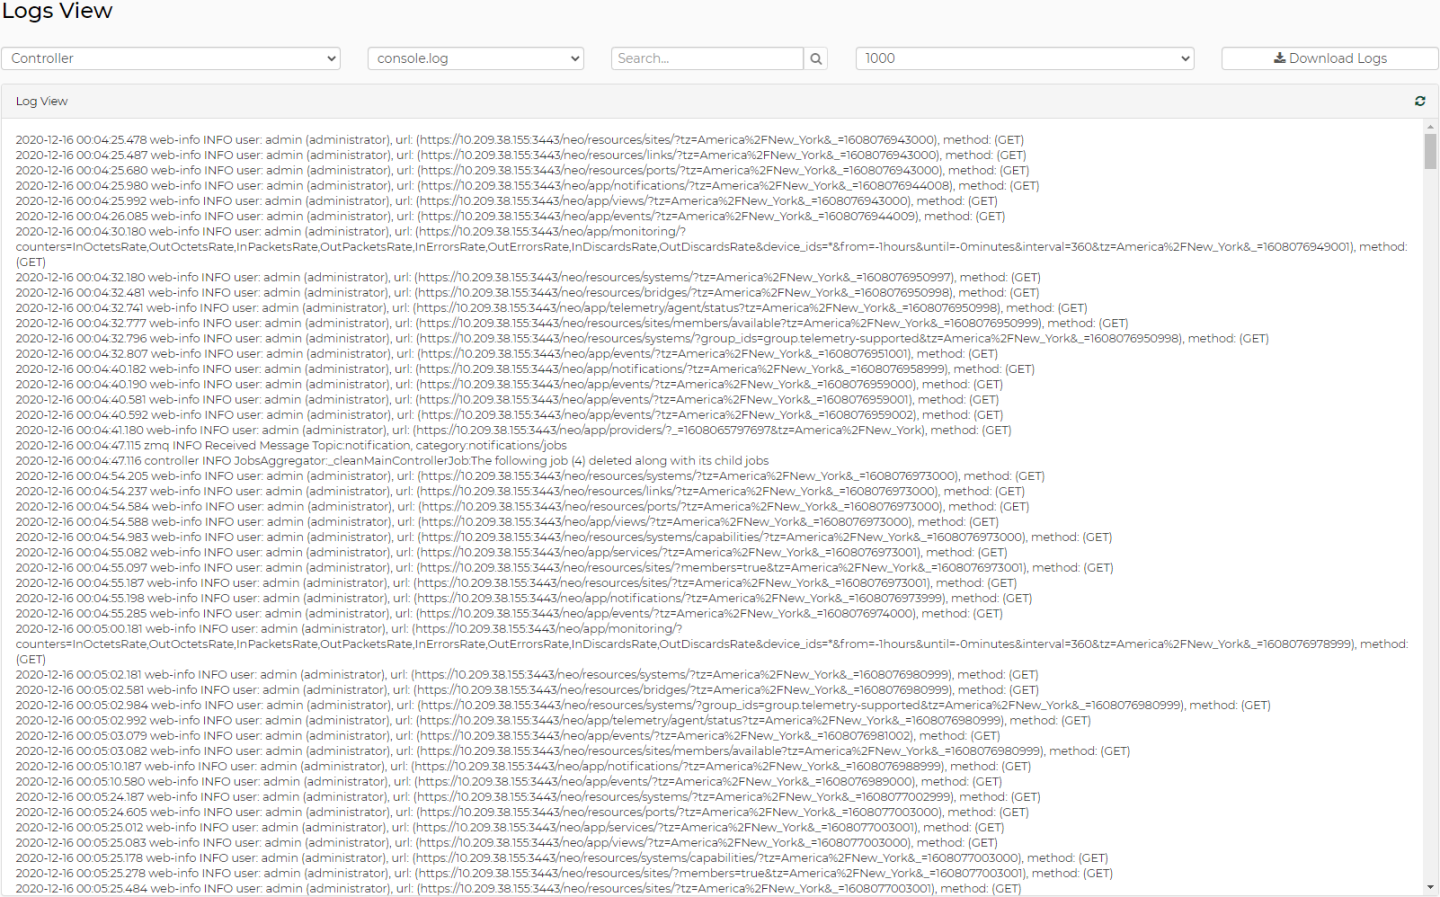
By clicking “Download Logs”, all logs for all NEO providers and log types will be saved in one tar.gz file that can be downloaded.
Log Types
console.log – contains the union of related component (controller or provider) logs
controller.log – contains logging information for NEO’s central controller component
events.log – contains logging information regarding events of a related component
jobs.log – contains logging information regarding related component jobs (currently running actions)
repository.log - contains logging information on related component repository changes
zmq.log – contains logging information on related component ZMQ communication
rest.log - contains logging information on rest calls for a related component
web-info.log – contains logging information on web access of a controller
monitors.log – contains logging information on InfluxDB accessing via controller monitoring API
WarningInfluxDB is a Scalable Realtime Graphing open source tool (http://InfluxDB.wikidot.com/start) licensed by Creative Commons Attribution-ShareAlike 3.0 License.
web-access.log – contains logging information on web access of a specific internal service
Log files are located in the file system, according to the specific component (Controller or Provider):
Controller logs are located at: /opt/neo/controller/log
Access Credentials Provider logs are located at: /opt/neo/providers/ac/log
IP Discovery Provider logs located at: /opt/neo/providers/discovery/log
Device Manager Provider logs located at: /opt/neo/providers/dm/log
Monitoring Provider logs located at: /opt/neo/providers/monitor/log
Provisioning Provider logs located at: /opt/neo/providers/provisioning/log
ETH Discovery Provider logs located at: eth discovery log /opt/neo/providers/ethdisc/ log/
Solution Manager logs located at: /opt/neo/providers/solution/log/
IB Manager logs located at: /opt/neo/providers/ib/log/