BrightnessContrast Example#
This example demonstrates usage of brightness_contrast operator.
Brighness and Contrast Adjustment#
Brithness and contrast can be adjusted using three parameters: contrast - makes the dark parts darker and bright parts brighter while keeping the gray (at half dynamic range of the input type) constant,
brightness - multiplies the intensities,
brightness_shift - shifts the pixel intensities.
The formula is given as:
where \({contrast\_center}\) denotes a value that is unaffected by contrast changes; by default, it’s at half of the input’s dynamic range (e.g. 128 for uint8) and \({Max}_{out}\) is the maximum positive value of the output type, for integer types, or 1 for floating point) - but it can also be specified as an argument for the operator. The operator can be used to adjust contrast and brighness as well as to compute negative images (brightness = -1, brighness_shift = 1).
Step-by-Step Guide#
Let’s start from importing necessary modules (and DALI itself).
[1]:
from nvidia.dali import pipeline_def
import nvidia.dali.fn as fn
import nvidia.dali.types as types
import matplotlib.pyplot as plt

batch_size = 10
image_filename = "../data/images"
The batch_size is bigger than one to make it easier to switch images at the end of the example.
Next, let’s implement the pipelines. We’ve presented 2 versions of a pipeline. The CPU one does all the processing (i.e. reading file, decoding it and brightness/contrast manipulation) on the CPU, while the other pipeline conducts these operations on the GPU.
[2]:
@pipeline_def()
def bc_cpu_pipeline():
    files, labels = fn.readers.file(file_root=image_filename)
    images = fn.decoders.image(files)
    converted = fn.brightness_contrast(
        images, brightness_shift=0.3, contrast=0.4, contrast_center=100
    )
    return images, converted


@pipeline_def()
def bc_gpu_pipeline():
    files, labels = fn.readers.file(file_root=image_filename)
    images = fn.decoders.image(files, device="mixed")
    converted = fn.brightness_contrast(
        # increase contrast  # invert...
        images,
        contrast=1.5,
        brightness_shift=1,
        brightness=-1,
    )  # ...colors
    return images, converted
The function below is used to actually display result of manipulation. Since the pipelines we set up return 2 outputs: modified image and original image, the function aquires both of them from the output and displays them. Additional flag (cpu) is specified, to determine, whether the pipeline output comes from CPU or GPU. In the latter case, we have to tell the output, to return a CPU-accessible copy of the data.
[3]:
def display(output, cpu=True):
    i = 2  # Tweak that to have various images from batch
    img1 = output[0].at(i) if cpu else output[0].as_cpu().at(i)
    img2 = output[1].at(i) if cpu else output[1].as_cpu().at(i)
    fig, ax = plt.subplots(1, 2)
    ax[0].imshow(img1)
    ax[1].imshow(img2);
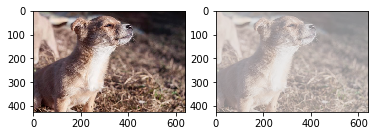
Now let’s just build the pipelines, run them and display the results. First the GPU one:
[4]:
pipe_gpu = bc_gpu_pipeline(batch_size=batch_size, num_threads=1, device_id=0)
pipe_gpu.build()
[5]:
gpu_output = pipe_gpu.run()
[6]:
display(gpu_output, cpu=False)
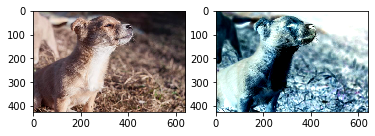
And the CPU:
[7]:
pipe_cpu = bc_cpu_pipeline(batch_size=batch_size, num_threads=1, device_id=0)
pipe_cpu.build()
cpu_output = pipe_cpu.run()
[8]:
display(cpu_output)