Deploying to DeepStream for Classification TF1/TF2
The deep learning and computer vision models that you’ve trained can be deployed on edge devices, such as a Jetson Xavier or Jetson Nano, a discrete GPU, or in the cloud with NVIDIA GPUs. TAO Toolkit has been designed to integrate with DeepStream SDK, so models trained with TAO Toolkit will work out of the box with DeepStream SDK.
DeepStream SDK is a streaming analytic toolkit to accelerate building AI-based video analytic applications. This section will describe how to deploy your trained model to DeepStream SDK.
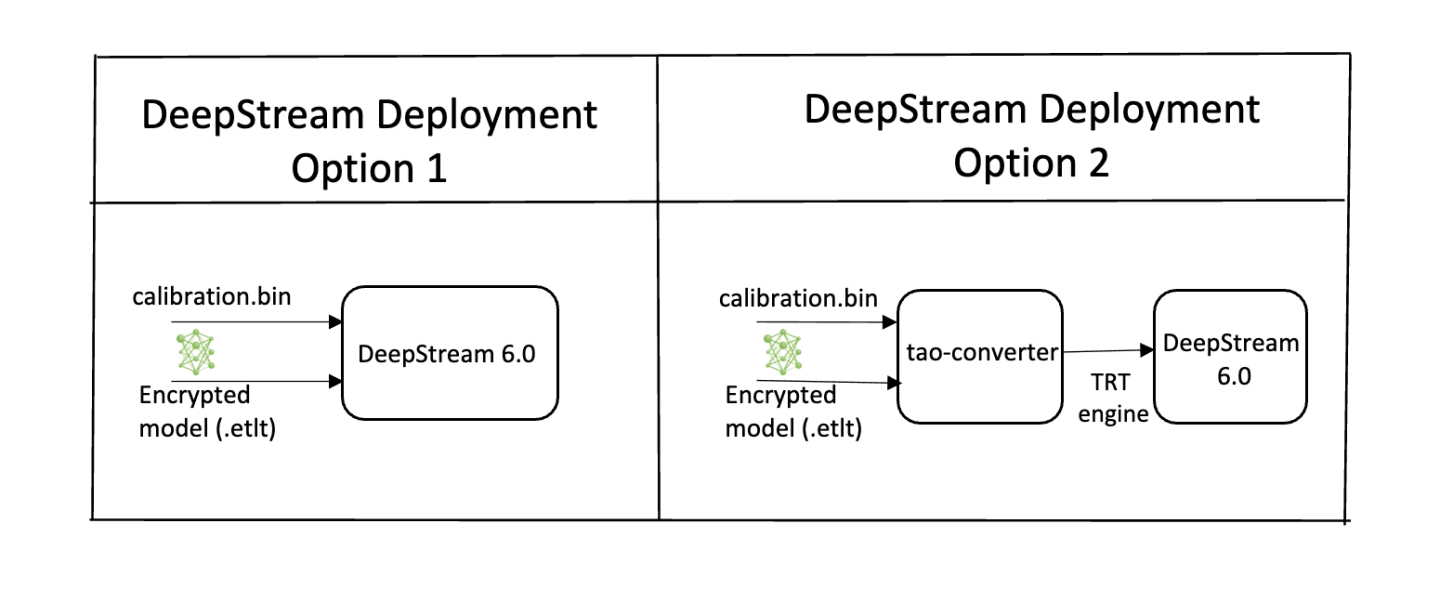
To deploy a model trained by TAO Toolkit to DeepStream we have two options:
Option 1: Integrate the
.etltmodel directly in the DeepStream app. The model file is generated by export.Option 2: Generate a device specific optimized TensorRT engine using
tao-deploy. The generated TensorRT engine file can also be ingested by DeepStream.Option 3: (Deprecated) Generate a device specific optimized TensorRT engine using
tao-converter.
Machine-specific optimizations are done as part of the engine creation process, so a distinct engine should be generated for each environment and hardware configuration. If the TensorRT or CUDA libraries of the inference environment are updated (including minor version updates), or if a new model is generated, new engines need to be generated. Running an engine that was generated with a different version of TensorRT and CUDA is not supported and will cause unknown behavior that affects inference speed, accuracy, and stability, or it may fail to run altogether.
Option 1 is very straightforward. The .etlt file and calibration cache are directly
used by DeepStream. DeepStream will automatically generate the TensorRT engine file and then run
inference. TensorRT engine generation can take some time depending on size of the model
and type of hardware. Engine generation can be done ahead of time with Option 2.
With option 2, the tao-deploy is used to convert the .etlt file to TensorRT; this
file is then provided directly to DeepStream. The tao-converter follows the similar workflow
as tao-deploy. This option is deprecated for 4.0.0 and will not be available in the future release.
See the Exporting the Model section for more details on how to export a TAO model.
The tao-converter tool is provided with the TAO Toolkit
to facilitate the deployment of TAO trained models on TensorRT and/or Deepstream.
This section elaborates on how to generate a TensorRT engine using tao-converter.
For deployment platforms with an x86-based CPU and discrete GPUs, the tao-converter
is distributed within the TAO docker. Therefore, we suggest using the docker to generate
the engine. However, this requires that the user adhere to the same minor version of
TensorRT as distributed with the docker. The TAO docker includes TensorRT version 8.0.
Instructions for x86
For an x86 platform with discrete GPUs, the default TAO package includes the tao-converter
built for TensorRT 8.2.5.1 with CUDA 11.4 and CUDNN 8.2. However, for any other version of CUDA and
TensorRT, please refer to the overview section for download. Once the
tao-converter is downloaded, follow the instructions below to generate a TensorRT engine.
Unzip the zip file on the target machine.
Install the OpenSSL package using the command:
sudo apt-get install libssl-dev
Export the following environment variables:
            $ export TRT_LIB_PATH=”/usr/lib/x86_64-linux-gnu”
$ export TRT_INC_PATH=”/usr/include/x86_64-linux-gnu”
Run the
tao-converterusing the sample command below and generate the engine.
Make sure to follow the output node names as mentioned in Exporting the Model
section of the respective model.
Instructions for Jetson
For the Jetson platform, the tao-converter is available to download in the NVIDIA developer zone. You may choose
the version you wish to download as listed in the overview section.
Once the tao-converter is downloaded, please follow the instructions below to generate a
TensorRT engine.
Unzip the zip file on the target machine.
Install the OpenSSL package using the command:
sudo apt-get install libssl-dev
Export the following environment variables:
            $ export TRT_LIB_PATH=”/usr/lib/aarch64-linux-gnu”
$ export TRT_INC_PATH=”/usr/include/aarch64-linux-gnu”
For Jetson devices, TensorRT comes pre-installed with Jetpack. If you are using older JetPack, upgrade to JetPack-5.0DP.
Run the
tao-converterusing the sample command below and generate the engine.
Make sure to follow the output node names as mentioned in Exporting the Model
section of the respective model.
Using the tao-converter
            tao-converter [-h] -k <encryption_key>
                   -d <input_dimensions>
                   -o <comma separated output nodes>
                   [-c <path to calibration cache file>]
                   [-e <path to output engine>]
                   [-b <calibration batch size>]
                   [-m <maximum batch size of the TRT engine>]
                   [-t <engine datatype>]
                   [-w <maximum workspace size of the TRT Engine>]
                   [-i <input dimension ordering>]
                   [-p <optimization_profiles>]
                   [-s]
                   [-u <DLA_core>]
                   input_file
Required Arguments
input_file: The path to the.etltmodel exported usingexport-k: The key used to encode the.tltmodel when training-d: A comma-separated list of input dimensions that should match the dimensions used fortao classification export. Unliketao classification export, this cannot be inferred from calibration data. This parameter is not required for new models introduced in TAO Toolkit 3.0-21.08 (for example, LPRNet, UNet, GazeNet, etc).-o: A comma-separated list of output blob names that should match the output configuration used fortao classification export. This parameter is not required for new models introduced in TAO Toolkit v3.0 (for example, LPRNet, UNet, GazeNet, etc). For classification, set this argument topredictions/Softmax.
Optional Arguments
-e: The path to save the engine to. The default value is./saved.engine.-t: The engine data type; this argument generates a calibration cache if in INT8 mode. The default value isfp32. The options are {fp32,fp16,int8}.-w: The maximum workspace size for the TensorRT engine. The default value is1073741824(1<<30).-i: The input dimension ordering, all other TAO commands use NCHW. The default value isnchw. The options are {nchw,nhwc,nc}. For classification, it can be omitted (defaults tonchw).-p: Optimization profiles for.etltmodels with dynamic shape. The argument format is a comma-separated list of optimization profile shapes in the format<input_name>,<min_shape>,<opt_shape>,<max_shape>, where each shape has the format<n>x<c>x<h>x<w>. This argument can be specified multiple times if there are multiple input tensors for the model. This is only useful for new models introduced in TAO Toolkit v3.0.-s: A Boolean to apply TensorRT strict type constraints when building the TensorRT engine.-u: Specifies the DLA core index when building the TensorRT engine on Jetson devices.
INT8 Mode Arguments
-c: The path to the calibration cache file. This argument is only used in INT8 mode. The default value is./cal.bin.-b: The batch size to use during the export step for INT8 calibration cache generation. The default value is 8.-m: The maximum batch size for the TensorRT engine. The default value is 16. If you encounter an out-of-memory issue, decrease the batch size accordingly. This parameter is only useful for.etltmodels generated with static shape.
Sample Output Log
Here is a sample log for converting a classification model.
            tao-converter /ws/export/final_model.etlt
              -k $KEY
              -c /ws/export/final_model_int8_cache.bin
              -o predictions/Softmax
              -d 3,224,224
              -i nchw
              -m 64 -t int8
              -e /ws/export/final_model.trt
              -b 64

[INFO] Some tactics do not have sufficient workspace memory to run. Increasing workspace size may increase performance, please check verbose output.
[INFO] Detected 1 inputs and 1 output network tensors.
In order to integrate the models with DeepStream, you need the following:
The DeepStream SDK. Installation instructions for DeepStream are provided in the DeepStream Development Guide.
An exported
.etltmodel file and optional calibration cache for INT8 precisionA
labels.txtfile containing the labels for classes in the order in which the networks produce outputs.A sample
config_infer_*.txtfile to configure the nvinfer element in DeepStream. The nvinfer element handles everything related to TensorRT optimization and engine creation in DeepStream.
The DeepStream SDK ships with an end-to-end reference application that is fully configurable. You
can configure the input sources, inference model, and output sinks. The app requires a primary object
detection model, followed by an optional secondary classification model. The reference
application is installed as deepstream-app. The graphic below shows the architecture of the
reference application.

There are typically two or more configuration files that are used with this app. In the install
directory, the config files are located in samples/configs/deepstream-app or
sample/configs/tlt_pretrained_models. The main config file configures all the high level
parameters in the pipeline above, setting the input source and resolution, number of
inferences, tracker and output sinks. The supporting config files are for each individual
inference engine. The inference-specific config files are used to specify models, inference
resolution, batch size, number of classes and other customization. The main config file will call
all the supporting config files. Here are some config files in
samples/configs/deepstream-app for reference:
source4_1080p_dec_infer-resnet_tracker_sgie_tiled_display_int8.txt: The main config fileconfig_infer_primary.txt: The supporting config file for the primary detector in the pipeline aboveconfig_infer_secondary_*.txt: The supporting config file for the secondary classifier in the pipeline above
The deepstream-app will only work with the main config file. This file will most likely
remain the same for all models and can be used directly from the DeepStream SDK with little to no
change. You will only need to modify or create config_infer_primary.txt and
config_infer_secondary_*.txt.
Integrating a Classification Model
See Exporting The Model for more details on how to export a TAO model. After the model has been generated, two extra files are required:
A label file
A DeepStream configuration file
Label File
The label file is a text file, containing the names of the classes that the TAO model is trained
to classify against. The order in which the classes are listed must match the order in which
the model predicts the output. This order may be deduced from the classmap.json file that is
generated by TAO. This file is a simple dictionary containing the ‘class_name’ to ‘index map’.
For example, in the sample classification sample notebook file included with the TAO Toolkit package,
the classmap.json file generated for Pascal Visual Object Classes (VOC) would look like this:
            {"sheep": 16,"horse": 12,"bicycle": 1, "aeroplane": 0, "cow": 9,
 "sofa": 17, "bus": 5, "dog": 11, "cat": 7, "person": 14, "train": 18,
 "diningtable": 10, "bottle": 4, "car": 6, "pottedplant": 15,
 "tvmonitor": 19, "chair": 8, "bird": 2, "boat": 3, "motorbike": 13}
The 0th index corresponds to aeroplane, the 1st index corresponds to bicycle,
up to 19, which corresponds to tvmonitor. Here is a sample
classification_labels.txt file, arranged in order of index:
aeroplane;bicycle;bird;boat;bottle;bus;....;tvmonitor
DeepStream Configuration File
A typical use case for video analytic is first to do an object detection and then crop the
detected object and send it further for classification. This is supported by deepstream-app
and the app architecture can be seen above. For example, to classify models of cars on the
road, first you will need to detect all the cars in a frame. Once you do detection, you perform
classification on the cropped image of the car. In the sample DeepStream app, the classifier
is configured as a secondary inference engine after the primary detection. If configured
appropriately, deepstream-app will automatically crop the detected image and send the frame
to the secondary classifier. The config_infer_secondary_*.txt is used to configure the
classification model.
Option 1: Integrate the model (.etlt) directly in the DeepStream app. For this option,
users will need to add the following parameters in the configuration file. The
int8-calib-file is only required for INT8 precision.
            tlt-encoded-model=<TAO Toolkit exported .etlt>
tlt-model-key=<Model export key>
int8-calib-file=<Calibration cache file>
Option 2: Integrate the TensorRT engine file with the DeepStream app.
Step 1: Generate the TensorRT engine using tao-converter. Detail instructions are provided in the Generating an Engine Using tao-converter section.
Step 2: After the engine file is generated successfully, modify the following parameters to use this engine with DeepStream.
model-engine-file=<PATH to generated TensorRT engine>
All other parameters are common between the 2 approaches. Add the label file generated above using:
labelfile-path=<Classification labels>
For all the options, see the configuration file below. To learn about what all the parameters are used for, refer to DeepStream Development Guide.
            [property]
gpu-id=0
# preprocessing parameters: These are the same for all classification models generated by TAO Toolkit.
net-scale-factor=1.0
offsets=103.939;116.779;123.68
model-color-format=1
batch-size=30

# Model specific paths. These need to be updated for every classification model.
int8-calib-file=<Path to optional INT8 calibration cache>
labelfile-path=<Path to classification_labels.txt>
tlt-encoded-model=<Path to Classification etlt model>
tlt-model-key=<Key to decrypt model>
infer-dims=c;h;w # where c = number of channels, h = height of the model input, w = width of model input
uff-input-blob-name=input_1
uff-input-order=0
output-blob-names=predictions/Softmax

## 0=FP32, 1=INT8, 2=FP16 mode
network-mode=0
# process-mode: 2 - inferences on crops from primary detector, 1 - inferences on whole frame
process-mode=2
interval=0
network-type=1 # defines that the model is a classifier.
gie-unique-id=1
classifier-threshold=0.2