Installing IGX-Software on IGX 500#
IGX-Software for IGX 500 includes:
IGX-OS, which is Long Term Supported OS based on Ubuntu. This is the main operating system running on IGX.
NVIDIA AI stack, which is installed on IGX-OS and supported by NVIDIA AI Enterprise-IGX.
Firmware for Bootloader firmware (QSPI), Safety Microcontroller firmware.
Enterprise support on IGX-Software is provided by NVIDIA AI Enterprise - IGX which is purpose-built for mission-critical applications and provides unmatched performance, security, stability, and long-term enterprise support for the entire software stack. IGX-Software is accessible via NVIDIA AI Enterprise - IGX subscription. Please refer following docs on more info on NVIDIA AI Enterprise - IGX.
IGX-Software is also publicly hosted for development and evaluation in the IGX Download Center.
The installation procedures in this document are the same whether IGX-Software is downloaded from NVIDIA AI Enterprise - IGX or from a public hosted download center.
Connect a Display for Software Installation#
Connect a display to the display port (DP) of the IGX 500 for software installation.
Firmware and OS Updates#
Update the firmware and OS in the following order:
Update the MCU firmware.
Update the Boot firmware (QSPI).
Update the IGX OS.
Update the MCU Firmware#
Use the following procedure to update the microcontroller (MCU) firmware.
Connecting the micro-USB cable and USB-C cable from the PC running Ubuntu to the IGX-500.
Download the MCU Firmware and Tools to an Ubuntu Linux host from the IGX Download Center.
On the host computer, extract the downloaded MCU firmware.
1tar xvf smcu_ifw_R36.x.x_aarch64.tbz2
2cd unzipped_folder
3# Depends on your Linux host ttyACMx could be ttyACM2
4sudo ./flash_tc39x.py ttyACMx 921600 ./PathTo/P3974_t23x-Aurix-StepB.hex
5# wait until it's done
Power cycle the IGX-500.
Warning
Close the UART port before start flashing. Otherwise, it will give “NGNG” error.
Update the Boot Firmware (QSPI)#
To flash the boot firmware (QSPI), follow the instructions:
Connecting the micro-USB cable and USB-C cable from the PC running Ubuntu to the IGX-500.
Download the L4T_RELEASE_PACKAGE (Jetson_Linux_R36.x.x_aarch64.tbz2) to an Ubuntu Linux host from the IGX Download Center.
On the host computer, extract the downloaded QSPI firmware.
1tar xvf ${L4T_RELEASE_PACKAGE}
2cd Linux_for_Tegra/
3sudo ./tools/l4t_flash_prerequisites.sh
4# Put the IGX500 into recovery mode
5sudo ./flash.sh igx-500-qspi external
After reboot
1  cat /sys/class/dmi/id/bios_version
2  36.4.5-gcid-39296390
3
4  cat /sys/class/dmi/id/bios_date
5  01/29/2025
Install the IGX OS Image#
The bootloader firmware must be updated before loading the IGX Base OS image.
Warning
Installing the IGX OS will erase the content of the SSD (NVMe) on the IGX-500. Please backup your data.
Download the IGX OS ISO image from the IGX Download Center.
To install the IGX OS ISO image locally from a UEFI-bootable USB flash drive:
Create a bootable installation medium, such as a USB flash drive, that contains the image. See Create a Bootable USB Flash Drive by Using BalenaEtcher for detailed steps.
Boot the IGX OS ISO image#
Warning
Tegra Boot Firmware must be updated first.
Insert the USB flash drive containing the OS image into the IGX-500 Kit.
Connect a monitor and keyboard directly to the IGX system’s Display Port.
Boot the system. Press F11 when the NVIDIA logo appears to access the boot menu.
Select the USB volume name that corresponds to the inserted USB flash drive and boot the system from that drive.
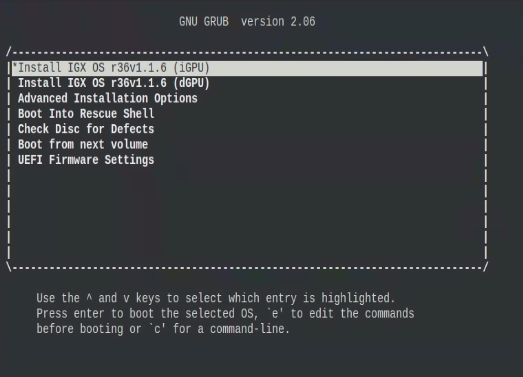
Continue to the IGX OS ISO Boot Options topic for a description of the GRUB menu options and for instructions on completing the installation process.
Install IGX OS (iGPU)
Advanced Installation Options
Install IGX OS with Real-Time Kernel (iGPU)
Install IGX OS with Encrypted File System (iGPU)
Install IGX OS with Real-Time Kernel and Encrypted File System
Install IGX OS (headless)
Install IGX OS with Encrypted File System (headless)

Warning
Please ignore the dGPU options.
Install the NVIDIA AI Stack#
You can install the NVIDIA AI Stack on IGX-OS as Debian packages or as containers.
Caution
If you install by using Debian packages, the size of the installation is approximately 11 gigabytes.
Debian Packages#
1  sudo apt update
2  sudo apt install nvidia-igx-ai
3  sudo apt --fix-broken install
Containers#
NVIDIA AI Stack containers include:
Tensorrt Container
Triton Container
Tensorflow Container
PyTorch Container
Holoscan Container
The container supported via NVIDIA AI Enterprise - IGX can be accessed with NVIDIA AI Enterprise - IGX subscription.
These publicly hosted versions of the containers for development and evalutaion can be found at the locations below on NVIDIA GPU Cloud (NGC):
https://catalog.ngc.nvidia.com/orgs/nvidia/containers/tensorrt/tags
iGPU support starting with 24.12. iGPU container has a -igpu in the tag
https://catalog.ngc.nvidia.com/orgs/nvidia/containers/tritonserver/tags
iGPU support starting with 24.12. iGPU container has a -igpu in the tag
https://catalog.ngc.nvidia.com/orgs/nvidia/containers/tensorflow/tags
iGPU support starting with 24.12. iGPU container has a -igpu in the tag
https://catalog.ngc.nvidia.com/orgs/nvidia/containers/pytorch/tags
iGPU support starting with 24.12. iGPU container has a -igpu in the tag
https://catalog.ngc.nvidia.com/orgs/nvidia/teams/clara-holoscan/containers/holoscan/tags
iGPU support starting with 2.9.0. iGPU container has a -igpu in the tag
Further References#
Put IGX into Recovery mode#
From IGX OS
Login to IGX OS.
sudo reboot forced-recovery
Warning
To check if the IGX is in recovery mode, use the linux command lsusb and you should see a USB device with PID 7023. If you are still not able to see this USB device, a power cycle of the IGX is required.
Access all downloads from the IGX Download Center.
Create a Bootable USB Flash Drive using BalenaEtcher#
BalenaEtcher https://etcher.balena.io/ currently supports:
Windows
MacOS
Linux
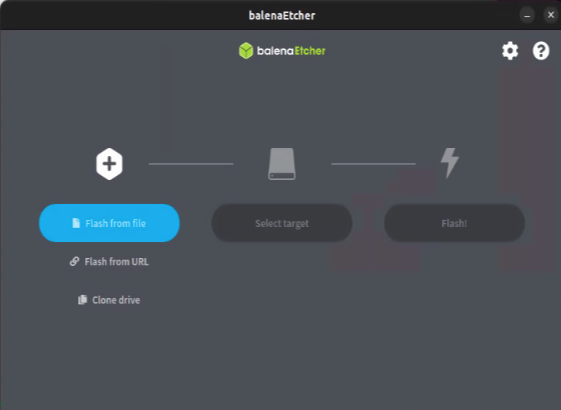
Follow these steps to create the bootable USB Flash drive:
Download and launch the balenaEtcher https://etcher.balena.io/.
Plug the USB flash drive into one of the USB ports of your Windows system.
Click Flash from file, select the iso image you downloaded.

Click Select target, select the USB flash drive you inserted this host.

Click Flash!
IGX-500 Orin Serial Console#
Connecting the micro-USB cable from the PC running Ubuntu to the IGX-500. This will register four serial ports in the PC. They will be assigned devices /dev/ttyACM0, /dev/ttyACM1, /dev/ttyACM2 and /dev/ttyACM3, assuming no other /dev/ttyACMn existed before the connection.
/dev/ttyACM0 is the Orin UART Serial Console /dev/ttyACM2 is the MCU UART Serial Console
open minicom on your PC with the corresponding parameters to access the Orn UART
1 sudo minicom -D /dev/ttyACM0