Enable Secure Boot for UEFI#
You can enable end-to-end secure boot for your production NVIDIA IGX device. For an overview, see Secure Boot for IGX.
Before you complete the steps in this documentation, complete the steps in Enable Secure Boot for Pre-UEFI Phases.
To enable secure boot for UEFI phases, use the following documentation:
Overview of Secure Boot for UEFI#
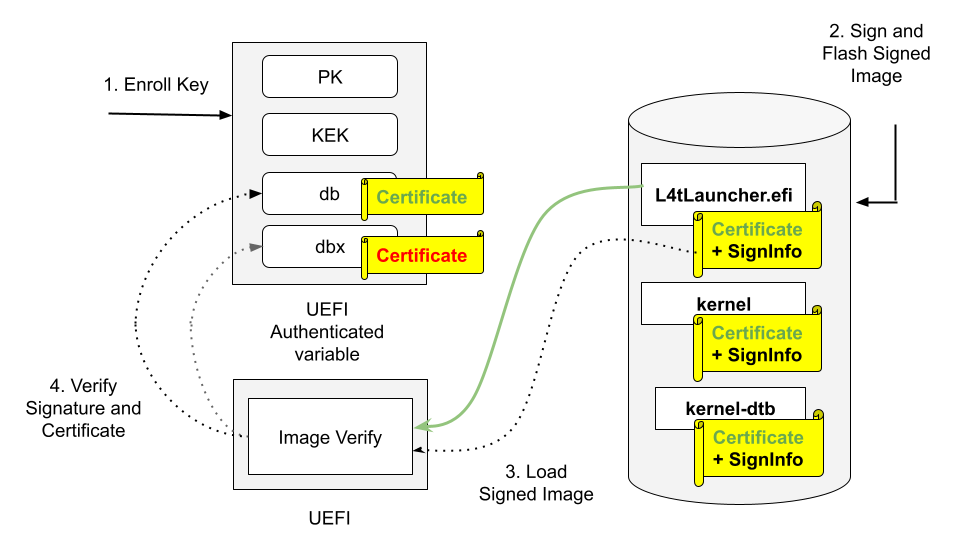
UEFI secure boot uses digital signatures (RSA) to validate the authenticity and integrity of the codes that it loads.

Prerequisites#
Before you can complete the steps in this documentation, you need the following installed on your computer:
openssl
device-tree-compiler
efitools
uuid-runtime
BSP
On the your Linux host computer, download Bootloader(BSP) Package from the IGX Download Center.
On the host computer, run the following code.
1tar xvf Jetson_Linux_R36.x.x_aarch64.tbz2
2cd <Linux_for_Tegra>
Prepare the Keys#
In this example we prepare the keys by using self-signed certificates for demonstration purposes only. For production, follow your official certificate generation procedure.
To generate the PK RSA keypairs and certificates, run the following code.
1cd <Your_DIR>/Linux_for_Tegra
2mkdir uefi_keys
3cd uefi_keys
4GUID=$(uuidgen)
5openssl req -newkey rsa:3072 -nodes -keyout PK.key  -new -x509 -sha256 -days 3650 \
6   -subj "/CN=Vendor Owned Platform Key/" -out PK.crt
7cert-to-efi-sig-list -g "${GUID}" "PK.crt" PK.esl
Caution
Guard your
PK.keyprivate key file. The security of your IGX device depends on the security of your private keys.To generate the KEK and DB RSA key pairs and certificates, run the following code.
 1cd <Your_DIR>/Linux_for_Tegra/uefi_keys
 2
 3openssl req -newkey rsa:3072 -nodes -keyout KEK_vendor.key -new -x509 -sha256 -days 3650 \
 4   -subj "/CN=Vendor Owned Key Exchange Key/" -out KEK_vendor.crt
 5cert-to-efi-sig-list -g "${GUID}" KEK_vendor.crt KEK_vendor.esl
 6sign-efi-sig-list -k PK.key -c PK.crt KEK KEK_vendor.esl KEK_vendor.auth
 7
 8openssl req -newkey rsa:3072 -nodes -keyout db_vendor.key  -new -x509 -sha256 -days 3650 \
 9   -subj "/CN=Vendor Owned Signature Database key/" -out db_vendor.crt
10cert-to-efi-sig-list -g "${GUID}" db_vendor.crt db_vendor.esl
11sign-efi-sig-list -k KEK_vendor.key -c KEK_vendor.crt db db_vendor.esl db_vendor.auth
Caution
Guard your
KEK_vendor.keyanddb_vendor.keyprivate key files. The security of your IGX device depends on the security of your private keys.Download the Microsoft KEK and DB esl files, and create an EFI Signature List from Microsoft’s DER format KEK certificate.
1cd <Your_DIR>/Linux_for_Tegra/uefi_keys
2
3# download Microsoft Corporation KEK CA 2011 certificate:
4curl -O https://www.microsoft.com/pkiops/certs/MicCorKEKCA2011_2011-06-24.crt
5sbsiglist --owner 77fa9abd-0359-4d32-bd60-28f4e78f784b --type x509 --output MS_Win_KEK.esl MicCorKEKCA2011_2011-06-24.crt
6
7# download Microsoft Corporation UEFI CA 2011 certificate:
8curl -O https://www.microsoft.com/pkiops/certs/MicCorUEFCA2011_2011-06-27.crt
9sbsiglist --owner 77fa9abd-0359-4d32-bd60-28f4e78f784b --type x509 --output MS_UEFI_db.esl MicCorUEFCA2011_2011-06-27.crt
Append the esl files of the KEK and the DB.
1cat KEK_vendor.esl MS_Win_KEK.esl > combined_KEK.esl
2cat db_vendor.esl MS_UEFI_db.esl > combined_db.esl
Enable UEFI Secure Boot#
There are two ways to enable the UEFI secure boot:
Note
Although you can enable UEFI secure boot independently from a low-level bootloader secure boot, we strongly recommended that you enable bootloader secure boot so that the root-of-trust can start from the BootROM.
Enable UEFI Secure Boot at Run Time#
You can enable UEFI secure boot at run time from the kernel with the UEFI utility running from Ubuntu. These instructions are for targets that are not flashed with UEFI secure boot enabled.
Make sure the IGX network port is connected. Use the port on the left, labelled 4 in the diagram in I/O and External Interfaces.
To install the UEFI utilities
efitoolsandefivaron IGX, run the following code.1sudo apt update 2sudo apt-get install efitools 3sudo apt-get install efivar
Verify that secure boot is not yet enabled by running the following code. If the return value is
0, secure boot is not enabled. If the return value is1, secure boot is already enabled.1efivar -n 8be4df61-93ca-11d2-aa0d-00e098032b8c-SecureBoot
To generate the file
PK.authon your computer, run the following code.Note
Before you do this step, verify that you generated the KEK and DB RSA key pairs and certificates in the section Prepare the Keys.
1cd <Your_DIR>/Linux_for_Tegra/uefi_keys
2sign-efi-sig-list -k PK.key -c PK.crt PK PK.esl PK.auth
To download the files
PK.auth,combined_KEK.esl, andcombined_db.eslfrom the host computer to IGX, run the following code.1cd /opt 2sudo mkdir uefi_keys 3 4sudo scp <host_name>@<host_ip>:<Your_DIR>/Linux_for_Tegra/uefi_keys/PK.auth ./uefi_keys/ 5sudo scp <host_name>@<host_ip>:<Your_DIR>/Linux_for_Tegra/uefi_keys/combined_KEK.esl ./uefi_keys/ 6sudo scp <host_name>@<host_ip>:<Your_DIR>/Linux_for_Tegra/uefi_keys/combined_db.esl ./uefi_keys/
Before enrollment, to check the UEFI secure boot key status, run the following code.
1sudo efi-readvar
The output should look similar to the following.
1Variable PK has no entries
2Variable KEK has no entries
3Variable db has no entries
4Variable dbx has no entries
5Variable MokList has no entries
To enroll the combined DB, run the following code.
1sudo efi-updatevar -e -f /opt/uefi_keys/combined_db.esl db
To enroll the combined KEK, run the following code.
1sudo efi-updatevar -e -f /opt/uefi_keys/combined_KEK.esl KEK
To enroll the PK and enable UEFI secure boot, run the following code.
1sudo efi-updatevar -f /opt/uefi_keys/PK.auth PK
Reboot the target device.
Verify that secure boot is enabled by running the following code. If the return value is
1, secure boot is now enabled.1efivar -n 8be4df61-93ca-11d2-aa0d-00e098032b8c-SecureBoot
Note
You can also use the command
sudo mokutil --sb-stateto check the status of UEFI secure boot.
Enable UEFI Secure Boot at Flash Time#
To create a UEFI keys config file with the generated keys, use the following procedure.
To open and edit your
uefi_keys.conffile, run the following code.1cd to <Your_DIR>/Linux_for_Tegra/uefi_keys 2vim uefi_keys.conf
Insert the following lines in the
uefi_keys.conffile. You generated the .esl files previously in Prepare the Keys.1UEFI_DEFAULT_PK_ESL="PK.esl" 2UEFI_DEFAULT_KEK_ESL_0="MS_Win_KEK.esl" 3UEFI_DEFAULT_DB_ESL_0="MS_UEFI_db.esl" 4UEFI_DEFAULT_KEK_ESL_1="KEK_vendor.esl" 5UEFI_DEFAULT_DB_ESL_1="db_vendor.esl"
To generate the
UefiDefaultSecurityKeys.dtbofile, run the following code.1cd .. 2sudo tools/gen_uefi_keys_dts.sh --no-signing-key uefi_keys/uefi_keys.conf 3cp uefi_keys/UefiDefaultSecurityKeys.dtbo bootloader/
Put the IGX device into recovery mode. For details, see Put the system into recovery mode.
Flash the IGX with QSPI-only configuration with the
UefiDefaultSecurityKeys.dtbofile. Specify-u <RSA-Private-Key>or-v <sbk key>if the IGX secure boot has already been enabled on the boards. You can use this step to enable both pre-UEFI and UEFI secure boot in one flashing step, and to enable both at the same time.IGX 700 Devkit or Board kit
1sudo ADDITIONAL_DTB_OVERLAY="UefiDefaultSecurityKeys.dtbo" ./flash.sh [-u <RSA-Private-Key>] [-v <SBK-key>] p3740-0002-p3701-0008-qspi external
IGX 500
1sudo ADDITIONAL_DTB_OVERLAY="UefiDefaultSecurityKeys.dtbo" ./flash.sh [-u <RSA-Private-Key>] [-v <SBK-key>] igx-500-qspi external
Boot to the OS and check the UEFI secure boot status by running the following code.
1 mokutil --sb-state
You should see the following output.
1SecureBoot enabled