DetectNet_v2
DetectNet_v2 is an NVIDIA-developed object-detection model that is included in the TAO Toolkit. DetectNet_v2 supports the following tasks:
dataset_convert
train
evaluate
inference
prune
calibration_tensorfile
export
These tasks can be invoked from the TAO Toolkit Launcher using the following convention on the command-line:
tao detectnet_v2 <sub_task> <args_per_subtask>
where, args_per_subtask are the command-line arguments required for a given subtask. Each
subtask is explained in detail in the following sections.
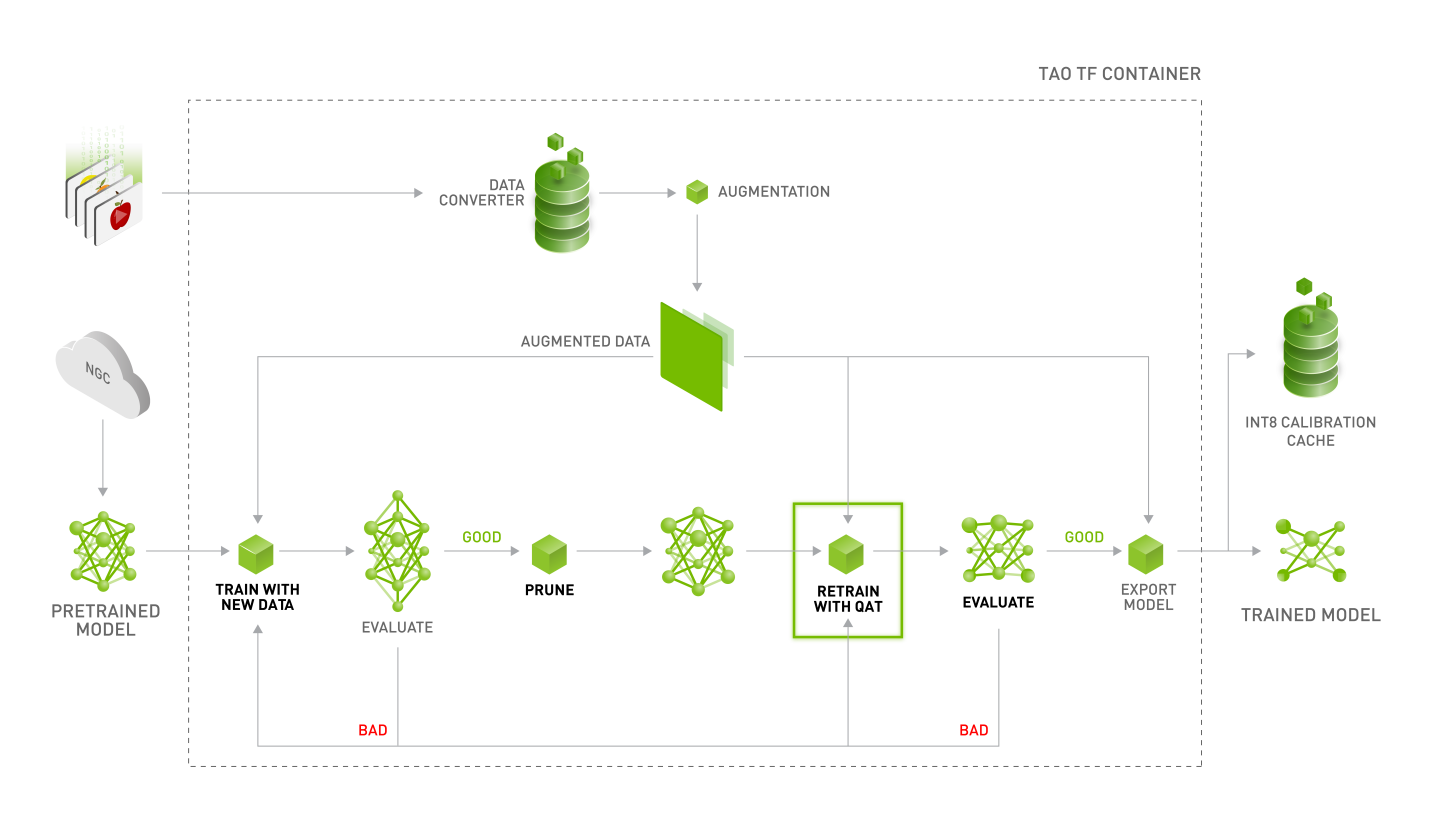
NVIDIA recommends following the workflow in the diagram below to generate a trained and optimized DetectNet_v2 model.
The object detection apps in TAO Toolkit expect data in KITTI format for training and evaluation.
See the Data Annotation Format page for more information about the KITTI data format.
The DetectNet_v2 app requires the raw input data to be converted to TFRecords for optimized
iteration across the data batches. This can be done using the dataset_convert subtask under
DetectNet_v2. Currently, the KITTI and COCO formats are supported.
The dataset_convert tool requires a configuration file as input. Details of the
configuration file and examples are included in the following sections.
Configuration File for Dataset Converter
The dataset_convert tool provides several configurable parameters. The parameters are encapsulated in
a spec file to convert data from the original annotation format to the TFRecords format which the trainer can ingest.
KITTI and COCO formats can be configured by using either kitti_config or coco_config
respectively. You may use only one of the two in a single spec file.
The spec file is a prototxt format file with following global parameters:
kitti_config: A nested prototxt configuration with multiple input parameterscoco_config: A nested prototxt configuration with multiple input parametersimage_directory_path: The path to the dataset root. Theimage_dir_nameis appended to this path to get the input images and must be the same path specified in the experiment spec file.target_class_mapping: The prototxt dictionary that maps the class names in the tfrecords to the target class to be trained in the network.
kitti_config
Here are descriptions of the configurable parameters for the kitti_config field:
Parameter |
Datatype |
Default |
Description |
Supported Values |
|---|---|---|---|---|
root_directory_path |
string |
– |
The path to the dataset root directory |
– |
image_dir_name |
string |
– |
The relative path to the directory containing images from the path in root_directory_path. |
– |
label_dir_name |
string |
– |
The relative path to the directory containing labels from the path in root_directory_path. |
– |
partition_mode |
string |
– |
The method employed when partitioning the data to multiple folds. Two methods are supported:
|
|
num_partitions |
int |
2 (if partition_mode is random) |
The number of partitions to use to split the data (N folds). This field is ignored when the partition model is set to random, as by default only two partitions are generated: val and train. In sequence mode, the data is split into n-folds. The number of partitions is ideally fewer than the total number of sequences in the kitti_sequence_to_frames file. |
n=2 for random partition n< number of sequences in the kitti_sequence_to_frames_file |
image_extension |
str |
.png |
The extension of the images in the image_dir_name parameter. |
.png .jpg .jpeg |
val_split |
float |
20 |
The percentage of data to be separated for validation. This only works under “random” partition mode. This partition is available in fold 0 of the TFrecords generated. Set the validation fold to 0 in the dataset_config. |
0-100 |
kitti_sequence_to_frames_file |
str |
The name of the KITTI sequence to frame mapping file. This file must be present within the dataset root as mentioned in the root_directory_path. |
||
num_shards |
int |
10 |
The number of shards per fold. |
1-20 |
The sample configuration file shown below converts the 100% KITTI dataset to the training set.
            kitti_config {
  root_directory_path: "/workspace/tao-experiments/data/"
  image_dir_name: "training/image_2"
  label_dir_name: "training/label_2"
  image_extension: ".png"
  partition_mode: "random"
  num_partitions: 2
  val_split: 0
  num_shards: 10
}
image_directory_path: "/workspace/tao-experiments/data/"
  target_class_mapping {
      key: "car"
      value: "car"
  }
  target_class_mapping {
      key: "pedestrian"
      value: "pedestrian"
  }
  target_class_mapping {
      key: "cyclist"
      value: "cyclist"
  }
  target_class_mapping {
      key: "van"
      value: "car"
  }
  target_class_mapping {
      key: "person_sitting"
      value: "pedestrian"
  }
  target_class_mapping {
      key: "truck"
      value: "car"
  }
coco_config
Here are descriptions of the configurable parameters for the coco_config field:
Parameter |
Datatype |
Default |
Description |
Supported Values |
|---|---|---|---|---|
root_directory_path |
string |
– |
The path to the dataset root directory |
– |
image_dir_names |
string (repated) |
– |
The relative path to the directory containing images from the path in root_directory_path for each partition. |
– |
annotation_files |
string (repated) |
– |
The relative path to the directory containing JSON file from the path in root_directory_path for each partition. |
– |
num_partitions |
int |
2 |
The number of partitions in the data. The number of partition must match the length of the list for image_dir_names and annotation_files. By default, two partitions are generated: val and train. |
n==len(annotation_files) |
num_shards |
int (repeated) |
[10] |
The number of shards per partitions. If only one value is provided, same number of shards is applied in all partitions |
The sample configuration file shown below converts the COCO dataset with training and validation data where number of shard is 32 for validation and 256 for training.
            coco_config {
  root_directory_path: "/workspace/tao-experiments/data/coco"
  img_dir_names: ["val2017", "train2017"]
  annotation_files: ["annotations/instances_val2017.json", "annotations/instances_train2017.json"]
  num_partitions: 2
  num_shards: [32, 256]
}
image_directory_path: "/workspace/tao-experiments/data/coco"
Sample Usage of the Dataset Converter Tool
While KITTI is the accepted dataset format for object detection, the DetectNet_v2 trainer requires
this data to be converted to TFRecord files for ingestion. The dataset_convert
tool is described below:
            tao detectnet_v2 dataset-convert [-h] -d DATASET_EXPORT_SPEC -o OUTPUT_FILENAME
                 [-f VALIDATION_FOLD]
You can use the following optional arguments:
-h, --help: Show this help message and exit-d, --dataset-export-spec: The path to the detection dataset spec containing the config for exporting.tfrecordfiles-o output_filename: The output filename-f, –validation-fold: The validation fold in 0-based indexing. This is required when modifying the training set, but otherwise optional.
The following example shows how to use the command with the dataset:
            tao detectnet_v2 dataset_convert  [-h] -d <path_to_tfrecords_conversion_spec>
                                       -o <path_to_output_tfrecords>
The following is the output log from executing tao detectnet_v2 dataset_convert:
            Using TensorFlow backend.
2019-07-16 01:30:59,073 - iva.detectnet_v2.dataio.build_converter - INFO - Instantiating a kitti converter
2019-07-16 01:30:59,243 - iva.detectnet_v2.dataio.kitti_converter_lib - INFO - Num images in
Train: 10786    Val: 2696
2019-07-16 01:30:59,243 - iva.detectnet_v2.dataio.kitti_converter_lib - INFO - Validation data in partition 0. Hence, while choosing the validation set during training choose validation_fold 0.
2019-07-16 01:30:59,251 - iva.detectnet_v2.dataio.dataset_converter_lib - INFO - Writing partition 0, shard 0
/usr/local/lib/python2.7/dist-packages/iva/detectnet_v2/dataio/kitti_converter_lib.py:265: VisibleDeprecationWarning: Reading unicode strings without specifying the encoding argument is deprecated. Set the encoding, use None for the system default.
2019-07-16 01:31:01,226 - iva.detectnet_v2.dataio.dataset_converter_lib - INFO - Writing partition 0, shard 1
. .
sheep: 242
bottle: 205
..
boat: 171
car: 418
2019-07-16 01:31:20,772 - iva.detectnet_v2.dataio.dataset_converter_lib - INFO - Writing partition 1, shard 0
..
2019-07-16 01:32:40,338 - iva.detectnet_v2.dataio.dataset_converter_lib - INFO - Writing partition 1, shard 9
2019-07-16 01:32:49,063 - iva.detectnet_v2.dataio.dataset_converter_lib - INFO -
Wrote the following numbers of objects:
sheep: 695
..
car: 1770

2019-07-16 01:32:49,064 - iva.detectnet_v2.dataio.dataset_converter_lib - INFO - Cumulative object statistics
2019-07-16 01:32:49,064 - iva.detectnet_v2.dataio.dataset_converter_lib - INFO -
Wrote the following numbers of objects:
sheep: 937
..
car: 2188
2019-07-16 01:32:49,064 - iva.detectnet_v2.dataio.dataset_converter_lib - INFO - Class map.
Label in GT: Label in tfrecords file
sheep: sheep
..

boat: boat
For the dataset_config in the experiment_spec, please use labels in the tfrecords file, while writing the classmap.


2019-07-16 01:32:49,064 - iva.detectnet_v2.dataio.dataset_converter_lib - INFO - Tfrecords generation complete.
The dataset_convert tool converts the class names in the KITTI-formatted data files
to lowercase characters. Therefore, when configuring a training experiment, ensure that
lowercase class names are used in the dataset_config section under target class
mapping. Using incorrect class names in the dataset_config section can cause invalid
training experiments with 0 mAP.
When using the dataset_convert tool to create separate TFRecords for evaluation,
which may be defined under dataset_config using the parameter validation_data_source,
we recommend setting the partition_mode to random with 2 partitions and an
arbitrary val_split (1-100). The dataloader takes care of traversing through all
the folds and generating the mAP accordingly.
To perform training, evaluation, and inference for DetectNet_v2, you need to configure several
components, each with their own parameters. The train and evaluate tasks for a
DetectNet_v2 experiment share the same configuration file. The inference task uses a
separate configuration file.
The specification file for DetectNet_v2 training configures these components of the training pipe:
Model
BBox ground truth generation
Post processing module
Cost function configuration
Trainer
Augmentation model
Evaluator
Dataloader
Model Config
The core object-detection model can be configured using the model_config option in the spec
file.
The following is a sample model config to instantiate a ResNet-18 model with pretrained weights and freeze blocks 0 and 1 with all shortcuts set to projection layers.
            # Sample model config for to instantiate a resnet18 model with pretrained weights and freeze blocks 0, 1
# with all shortcuts having projection layers.
model_config {
  arch: "resnet"
  pretrained_model_file: <path_to_model_file>
  freeze_blocks: 0
  freeze_blocks: 1
  all_projections: True
  num_layers: 18
  use_pooling: False
  use_batch_norm: True
  dropout_rate: 0.0
  objective_set: {
    cov {}
    bbox {
      scale: 35.0
      offset: 0.5
    }
  }
}
The following table describes the model_config parameters:
Parameter |
Datatype |
Default |
Description |
Supported Values |
|---|---|---|---|---|
all_projections |
bool |
False |
For templates with shortcut connections, this parameter defines whether or not all shortcuts should be instantiated with 1x1 projection layers, irrespective of whether there is a change in stride across the input and output. |
True or False (only to be used in ResNet templates) |
arch |
string |
resnet |
The architecture of the backbone feature extractor to be used for training. |
|
num_layers |
int |
18 |
The depth of the feature extractor for scalable templates. |
|
pretrained model file |
string |
– |
This parameter defines the path to a pretrained TAO model file. If the |
Unix path |
use_pooling |
Boolean |
False |
Choose between using strided convolutions or MaxPooling while downsampling. When True, MaxPooling is used to downsample; however, for the object-detection network, NVIDIA recommends setting this to False and using strided convolutions. |
True or False |
use_batch_norm |
Boolean |
False |
A flag to determine whether to use Batch Normalization layers or not. |
True or False |
objective_set |
Proto Dictionary |
– |
The objectives for training the network. For object-detection networks, set it to learn cov and bbox. These parameters should not be altered for the current training pipeline. |
cov {} bbox { scale: 35.0 offset: 0.5 } |
dropout_rate |
Float |
0.0 |
Probability for drop out, |
0.0-0.1 |
load_graph |
Boolean |
False |
A flag to determine whether or not to load the graph from the pretrained model file, or just the weights. For a pruned model, set this parameter to True. Pruning modifies the original graph, so the pruned model graph and the weights need to be imported. |
True or False |
freeze_blocks |
float (repeated) |
– |
This parameter defines which blocks may be frozen from the instantiated feature extractor template, and is different for different feature extractor templates. |
|
freeze_bn |
Boolean |
False |
A flag to determine whether to freeze the Batch Normalization layers in the model during training. |
True or False |
BBox Ground Truth Generator
DetectNet_v2 generates 2 tensors, cov and bbox. The image is divided into 16x16 grid cells. The cov tensor (short for “coverage” tensor) defines the number of grid cells that are covered by an object. The bbox tensor defines the normalized image coordinates of the object top left (x1, y1) and bottom right (x2, y2) with respect to the grid cell. For best results, you can assume the coverage area to be an ellipse within the bbox label with the maximum confidence assigned to the cells in the center and reducing coverage outwards. Each class has its own coverage and bbox tensor, thus the shape of the tensors are as follows:
cov: Batch_size, Num_classes, image_height/16, image_width/16
bbox: Batch_size, Num_classes * 4, image_height/16, image_width/16 (where 4 is the number of coordinates per cell)
Here is a sample rasterizer config for a 3 class detector:
            # Sample rasterizer configs to instantiate a 3 class bbox rasterizer
bbox_rasterizer_config {
  target_class_config {
    key: "car"
    value: {
      cov_center_x: 0.5
      cov_center_y: 0.5
      cov_radius_x: 0.4
      cov_radius_y: 0.4
      bbox_min_radius: 1.0
    }
  }
  target_class_config {
    key: "cyclist"
    value: {
      cov_center_x: 0.5
      cov_center_y: 0.5
      cov_radius_x: 0.4
      cov_radius_y: 0.4
      bbox_min_radius: 1.0
    }
  }
  target_class_config {
    key: "pedestrian"
    value: {
      cov_center_x: 0.5
      cov_center_y: 0.5
      cov_radius_x: 0.4
      cov_radius_y: 0.4
      bbox_min_radius: 1.0
    }
  }
  deadzone_radius: 0.67
}
The bbox_rasterizer has the following parameters that are configurable:
Parameter |
Datatype |
Default |
Description |
Supported Values |
|---|---|---|---|---|
deadzone radius |
float |
0.67 |
The area to be considered dormant (or area of no bbox) around the ellipse of an object. This is particularly useful in cases of overlapping objects so that foreground objects and background objects are not confused. |
0-1.0 |
target_class_config |
proto dictionary |
This is a nested configuration field that defines the coverage region for an object of a given class. For each class, this field is repeated. The following are configurable parameters for the target_class_config:
|
|
Post-Processor
The post-processor module generates renderable bounding boxes from the raw detection output. The process includes the following:
Filtering out valid detections by thresholding objects using the confidence value in the coverage tensor.
Clustering the raw filtered predictions using DBSCAN to produce the final rendered bounding boxes.
Filtering out weaker clusters based on the final confidence threshold derived from the candidate boxes that get grouped into a cluster.
Here is an example of the definition of the post-processor for a 3-class network learning for car, cyclist, and pedestrian:
            postprocessing_config {
  target_class_config {
    key: "car"
    value: {
      clustering_config {
        coverage_threshold: 0.005
        dbscan_eps: 0.15
        dbscan_min_samples: 0.05
        minimum_bounding_box_height: 20
      }
    }
  }
  target_class_config {
    key: "cyclist"
    value: {
      clustering_config {
        coverage_threshold: 0.005
        dbscan_eps: 0.15
        dbscan_min_samples: 0.05
        minimum_bounding_box_height: 20
      }
    }
  }
  target_class_config {
    key: "pedestrian"
    value: {
      clustering_config {
        coverage_threshold: 0.005
        dbscan_eps: 0.15
        dbscan_min_samples: 0.05
        minimum_bounding_box_height: 20
      }
    }
 }
}
This section defines parameters that configure the post-processor. For each class that you can train
for, the postprocessing_config has a target_class_config element that defines
the clustering parameters for this class. The parameters for each target class include the
following:
Parameter |
Datatype |
Default |
Description |
Supported Values |
|---|---|---|---|---|
key |
string |
– |
The name of the class for which the post processor module is being configured |
The network object class name, which is mentioned in the cost_function_config. |
value |
clustering _config proto |
– |
The nested clustering-config proto parameter that configures the postprocessor module. The parameters for this module are defined in the next table. |
Encapsulated object with parameters defined below. |
The clustering_config element configures the clustering block for this class. Here are the
parameters for this element:
Parameter |
Datatype |
Default |
Description |
Supported Values |
coverage_threshold |
float |
– |
The minimum threshold of the coverage tensor output to be considered a valid candidate box for clustering. The four coordinates from the bbox tensor at the corresponding indices are passed for clustering. |
0.0 - 1.0 |
dbscan_eps |
float |
– |
The maximum distance between two samples for one to be considered in the neighborhood of the other. This is not a maximum bound on the distances of points within a cluster. The greater the dbscan_eps value, the more boxes are grouped together. |
0.0 - 1.0 |
dbscan_min_samples |
float |
– |
The total weight in a neighborhood for a point to be considered as a core point. This includes the point itself. |
0.0 - 1.0 |
minimum_bounding_box_height |
int |
– |
The minimum height in pixels to consider as a valid detection post clustering. |
0 - input image height |
clustering_algorithm |
enum |
DBSCAN |
Defines the post-processing algorithm to cluter raw detections to the final bbox render. When using HYBRID mode, ensure both DBSCAN and NMS configuration parameters are defined. |
DBSCAN, NMS, HYBRID |
dbscan_confidence_threshold |
float |
0.1 |
The confidence threshold used to filter out the clustered bounding box output from DBSCAN. |
> 0.0 |
nms_iou_threshold |
float |
0.2 |
The Intersection Over Union (IOU) threshold to filter out redundant boxes from raw detections to form final clustered outputs. |
(0.0 - 1.0) |
nms_confidence_threshold |
float |
0. |
The confidence threshold to filter out clustered bounding boxes from NMS. |
0.0 - 1.0 |
In TAO Toolkit 3.21.08, DetectNet_v2 supports three methods for clustering raw detections for the network in final rendered bounding boxes.
DBSCAN: Density Based Spatial Clustering of Application
NMS: Non-Maximal suppression
HYDRID: DBSCAN + NMS
Under HYBRID clustering, DetectNet_v2 post-processing first passes the raw network outputs to the DBSCAN clustering and uses the candidate boxes per cluster from DBSCAN as input to NMS. The NMS clustering generates the final rendered boxes.
For HYBRID clustering, ensure both DBSCAN and NMS related parameters are defined in the post-processing config.
Cost Function
This section describes how to configure the cost function to include the classes that you are training for. For each class you want to train, add a new entry for the target classes to the spec file. We recommend not changing the parameters within the spec file for best performance with these classes. The other parameters here should remain unchanged.
            cost_function_config {
  target_classes {
    name: "car"
    class_weight: 1.0
    coverage_foreground_weight: 0.05
    objectives {
      name: "cov"
      initial_weight: 1.0
      weight_target: 1.0
    }
    objectives {
      name: "bbox"
      initial_weight: 10.0
      weight_target: 10.0
    }
  }
  target_classes {
    name: "cyclist"
    class_weight: 1.0
    coverage_foreground_weight: 0.05
    objectives {
      name: "cov"
      initial_weight: 1.0
      weight_target: 1.0
    }
    objectives {
      name: "bbox"
      initial_weight: 10.0
      weight_target: 1.0
    }
  }
  target_classes {
    name: "pedestrian"
    class_weight: 1.0
    coverage_foreground_weight: 0.05
    objectives {
      name: "cov"
      initial_weight: 1.0
      weight_target: 1.0
    }
    objectives {
      name: "bbox"
      initial_weight: 10.0
      weight_target: 10.0
    }
  }
  enable_autoweighting: True
  max_objective_weight: 0.9999
  min_objective_weight: 0.0001
}
Trainer
The following is a sample training_config block to configure a DetectNet_v2 trainer:
            training_config {
  batch_size_per_gpu: 16
    num_epochs: 80
    learning_rate {
    soft_start_annealing_schedule {
      min_learning_rate: 5e-6
      max_learning_rate: 5e-4
      soft_start: 0.1
      annealing: 0.7
    }
  }
  regularizer {
    type: L1
    weight: 3e-9
  }
  optimizer {
    adam {
      epsilon: 1e-08
      beta1: 0.9
      beta2: 0.999
    }
  }
  cost_scaling {
    enabled: False
    initial_exponent: 20.0
    increment: 0.005
    decrement: 1.0
  }
  visualizer {
    enabled: true
    num_images: 3
    scalar_logging_frequency: 10
    infrequent_logging_frequency: 1
    target_class_config {
      key: "car"
      value: {
        coverage_threshold: 0.005
      }
    }
    target_class_config {
      key: "pedestrian"
      value: {
        coverage_threshold: 0.005
      }
    }
  }
}
The following table describes the parameters used to configure the trainer:
Parameter |
Datatype |
Default |
Description |
Supported Values |
batch_size_per_gpu |
int |
32 |
The number of images per batch per GPU. |
>1 |
num_epochs |
int |
120 |
The total number of epochs to run the experiment. |
|
enable_qat |
bool |
False |
Enables model training using Quantization Aware Training (QAT). For more information about QAT, see the Quantization Aware Training section. |
True or False |
learning rate |
learning rate scheduler proto |
soft_start _annealing _schedule |
Configures the learning rate schedule for the trainer. Currently, DetectNet_v2 only supports the soft_start annealing learning rate schedule, which may be configured using the following parameters:
|
annealing: 0.0-1.0 and greater than soft_start Soft_start: 0.0 - 1.0 A sample lr plot for a soft_start of 0.3 and annealing of 0.1 is shown in the figure below. |
regularizer |
regularizer proto config |
The type and the weight of the regularizer to be used during training. There are two parameters:
|
The supported values for type are:
|
|
optimizer |
optimizer proto config |
The optimizer to use for training and the parameters to configure it:
|
||
cost_scaling |
costscaling _config |
Enables cost scaling during training. Leave this parameter untouched currently for the DetectNet_v2 training pipe. |
cost_scaling { enabled: False initial_exponent: 20.0 increment: 0.005 decrement: 1.0 } |
|
checkpoint interval |
float |
0/10 |
The interval (in epochs) at which |
0 to num_epochs |
|
visualizer |
visualizer proto config |
|
Configurable elements of the visualizer. DetectNetv2’s visualizer interfaces with TensorBoard. |
|
DetectNet_v2 currently supports the soft_start annealing learning rate schedule. The learning rate when plotted as a function of the training progress (0.0, 1.0) results in the following curve:
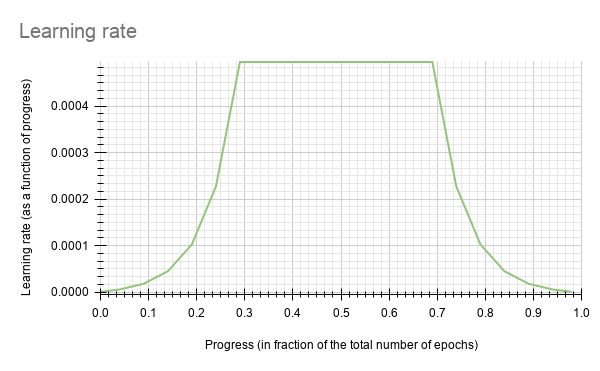
In this experiment, the soft_start was set as 0.3 and annealing as 0.7, with the minimum learning rate as 5e-6 and maximum learning rate, or base_lr, as 5e-4.
We suggest using an L1 regularizer when training a network before pruning, as L1
regularization makes pruning the network weights easier. After pruning,
when retraining the networks, we recommend turning regularization off by setting
the regularization type to NO_REG.
Visualizer
DetectNet_v2 supports visualization of important metrics, weight histograms and intermediate images via tensorboard. The visualized collaterals are broadly divided into 2 categories
Frequently plotted collaterals: These are scalar values that are plotted as a function on time. These values are plotted more frequently so that you may see a continuous behaviour.
Infrequently plotted collaterals: These include histograms and intermediate images, which consume more resources to plot and are therefore plotted less frequently.
The metrics of the network are plotted as scalar plots which include
Bounding box loss (mean_cost_${class_bbox}): Cost component that computes the accuracy of the bbox coordinates.
Coverage loss (mean_cost_${class_cov}): Cost of the coverage blob that yields the confidence of an object.
Task Cost (task_cost): This is computed as (Coverage loss + Bounding Box loss).
Regularization cost (regularization_cost): Sum of all the regularizer losses in the model.
Total Cost (total_cost): This is computed as the task cost + (regularizer weight * regularization cost).
Validation Cost (validation_cost): This is the total cost computed during evaluation.
Mean Average Precision (mAP): The mean average precision of the network across all classes, as computed during training.
Learning rate (lr): The learning rate applied to the optimizer.
The plotting intervals of the frequent and infrequent collaterals are configurable via the visualizer element of the training config.
Parameter |
Datatype |
Default |
Description |
Supported Values |
enabled |
bool |
‘false’ |
Flag to enable tensorboard visualization. |
true or false |
num_images |
int |
3 |
Number of images to be plotted per step |
1 < num_images < batch_size |
scalar_logging_frequency |
int |
10 |
Number of points per epoch |
1 to num_steps_per_epoch |
infrequent_logging_frequency |
int |
1 |
Interval to plot infrequent visualization collaterals (in number of epochs) |
1 to num_epochs |
target_class_config |
proto dictionary |
This is a nested configuration field that defines the post-processing threshold for the coverage blob to render the raw bounding boxes before clustering. The configurable parameter is
|
|
The scalar plots of total_cost and validation_cost, are a good indication of how the model
training is proceeding. If the 2 plots are converging and decreasing over time, it implies that the network is still learning.
However, if the validation_cost starts diverging and rises, while the training_cost plateaus or
decreases, it indicates that the network may be overfitting to the training dataset.
Under the images tab, the DetectNet_v2 app renders number of images. The key images of interest are:
images: This shows the input image currently under training${class_name}_rectangle_bbox_preds: This image shows the raw predictions of the network before applying NMS/DBSCAN clustering. The outputs seen here are a result of filtering per class by the coverage threshold.${class_name}_cov_norm: This is the normalized coverage output, which is a heatmap of the confidence with which the network says that an object exists.${class_name}_cov_gt: This is the normalized coverage ground truth, which is a heatmap of the confidence with which the network should say that an object exists.
As training progresses, you will see that the ${class_name}_cov_norm and ${class_name}_cov_gt images look similar, and
${class_name}_rectaging_bbox_preds will only show clusters of bounding boxes around valid objects of that $class_name
Under the histograms tab, you can see the histogram distribution of all the weights in the model. This is a good indicator on how well the regularizers work and how much of the model can be pruned. Using the L1 regularizer, forces the weights to be closer to 0, making the model friendly to pruning. If you see a histogram with the bulk of the distribution around 0, it means that the model will yield good gains when pruned. If the histogram is more flat, then it indicates that you may need to increase the weight of the L1 regularizer, or your model for this dataset, cannot be pruned aggressively.
Augmentation Module
The augmentation module provides some basic pre-processing and augmentation when training. Here
is a sample augmentation_config element:
            # Sample augementation config for
augmentation_config {
  preprocessing {
    output_image_width: 960
    output_image_height: 544
    output_image_channel: 3
    min_bbox_width: 1.0
    min_bbox_height: 1.0
  }
  spatial_augmentation {

    hflip_probability: 0.5
    vflip_probability: 0.0
    zoom_min: 1.0
    zoom_max: 1.0
    translate_max_x: 8.0
    translate_max_y: 8.0
  }
  color_augmentation {
    color_shift_stddev: 0.0
    hue_rotation_max: 25.0
    saturation_shift_max: 0.2
    contrast_scale_max: 0.1
    contrast_center: 0.5
  }
}
If the output image height and output image width of the preprocessing block doesn’t match with the dimensions of the input image, the dataloader either pads with zeros or crops to fit to the output resolution. It does not resize the input images and labels to fit.
The augmentation_config contains three elements:
preprocessing: This nested field configures the input image and ground truth label
pre-processing module. It sets the shape of the input tensor to the network. The ground truth
labels are pre-processed to meet the dimensions of the input image tensors.
Parameter |
Datatype |
Default/Suggested value |
Description |
Supported Values |
output _image _width |
int |
– |
The width of the augmentation output. This is the same as the width of the network input and must be a multiple of 16. |
>480 |
output _image _height |
int |
– |
The height of the augmentation output. This is the same as the height of the network input and must be a multiple of 16. |
>272 |
output _image _channel |
int |
1, 3 |
The channel depth of the augmentation output. This is the same as the channel depth of the network input. Currently, 1-channel input is not recommended for datasets with JPG images. For PNG images, both 3-channel RGB and 1-channel monochrome images are supported. |
1,3 |
output _image_min |
int |
– |
The smaller side of the augmentation output. This is the same as the smaller side of the network input. This is used in the case of input with dynamic shape in FasterRCNN where we specify the smaller side size and the data loader will resize the image such that the smaller side is this number and keep aspect ratio. |
>272 |
output _image_max |
int |
– |
The larger side of the augmentation output. This is the same as the larger side of the
network input. This is used in the case of input with dynamic shape in FasterRCNN
where if the smaller side and keep aspect ratio results in the other side exceeding
this limit, it will resize such that the larger side is exactly this number and keep
aspect ratio so the smaller side does not exceed |
>272 |
enable_auto _resize |
bool |
False |
A flag to enable automatic resize during training. When it is set to True, offline resize before the training is no longer required. Enabling this will potentially increase the training time. |
– |
min_bbox _height |
float |
The minimum height of the object labels to be considered for training. |
0 - output_image_height |
|
min_bbox _width |
float |
The minimum width of the object labels to be considered for training. |
0 - output_image_width |
|
crop_right |
int |
The right boundary of the crop to be extracted from the original image. |
0 - input image width |
|
crop_left |
int |
The left boundary of the crop to be extracted from the original image. |
0 - input image width |
|
crop_top |
int |
The top boundary of the crop to be extracted from the original image. |
0 - input image height |
|
crop_bottom |
int |
The bottom boundary of the crop to be extracted from the original image. |
0 - input image height |
|
scale_height |
float |
The floating point factor to scale the height of the cropped images. |
> 0.0 |
|
scale_width |
float |
The floating point factor to scale the width of the cropped images. |
> 0.0 |
spatial_augmentation: This module supports basic spatial augmentation such as flip, zoom,
and translate, which may be configured.
Parameter |
Datatype |
Default/Suggested value |
Description |
Supported Values |
hflip_probability |
float |
0.5 |
The probability to flip an input image horizontally. |
0.0-1.0 |
vflip_probability |
float |
0.0 |
The probability to flip an input image vertically. |
0.0-1.0 |
zoom_min |
float |
1.0 |
The minimum zoom scale of the input image. |
> 0.0 |
zoom_max |
float |
1.0 |
The maximum zoom scale of the input image. |
> 0.0 |
translate_max_x |
int |
8.0 |
The maximum translation to be added across the x axis. |
0.0 - output_image_width |
translate_max_y |
int |
8.0 |
The maximum translation to be added across the y axis. |
0.0 - output_image_height |
rotate_rad_max |
float |
0.69 |
The angle of rotation to be applied to the images and the training labels. The range is defined between [-rotate_rad_max, rotate_rad_max]. |
> 0.0 (modulo 2*pi |
color_augmentation: This module configures the color space transformations, such as color
shift, hue_rotation, saturation shift, and contrast adjustment.
Parameter |
Datatype |
Default/Suggested value |
Description |
Supported Values |
color_shift_stddev |
float |
0.0 |
The standard devidation value for the color shift. |
0.0-1.0 |
hue_rotation_max |
float |
25.0 |
The maximum rotation angle for the hue rotation matrix. |
0.0-360.0 |
saturation_shift_max |
float |
0.2 |
The maximum shift that changes the saturation. A value of 1.0 means no change in saturation shift. |
0.0 - 1.0 |
contrast_scale_max |
float |
0.1 |
The slope of the contrast as rotated around the provided center. A value of 0.0 leaves the contrast unchanged. |
0.0 - 1.0 |
contrast_center |
float |
0.5 |
The center around which the contrast is rotated. Ideally, this is set to half of the maximum pixel value. Since our input images are scaled between 0 and 1.0, you can set this value to 0.5. |
0.5 |
The dataloader online augmentation pipeline applies spatial and color-space augmentation transformations in the following order:
The dataloader first performs the pre-processing operations on the input data (image and labels) read from the tfrecords files. Here the images and labels are cropped and scaled based on the parameters mentioned in the
preprocessingconfig. The boundaries for generating the cropped image and labels from the original image is defined by thecrop_left,crop_right,crop_topandcrop_bottomparameters. This cropped data is then scaled by the scale factors defined byscale_heightandscale_width. The transformation matrices for these operations are computed globally and do not change per image.The net tensors generated from the pre-processing blocks are then passed through a pipeline of random augmentations in spatial and color domains. The spatial augmentations are applied to both images and label coordinates, while the color augmentations are applied only to images. To apply color augmentations, the
output_image_channelparameter must be set to 3. For monochrome tensors, color augmentations are not applied. The spatial and color transformation matrices are computed per image, based on a uniform distribution along the maximum and minimum ranges defined by thespatial_augmentationandcolor_augmentationconfig parameters.Once the spatial and color augmented net input tensors are generated, the output is then padded with zeros or clipped along the right and bottom edge of the image to fit the output dimensions defined in the
preprocessingconfig.
Configuring the Evaluator
The evaluator in the detection training pipeline can be configured using the
evaluation_config parameters. The following is an example
evaluation_config element:
            # Sample evaluation config to run evaluation in integrate mode for the given 3 class model,
# at every 10th epoch starting from the epoch 1.
evaluation_config {
  average_precision_mode: INTEGRATE
  validation_period_during_training: 10
  first_validation_epoch: 1
  minimum_detection_ground_truth_overlap {
    key: "car"
    value: 0.7
  }
  minimum_detection_ground_truth_overlap {
    key: "person"
    value: 0.5
  }
  minimum_detection_ground_truth_overlap {
    key: "bicycle"
    value: 0.5
  }
  evaluation_box_config {
    key: "car"
    value {
      minimum_height: 4
      maximum_height: 9999
      minimum_width: 4
      maximum_width: 9999
    }
  }
  evaluation_box_config {
    key: "person"
    value {
      minimum_height: 4
      maximum_height: 9999
      minimum_width: 4
      maximum_width: 9999
    }
  }
  evaluation_box_config {
    key: "bicycle"
    value {
      minimum_height: 4
      maximum_height: 9999
      minimum_width: 4
      maximum_width: 9999
    }
  }
}
The following tables describe the parameters used to configure evaluation:
Parameter |
Datatype |
Default/Suggested value |
Description |
Supported Values |
average_precision _mode |
Sample |
The mode in which the average precision for each class is calculated. |
|
|
validation_period _during_training |
int |
10 |
The interval at which evaluation is run during training. The evaluation is run at this interval starting from the value of the first validation epoch parameter as specified below. |
1 - total number of epochs |
first_validation _epoch |
int |
30 |
The first epoch to start running validation. Ideally it is preferred to wait for at least 20-30% of the total number of epochs before starting evaluation, since the predictions in the initial epochs would be fairly inaccurate. Too many candidate boxes may be sent to clustering and this can cause the evaluation to slow down. |
1 - total number of epochs |
minimum_detection _ground_truth_overlap |
proto dictionary |
Minimum IOU between ground truth and predicted box after clustering to call a valid detection. This parameter is a repeatable dictionary and a separate one must be defined for every class. The members include:
|
||
evaluation_box_config |
proto dictionary |
This nested configuration field configures the min and max box dimensions to be considered as a valid ground truth and prediction for AP calculation. |
The evaluation_box_config field has these configurable inputs.
Parameter |
Datatype |
Default/Suggested value |
Description |
Supported Values |
minimum_height |
float |
10 |
Minimum height in pixels for a valid ground truth and prediction bbox. |
|
minimum_width |
float |
10 |
Minimum width in pixels for a valid ground truth and prediction bbox. |
|
maximum_height |
float |
9999 |
Maximum height in pixels for a valid ground truth and prediction bbox. |
minimum_height - model image height |
maximum_width |
float |
9999 |
Maximum width in pixels for a valid ground truth and prediction bbox. |
minimum _width - model image width |
Dataloader
The dataloader defines the path to the data you want to train on and the class mapping for classes in the dataset that the network is to be trained for.
The following is an example dataset_config element:
            dataset_config {
  data_sources: {
    tfrecords_path: "<path to the training tfrecords root/tfrecords train pattern>"
    image_directory_path: "<path to the training data source>"
  }
  image_extension: "jpg"
  target_class_mapping {
      key: "car"
      value: "car"
  }
  target_class_mapping {
      key: "automobile"
      value: "car"
  }
  target_class_mapping {
      key: "heavy_truck"
      value: "car"
  }
  target_class_mapping {
      key: "person"
      value: "pedestrian"
  }
  target_class_mapping {
      key: "rider"
      value: "cyclist"
  }
  validation_fold: 0
}
In this example the tfrecords is assumed to be multi-fold, and the fold number to validate on is
defined. However, evaluation doesn’t necessarily have to be run on a split of the training set.
Many ML engineers choose to evaluate the model on a well chosen evaluation dataset that is
exclusive of the training dataset. If you prefer to run evaluation on a different validation
dataset as opposed to a split from the training dataset, then convert this dataset into
tfrecords by using the dataset-convert tool as mentioned here and use the validation_data_source field in the
dataset_config to define this dataset to the evaluator . In this case,
do not forget to remove the validation_fold field from the spec.
When generating the TFRecords for evaluation by using the validation_data_source field,
please review the notes here.
            validation_data_source: {
    tfrecords_path: " <path to tfrecords to validate on>/tfrecords validation pattern>"
    image_directory_path: " <path to validation data source>"
}
The parameters in dataset_config are defined as follows:
data_sources: Captures the path to tfrecords to train on. This field contains 2 parameters:tfrecords_path: Path to the individual tfrecords files. This path follows the UNIX style pathname pattern extension, so a common pathname pattern that captures all the tfrecords files in that directory can be used.image_directory_path: Path to the training data root from which the tfrecords was generated.
image_extension: Extension of the images to be used.target_class_mapping: This parameter maps the class names in the tfrecords to the target class to be trained in the network. An element is defined for every source class to target class mapping. This field was included with the intention of grouping similar class objects under one umbrella. For example: car, van, heavy_truck etc may be grouped under automobile. The “key” field is the value of the class name in the tfrecords file and the “value” field corresponds to the value that the network is expected to learn.validation_fold: In case of an n fold tfrecords, you define the index of the fold to use for validation. For sequencewise validation choose the validation fold in the range [0, N-1]. For random split partitioning, force the validation fold index to 0 as the tfrecord is just 2-fold.
The class names key in the target_class_mapping must be identical to the one shown in the dataset converter log, so that the correct classes are picked up for training.
Specification File for Inference
This spec file configures the infer tool of detectnet to generate valid bbox predictions.
The inference tool consists of 2 blocks, namely the inferencer and the bbox handler. The inferencer
instantiates the model object and preprocessing pipe. The bbox handler handles the post
processing, rendering of bounding boxes and the serialization to KITTI format output labels.
Inferencer
The inferencer instantiates a model object that generates the raw predictions from the trained model. The model may be defined to run inference in the TAO Toolkit backend or the TensorRT backend.
A sample inferencer_config element for the inferencer spec is defined here:
            inferencer_config{
  # defining target class names for the experiment.
  # Note: This must be mentioned in order of the networks classes.
  target_classes: "car"
  target_classes: "cyclist"
  target_classes: "pedestrian"
  # Inference dimensions.
  image_width: 1248
  image_height: 384
  # Must match what the model was trained for.
  image_channels: 3
  batch_size: 16
  gpu_index: 0
  # model handler config
  tensorrt_config{
    parser:  ETLT
    etlt_model: "/path/to/model.etlt"
    backend_data_type: INT8
    save_engine: true
    trt_engine: "/path/to/trt/engine/file"
    calibrator_config{
        calibration_cache: "/path/to/calibration/cache"
        n_batches: 10
        batch_size: 16
    }
  }
}
The inferencer_config parameters are explained in the table below.
Parameter |
Datatype |
Default/Suggested value |
Description |
Supported Values |
target_classes |
String (repeated) |
None |
The names of the target classes the model should output. For a multi-class model this parameter is repeated N times. The number of classes must be equal to the number of classes and the order must be the same as the classes in costfunction_config of the training config file. |
For example, for the 3 class kitti model it will be:
|
batch_size |
int |
1 |
The number of images per batch of inference. |
Max number of images that can be fit in 1 GPU |
image_height |
int |
384 |
The height of the image in pixels at which the model will be inferred. |
>16 |
image_width |
int |
1248 |
The width of the image in pixels at which the model will be inferred. |
>16 |
image_channels |
int |
3 |
The number of channels per image. |
1,3 |
gpu_index |
int |
0 |
The index of the GPU to run inference on. This is useful only in TAO inference. For tensorRT inference, by default, the GPU of choice in ‘0’. |
|
tensorrt_config |
TensorRTConfig |
None |
Proto config to instantiate a TensorRT object. |
|
tlt_config |
TLTConfig |
None |
Proto config to instantiate a TLT model object. |
As mentioned earlier, the infer tool is capable of running inference using the native TAO Toolkit
backend and the TensorRT backend. They can be configured by using the tensorrt_config proto
element or the tlt_config proto element respectively. You may use only one of the two in a
single spec file. The definitions of the two model objects are:
Parameter |
Datatype |
Default/Suggested value |
Description |
Supported Values |
parser |
enum |
ETLT |
The tensorrt parser to be invoked. Only ETLT parser is supported. |
ETLT |
etlt_model |
string |
None |
Path to the exported etlt model file. |
Any existing etlt file path. |
backend_data _type |
enum |
FP32 |
The data type of the backend TensorRT inference engine. For int8 mode, be sure to mention the calibration_cache. |
FP32 FP16 INT8 |
save_engine |
bool |
False |
Flag to save a TensorRT engine from the input etlt file. This will save initialization time if inference needs to be run on the same etlt file and there are no changes needed to be made to the inferencer object. |
True, False |
trt_engine |
string |
None |
Path to the TensorRT engine file. This acts an I/O parameter. If the path defined here
is not an engine file, then the |
UNIX path string |
calibration _config |
CalibratorConfig Proto |
None |
This is a required parameter when running in the int8 inference mode. This proto object
contains parameters used to define a calibrator object. Namely:
calibration_cache: path to the calibration cache file generated using |
TLT_Config
Parameter |
Datatype |
Default/Suggested value |
Description |
Supported Values |
model |
string |
None |
The path to the .tlt model file. |
Since detectnet is a full convolutional neural net, the model can be inferred at a different inference resolution than the resolution at which it was trained. The input dims of the network will be overridden to run inference at this resolution, if they are different from the training resolution. There may be some regression in accuracy when running inference at a different resolution since the convolutional kernels don’t see the object features at this shape.
Bbox Handler
The bbox handler takes care of the post processing the raw outputs from the inferencer. It performs the following steps:
Thresholding the raw outputs to defines grid cells where the detections may be present per class.
Reconstructing the image space coordinates from the raw coordinates of the inferencer.
Clustering the raw thresholded predictions.
Filtering the clustered predictions per class.
Rendering the final bounding boxes on the image in its input dimensions and serializing them to KITTI format metadata.
A sample bbox_handler_config element is defined below.
            bbox_handler_config{
  kitti_dump: true
  disable_overlay: false
  overlay_linewidth: 2
  classwise_bbox_handler_config{
    key:"car"
    value: {
      confidence_model: "aggregate_cov"
      output_map: "car"
      bbox_color{
        R: 0
        G: 255
        B: 0
      }
      clustering_config{
        coverage_threshold: 0.005
        dbscan_eps: 0.3
        dbscan_min_samples: 0.05
        dbscan_confidence_threshold: 0.9
        minimum_bounding_box_height: 4
      }
    }
  }
  classwise_bbox_handler_config{
    key:"default"
    value: {
      confidence_model: "aggregate_cov"
      bbox_color{
        R: 255
        G: 0
        B: 0
      }
      clustering_config{
        coverage_threshold: 0.005
        dbscan_eps: 0.3
        dbscan_min_samples: 0.05
        dbscan_confidence_threshold: 0.9
        minimum_bounding_box_height: 4
      }
    }
  }
}
The parameters to configure the bbox handler are defined below.
Parameter |
Datatype |
Default/Suggested value |
Description |
Supported Values |
kitti_dump |
bool |
false |
Flag to enable saving the final output predictions per image in KITTI format. |
true, false |
disable_overlay |
bool |
true |
Flag to disable bbox rendering per image. |
true, false |
overlay _linewidth |
int |
1 |
Thickness in pixels of the bbox boundaries. |
>1 |
classwise_bbox _handler_config |
ClasswiseCluster Config (repeated) |
None |
This is a repeated class-wise dictionary of post-processing parameters. DetectNet_v2 uses dbscan clustering to group raw bboxes to final predictions. For models with several output classes, it may be cumbersome to define a separate dictionary for each class. In such a situation, a default class may be used for all classes in the network. |
The classwise_bbox_handler_config is a Proto object containing several parameters to
configure the clustering algorithm as well as the bbox renderer.
Parameter |
Datatype |
Default / Suggested value |
Description |
Supported Values |
confidence _model |
string |
aggregate_cov |
Algorithm to compute the final confidence of the clustered bboxes. In the aggregate_cov mode, the final confidence of a detection is the sum of the confidences of all the candidate bboxes in a cluster. In mean_cov mode, the final confidence is the mean confidence of all the bboxes in the cluster. |
aggregate_cov, mean_cov |
bbox_color |
BBoxColor Proto Object |
None |
RGB channel wise color intensity per box. |
R: 0 - 255 G: 0 - 255 B: 0 - 255 |
clustering_config |
ClusteringConfig |
None |
Proto object to configure the DBSCAN, NMS or HYBRID clustering algorithm. It leverages the same
parameters as defined in the |
After creating TFRecords ingestible by the TAO training (as outlined in Preprocessing the Dataset) and setting up a spec file, you are now ready to start training an object detection network.
The following outlines the DetectNet_v2 training command:
            tao detectnet_v2 train [-h] -k <key>
                            -r <result directory>
                            -e <spec_file>
                            [-n <name_string_for_the_model>]
                            [--gpus <num GPUs>]
                            [--gpu_index <comma separate gpu indices>]
                            [--use_amp]
                            [--log_file <log_file>]
Required Arguments
-r, --results_dir: The path to a folder where experiment outputs should be written.-k, –key: A user-specific encoding key to save or load a.tltmodel.-e, --experiment_spec_file: The path to the spec file. The path may be absolute or relative to the working directory. By default, the spec fromspec_loader.pyis used.
Optional Arguments
-n, --model_name: The name of the final step model saved. If not provided, defaults to the model.--gpus: The number of GPUs to use and processes to launch for training. The default value is 1.--gpu_index: The indices of the GPUs to use for training. The GPUs are referenced as per the indices mentioned in the./deviceQueryCUDA samples.--use_amp: When defined, this flag enables Automatic Mixed Precision mode.--log_file: The path to the log file. Defaults tostdout.-h, --help: Show this help message and exit.
Input Requirement
Input size: C * W * H (where C = 1 or 3, W > =480, H >=272 and W, H are multiples of 16)
Image format: JPG, JPEG, PNG
Label format: KITTI detection
The train tool does not support training on images of multiple resolutions. However, the dataloader does
support resizing images to the input resolution defined in the specification file. This can be enabled by setting the
enable_auto_resize parameter to true in the augmentation_config module of the spec file.
Sample Usage
Here is an example of a command for training with two GPUs:
            tao detectnet_v2 train -e <path_to_spec_file>
                       -r <path_to_experiment_output>
                       -k <key_to_load_the_model>
                       -n <name_string_for_the_model>
                       --gpus 2
The train tool does not support training on images of multiple resolutions,
or resizing images during training. All of the images must be resized offline to the
final training size and the corresponding bounding boxes must be scaled accordingly.
DetectNet_v2 now supports resuming training from intermediate checkpoints. When a previously running training experiment is stopped prematurely, one may restart the training from the last checkpoint by simply re-running the detectnet_v2 training command with the same command line arguments as before. The trainer for detectnet_v2 finds the last saved checkpoint in the results directory and resumes the training from there. The interval at which the checkpoints are saved are defined by the checkpoint_interval parameter under the “training_config” for detectnet_v2. More, during training, the saved checkpoint number equals to the following formula: checkpoint_number = epoch_num * ceil(ceil((training_images)/gpu_nums)/batch_size_per_gpu )
Execute evaluate on a DetectNet_v2 model.
            tao detectnet_v2 evaluate [-h] -e <experiment_spec
                               -m <model_file>
                               -k <key>
                               [--use_training_set]
                               [--gpu_index]
Required Arguments
-e, --experiment_spec_file: The experiment spec file to set up the evaluation experiment. This should be the same as training spec file.-m, --model: The path to the model file to use for evaluation. This could be a.tltmodel file or a tensorrt engine generated using theexporttool.-k, -–key: The encryption key to decrypt the model. This argument is only required with a.tltmodel file.
Optional Arguments
-h, --help: Show this help message and exit.-f, --framework: The framework to use when running evaluation (choices: “tlt”, “tensorrt”). By default the framework is set to TensorRT.--use_training_set: Set this flag to run evaluation on the training dataset.--gpu_index: The index of the GPU to run evaluation on.
If you have followed the example in Training a Detection Model, you may now evaluate the model using the following command:
            tao detectnet_v2 evaluate -e <path to training spec file>
                          -m <path to the model>
                          -k <key to load the model>
This command runs evaluation on the same validation set that was used during training.
Use these steps to evaluate on a test set with ground truth labeled:
Create tfrecords for this training set by following the steps listed in the data input section.
Update the dataloader configuration part of the training spec file to include the newly generated tfrecords. For more information on the dataset config, refer to Creating an Experiment Spec File. You may create the tfrecords with any partition mode (sequence/random). The evaluate tool iterates through all the folds in the tfrecords patterns mentioned in the
validation_data_source.
            dataset_config {
  data_sources: {
    tfrecords_path: "<path to training tfrecords root>/<tfrecords_name*>"
    image_directory_path: "<path to training data root>"
  }
  image_extension: "jpg"
  target_class_mapping {
      key: "car"
      value: "car"
  }
  target_class_mapping {
      key: "automobile"
      value: "car"
  }
  ..
  ..
  ..
  target_class_mapping {
      key: "person"
      value: "pedestrian"
  }
  target_class_mapping {
      key: "rider"
      value: "cyclist"
  }
  validation_data_source: {
    tfrecords_path: "<path to testing tfrecords root>/<tfrecords_name*>"
    image_directory_path: "<path to testing data root>"
  }
}
The rest of the experiment spec file should remain the same as the training spec file.
The infer task for detectnet_v2 may be used to visualize bboxes and/or
generate frame-by-frame KITTI format labels on a single image or directory of images. An
example of the command for this task is shown below:
            tao detectnet_v2 inference [-h] -e </path/to/inference/spec/file>
                                -i </path/to/inference/input>
                                -o </path/to/inference/output>
                                -k <model key>
Required Parameters
-e, --inference_spec: The path to an inference spec file.-i, --inference_input: The directory of input images or a single image for inference.-o, --inference_output: The directory to the output images and labels. The annotated images are ininference_output/images_annotatedand labels are ininference_output/labels.-k, --enc_key: The key to load the model.
The tool automatically generates bbox rendered images in output_path/images_annotated.
To get the bbox labels in KITTI format, configure the bbox_handler_config
spec file using the kitti_dump parameter as mentioned here. This will
generate the output in output_path/labels.
Pruning removes parameters from the model to reduce the model size without compromising the
integrity of the model itself using the prune command.
The prune task includes these parameters:
            tao detectnet_v2 prune [-h] -pm <pretrained_model>
                            -o <output_file>
                            -k <key>
                            [-n <normalizer>]
                            [-eq <equalization_criterion>]
                            [-pg <pruning_granularity>]
                            [-pth <pruning threshold>]
                            [-nf <min_num_filters>]
                            [-el [<excluded_list>]
Required Arguments
-pm, --pretrained_model: The path to the pretrained model.-o, --output_file: The path to the output checkpoints.-k, --key: The key to load a .tlt model.
Optional Arguments
-h, --help: Show this help message and exit.-n, –normalizer: Specifymaxto normalize by dividing each norm by the maximum norm within a layer; specifyL2to normalize by dividing by the L2 norm of the vector comprising all kernel norms. The default value ismax.-eq, --equalization_criterion: Criteria to equalize the stats of inputs to an element-wise op layer or depth-wise convolutional layer. This parameter is useful for resnets and mobilenets. The options arearithmetic_mean,geometric_mean,union, andintersection(default:union).-pg, -pruning_granularity: The number of filters to remove at a time (default:8)-pth: The threshold to compare the normalized norm against (default:0.1)-nf, --min_num_filters: The minimum number of filters to keep per layer (default:16)-el, --excluded_layers: A list of excluded_layers (e.g.-i item1 item2) (default: [])
After pruning, the model needs to be retrained. See Re-training the Pruned Model for more details.
Using the Prune Command
Here’s an example of using the prune task:
            tao detectnet_v2 prune -m /workspace/output/weights/resnet_003.tlt
                       -o /workspace/output/weights/resnet_003_pruned.tlt
                       -eq union
                       -pth 0.7 -k $KEY
Once the model has been pruned, there might be a slight decrease in accuracy
because some previously useful weights may have been removed. To regain the accuracy,
we recommend that you retrain this pruned model over the same dataset using
the train task, as documented in the Training the model
section, with an updated spec file that points to the newly pruned model as the pretrained model file.
You should turn off the regularizer in the training_config for detectnet to recover
the accuracy when retraining a pruned model. You may do this by setting the regularizer type
to NO_REG as mentioned here. All other parameters may be
retained in the spec file from the previous training.
To load the pretrained model, set the load_graph flag under model_config to
true.
Exporting the model decouples the training process from deployment and allows conversion to
TensorRT engines outside the TAO environment. TensorRT engines are specific to each hardware
configuration and should be generated for each unique inference environment. This may be
interchangeably referred to as a .trt or .engine file. The same exported TAO model
may be used universally across training and deployment hardware. This is referred to as the
.etlt file, or encrypted TAO file. During model export, the TAO model is encrypted with a
private key, which is required when you deploy this model for inference.
INT8 Mode Overview
TensorRT engines can be generated in INT8 mode to run with lower precision,
and thus improve performance. This process requires a cache file that contains scale factors
for the tensors to help combat quantization errors, which may arise due to low-precision arithmetic.
The calibration cache is generated using a calibration tensorfile when export is
run with the --data_type flag set to int8. Pre-generating the calibration
information and caching it removes the need for calibrating the model on the inference machine.
Moving the calibration cache is usually much more convenient than moving the calibration tensorfile
since it is a much smaller file and can be moved with the exported model. Using the calibration
cache also speeds up engine creation as building the cache can take several minutes to generate
depending on the size of the Tensorfile and the model itself.
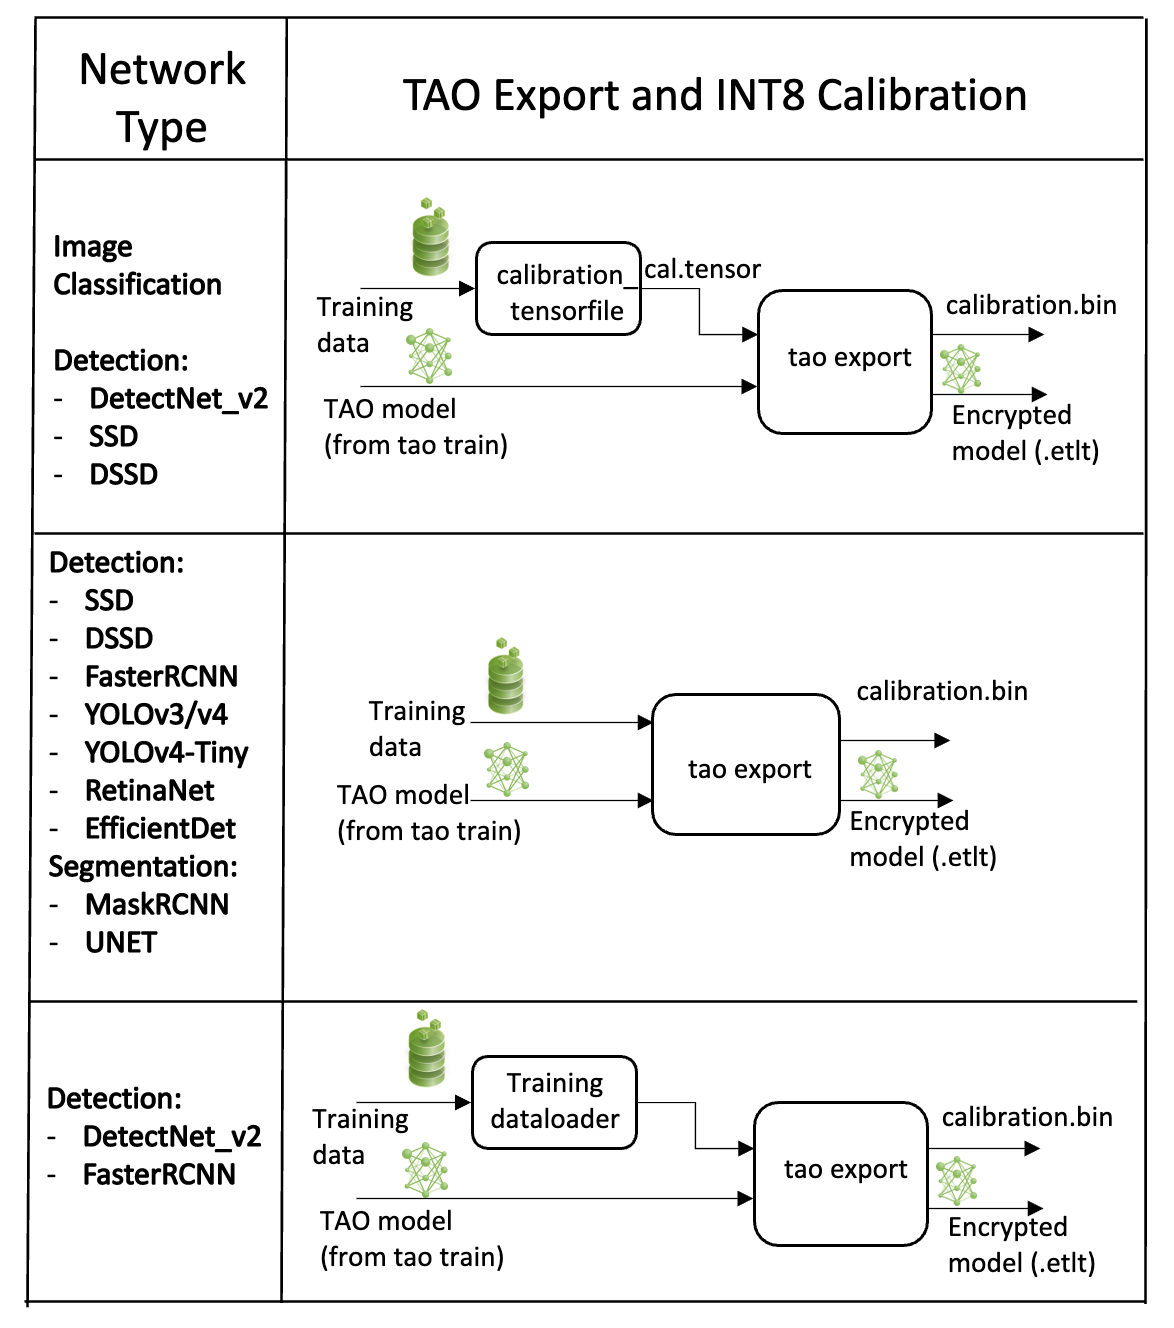
The export tool can generate an INT8 calibration cache by ingesting training data using one of these options:
Option 1: Providing a calibration tensorfile generated using the
calibration_tensorfiletask defined in DetectNet_v2. This command uses the data generators in the training pipeline to produce a drop of preprocessed batches of input images from the training dataset. Using this gives users the opportunity to maintain a record of the exact batches of the training data used to generate the calibration scale factors in the calibration cache file. However, this is a two-step process for generating an int8 cache file.Option 2: Pointing the tool to a directory of images that you want to use to calibrate the model. For this option, you will need to create a sub-sampled directory of random images that best represent your training dataset.
Option 3: Using the training data loader directly to load the training images for INT8 calibration. This option is now the recommended approach as it helps to generate multiple random samples. This also ensures two important aspects of the data during calibration:
Data pre-processing in the INT8 calibration step is the same as in the training process.
The data batches are sampled randomly across the entire training dataset, thereby improving the accuracy of the int8 model.
Calibration occurs as a one-step process with the data batches being generated on the fly.
NVIDIA plans to eventually deprecate Option 1 and only support Options 2 and 3.
FP16/FP32 Model
The calibration.bin is only required if you need to run inference at INT8 precision. For
FP16/FP32 based inference, the export step is much simpler. All that is required is to provide
a model from the train step to export to convert it into an encrypted TAO
model.

Generating an INT8 tensorfile Using the calibration_tensorfile Command
The INT8 tensorfile is a binary file that contains the preprocessed training samples, which may be used to calibrate the model. In this release, TAO Toolkit only supports calibration tensorfile generation for SSD, DSSD, DetectNet_v2, and classification models.
The sample usage for the calibration_tensorfile command to generate a calibration
tensorfile is defined below:
            tao detectnet_v2 calibration_tensorfile [-h] -e <path to training experiment spec file>
                                             -o <path to output tensorfile>
                                             -m <maximum number of batches to serialize>
                                            [--use_validation_set]
Required Arguments
-e, --experiment_spec_file: The path to the experiment spec file (only required for SSD and FasterRCNN).-o, --output_path: The path to the output tensorfile that will be created.-m, --max_batches: The number of batches of input data to be serialized.
Optional Argument
--use_validation_set: A flag specifying whether to use the validation dataset instead of the training set.
The following is a sample command to invoke the calibration_tensorfile command for a
classification model:
            tao detectnet_v2 calibration_tensorfile
                  -e $SPECS_DIR/classification_retrain_spec.cfg
                  -m 10
                  -o $USER_EXPERIMENT_DIR/export/calibration.tensor
Exporting the DetectNet_v2 Model
The following are command line arguments of the export command:
            tao detectnet_v2 export [-h] -m <path to the .tlt model file generated by tao train>
                             -k <key>
                             [-o <path to output file>]
                             [--cal_data_file <path to tensor file>]
                             [--cal_image_dir <path to the directory images to calibrate the model]
                             [--cal_cache_file <path to output calibration file>]
                             [--data_type <Data type for the TensorRT backend during export>]
                             [--batches <Number of batches to calibrate over>]
                             [--max_batch_size <maximum trt batch size>]
                             [--max_workspace_size <maximum workspace size]
                             [--batch_size <batch size to TensorRT engine>]
                             [--experiment_spec <path to experiment spec file>]
                             [--engine_file <path to the TensorRT engine file>]
                             [--verbose Verbosity of the logger]
                             [--force_ptq Flag to force PTQ]
                             [--gen_ds_config Generate DeepStream config]
Required Arguments
-m, --model: The path to the.tltmodel file to be exported usingexport.-k, --key: The key used to save the.tltmodel file.-e, --experiment_spec: The path to the spec file. This argument is required for faster_rcnn, ssd, dssd, yolo, and retinanet.
Optional Arguments
-o, --output_file: The path to save the exported model to. The default path is./<input_file>.etlt.--gen_ds_config: A Boolean flag indicating whether to generate the template DeepStream related configuration (“nvinfer_config.txt”) as well as a label file (“labels.txt”) in the same directory as theoutput_file. Note that the config file is NOT a complete configuration file and requires the user to update the sample config files in DeepStream with the parameters generated.--gpu_index: The index of (discrete) GPUs used for exporting the model. You can specify the GPU index used to run evaluation when the machine has multiple GPUs installed. Note that export can only run on a single GPU.--log_file: The path to the log file. The default path isstdout.-h, --help: Show this help message and exit.
QAT Export Mode Required Arguments
--cal_json_file: The path to the JSON file containing the tensor scales for QAT models. This argument is required if the engine for the QAT model is being generated.
When exporting a model trained with QAT enabled, the tensor scale factors to calibrate
the activations are peeled out of the model and serialized to a JSON file defined by the
cal_json_file argument.
Sample usage for the export sub-task
The following is a sample command to export a DetectNet_v2 model in INT8 mode. This command shows
option 1: using the --cal_data_file option with the calibration.tensor generated
using the calibration_tensorfile sub-task.
            tao detectnet_v2 export
     -e $USER_EXPERIMENT_DIR/experiment_dir_retrain/experiment_spec.txt
     -m $USER_EXPERIMENT_DIR/experiment_dir_retrain/weights/resnet18_detector_pruned.tlt
     -o $USER_EXPERIMENT_DIR/experiment_dir_final/resnet18_detector.etlt
     -k $KEY
The following is an example log of a successful export:
Generating a Template DeepStream Config File
TAO Toolkit supports serializing a template config file for the nvinfer element of deepstream to consume this model. This config file contains the network specific pre-processing
parameters and network graph parameters for parsing the etlt model file. It also generates a label file that contains the names of the classes that the
model was trained for in the order in which the outputs are generated. To generate the deepstream config, simply run the export command using the
--gen_ds_config option.
The following example shows how to generate the DeepStream config:
            tao detectnet_v2 export
      -m $USER_EXPERIMENT_DIR/detectnet_v2/model.tlt
      -o $USER_EXPERIMENT_DIR/detectnet_v2/model.int8.etlt
      -e $SPECS_DIR/detectnet_v2_kitti_retrain_spec.txt
      --gen_ds_config
The template DeepStream config is generated in the same directory as the output model file as nvinfer_config.txt, while the labels are
serialized in labels.txt file. Sample output of the nvinfer_config.txt and labels.txt are as follows:
Sample
nvinfer_config.txtnet-scale-factor=0.00392156862745098 offsets=0;0;0 infer-dims=3;544;960 tlt-model-key=tlt_encode network-type=0 num-detected-classes=3 uff-input-order=0 output-blob-names=output_cov/Sigmoid;output_bbox/BiasAdd uff-input-blob-name=input_1 model-color-format=0
Sample
labels.txtperson bag face
The nvinfer_config.txt file that is generated by export is NOT a complete config_infer_*.txt file that can be replaced
into the DeepStream config file. You need to find and replace the parameters defined in this file, with the parameters in the default config_infer_*.txt
file.
For TensorRT engine generation, validation, and INT8 calibration, refer to the TAO Deploy documentation.
Refer to the Integrating a DetectNet_v2 Model page for more information about deploying a DetectNet_v2 model to DeepStream.