Running TAO on Google Colab#
Google Colab provides access to free GPU instances for running compute jobs in the cloud. This page provides instructions for getting started with TAO on Google Colab.
Google Colab has some restrictions with TAO based on the limitations of the hardware and software available with the Colab Instances. You can view the limitations in the Notes section.
Pre-Requisites#
To use Google Colab, you’ll need a Google Account with Google Drive access.
Log in to your Google account,or create one by following instructions on the Sign-Up for Gmail page
Launching Notebooks with Google Colab#
TAO provides an extensive model zoo containing pretrained models for different computer-vision use cases. You can click on the “One-Click Deploy” link for the model of your use-case.
Refer to the Steps to Locate files in a Colab Notebook section for an example of accessing files within the Colab notebook.
General-Purpose Computer Vision Models#
With general purpose models, you can train an image classification model, object detection model, or an instance segmentation model.
Model Name |
One-Click Deploy |
Action |
|---|---|---|
Multi-class Image Classification |
Classification |
|
Multi-task Image Classification |
Classification |
|
DSSD |
Object Detection |
|
EfficientDet |
Object Detection |
|
RetinaNet |
Object Detection |
|
SSD |
Object Detection |
|
Yolo V3 |
Object Detection |
|
Yolo V4 |
Object Detection |
|
Yolo V4 Tiny |
Object Detection |
Purpose-Built Computer Vision Models#
Purpose-built models are built for high accuracy and performance. You can deploy these models out of the box for applications such as smart city, retail, public safety, and healthcare. You can also retrain them with your own data.
Model Name |
One-Click Deploy |
Purpose |
|---|---|---|
ActionRecognitonNet |
Detecting actions from videos |
|
LPRNET |
Recognize License plates numbers |
|
PoseClassificationNet |
Classify poses of people from their skeletons |
TAO Pre-trained Models (Inference Only)#
In addition to training different models using the one-click deploy links, you can run inference with the Pre-trained Models TAO has published using this Notebook
Utility scripts to obtain subset of data#
If you have limited storage space, or want to iterate quickly through training experiments, we suggest you
Download data on to your local system
Run a utility script to generate a subset of the dataset
Upload this smaller dataset to your Google Drive to run experiments on
TAO provides utility scripts to generate such subsets for COCO dataset (which is around ~25 GB with ~120k images) and KITTI dataset (which is around ~12 GB with ~14k images)
To obtain subset for KITTI:#
The subset generation file is present here. Run this script in your local system (not in Colab as you might have storage limitations)
Download and unzip kitti training and testing zip files here, you’ll have 2 folders training and testing
To obtain subset for training:
python generate_kitti_subset.py --source-data-dir=path_to_training_folder --out-data-dir=path_to_save_subset_data/training/ --training True --num-images=num_of_images_in_subset
Example
python generate_kitti_subset.py --source-data-dir=/home/user/data/training --out-data-dir=/home/user/subset_data/training/ --training True --num-images=100
To obtain subset for testing:
python generate_kitti_subset.py --source-data-dir=path_to_training_folder --out-data-dir=path_to_save_subset_data/training/ --num-images=num_of_images_in_subset
Example
python generate_kitti_subset.py --source-data-dir=/home/user/data/testing --out-data-dir=/home/user/subset_data/testing/ --num-images=100
Dataset folder structure for kitti:
path_to_training_folder
|___images
|___labels

path_to_testing_folder
|___images
To obtain subset for COCO:#
The subset generation file is present here. Run this script in your local system (not in Colab as you might have storage limitations)
Download and unzip 2017 train and val images, 2017 train/val annotations from here
To obtain subset for training:
python generate_coco_subset.py --source-image-dir=path_to_train2017_folder --source-annotation-file=path_to_instances_train2017.json_file --out-data-dir=path_to_save_subset_data --num-images=num_of_images_in_subset
Example
python generate_coco_subset.py --source-image-dir=/home/user/data/train2017 --source-annotation-file=/home/user/data/annotations/instances_train2017.json --out-data-dir=/home/user/subset_data/ --num-images=100
To obtain subset for validation:
python generate_coco_subset.py --source-image-dir=path_to_val2017_folder --source-annotation-file=path_to_instances_val2017.json_file --out-data-dir=path_to_save_subset_data --num-images=num_of_images_in_subset
Example
python generate_coco_subset.py --source-image-dir=/home/user/data/val2017 --source-annotation-file=/home/user/data/annotations/instances_val2017.json --out-data-dir=/home/user/subset_data/ --num-images=100
Dataset folder structure for coco:
folder_into_which_downloaded_coco_files_are_unzipped
|___train2017
|___val2017
|___annotations
    |___instances_train2017.json
    |___instances_val2017.json
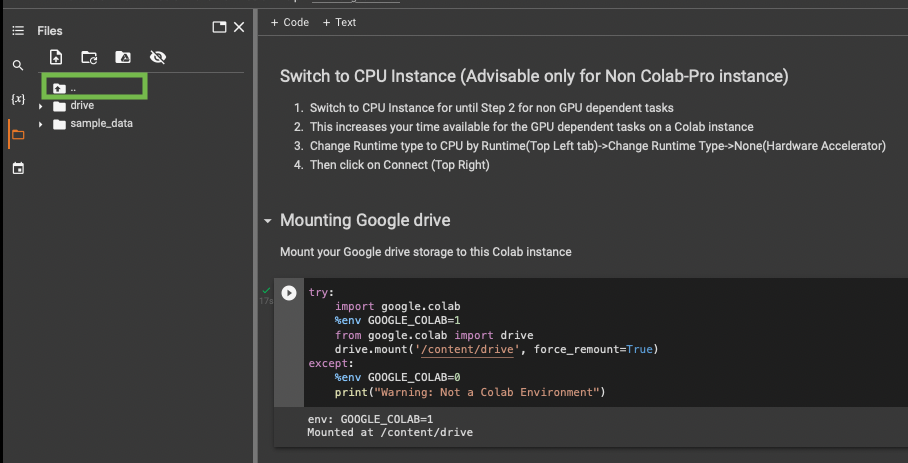
Steps to Locate Files in a Colab Notebook#
Mount the drive in the Colab Instance.
Click on the folder icon (shown within the green box)

Click on the ‘move up one folder’ icon (shown within the green box)
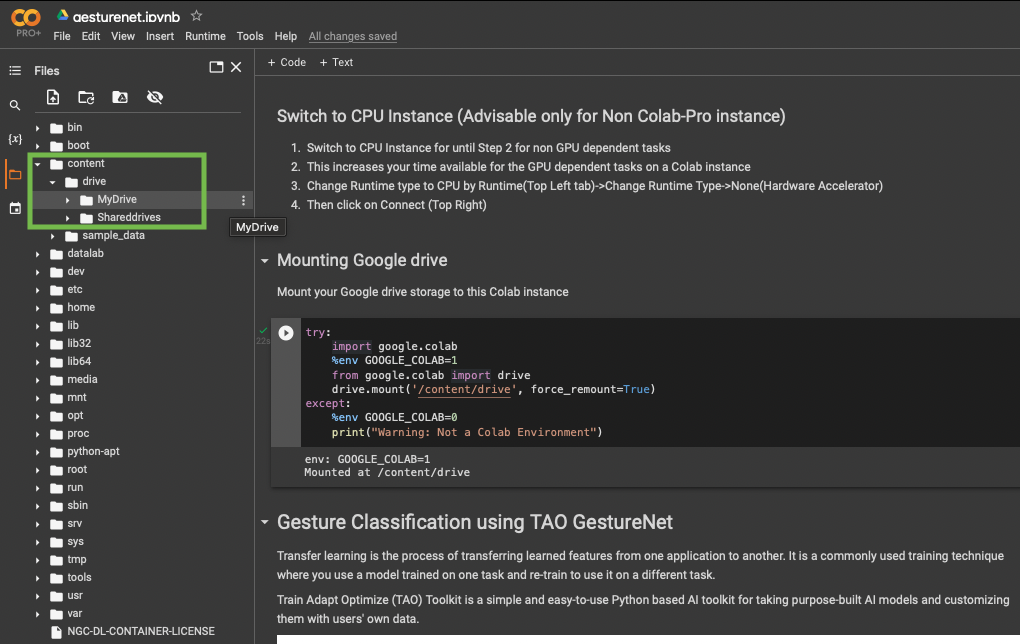
Now you can view all folders that are tied to this instance.
The google drive you mounted is present at content->drive->MyDrive.
All the folders listed in the below screenshot are folders in the root directory “/”.
Notes#
The following TAO networks can’t run on Colab until Colab has updated its drivers to 515 or above: Detectnetv2, BPNET, FasterRCNN, FPNet, and Gazenet.
Any folder that is not in
/content/drive/MyDrive/will be a volatile path: You’ll lose access to the contents when the session disconnectsIf you have a 15GB drive storage limit, try setting the data folder to
/content/data/data_you_are_downloadinginstead of using the drive at/content/drive/MyDrive.This is preferred because volatile storage is greater than 15G.B
You can also upload a file downloaded on your system to
/content/datausing the drag-and-drop method.
The browser tab needs to be active for the duration of a Colab session. To keep the Colab instance active in the background, you can use a third party extension like Colab Alive.
In Tensorflow notebooks, to maximize GPU usage, you can switch to GPU hardware only after completing the data download and preprocessing steps that doesn’t require a GPU:
At the point of switching to a GPU instance, it is fine to terminate the previous instance.
You can keep running successive cells without rerruning any of the previous cells, with the following exceptions:
If some data was saved in the volatile storage instead of the Google Drive storage, then switching instances will delete the data.
In such cases, the data must be backed up to Google Drive before terminating. This can be achieved with a simple Linux copy command:
cp path_to_volatile_storage /content/drive/MyDrive/folder_to_be_copied_into
With the free version of Colab, GPU instances can run a maximum of 8 hours.
With the free version of Colab, only one GPU instance notebook can run at a time.
Colab Pro can run two GPU instance notebooks simultaneously.
Colab does not allow you to choose the GPU type.
As of November 2022, the predominant GPU is a Tesla T4 with the free version and a P100 with Colab Pro.