Deploying to DeepStream for MaskRCNN#
The deep learning and computer vision models that you’ve trained can be deployed on edge devices, such as a Jetson Xavier or Jetson Nano, a discrete GPU, or in the cloud with NVIDIA GPUs. TAO has been designed to integrate with DeepStream SDK, so models trained with TAO will work out of the box with DeepStream SDK.
DeepStream SDK is a streaming analytic toolkit to accelerate building AI-based video analytic applications. This section will describe how to deploy your trained model to DeepStream SDK.
To deploy a model trained by TAO to DeepStream we have two options:
Option 1: Integrate the
.etltmodel directly in the DeepStream app. The model file is generated by export.Option 2: Generate a device-specific optimized TensorRT engine using TAO Deploy. The generated TensorRT engine file can also be ingested by DeepStream.
Option 3 (Deprecated for x86 devices): Generate a device-specific optimized TensorRT engine using TAO Converter.
Machine-specific optimizations are done as part of the engine creation process, so a distinct engine should be generated for each environment and hardware configuration. If the TensorRT or CUDA libraries of the inference environment are updated (including minor version updates), or if a new model is generated, new engines need to be generated. Running an engine that was generated with a different version of TensorRT and CUDA is not supported and will cause unknown behavior that affects inference speed, accuracy, and stability, or it may fail to run altogether.
Option 1 is very straightforward. The .etlt file and calibration cache are directly
used by DeepStream. DeepStream will automatically generate the TensorRT engine file and then run
inference. TensorRT engine generation can take some time depending on size of the model
and type of hardware.
Engine generation can be done ahead of time with Option 2: TAO Deploy is used to convert the .etlt
file to TensorRT; this file is then provided directly to DeepStream. The TAO Deploy workflow is similar to
TAO Converter, which is deprecated for x86 devices from TAO version 4.0.x but is still required for
deployment to Jetson devices.
See the Exporting the Model section for more details on how to export a TAO model.
TensorRT Open Source Software (OSS)#
MaskRCNN, requires the generateDetectionPlugin, multilevelCropAndResizePlugin,
resizeNearestPlugin and multilevelProposeROI plugins from the
TensorRT OSS build.
If the deployment platform is x86 with an NVIDIA GPU, follow the TensorRT OSS on x86 instructions. On the other hand, if your deployment is on NVIDIA Jetson platform, follow the TensorRT OSS on Jetson (ARM64) instructions.
TensorRT OSS on x86#
Building TensorRT OSS on x86:
Install Cmake (>=3.13).
Note
TensorRT OSS requires cmake >= v3.13, so install cmake 3.13 if your cmake version is lower than 3.13c
sudo apt remove --purge --auto-remove cmake
wget https://github.com/Kitware/CMake/releases/download/v3.13.5/cmake-3.13.5.tar.gz
tar xvf cmake-3.13.5.tar.gz
cd cmake-3.13.5/
./configure
make -j$(nproc)
sudo make install
sudo ln -s /usr/local/bin/cmake /usr/bin/cmake
Get GPU architecture. The
GPU_ARCHSvalue can be retrieved by thedeviceQueryCUDA sample:cd /usr/local/cuda/samples/1_Utilities/deviceQuery sudo make ./deviceQuery
If the
/usr/local/cuda/samplesdoesn’t exist in your system, you could downloaddeviceQuery.cppfrom this GitHub repo. Compile and rundeviceQuery.nvcc deviceQuery.cpp -o deviceQuery ./deviceQuery
This command will output something like this, which indicates the
GPU_ARCHSis75based on CUDA Capability major/minor version.Detected 2 CUDA Capable device(s) Device 0: "Tesla T4" CUDA Driver Version / Runtime Version 10.2 / 10.2 CUDA Capability Major/Minor version number: 7.5
Build TensorRT OSS:
git clone -b 21.08 https://github.com/nvidia/TensorRT
cd TensorRT/
git submodule update --init --recursive
export TRT_SOURCE=`pwd`
cd $TRT_SOURCE
mkdir -p build && cd build
Note
Make sure your
GPU_ARCHSfrom step 2 is in TensorRT OSSCMakeLists.txt. If GPU_ARCHS is not in TensorRT OSSCMakeLists.txt, add-DGPU_ARCHS=<VER>as below, where<VER>representsGPU_ARCHSfrom step 2./usr/local/bin/cmake .. -DGPU_ARCHS=xy -DTRT_LIB_DIR=/usr/lib/x86_64-linux-gnu/ -DCMAKE_C_COMPILER=/usr/bin/gcc -DTRT_BIN_DIR=`pwd`/out make nvinfer_plugin -j$(nproc)
After building ends successfully,
libnvinfer_plugin.so*will be generated under`pwd`/out/.Replace the original
libnvinfer_plugin.so*:sudo mv /usr/lib/x86_64-linux-gnu/libnvinfer_plugin.so.8.x.y ${HOME}/libnvinfer_plugin.so.8.x.y.bak // backup original libnvinfer_plugin.so.x.y sudo cp $TRT_SOURCE/`pwd`/out/libnvinfer_plugin.so.8.m.n /usr/lib/x86_64-linux-gnu/libnvinfer_plugin.so.8.x.y sudo ldconfig
TensorRT OSS on Jetson (ARM64)#
Install Cmake (>=3.13)
Note
TensorRT OSS requires cmake >= v3.13, while the default cmake on Jetson/Ubuntu 18.04 is cmake 3.10.2.
Upgrade TensorRT OSS using:
sudo apt remove --purge --auto-remove cmake
wget https://github.com/Kitware/CMake/releases/download/v3.13.5/cmake-3.13.5.tar.gz
tar xvf cmake-3.13.5.tar.gz
cd cmake-3.13.5/
./configure
make -j$(nproc)
sudo make install
sudo ln -s /usr/local/bin/cmake /usr/bin/cmake
Get GPU architecture based on your platform. The
GPU_ARCHSfor different Jetson platform are given in the following table.Jetson Platform
GPU_ARCHS
Nano/Tx1
53
Tx2
62
AGX Xavier/Xavier NX
72
Build TensorRT OSS:
git clone -b 21.03 https://github.com/nvidia/TensorRT
cd TensorRT/
git submodule update --init --recursive
export TRT_SOURCE=`pwd`
cd $TRT_SOURCE
mkdir -p build && cd build
Note
The
-DGPU_ARCHS=72below is for Xavier or NX, for other Jetson platform, change72referring toGPU_ARCHSfrom step 2./usr/local/bin/cmake .. -DGPU_ARCHS=72 -DTRT_LIB_DIR=/usr/lib/aarch64-linux-gnu/ -DCMAKE_C_COMPILER=/usr/bin/gcc -DTRT_BIN_DIR=`pwd`/out make nvinfer_plugin -j$(nproc)
After building ends successfully,
libnvinfer_plugin.so*will be generated under‘pwd’/out/.Replace
"libnvinfer_plugin.so*"with the newly generated.sudo mv /usr/lib/aarch64-linux-gnu/libnvinfer_plugin.so.8.x.y ${HOME}/libnvinfer_plugin.so.8.x.y.bak // backup original libnvinfer_plugin.so.x.y sudo cp `pwd`/out/libnvinfer_plugin.so.8.m.n /usr/lib/aarch64-linux-gnu/libnvinfer_plugin.so.8.x.y sudo ldconfig
Integrating the model with DeepStream#
For MaskRCNN, you will need to build the TensorRT open source plugins and custom bounding-box parser. The instructions are provided in the TensorRT Open Source Software (OSS) section above, and the required code can be found in this GitHub repo.
To integrate the models with DeepStream, you will need the following:
The DeepStream SDK (download from the DeepStream SDK Download Page). The installation instructions for DeepStream are provided in the DeepStream Development Guide.
An exported
.onnxmodel file and optional calibration cache for INT8 precision.A
labels.txtfile containing the labels for classes in the order in which the networks produce outputs.A sample
config_infer_*.txtfile to configure the nvinfer element in DeepStream. The nvinfer element handles everything related to TensorRT optimization and engine creation in DeepStream.
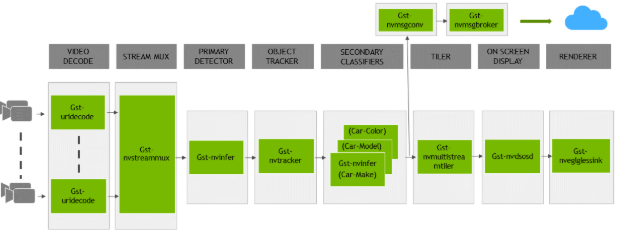
TDeepStream SDK ships with an end-to-end reference application that is fully configurable. You
can configure input sources, the inference model, and output sinks. The app requires a primary
object-detection model, followed by an optional secondary classification model. The reference
application is installed as deepstream-app. The graphic below shows the architecture of the
reference application:
Typically, two or more configuration files are used with this app. In the install
directory, the config files are located in samples/configs/deepstream-app or
sample/configs/tlt_pretrained_models. The main config file configures all the high-level
parameters in the pipeline above. This will set the input source and resolution, number of
inferences, tracker, and output sinks. The other supporting config files are for each individual
inference engine. The inference-specific configuration files are used to specify the models,
inference resolution, batch size, number of classes, and other customizations. The main
configuration file will call all the supporting configuration files.
Here are some configuration files in samples/configs/deepstream-app for reference:
source4_1080p_dec_infer-resnet_tracker_sgie_tiled_display_int8.txt: The main configuration fileconfig_infer_primary.txt: The supporting configuration file for the primary detector in the pipeline aboveconfig_infer_secondary_*.txt: The supporting configuration file for the secondary classifier in the pipeline above
The deepstream-app will only work with the main config file. This file will most likely
remain the same for all models and can be used directly from the DeepStream SDK with little to no
change. You will only need to modify or create config_infer_primary.txt and
config_infer_secondary_*.txt.
Integrating a MaskRCNN Model#
To run a MaskRCNN model in DeepStream, you need a label file and a DeepStream configuration file. In addition, you need to compile the TensorRT 7+ open source software and MaskRCNN output parser for DeepStream.
See here for a GitHub page containing a DeepStream sample with documentation on how to run inference using the trained MaskRCNN models from TAO.
Prerequisites for MaskRCNN Model#
MaskRCNN requires the
generateDetectionPlugin,multilevelCropAndResizePlugin,resizeNearestPluginandmultilevelProposeROIplugins, which are available in the TensorRT open source repo. Detailed instructions to build TensorRT OSS can be found in the TensorRT Open Source Software (OSS) section.MaskRCNN requires custom output parsers that are not built-in inside the DeepStream SDK. The source code to build custom bounding box parsers for MaskRCNN is available here. The following instructions can be used to build bounding box parser:
Install git-lfs (git >= 1.8.2):
curl -s https://packagecloud.io/install/repositories/github/git-lfs/script.deb.sh | sudo bash
sudo apt-get install git-lfs
git lfs install
Download Source Code with SSH or HTTPS:
git clone -b release/tlt3.0 https://github.com/NVIDIA-AI-IOT/deepstream_tlt_apps
Build the parser:
// or Path for DS installation
export CUDA_VER=10.2         // CUDA version, e.g. 10.2
make
This generates
libnvds_infercustomparser_tlt.soin the directorypost_processor.
Label File#
If the COCO annotation file has the following in “categories”:
[{'supercategory': 'person', 'id': 1, 'name': 'person'},
 {'supercategory': 'car', 'id': 2, 'name': 'car'}]
Then the corresponding maskrcnn_labels.txt file will be as follows:
BG
person
car
Run deepstream-app as follows:
deepstream-app -c <deepstream-app config file>
Also, you can use deepstream-mrcnn-test to run the MaskRCNN model. See the README under
$DS_TOP/source/apps/sample_apps/deepstream-mrcnn-test/.
DeepStream Configuration File#
The configuration file is used by deepstream-app (see the
Deepstream Configuration Guide for more details). You need to enable the display-mask
under the osd group to see the mask visual view:
[osd]
enable=1
gpu-id=0
border-width=3
text-size=15
text-color=1;1;1;1;
text-bg-color=0.3;0.3;0.3;1
font=Serif
display-mask=1
display-bbox=0
display-text=0
Nvinfer config file
The Nvinfer configuration file is used in the nvinfer plugin; see the Deepstream plugin manual for more details. The following are key parameters for running the MaskRCNN model:
uff-file=<Path to MRCNN uff model>
parse-bbox-instance-mask-func-name=<post process parser name>
custom-lib-path=<path to post process parser lib>
network-type=3 ## 3 is for instance segmentation network
output-instance-mask=1
labelfile-path=<Path to label file>
int8-calib-file=<Path to optional INT8 calibration cache>
infer-dims=<Inference resolution if different than provided>
num-detected-classes=<# of classes if different than default>
Here’s an example:
[property]
gpu-id=0
net-scale-factor=0.017507
offsets=123.675;116.280;103.53
model-color-format=0
uff-file=<Path to MRCNN uff model>
parse-bbox-instance-mask-func-name=NvDsInferParseCustomMrcnnTLT
custom-lib-path=<path to post process parser lib>
network-type=3 ## 3 is for instance segmentation network
labelfile-path=<Path to MaskRCNN label file>
int8-calib-file=<Path to optional INT8 calibration cache>
infer-dims=<Inference resolution if different than provided>
num-detected-classes=3
uff-input-blob-name=Input
output-blob-names=generate_detections;mask_fcn_logits/BiasAdd
batch-size=1
## 0=FP32, 1=INT8, 2=FP16 mode
network-mode=2
interval=0
gie-unique-id=1
#no cluster
## 0=Group Rectangles, 1=DBSCAN, 2=NMS, 3= DBSCAN+NMS Hybrid, 4 = None(No clustering)
## MRCNN supports only cluster-mode=4; Clustering is done by the model itself
cluster-mode=4
output-instance-mask=1

[class-attrs-all]
pre-cluster-threshold=0.8