Installing IGX-Software on IGX 700 or IGX Developer Kit#
IGX-Software for IGX 700 and IGX Developer Kit includes:
IGX-OS, which is Long Term Supported OS based on Ubuntu. This is the main operating system running on IGX.
NVIDIA AI stack, which is installed on IGX-OS and supported by NVIDIA AI Enterprise-IGX.
Firmware for BMC, Bootloader firmware (QSPI), Safety Microcontroller firmware, ConnectX-7 firmware, and HDMI IN firmware.
Enterprise support on IGX-Software is provided by NVIDIA AI Enterprise - IGX which is purpose-built for mission-critical applications and provides unmatched performance, security, stability, and long-term enterprise support for the entire software stack. IGX-Software is accessible via NVIDIA AI Enterprise - IGX subscription. Please refer following docs on more info on NVIDIA AI Enterprise - IGX.
IGX-Software is also publicly hosted for development and evaluation in the IGX Download Center.
The installation procedures in this document are the same whether IGX-Software is downloaded from NVIDIA AI Enterprise - IGX or from a public hosted download center.
Connect a Display for Software Installation#
To connect a display for software installation, see Connect a Display to Your Dev Kit.
Check the Bootloader Firmware Version#
Before you install IGX OS, you must check the firmware version.
If your developer kit bootloader firmware is
UEFI firmware version 36.4.1-gcid-38375079 built on 11/19/2024or newer, and IGX OS is not already installed, proceed to Install the IGX OS Image.If your developer kit bootloader firmware is an older version you must update it before you can install IGX OS.
To check your bootloader firmware version:
Turn on and boot up your IGX Developer kit.
There are two options:
Option 1 — The UEFI splash screen appears, and you see a bootloader version message similar to the following:
GA 1.1 UEFI firmware version 36.4.1-gcid-38375079 built on 11/19/2024 GA 1.1.1 UEFI firmware version 36.4.5-gcid-39296390 built on 01/29/2025
Option 2 — Login to the IGX OS and run the highlighted commands.
 1#GA1.1 UEFI version
 2cat /sys/class/dmi/id/bios_version
 336.4.1-gcid-38375079
 4
 5cat /sys/class/dmi/id/bios_date
 611/19/2024
 7
 8#GA1.1.1 UEFI version
 9cat /sys/class/dmi/id/bios_version
1036.4.5-gcid-39296390
11
12cat /sys/class/dmi/id/bios_date
1301/29/2025
If necessary, update your boot firmware by following the instructions in Firmware and OS Updates.
Firmware and OS Updates#
Note
If GA1.0 IGX OS is already installed, run these commands to upgrade to GA1.1 and skip to Update the BMC firmware and Update the MCU firmware: If previously installed cuda and display driver from different public repo, these Components will need to be removed first.
Upgrade from GA1.0 to GA1.1.1
Download nv-update-debian-release.sh from the IGX Download Center.
Upgrade the BSP.
sudo apt update
chmod a+x ./nv-update-debian-release.sh
sudo ./nv-update-debian-release.sh --do-upgrade r36.4.1
Upgrade to the GA1.1.1 kernel.
sudo apt update
sudo apt install linux-nvidia-tegra-igx-r36.4.1
sudo reboot
Upgrade From GA1.1 to GA1.1.1
sudo apt update
sudo apt dist-upgrade
Update the firmware and OS in the following order:
Update the BMC firmware.
Update the MCU firmware.
Update the Boot firmware (QSPI).
Update the Connect-X 7 (CX7) firmware (optional).
Update the HDMI IN firmware (optional).
Update the IGX OS.
Warning
You must follow this order or your IGX might hang during boot.
Update the BMC Firmware#
Use the following procedure to update the BMC firmware.
Log in to the BMC and check the version.
Follow the instructions here if your BMC version is older than the version below: Update Your BMC Firmware.
Note
Login to BMC WebUI to Connect to the BMC Web UI to check the version from the WebUI.
SSH to the BMC to Check the version with the highlighted command:
root@mgx-3809:~# cat /etc/os-release

ID=openbmc-phosphor
NAME="NVIDIA MGX/IGX BMC (OpenBMC Project Reference Distro)"
VERSION="IGX-BMC-10.10-rc-4.1"
VERSION_ID=igx-bmc-10.10-rc-4.1-6-ga662035739a.1729874607.1553206
PRETTY_NAME="NVIDIA MGX/IGX BMC (OpenBMC     Project Reference Distro) IGX-BMC-10.10-rc-4.1"
BUILD_ID="20241025164321"
OPENBMC_TARGET_MACHINE="mgx-3809"
Update the MCU Firmware#
Use the following procedure to update the microcontroller (MCU) firmware.
Warning
You must install the BMC firmware update first.
IGX BMC can flash the MCU firmware and upgrade the MCU.
MCU FW |
HW Board Revision |
|---|---|
P3740-Aurix-StepB_C00.hexC |
TS3 |
P3740-Aurix-StepB_C01.hex |
QS2, CR |
Note
The version of the IGX Developer Kit (TS3, QS2 or CR) can be found on the sticker on the developer kit or laser etched on the bottom.
To flash the MCU, follow the instructions at: Update your MCU firmware.
Update the Boot Firmware (QSPI)#
To flash the boot firmware (QSPI), follow the instructions at: Update your QSPI firmware.
Update the Connect-X 7 (CX7) Firmware#
You can update the CX7 from the IGX OS.
Note
CX7 firmware is updated from IGX OS. If you have not yet done so, install IGX OS before continuing.
Download or copy the .iso from the download center to the IGX.
Mount the ISO image on your machine.
Open a terminal on the IGX developer kit, and navigate to the directory where the .iso was downloaded. Then mount the .iso:
mount -o ro,loop MLNX_OFED_LINUX-23.10-x.x.x-ubuntu22.04-aarch64.iso /mnt
Run the following command to update the CX7 firmware:
/mnt/mlnxofedinstall --fw-update-only
Update the HDMI IN (Input) Firmware#
Before you use the HDMI in device of your devkit, ensure that it has the latest firmware.
Note
HDMI-IN firmware is updated from IGX OS. If you have not yet done so, install IGX OS before continuing.
Register an account with Lontium.
Note
It may take several days for Lontium to approve your registration.
Downloading the firmware files from the Lontium website, or contact NVIDIA Support. Download the following two files from the NVIDIA section on to your IGX.
lontium_lt6911_flash_update
LT6911UXC_RGB888
Extract the downloaded files on Tegra Linux by running the following command:
1unrar e lontium_lt6911_flash_update.rar
2unrar e LT6911UXC_RGB888.rar
Change the executable flag on the updater:
chmod a+x lontium_lt6911_flash_update
If you do not have
v4l2-ctl, run the following command:1sudo apt-get install v4l-utils
To power the HDMI-IN chip and flash it with the firmware file, run the following command:
1v4l2-ctl -d /dev/video0 --stream-mmap &
2sudo ./lontium_lt6911_flash_update 2 0x2b LT6911UXC_RGB888.bin
Reboot the IGX.
Warning
The HDMI-IN firmware does not support hot-plugging. For details, see Troubleshoot Your Dev Kit.
Install the IGX OS Image#
The bootloader firmware must be updated before loading the IGX Base OS image. For details, see Check the Bootloader Firmware Version.
Warning
Installing the IGX OS will erase the content of the SSD (NVMe) on the IGX. Please backup your data.
Download the IGX OS ISO image from the IGX Download Center.
To install the IGX OS ISO image locally from a UEFI-bootable USB flash drive:
Create a bootable installation medium, such as a USB flash drive, that contains the image. See Create a Bootable USB Flash Drive by Using BalenaEtcher for detailed steps.
To install the IGX OS ISO image from BMC Virtual Media:
Follow the instructions at Install IGX OS using virtual media.
Boot the IGX OS ISO image#
Warning
Tegra Boot Firmware must be updated first.
Insert the USB flash drive containing the OS image into the IGX Developer Kit.
Connect a monitor and keyboard directly to the IGX system’s iGPU or dGPU based on whether you are using iGPU mode or dGPU mode.
Boot the system. Press F11 when the NVIDIA logo appears to access the boot menu.
Select the USB volume name that corresponds to the inserted USB flash drive and boot the system from that drive.
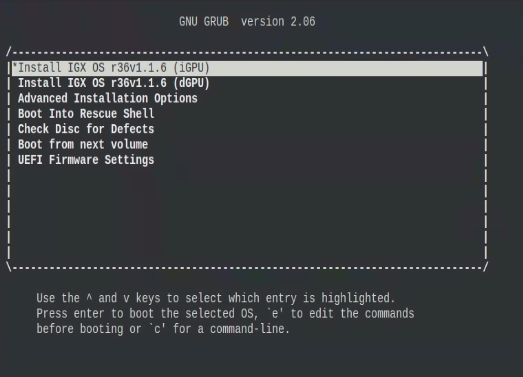
Continue to the IGX OS ISO Boot Options topic for a description of the GRUB menu options and for instructions on completing the installation process.
Install IGX OS (iGPU)
Install IGX OS (dGPU)
Advanced Installation Options
Install IGX OS with Real-Time Kernel (iGPU)
Install IGX OS with Encrypted File System (iGPU)
Install IGX OS with Real-Time Kernel and Encrypted File System
Install IGX OS with Encrypted File System (dGPU)
Install IGX OS (headless)
Install IGX OS with Encrypted File System (headless)
Warning
Headless installation mode requires connecting the USB-C cable from the Linux host to the USB-C connector. For more information, see System Overview.
Install the NVIDIA AI Stack#
You can install the NVIDIA AI Stack on IGX-OS as Debian packages or as containers.
Caution
If you install by using Debian packages, the size of the installation is approximately 11 gigabytes.
Debian Packages#
iGPU |
dGPU |
|---|---|
$ sudo apt update
$ sudo apt install nvidia-igx-ai
$ sudo apt --fix-broken install
|
$ sudo apt update
$ sudo apt install nvidia-igx-ai-rm
$ sudo apt --fix-broken install
|
Containers#
NVIDIA AI Stack containers include:
Tensorrt Container
Triton Container
Tensorflow Container
PyTorch Container
Holoscan Container
The container supported via NVIDIA AI Enterprise - IGX can be accessed with NVIDIA AI Enterprise - IGX subscription.
These publicly hosted versions of the containers for development and evalutaion can be found at the locations below on NVIDIA GPU Cloud (NGC):
https://catalog.ngc.nvidia.com/orgs/nvidia/containers/tensorrt/tags
dGPU support starting with 24.12
iGPU support starting with 24.12. iGPU container has a -igpu in the tag
https://catalog.ngc.nvidia.com/orgs/nvidia/containers/tritonserver/tags
dGPU support starting with 24.12
iGPU support starting with 24.12. iGPU container has a -igpu in the tag
https://catalog.ngc.nvidia.com/orgs/nvidia/containers/tensorflow/tags
dGPU support starting with 24.12
iGPU support starting with 24.12. iGPU container has a -igpu in the tag
https://catalog.ngc.nvidia.com/orgs/nvidia/containers/pytorch/tags
dGPU support starting with 24.12
iGPU support starting with 24.12. iGPU container has a -igpu in the tag
https://catalog.ngc.nvidia.com/orgs/nvidia/teams/clara-holoscan/containers/holoscan/tags
dGPU support starting with 2.9.0 dGPU container has a -dgpu in the tag
iGPU support starting with 2.9.0. iGPU container has a -igpu in the tag
Further References#
Log in to the BMC#
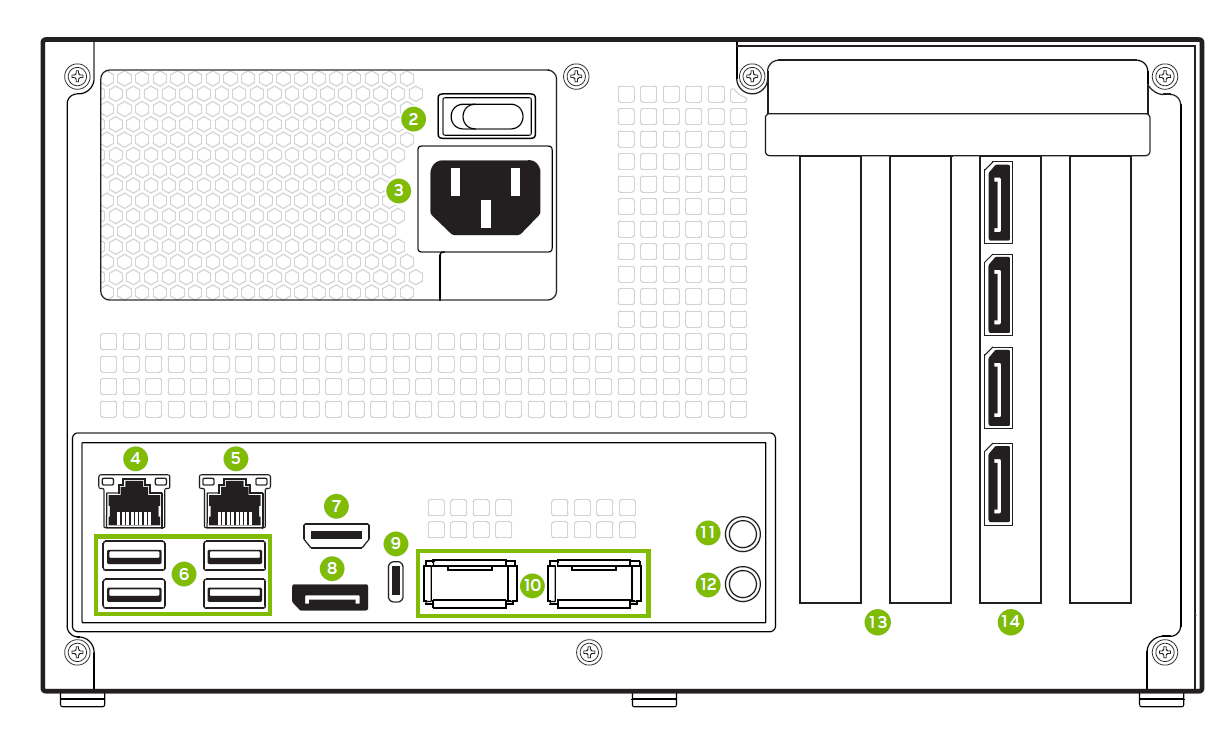
Developer Kit Back Panel#
Connect your Linux host machine and the developer kit with an Ethernet cable. Use the Ethernet port labeled 5 in the figure above.
Find out which Ethernet adapter on the host machine is connected, then start static IP configuration.
Configure the remote Ubuntu host machine Ethernet adapter as a static node. Thus, the Ubuntu Host can communicate to the BMC over the static IP address
192.168.1.110. Find the network adapter inifconfig, which is connected to the RJ45 port of the NVIDIA IGX Orin Developer Kit, then configure it as a static route. The name can beem1oreno1or whatever you choose. As an example:ifconfig eno1 192.168.1.1 netmask 255.255.255.0
Test the connection to the BMC default IP address with either an SSH or ping.
ssh root@192.168.1.110
The first time you log in, you are prompted to change the password: add default password “0penBmc (here, the first character is '0' zero)”
Get the Tegra UART Port#
Warning
ssh port 2200 is the default to mux the UART to Tegra. Set gpiochip0 60 to 1 to switch it to Tegra Linux.
root@mgx:~# gpioset -m exit gpiochip0 60=1ssh root@192.168.1.110 -p 2200
Get the MCU UART Port#
Warning
ssh port 2200 is default to mux the UART to Tegra. Set gpiochip0 60 to 0 to switch to MCU.
root@mgx:~# gpioset -m exit gpiochip0 60=0ssh root@192.168.1.110 -p 2200
Put IGX into Recovery mode#
From BMC
root@mgx:~# powerctrl recovery
From IGX OS
Login to IGX OS.
sudo reboot forced-recovery
Warning
To check if the IGX is in recovery mode, use the linux command lsusb and you should see a USB device with PID 7023. If you are still not able to see this USB device, a power cycle of the IGX is required.
Access all downloads from the IGX Download Center.
Create a Bootable USB Flash Drive using BalenaEtcher#
BalenaEtcher https://etcher.balena.io/ currently supports:
Windows
MacOS
Linux
Follow these steps to create the bootable USB Flash drive:
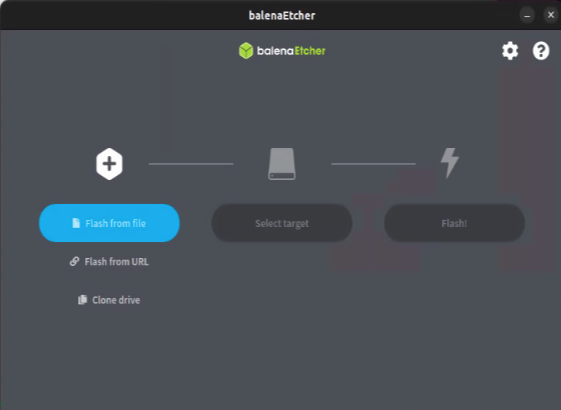
Download and launch the balenaEtcher https://etcher.balena.io/.
Plug the USB flash drive into one of the USB ports of your Windows system.
Click Flash from file, select the iso image you downloaded.
Click Select target, select the USB flash drive you inserted this host.
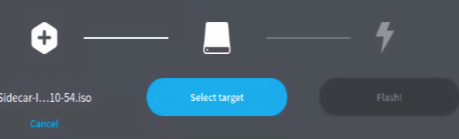
Click Flash!