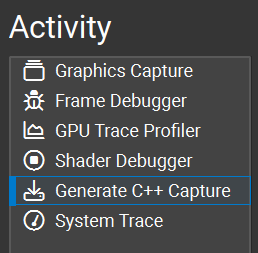
Generate C++ Capture#
The C++ Capture activity allows you to export an application frame as C++ code to be compiled and run as a self-contained application for later analysis, debugging, profiling, regression testing, and edit-and-compile experimentation.
When to Use the Generate C++ Capture Activity#
While C++ captures can be collected in while Frame Debugging, the C++ capture activity provides a focused activity to streamline the creation of captures. Non-necessary analysis subsystems are turned off to allow for the quickest and most robust application capture. This activity is an excellent way to save a snapshot of your application, frozen in time. Use this activity when:
You want to save a deterministic application for follow-up performance analysis.
You want to save a reference point for how your application is working.
You want to share a minimal reproducible with the developer tools or driver teams at NVIDIA to facilitate bug reporting.
The Generate C++ Capture activity supports all APIs that are generally supported by Nsight Graphics.
Basic Workflow#
To start this activity, select Generate C++ Capture from the connection dialog.
Once the application is running, the Generate C++ Capture button will be available on the main toolbar.

Once a capture is started, the target application will temporarily pause, and a progress dialog will be shown detailing the steps of the export to C++ process. When complete, the C++ project is written to the disk and the application will resume.
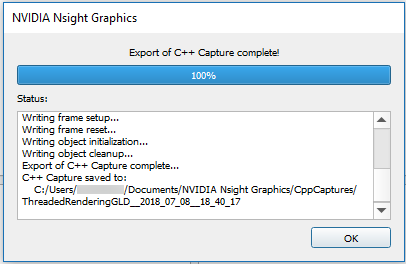
By default, the save directory is co-located beside the current project. If no project is currently loaded, the default save directory is used (see Options > Environment > Default Documents Folder).
In addition to the C++ project, the code generation process also produces an ngfx-cppcap file with additional information and utilities. These ngfx-cppcap files are automatically associated with the current project and can be reopened later.
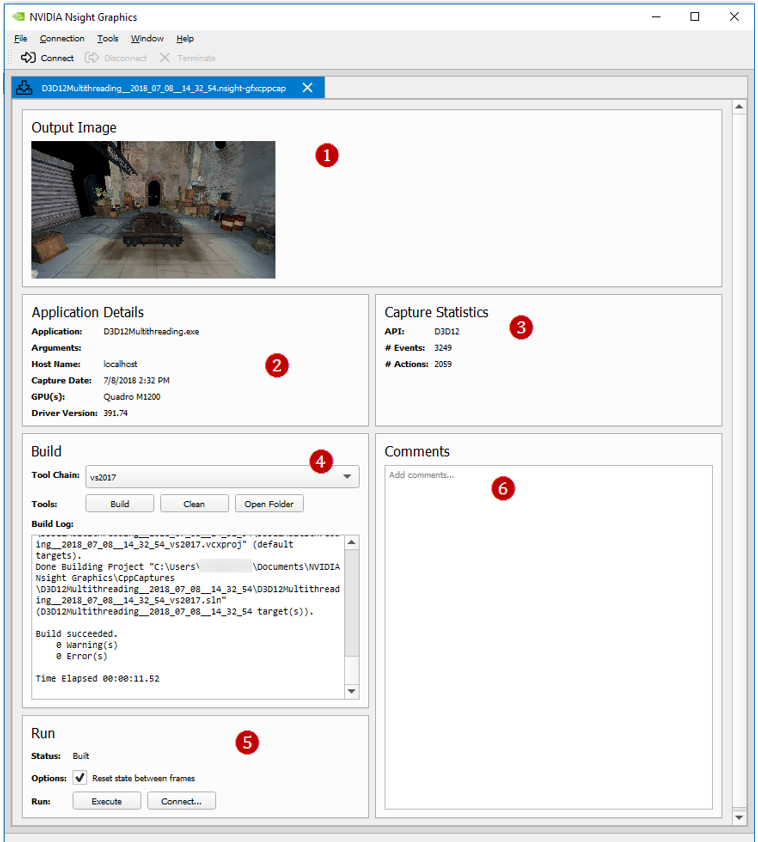
The additional features of an ngfx-cppcap file include:
Screenshot of the capture taken from the original application.
Information about the captured application and its original system.
Statistics about the captured API stream.
Utilities to build the C++ capture without opening the generated Visual Studio project.
Utilities to launch the compiled application:
The Execute button launches the compiled executable.
The Connect… button populates a new connection dialog that allows you to run a specific activity on the generated capture.
User comments that are persisted within this file.
Using a Saved Capture
To use the saved capture, use Visual Studio’s Open Folder capability on the directory that was generated. After doing this, Visual Studio reads the
CMakeLists.txtand allows you to build and run the executable. Alternatively, if you are using a version of Visual Studio that is earlier than 2017, and it does not support native CMake loading, you can use a standalone CMake tool to generate the projects for your version of Visual Studio.These solution files contain a number of generated source files.
Main.cpp— This is where all of the initialization code is called, resources are created, and each frame portion is called in a message loop.Resources NN .cpp— Depending on the number of resources to be created, there are multipleResources NN.cppfiles, each with aCreateResourcesNNcall in them, that construct all of the resources (device(s), textures, shaders, etc.) that are used in the scene. These are called inMain.cppbefore replaying the frame in the message loop.FrameSetup.cpp— This file contains all of the state setting calls to set the API state to the proper values for the beginning of the frame, including what buffers are bound, which shaders are enabled, etc.FrameNPartMM.cpp— In Direct3D and single-threaded OpenGL captures, these files contain the API functions, each namedRunFrameNPartMM(), to replay the frame. It is split into multiple files so generated code is easier to work with. These functions are called sequentially in the message loop inMain.cpp.Note
In this scenario, both
NandMMare placeholders for numbers in the multiple files generated.Frame Nwill typically beFrame0since only a single frame is captured, andPart MMwill typically be in the00-05range, depending on how many API calls are in the frame.ThreadLLFrameNPartMM.cpp— In multi-threaded OpenGL captures, these files contain the API functions, each namedThreadLLRunFrameNPartMM(), to replay the frame. The functions correspond to the work done by each thread during the frame. These functions are called by their respective threads and synchronized to replay the saved events in the same order as captured.ReadOnlyDatabase.cpp— This is a helper class to access resource data that is stored in thedata.binfile. It is accessed throughout the code via theGetResource()call.Helpers.cpp— These functions are used throughout the replayer for various conversions and access to theReadOnlyDatabase.Threading.cpp— This file contains helper functions and classes to manage threads used in the project.
Build and run the project.
Building a Saved Capture for a Different Platform
For Vulkan applications, Nsight Graphics currently supports building and running the saved capture for a different platform. In other words, you may have a capture saved on Windows but would like to run it on Embedded Linux.
Nsight Graphics tries to support the cross-platform converting on a best-efforts basis, but there are some platform-specific considerations and mechanisms outside Vulkan, and some platform-specific extensions and functions may not be able to be converted properly for a different platform. Accordingly, the runtime compatibility of the cross-platform converted capture cannot be ensured.
To use a capture saved on a different platform, you can simply open an ngfx-cppcap file in Nsight Graphics through File > Open File…, and click Build button. We automatically determine the default compile options for you.
Alternatively, you can manually build a saved capture from a command line, but you need to explicitly specify the compile options:
NV_TARGET_PLATFORM: select target platform to build for
NV_WINSYS: select window system type to interact with graphics API
NV_SDKDIR: specify the path to SDK directory (only required when building for Embedded Linux)
Examples:
Build a saved capture for Embedded Linux and use x11 as the window system:
mkdir -p int &&
cd int &&
cmake -G "Unix Makefiles" -DNV_INSTALL_FOLDER=bin -DNV_TARGET_PLATFORM=LINUX_EMBEDDED -DNV_WINSYS=x11 -DNV_SDKDIR=<SDK_PATH> .. &&
cmake --build . --config RelWithDebInfo --target install -- -j13
Build a saved capture for Windows:
MD int &&
CD int &&
cmake -G "Visual Studio 16 2019" -A x64 -DCMAKE_GENERATOR_INSTANCE="C:\Program Files (x86)\Microsoft Visual Studio\2019\Professional" -DNV_INSTALL_FOLDER=bin .. &&
cmake --build . --config RelWithDebInfo --target install
Build a saved capture for Linux Desktop and use xcb as the window system:
mkdir -p int &&
cd int &&
cmake -G "Unix Makefiles" -DNV_INSTALL_FOLDER=bin -DNV_TARGET_PLATFORM=LINUX_DESKTOP -DNV_WINSYS=xcb .. &&
cmake --build . --config RelWithDebInfo --target install -- -j13
Changing a Resource
If you want to change a resource (for example, to swap in a different texture), you can change the parameters for the construction by looking within the ResourcesNN.cpp files for the texture in question. Textures can be matched by size and/or format. Once you find the variable for the texture, look for that name in the FrameSetup.cpp file. This contains source lines to lock the texture, call GetResource() to retrieve the data from the ReadOnlyDatabase, and then call memcpy(…) to link the data to the texture. You can substitute the call to the ReadOnlyDatabase with a call to read from a file of choice to load the alternate texture.
Changing a Draw Call
If you want to change the state for a given draw call, you can locate the draw call by replaying the capture within Nsight Graphics and scrubbing to find the call you want to examine. Search in the FrameNPartMM.cpp files for Draw NN, where NN is the 0-based draw call index that Nsight Graphics displayed on the scrubber. Doing this brings you to the source line for that draw call, and from here, you can add any state changes before that call. Alternatively, you can also disable that specific call by commenting out the source call containing the draw call.
Parameters
-repeatN— This setting enables Nsight Graphics to use serialized captures in the normal arch workflow. The N setting indicates the number of times to repeat the entire capture; the default setting is -1, which keeps the capture running on an infinite loop.-noreset— This setting controls whether context state and all resources are reset to their beginning of frame value. When this setting is specified, all frame restoration operations are skipped, avoiding the performance cost associated with them. Note that this may introduce rendering errors if the rendered frame has a data dependency on the results of a previous frame. Additionally, note that, while uncommon, skipping frame restoration does have the opportunity to lead to application crashes.
Generate C++ Capture from a Command Line#
To understand how to generate C++ capture, start by launching the CLI with the --help-all argument. This will display all available options the CLI has.
The CLI can launch an application for generating C++ capture in the form:
ngfx.exe --activity="Generate C++ Capture" [general_options] [Generate_C++_Capture_activity_options]
See CLI Arguments Details for the general options details, the Generate C++ Capture activity options:
Option |
Description |
|---|---|
–wait-seconds arg |
Wait time (in seconds) before capturing a frame. |
–wait-hotkey |
The capture is expected to be triggered by pressing Target application capture hotkey on the running application. If enabled, the option about waiting in seconds would be ignored. |
Examples:
ngfx.exe --activity="Generate C++ Capture" --platform="Windows"
--exe=D:\Bloom\bloom.exe --wait-seconds=10
Launch an application for automatically generating C++ capture after waiting the specified count of seconds.
ngfx.exe --activity="Generate C++ Capture" --platform="Windows"
--exe=D:\Bloom\bloom.exe --wait-hotkey
Launch an application for manually triggering capture so as to generate C++ capture. CLI is waiting for the capture triggered from the target side (pressing Target application capture hotkey on the running application).
ngfx.exe --activity="Generate C++ Capture" --platform="Windows"
--project="D:\Projects\Bloom.ngfx-proj" --wait-seconds=10 --no-timeout
Launch an application for automatically generating C++ capture after waiting the specified count of seconds, but with using the launch options and activity options read from a Nsight Graphics project. In addition,
--no-timeoutdisables all timeouts in case this application may take a long time to launch/capture.