

Fraud Detection Demo
This demo shows how to use Kumo to detect fraudulent credit card transactions.
Prerequisites
- Kumo access: Ensure you have access to a Kumo environment, including the platform URL and API credentials required for your deployment.
- [SPCS Only]: Ensure the Kumo app is installed and started. If you have not already installed or started Kumo, follow the Snowflake Native App installation guide.
What You Will Learn in This Demo
You will learn how to use Kumo’s GNNs to predict fraudulent transactions. This demo uses a dataset created by the Sparkov Fraud Data Generator. This dataset generator simulates credit card transactions according to several real-world fraud patterns, such as:
- A credit card being stolen: multiple fraudulent transactions happening in quick succession
- A fraudulent merchant: a bad merchant making many fake transactions
As you work through this tutorial, you see how the Kumo Graph Neural Network learns these temporal and relational patterns effectively.
The dataset is organized into four main tables:
- Customers: Contains information about ~1000 customers and their location
- Merchants: Contains information about ~700 merchants and their location
- Transactions: Contains 1 million transactions spanning over about 18 months
- Fraud Reports: Contains 14 thousand customer fraud reports, half of which have been confirmed to be valid according the fraud operations team
While this dataset is intentionally kept small for demonstration purposes, the Kumo RDL Platform can easily scale to datasets that are thousands of times larger.
Step 0 [SPCS Only]: Upload Data to Your Snowflake Account
See details
Follow these steps to upload the H&M data:
-
Log into your Snowflake account.
-
Run these commands to load the dataset from Kumo’s public S3 bucket into your Snowflake account:
sql -
Inspect the tables:
While the data is being uploaded, you can continue with Step 1 and connect your database to Kumo. After that, return to Snowflake to inspect the tables using the following queries:
sql
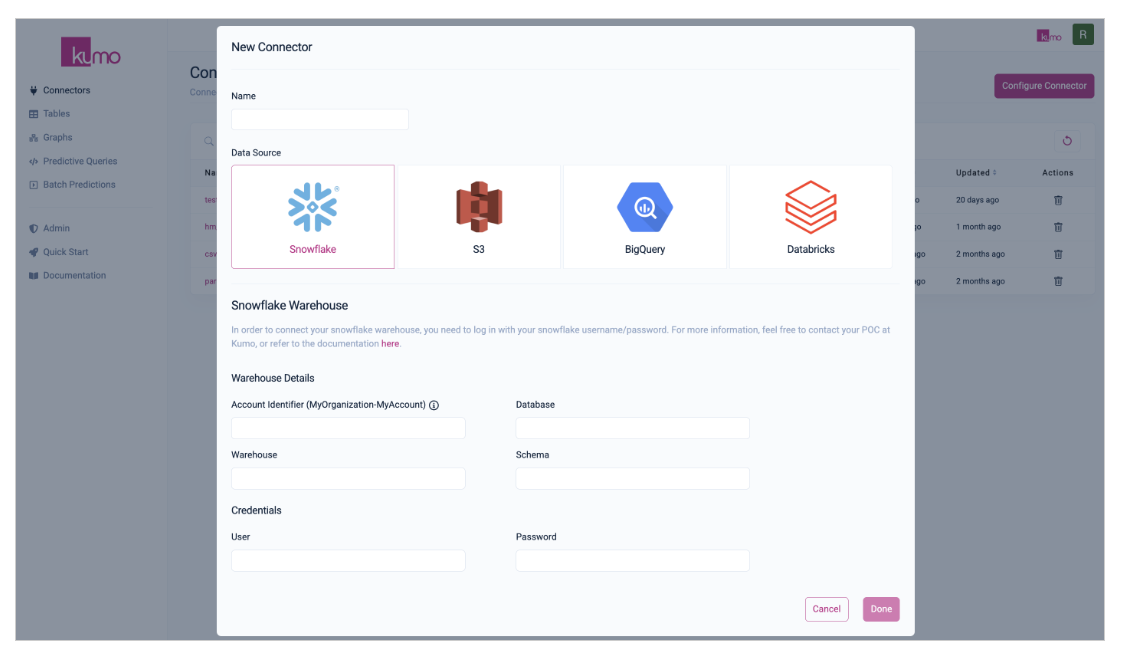
Step 1: Set Up Your Connector
This step gives Kumo access to your data source.
-
Open Connector Configuration:
- In the left-hand menu, click on
Connectors. - Click
Configure Connectorto open the “New Connector” modal.
- In the left-hand menu, click on
-
Create a New Connector:
i. Provide a name for your new connector (for example,
fraud_connector).ii. Choose your data source:
- For Snowflake, enter the following details:
- Account Identifier:
ORGNAME-ACCOUNT_NAME. Find your account details. - Database: The database where your data exists. Ensure your user has
USAGEprivileges. If you followed Step 0, it will beKUMO_DB. - Warehouse: The warehouse to process data. Ensure your user has
USAGEprivileges. - Schema Name: The schema to load tables from. Your user should have
USAGEandSELECTprivileges, andCREATE TABLEfor writing back predictions. If you followed Step 0, it will beFRAUD. - User: Your username for Snowflake.
- Password: Your password for Snowflake.
- Account Identifier:
- For S3:
- In the S3 Path textbox, enter:
s3://kumo-public-datasets/credit_card_fraud/. - Click the
Validatebutton to see all files within the directory.
- In the S3 Path textbox, enter:
- For other data sources: Refer to Data Connectors.
iii. Click
Doneto save the connector. - For Snowflake, enter the following details:
Step 2: Register Table Schema
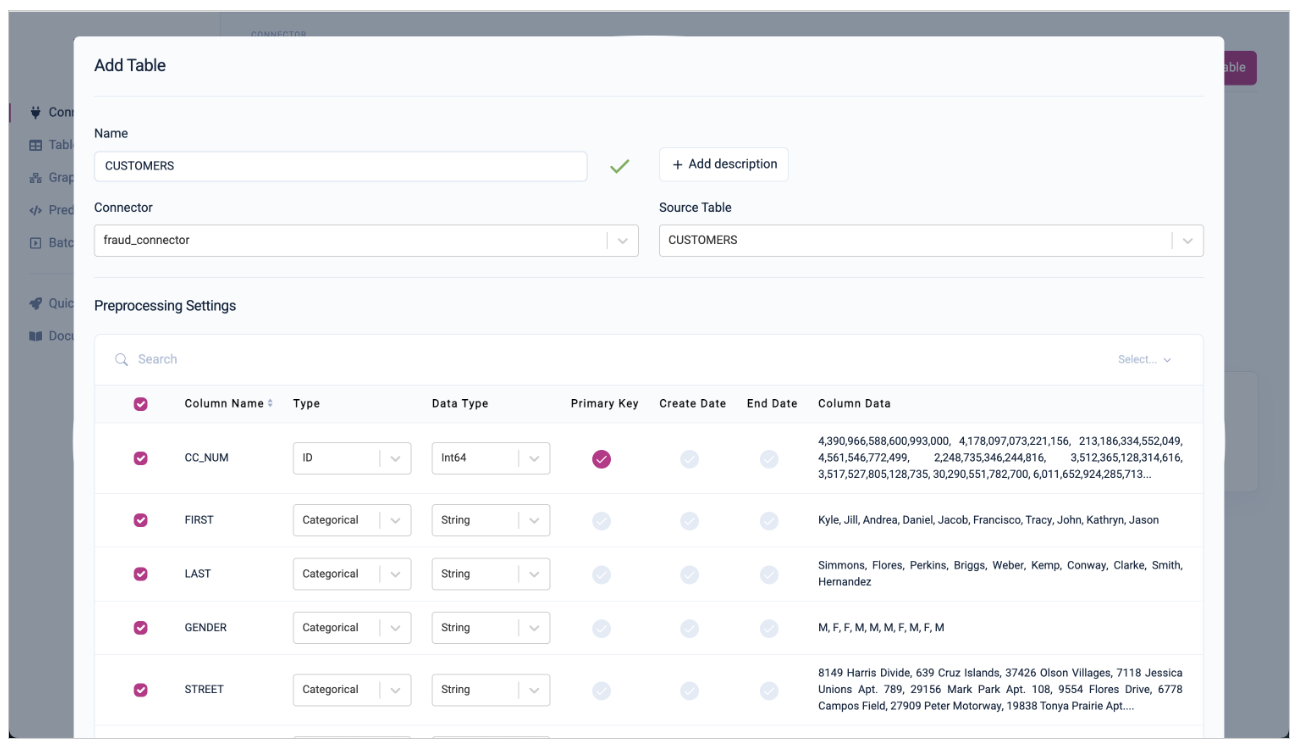
Register your tables so Kumo knows how to encode each column and how to connect tables in the graph.
-
Navigate to Tables Overview:
- In the left-hand menu, click on
Tables.
- In the left-hand menu, click on
-
Add Data Tables (Customers, Articles, Transactions):
Follow the steps for each table:
- Click
Add Table. - Set the table name.
- Select the appropriate connector (for example,
fraud_connector). - Choose the respective table from your data source.
- Wait for column types to be inferred based on sample statistics. If this takes too long, which can happen in SPCS deployments if the warehouse you are using is busy, skip the inferring and set the column types manually. Follow these steps:
- Check the type of each column: The type of a column refers to how the data is later encoded. Kumo supports preprocessing for the following generic types:
- Numerical: Integers and floats where the ordering of numbers from lower to higher values has semantic meaning (for example, product price or percentage discount).
- Categorical: Boolean values or string values typically only a single token in length, with limited semantic meaning, and up to 4000 unique values (for example, premium subscription status).
- Multi-categorical: Comma-separated variable length lists of categorical values (for example, a list of product attributes or categories).
- ID: Columns the correspond to primary or foreign keys in a relational schema. (for example, customer ID or product group number).
- Text: String values with multiple tokens in length, where the content has semantic meaning (for example, product description).
- Timestamp: String or format-specific date/timestamp values (preferably ISO 8601). Ensure date/time format is valid.
- Embedding: Lists of floats, all of equal length; typically the output of another AI model.
- Check the data type: This refers to the underlying data type. This is especially relevant for connecting tables later, as only columns with the same type can be connected through a Primary/Foreign key link. No modification is needed for data types for the H&M dataset.
- Set the primary key: This is the unique identifier column of a table and is used later within the Primary/Foreign key connection.
- Set a create date: For tables that correspond to real-world events (such as transactions), this is the time that the event took place in the real world. Kumo uses this to automatically prevent data leakage during training time, which is a very common mistake when building models by hand.
- Check the type of each column: The type of a column refers to how the data is later encoded. Kumo supports preprocessing for the following generic types:
- Before saving, please verify if all properties are set correctly:
-
Customers: Set the Primary Key to
CC_NUMwith Type =ID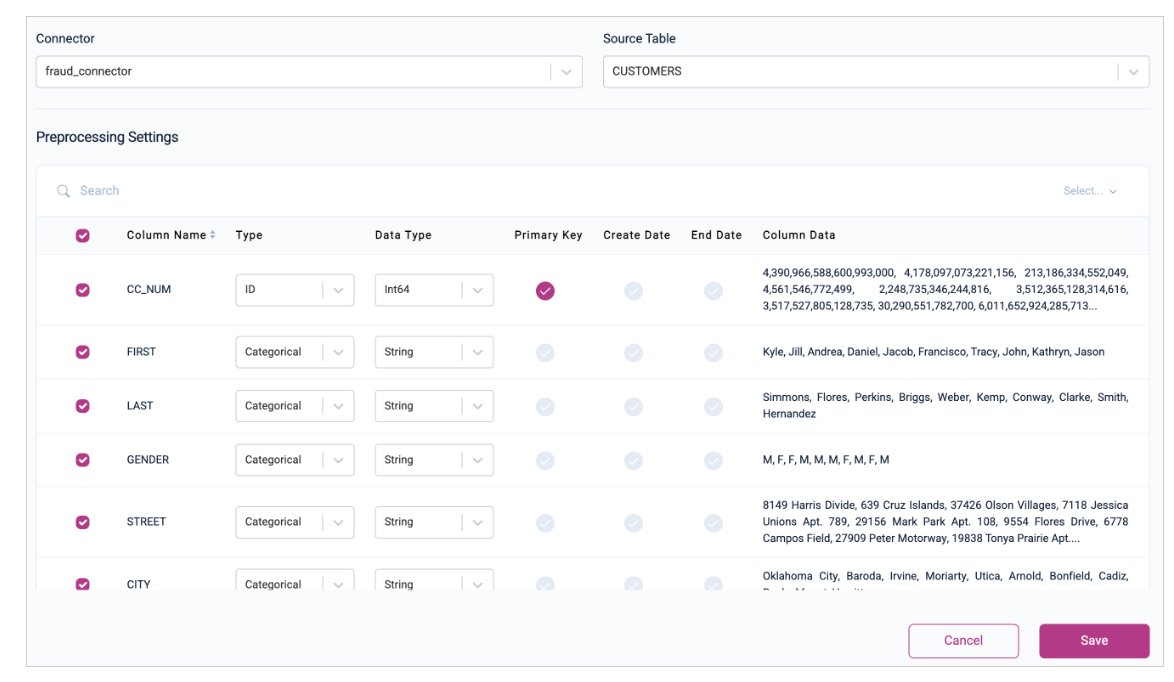
-
Merchants: Set the Primary Key to
MERCHANTwith Type =ID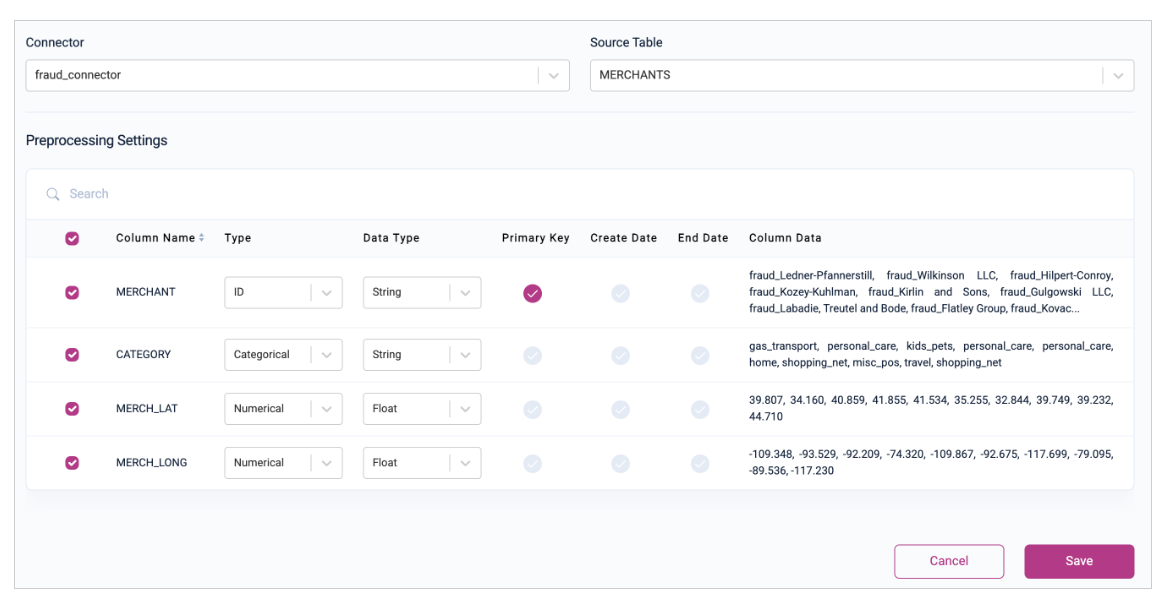
-
Transactions: Change the Type of
CC_NUMandMERCHANTtoID, because they are foreign keys into other tables. SetTRANS_NUMto be the Primary Key, with Type =IDas well. SetTRANS_DATE_TRANS_TIMEas the Create Date.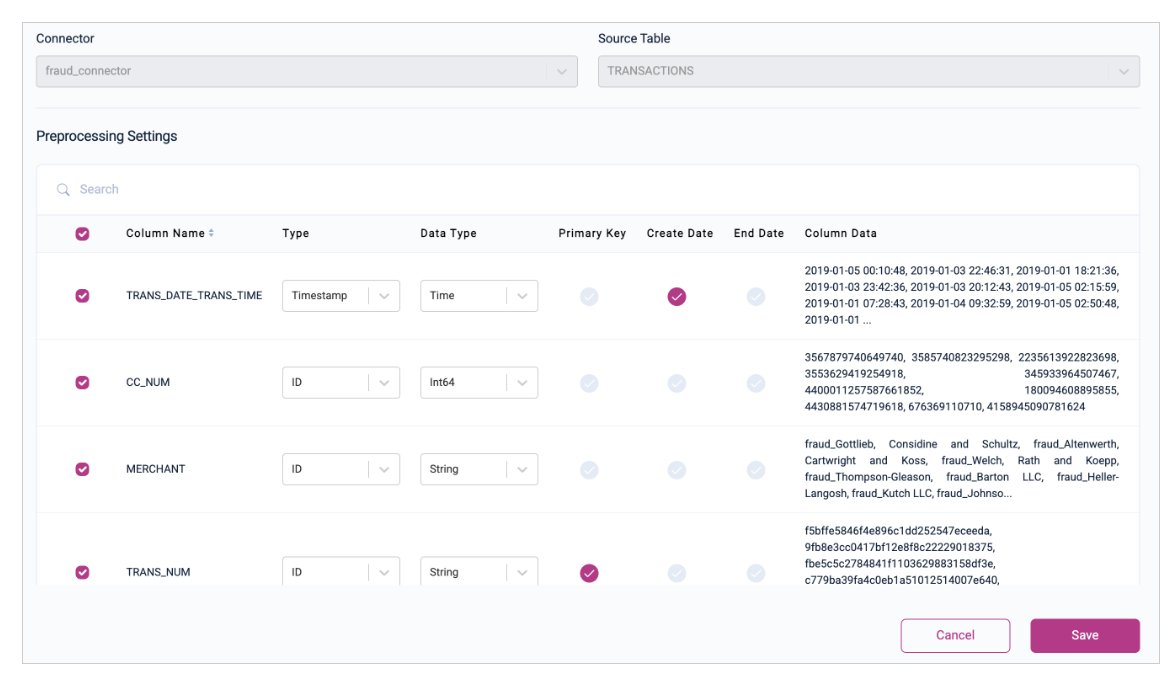
-
Fraud Reports: Change the type of
TRANS_NUMto ID because it is a foreign key into theTRANSACTIONStable. SetREPORT_TIMEas the Create Date.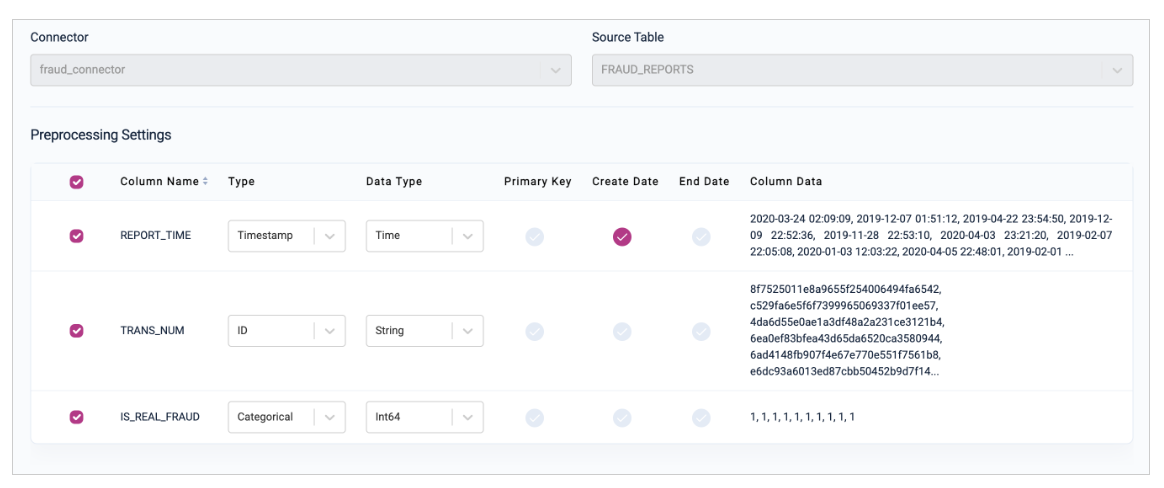
-
- Click
Saveto save each table.
- Click
Step 3: Create a Graph Schema
Define the graph schema to specify how your data tables connect. This is required to use Kumo’s Graph Neural Networks (GNNs).
-
Navigate to Graph Setup:
- In the left-hand menu, click on
Graphs.
- In the left-hand menu, click on
-
Create a New Graph:
i. Click
Create Graphin the top right-hand corner.ii. Provide Graph Details:
- On the “Graph Setup” page, provide a name for your new graph (for example,
fraud_graph).
iii. Select Tables:
- Select the
TRANSACTIONS,CUSTOMERS,FRAUD_REPORTS, andMERCHANTStables by checking the respective boxes.
iv. Configure Graph Links:
- Click the
Nextbutton on the top right-hand corner. - Kumo automatically detects and suggests linkages.
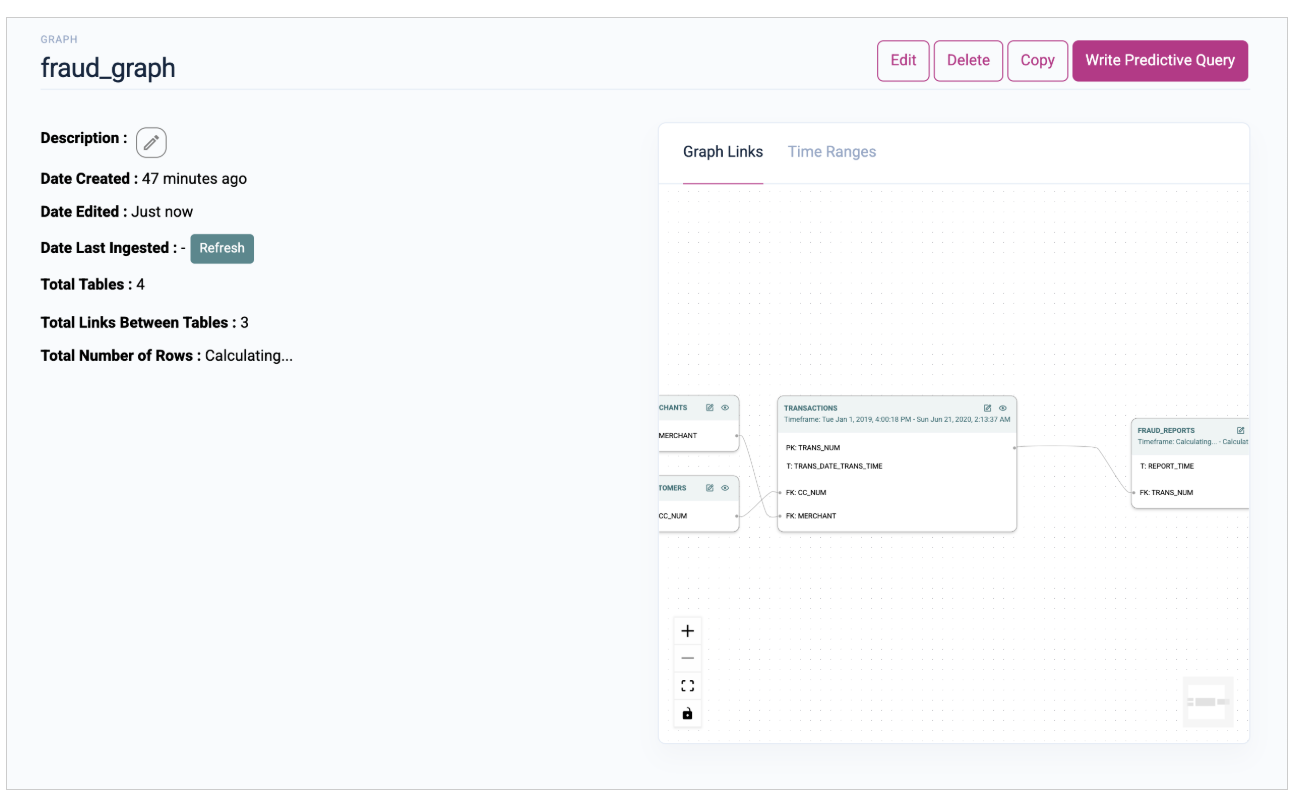
- Verify the linkages:
- Ensure
CC_NUMinCUSTOMERSis linked toCC_NUMinTRANSACTIONS. - Ensure
MERCHANTinMERCHANTSis linked toMERCHANTinTRANSACTIONS. - Ensure
TRANS_NUMinFRAUD_REPORTSis linked toTRANS_NUMinTRANSACTIONS.
- Ensure
- Click the
Confirm Groupbutton for both column groups.
v. Complete Graph Creation:
- Click on the
Complete Graph Creationbutton on the top right-hand corner.
- On the “Graph Setup” page, provide a name for your new graph (for example,
You should now view the following graph:
Step 4: Train Your First Model via PQL
After defining the graph, train a model using Kumo’s Predictive Query Language (PQL). PQL specifies the prediction target and the entity to make predictions for. In this demo, you will predict whether each transaction is fraudulent.
-
Open Predictive Query Creation:
- Click on
Write Predictive Queryin the top right-hand corner.
- Click on
-
Train Model through a Predictive Query:
i. Provide a name for your predictive query (for example,
cc_fraud).ii. Select the graph you created earlier from the drop-down menu.
iii. Specify PQuery:
-
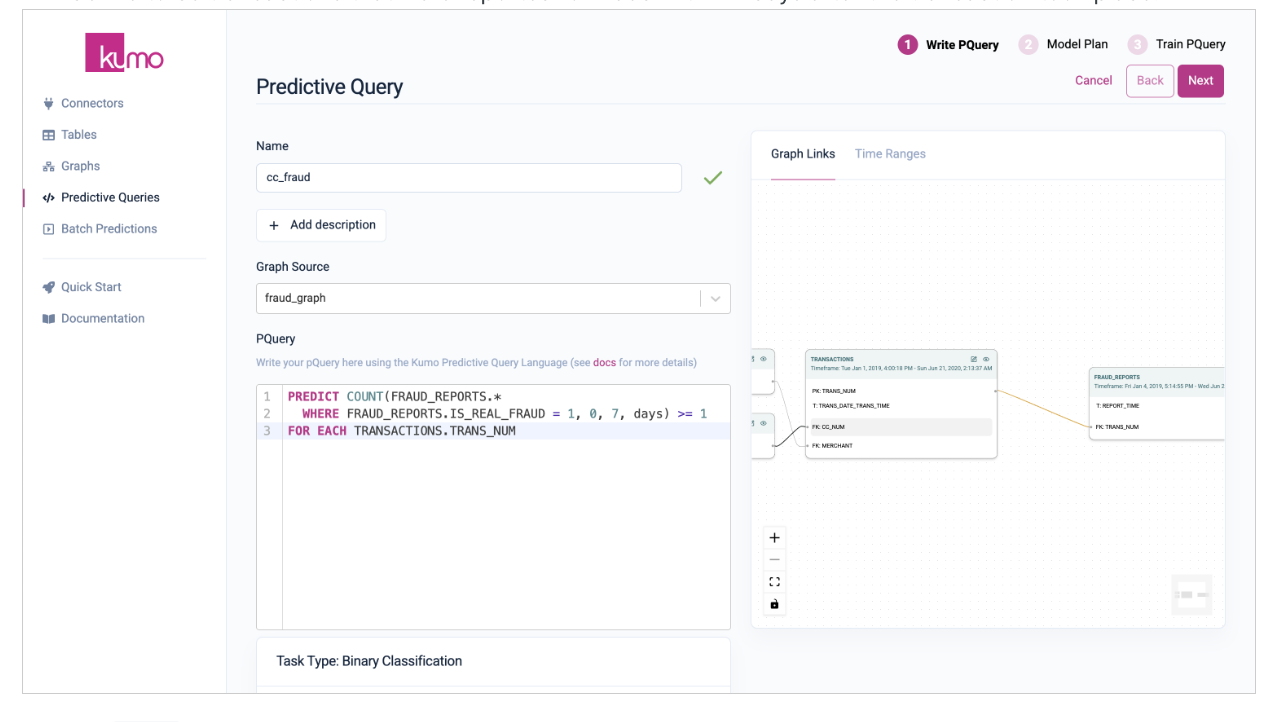
In the PQuery text area, insert the following PQL statement to predict the probability that a given transaction is fraudulent.
PQLThe query defines how the training data is (automatically) generated. In this example, Kumo generates a training table of positive and negative examples used to train the model. Positive examples are transactions reported for fraud within 7 days of the transaction date.
iv. Click
Nextto specify the Model Planner.-
Since this fraud dataset has extremely heavy class imbalance (fraud is an extremely rare event), tell the GNN to pay more attention to the (rare) positive examples. To do this, set
majority_sampling_ratioto100andtune_metrictoauprc.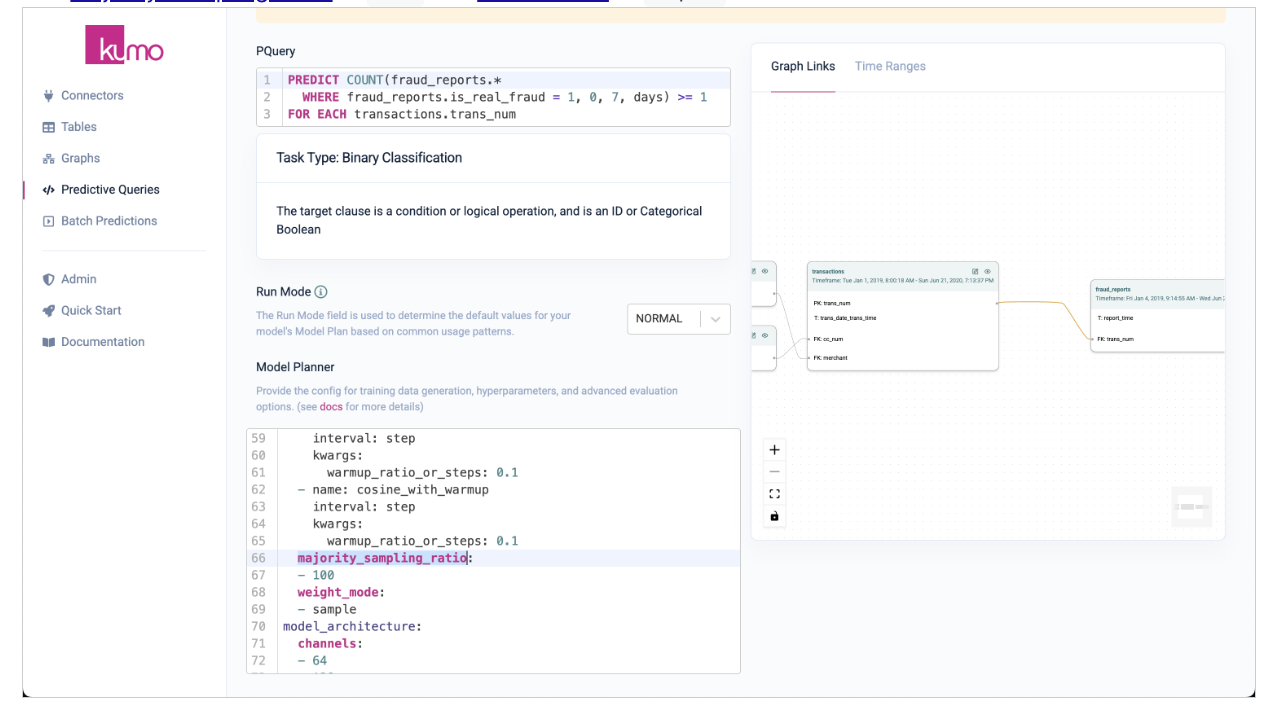
v. Click
Save and Train. -
🏆 Great work! Your model is now training. This can take a few minutes while Kumo ingests data, encodes columns, builds the computation graph, and trains and evaluates the models. You can monitor progress through the training table statistics and loss curves. When training is complete, review the results:
- Check the evaluation metrics in the evaluation tab.
- Inspect the holdout set through the Download button, or through the SQL command shown in Snowflake (for SPCS deployments).
- Explore example predictions in the explorer tab, which shows the specific predictions made by the model and how they match actual outcomes.
Conclusion
🚀 You have now successfully created and trained your first predictive model using Kumo. Here is a summary of what this demo covers:
- Set Up Your Connector: Connected your data source to Kumo.
- Register Table Schema: Defined the table schemas.
- Create Your Graph: Defined the relationships between tables.
- Create Your PQuery: Wrote and trained models through a predictive query to make predictions.
Next, you can start training models on your data. To learn how to write a PQuery, refer to Understanding Predictive Queries. You can also learn how to create batch predictions or automate workflows with the Python SDK.