Real-Time Alert Workflow#
The Real-Time Alert Workflow monitors live video streams and generates alerts when the VLM detects anomalies or specified events.
Capabilities
Use Cases
Traffic collision detection
Unusual behavior detection
Equipment malfunction identification
Safety hazard detection
Estimated Deployment Time: 15-20 minutes
The following diagram illustrates the real-time alert workflow architecture:
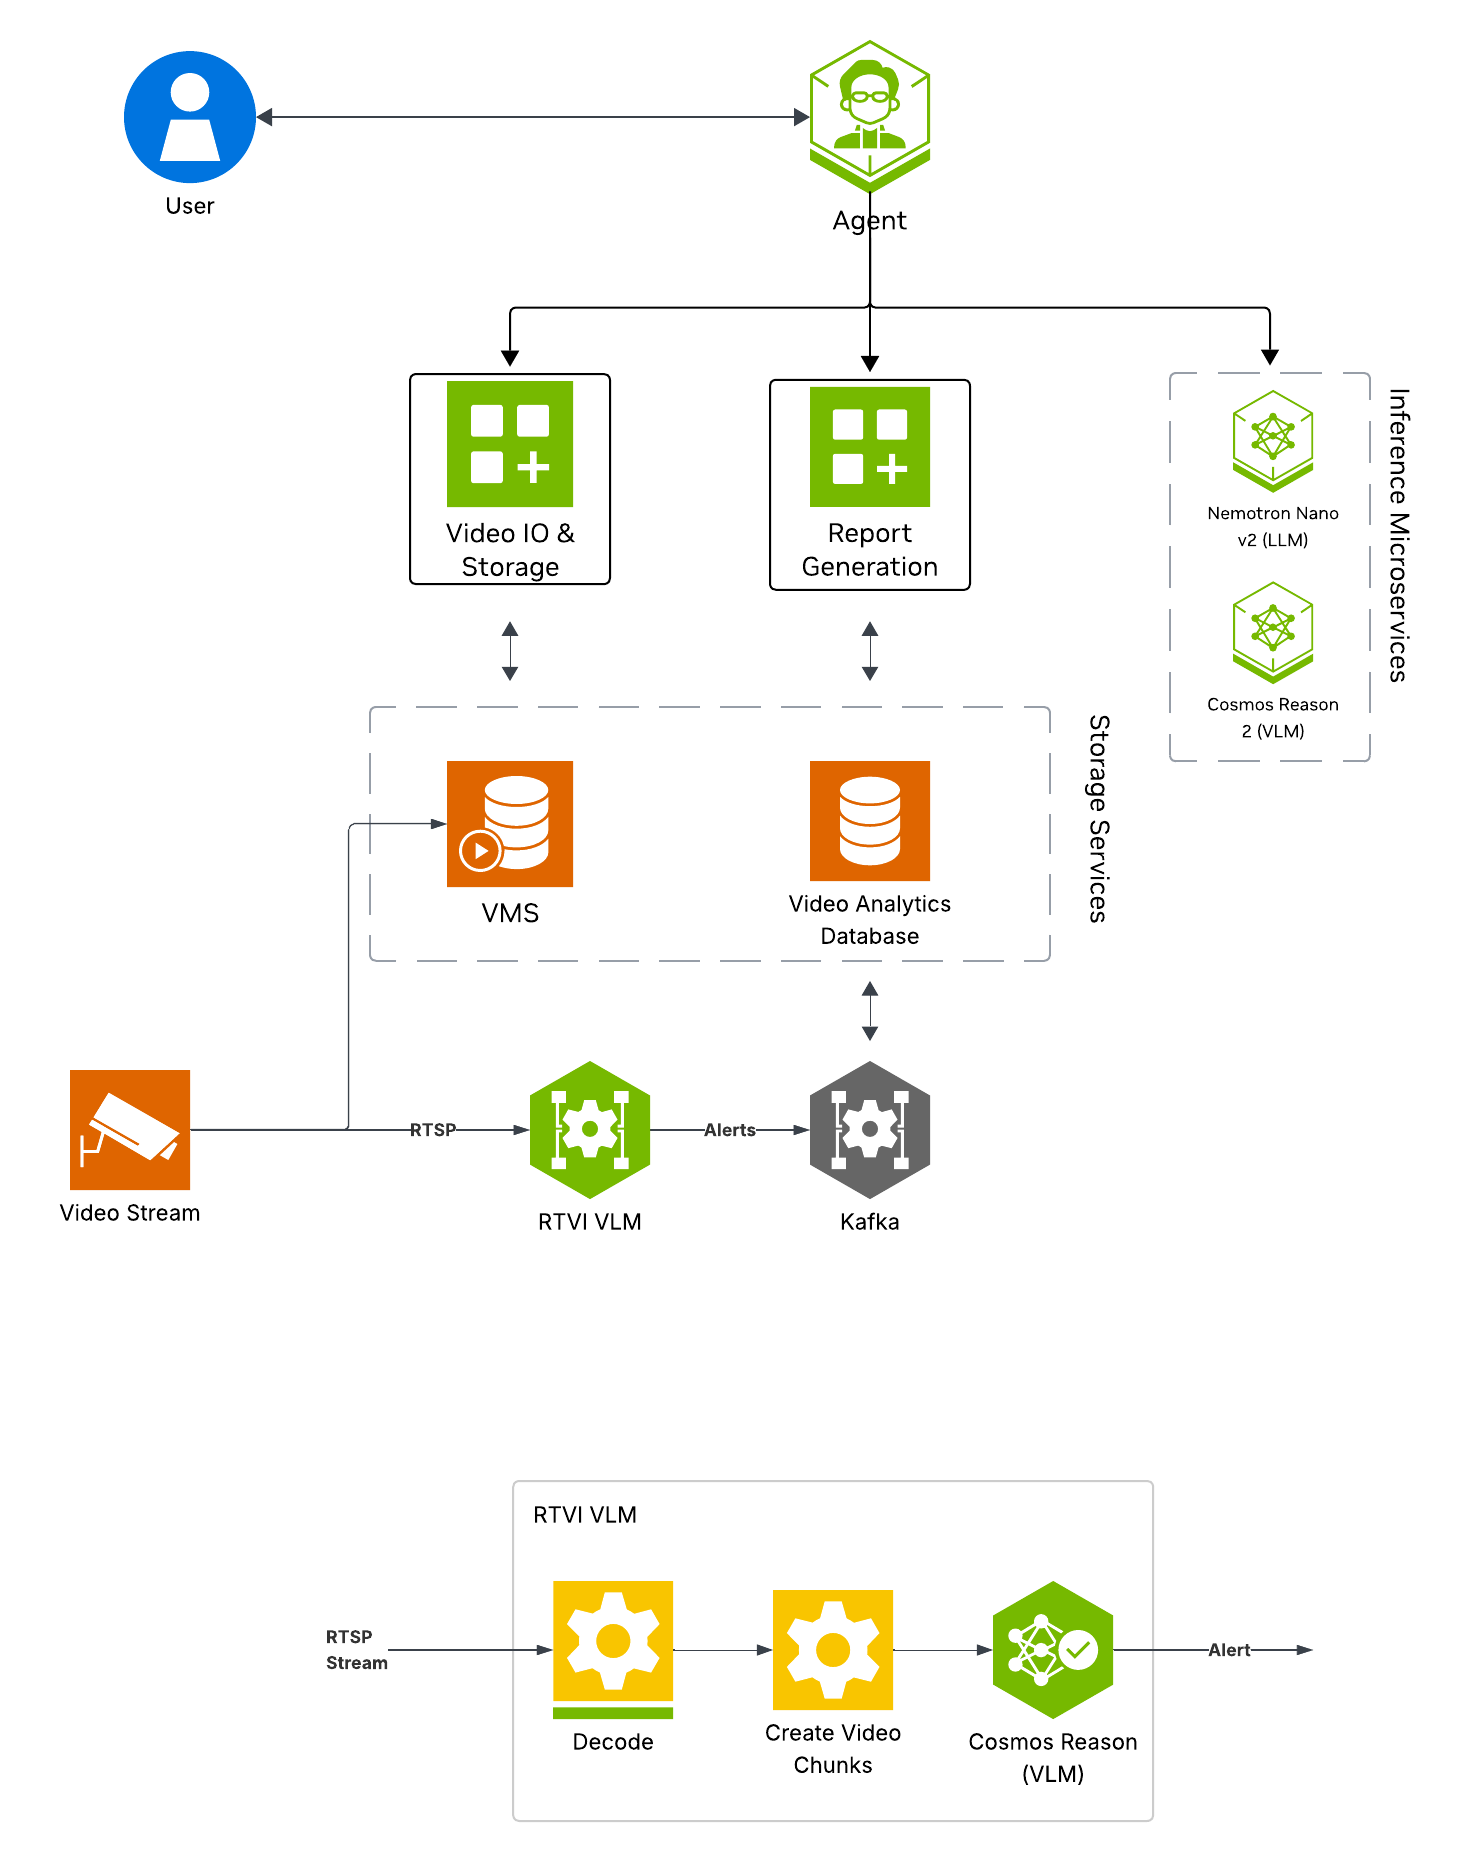
Key Features of the Real-Time Alert Agent:
Continuous frame sampling from video streams
Natural language queries for detected alerts
Frame sampling and VLM-based anomaly detection using the RTVI microservice.
Configurable alert prompts and invocation settings for custom detection scenarios.
Report Generation
What’s being deployed#
VSS Agent: Agent service that orchestrates tool calls and model inference to answer questions and generate outputs
VSS Agent UI: Web UI with chat, video upload, and different views
RTVI VLM: Real-Time VLM microservice for alert verification
Video IO & Storage (VIOS): Video ingestion, recording, and playback services used by the agent for video access and management
NVStreamer: Video streaming service for video playback
Nemotron LLM (NIM): LLM inference service used for reasoning, tool selection, and response generation
Cosmos Reason (NIM): Vision-language model with physical reasoning capabilities
ELK: Elasticsearch, Logstash, and Kibana stack for log storage and analysis
Phoenix: Observability and telemetry service for agent workflow monitoring
Prerequisites#
Before you begin, ensure all of the prerequisites are met. See Prerequisites for more details.
Deploy#
Note
For instructions on downloading sample data and the deployment package, see Download Sample Data and Deployment Package in the Quickstart guide.
Skip to Step 1: Deploy the Agent if you have already downloaded and deployed another agent workflow.
Step 1: Deploy the Agent#
Note
Set the NGC CLI API key, then run the deploy commands for your GPU type.
Refer to VSS-Agent-Customization-configure-llm and VSS-Agent-Customization-configure-vlm for all LLM and VLM (local and remote) configuration options.
For advanced settings and Agent Customization, see the deploy command help.
# Set NGC CLI API key
export NGC_CLI_API_KEY='your_ngc_api_key'

# View all available options
scripts/dev-profile.sh --help
scripts/dev-profile.sh up -p alerts -m real-time -H H100
scripts/dev-profile.sh up -p alerts -m real-time -H H100 \
    --llm-device-id 1 --vlm-device-id 2
export LLM_ENDPOINT_URL=https://your-llm-endpoint.com
scripts/dev-profile.sh up -p alerts -m real-time -H H100 \
    --use-remote-llm
scripts/dev-profile.sh up -p alerts -m real-time -H RTXPRO6000BW
scripts/dev-profile.sh up -p alerts -m real-time -H RTXPRO6000BW \
    --llm-device-id 1 --vlm-device-id 2
export LLM_ENDPOINT_URL=https://your-llm-endpoint.com
scripts/dev-profile.sh up -p alerts -m real-time -H RTXPRO6000BW \
    --use-remote-llm
scripts/dev-profile.sh up -p alerts -m real-time -H L40S \
    --llm-device-id 1 --vlm-device-id 2
export LLM_ENDPOINT_URL=https://your-llm-endpoint.com
scripts/dev-profile.sh up -p alerts -m real-time -H L40S \
    --use-remote-llm
See VSS-Agent-Customization-configure-llm for remote LLM endpoint options.
export LLM_ENDPOINT_URL=https://your-llm-endpoint.com
scripts/dev-profile.sh up -p alerts -m real-time -H DGX-SPARK \
    --use-remote-llm
See VSS-Agent-Customization-configure-llm for remote LLM endpoint options.
export LLM_ENDPOINT_URL=https://your-llm-endpoint.com
scripts/dev-profile.sh up -p alerts -m real-time -H IGX-THOR \
    --use-remote-llm
See VSS-Agent-Customization-configure-llm for remote LLM endpoint options.
export LLM_ENDPOINT_URL=https://your-llm-endpoint.com
scripts/dev-profile.sh up -p alerts -m real-time -H AGX-THOR \
    --use-remote-llm
See Local LLM and VLM deployments on OTHER hardware for known limitations and constraints.
scripts/dev-profile.sh up -p alerts -m real-time -H OTHER \
    --llm-env-file /path/to/llm.env --vlm-env-file /path/to/vlm.env
scripts/dev-profile.sh up -p alerts -m real-time -H OTHER \
    --llm-device-id 1 --vlm-device-id 2 \
    --llm-env-file /path/to/llm.env --vlm-env-file /path/to/vlm.env
export LLM_ENDPOINT_URL=https://your-llm-endpoint.com
scripts/dev-profile.sh up -p alerts -m real-time -H OTHER \
    --use-remote-llm --vlm-env-file /path/to/vlm.env
This command will download the necessary containers from the NGC Docker registry and start the agent. Depending on your network speed, this may take a few minutes.
This deployment uses the following defaults:
Host IP: src IP from
ip route get 1.1.1.1LLM model: nvidia/nvidia-nemotron-nano-9b-v2
VLM model: nvidia/cosmos-reason2-8b
To use a different IP than the one derived:
-i: Manually specify the host IP address.-e: Optionally specify an externally accessible IP address for services that need to be reached from outside the host.
Note
When using a remote VLM of model-type nim (not openai), see How does a remote nim VLM access videos? for access requirements.
Once the deployment is complete, check that all the containers are running and healthy:
docker ps
Once all the containers are running, you can access the agent UI at http://<HOST_IP>:3000/.
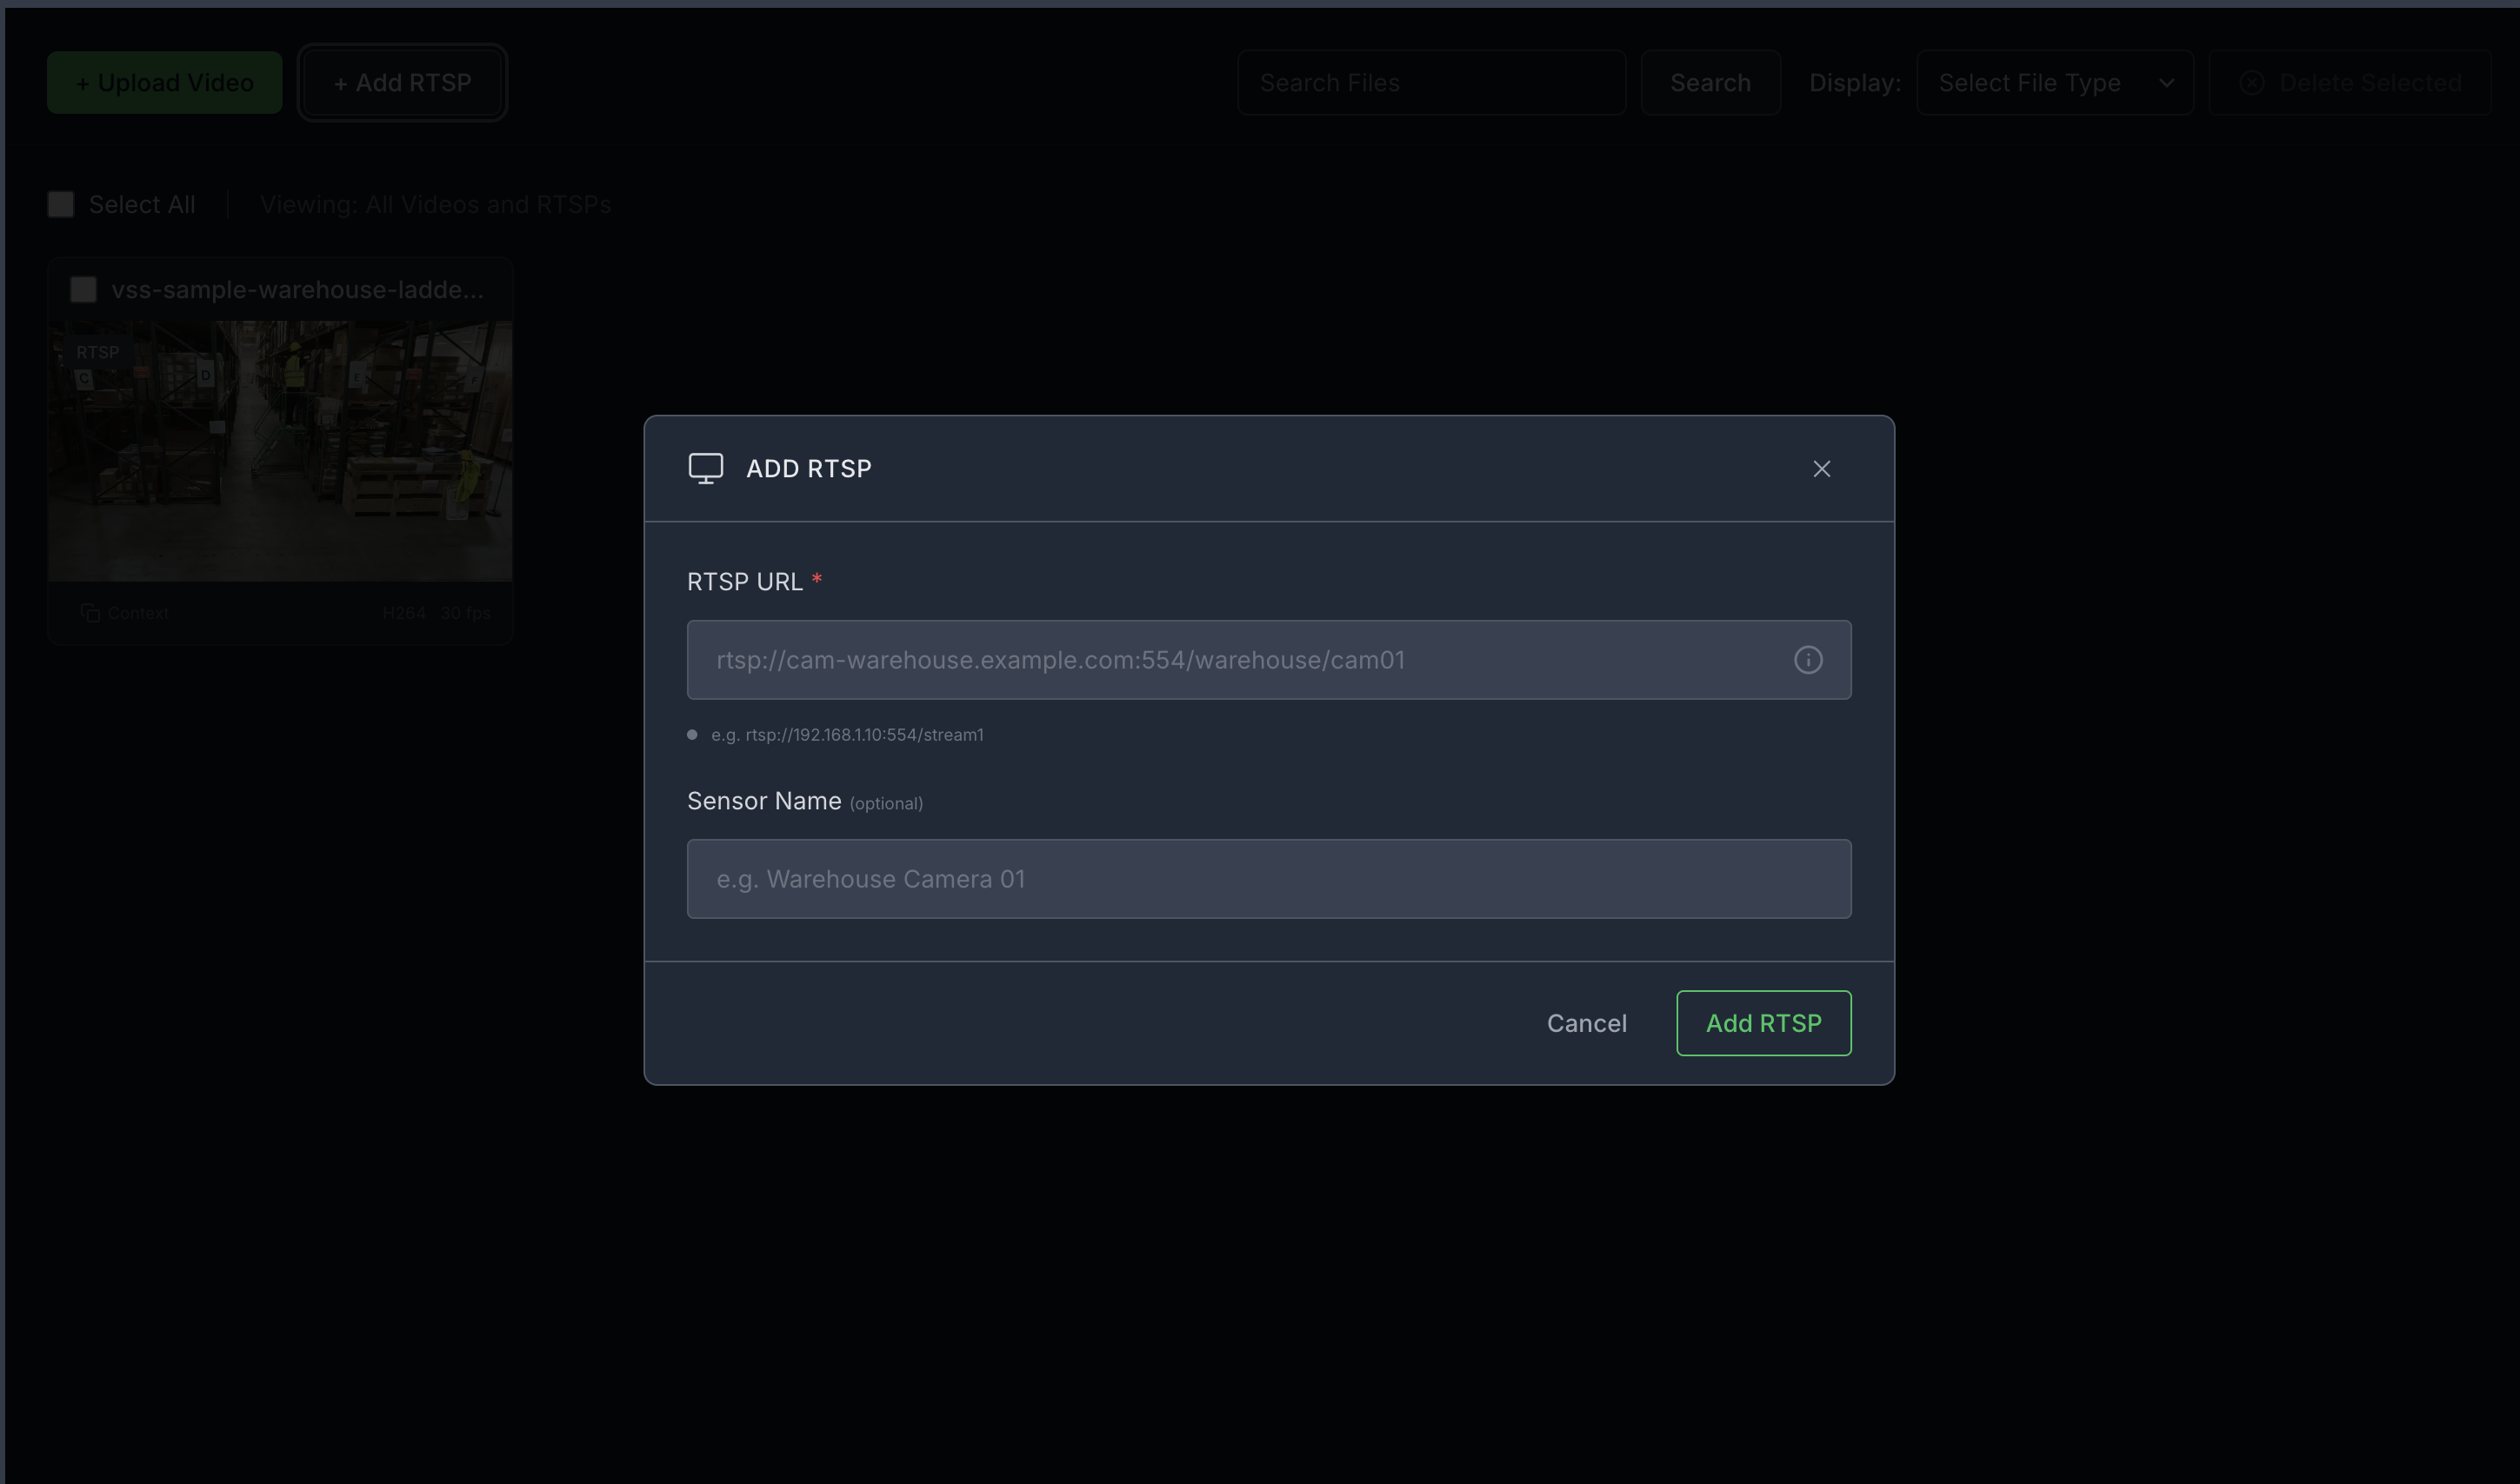
Step 2: Add a video stream#
Add an RTSP stream by clicking the “+ Add RTSP” button under the “Video Management tab” on the agent UI. If you do not have an RTSP stream, you can use NVStreamer at http://<HOST_IP>:31000 to upload a video file and create an RTSP stream.
For this profile, use the warehouse_sample.mp4 stream. When prompting, ensure the sensor name matches exactly what you configured for the stream (e.g., warehouse_sample).
Note
By default, this profile only supports up to one stream being processed at a time.
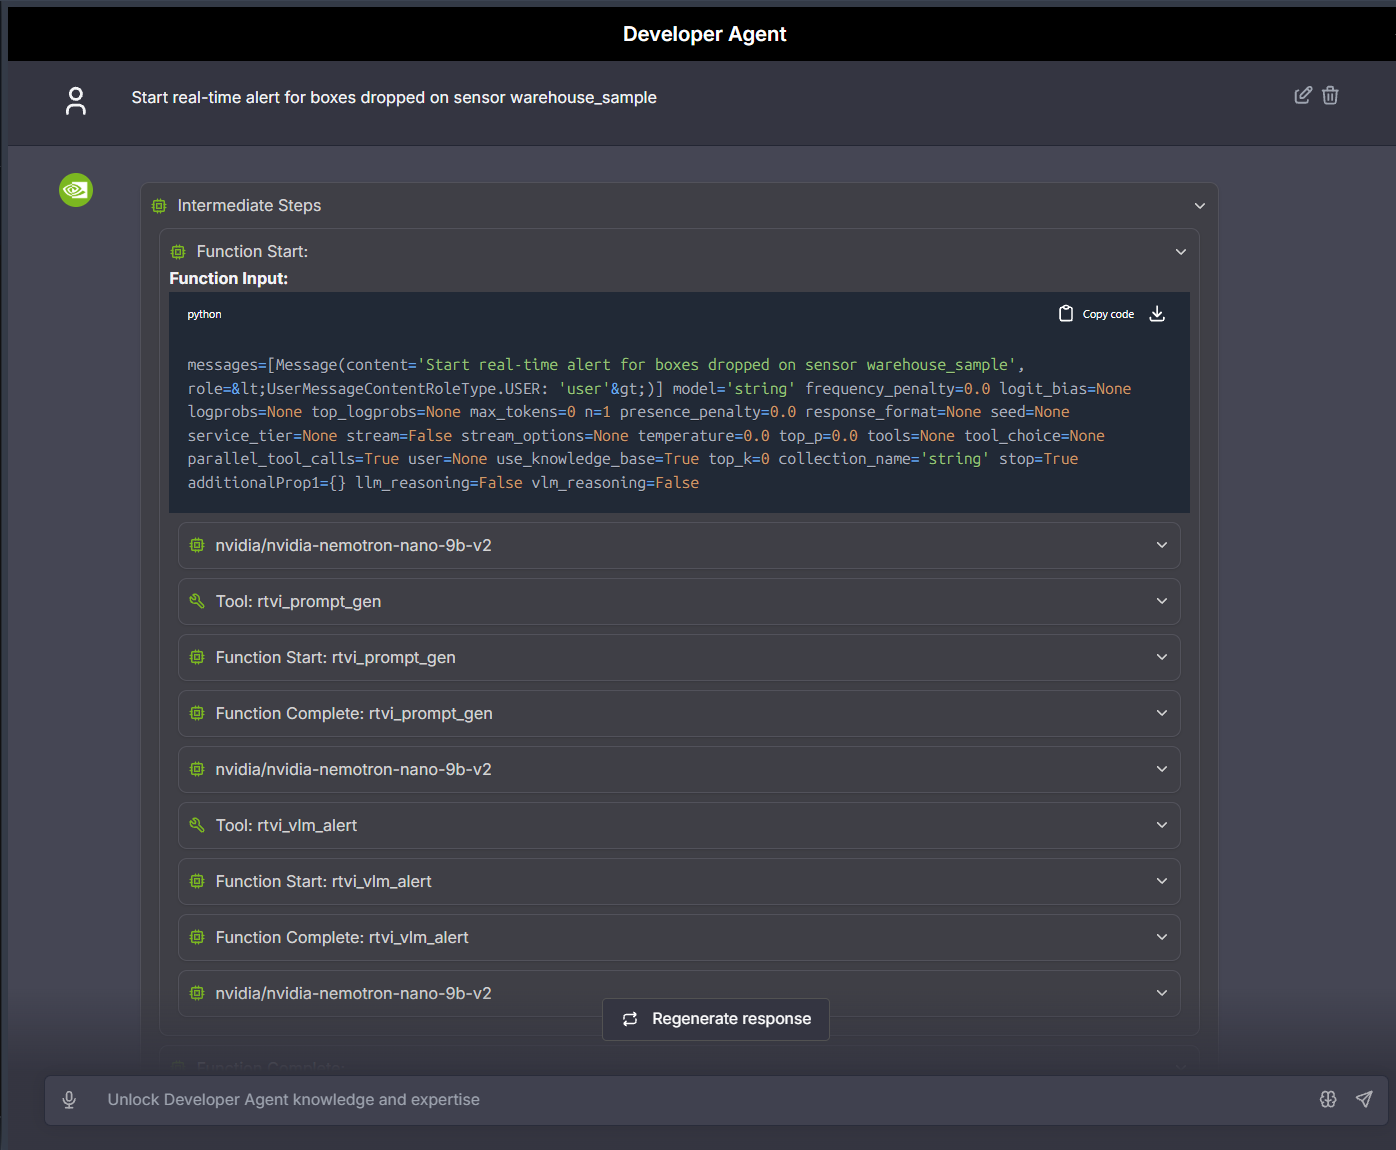
Step 3: Start a real-time alert#
Launch the Agent UI at http://<HOST_IP>:3000/.
Use the Chat Tab to interact with the system:
- Start an RTVI real-time alert for a stream by specifying the alert type.
Sample prompt: Start real-time alert for boxes dropped on sensor warehouse_sample
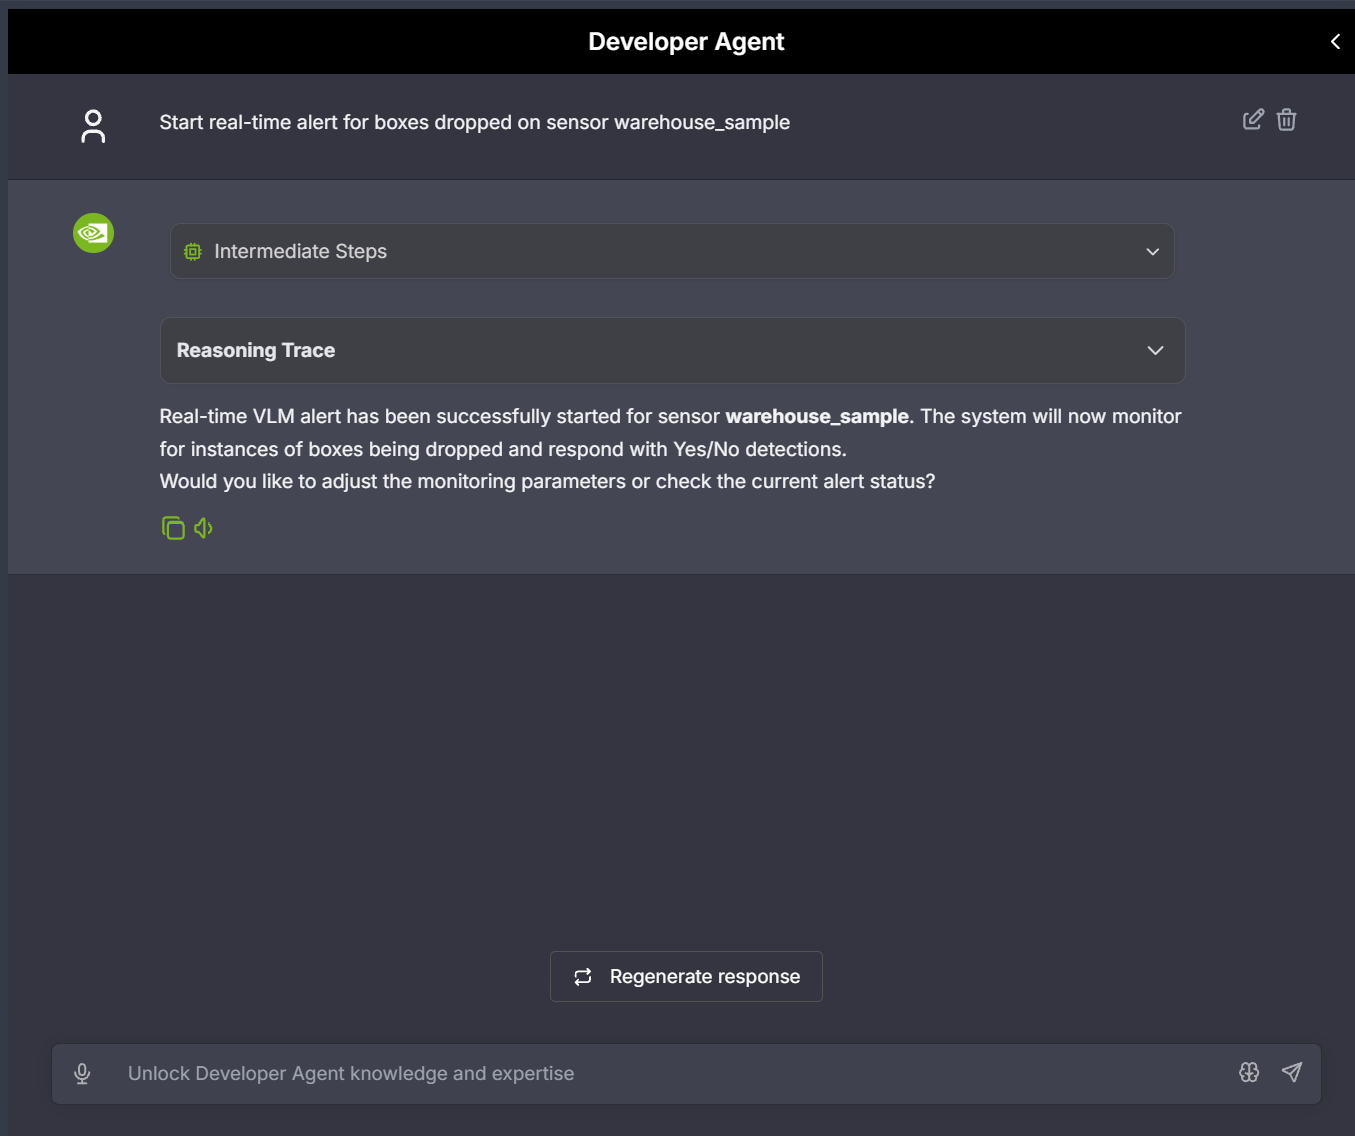
To view the reasoning trace for alert detection, click on the “Trace” icon in the alert details. This shows the VLM’s analysis process and decision-making steps.
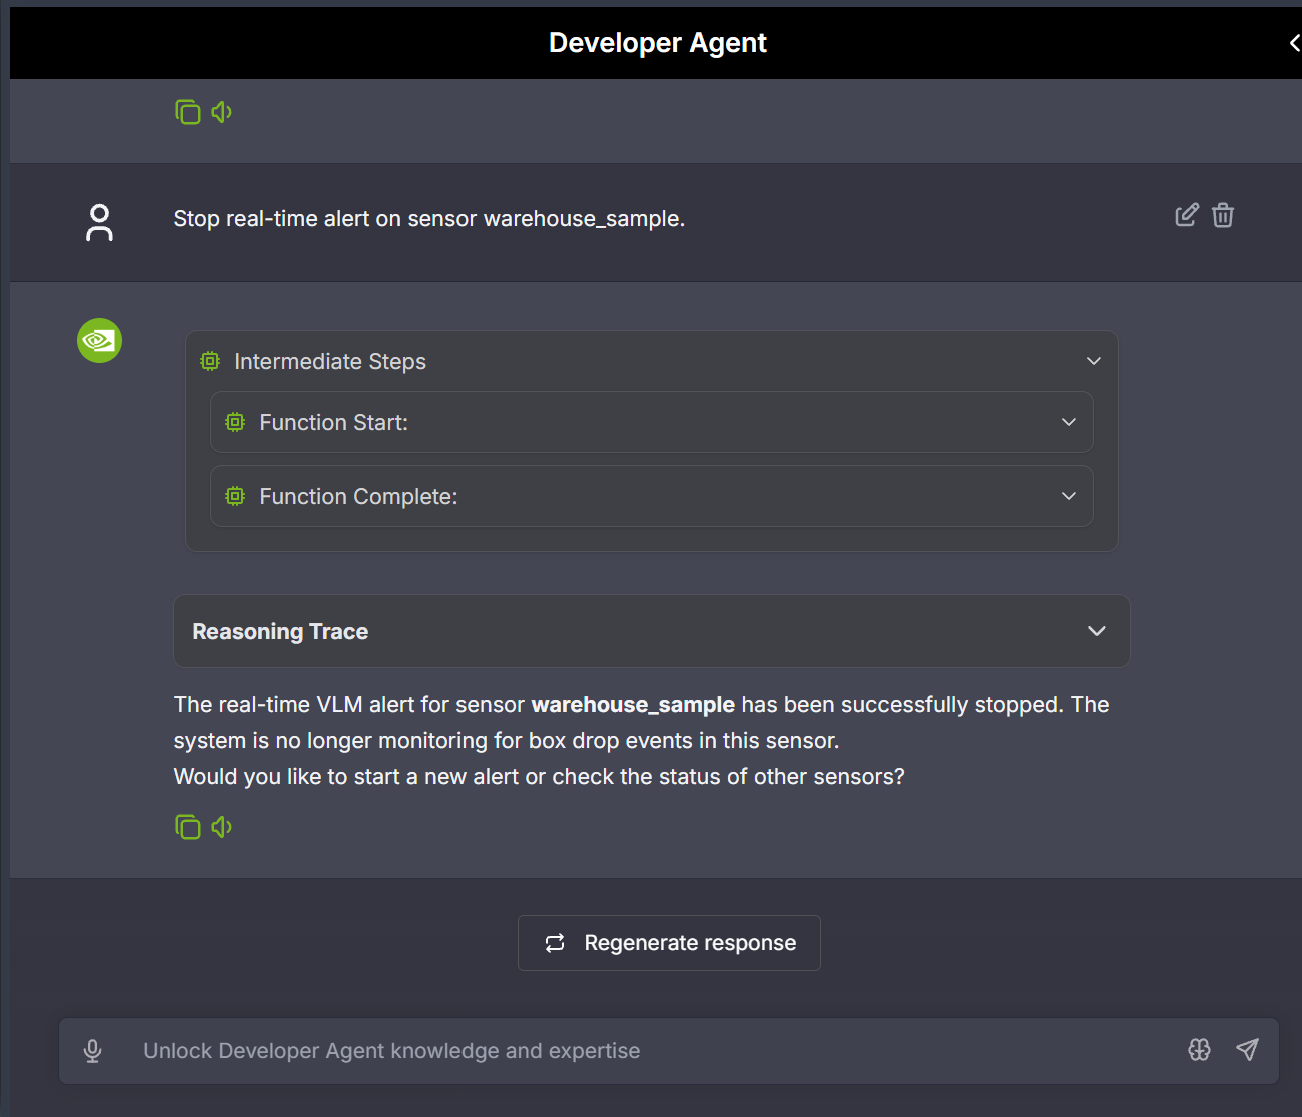
- Stop an RTVI real-time alert for a stream when monitoring is no longer needed.
Sample prompt: Stop real-time alert on sensor warehouse_sample
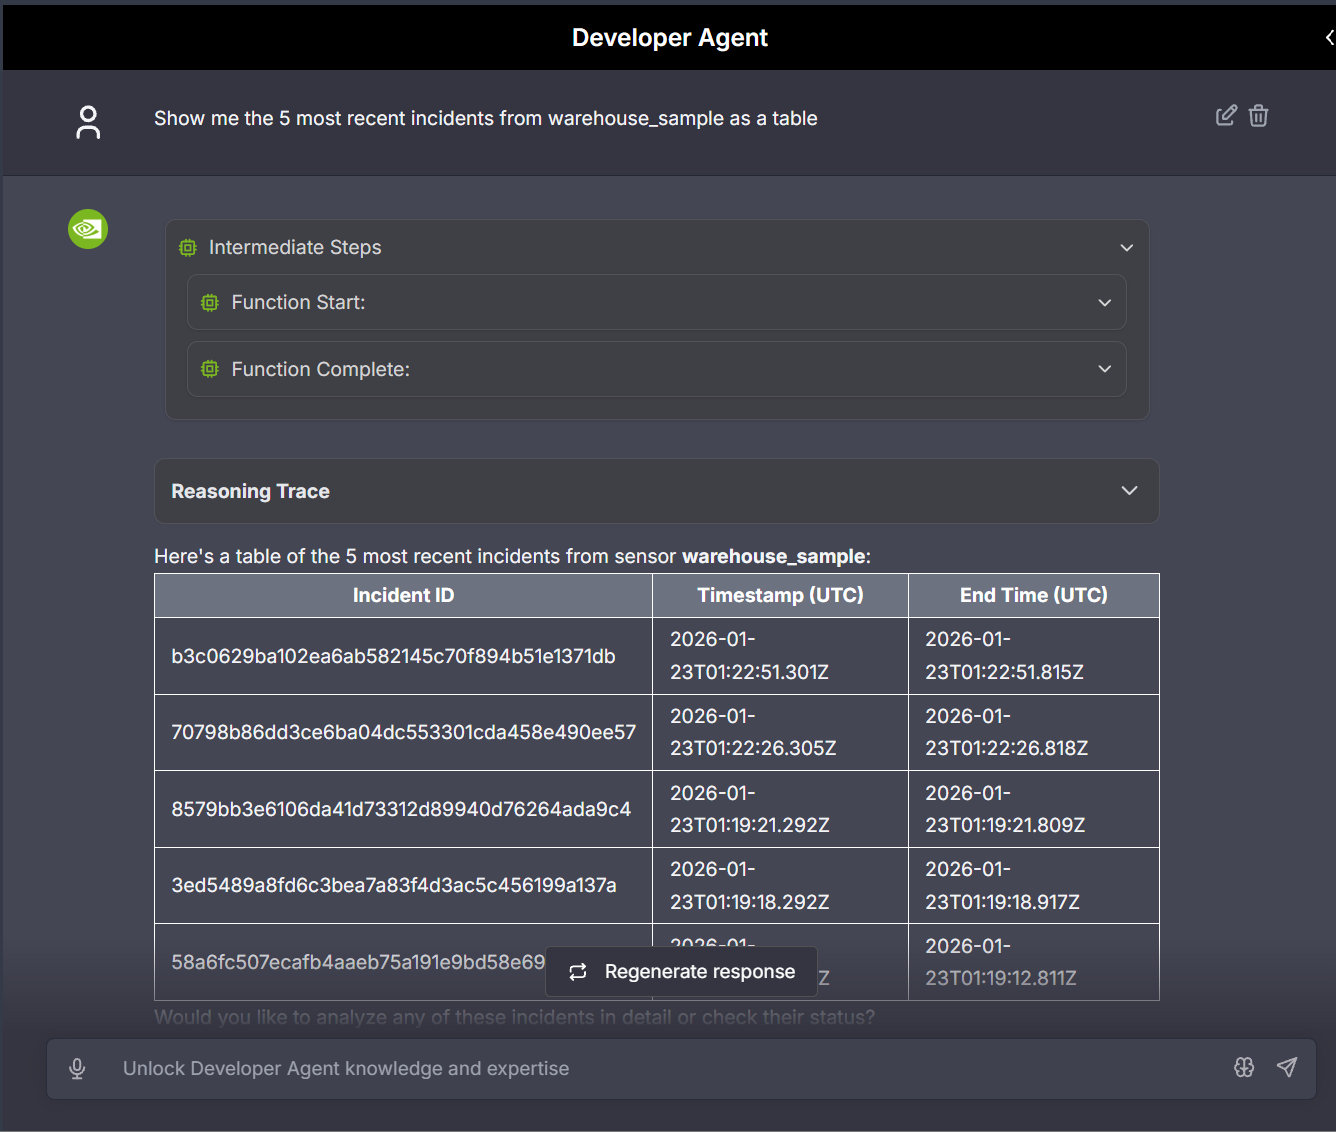
- List alert incidents for a stream to review detected anomalies.
Sample prompt: Show me the 5 most recent incidents from warehouse_sample as a table
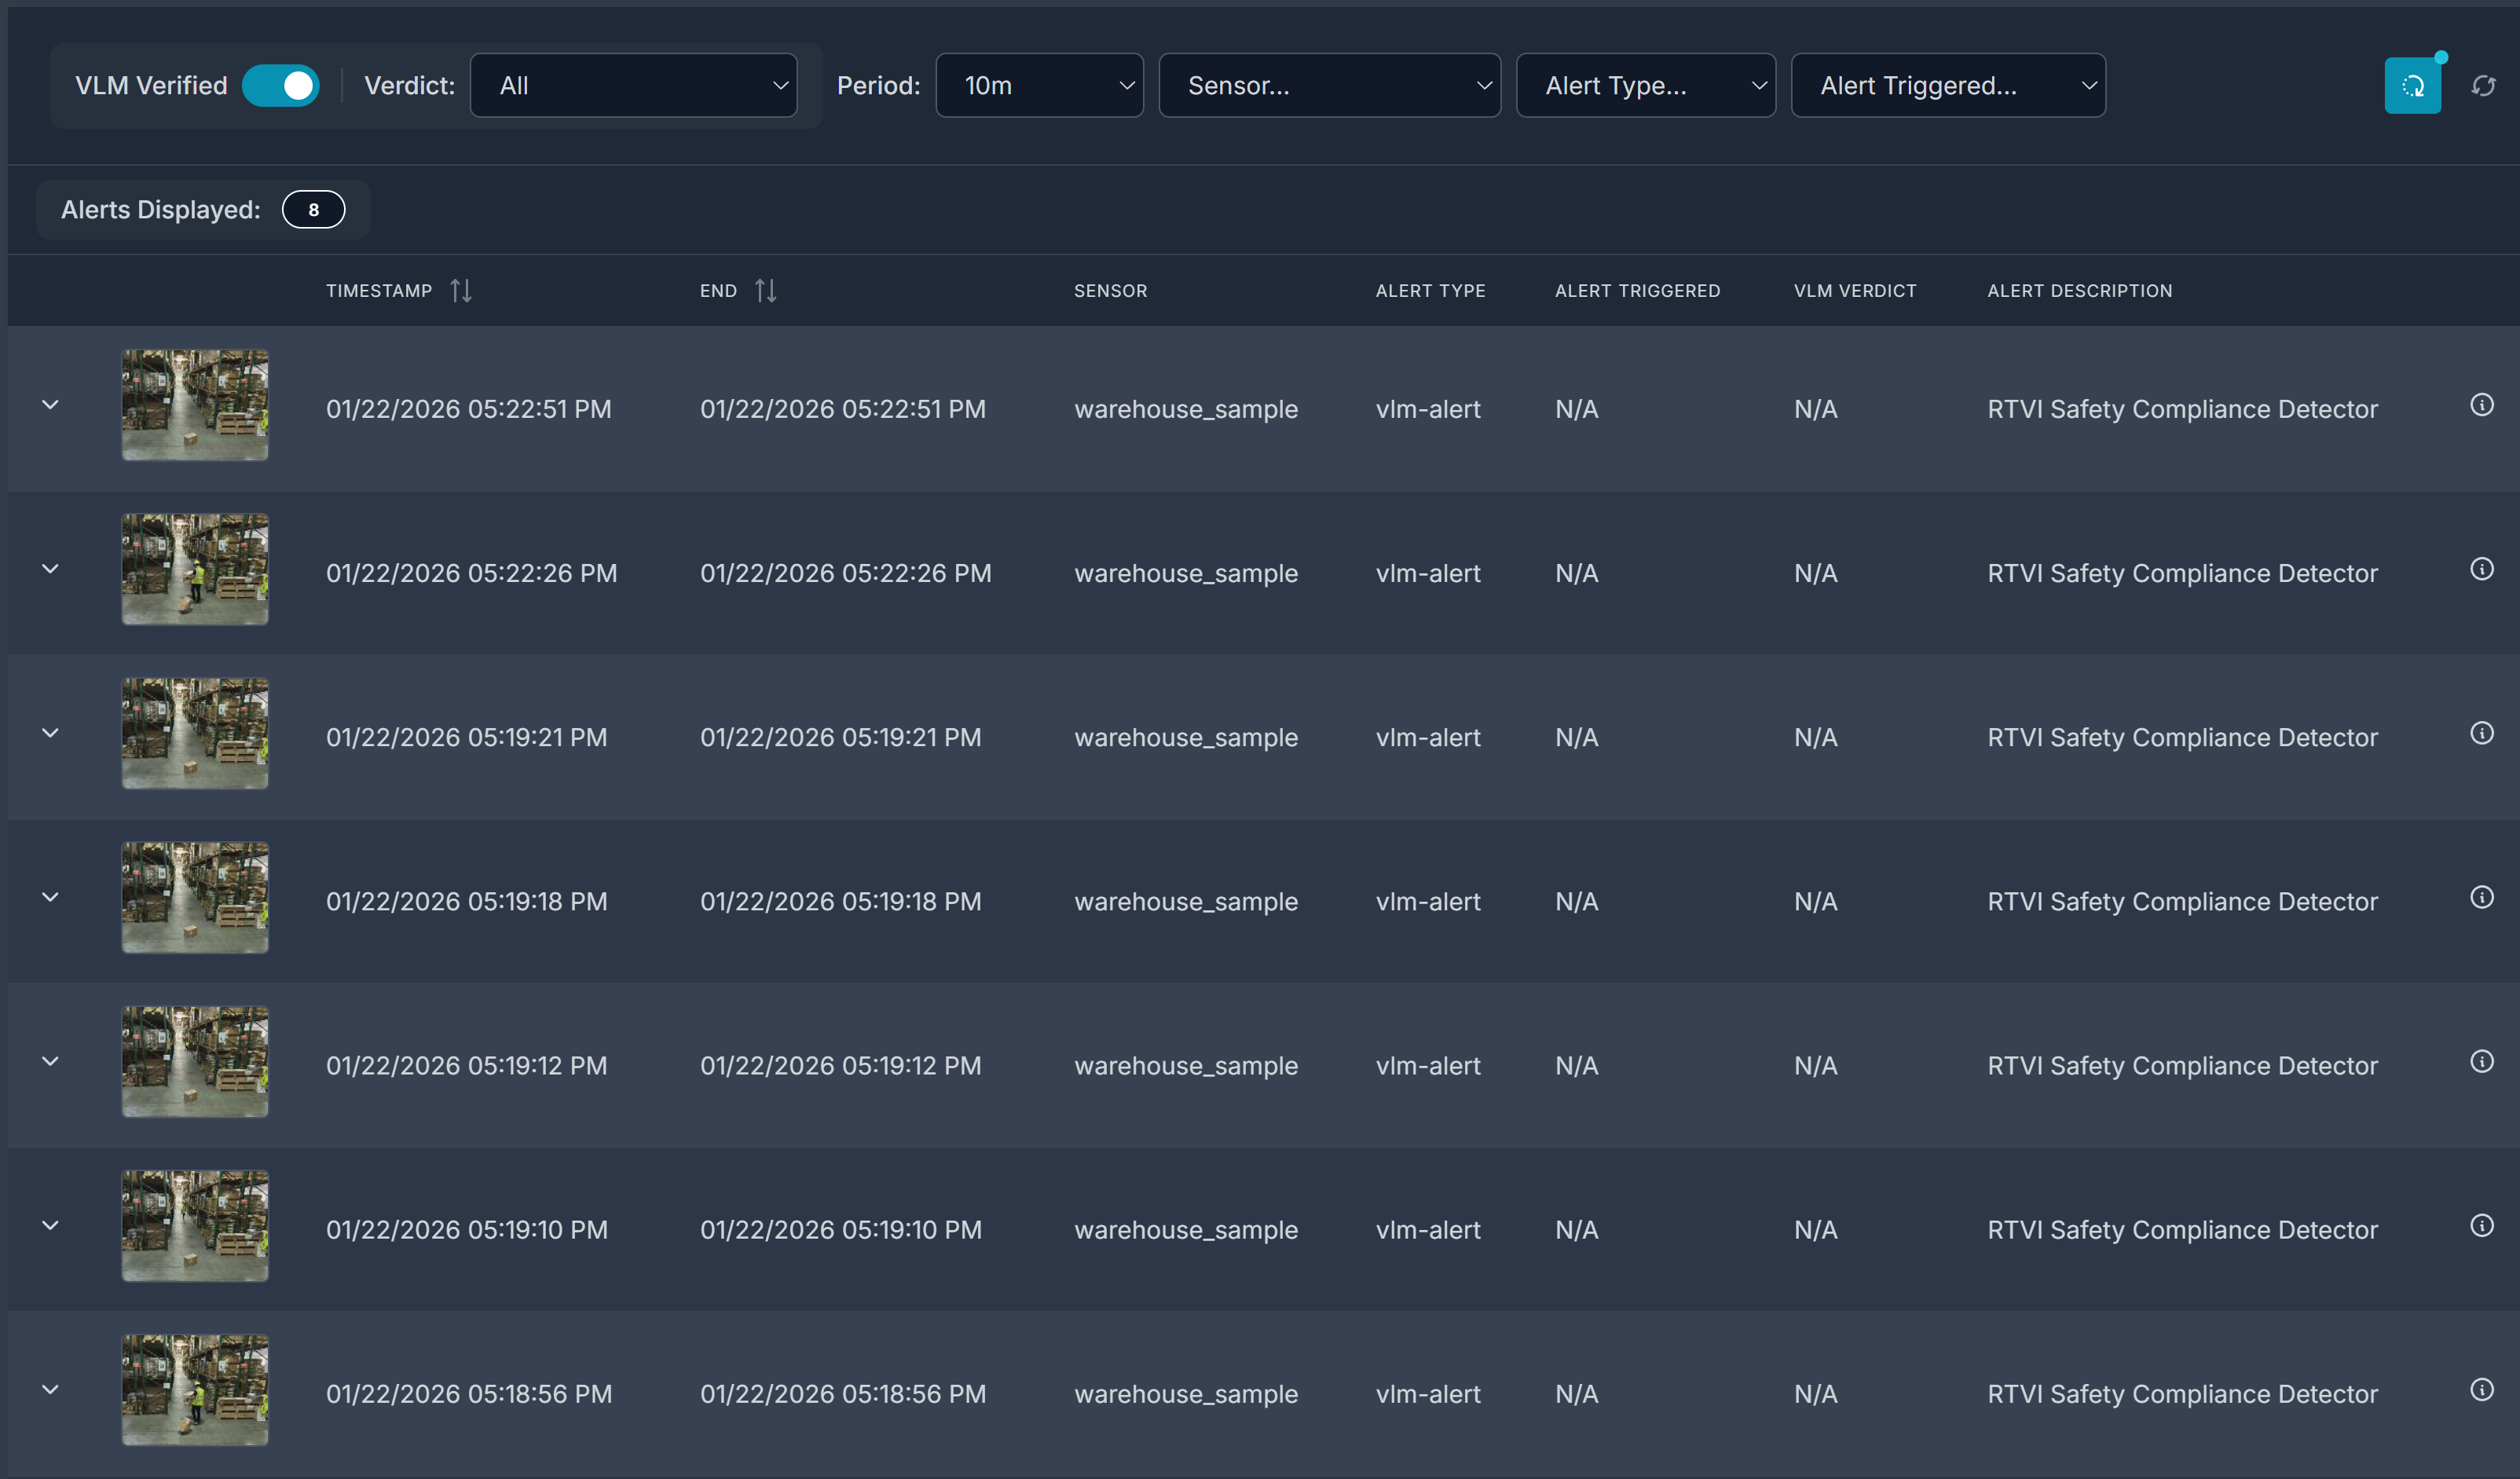
Click on the “Alerts” tab on the left hand side and enable “VLM Verified” to view the verified alerts for all active sensors.
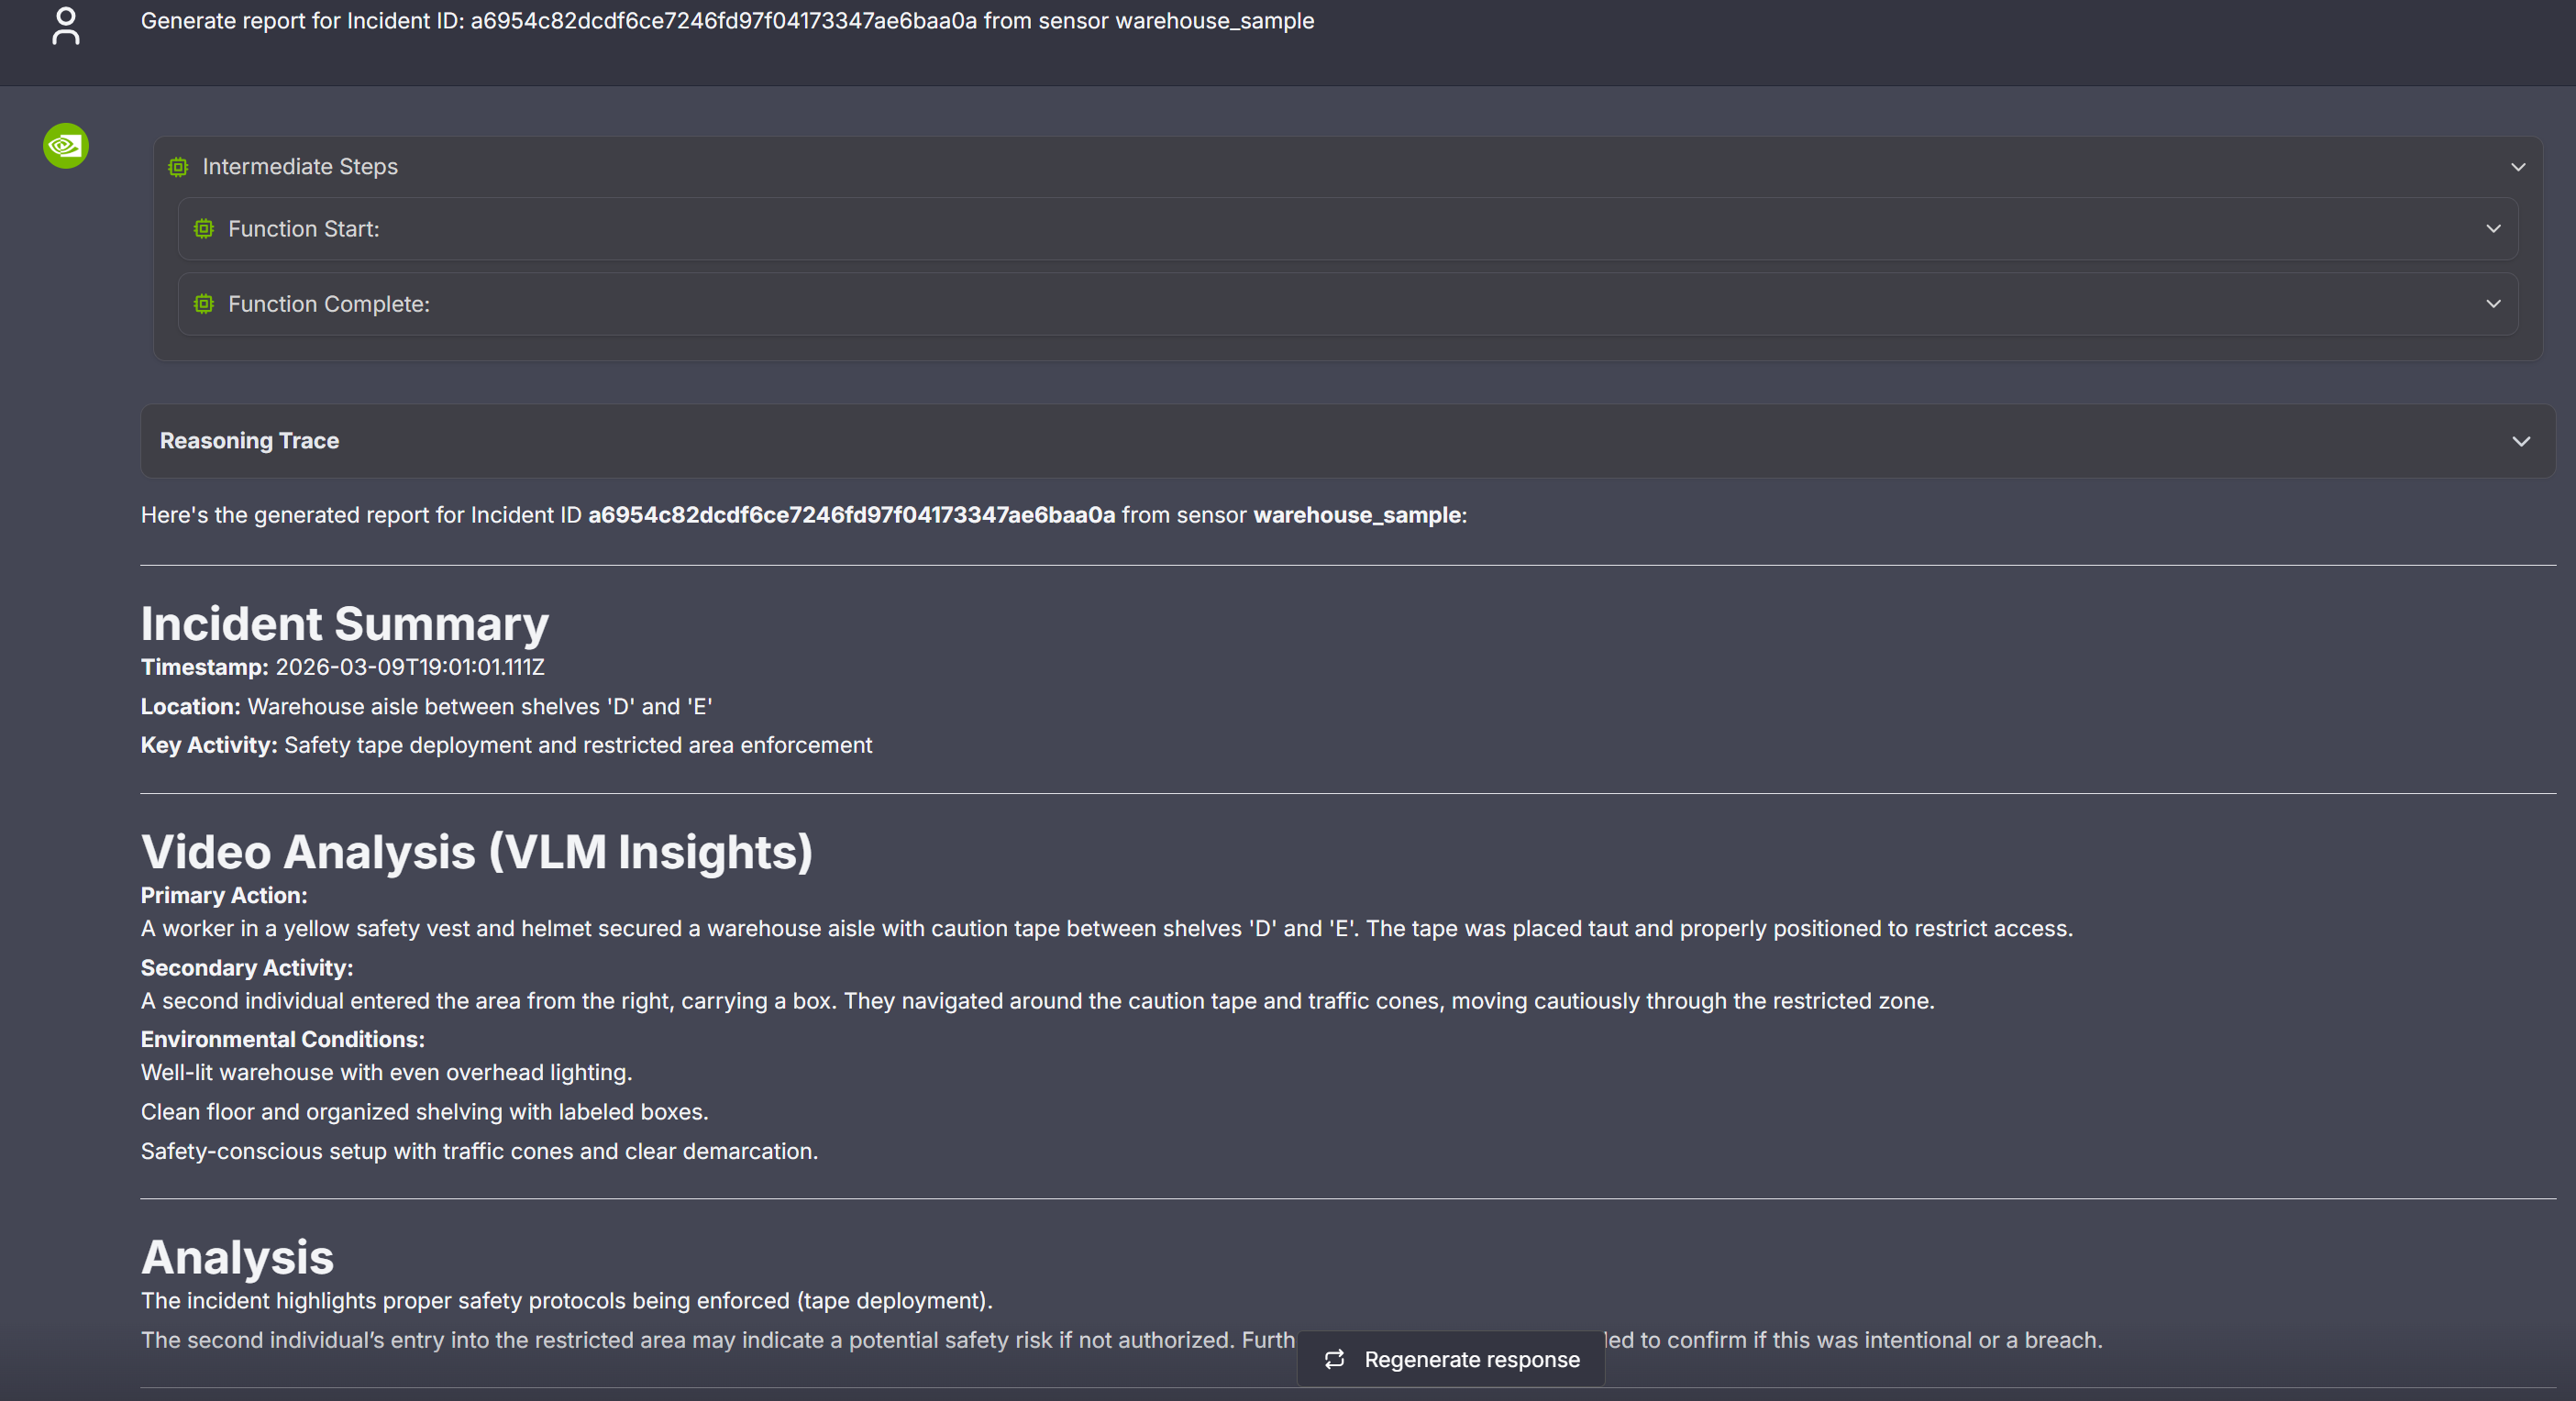
Step 4: Generate a Report for the Alert#
User can use the chat interface to request creation of a report for the generated alerts. The report is currently generated in markdown format and displayed in the VSS UI.
As part of the first step, identify the alert id for which the report needs to be generated. The chat interface could be used to retrieve the id as described earlier; alternatively expand any of the alerts in the Alerts tab to display the “Id” along with various pieces of metadata associated with the alert.
Now, use the id to request generation of the report while also specifying the associated sensor as shown in the sample image below.
Step 5: Teardown the Agent#
To teardown the agent, run the following command:
scripts/dev-profile.sh down
This command will stop and remove the agent containers.
Service Endpoints#
Once deployed, the following services are available:
Service |
URL |
|---|---|
VSS UI |
|
NVStreamer UI |
|
VST UI |
|
Phoenix UI |
|
Known Issues#
It is recommended to clear chat and refresh the VSS UI page after deployment to clear any data from a previous deployment.