Simulation and Synthetic Data Generation#
Synthetic Data Generation (SDG) addresses simulation, and subsequently augmentation of traffic scenarios including anomalies (such as vehicle collision) using digital twins. Goal is to create sizable, diverse datasets comprising videos, frame level annotations (such as bounding box, tracker id), and scenario level annotations (such as global/dense captions) that are used for training and fine tuning VLMs and CV models.
The SDG workflow can be broken in a series of steps:
Scenario creation (e.g. for collision detection) in simulation
Running simulation to generation video output along with ground truth
Augmentation of simulation output to bridge the sim to real gap
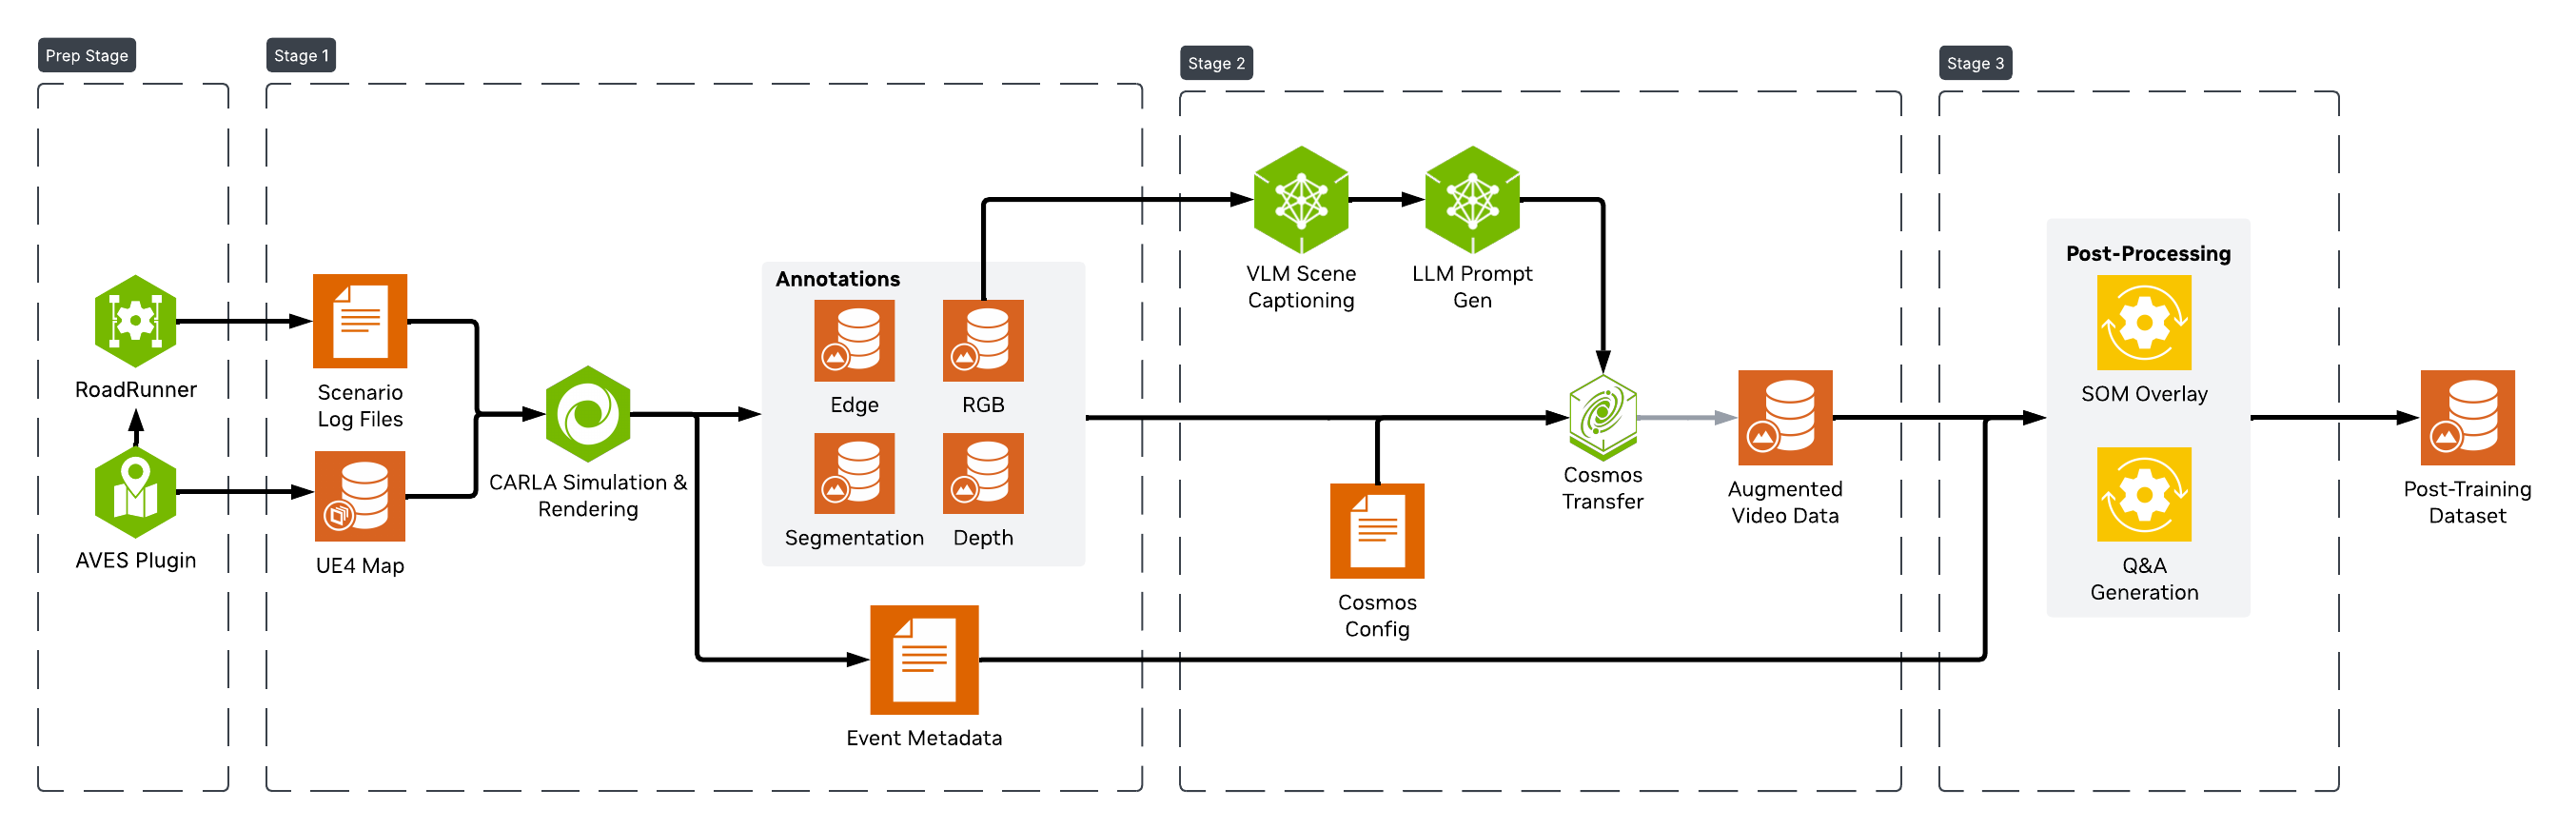
Each scenario is processed by a multi-stage pipeline to generate the full dataset, as shown below.
Simulation for Outdoor Environments#
The outdoor simulation and SDG workflow uses the open source CARLA simulator to simulate various kinds of traffic patterns and incidents at a variety of map locations. These are used to generate large scale data sets needed for training and fine tuning models. The current release is based on CARLA 0.9.16
To create an outdoor simulation, we need a digital twin of the area, which is an accurate digital representation of the real world, specially the road layout, the road markings, traffic signals and signs. It can also include the buildings and foliage, though they can be generated via augmentation. In the case of CARLA, the world map includes both the 3D model of the area and its road definition. A map’s road definition is based on an OpenDRIVE file. CARLA provides a set of pre-built maps that can be used for building and testing the simulation and SDG workflow. Further details about maps and its elements can be found here.
For creating Digital Twins, i.e, CARLA maps that are based on real world locations, a tool from AVES Reality can be used. It provides a plugin with a tiled view of the world map, that you can use to select the desired area and generate the map through the CARLA UE4 Editor bridge that they also provide. The road network is generated as part of the process, along with any buildings and foliage. The map project can then be exported for installing and use in your CARLA instance, to do simulations.
Scenario Generation#
Using maps, a traffic scenario can be created, which can include specific incidents (e.g. collision, wrong way driving) along with randomized traffic. CARLA provides a set of vehicle assets to use in the simulation. Note that the current SDG release is geared towards vehicles (not pedestrians) and you can use any vehicles from the CARLA catalog.
There are two types of scenarios you can generate:
A base scenario that contains only randomized traffic. This can be done easily for any CARLA map through provided scripting. The CARLA quick start guide provides steps on how to do so using their generate_traffic.py example script.
An incident scenario that contains desired behavior (e.g. collision) for specific vehicle(s). These can be created using scenario creation tools that allow user to specify the vehicle behavior and run the simulation through CARLA to generate the scenario. One such tool is RoadRunner from MathWorks. A detailed description on how to create various collision scenarios using RoadRunner and CARLA is available in their blog post. There are also providers like InvertedAI who can generate scenarios based on your requirements.
Scenario simulations can be recorded and saved as a CARLA log file (in custom binary file format), which captures the state of the simulation frame by frame for every actor in the simulation. It can be played back and queried through CARLA provided scripts, as described in CARLA’s recording and playback feature. The log file serves as one of the inputs to the SDG workflow, which generates ground truths by placing CARLA sensors at specified map locations to observe the simulation captured in the log.
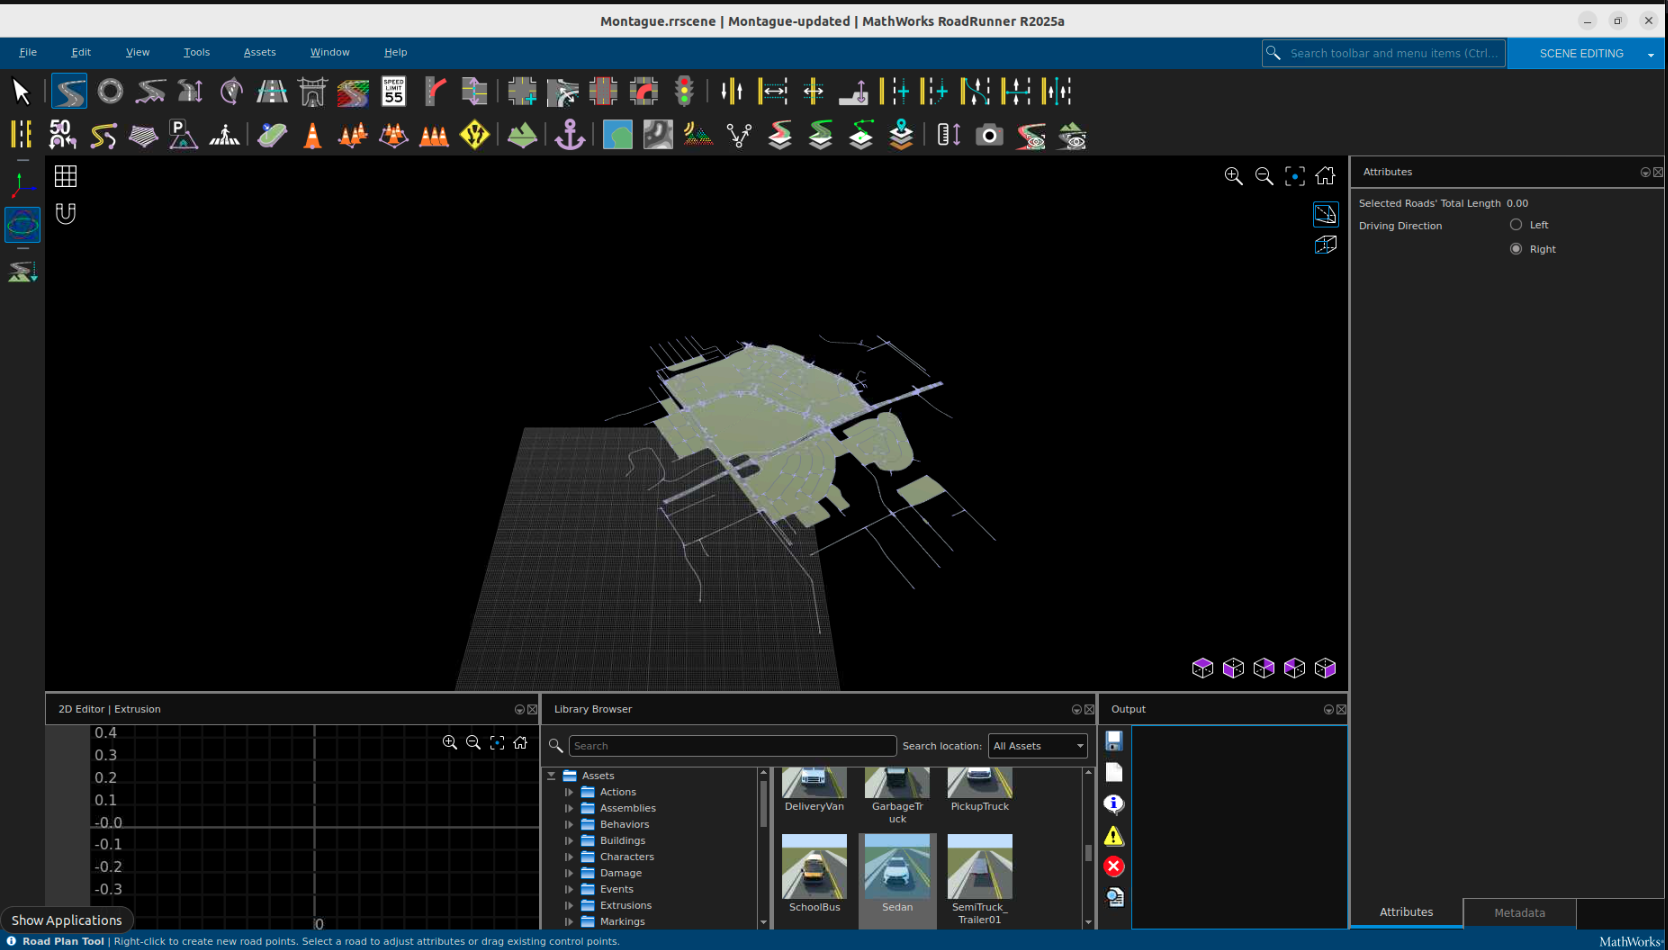
You can create simulations on real world locations using their digital twins. A sample CARLA map for Montague Expressway in Santa Clara, CA, USA (screenshot below) is available from AVES for download and testing.

To create and use your own digital twin, follow these steps:
Install full CARLA distribution that includes the UE4 Editor and the AVES plugin (see link provided earlier). Follow AVES instructions to select the map area and generate the CARLA map. If you need a very accurate geo-representation of the area for your simulation and Calibration needs, you can ask AVES to provide you a cleaned up xodr file for your chosen location that you can import into your project and use. Once the map is created, you can package it using CARLA’s packaging instructions to generate the tar.gz (similar to the sample) that you can import and install on other CARLA instances for simulation and testing. See section below for setting up CARLA server and importing your generated map.
You can generate traffic on the digital twin using AVES provided instructions with their additional script. To create custom scenarios for anomalies like collisions, wrong way driving, speeding, stalling, etc., you can install and use RoadRunner tooling. See section below on how to create such scenarios using RoadRunner. They can then be processed with the SDG pipeline to generate data at scale, to fine tune your models for Smart City use cases.
Set up CARLA server and Import Custom Map#
To run simulations with a custom map, you can use the official CARLA server Docker image: carlasim/carla:0.9.16.
Custom or additional maps are not included by default and must be imported into the CARLA server image before running the simulation.
Steps to Import a Custom Map#
Download the custom map archive (.tar.gz).
Update the CARLA server Dockerfile to extract the map into the container.
You may either download official additional maps from the CARLA website or include your own custom map archive. Like the following for Montague map
Sample Dockerfile for Montague and additional map
FROM carlasim/carla:0.9.16

USER root

# Disable audio warnings
ENV SDL_AUDIODRIVER=dummy
ENV DISPLAY=

WORKDIR /workspace
# install curl
RUN apt-get update && apt-get install -y curl
# Import official additional maps
RUN curl https://carla-releases.b-cdn.net/Linux/AdditionalMaps_0.9.16.tar.gz --output AdditionalMaps_0.9.16.tar.gz
RUN tar -xvzf AdditionalMaps_0.9.16.tar.gz && rm AdditionalMaps_0.9.16.tar.gz

# Import a custom map
COPY Montague.tar.gz .
RUN tar -xvzf Montague.tar.gz && rm Montague.tar.gz

USER carla

ENTRYPOINT ["/workspace/CarlaUE4.sh", "-carla-rpc-port=2000",  "-carla-server", "-RenderOffScreen"]
sample docker-compose.yaml
services:
   carla-server:
      build:
         context: ./
         dockerfile: Dockerfile
      container_name: carla-server
      environment:
         - SDL_AUDIODRIVER=dummy
         - DISPLAY=
      ports:
         - "2000-2002:2000-2002"
      privileged: true
      runtime: nvidia
      deploy:
         resources:
         limits:
            cpus: "12.0"
      healthcheck:
         test: ["CMD", "bash", "-c", "echo > /dev/tcp/localhost/2000"]
         interval: 10s
         timeout: 5s
         retries: 10
         start_period: 30s
      restart: unless-stopped
If you have additional services that need to communicate with the CARLA server, you can integrate them into your existing Docker Compose workflow by configuring them accordingly. One such use case is running calibration using Digital Twin. For more information refer to (Calibration).
Create Scenarios using RoadRunner#
You can use RoadRunner to create scenarios and then cosimulate with CARLA to generate the data. Once you import the sample Montague Expressway map, you’ll see something similar to below
You can then add vehicles into the scene, add paths to each vehicle in the scene, modify behaviors, and create scenarios as desired
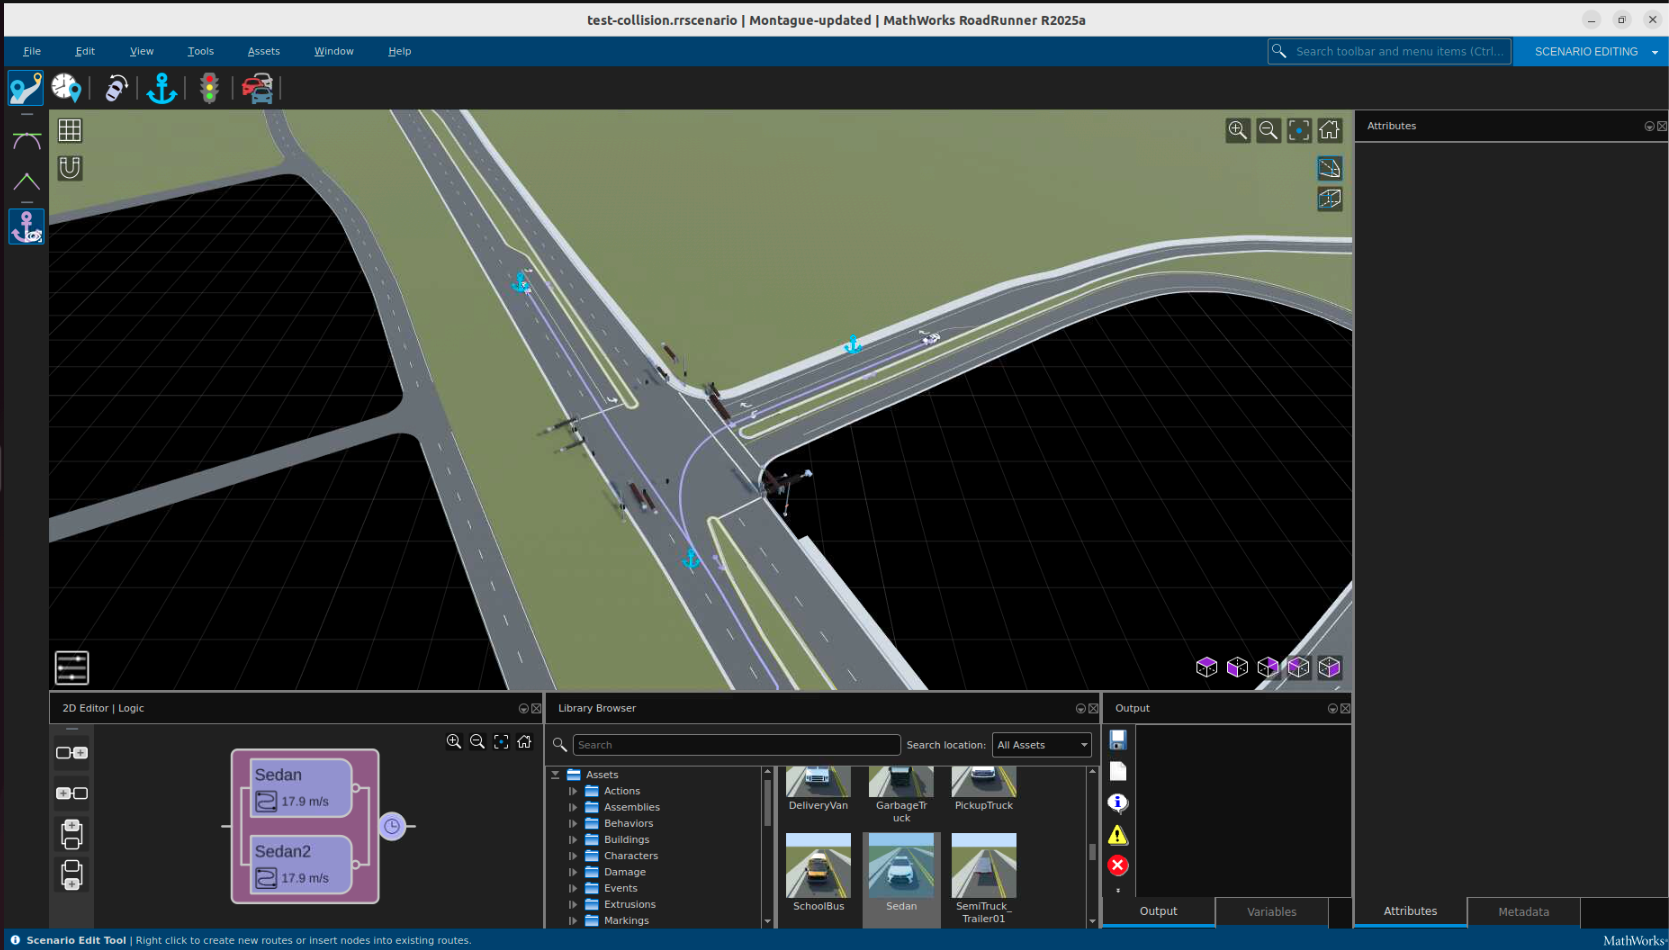
Afterwards, cosimulation with CARLA can occur. The above scenario can be seen below being played out in CARLA
For more information on creating scenarios using RoadRunner, refer to the RoadRunner blog and documentation.
Simulation Execution#
CARLA provides various types of camera sensors (e.g. RGB, Depth, Semantic Segmentation, Instance Segmentation, etc.) which can be placed at a specific location on the map to record and generate ground truths as the simulation is played. See this section for details on each sensor and data they generate. The SDG workflow uses these sensors to generate the various ground truths that are output by it.
The location (x, y, z) and pose (roll, pitch, yaw), and other sensor specific attributes need to be provided to the workflow through a yaml input file that contains values for each of the sensor’s attributes. You need to provide the appropriate values for your scenario by using the values of location and rotation that you can obtain using CARLA’s UE4 Editor. To do so, open the CARLA map in the editor and navigate to the location of interest, for e.g. where the collision occurs in the scenario. Then drag and drop a camera at the location and rotate it so it has the right view. Note the location and rotation values as displayed in the camera details panel. The rotation values around x, y, z axis map to roll, pitch, yaw respectively.
Although there are multiple types of sensors, they are placed together at the same location and the same pose, so that their output can be correlated across their corresponding data frames. The location, rotation and other sensor attributes are provided to SDG workflow through a yaml file, to generate the various ground truths. In addition to camera sensors, CARLA also provides detectors (e.g. for collisions) that can be attached to actors (vehicles) in the scenario for generating data about such events. The SDG workflow checks for collisions using collision detectors, if they are included in the input log.
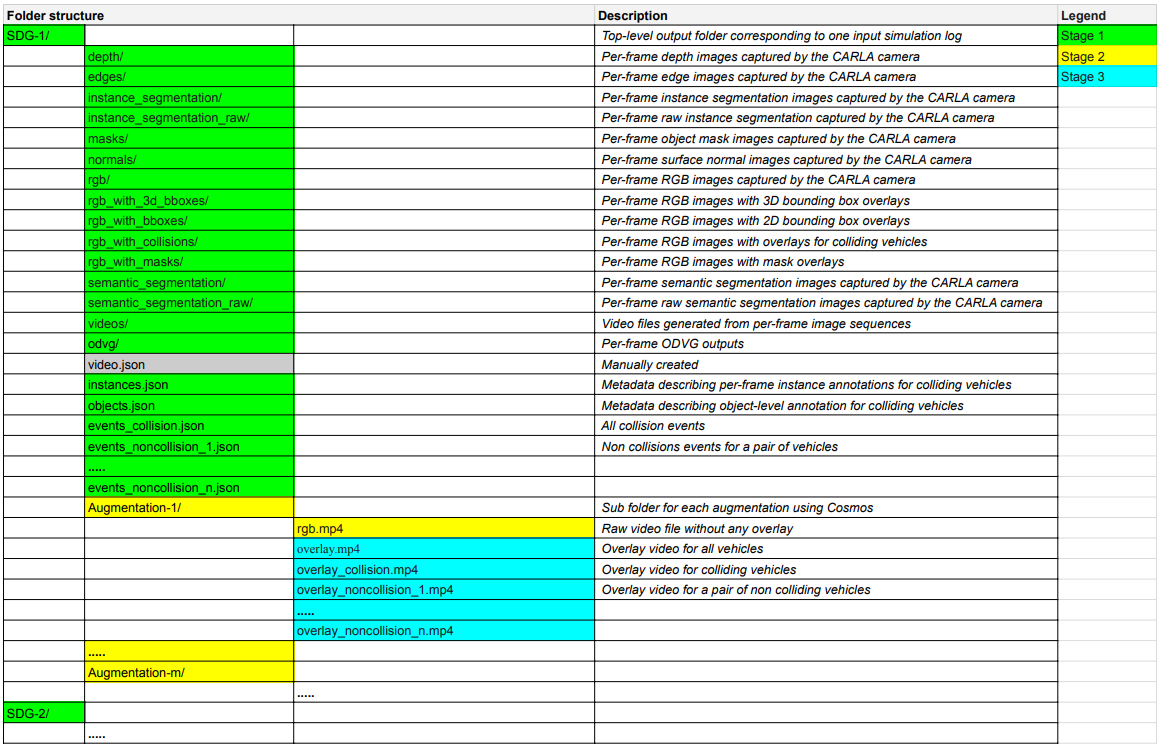
The SDG workflow runs in multiple stages to generate the base ground truths, and the augmented output through Cosmos. The base ground truths include frames and video for RGB, Instance and Semantic segmentation, Depth, Edge, Normals, 2D and 3D Bounding box overlays, ODVG data, and Json files for objects, instances, and detected collisions. The augmented output (only supported for scenario duration of up to 15 secs for Cosmos Transfer) includes multiple iterations with RGB video and bounding box overlays, including collision and non-collision vehicles. The full list of SDG outputs is shown below, with a separate output folder (denoted by SDG-1, SDG-2,…) generated for each input log.
Augmentation#
Cosmos Transfer 2.5 transforms synthetic simulator outputs into photorealistic, diverse datasets that bridge the sim-to-real domain gap. By leveraging the advanced generative capabilities of the Cosmos Transfer model, we can expand a single simulation scenario into many realistic variations while preserving ground truth annotations.
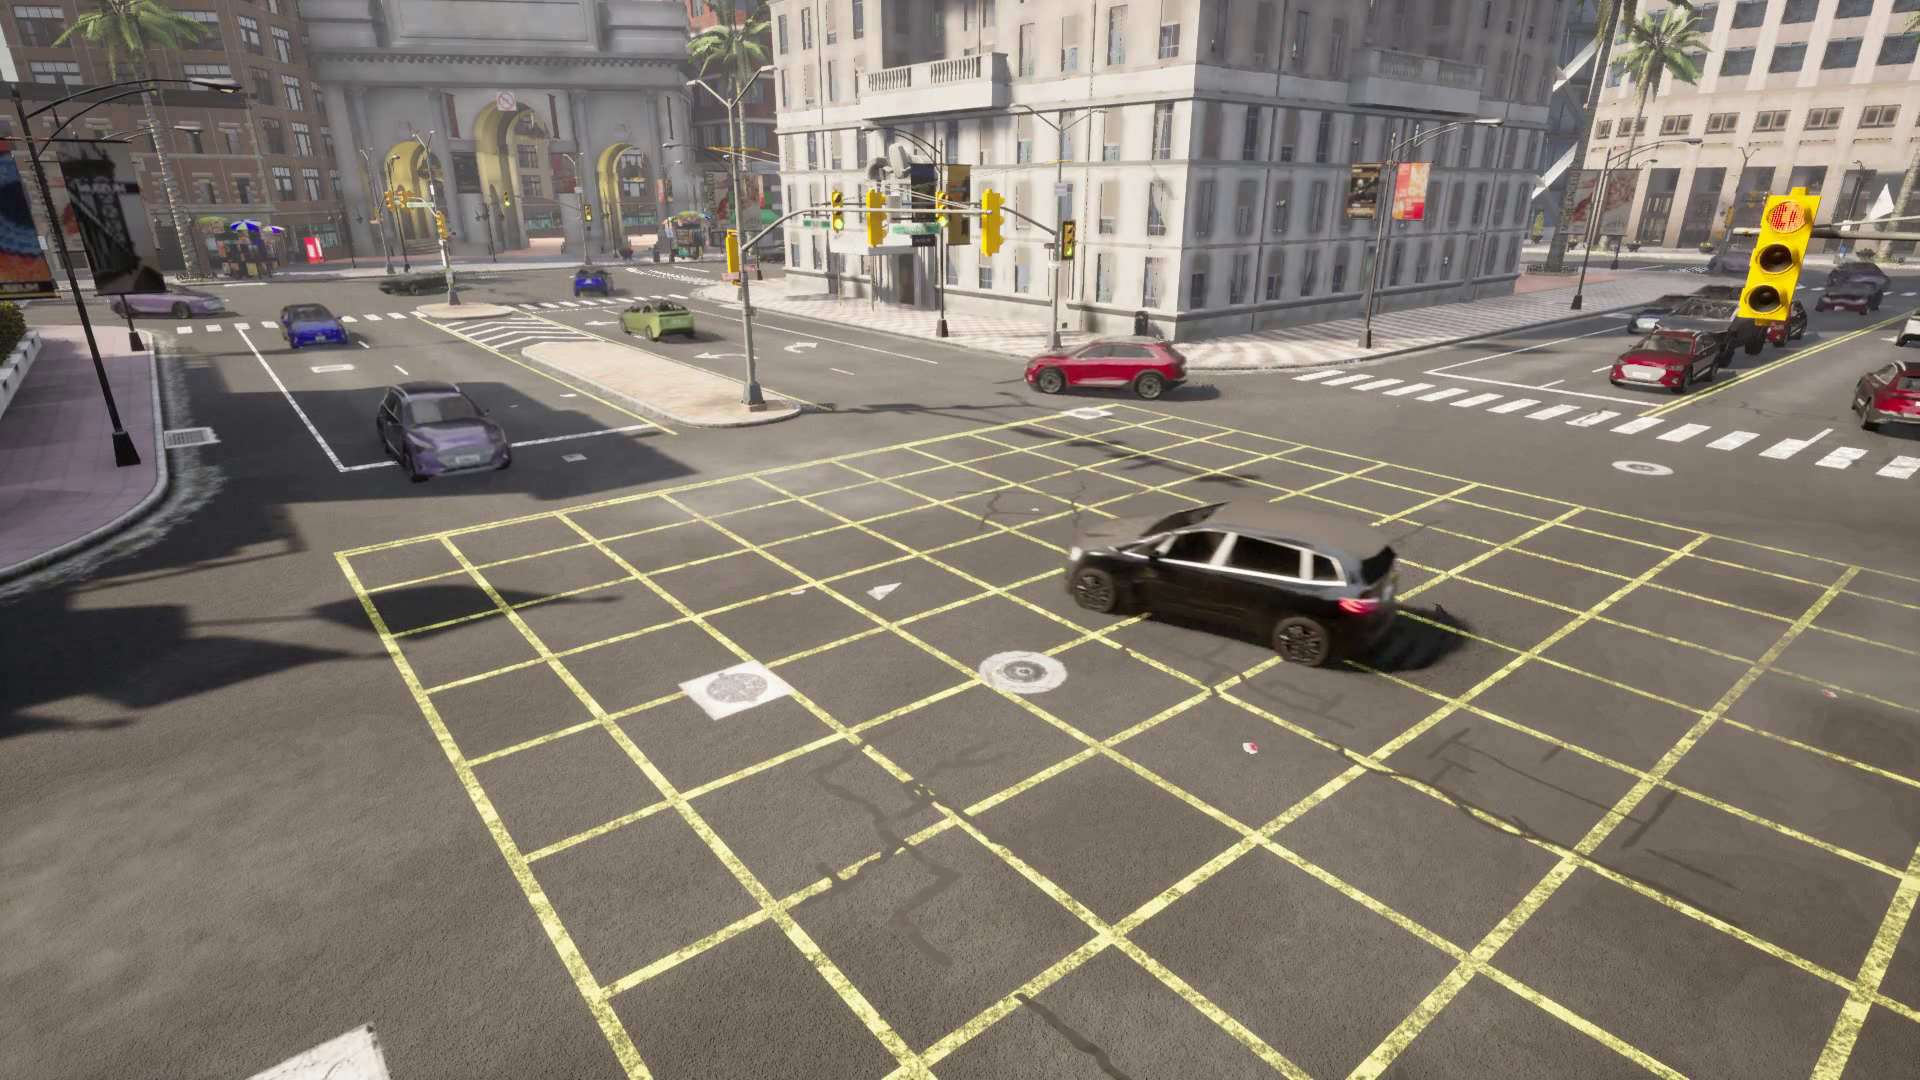
Base Simulation Output
The simulation generates synthetic data that, while providing perfect ground truth, has a characteristic rendering style that creates a domain gap with real-world data:
Types of Augmentation#
Cosmos Transfer 2.5 supports 18 distinct augmentation types organized into three categories:
Environment Lighting (9 conditions)
Sunrise - Warm morning light with long shadows and orange-pink eastern sky
Sunset - Warm evening light with long shadows and orange-pink western sky
Twilight - Cool blue cast with low ambient light and diffused backgrounds
Mid-morning - Clear daylight with balanced shadows and crisp textures
Afternoon - Neutral daylight with natural shadows and bright exposure
Zenith - Harsh overhead light with short shadows and strong contrast
Golden hour - Soft warm tones with elongated shadows and enhanced depth
Blue hour - Deep blue tones with low light and soft ambient illumination
Night - Low light, high contrast with vehicle headlight glow and streetlamps
Weather Conditions (5 conditions)
Clear Sky - High visibility with distinct shadows and light blue gradient
Overcast - Flat diffuse lighting with gray/white sky and reduced shadows
Snow Falling - Snow overlays with cold white balance and desaturated tones
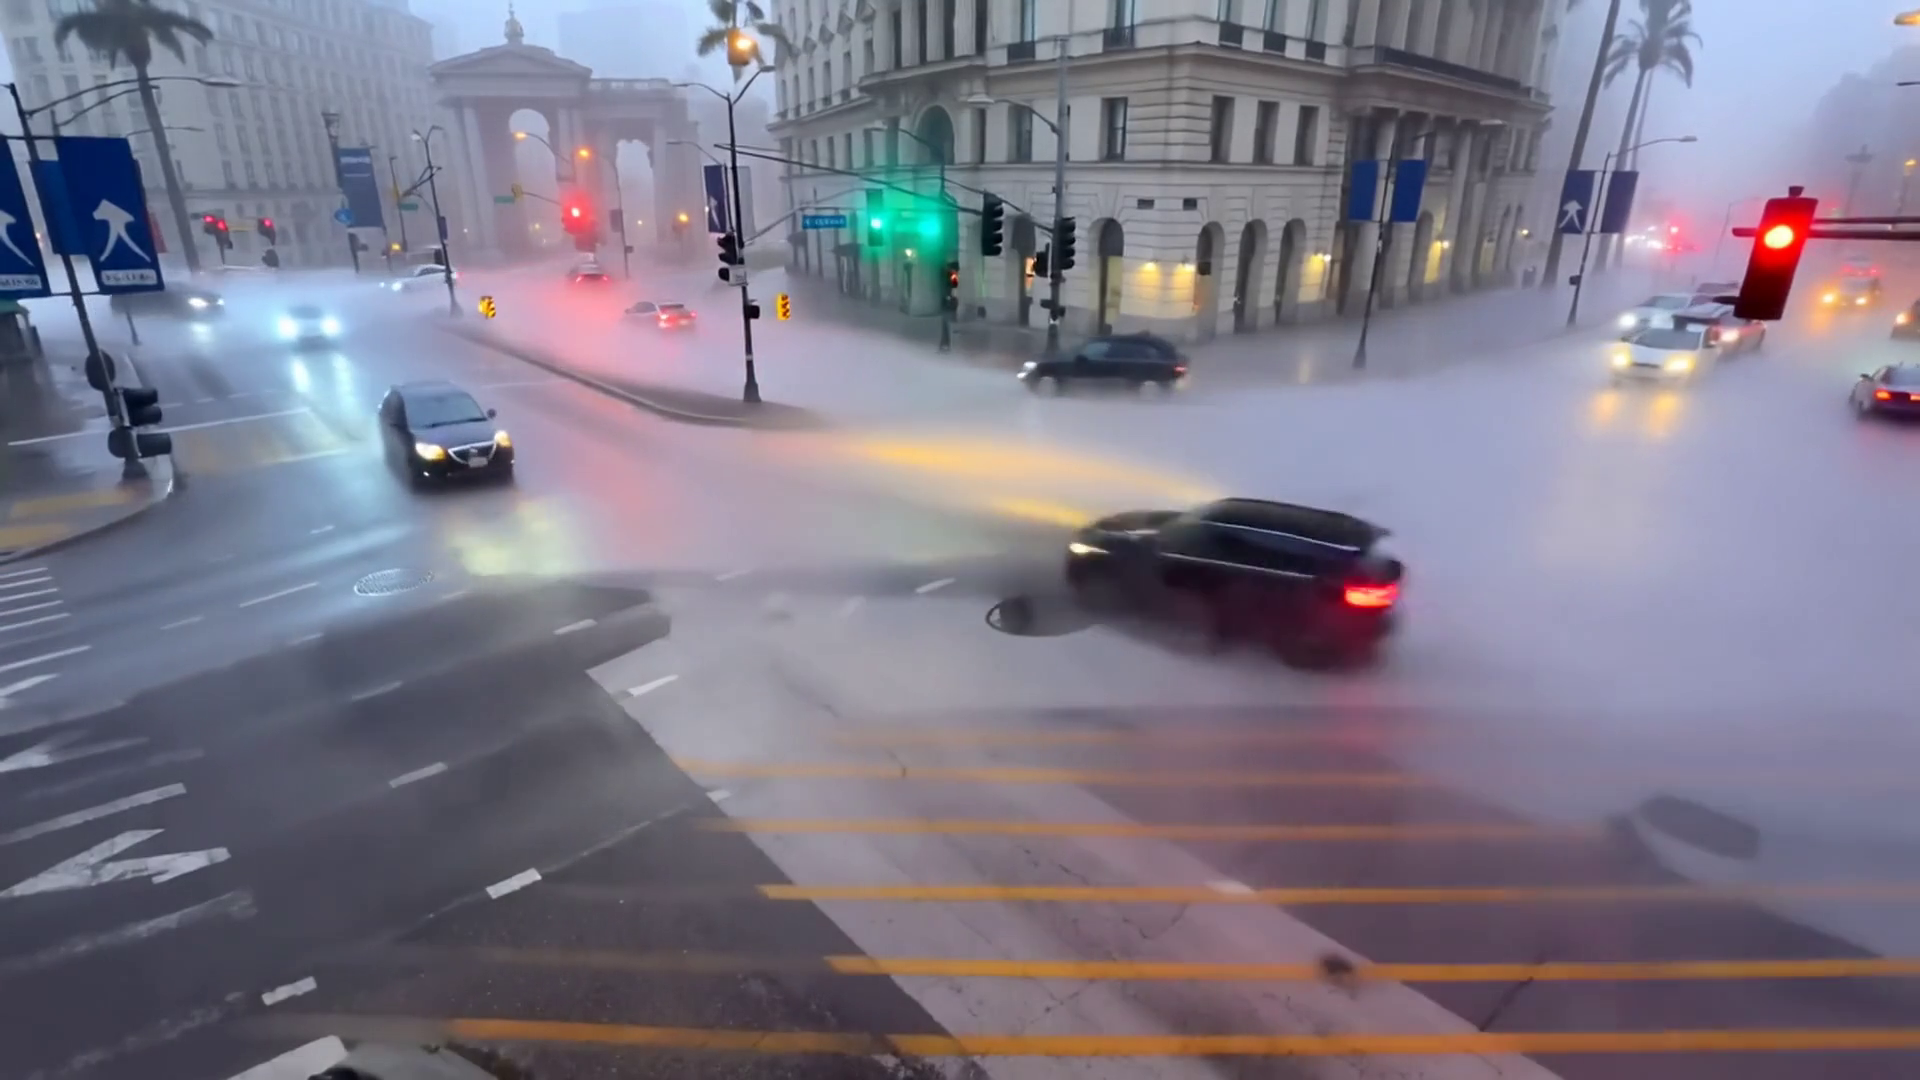
Raining - Rain streaks with puddle reflections and wet road sheen
Fog - Depth-based haze with white/gray overlay and obscured distance
Road Surface (4 conditions)
Dry road - Clean asphalt with visible lane markings
Snow on ground - White surface cover with tire tracks and snow piles
Sand on ground - Light tan surface with granular texture and dust haze
Puddles - Water accumulation with mirror-like reflections and ripples
Augmentation Examples#
From a single base simulation, Cosmos Transfer 2.5 generates photorealistic variations while preserving the original scenario behavior:

Night - Dramatic nighttime lighting with street lamps |
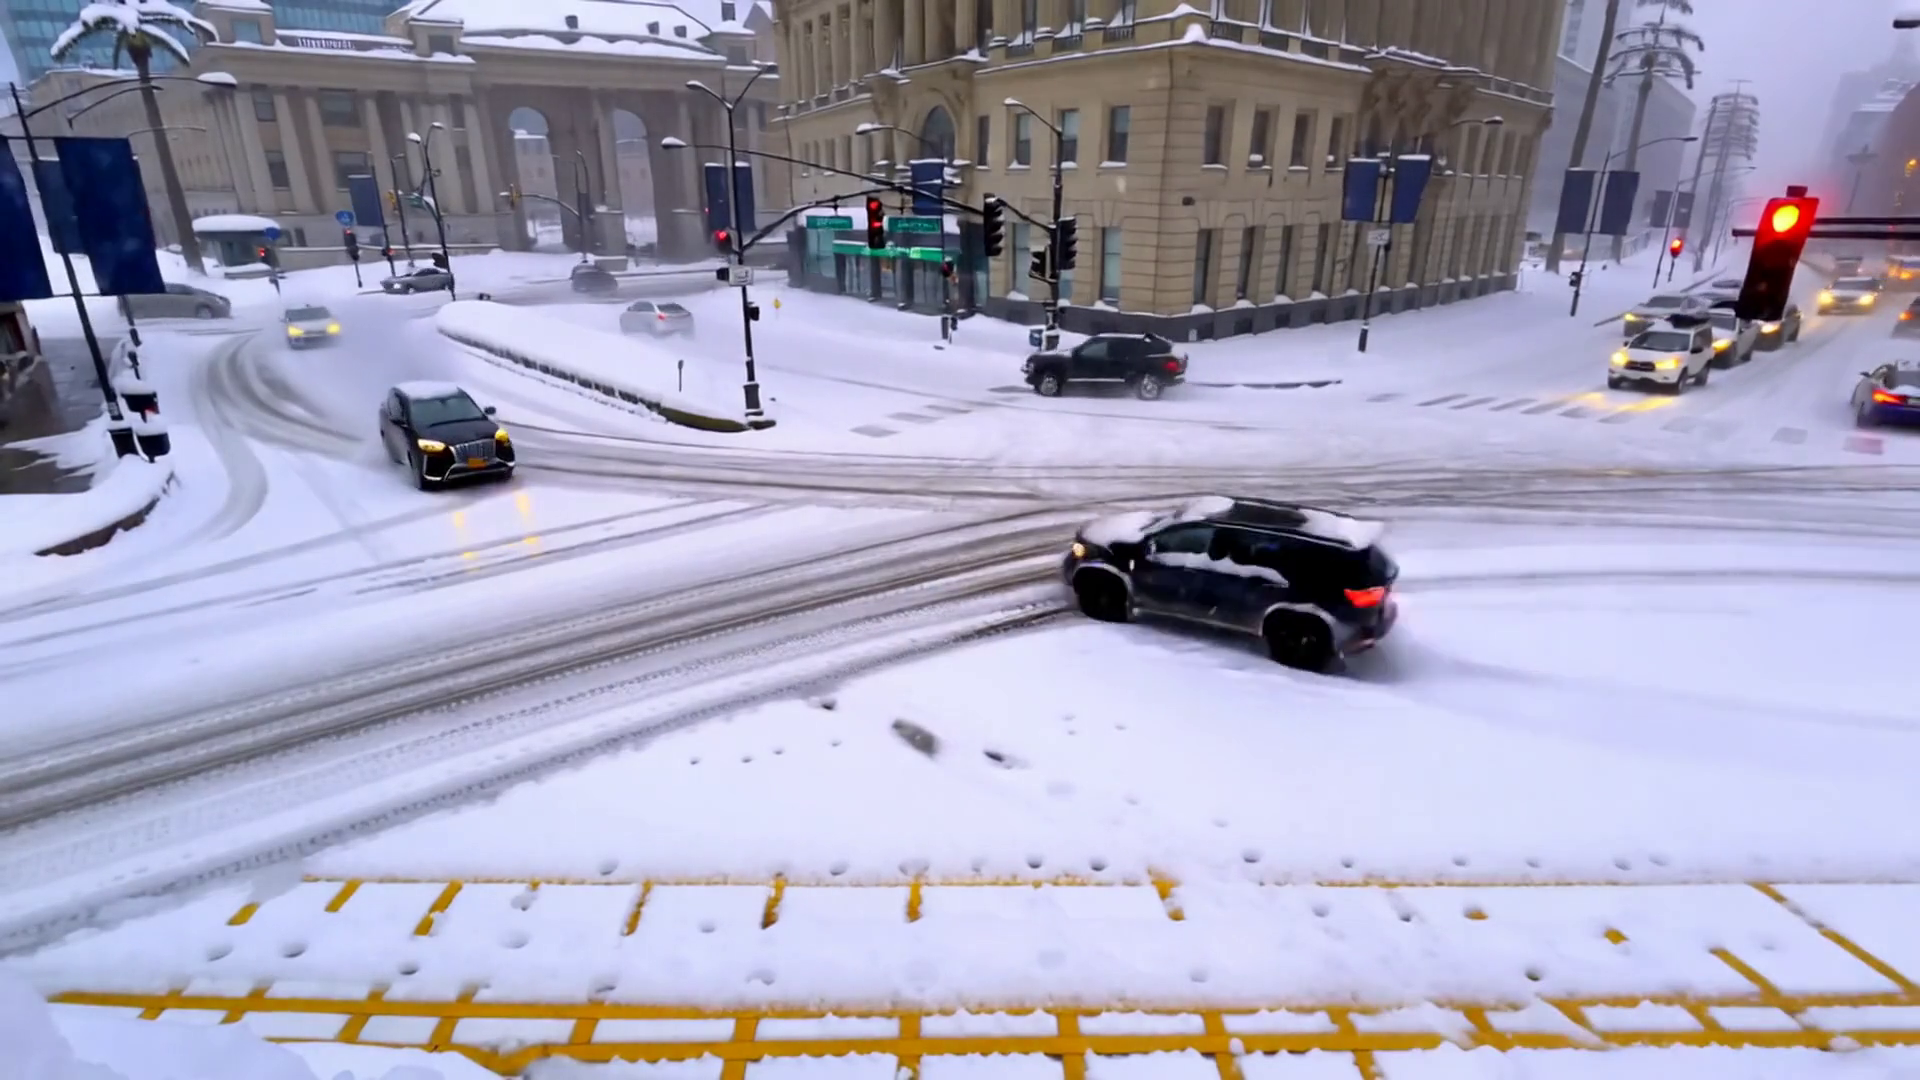
Snow Falling - Heavy snowfall with preserved road boundaries |
Fog - Depth-based fog naturally obscuring distant objects |
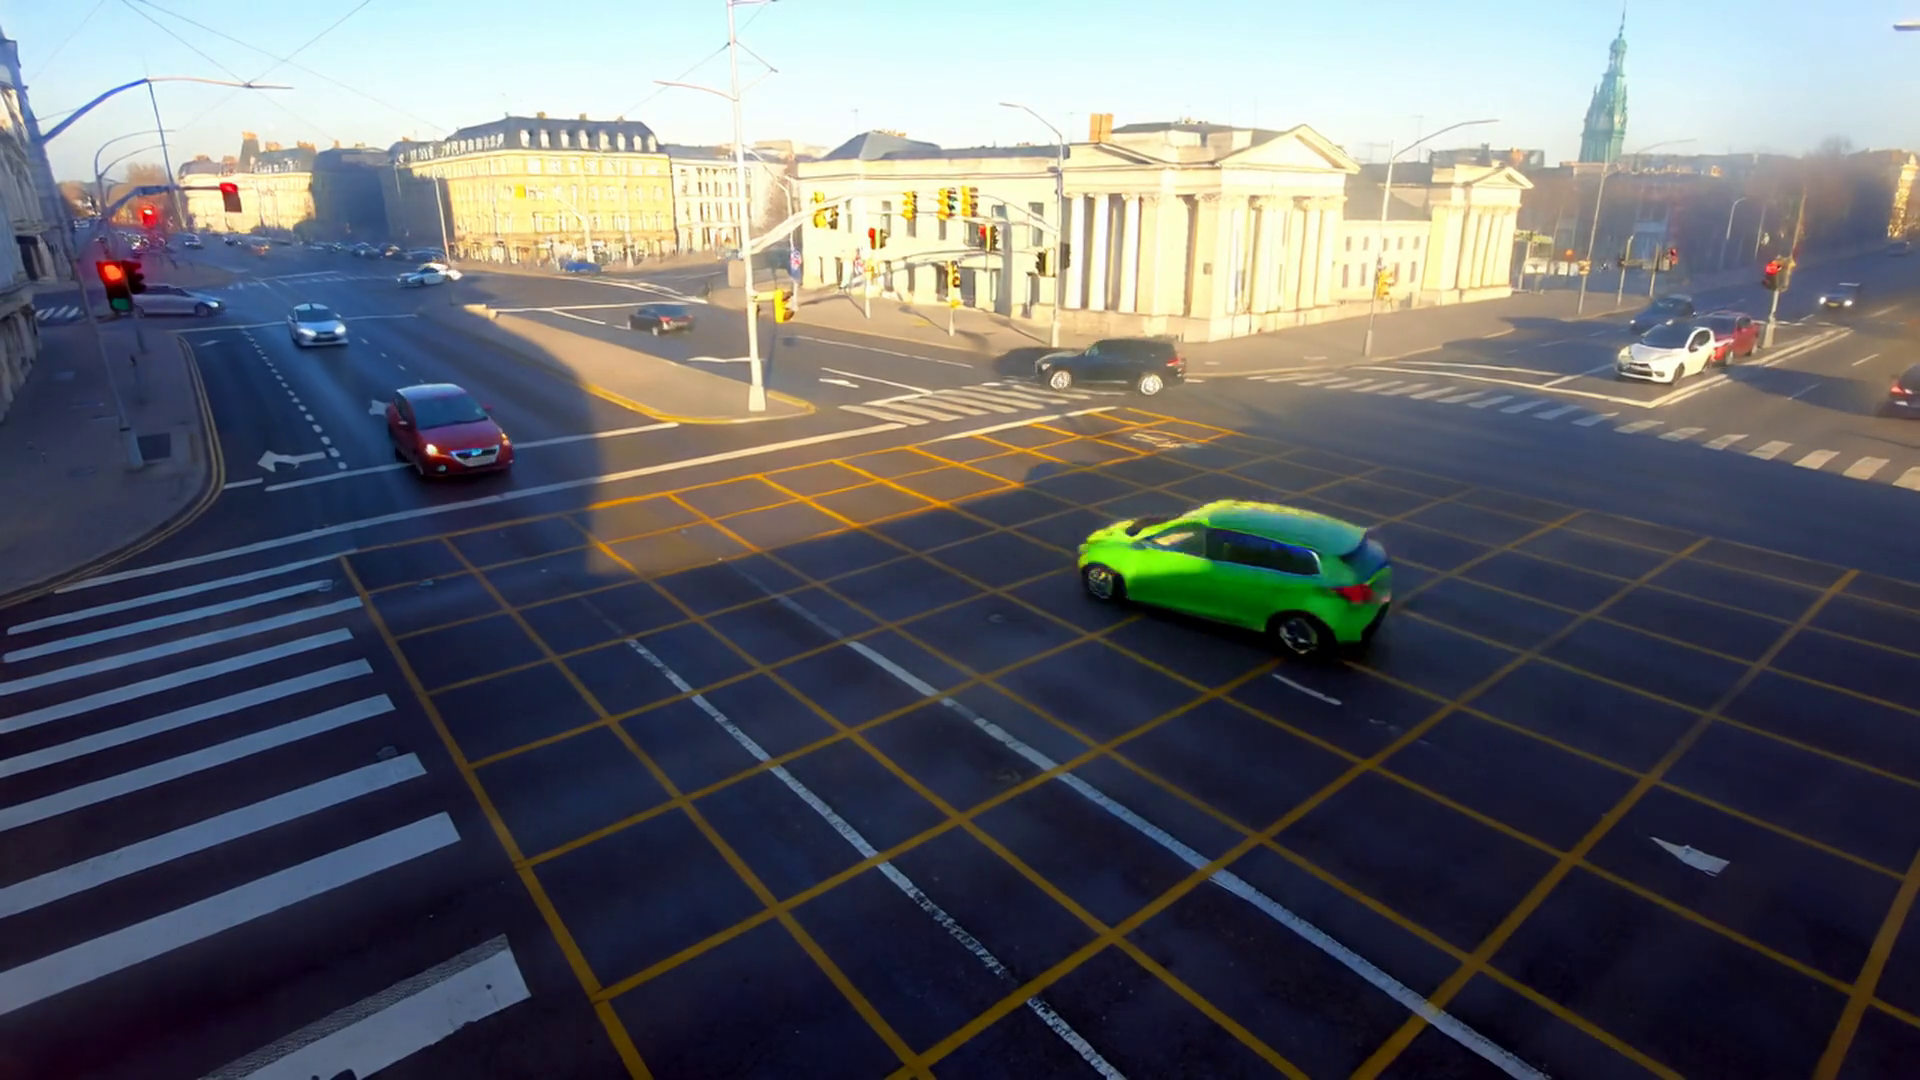
Mid-Morning - Bright natural daylight conditions |
Scaling Data Diversity#
The key benefit of this augmentation approach is multiplicity - from a single simulation scenario, you can generate 18+ photorealistic variations spanning different lighting, weather, and road conditions. The matrix below shows all possible augmentations from one base scene:
This approach provides significant advantages over traditional simulator methods:
18x Data Multiplication - One simulation scenario becomes 18 photorealistic variations
Preserved Ground Truth - 100% retention of vehicle trajectories and annotations
Reduced Engineering Effort - Hours instead of weeks to generate diverse datasets
Photorealistic Quality - Output suitable for training production AI systems
For more details on Cosmos Transfer 2.5 for sim-to-real augmentation, see the Cosmos Transfer documentation.
Setup and Workflow#
Details on how to setup and run the SDG workflow are available in this cookbook recipe.
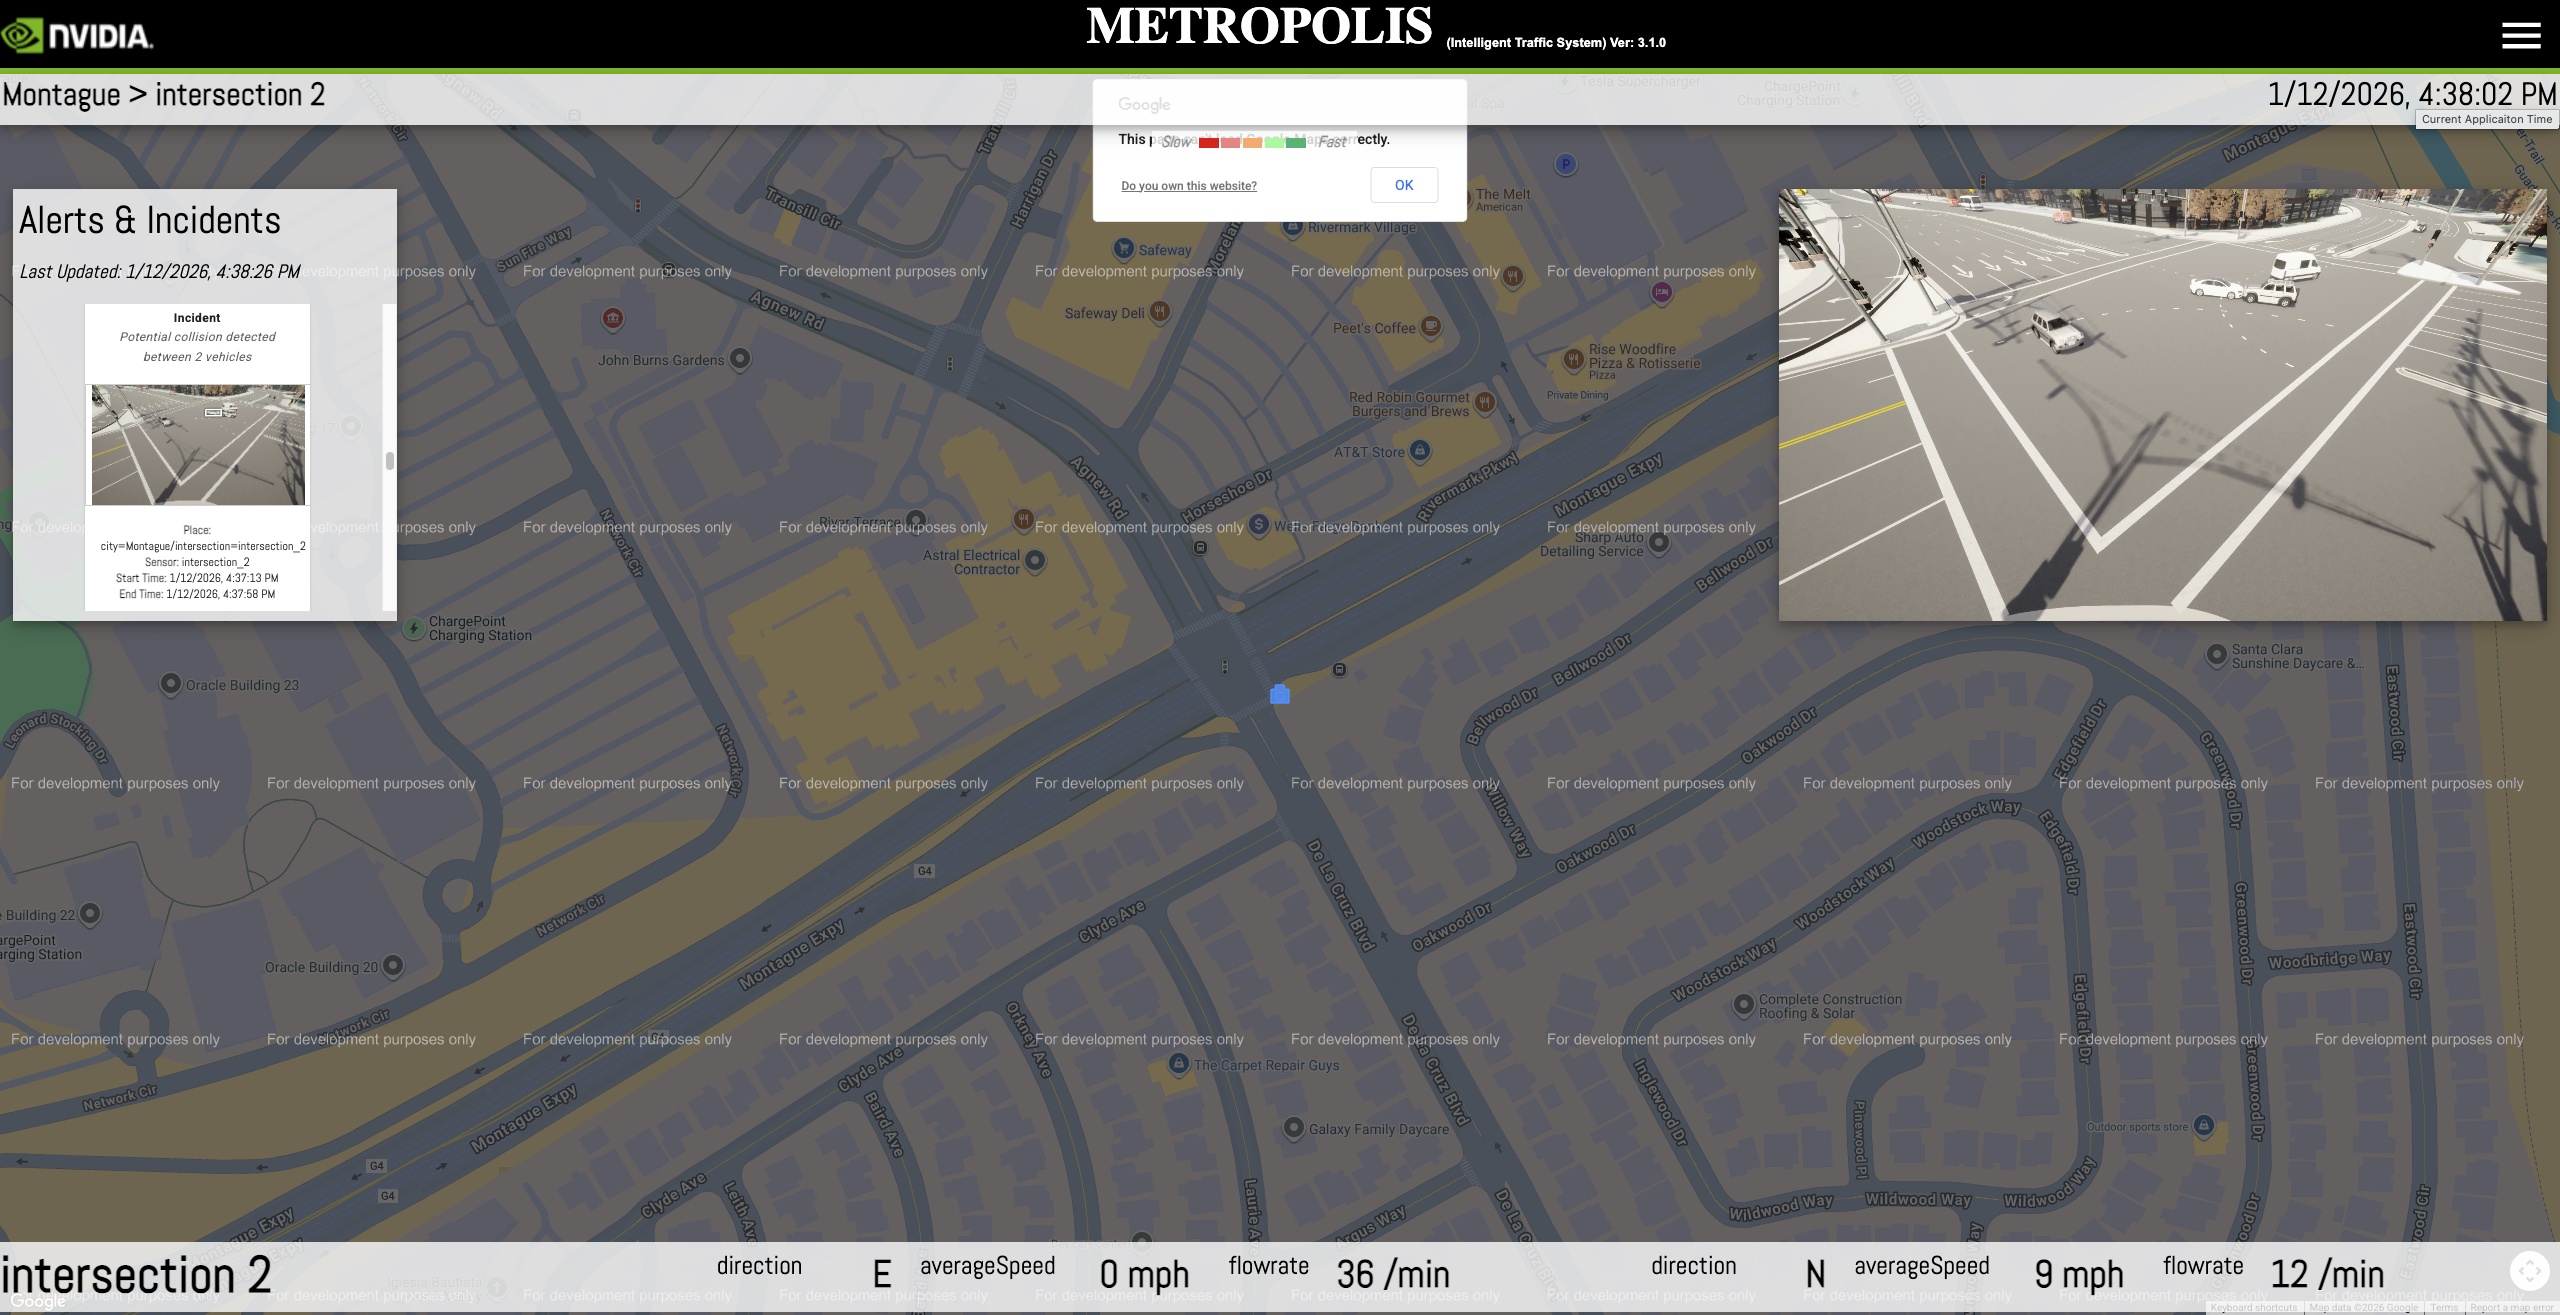
SDG Integration with Smart City Blueprint end-to-end Workflow#
The SDG-generated videos can be ingested into the Smart City workflow for validation and testing. The screenshot below shows the Map UI visualizing the processed SDG video output, with vehicle detections, tracking, and collision alerts overlaid on the Montague Expressway digital twin.
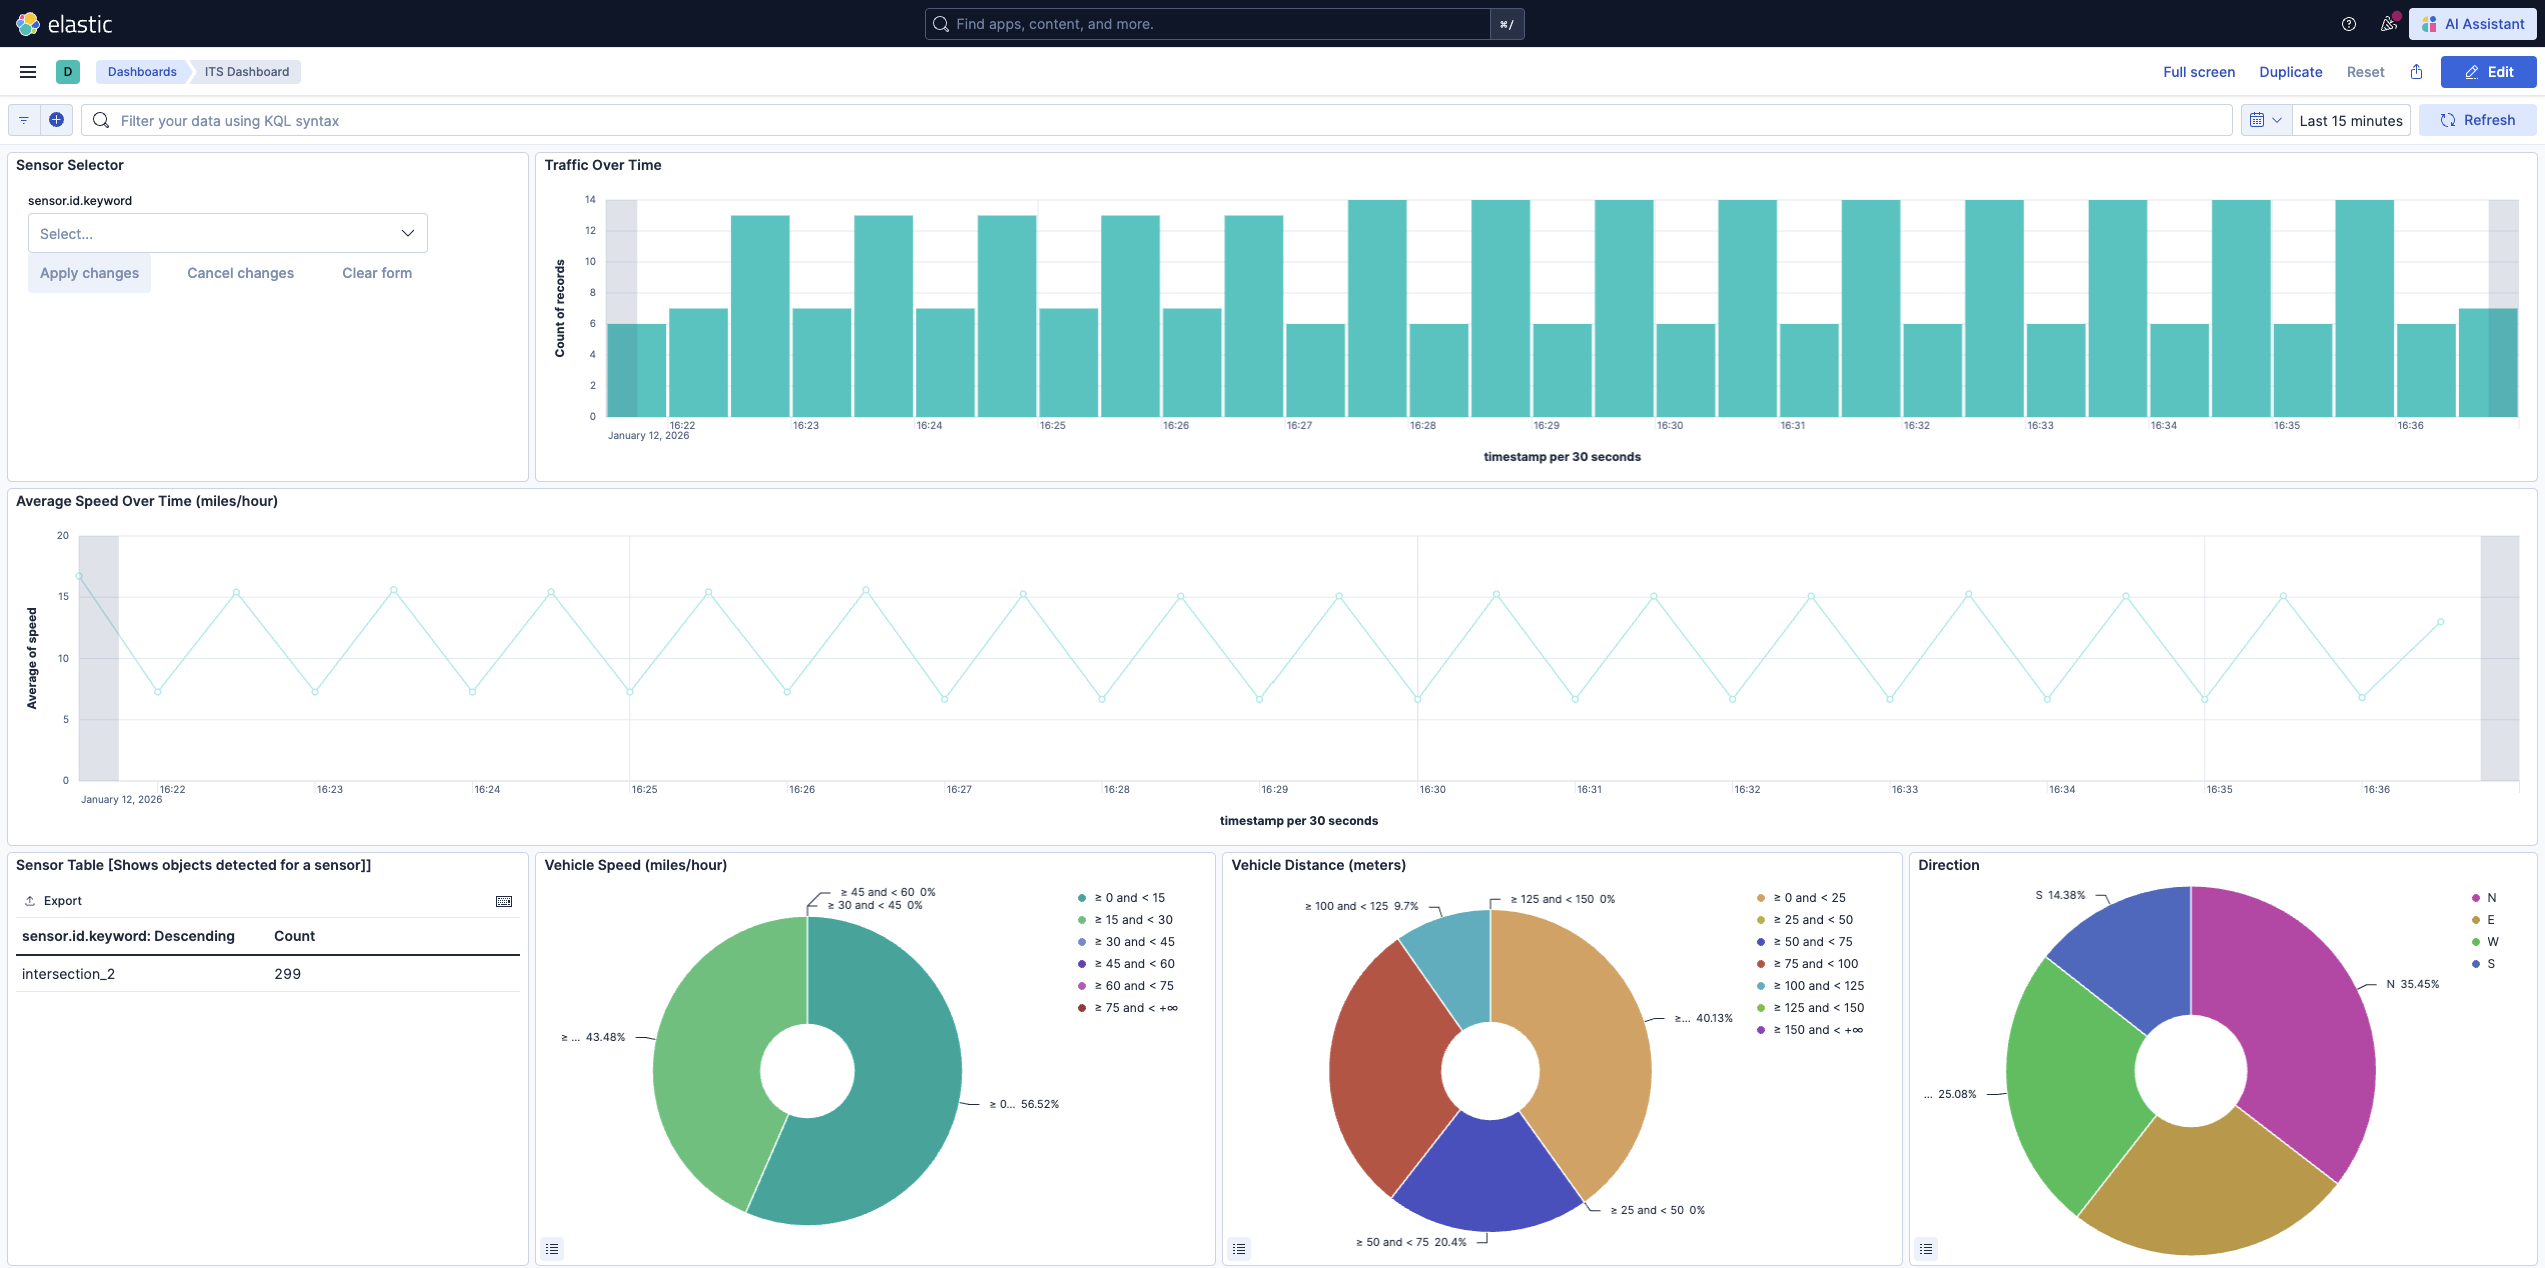
The workflow generates metrics that can be monitored through Kibana dashboards, enabling analysis of detection accuracy and traffic patterns from the synthetic data.
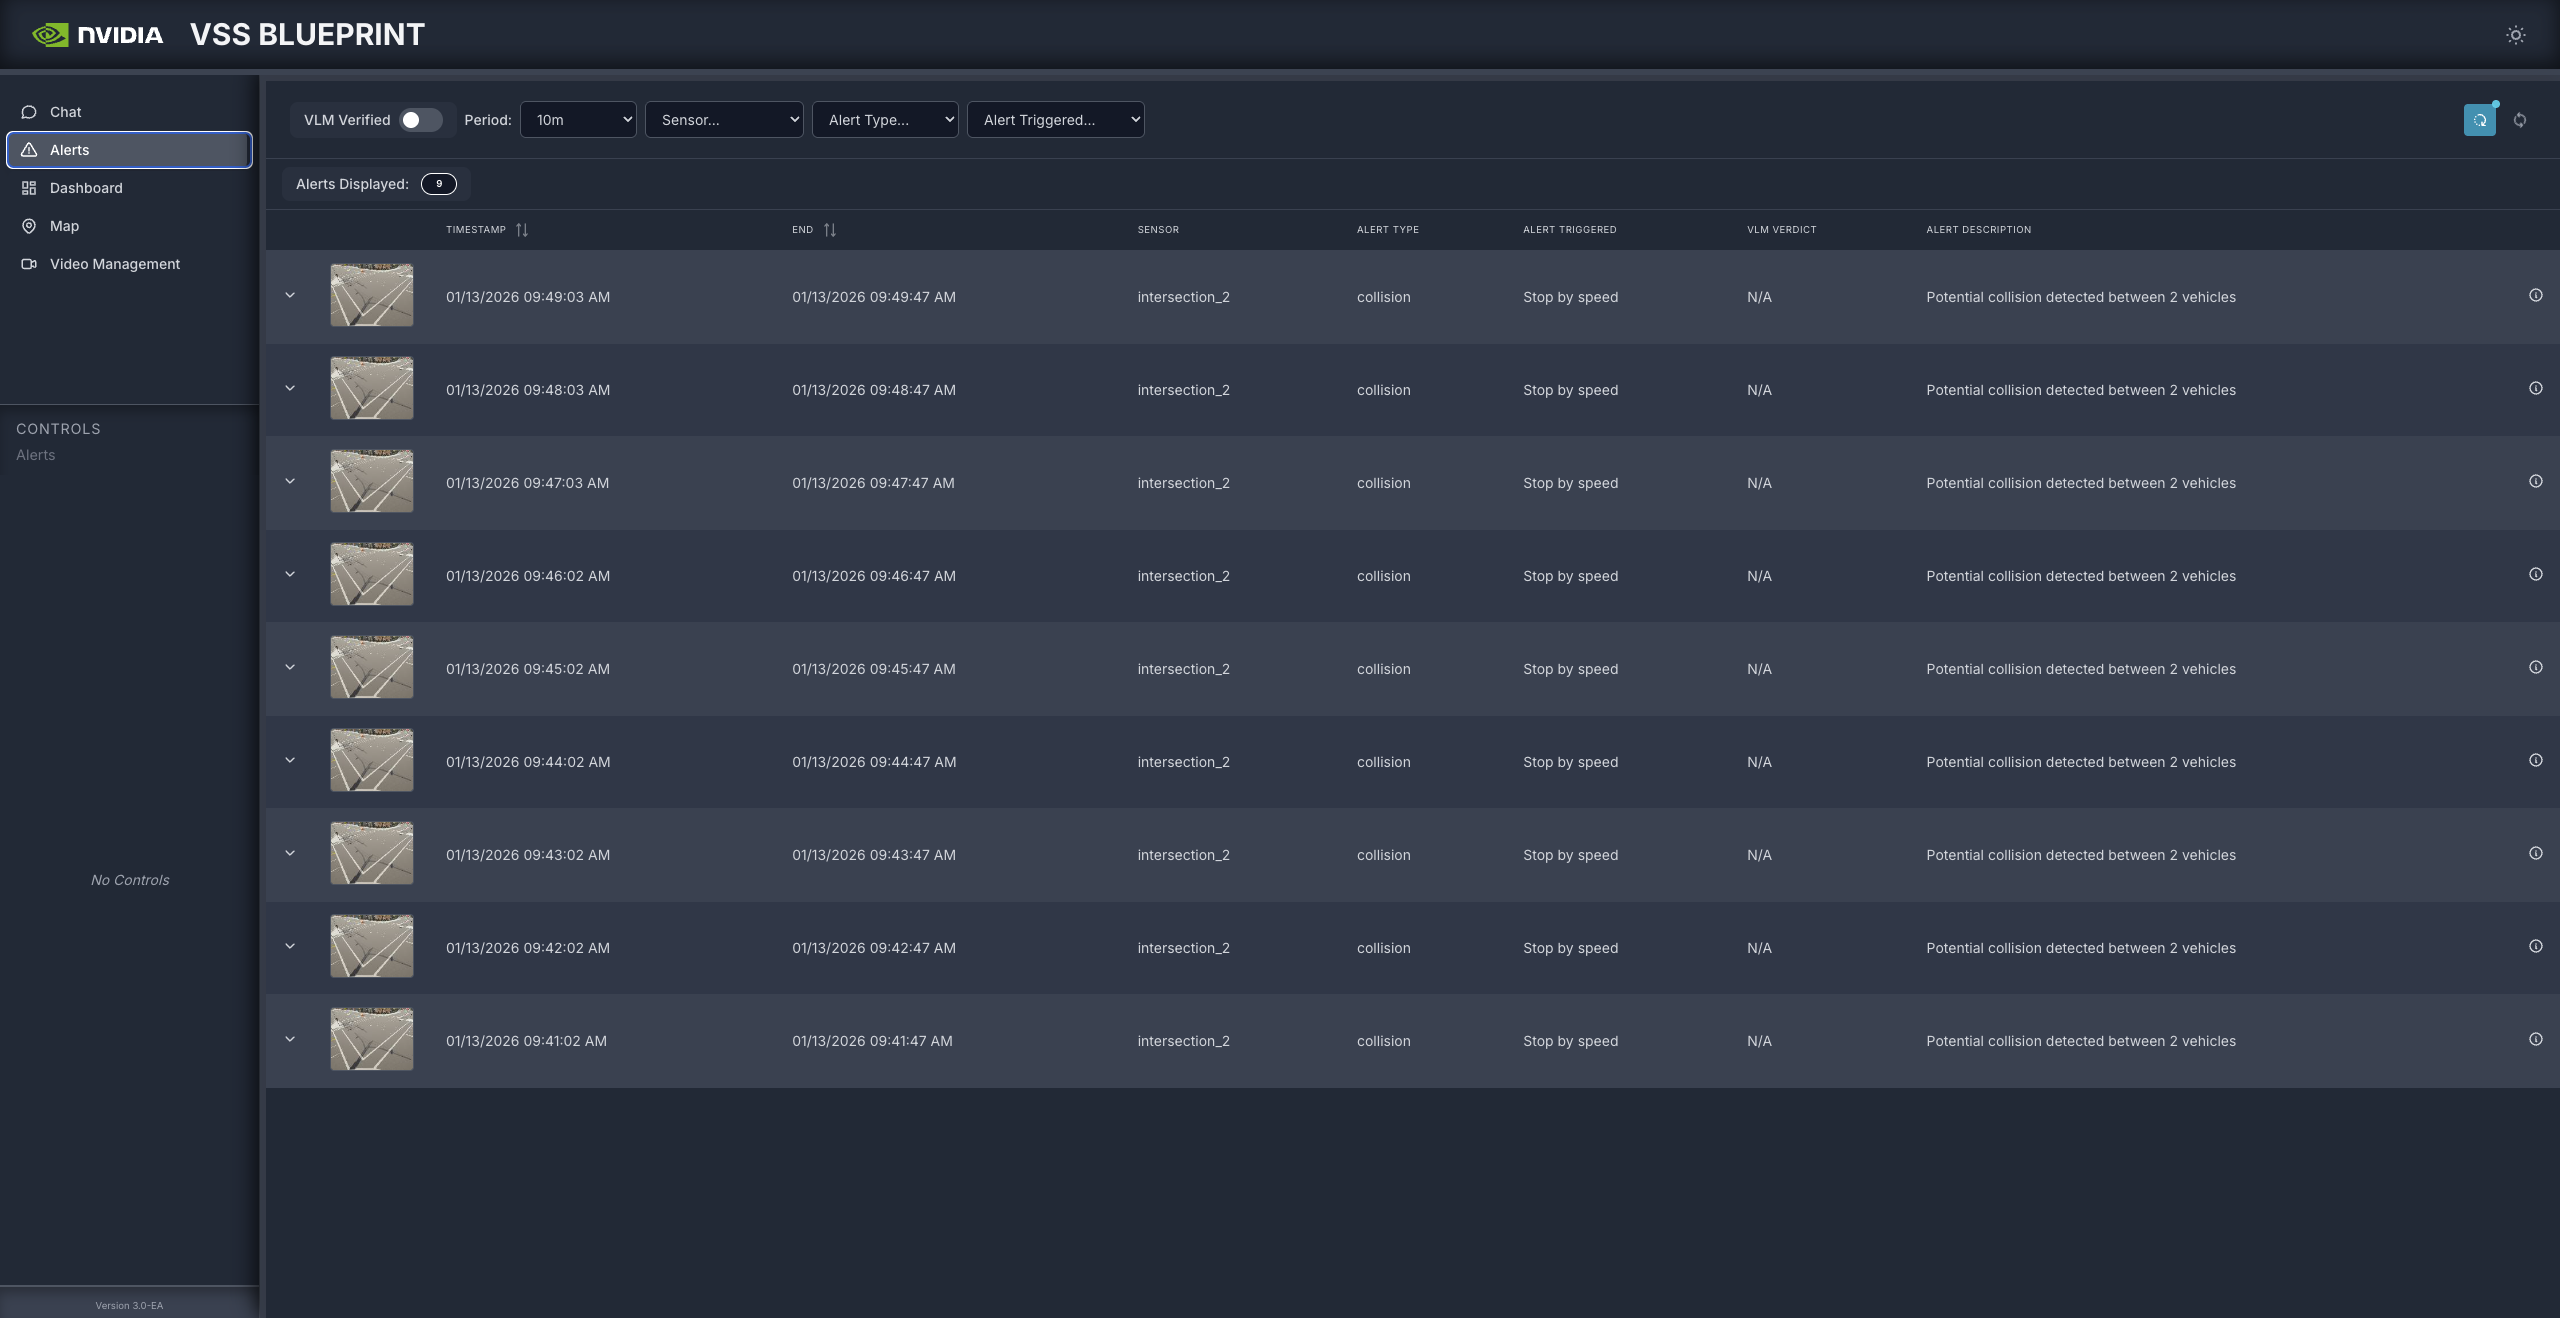
The VSS Blueprint UI displays detected collision alerts with timestamps, sensor information, and alert descriptions, allowing verification of incident detection from the SDG video output.