Quickstart#
Overview#
Deploy a vision agent in 10 minutes
This guide will walk you through the steps to deploy a vision agent using the VSS Blueprint. You’ll create a simple vision agent that you can upload videos to, ask questions about the videos, and generate reports. Afterwards, you can explore adding agent workflows such as video summarization, search, and alerting.
The following diagram illustrates a conceptual architecture of the base vision agent that you’ll deploy:
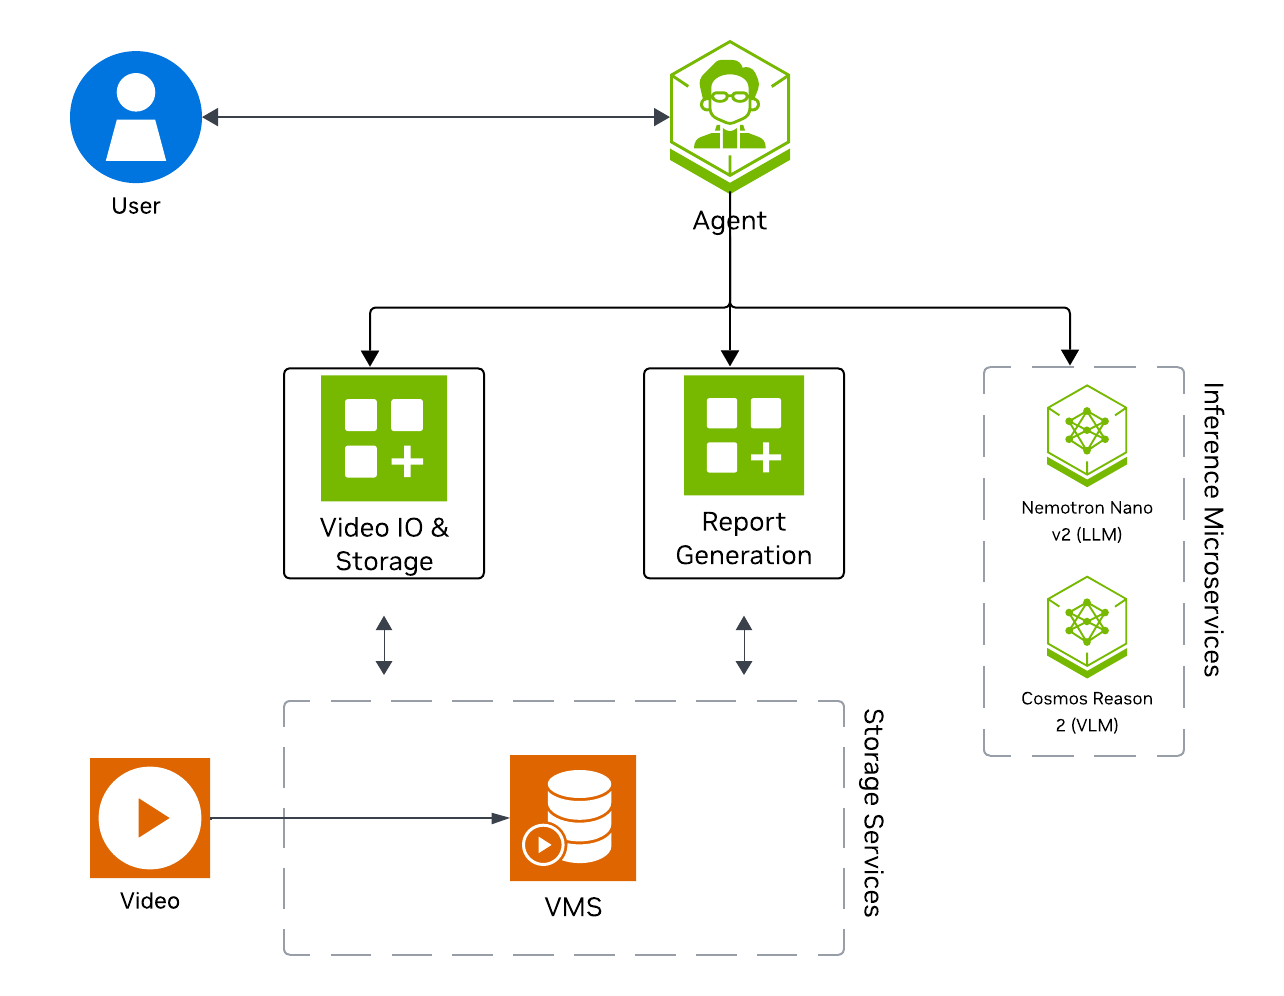
Key Features of the Base Vision Agent:
Upload videos to a video management system and connect the agent to it through the MCP service.
Report generation tool which utilizes a LLM and VLM to generate reports from the videos.
Video understanding tool which utilizes a VLM to perform video understanding tasks, such as Q&A.
What’s being deployed#
VSS Agent: Agent service that orchestrates tool calls and model inference to answer questions and generate outputs
VSS Agent UI: Web UI with chat, video upload, and different views
VSS Video IO & Storage (VIOS): Video ingestion, recording, and playback services used by the agent for video access and management
Nemotron LLM (NIM): LLM inference service used for reasoning, tool selection, and response generation
Cosmos Reason 2 (NIM): Vision-language model with physical reasoning capabilities
Phoenix: Observability and telemetry service for agent workflow monitoring
Prerequisites#
Before you begin, ensure all of the prerequisites are met. See Prerequisites for more details.
Download Sample Data and Deployment Package#
Configure NGC Access#
Note
Before proceeding, ensure that NGC CLI is installed on your system. For installation instructions, see Install NGC CLI in the Prerequisites.
Download Sample Data From NGC#
Perform this on the machine from which you may use the web-browser.
This can be done using NGC CLI as documented below, or downloaded from the NGC UI directly.
Download the Deployment Package#
Perform this on the machine where you intend to deploy the agent.
Note
Git LFS required: The repository uses Git LFS for large files. Install it before cloning or pulling. For example, on Ubuntu/Debian: sudo apt-get install git-lfs. On other systems, see Git LFS installation.
git clone https://github.com/NVIDIA-AI-Blueprints/video-search-and-summarization.git
cd video-search-and-summarization
git checkout tags/v3.1.0
git lfs install
git lfs pull
Deploy#
Note
Set the NGC CLI API key, then run the deploy commands for your GPU type.
Refer to VSS-Agent-Customization-configure-llm and VSS-Agent-Customization-configure-vlm for all LLM and VLM (local and remote) configuration options.
For advanced settings and Agent Customization, see the deploy command help.
# Set NGC CLI API key
export NGC_CLI_API_KEY='your_ngc_api_key'

# View all available options
scripts/dev-profile.sh --help
scripts/dev-profile.sh up -p base -H H100
scripts/dev-profile.sh up -p base -H H100 --llm-device-id 0 --vlm-device-id 1
export LLM_ENDPOINT_URL=https://your-llm-endpoint.com
scripts/dev-profile.sh up -p base -H H100 --use-remote-llm
export VLM_ENDPOINT_URL=https://your-vlm-endpoint.com
scripts/dev-profile.sh up -p base -H H100 --use-remote-vlm
export LLM_ENDPOINT_URL=https://your-llm-endpoint.com
export VLM_ENDPOINT_URL=https://your-vlm-endpoint.com
scripts/dev-profile.sh up -p base -H H100 --use-remote-llm --use-remote-vlm
scripts/dev-profile.sh up -p base -H RTXPRO6000BW
scripts/dev-profile.sh up -p base -H RTXPRO6000BW --llm-device-id 0 --vlm-device-id 1
export LLM_ENDPOINT_URL=https://your-llm-endpoint.com
scripts/dev-profile.sh up -p base -H RTXPRO6000BW --use-remote-llm
export VLM_ENDPOINT_URL=https://your-vlm-endpoint.com
scripts/dev-profile.sh up -p base -H RTXPRO6000BW --use-remote-vlm
export LLM_ENDPOINT_URL=https://your-llm-endpoint.com
export VLM_ENDPOINT_URL=https://your-vlm-endpoint.com
scripts/dev-profile.sh up -p base -H RTXPRO6000BW --use-remote-llm --use-remote-vlm
scripts/dev-profile.sh up -p base -H L40S --llm-device-id 0 --vlm-device-id 1
export LLM_ENDPOINT_URL=https://your-llm-endpoint.com
scripts/dev-profile.sh up -p base -H L40S --use-remote-llm
export VLM_ENDPOINT_URL=https://your-vlm-endpoint.com
scripts/dev-profile.sh up -p base -H L40S --use-remote-vlm
export LLM_ENDPOINT_URL=https://your-llm-endpoint.com
export VLM_ENDPOINT_URL=https://your-vlm-endpoint.com
scripts/dev-profile.sh up -p base -H L40S --use-remote-llm --use-remote-vlm
See VSS-Agent-Customization-configure-llm for remote LLM endpoint options, and Edge Deployment for this particular setup.
export LLM_ENDPOINT_URL=https://your-llm-endpoint.com
scripts/dev-profile.sh up -p base -H DGX-SPARK --use-remote-llm
See VSS-Agent-Customization-configure-llm for remote LLM endpoint options, and Edge Deployment for this particular setup.
export LLM_ENDPOINT_URL=https://your-llm-endpoint.com
scripts/dev-profile.sh up -p base -H IGX-THOR --use-remote-llm
See VSS-Agent-Customization-configure-llm for remote LLM endpoint options, and Edge Deployment for this particular setup.
export LLM_ENDPOINT_URL=https://your-llm-endpoint.com
scripts/dev-profile.sh up -p base -H AGX-THOR --use-remote-llm
See Local LLM and VLM deployments on OTHER hardware for known limitations and constraints.
scripts/dev-profile.sh up -p base -H OTHER [ --llm-env-file /path/to/llm.env --vlm-env-file /path/to/vlm.env ]
scripts/dev-profile.sh up -p base -H OTHER --llm-device-id 0 --vlm-device-id 1 [ --llm-env-file /path/to/llm.env --vlm-env-file /path/to/vlm.env ]
export LLM_ENDPOINT_URL=https://your-llm-endpoint.com
scripts/dev-profile.sh up -p base -H OTHER --use-remote-llm [ --vlm-env-file /path/to/vlm.env ]
export VLM_ENDPOINT_URL=https://your-vlm-endpoint.com
scripts/dev-profile.sh up -p base -H OTHER --use-remote-vlm [ --llm-env-file /path/to/llm.env ]
export LLM_ENDPOINT_URL=https://your-llm-endpoint.com
export VLM_ENDPOINT_URL=https://your-vlm-endpoint.com
scripts/dev-profile.sh up -p base -H OTHER --use-remote-llm --use-remote-vlm
This command will download the necessary containers from the NGC Docker registry and start the agent. Depending on your network speed, this may take a few minutes.
This deployment uses the following defaults:
Host IP: src IP from
ip route get 1.1.1.1Which is the default IP address for the agent.
Override IP than the one derived:
-i: Manually specify the host IP address.-e/--external-ip: Optionally specify an externally accessible IP address for services that need to be reached from outside the host. For VSS on a cloud machine, this flag is required — pass the instance’s external IP (for example, its public address).
Note
When using a remote VLM of model-type nim (not openai), see How does a remote nim VLM access videos? for access requirements.
Note
Switch Agent Workflows: You can deploy different agent workflows by changing the -p (profile) argument. For alerts, also specify -m (mode):
base: Base vision agent (this quickstart)search: Search Workflowalerts: Alert workflows (requires-m verificationor-m real-time)Alert Verification Workflow — use
-m verificationReal-Time Alert Workflow — use
-m real-time
Once the deployment is complete, check that all the containers are running and healthy:
docker ps
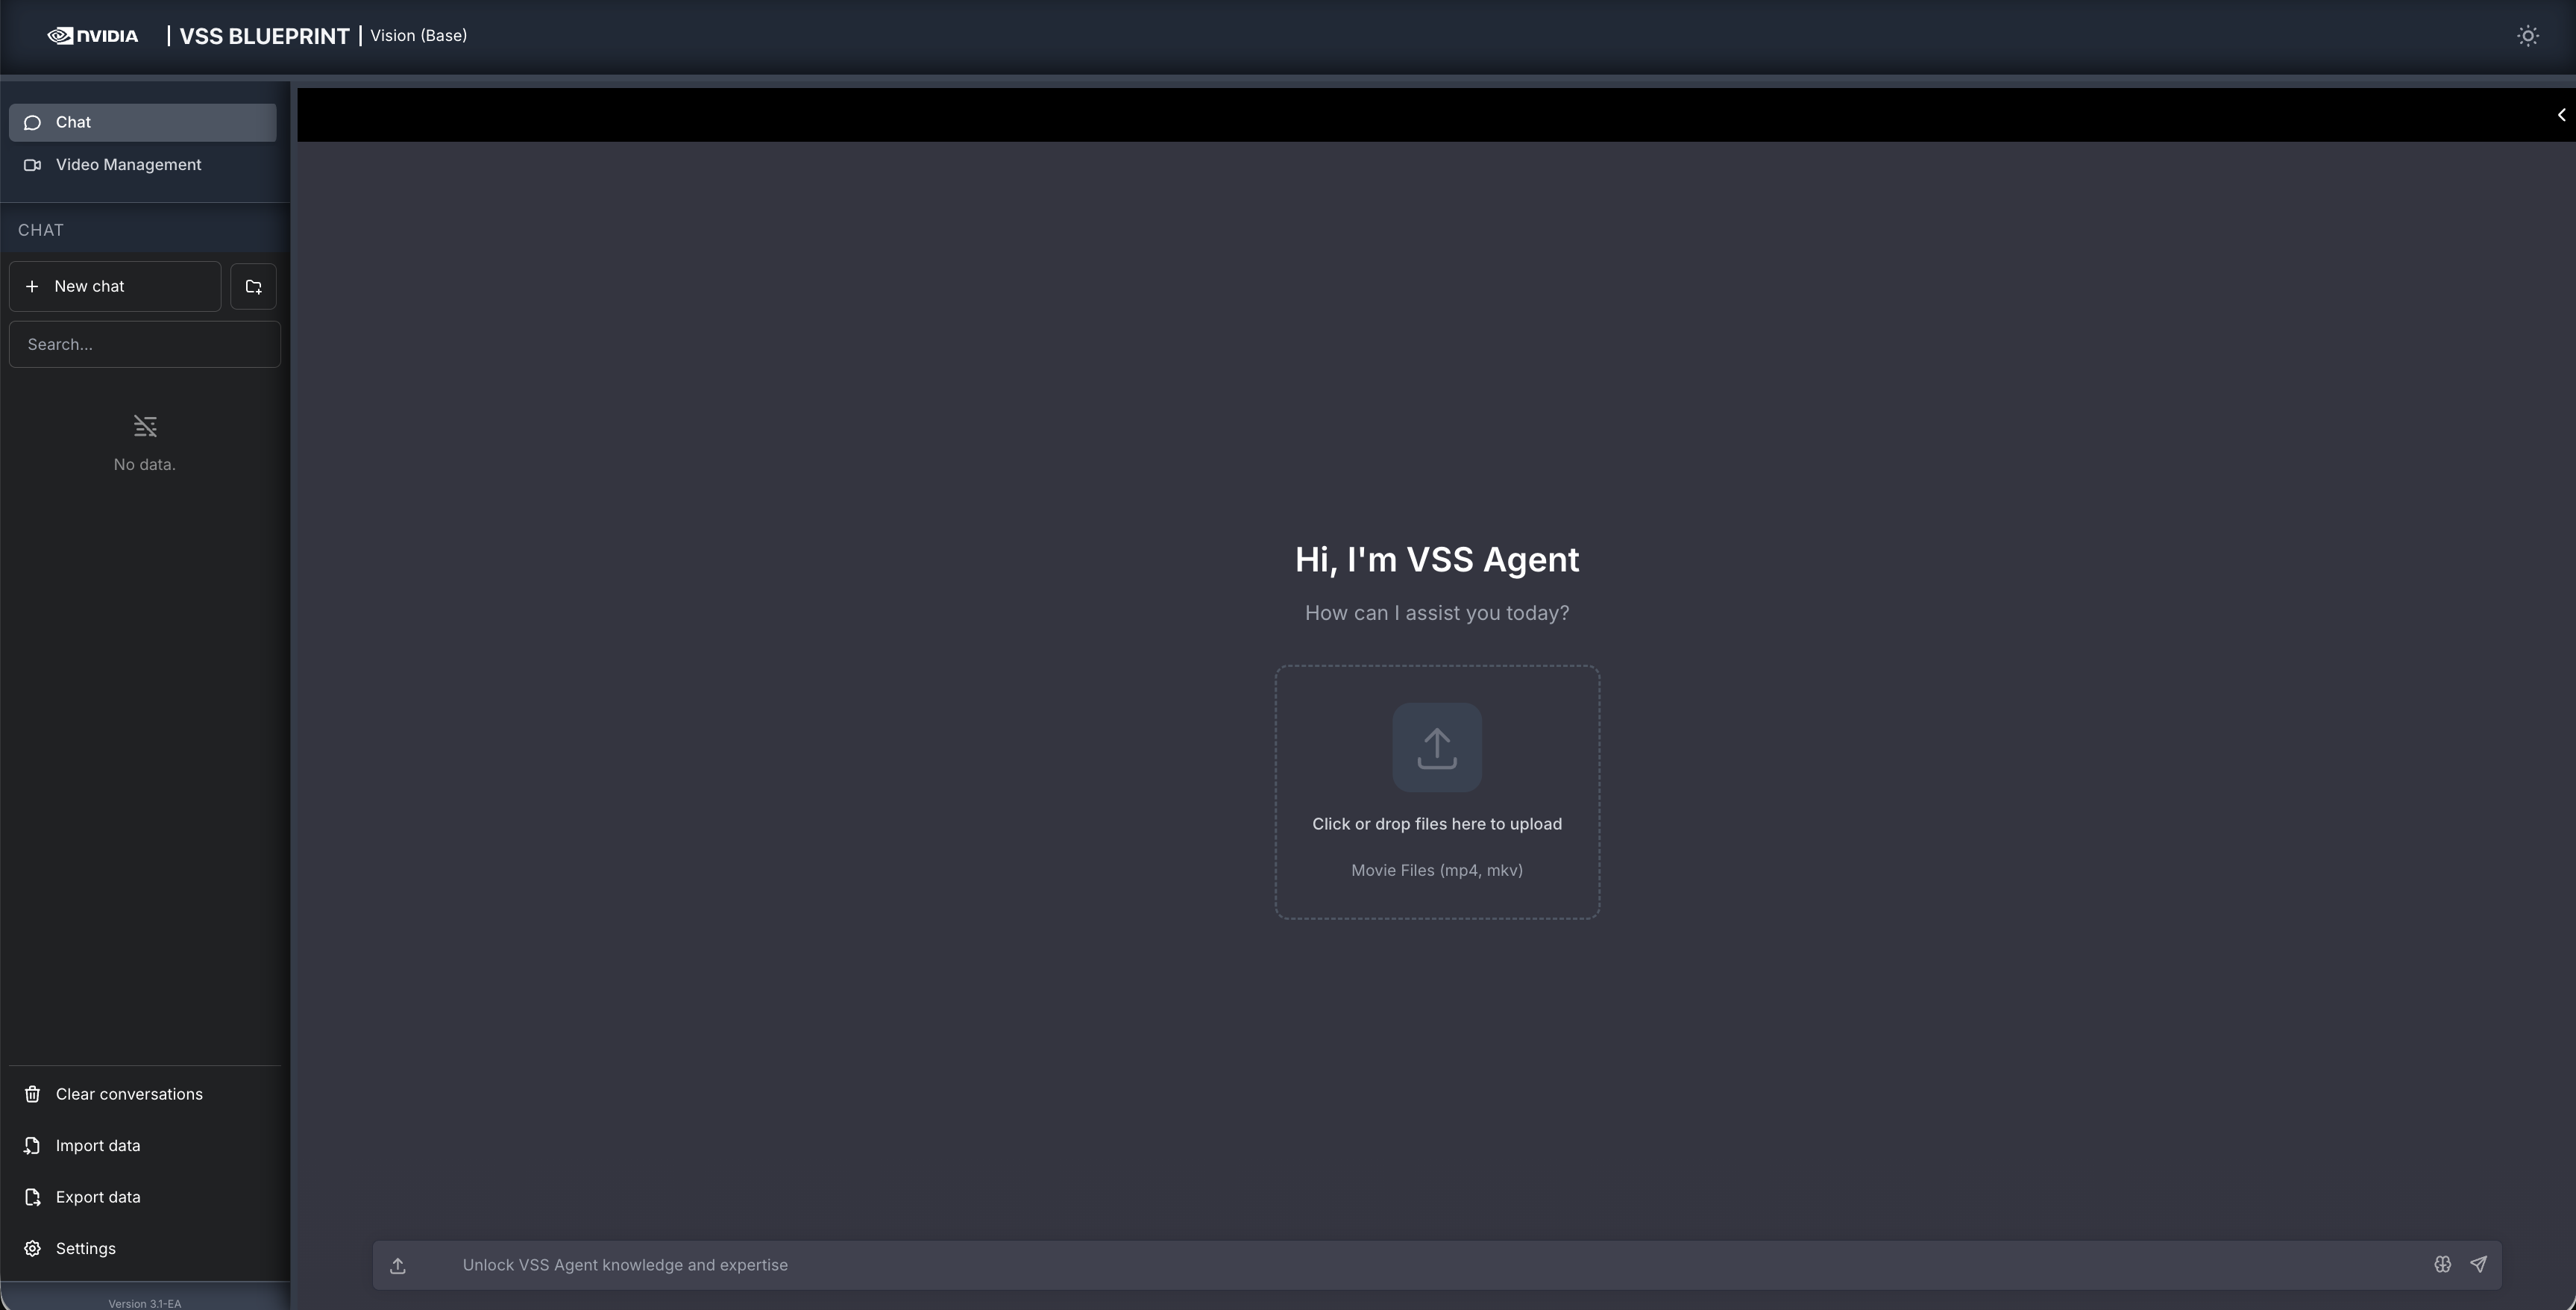
Once all the containers are running, you can access the agent UI at http://<HOST_IP>:3000/.
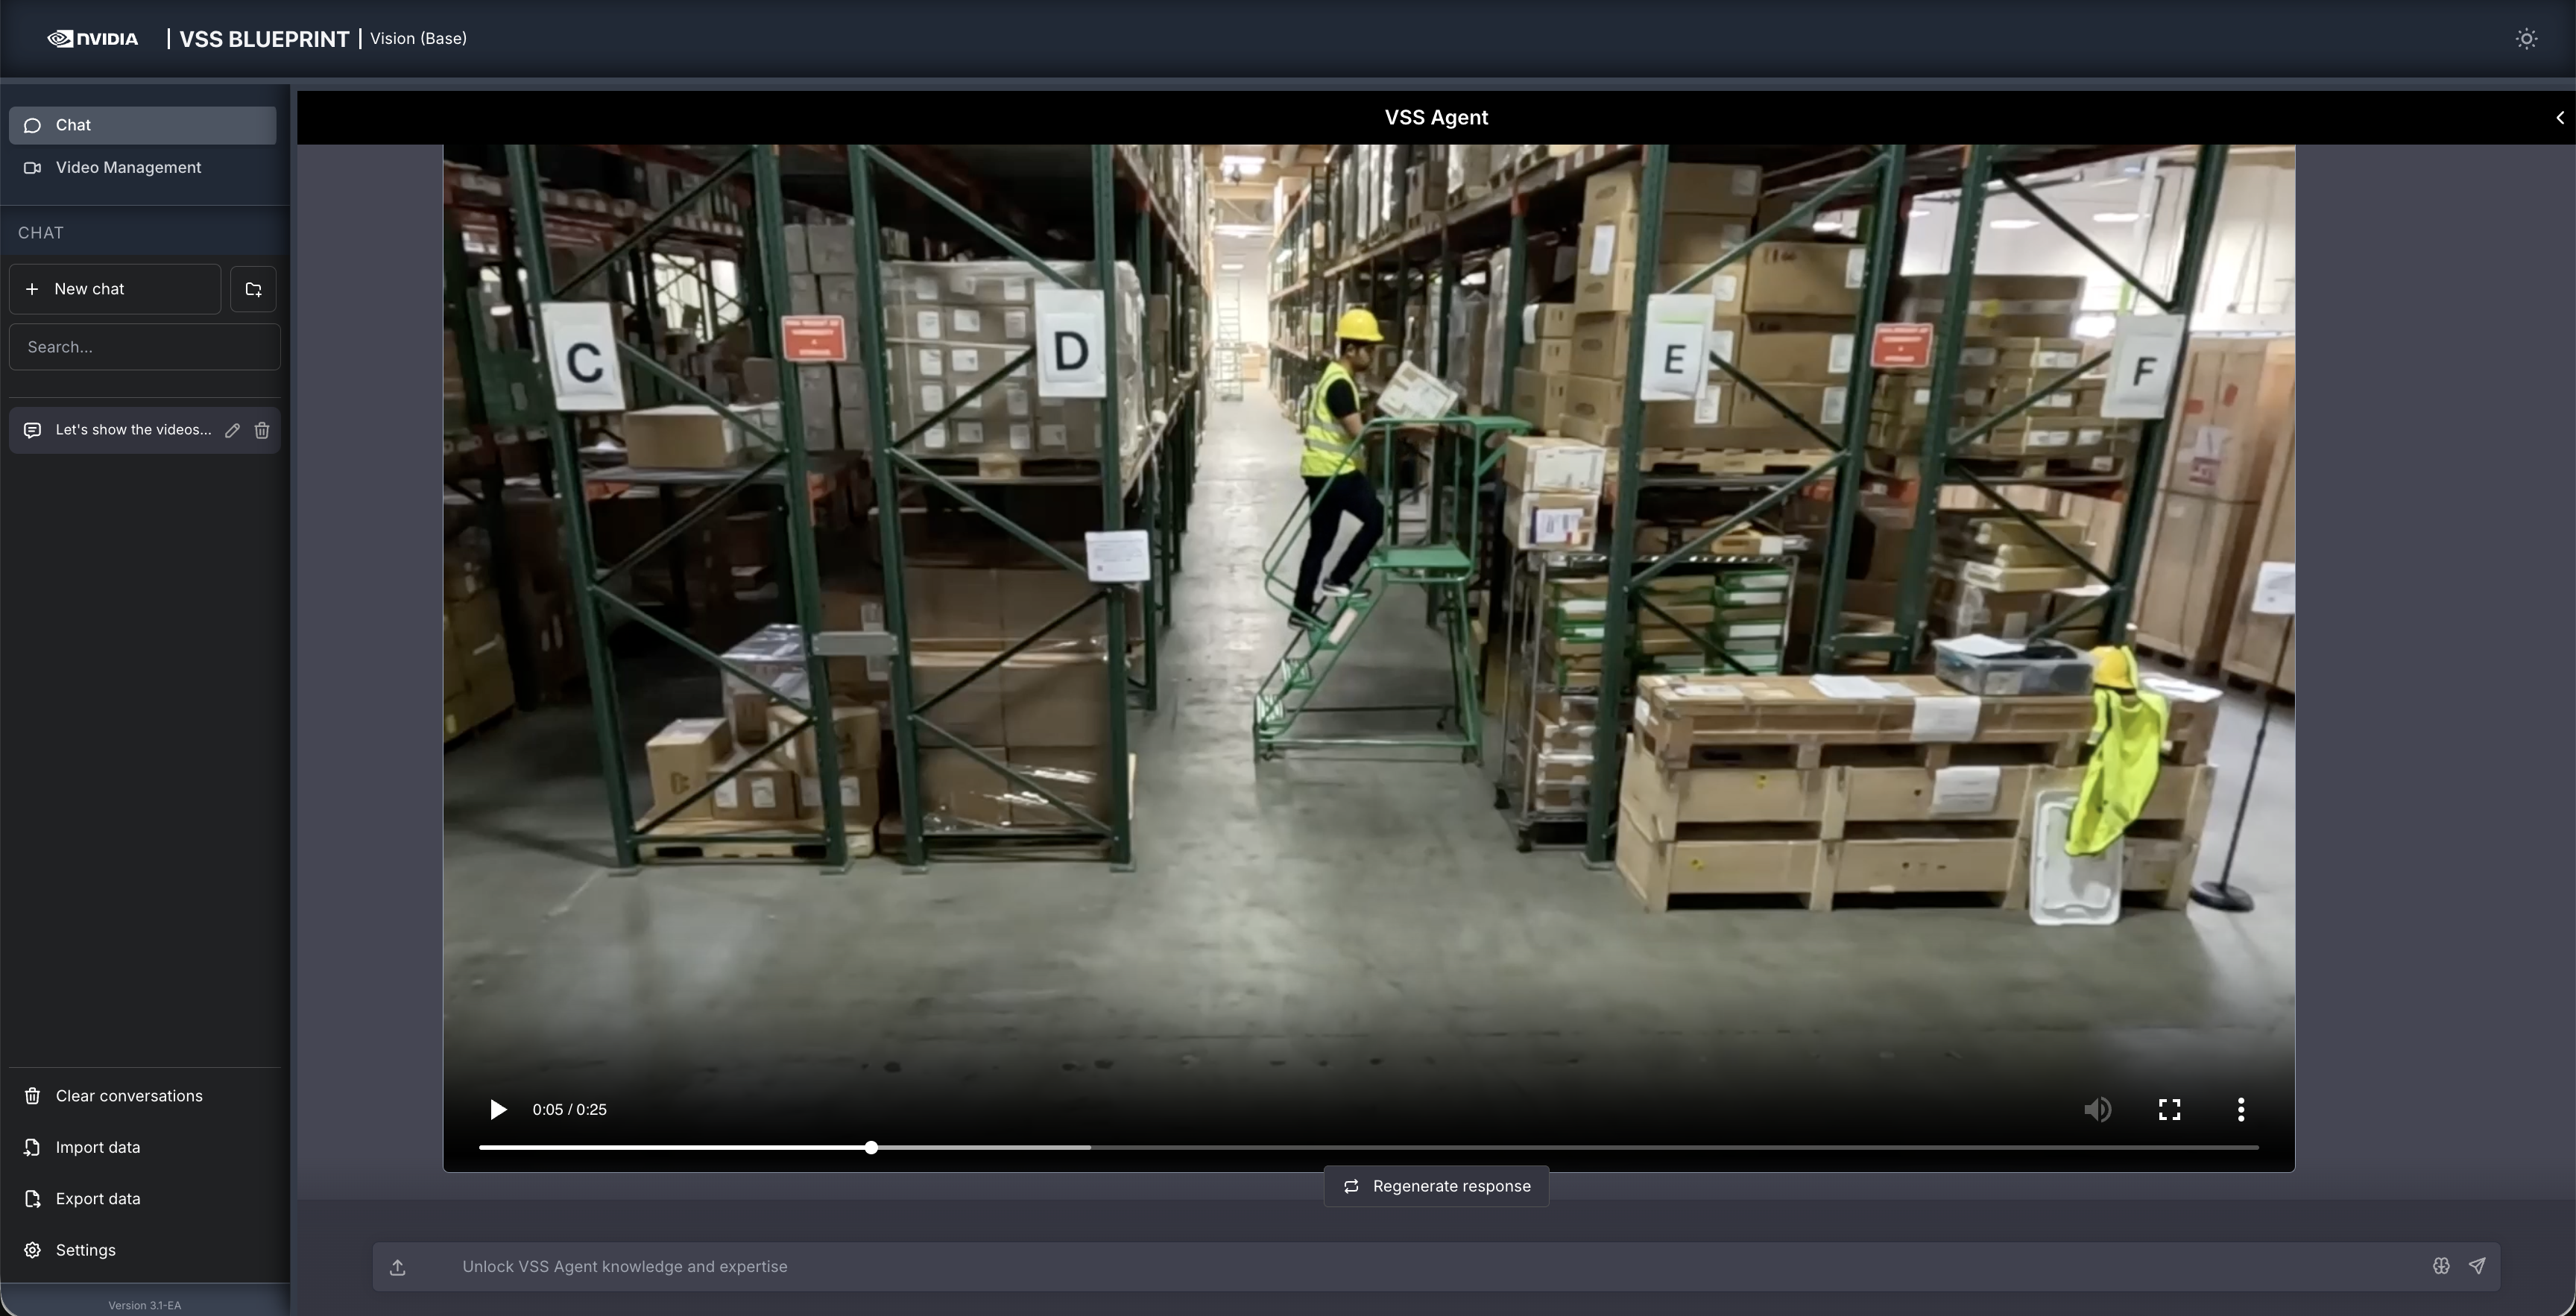
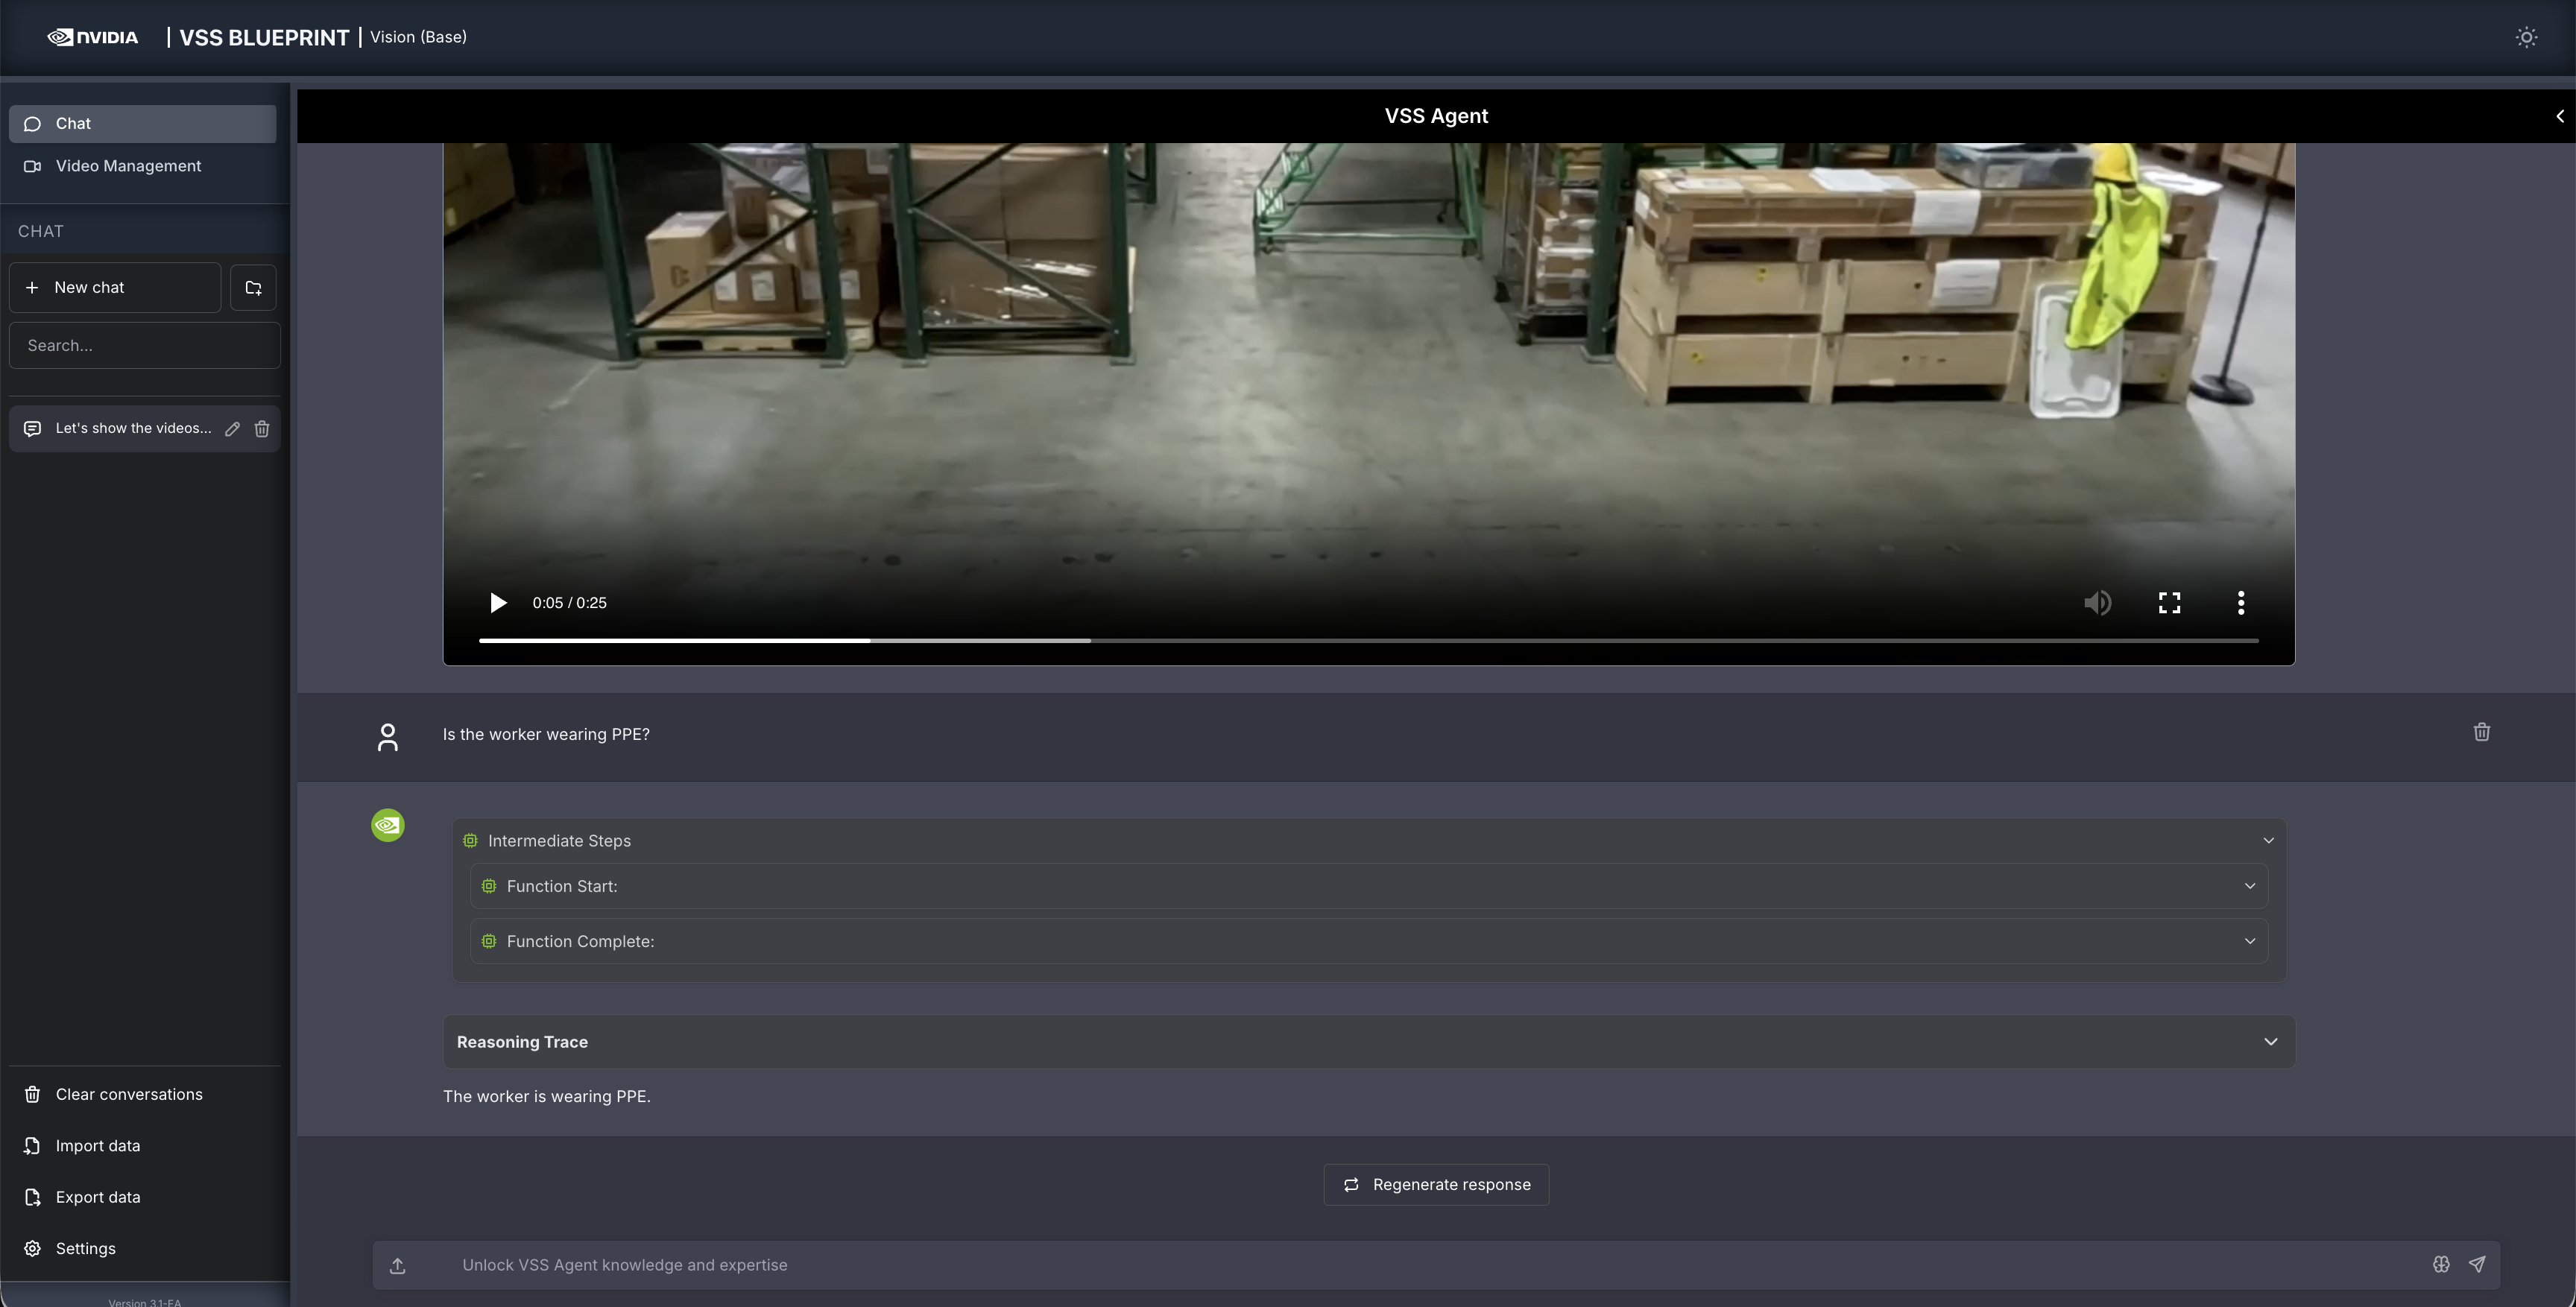
Step 2: Upload a video#
In the chat interface, drag and drop the video warehouse_safety_0001.mp4 into the chat window.
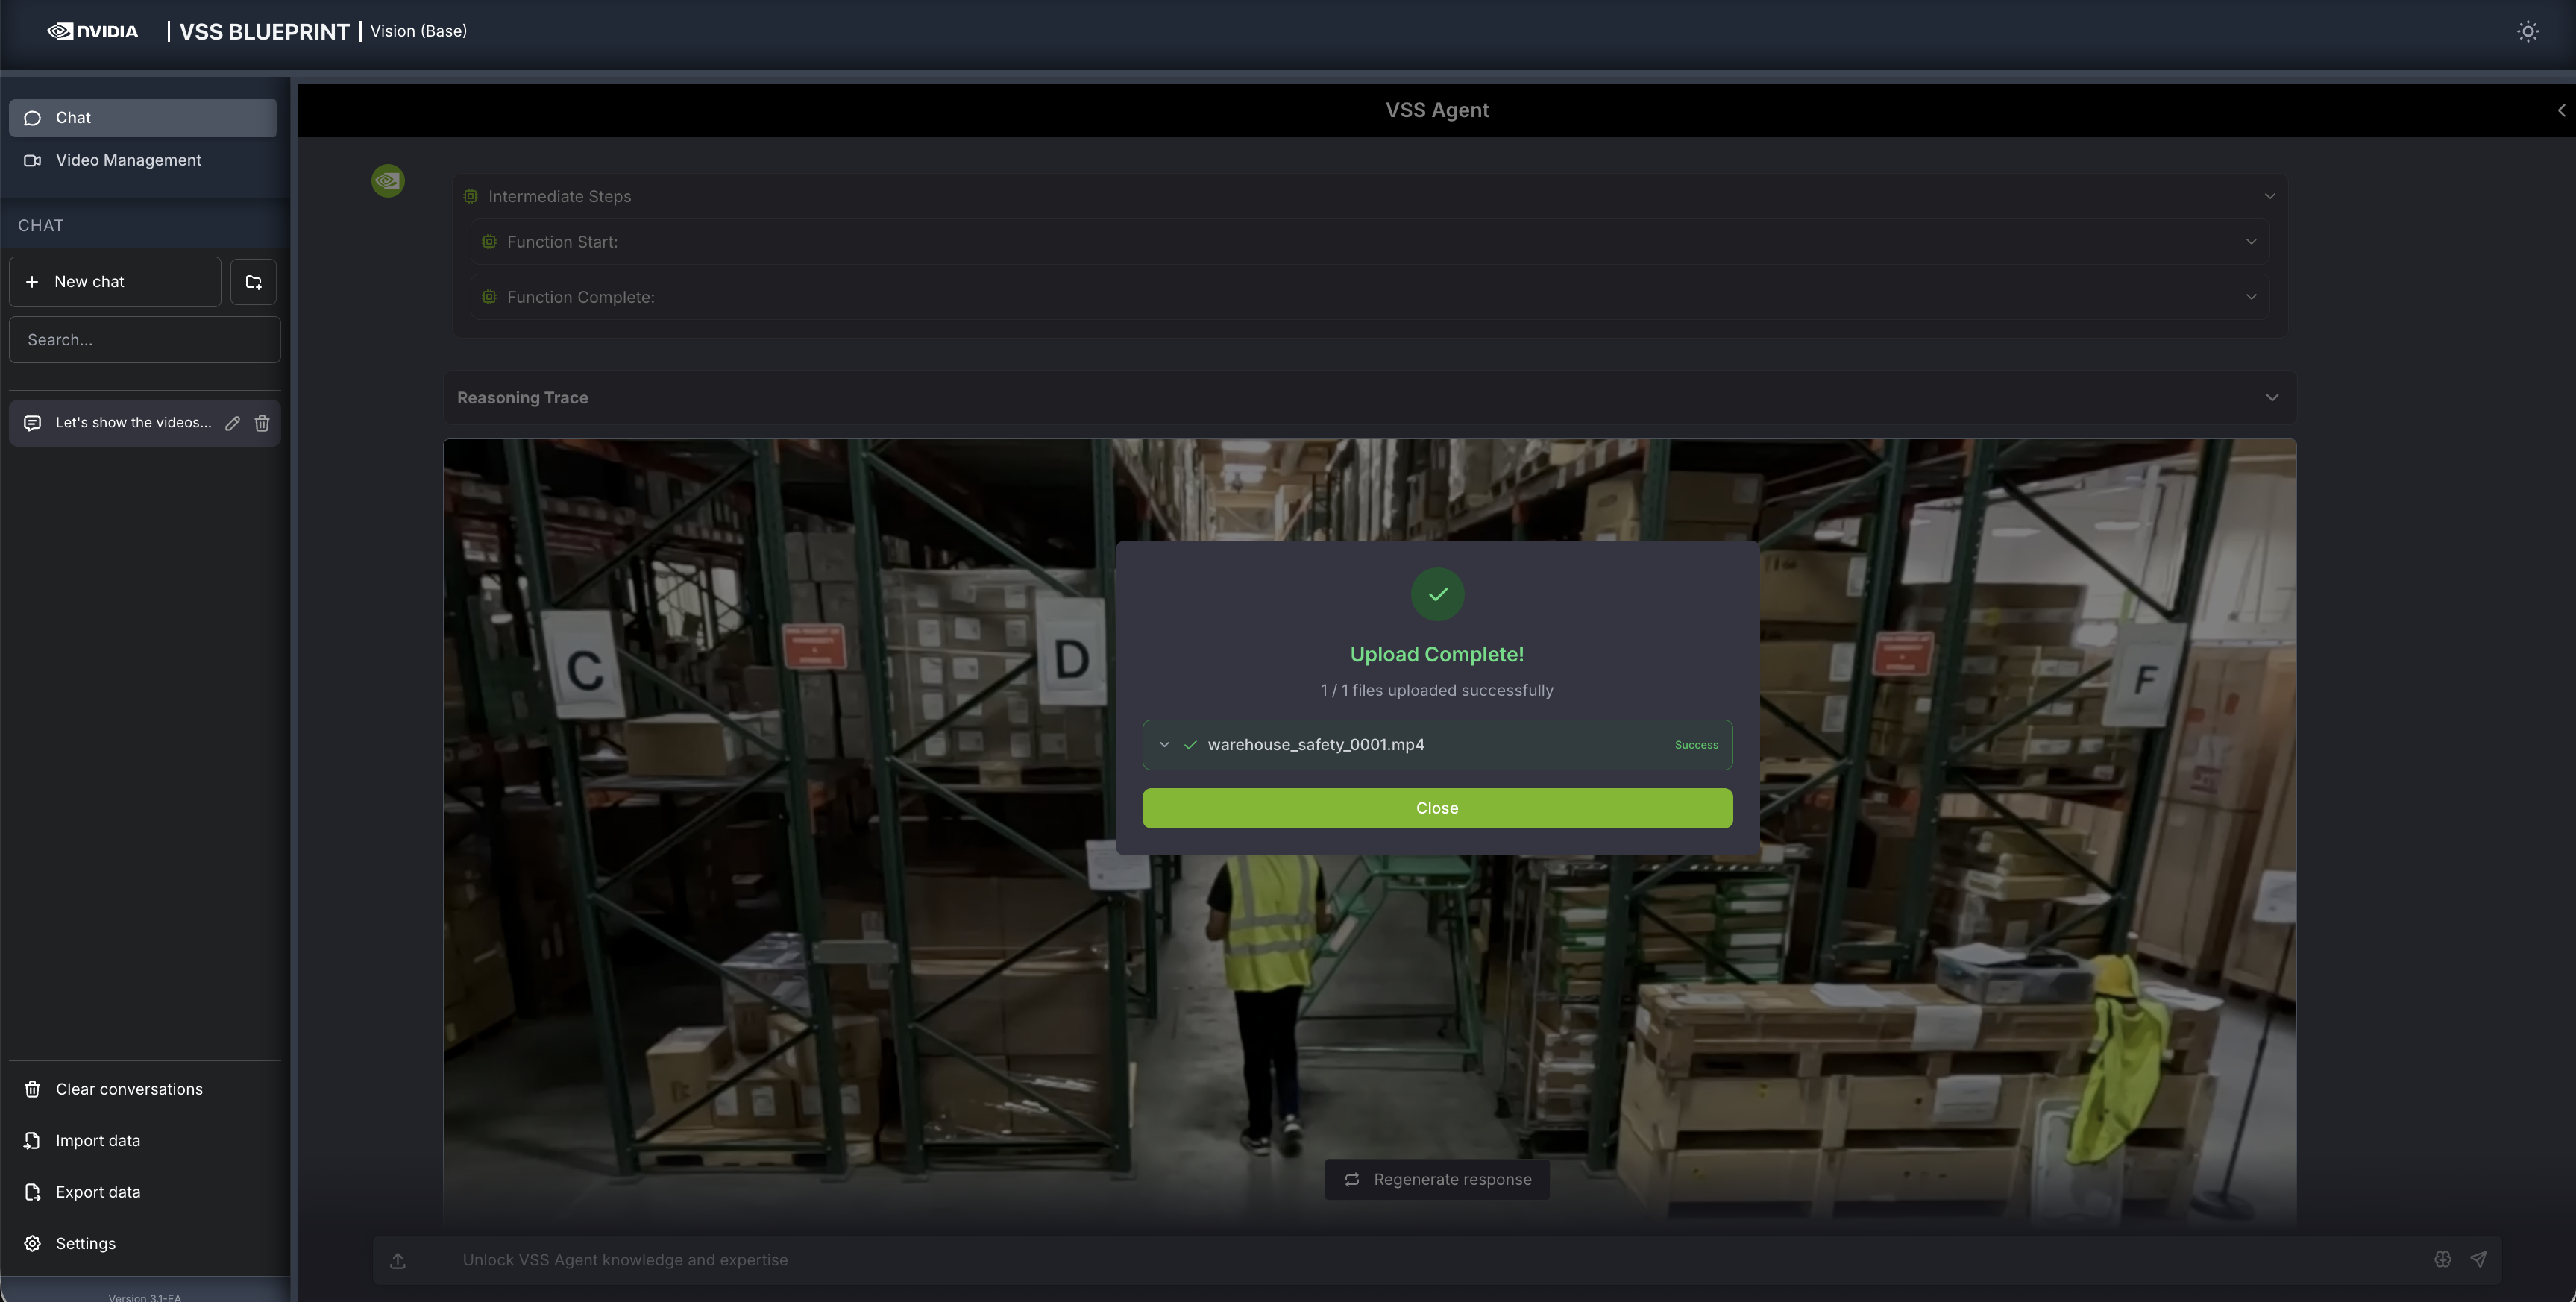
Once the video is uploaded, the agent will respond with the playback clip.
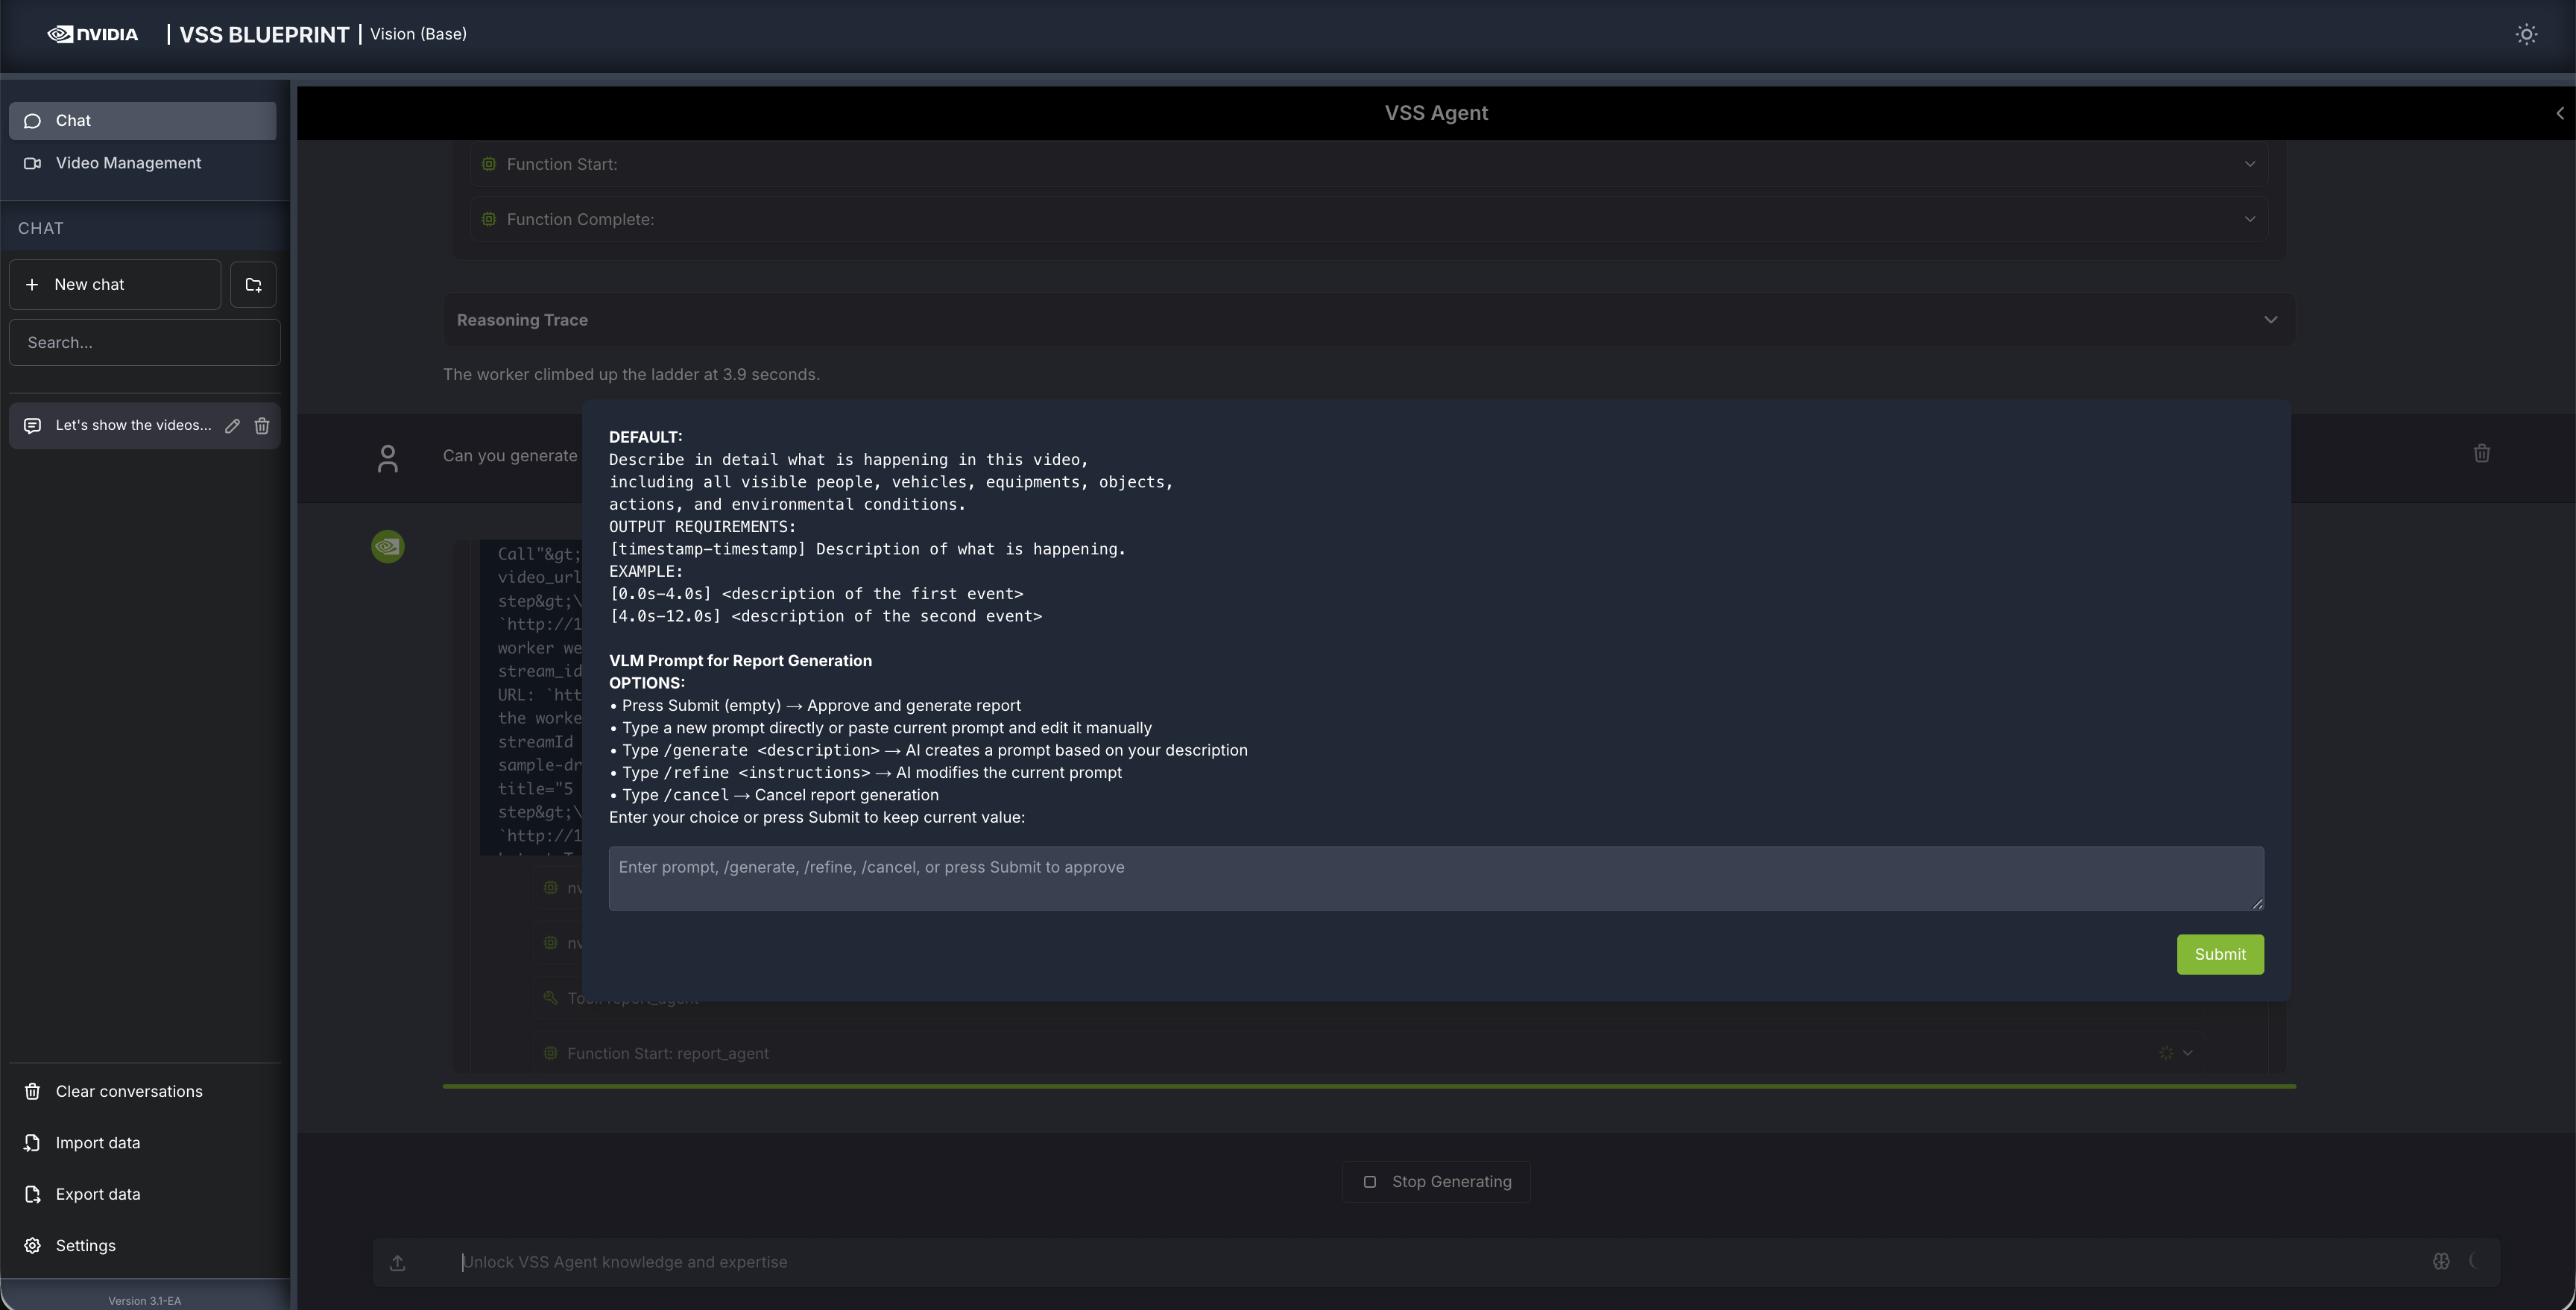
Step 3: Ask the Agent questions#
You can now ask the agent questions about the video. Here is an example:
Is the worker wearing PPE?
The agent will show the intermediate steps of the agent’s reasoning while the response is being generated and then output the final answer.
Follow up questions can be asked, for example:
When did the worker climb up the ladder?
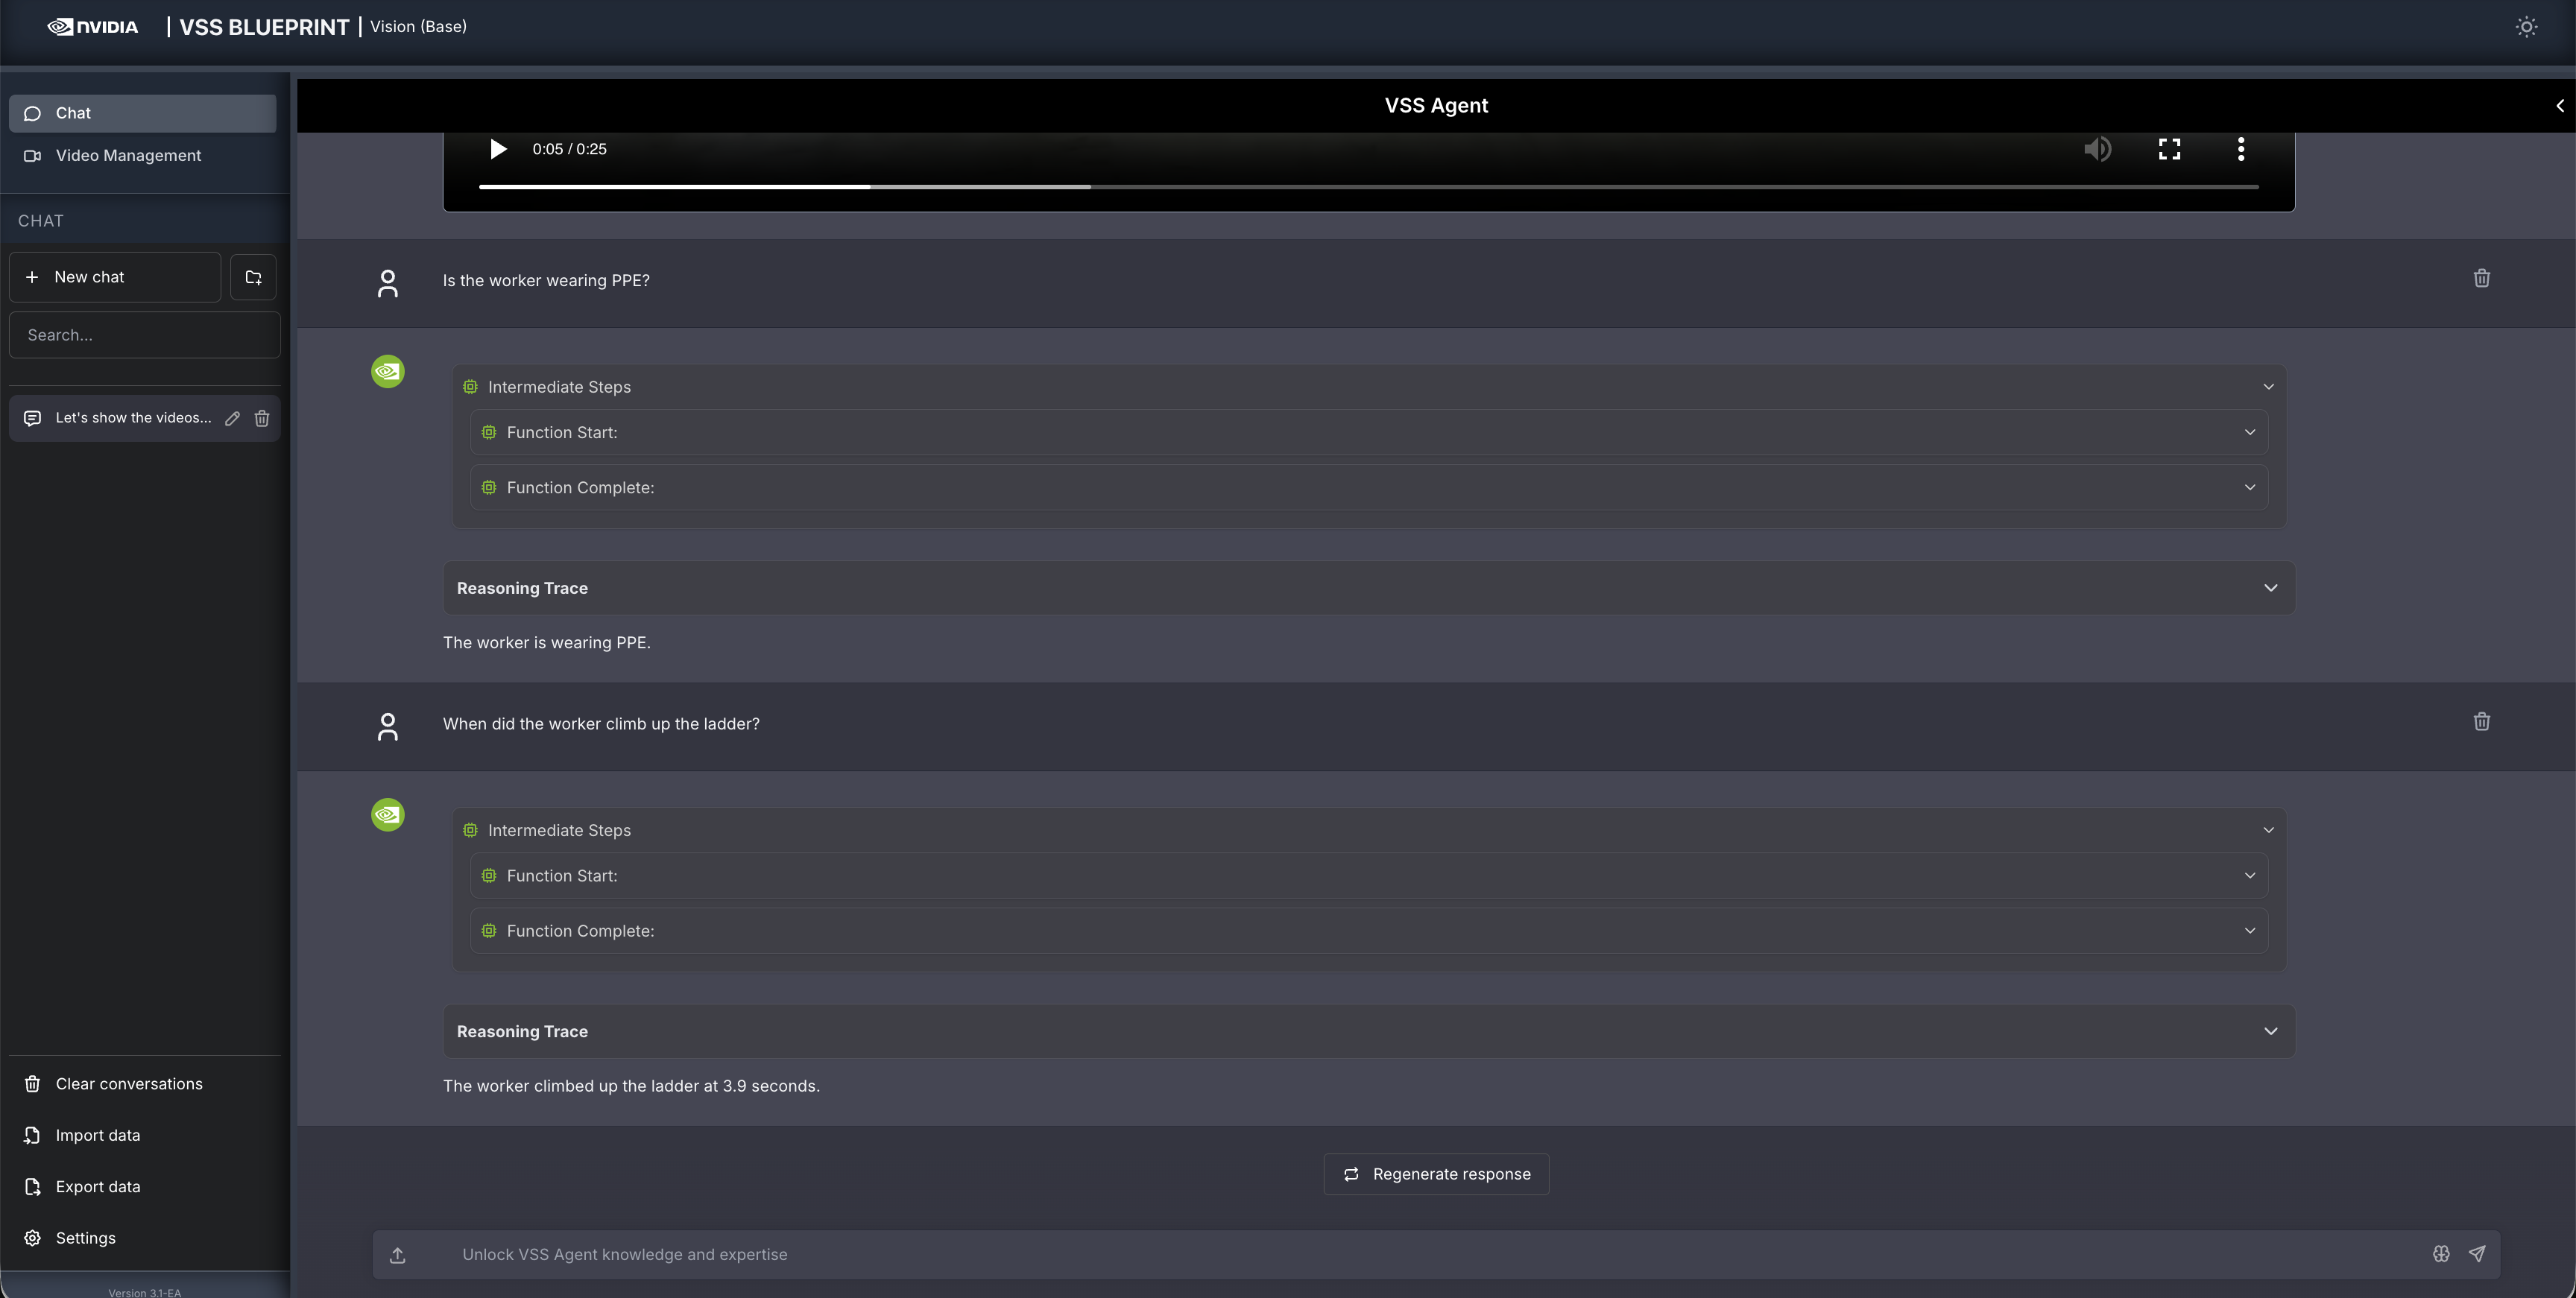
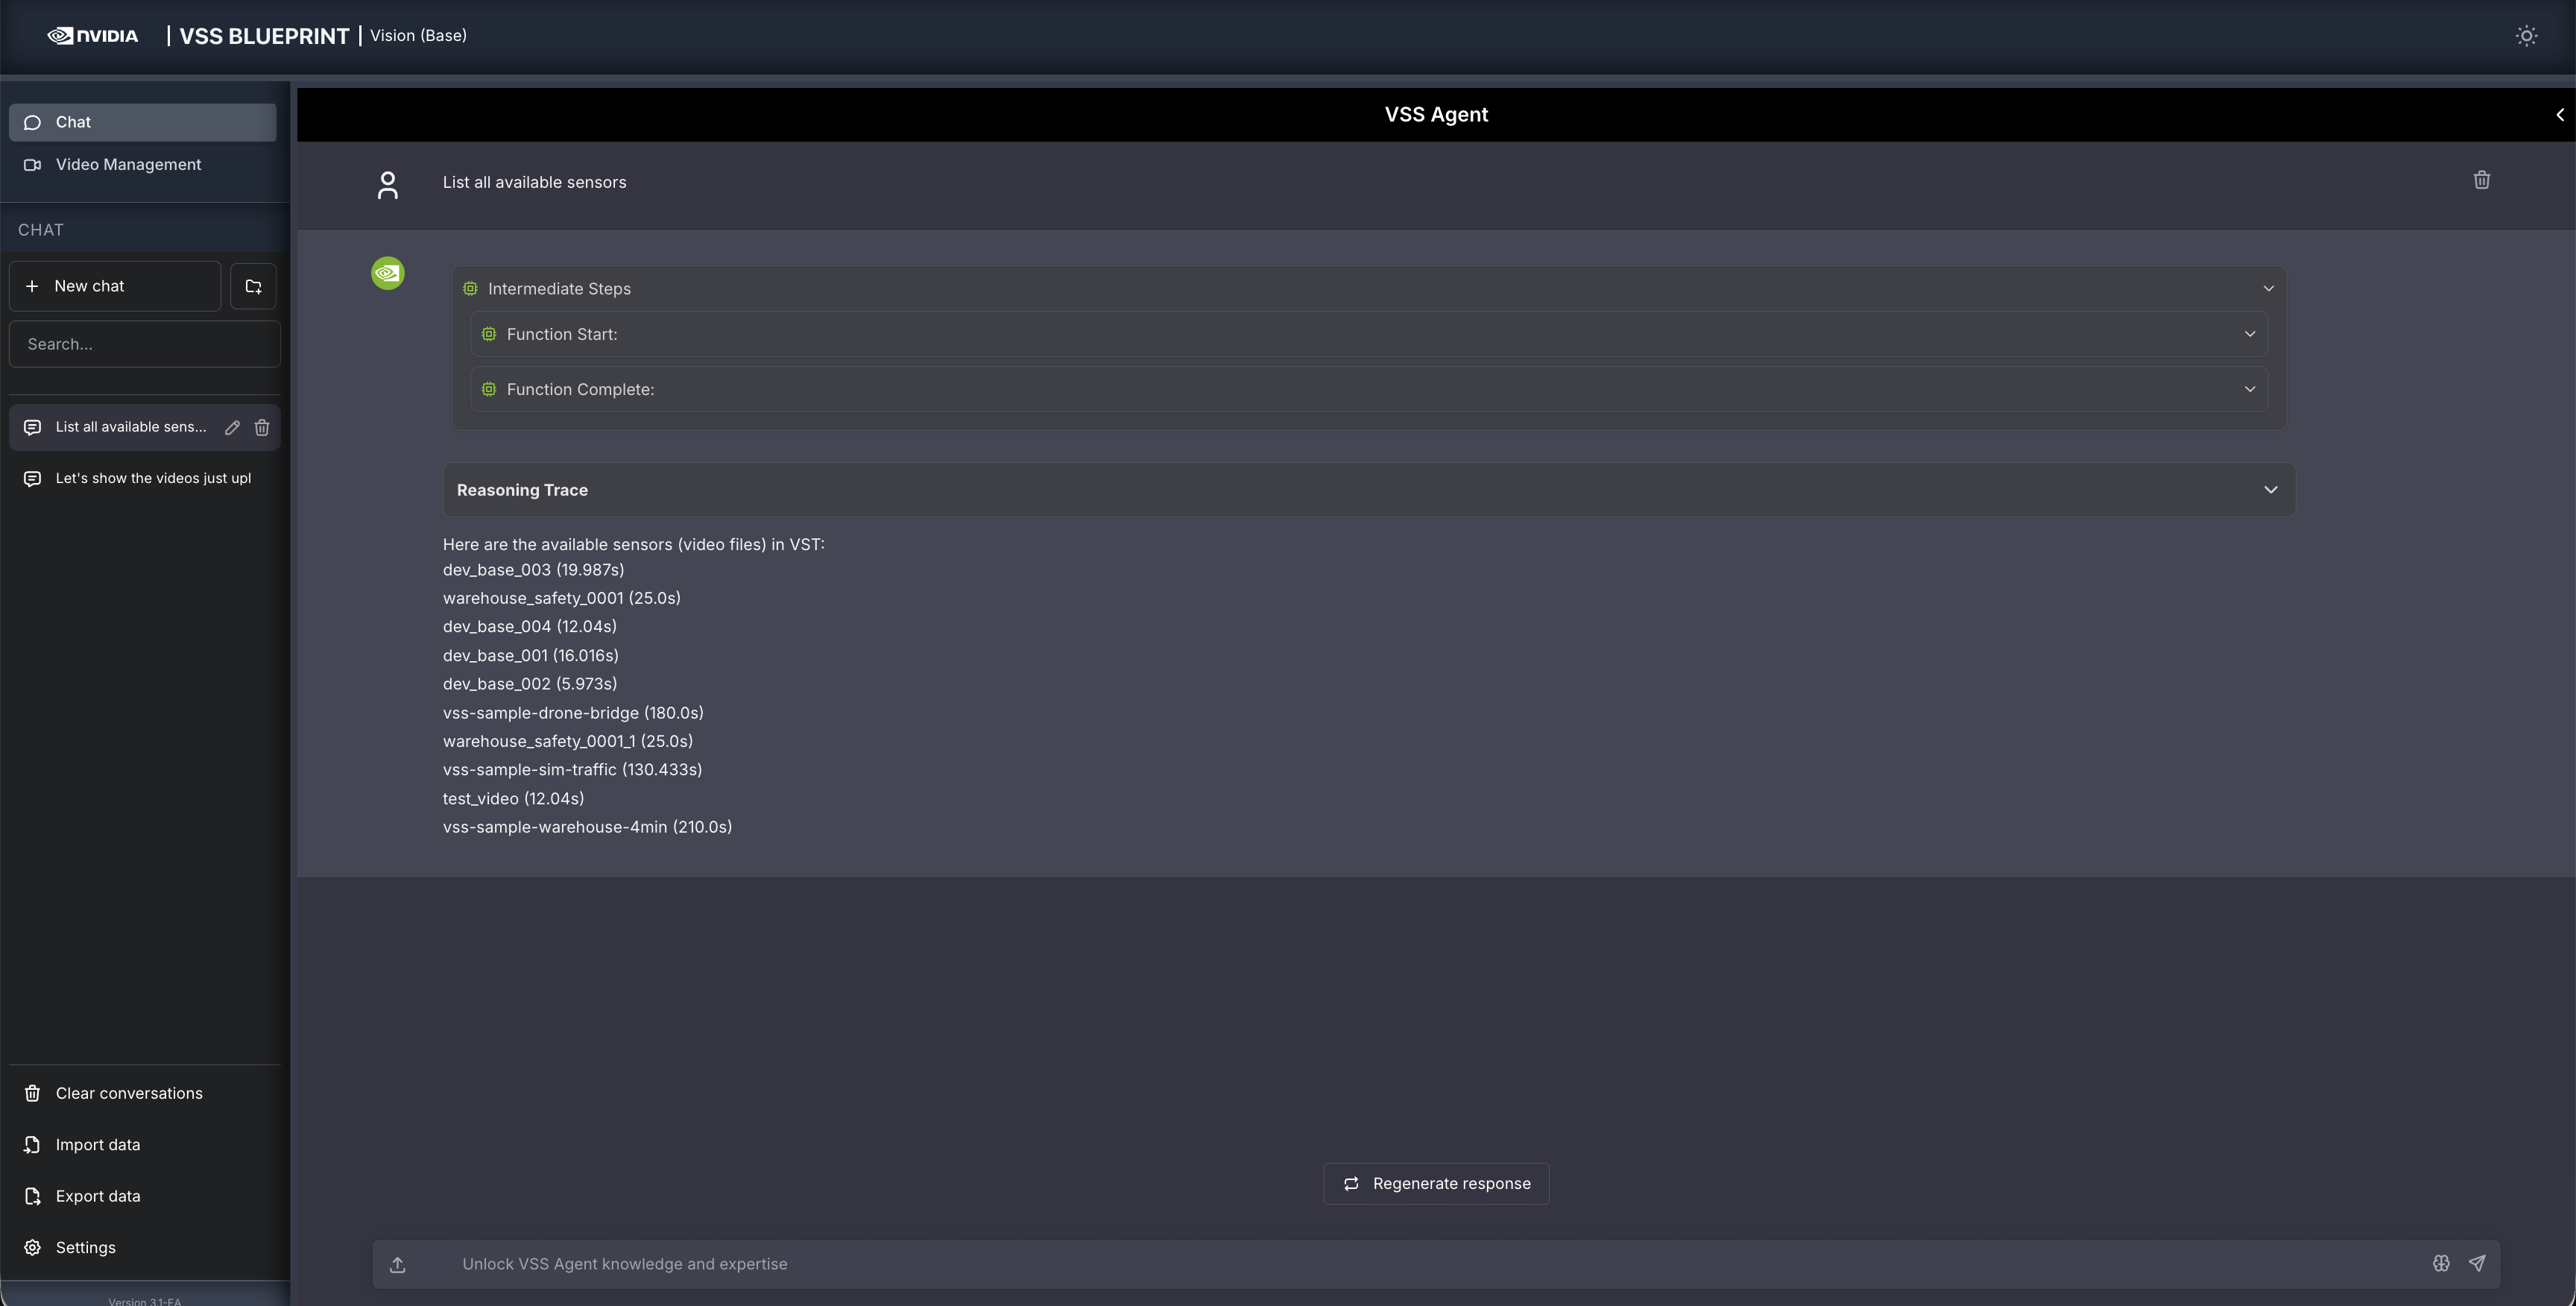
Other examples of general supported queries include:
List all available sensors
Fetch the video for <sensor-id/video-file-name>
Take a snapshot of <sensor-id/video-file-name> at <timestamp>
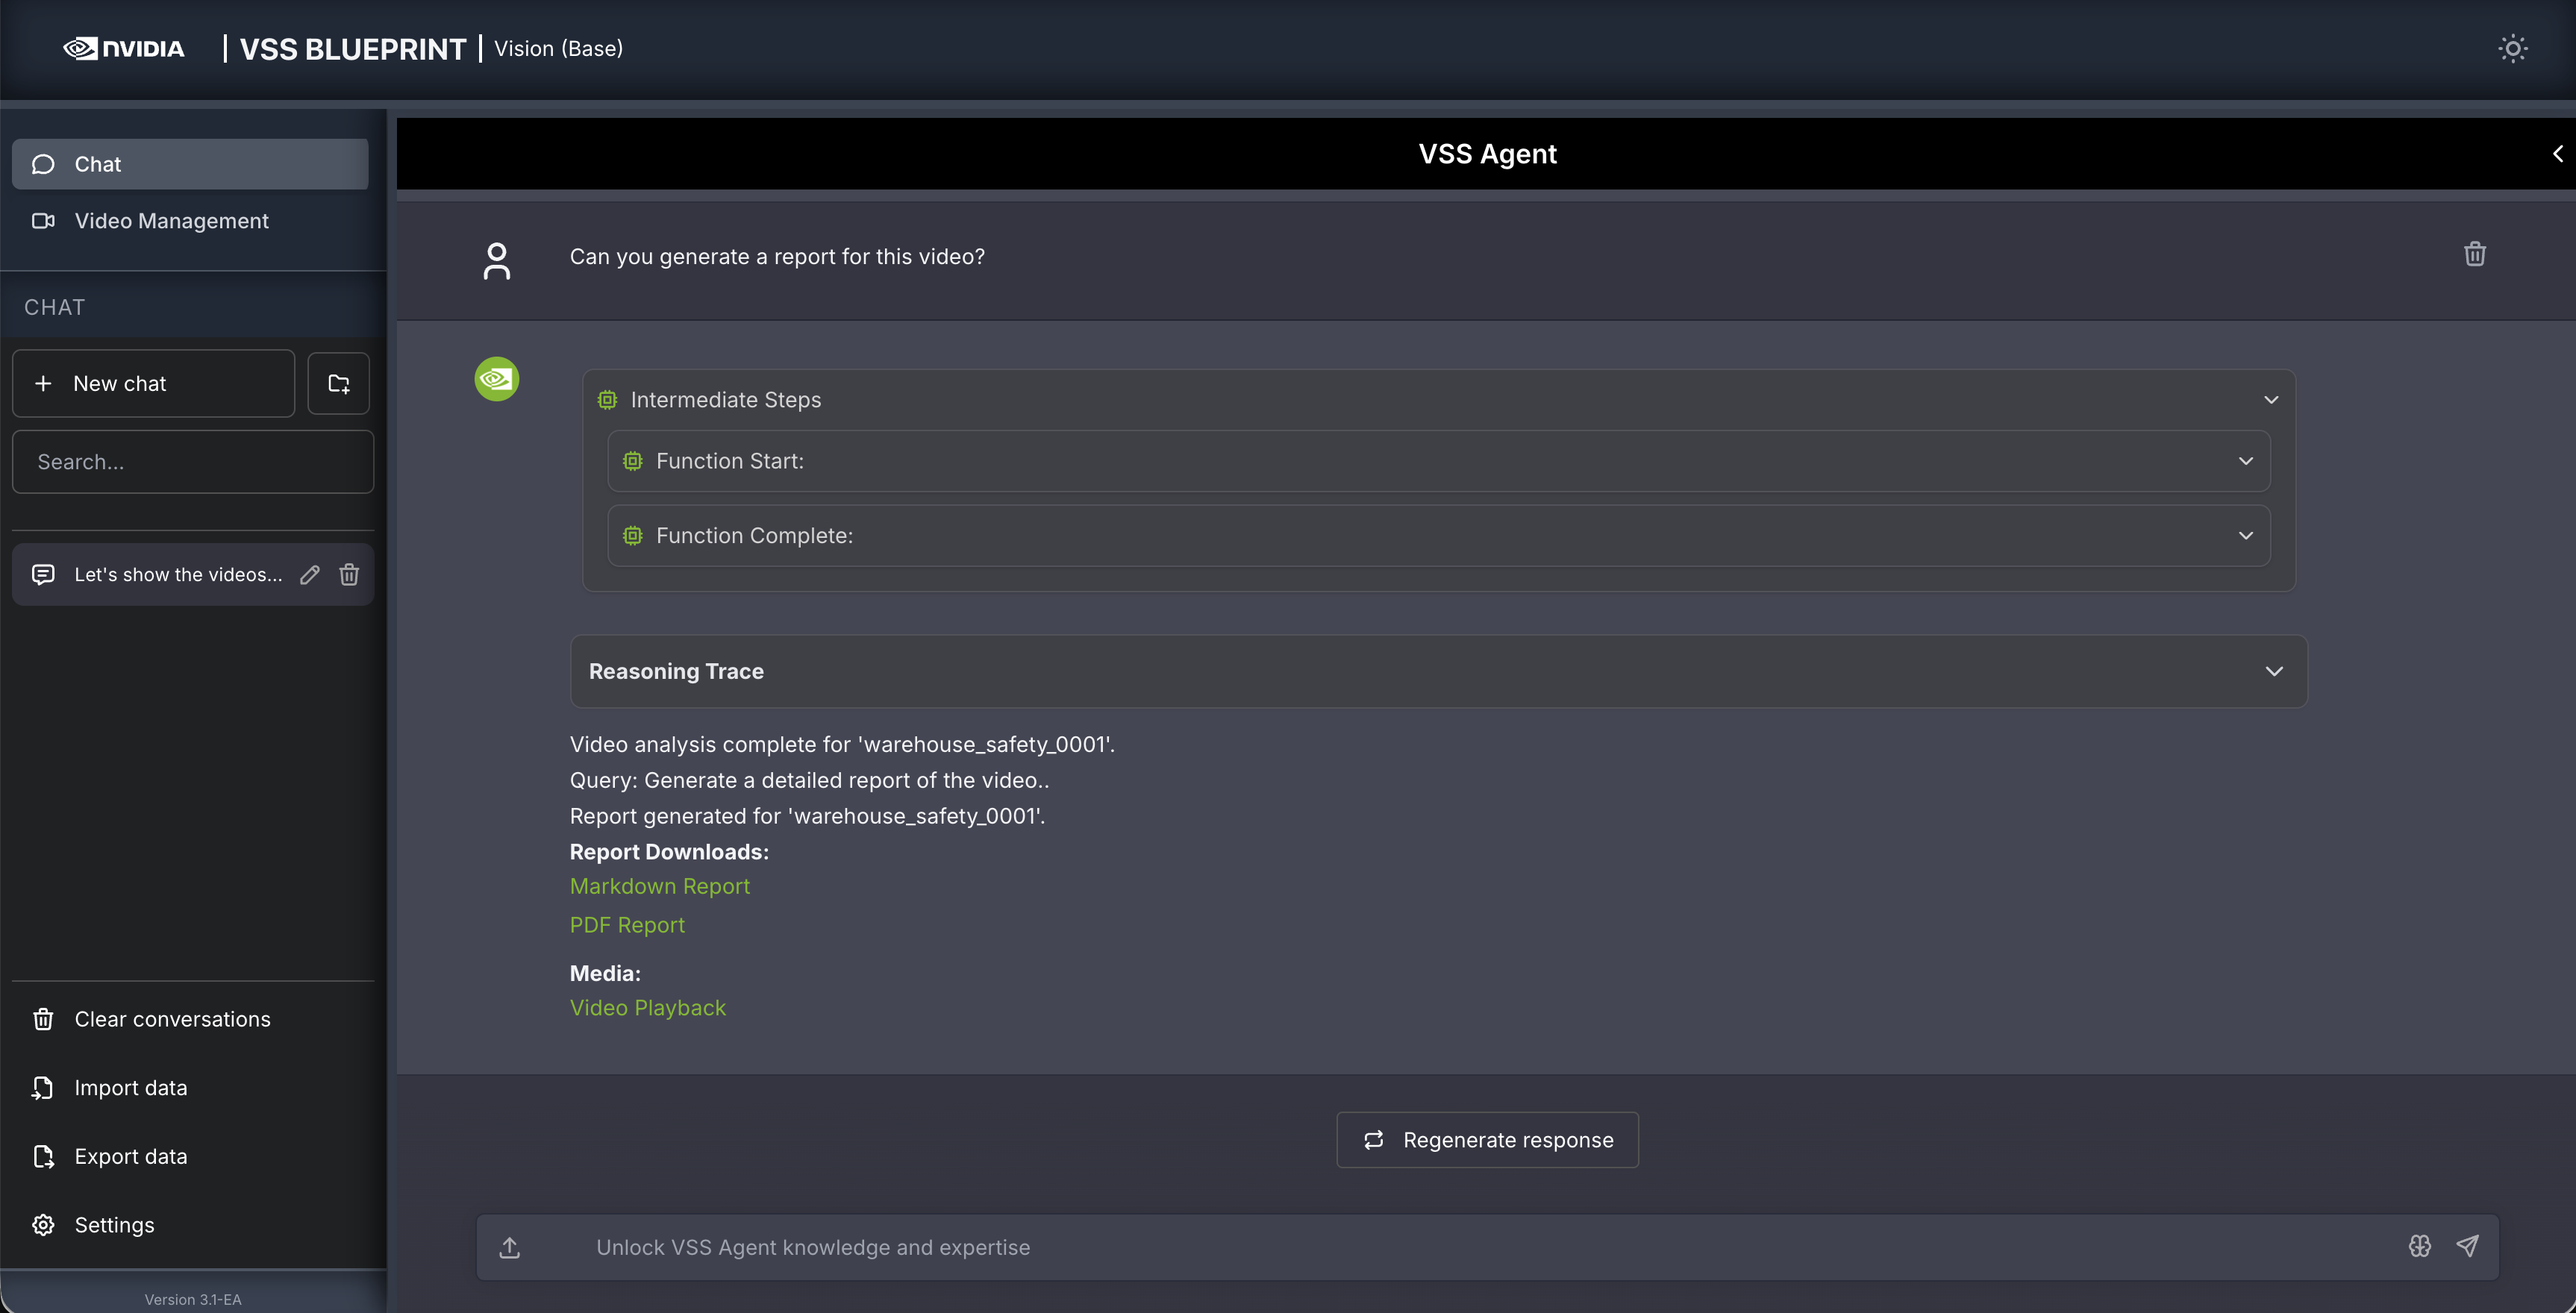
Step 4: Generate a report#
You can also ask the agent to generate a report about the video. Here is an example prompt to generate a report about the video:
Can you generate a report for this video?
Human in the loop (HITL) prompt editing:#
When generating a report, the agent will prompt the user to review the vlm prompt for report generation. This allows the user to edit the vlm prompt for report generation to improve the specificity and accuracy of the report.
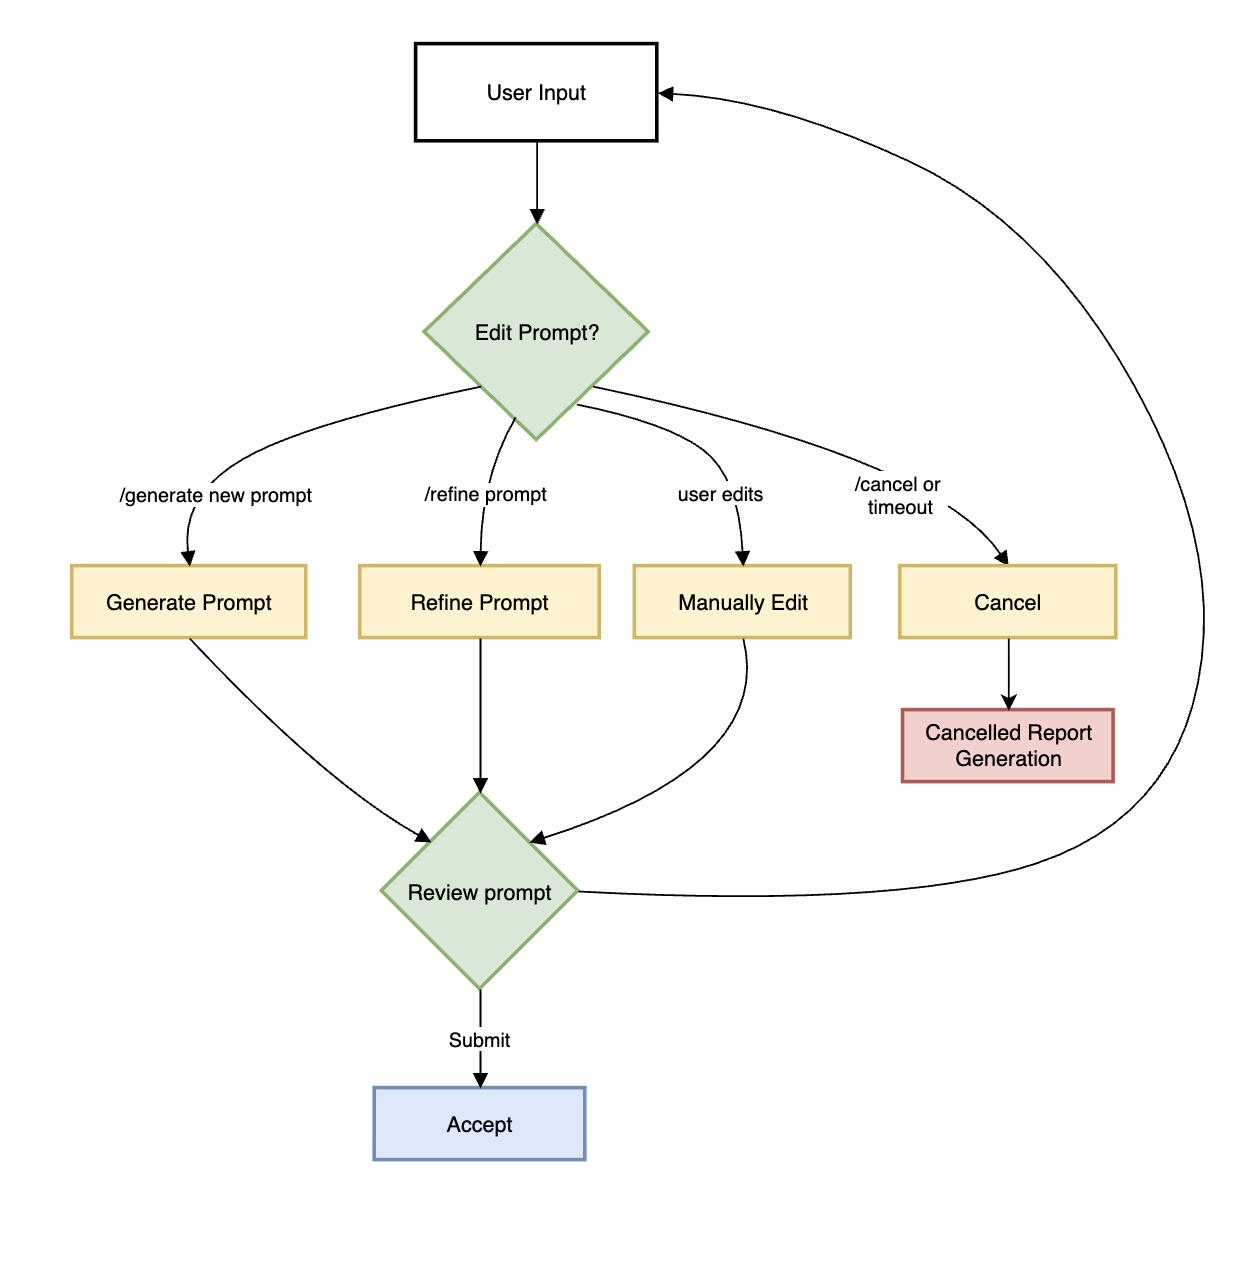
The HITL options for prompt-editing include:
Press Submit (empty) → Approve and generate report
Type a new prompt directly or paste current prompt and edit it manually
Type /generate <description>: LLM creates a prompt based on the description
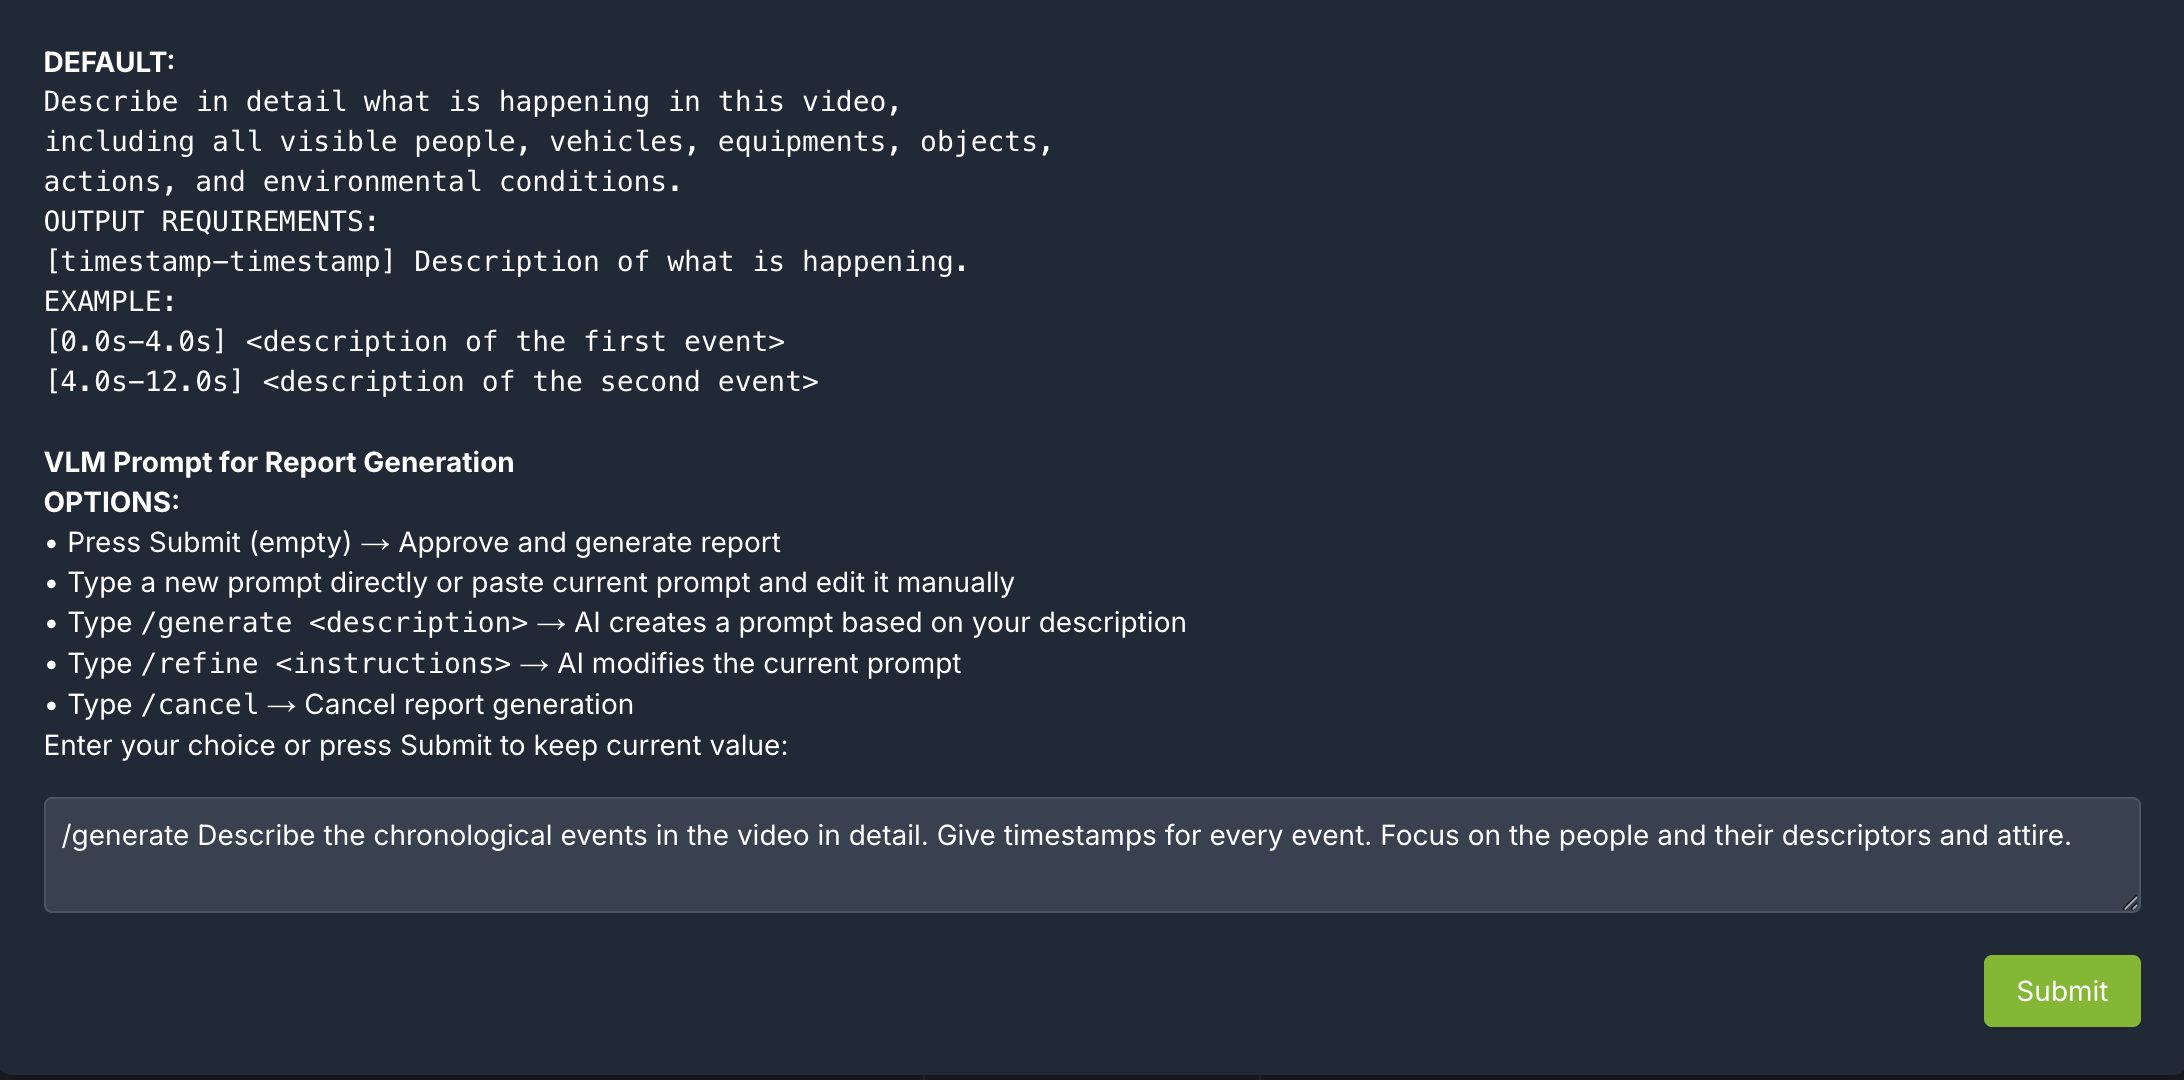
Type /refine <instructions>: LLM modifies the current prompt based on the description
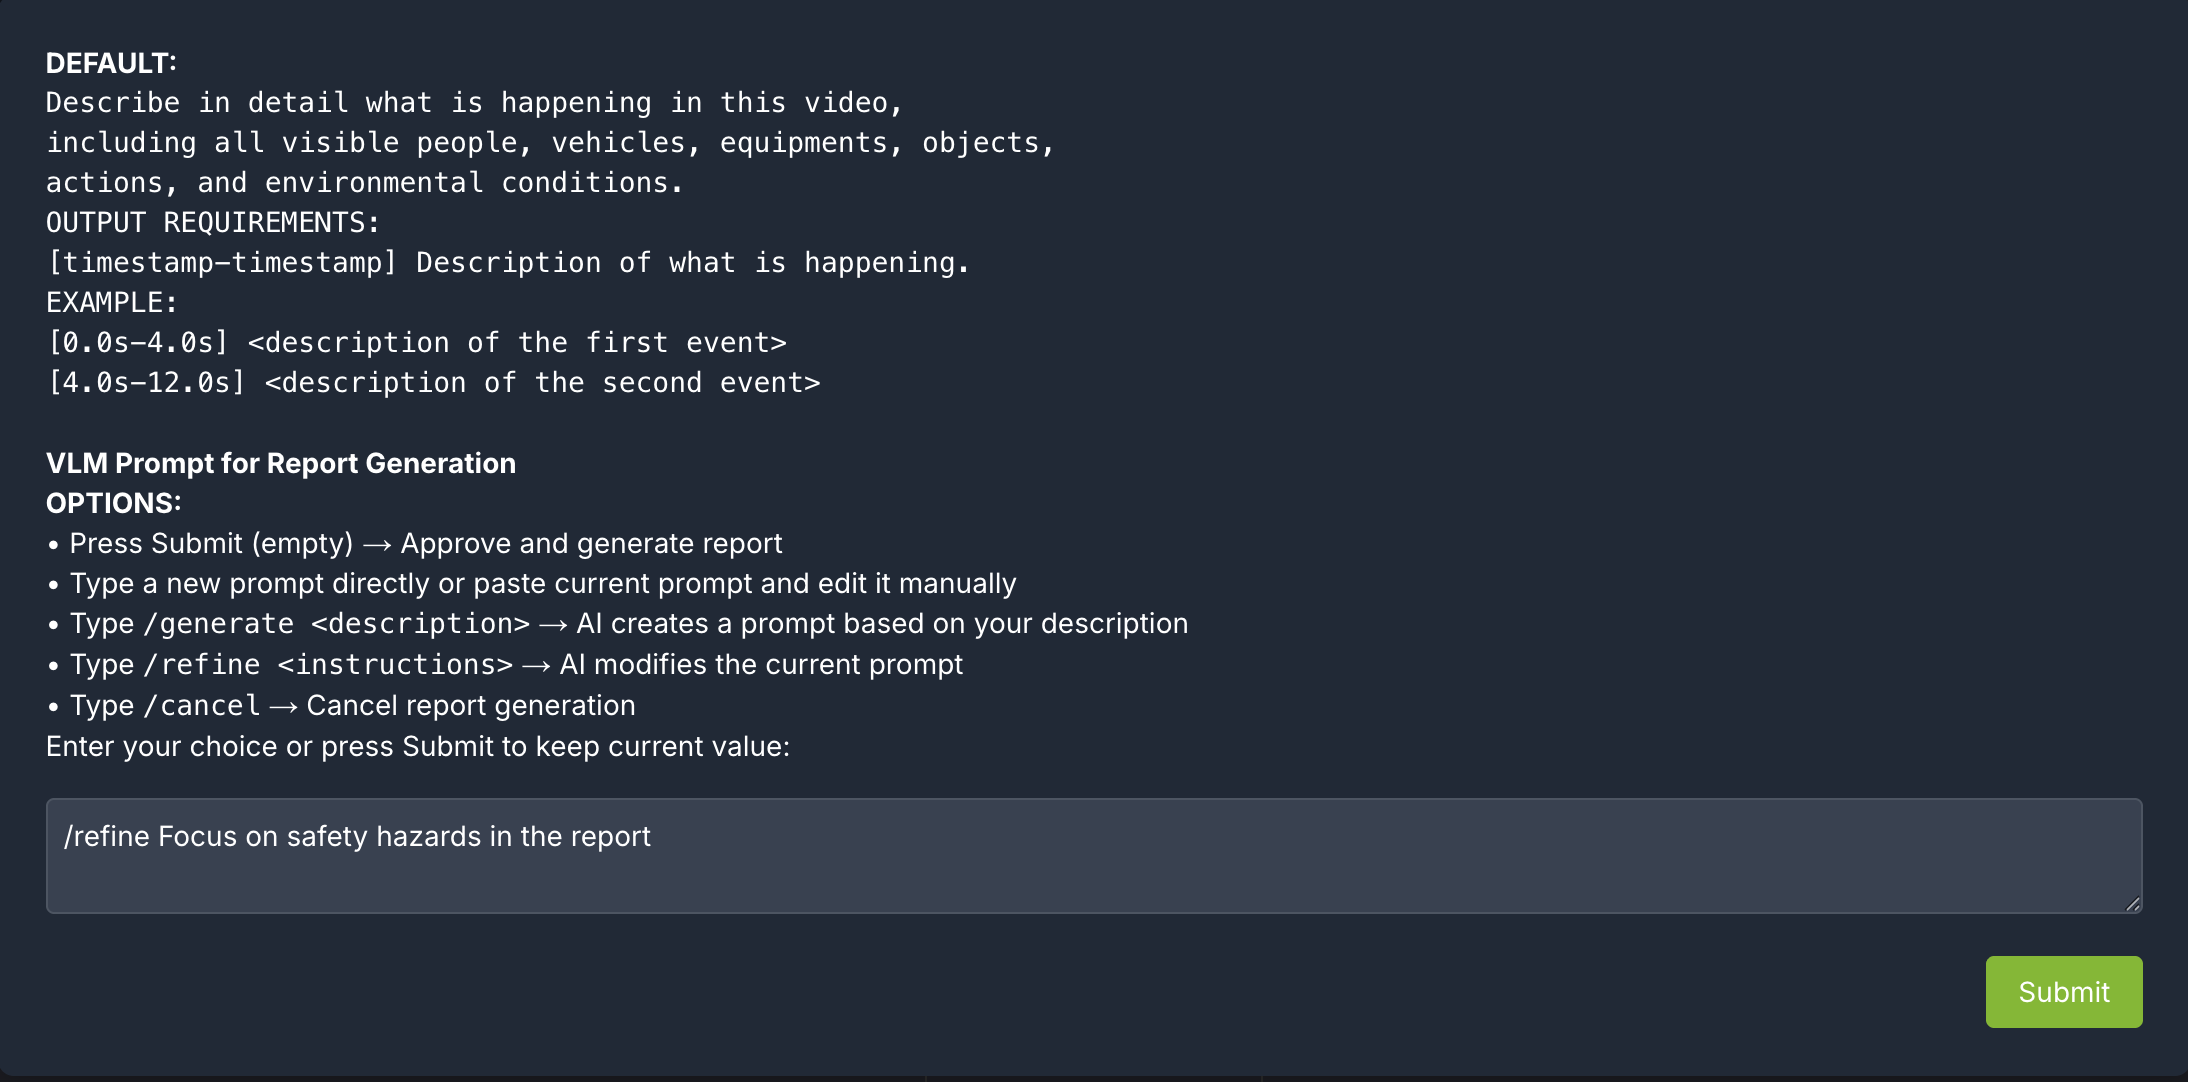
Type /cancel → Cancel report generation

After the prompt is edited using LLM, the user can review the prompt once more and make more edits or approve.

For any video clip, a report can be generated and then follow-up questions can be asked about the report or video content. Here is what this may look like:
Can you generate a report for <sensor-id/video-file-name>
Follow up questions (Example: If the report mentions a truck at 0:05, you may ask: “What color was the truck at 0:05?”)
Give me a snapshot of the video at <timestamp>.
Note
The agent generates both Markdown (.md) and PDF (.pdf) reports. Generated reports are accessible at
http://<HOST_IP>:8000/static/agent_report_<DATE>.md and http://<HOST_IP>:8000/static/agent_report_<DATE>.pdf.
By default, the agent uses an in-memory object store (_type: in_memory), so reports will be lost when the
vss-agent container restarts. To persist reports, enable save_local_copy in the agent configuration and
mount a host directory as a Docker volume. For details, refer to Report Generation.
Step 5: Teardown the Agent#
To teardown the agent, run the following command:
scripts/dev-profile.sh down
This command will stop and remove the agent containers.
Next steps#
Once you’ve familiarized yourself with the base vision agent, you can test other videos and explore adding agent workflows, such as video summarization, search, and alerting.
Additionally, you can dive deeper into the agent tools for report generation, video understanding, and video management.
Known Issues#
cosmos-reason2-8b NIM can not be restarted after being stopped or container crash. To restart, you need to redeploy the entire blueprint.