Erasure Coding Programming Guide
NVIDIA DOCA Erasure Coding Programming Guide
This guide provides instructions on how to use the DOCA Erasure Coding API.
This library is currently supported at alpha version only.
The DOCA Erasure Coding (known also as forward error correction or FEC) library provides an API to encode and decode data using hardware acceleration, supporting both host and NVIDIA® BlueField®-3 (and higher) DPU memory regions.
DOCA Erasure Coding recovers lost data fragments by creating generic redundancy fragment (backup). Each redundancy block that the library creates can help recover any block in the original data should a total loss of fragment occur. This increases data redundancy and reduces data overhead.
The library provides an API for executing erasure coding (EC) operations on DOCA buffers residing in either the DPU or host memory.
This document is intended for software developers wishing to accelerate their application's EC memory operations.
1.1. Glossary
Familiarize yourself with the following terms to better understand the information in this document:
| Term | Definition |
|---|---|
| Data | Original data, original blocks, blocks of original data to be protected/preserved |
| Coding matrix | Coefficients, the matrix used to generate the redundancy blocks and recovery |
| Redundancy blocks | Codes; encoded data; the extra blocks that help recover data loss |
| Encoding | The process of creating the redundancy blocks. Encoded data is referred to as the original blocks or redundancy blocks. |
| Decoding | The process of recovering the data. Decoded data is referred to as the original blocks alone. |
DOCA Erasure Coding relies on DOCA Core architecture, utilizing the existing memory map and buffer objects. After initialization, an EC operation is requested by submitting an EC job on the relevant work queue (workq). The DOCA Erasure Coding library then executes that operation asynchronously before posting a completion event on the workq. The following diagram presents a high-level view of the EC transmission flow:
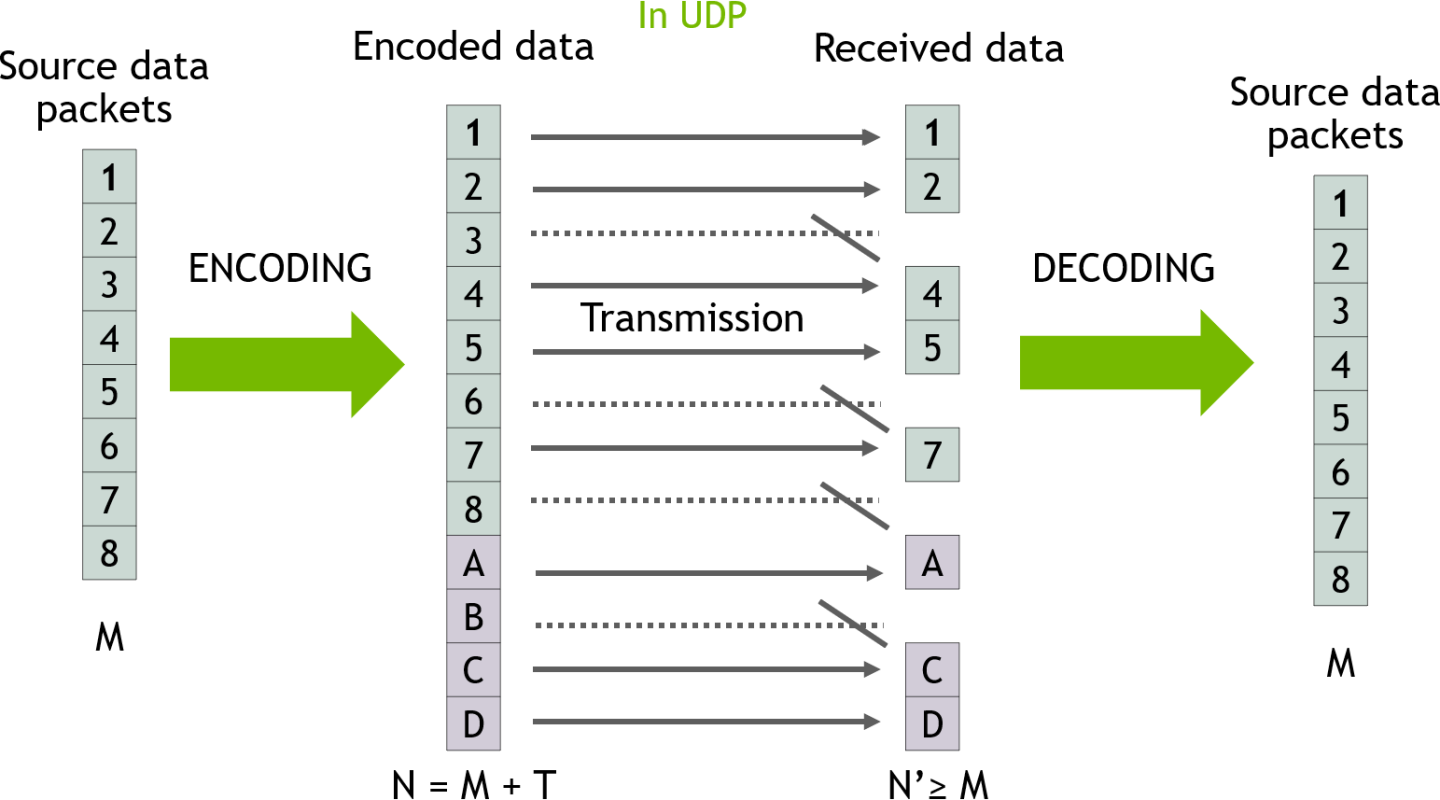
- M packets are sent from the source (8 in this case).
- Before the source send them, the source encode the data by adding to it T redundancy packets (4 in this case).
- The packets are transmitted to the destination in UDP protocol. Some packets are lost and N packets are received (in this case 4 packets are lost and 8 are received).
- The destination decodes the data using all the packets available (both original data in green and redundancy data in red) and gets back the M original data packets.
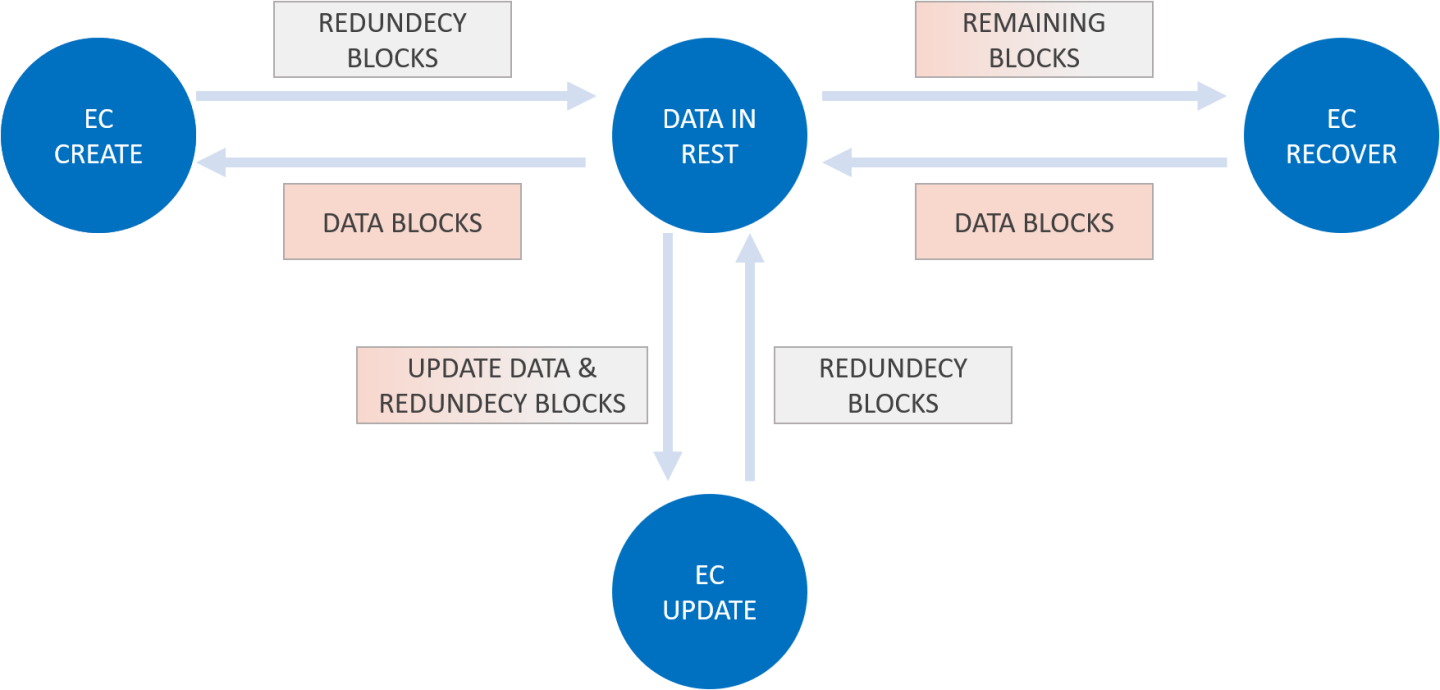
Regular EC flow consists of the following elements:
- Creating redundancy blocks from data (EC create).
- Updating redundancy blocks from updated data (EC update).
- Recovering data blocks from redundancy blocks (EC recover).
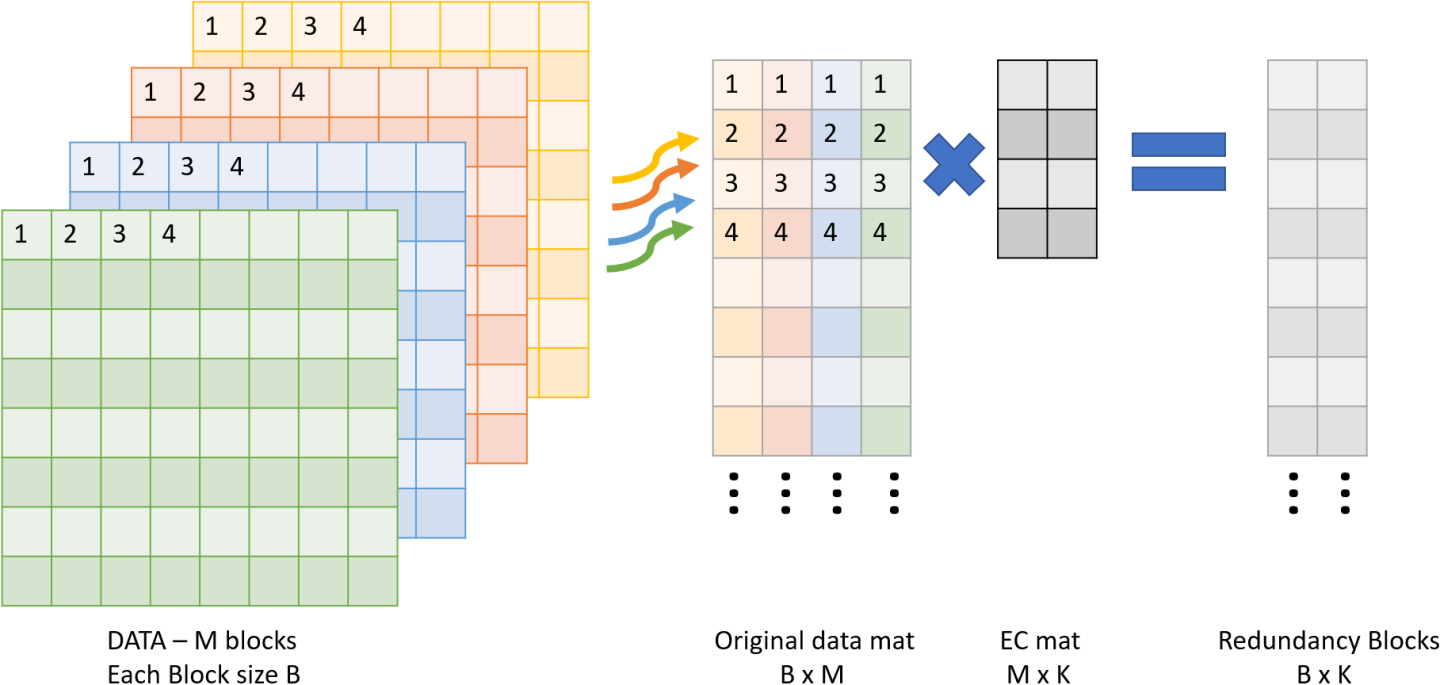
The following sections examine an M:K (where M is the original data and K is redundancy) EC.
4.1. Create Redundancy Blocks
The user must perform the following:
- Input M data blocks via
doca_buf(filled with data, each block size B) - Output K empty blocks via
doca_buf(each block size B) - Use DOCA Erasure Coding to "create coding matrix" of M by K via
doca_buf. - Create an EC job and get in return the K output redundancy blocks.
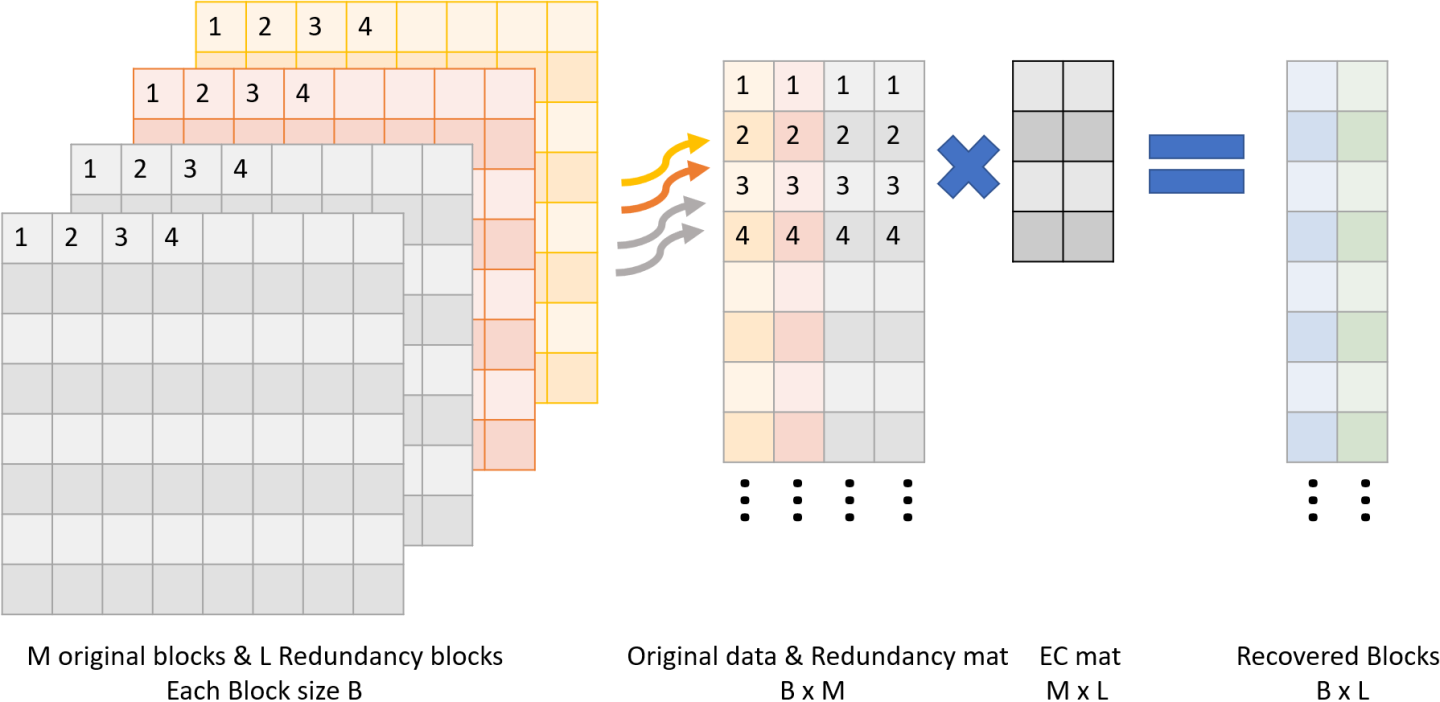
4.2. Recover Block
The user must perform the following:
- Input M-L original blocks via
doca_buf(not harmed blocks). - Input L≤K (any) redundancy blocks via
doca_buf(from create or last update). - Input bitmask or array, indicating which blocks to recover.
- Output L empty blocks via
doca_buf(same size of data block). - Use DOCA EC to create a "recovery coding matrix" of M by L via
doca_buf(unique per bitmask). - Use EC job and get in return the L output recovered data blocks.
This chapter details the specific structures and operations related to the DOCA Erasure Coding library for general initialization, setup, and clean-up. See later sections for local and remote DOCA Erasure Coding operations.
5.1. Jobs
The API for DOCA Erasure Coding consists of two job structures:
struct doca_ec_job_createfor encoding:struct doca_ec_job_create { struct doca_job base; /**< Common job data. */ struct doca_matrix *create_matrix; /**< create matrix (see below doca_ec_matrix_create) */ struct doca_buf const *src_original_data_buff; /**< Source original data buffer - sequence containing all original blocks - block_1, block_2 ,.... (order does matter) */ struct doca_buf *dst_rdnc_buff; /**< Destination redundancy data buffer - sequence containing all redundancy blocks - rdnc_block_1, rdnc_block_2 ,.... */ };
struct doca_ec_job_recoverfor decoding:struct doca_ec_job_recover { struct doca_job base; /**< Common job data. */ struct doca_matrix *recover_matrix; /**< recover matrix (see below doca_ec_recover_matrix_create) */ struct doca_buf const *src_remaining_data_buff; /**< Source remaining blocks buffer - sequence containing all remaining original blocks and pad them with redundancy blocks at size of original data - block_1, block_2, block_4 ,.... ,rdnc_block_1, rdnc_block_2 ,.... */ struct doca_buf *dst_recovered_data_buff; /**< Destination data buffer - sequence containing all missing/recovered blocks - block_3, block_5 ,.... */ };
Note:src_remaining_data_buffanddst_recovered_data_buffmust be in multiplication of the block size. For example, if a recover job matrix is 10x4 (i.e., 10 original and redundancy blocks, 4 expected original recovered blocks):src_remaining_data_buffsize is 10x64KB = 640KBdst_recovered_data_buffsize is 4x64KB = 256KB
These structures are passed to the workq to instruct the library on the source, destination, and output.
The source and destination buffers must not overlap with the destination buffer. The data_len field of the source doca_buf defines the number of bytes to erasure code/decode, and the data field of the source doca_buf defines the location in the source buffer to erasure code/decode coding from.
As with other libraries, the EC job contains the standard doca_job base field which must be set as follows:
- For an encoding job:
            /* Construct encoding job */
doca_job.type = DOCA_EC_JOB_CREATE;
doca_job.flags = DOCA_JOB_FLAGS_NONE;
doca_job.ctx = doca_ec_as_ctx(doca_ec_inst);
- For a decoding job:
            /* Construct decoding job */
doca_job.type = DOCA_EC_JOB_RECOVER;
doca_job.flags = DOCA_JOB_FLAGS_NONE;
doca_job.ctx = doca_ec_as_ctx(doca_ec_inst);
EC job-specific fields must be set based on the required source and destination buffers:
- For an encoding job:
            ec_job_create.base = doca_job;
ec_job_create.create_matrix = create_matrix;
ec_job_create.src_original_data_buff = src_original_data_buff;
ec_job_create.dst_rdnc_buff = dst_rdnc_buff;
- For a decoding job:
            ec_job_recover.base = doca_job;
ec_job_recover.recover_matrix = create_matrix;
ec_job_recover.src_remaining_data_buff = src_remaining_data_buff;
ec_job_recover.dst_recovered_data_buff = dst_recovered_data_buff;
To get the job result from the workq, depending on the workq's working mode, the application can either periodically poll the workq or wait for an event on the workq using the doca_workq_progress_retrieve API call.
When the call returns DOCA_SUCCESS (to indicate the workq event is valid), you may then test that received event for success:
event.result.u64 == DOCA_SUCCESS
5.2. Matrix Generate
5.2.1. Create
There are two options for creating matrices as detailed in the following subsections.
5.2.1.1. Generic
Generic creation (doca_ec_matrix_gen) is used for a simple setup with one of matrix types provided by the library.
            /**
 * @param [in] ctx - ctx of doca EC
 * @param [in] type - provided in enum doca_ec_matrix_types, the type should be consistent in recovery/update process.
 * @param [in] data_block_count - original data block count
 * @param [in] rdnc_block_count - redundancy block count
 * @param [out] matrix - output object
 */
doca_error_t doca_ec_matrix_create(struct doca_ec *ctx, enum doca_ec_matrix_types type, size_t data_block_count, size_t rdnc_block_count, struct doca_matrix **matrix);
5.2.1.2. Custom
Custom creation is used if another type of matrix is needed not provided by the library.
            /**
* @param [in] ctx - ctx of doca EC
* @param [in] data - coding matrix in size data_block_count * rdnc_block_count
* @param [in] data_block_count - original data block count
* @param [in] rdnc_block_count - redundancy block count
* @param [out] matrix - output object
*/
doca_error_t doca_ec_matrix_from_raw(struct doca_ec *ctx, uint8_t *data, size_t data_block_count, size_t rdnc_block_count, struct doca_matrix **matrix);
5.2.2. Recover
            /**
 * @param [in] coding_matrix - matrix generated with gen function (see doca_ec_matrix_gen)
 * @param [in] ctx - ctx of doca EC
 * @param [in] missing_indices - array containing which data blocks are missing (note that the indexes should match to the create function data block
 * order)
 * @param [in] n_missing - missing_indices count
 * @param [out] matrix - output object
 */
doca_error_t doca_ec_recover_matrix_create(const struct doca_matrix *coding_matrix, struct doca_ec *ctx, uint32_t missing_indices[], size_t n_missing, struct doca_matrix **matrix);
The following subsections cover the usage of the DOCA Erasure Coding library in real-world situations. Most of this section utilizes code which is available in the DOCA Erasure Coding sample projects located under /samples/doca_erasure_coding/.
When memory is local to your DOCA application (i.e., you can directly access the memory space of both source and destination buffers) this is referred to as a local erasure coding/decoding operation.
The following step-by-step guide goes through the various stages necessary to initialize, execute, and clean-up a local memory erasure coding/decoding operation.
6.1. Initializing Operation
The DOCA Erasure Coding API uses the DOCA Core library to create the required objects (e.g., memory map, inventory, buffers, etc.) for its operations.
This section runs through this process in a logical order. If you already have some of these operations in your DOCA application, you may skip or modify them as needed.
6.1.1. Opening DOCA Device
The first requirement is to open a DOCA device, normally your BlueField device. You should iterate on all DOCA devices (via doca_devinfo_list_create) and select one using some criteria (e.g., PCIe address, etc). You may also use the function doca_ec_job_get_supported to check if the device is suitable for the EC job type you want to perform. After this, the device must be opened using doca_dev_open.
6.1.2. Creating DOCA Core Objects
DOCA Erasure Coding requires several DOCA objects to be created. This includes the memory map (doca_mmap_create), buffer inventory (doca_buf_inventory_create), and workq (doca_workq_create). DOCA Erasure Coding also requires the actual DOCA Erasure Coding context to be created (doca_ec_create).
Once a DOCA Erasure Coding instance has been created, it can be used as a context using the doca_ctx APIs. This can be achieved by getting a context representation using doca_ec_as_ctx().
6.1.3. Initializing DOCA Core Objects
In this phase of initialization, the core objects are ready to be set up and started.
6.1.3.1. Memory Map Initialization
Prior to starting the mmap (doca_mmap_start), make sure that you set the memory range correctly (via doca_mmap_set_memrange). After starting mmap, add the DOCA device to the mmap (doca_mmap_dev_add).
6.1.3.2. Buffer Inventory Initialization
This can be started using the doca_buf_inventory_start call.
6.1.3.3. WorkQ Initialization
The workq can be set to one of two modes: Polling mode (default) or event-driven mode.
To set the workq to event-driven mode, use doca_workq_set_event_driven_enable and then doca_workq_get_event_handle to get the event handle of the workq so you can wait on events using epoll or other Linux wait for event interfaces.
6.1.3.4. DOCA Erasure Coding Context Initialization
The context created previously via doca_ec_create() and acquired using doca_ec_as_ctx() can have the device added (doca_ctx_dev_add), started (doca_ctx_start), and workq added (doca_ctx_workq_add). It is also possible to add multiple workqs to the same context.
6.1.4. Populating Memory Map
Provide the memory regions to use for EC operations to the memory map using the doca_mmap_set_memrange call. These regions may be one large region or many smaller regions.
6.1.5. Constructing DOCA Buffers
Prior to building and submitting an EC operation, construct two source DOCA buffers for the source and destination addresses (the addresses used must exist within the memory region registered with the memory map). The doca_buf_inventory_buf_by_addr returns a doca_buffer when provided with a memory address.
Finally, set the data address and length of the DOCA buffers using the function doca_buf_set_data. This field determines the data address and the data length to perform the erasure code/decode operation on.
To know the maximum data_len of a doca_buffer that can be used to perform an EC operation on, call the function doca_ec_get_max_buffer_size.
6.2. Executing Erasure Coding
The DOCA Erasure Coding operation is asynchronous. Therefore, you must enqueue the operation and poll for completion later.
To begin the EC operation, enqueue an EC job on the previously created work queue object. This involves creating the DOCA Erasure Coding job (struct doca_ec_job) which is a composite of specific EC fields.
Within the EC job structure, the context field must point to the DOCA Erasure Coding context and the type field must be set to:
DOCA_EC_JOB_CREATEfor an encoding EC operationDOCA_EC_JOB_RECOVERfor a decoding EC operation
The DOCA Erasure Coding specific elements of the job point to your DOCA buffers for the source and destination.
Finally, the doca_workq_submit API call is used to submit the EC operation to the hardware.
6.3. Waiting for Completion
It is possible to detect when the Erasure Coding operation has completed (via doca_workq_progress_retrieve) depending on the workq mode:
- Polling mode – periodically poll the work queue until the API call indicates that a valid event has been received
- Event mode – while
doca_workq_progress_retrievedoes not return a success result, perform the following loop:- Arm the workq using
doca_workq_event_handle_arm. - Wait for an event using the event handle (e.g.,
epoll_wait()). - Once the thread wakes up, call
doca_workq_event_handle_clear.
- Arm the workq using
Regardless of the operating mode, you are able to detect the success of the EC operation if the event.result.u64 field is equal to DOCA_SUCCESS.
If there is data inside the destination buffer already, the DOCA Erasure Coding library appends the EC operation result after the existing data. If not, it stores the new data in the data address of the destination buffer. Either way, the library keeps the data address unchanged and increases the data_len field of the destination buffer by the number of bytes produced by the erasure codes/decodes operation.
6.4. Clean-up
To clean up the doca_buffers, deference them using the doca_buf_refcount_rm call. This call must be made on all buffers after finishing with them (regardless of whether the operation is successful or not).
The main cleanup process is to remove the workq from the context (doca_ctx_workq_rm), stop the context itself (doca_ctx_stop), remove the device from the context (doca_ctx_dev_rm), and remove the device from the memory map (doca_mmap_dev_rm).
The final destruction of the objects can now occur. This can happen in any order, but destruction must occur on the workq (doca_workq_destroy), EC context (doca_ec_destroy), buf inventory (doca_buf_inventory_destroy), mmap (doca_mmap_destroy), and device closure (doca_dev_close).
This section covers the creation of a remote memory DOCA Erasure Coding operation. This operation allows memory from the host, accessible by DOCA Erasure Coding on the DPU, to be used as a source or destination.
7.1. Sender
The sender holds the source memory to perform the EC operation on and sends it to the DPU. The developer decides the method of how the source memory address is transmitted to the DPU (e.g., it can be a socket that is connected from a "local" host sender to a "remote" BlueField DPU receiver). The address is passed using this method.
The sender application should open the device, as per a normal local memory operation, but initialize only a memory map (doca_mmap_create, doca_mmap_start, doca_mmap_dev_add). It should then populate the mmap with exactly one memory regions (doca_mmap_set_memrange) and call a special mmap function (doca_mmap_export).
This function generates a descriptor object that can be transmitted to the DPU. The information in the descriptor object refers to the exported "remote" host memory (from the perspective of the receiver).
7.2. Receiver
For reception, the initiation process described for local memory must be followed.
Prior to constructing the DOCA buffer (via doca_buf_inventory_buf_by_addr) to represent the host memory, call the special mmap function that retrieves the remote mmap from the host (doca_mmap_create_from_export). The DOCA buffer can then be created using this remote mmap and used as source/destination buffer in the DOCA Erasure Coding job structures.
All other aspects of the application (i.e., executing, waiting on results, and clean-up) must follow the same process described for local memory.
9.1. Erasure Coding Job: Polling WorkQ Mode
            /* Create doca_ec object */
struct doca_ec *ec_ctx;
struct doca_ctx *ctx;

doca_ec_create(&ec_ctx);
ctx = doca_ec_as_ctx(ec_ctx);

/* Open a suitable device */
struct doca_devinfo **dev_list;
struct doca_dev *dev;
uint32_t nb_devs;

doca_devinfo_list_create(&dev_list, &nb_devs);
for (i = 0; i < nb_devs; i++) {
    if (doca_ec_job_get_supported(dev_list[i], DOCA_EC_JOB_CREATE) == DOCA_SUCCESS) {
        doca_dev_open(dev_list[i], &dev);
        break;
    }
}
doca_devinfo_list_destroy(dev_list);

/* Add device and WorkQ to ctx */
uint32_t workq_depth = 32;
struct doca_workq *workq;

doca_ctx_dev_add(ctx, dev);
doca_ctx_start(ctx);
doca_workq_create(workq_depth, &workq);
doca_ctx_workq_add(ctx, workq);

/* Alloc DOCA buffers */
struct doca_mmap *mmap;
struct doca_buf_inventory *buf_inv;
size_t file_size;
char *file_to_ec = read_file(&file_size);
void *dst_buf_memory_range = malloc(REQUIRED_SIZE);

doca_mmap_create(NULL, &mmap);
doca_buf_inventory_create(NULL, 2, DOCA_BUF_EXTENSION_NONE, &buf_inv);
doca_mmap_set_memrange(mmap, memory_range, REQUIRED_SIZE));
doca_mmap_start(mmap);
doca_mmap_dev_add(mmap, dev);
doca_buf_inventory_start(buf_inv);
doca_buf_inventory_buf_by_data(buf_inv, mmap, file_to_ec, file_size, &src_doca_buf);
doca_buf_inventory_buf_by_addr(buf_inv, mmap, dst_buf_memory_range, dst_buf_len, &dst_doca_buf);

/* prepare matrix */
struct doca_matrix *create_matrix;
uint32_t data_block_count = 10;
uint32_t rdnc_block_count = 2;
doca_ec_matrix_create(ec_ctx, DOCA_CODING_MATRIX_CAUCHY, data_block_count, rdnc_block_count, &create_matrix)

/* Construct coding job */
const struct doca_ec_create_job ec_job = {
    .base = (struct doca_job) {
        .type = DOCA_EC_JOB_CREATE,
        .flags = DOCA_JOB_FLAGS_NONE,
        .ctx = state.ctx,
        },
    .create_matrix = create_matrix,
    .src_original_data_buff = src_doca_buf,
    .dst_rdnc_buff = dst_doca_buf,
};

/* Submit & Retrieve ec job */
struct doca_event event = {0};

doca_workq_submit(workq, &ec_create_job.base);
while ((doca_workq_progress_retrieve(state.workq, event, DOCA_WORKQ_RETRIEVE_FLAGS_NONE)) ==
    DOCA_ERROR_AGAIN) {
    usleep(10);
}

/* Clean and destroy */
doca_buf_refcount_rm(src_doca_buf, NULL));
doca_buf_refcount_rm(dst_doca_buf, NULL));
free(file_to_ec);
free(dst_buf_memory_range);
doca_ctx_workq_rm(ctx, workq);
doca_workq_destroy(workq);
doca_buf_inventory_destroy(buf_inv);
doca_mmap_destroy(mmap);
doca_dev_close(dev);
doca_ec_destroy(ec_ctx);
This section provides DOCA Erasure Coding sample implementation on top of the BlueField-3 DPU (and higher).
10.1. Sample Prerequisites
N/A
10.2. Running the Sample
- Refer to the following documents:
- NVIDIA DOCA Installation Guide for Linux for details on how to install BlueField-related software.
- NVIDIA DOCA Troubleshooting Guide for any issue you may encounter with the installation, compilation, or execution of DOCA samples.
- To build a given sample:
            cd /opt/mellanox/doca/samples/doca_dma/<sample_name>
meson build
ninja -C build
- Sample (e.g.,
doca_erasure_coding_recover) usage:Usage: doca_erasure_coding_recover [DOCA Flags] [Program Flags] DOCA Flags: -h, --help Print a help synopsis -v, --version Print program version information -l, --log-level Set the log level for the program <CRITICAL=20, ERROR=30, WARNING=40, INFO=50, DEBUG=60> Program Flags: -p, --pci-addr DOCA device PCI device address - default: 03:00.0 -i, --input Input file/folder to ec - default: self -o, --output Output file/folder to ec - default: /tmp -b, --both Do both (encode & decode) - default: false -x, --matrix Matrix - {cauchy, vandermonde} - default: cauchy -t, --data Data block count - default: 2 -r, --rdnc Redundancy block count - default: 2 -d, --delete_index Indices of data blocks to delete comma seperated i.e. 0,3,4 - default: 0
- For additional information per sample, use the
-hoption:./build/doca_<sample_name> -h
10.3. Samples
10.3.1. Erasure Coding Recover
This sample illustrates how to use DOCA Erasure Coding library to encode and decode a file block (and entire file). The sample logic includes 3 steps:
- Encode – create redundancy.
- Delete – simulate disaster.
- Decode – recover data.
- Locating a DOCA device.
- Initializing the required DOCA Core structures.
- Reading source original data file and splitting it to a specified number of blocks,
<data block count>, specified for the sample to the output directory. - Populating DOCA memory map with two relevant buffers: one for the source data and one for the result.
- Allocating elements in DOCA buffer inventory for each buffer.
- Initializing EC job object.
- Create EC encoding matrix by the matrix type specified to the sample.
- Submitting an EC create job into the workq.
- Retrieving the job from the workq once it is done.
- Writing the resulting redundancy blocks to the output directory (count is specified by
<redundancy block count>). - Destroying all DOCA Erasure Coding and DOCA Core structures.
- Deleting the block files specified with
<indices of data blocks to delete>.
- Locating a DOCA device.
- Initializing the required DOCA Core structures.
- Reading the output directory (source remaining data) and determining the block size and which blocks are missing (needing recovery).
- Populating DOCA memory map with two relevant buffers: one for the source data and one for the result.
- Allocating elements in DOCA buffer inventory for each buffer.
- Initializing EC job object.
- Creating EC encoding matrix by the matrix type specified to the sample.
- Creating EC decoding matrix using the encoding matrix.
- Submitting an EC recover job into the workq.
- Retrieving the job from the workq once it is done.
- Writing the resulting recovered blocks to the output directory.
- Writing the recovered file to the output path.
- Destroying all DOCA Erasure Coding and DOCA Core structures.
- /opt/mellanox/doca/samples/doca_erasure_coding/doca_erasure_coding_recover/erasure_coding_recover_sample.c
- /opt/mellanox/doca/samples/doca_erasure_coding/doca_erasure_coding_recover/erasure_coding_recover_main.c
- /opt/mellanox/doca/samples/doca_erasure_coding/doca_erasure_coding_recover/meson.build
Notice
This document is provided for information purposes only and shall not be regarded as a warranty of a certain functionality, condition, or quality of a product. NVIDIA Corporation nor any of its direct or indirect subsidiaries and affiliates (collectively: “NVIDIA”) make no representations or warranties, expressed or implied, as to the accuracy or completeness of the information contained in this document and assume no responsibility for any errors contained herein. NVIDIA shall have no liability for the consequences or use of such information or for any infringement of patents or other rights of third parties that may result from its use. This document is not a commitment to develop, release, or deliver any Material (defined below), code, or functionality.
NVIDIA reserves the right to make corrections, modifications, enhancements, improvements, and any other changes to this document, at any time without notice.
Customer should obtain the latest relevant information before placing orders and should verify that such information is current and complete.
NVIDIA products are sold subject to the NVIDIA standard terms and conditions of sale supplied at the time of order acknowledgement, unless otherwise agreed in an individual sales agreement signed by authorized representatives of NVIDIA and customer (“Terms of Sale”). NVIDIA hereby expressly objects to applying any customer general terms and conditions with regards to the purchase of the NVIDIA product referenced in this document. No contractual obligations are formed either directly or indirectly by this document.
NVIDIA products are not designed, authorized, or warranted to be suitable for use in medical, military, aircraft, space, or life support equipment, nor in applications where failure or malfunction of the NVIDIA product can reasonably be expected to result in personal injury, death, or property or environmental damage. NVIDIA accepts no liability for inclusion and/or use of NVIDIA products in such equipment or applications and therefore such inclusion and/or use is at customer’s own risk.
NVIDIA makes no representation or warranty that products based on this document will be suitable for any specified use. Testing of all parameters of each product is not necessarily performed by NVIDIA. It is customer’s sole responsibility to evaluate and determine the applicability of any information contained in this document, ensure the product is suitable and fit for the application planned by customer, and perform the necessary testing for the application in order to avoid a default of the application or the product. Weaknesses in customer’s product designs may affect the quality and reliability of the NVIDIA product and may result in additional or different conditions and/or requirements beyond those contained in this document. NVIDIA accepts no liability related to any default, damage, costs, or problem which may be based on or attributable to: (i) the use of the NVIDIA product in any manner that is contrary to this document or (ii) customer product designs.
No license, either expressed or implied, is granted under any NVIDIA patent right, copyright, or other NVIDIA intellectual property right under this document. Information published by NVIDIA regarding third-party products or services does not constitute a license from NVIDIA to use such products or services or a warranty or endorsement thereof. Use of such information may require a license from a third party under the patents or other intellectual property rights of the third party, or a license from NVIDIA under the patents or other intellectual property rights of NVIDIA.
Reproduction of information in this document is permissible only if approved in advance by NVIDIA in writing, reproduced without alteration and in full compliance with all applicable export laws and regulations, and accompanied by all associated conditions, limitations, and notices.
THIS DOCUMENT AND ALL NVIDIA DESIGN SPECIFICATIONS, REFERENCE BOARDS, FILES, DRAWINGS, DIAGNOSTICS, LISTS, AND OTHER DOCUMENTS (TOGETHER AND SEPARATELY, “MATERIALS”) ARE BEING PROVIDED “AS IS.” NVIDIA MAKES NO WARRANTIES, EXPRESSED, IMPLIED, STATUTORY, OR OTHERWISE WITH RESPECT TO THE MATERIALS, AND EXPRESSLY DISCLAIMS ALL IMPLIED WARRANTIES OF NONINFRINGEMENT, MERCHANTABILITY, AND FITNESS FOR A PARTICULAR PURPOSE. TO THE EXTENT NOT PROHIBITED BY LAW, IN NO EVENT WILL NVIDIA BE LIABLE FOR ANY DAMAGES, INCLUDING WITHOUT LIMITATION ANY DIRECT, INDIRECT, SPECIAL, INCIDENTAL, PUNITIVE, OR CONSEQUENTIAL DAMAGES, HOWEVER CAUSED AND REGARDLESS OF THE THEORY OF LIABILITY, ARISING OUT OF ANY USE OF THIS DOCUMENT, EVEN IF NVIDIA HAS BEEN ADVISED OF THE POSSIBILITY OF SUCH DAMAGES. Notwithstanding any damages that customer might incur for any reason whatsoever, NVIDIA’s aggregate and cumulative liability towards customer for the products described herein shall be limited in accordance with the Terms of Sale for the product.
Trademarks
NVIDIA, the NVIDIA logo, and Mellanox are trademarks and/or registered trademarks of Mellanox Technologies Ltd. and/or NVIDIA Corporation in the U.S. and in other countries. The registered trademark Linux® is used pursuant to a sublicense from the Linux Foundation, the exclusive licensee of Linus Torvalds, owner of the mark on a world¬wide basis. Other company and product names may be trademarks of the respective companies with which they are associated.
Copyright
© 2023 NVIDIA Corporation & affiliates. All rights reserved.