Real-Time Alert Workflow#
The Real-Time Alert Workflow monitors live video streams and generates alerts when the VLM detects anomalies or specified events.
Use Cases
Traffic collision detection
Unusual behavior detection
Equipment malfunction identification
Safety hazard detection
Estimated Deployment Time: 15-20 minutes
The following diagram illustrates the real-time alert workflow architecture:
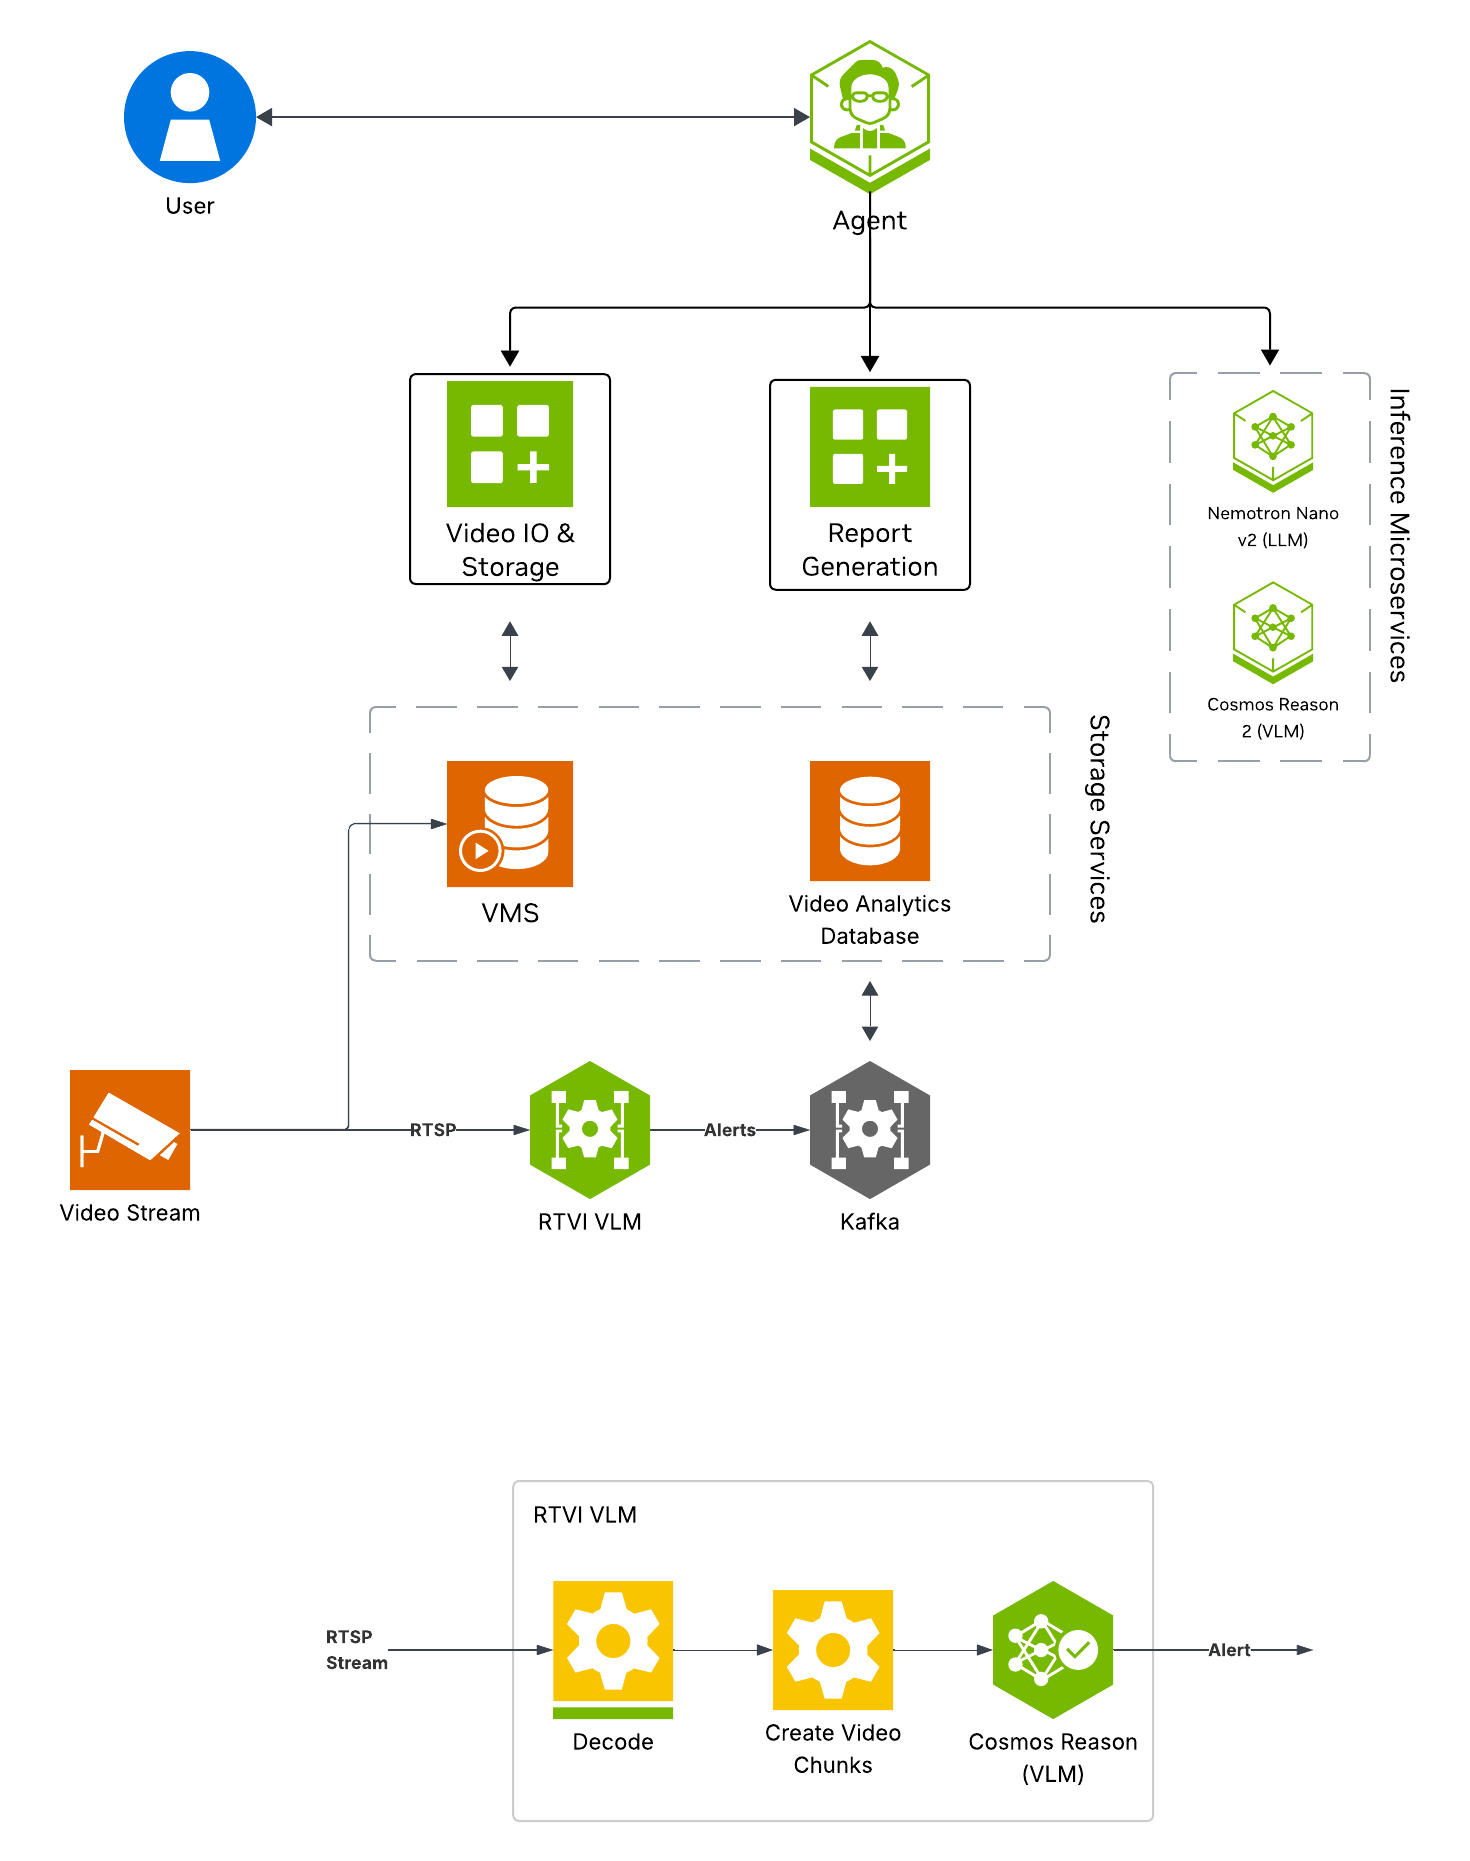
Key Features of the Real-Time Alert Agent:
Continuous frame sampling and VLM-based anomaly detection from video streams using the RTVI VLM microservice
Natural language queries for detected alerts
Configurable alert prompts and invocation settings for custom detection scenarios
Report Generation
What’s being deployed#
VSS Agent: Agent service that uses a configured LLM endpoint to route requests and orchestrate tool calls to VSS microservices and model endpoints (LLM/VLM NIMs) to answer questions and generate outputs
VSS Agent UI: Web UI with chat, video upload, and different views
RTVI VLM: Real-Time VLM Microservice for vision-language model inference used by real-time alerting
Video IO & Storage (VIOS): Video ingestion, recording, and playback services used by the agent for video access and management
NVStreamer: Video streaming service for video playback
Nemotron LLM (NIM): LLM inference service used for reasoning, tool selection, and response generation
ELK: Elasticsearch, Logstash, and Kibana stack for log storage and analysis
Phoenix: Observability and telemetry service for agent workflow monitoring
Prerequisites#
Before you begin, ensure all of the prerequisites are met. See Prerequisites for more details.
Deploy#
Note
For instructions on downloading sample data and the deployment package, see Download Sample Data and Deployment Package in the Quickstart guide.
With Agent Skills#
Step 1: Deploy the Agent#
Use VSS Agent Skills from an agent such as Claude Code, Codex, or NemoClaw to deploy and manage the real-time alerts workflow.
First, install the deploy skill as described in Agent Skills and make it
accessible to your agent. The host must meet the same deployment requirements listed above (supported GPU/hardware for that profile)
and must meet the Prerequisites.
The deploy skill will choose the <platform> and <mode> to match your system, as detailed in Development Profile GPU Requirements.
Refer to the requirements table for valid platform and mode combinations compatible with your hardware.
Note
Optional: You can enable notifications by setting webhook.openclaw.enabled to true in the deploy/docker/developer-profiles/dev-profile-alerts/vlm-as-verifier/configs/config.yml config.
Deploy the VSS alerts profile in real-time mode.
Step 2: Add a Video Stream#
To manage real-time alerts from your agent, install the vss-manage-alerts skill as described in Agent Skills.
Your agent can then start, stop, and inspect alerts through VSS with natural-language prompts, without requiring manual interaction with the UI.
Add a stream with the vss-manage-video-io-storage skill.
Add RTSP stream <rtsp stream URL> to VIOS with the sensor name warehouse_sample.
Note
If you do not have an RTSP stream, you can use NVStreamer at http://<HOST_IP>:31000 to upload a video file and create an RTSP stream.
What the agent does:
Loads the
vss-manage-video-io-storageskill and verifies that VIOS is reachable.Extracts the RTSP URL and requested sensor name from the prompt.
Registers the stream with VIOS by calling
POST /vst/api/v1/sensor/addwithsensorUrlandname.Confirms that VIOS lists the new sensor.
Returns the sensor ID or configured name to use in alert prompts.
Step 3: Manage Alert Rules#
Ask your agent to manage alert rules in natural language. The vss-manage-alerts skill routes these requests to the alert-specific workflow, checks that the alerts profile is running in VLM real-time mode, resolves the sensor name through VIOS/VST, and calls Alert Bridge to create, list, or delete persistent real-time rules. To change an existing rule, the agent uses the same rule-management workflow to replace the old rule with a new one.
For rule creation and replacement requests, the skill extracts the sensor and detection condition from your prompt, resolves the sensor ID and RTSP stream URL, derives a short alert_type tag, and submits the rule to Alert Bridge. For alert lookups, the skill routes the request through the agent incident-query workflow so that you can review notifications that have fired.
Add an Alert Rule#
Detect anyone entering without personal protective equipment on sensor warehouse_sample.
Send me alerts for fallen boxes in camera warehouse_sample.
Watch warehouse_sample for anyone without a safety vest.
What the agent does:
Parses the sensor name and detection condition from the prompt.
Resolves the sensor ID and RTSP stream URL through VIOS/VST.
Derives an
alert_typetag and submits a persistent real-time rule to Alert Bridge.
List Active Alert Rules#
What alert rules are currently active?
What the agent does:
Fetches active rules from Alert Bridge.
Resolves stream URLs back to readable sensor names when needed.
Applies any sensor or alert-type filter from your prompt and returns the current rule IDs.
Show Alert Notifications#
List any alerts for alert ID <alert ID>.
What the agent does:
Routes the request to the incident-query workflow.
Posts the natural-language query to the agent endpoint, which invokes
video_analytics_mcp.get_incidentsagainst the stored alert incidents.Summarizes matching notifications with status, sensor, timestamp, and available evidence.
Replace an Alert Rule#
Replace alert rule ID <alert ID> with a rule that watches warehouse_sample for fallen boxes.
What the agent does:
Uses the rule ID to identify the rule that needs to change.
Resolves the requested sensor and detection condition for the replacement rule.
Creates the replacement rule through Alert Bridge, then asks for confirmation before deleting the superseded rule.
Delete an Alert Rule#
Delete alert rule ID <alert ID>.
What the agent does:
Uses the rule ID to identify the rule to stop.
Asks you to confirm before stopping the rule.
After you confirm, calls Alert Bridge to delete the rule and reports whether it was stopped or was already inactive.
Note
The Alerts Microservice supports receiving alerts on the OpenClaw UI. Ensure that notifications are enabled as noted above.
To use this feature, send the following prompt after creating an alert rule:
Start the alert-notify relay (dashboard backend only). The relay runs INSIDE the openshell sandbox, so use these env values exactly — do not ask me, do not substitute:

NOTIFY_BACKENDS=dashboard

VST_ENDPOINT=host.openshell.internal:30888

VST_PUBLIC_URL_BASE=https://7777-xbrxpi7ia.brevlab.com

OPENCLAW_GATEWAY_URL=ws://127.0.0.1:18789

Infer OPENCLAW_GATEWAY_URL based on the deployment.
Be sure to replace the VST_PUBLIC_URL_BASE listed above with your own VST public URL.
Manually#
Step 1: Deploy the Agent#
Note
Set the NGC CLI API key, then run the deploy commands for your GPU type.
Refer to VSS-Agent-Customization-configure-llm and VSS-Agent-Customization-configure-vlm for all LLM and VLM (local and remote) configuration options. For RTVI-VLM configuration options, see Real-Time VLM.
For advanced settings and Agent Customization, see the deploy command help.
# Set NGC CLI API key
export NGC_CLI_API_KEY='your_ngc_api_key'

# View all available options
deploy/docker/scripts/dev-profile.sh --help
deploy/docker/scripts/dev-profile.sh up -p alerts -m real-time -H H100
deploy/docker/scripts/dev-profile.sh up -p alerts -m real-time -H H100 \
    --llm-device-id 1 --vlm-device-id 2
export LLM_ENDPOINT_URL=https://your-llm-endpoint.com
deploy/docker/scripts/dev-profile.sh up -p alerts -m real-time -H H100 \
    --use-remote-llm
deploy/docker/scripts/dev-profile.sh up -p alerts -m real-time -H RTXPRO6000BW
deploy/docker/scripts/dev-profile.sh up -p alerts -m real-time -H RTXPRO6000BW \
    --llm-device-id 1 --vlm-device-id 2
export LLM_ENDPOINT_URL=https://your-llm-endpoint.com
deploy/docker/scripts/dev-profile.sh up -p alerts -m real-time -H RTXPRO6000BW \
    --use-remote-llm
deploy/docker/scripts/dev-profile.sh up -p alerts -m real-time -H L40S \
    --llm-device-id 1 --vlm-device-id 2
export LLM_ENDPOINT_URL=https://your-llm-endpoint.com
deploy/docker/scripts/dev-profile.sh up -p alerts -m real-time -H L40S \
    --use-remote-llm
See VSS-Agent-Customization-configure-llm for remote LLM endpoint options.
export LLM_ENDPOINT_URL=https://your-llm-endpoint.com
deploy/docker/scripts/dev-profile.sh up -p alerts -m real-time -H DGX-SPARK \
    --use-remote-llm
See VSS-Agent-Customization-configure-llm for remote LLM endpoint options.
export LLM_ENDPOINT_URL=https://your-llm-endpoint.com
deploy/docker/scripts/dev-profile.sh up -p alerts -m real-time -H IGX-THOR \
    --use-remote-llm
See VSS-Agent-Customization-configure-llm for remote LLM endpoint options.
export LLM_ENDPOINT_URL=https://your-llm-endpoint.com
deploy/docker/scripts/dev-profile.sh up -p alerts -m real-time -H AGX-THOR \
    --use-remote-llm
See Local LLM and VLM deployments on OTHER hardware and Local RTVI-VLM deployments on OTHER hardware for known limitations and configuration constraints.
deploy/docker/scripts/dev-profile.sh up -p alerts -m real-time -H OTHER \
    --llm-env-file /path/to/llm.env --vlm-env-file /path/to/vlm.env
deploy/docker/scripts/dev-profile.sh up -p alerts -m real-time -H OTHER \
    --llm-device-id 1 --vlm-device-id 2 \
    --llm-env-file /path/to/llm.env --vlm-env-file /path/to/vlm.env
export LLM_ENDPOINT_URL=https://your-llm-endpoint.com
deploy/docker/scripts/dev-profile.sh up -p alerts -m real-time -H OTHER \
    --use-remote-llm --vlm-env-file /path/to/vlm.env
This command will download the necessary containers from the NGC Docker registry and start the agent. Depending on your network speed, this may take a few minutes.
This deployment uses the following defaults:
Host IP: src IP from
ip route get 1.1.1.1LLM model: nvidia/nvidia-nemotron-nano-9b-v2
VLM model: cosmos-reason2 (served via RTVI VLM container)
To use a different IP than the one derived:
-i: Manually specify the host IP address.-e: Optionally specify an externally accessible IP address for services that need to be reached from outside the host.
Note
When using a remote VLM of model-type nim (not openai), see How does a remote nim VLM access videos? for access requirements.
Once the deployment is complete, check that all the containers are running and healthy:
docker ps
Once all the containers are running, you can access the agent UI at http://<HOST_IP>:7777/.
Step 2: Add a video stream#
Add an RTSP stream by clicking the + Add RTSP button on the Video Management tab in the agent UI. If you do not have an RTSP stream, you can use NVStreamer at http://<HOST_IP>:31000 to upload a video file and create an RTSP stream.
For this profile, use the warehouse_sample.mp4 stream. When prompting, ensure the sensor name matches exactly what you configured for the stream (for example, warehouse_sample).
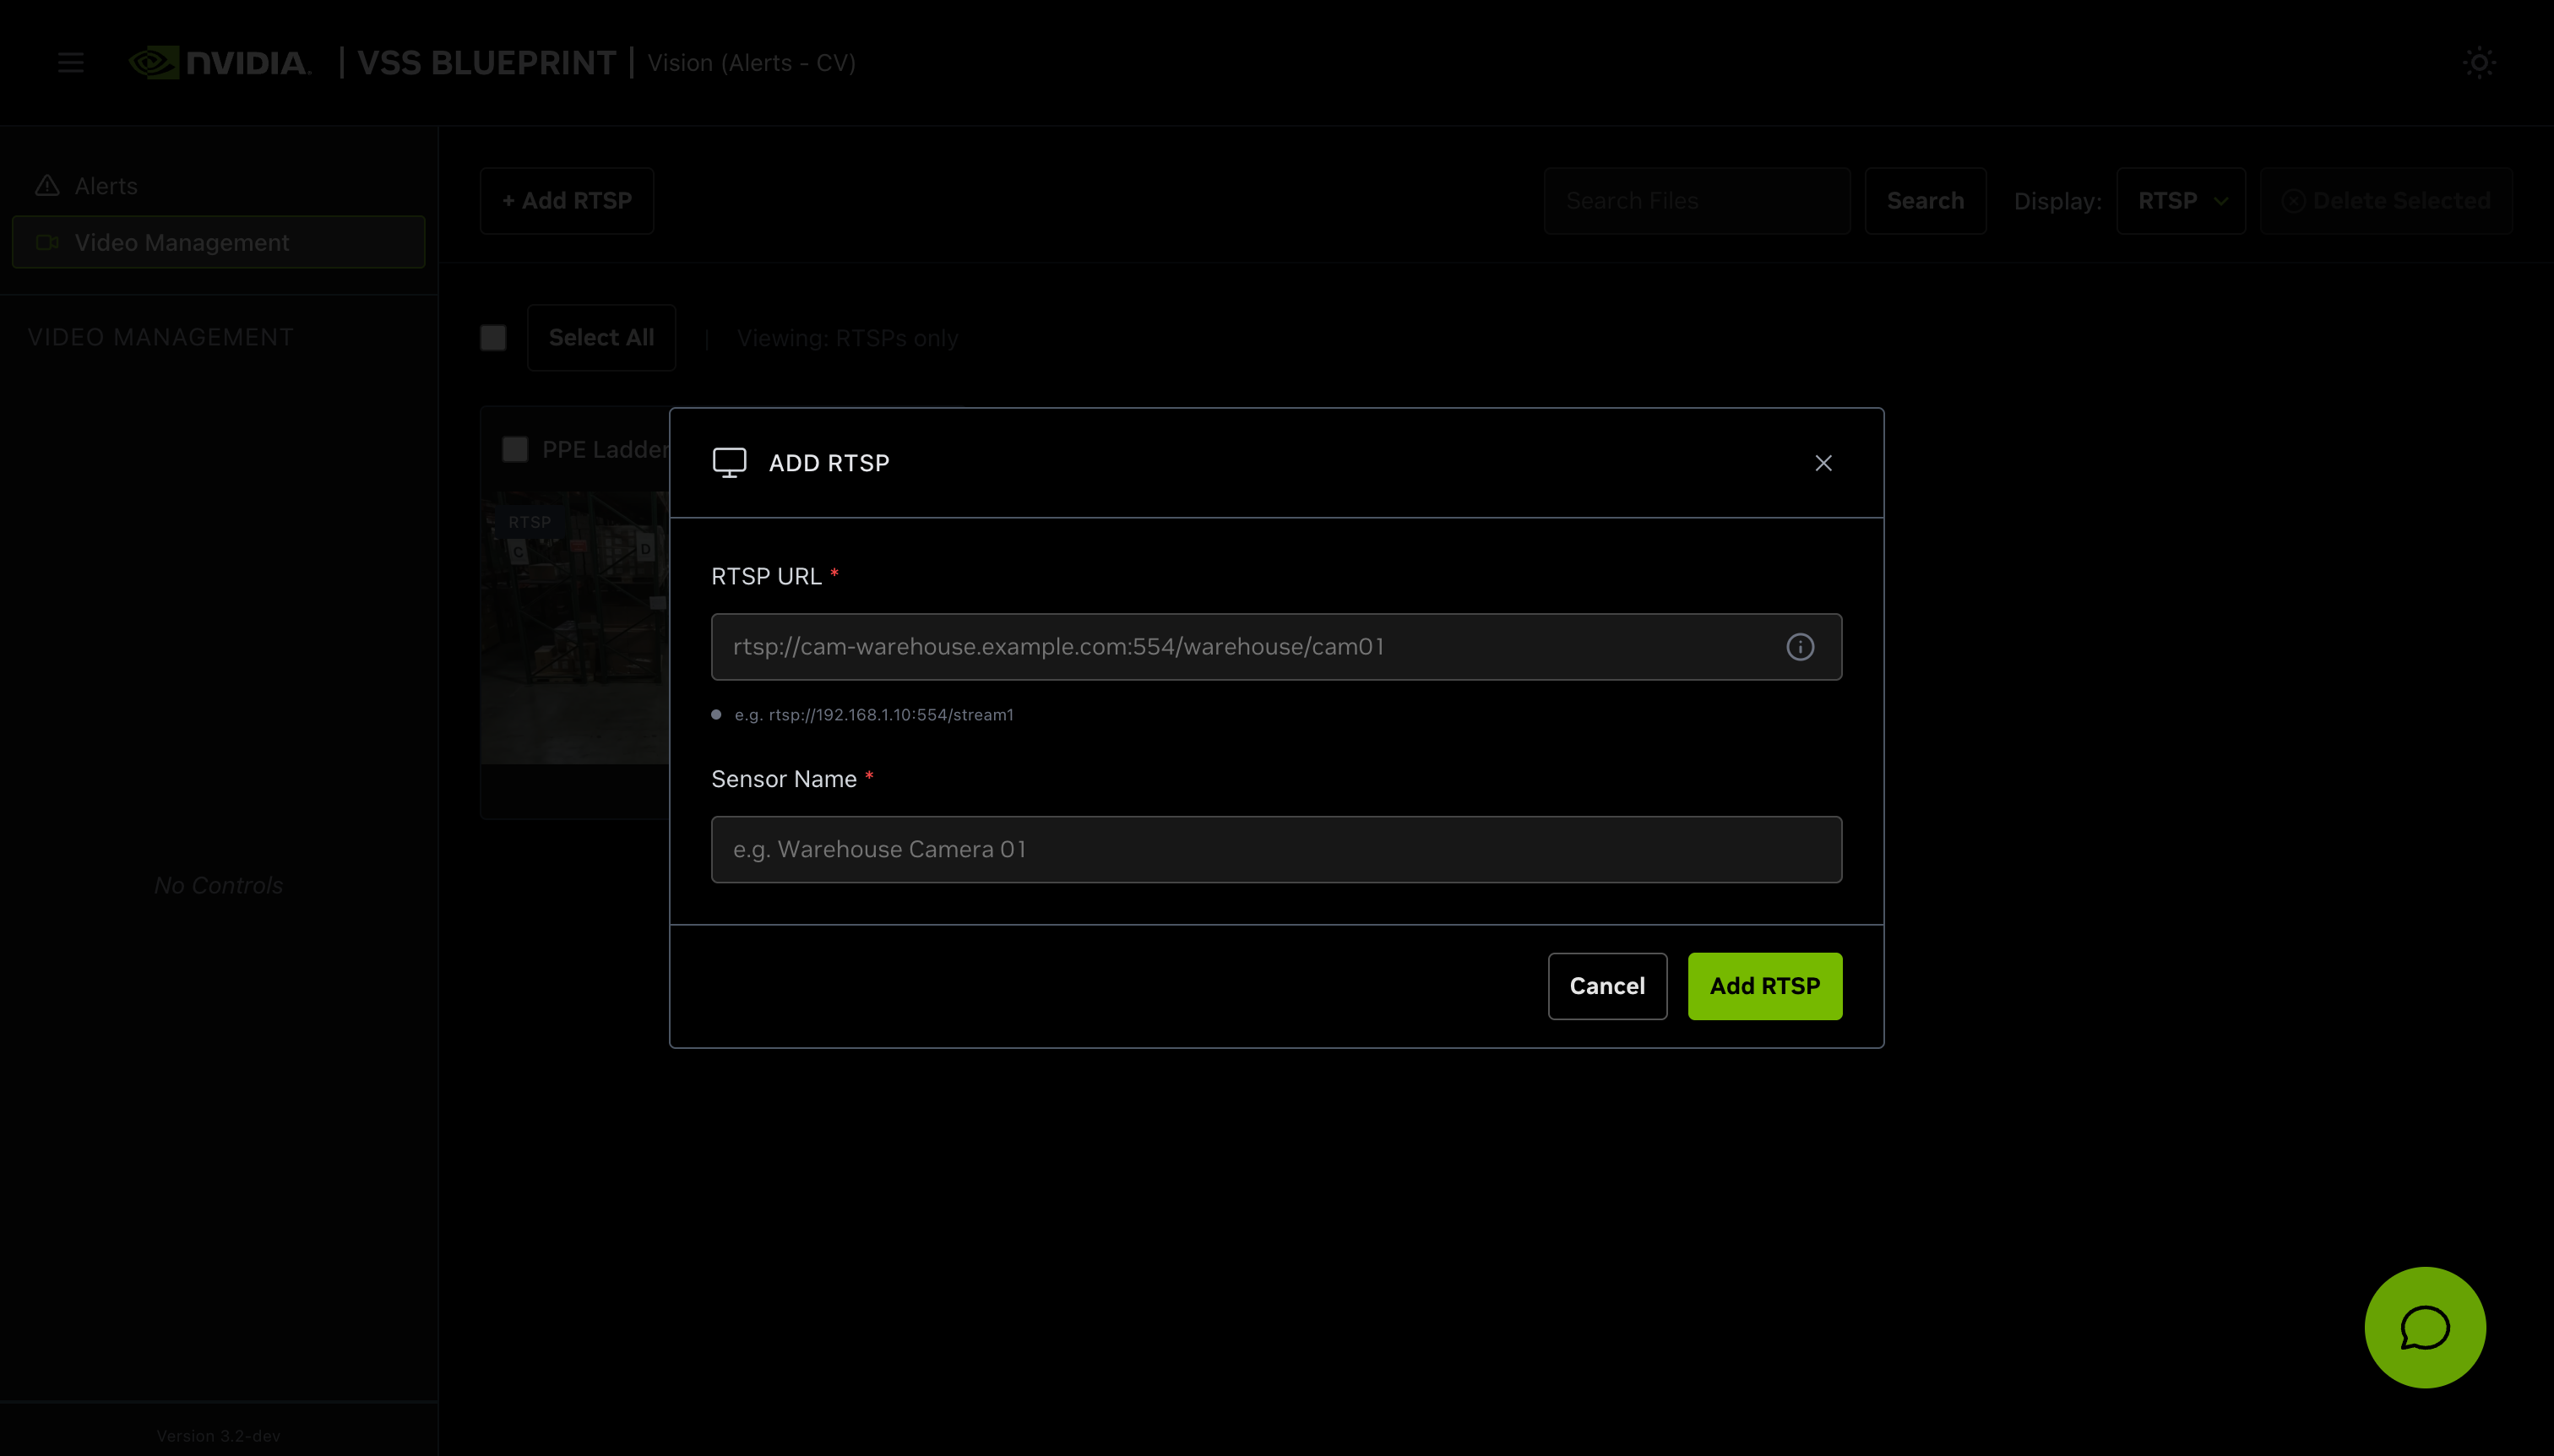
Note
By default, this profile only supports up to one stream being processed at a time.
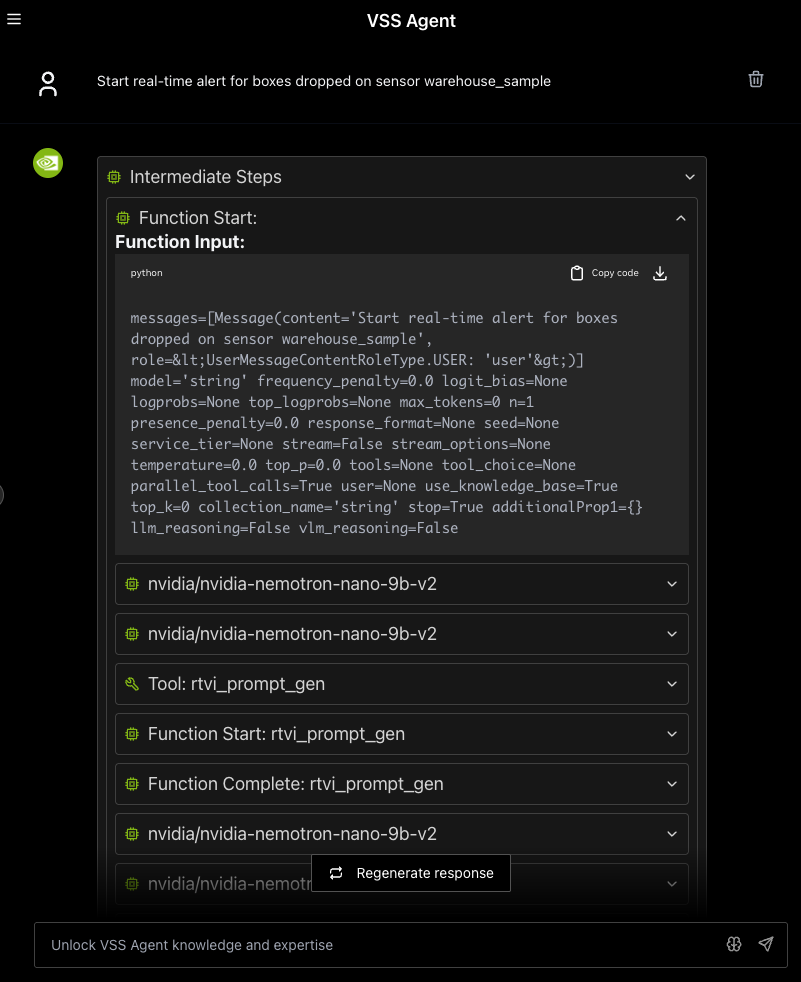
Step 3: Start a real-time alert#
Launch the Agent UI at http://<HOST_IP>:7777/.
Use the Global Chat Sidebar to interact with the system:
- Start an RTVI real-time alert for a stream by specifying the alert type.
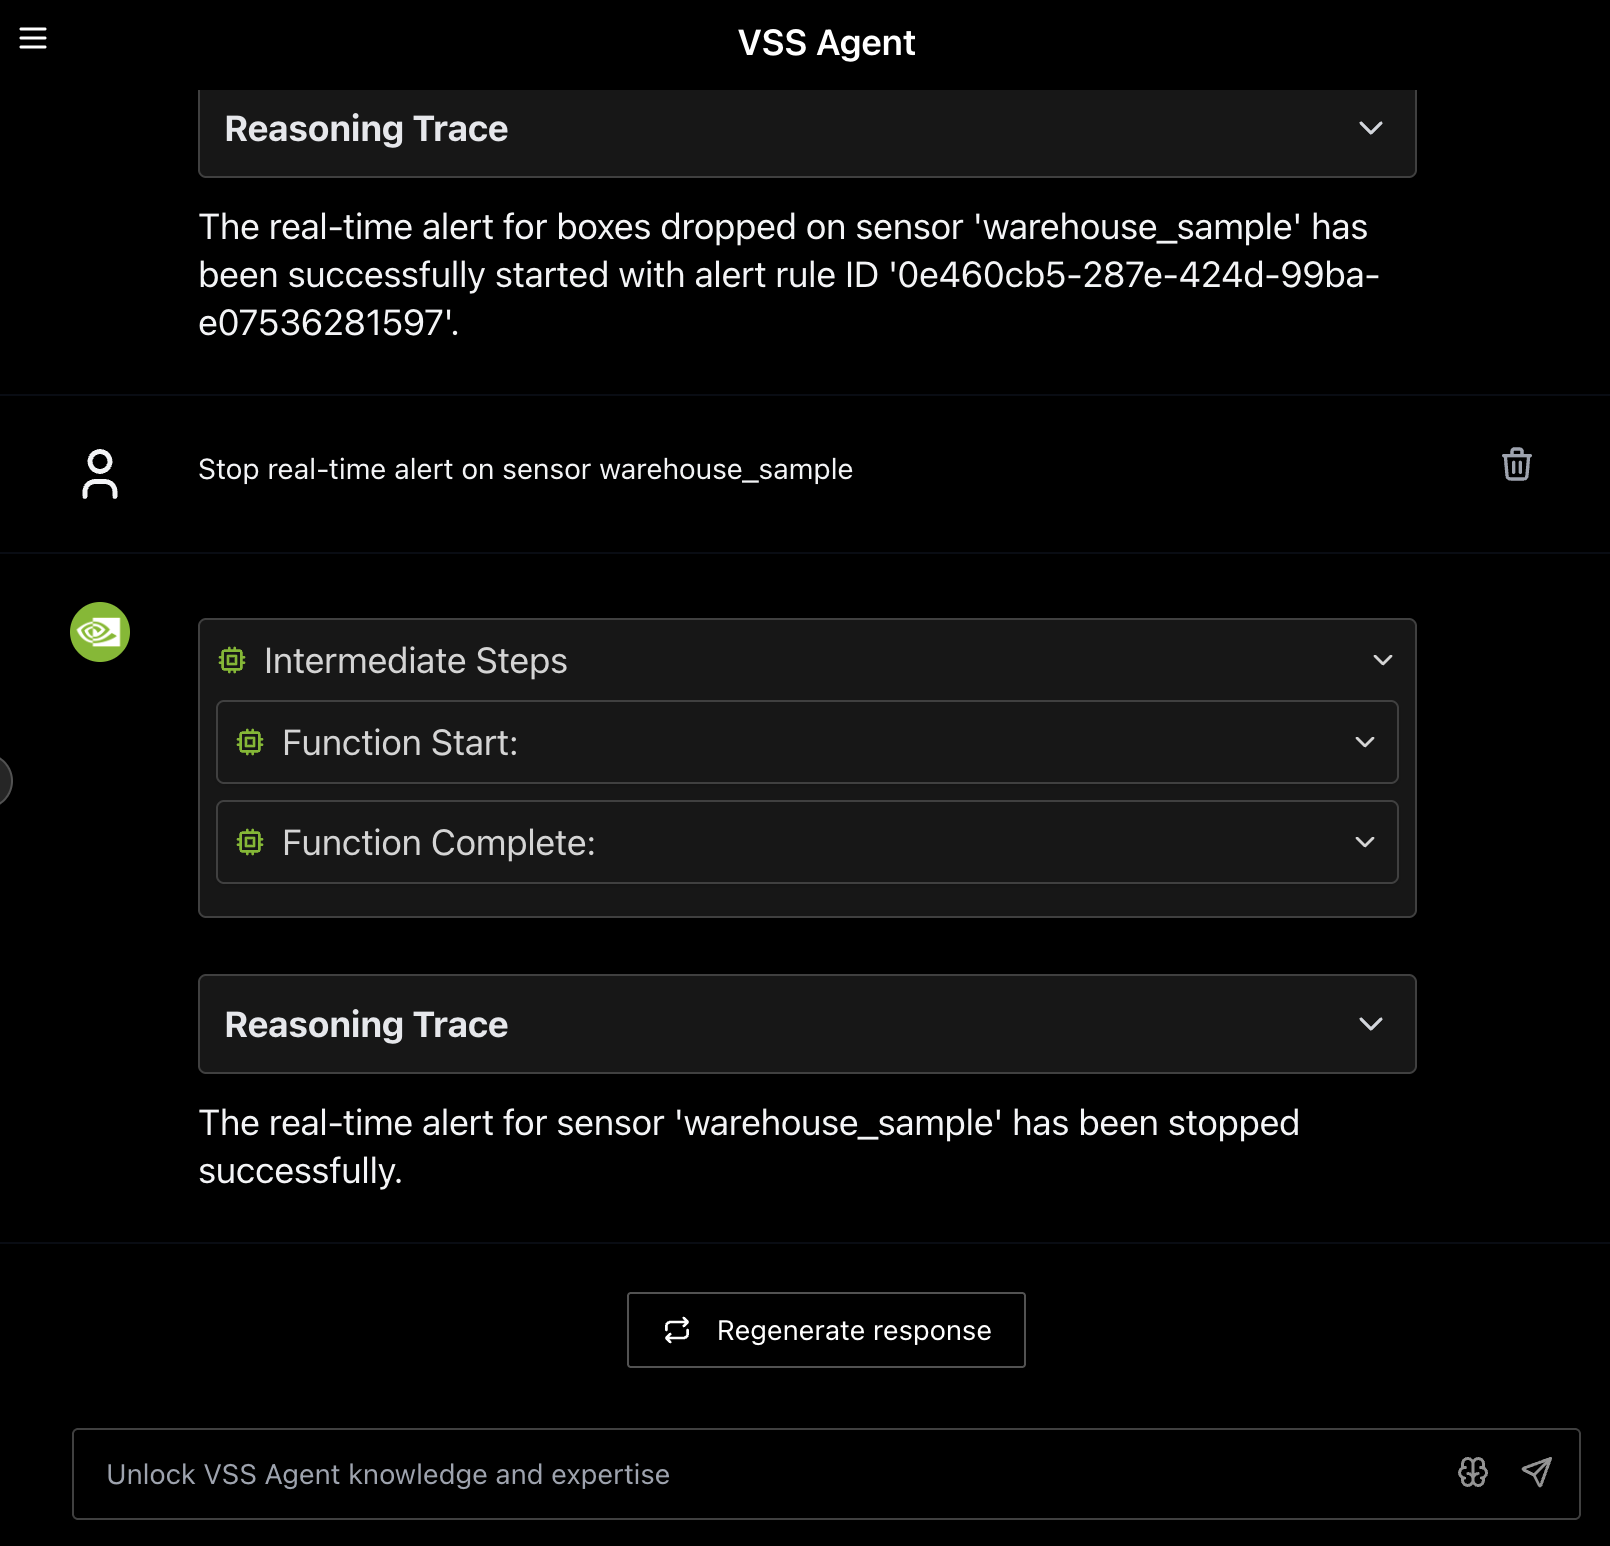
Sample prompt: Start real-time alert for boxes dropped on sensor warehouse_sample
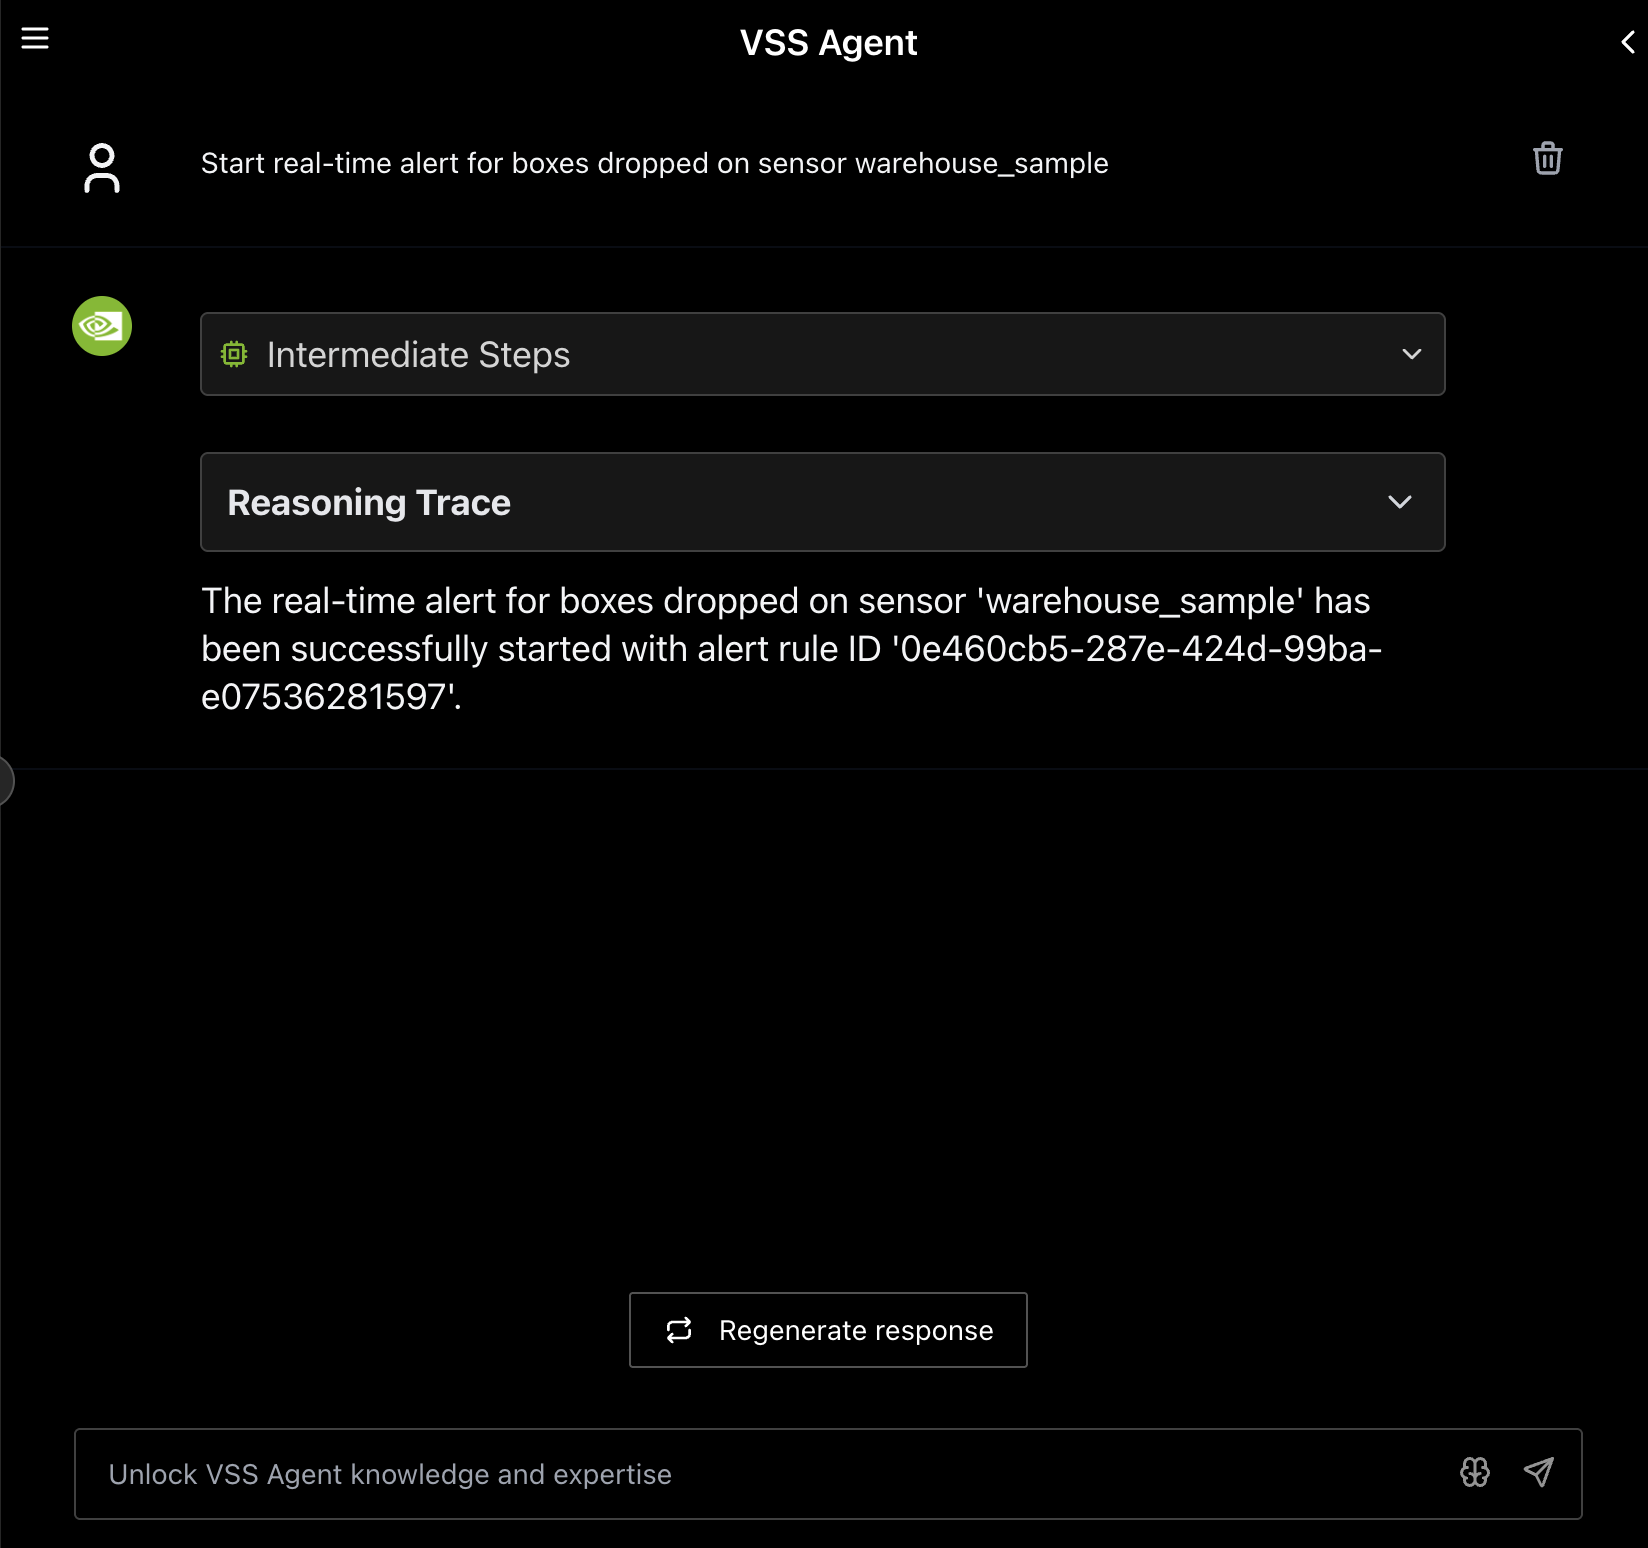
To view the reasoning trace for alert detection, click on the “Trace” icon in the alert details. This shows the VLM’s analysis process and decision-making steps.
- Stop an RTVI real-time alert for a stream when monitoring is no longer needed.
Sample prompt: Stop real-time alert on sensor warehouse_sample
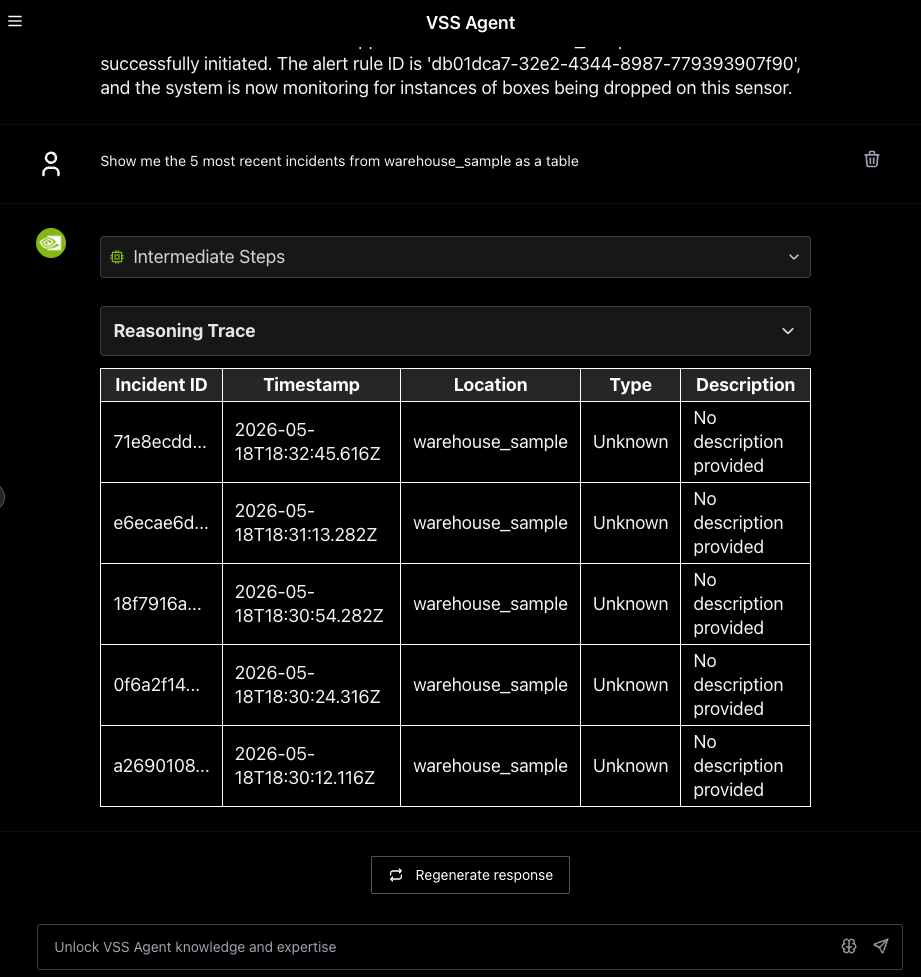
- List alert incidents for a stream to review detected anomalies.
Sample prompt: Show me the 5 most recent incidents from warehouse_sample as a table
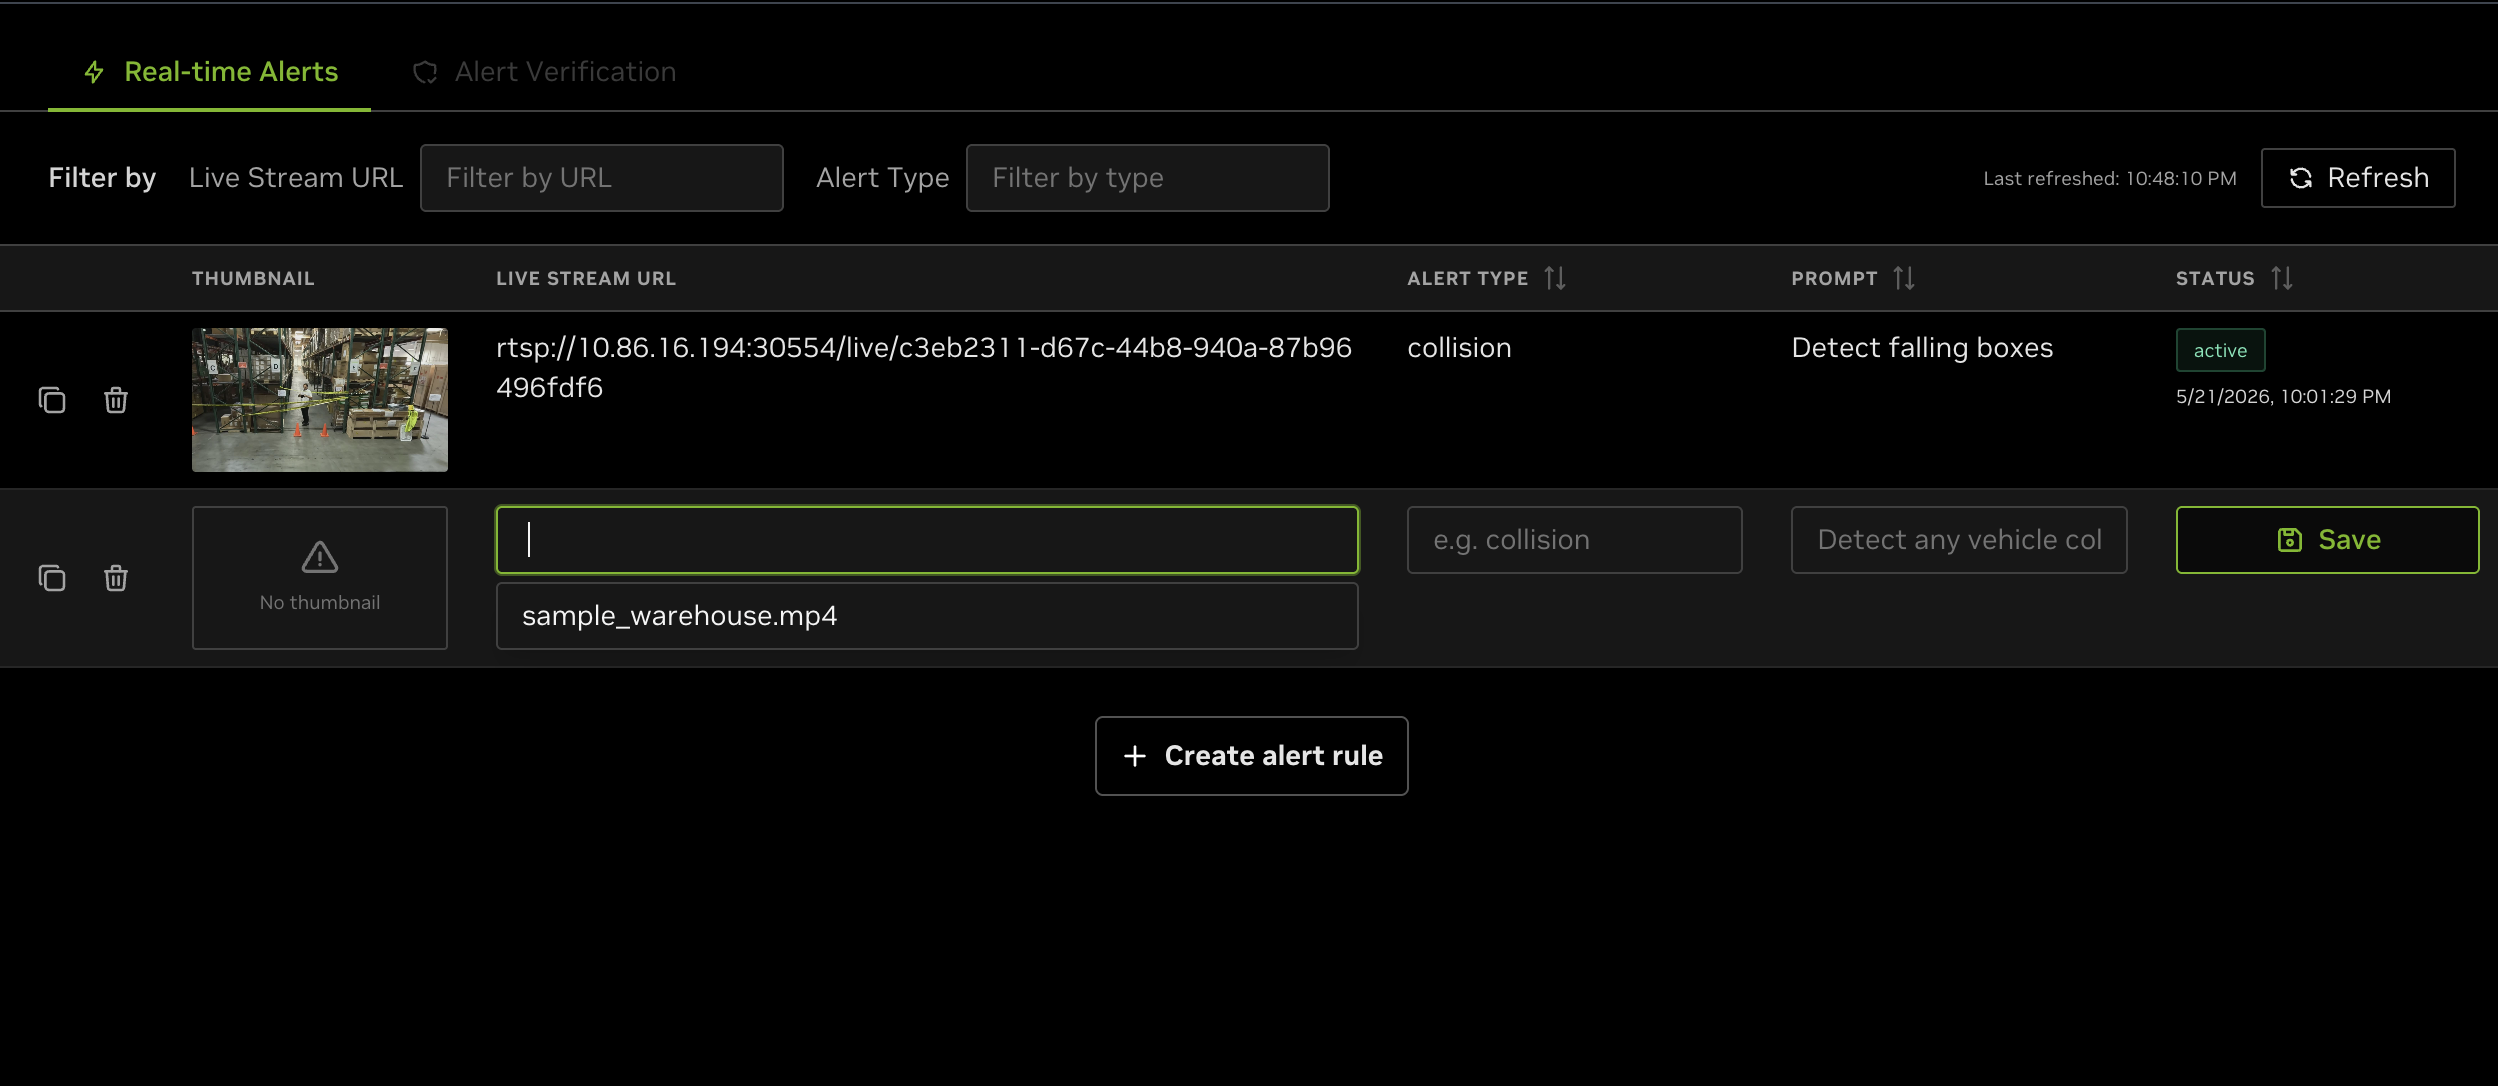
Alternatively, alerts can be created directly through the UI instead of the chat agent. Click the Alerts tab on the left-hand side, select Manage Alerts, and then click + Create alert rule. A draft row appears with a sensor picker populated from VIOS’s live-stream catalog — pick the friendly sensor name (for example, warehouse_sample) from the dropdown, fill in the alert type and prompt, and click Save. The UI resolves the RTSP URL from VIOS automatically; you do not need to enter a URL. See Manage Alerts in the VSS Reference UI section for full details.
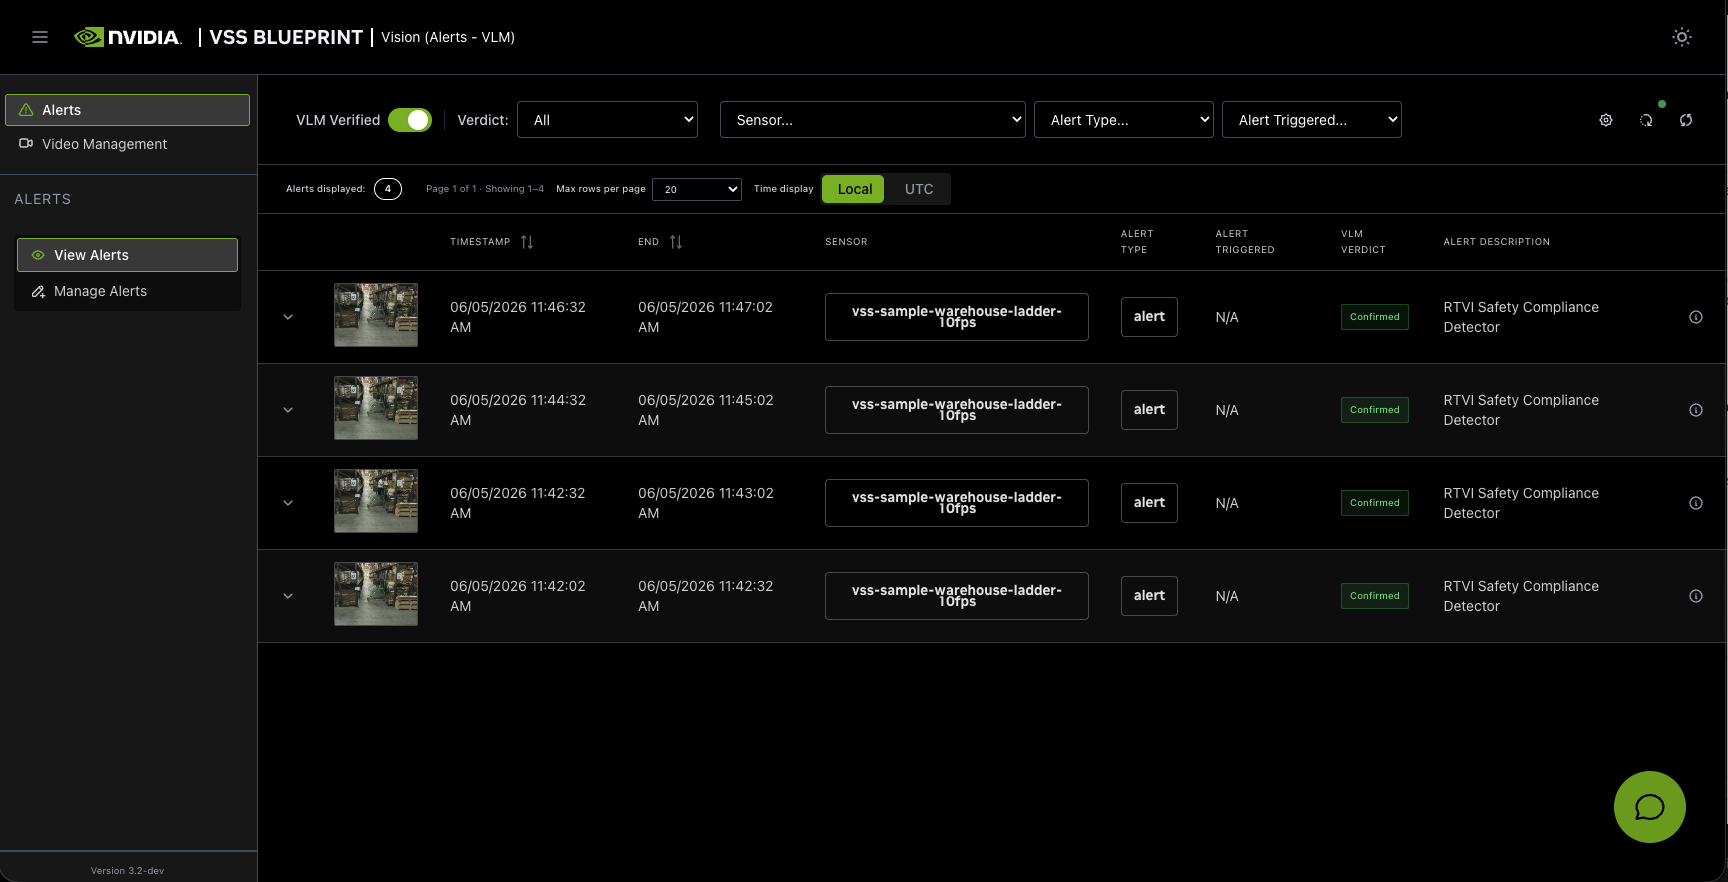
From the same Alerts tab, enable VLM Verified to view verified alerts for all active sensors.
Troubleshooting#
If alerts do not appear in the VSS UI after you create an alert rule, check the following item:
View the RTVI VLM container logs with
docker logs -f vss-rtvi-vlmand confirm that the alert rule was created and is being processed. If processing fails, confirm that the stream is valid and that the deployment has enough available GPU memory.
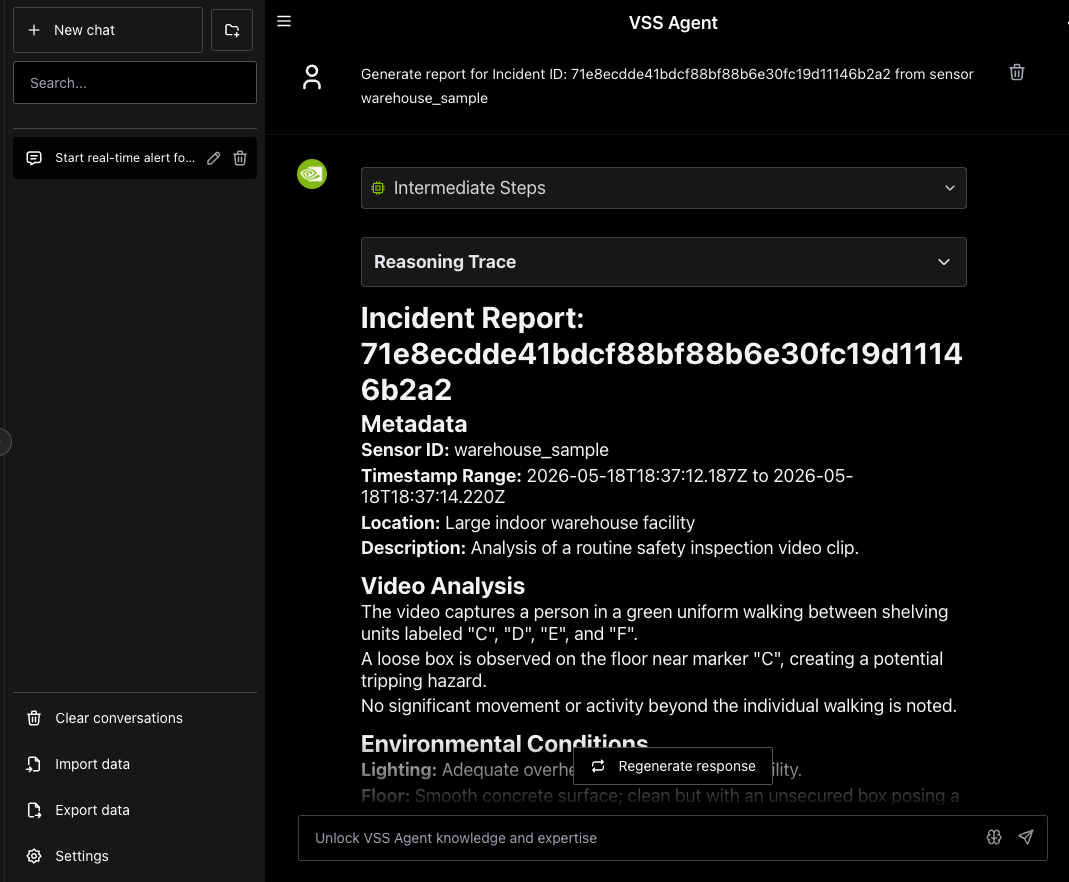
Step 4: Generate a Report for the Alert#
You can use the chat interface to request creation of a report for the generated alerts. The report is currently generated in markdown format and displayed in the VSS UI.
As a first step, identify the alert ID for which the report needs to be generated. Use the chat interface to retrieve the ID as described earlier, or expand any alert in the Alerts tab to display the Id field along with associated metadata.
Now, use the ID to request generation of the report while also specifying the associated sensor, as shown in the sample image below.
Step 5: Teardown the Agent#
To tear down the agent, run the following command:
deploy/docker/scripts/dev-profile.sh down
This command will stop and remove the agent containers.
Service Endpoints#
Once deployed, the following services are available:
Service |
URL |
|---|---|
VSS UI |
|
NVStreamer UI |
|
VST UI |
|
Phoenix UI |
|
Known Issues#
It is recommended to clear chat and refresh the VSS UI page after deployment to clear any data from a previous deployment.
VSS-RTVI-VLM logs may repeatedly show a “Generated text is empty” warning and result in incomplete/unreliable alert verdicts
VLM verdict verification can fail in the UI even when VLM requests are processed successfully. Alert Bridge response parsing accepts only raw verdicts such as
A/BorYes/Nobefore serializing them toconfirmedorrejected. As a result, a semantically validrejectedverdict from Cosmos Reason can fail schema validation and be persisted asverification-failed.Report generation may produce inaccurate results. As a potential workaround, remove the
use_base64: trueline undervideo_understanding_isoindeveloper-profiles/dev-profile-alerts/vss-agent/configs/config.yml.The VST UI is externally accessible on both port 30000 and 30888 because both ports are exposed on the host network. For security hardening, consider using a firewall to allowlist only the required VST ingress port.