Quickstart#
Overview#
Deploy a vision agent in 10 minutes
This guide will walk you through the steps to deploy a vision agent using the VSS Blueprint. You’ll create a simple vision agent that you can upload videos to, ask questions about the videos, and generate reports. Afterwards, you can explore adding agent workflows such as video summarization, search, and alerting.
Note
Before you start: Use 28.3.3 <= Docker Engine < 29.5.0.
Unsupported Docker Engine versions can fail when pulling some NGC-hosted image tags.
See Prerequisites for Docker setup and the supported version band.
The following diagram illustrates a conceptual architecture of the base vision agent that you’ll deploy:
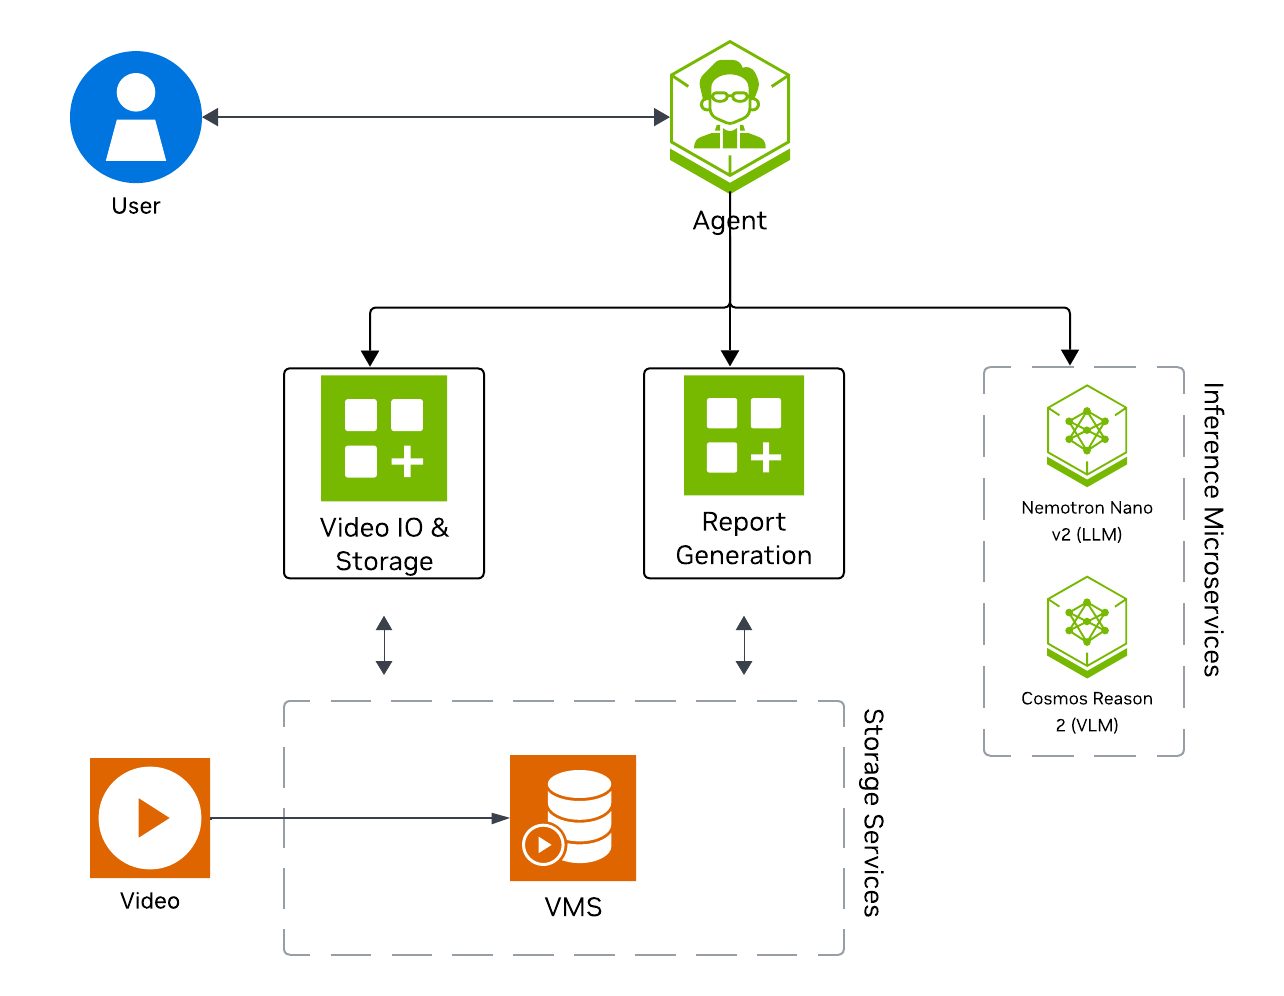
Key Features of the Base Vision Agent:
Upload videos to a video management system and connect the agent to it through the MCP service.
Report generation tool which utilizes a LLM and VLM to generate reports from the videos.
Video understanding tool which utilizes a VLM to perform video understanding tasks, such as Q&A.
What’s being deployed#
VSS Agent: Agent service that uses a configured LLM endpoint to route requests and orchestrate tool calls to VSS microservices and model endpoints (LLM/VLM NIMs) to answer questions and generate outputs. The recommended orchestrator model is NVIDIA Nemotron Nano 9B v2 (
nvidia/nvidia-nemotron-nano-9b-v2), which handles query routing, reasoning, and report generation.VSS Agent UI: Web UI with chat, video upload, and different views
VSS Video IO & Storage (VIOS): Video ingestion, recording, and playback services used by the agent for video access and management
Nemotron LLM (NIM): LLM inference service used for reasoning, tool selection, and response generation
Cosmos Reason 2 (NIM): Vision-language model with physical reasoning capabilities
Phoenix: Observability and telemetry service for agent workflow monitoring
Agent Harness Options#
The default VSS Agent is built on the NVIDIA NeMo Agent Toolkit (NAT) and is the recommended way to interact with VSS. However, the underlying VSS microservices (Video Analytics MCP, VSS Orchestrator MCP, VST/VIOS, Video Analytics API) are framework-agnostic, so you can also drive them from other agent harnesses. The table below compares the supported options.
Harness |
What it is |
Pros |
Cons |
|---|---|---|---|
NeMo Agent Toolkit (NAT) — VSS Agent (default) |
The shipped reference agent ( |
Native NIM and MCP integration out of the box; declarative |
YAML can become verbose for highly custom flows; tied to NAT’s runtime model. |
NemoClaw (OpenClaw sandbox) |
An agent sandbox with a chat UI that drives VSS through the VSS Orchestrator MCP server (port |
Natural-language operations on top of VSS (deploy profiles, fetch logs, inspect containers); guided host setup; safety prompts before destructive actions; policy-controlled skills. |
Focused on deploying and operating VSS rather than building bespoke video analytics agents; requires the orchestrator MCP server to be running on the host. |
Direct MCP client (BYO agent) |
Any MCP-compatible LLM client (e.g., Claude Desktop, OpenAI Agents SDK with MCP, custom Python) connecting to VSS’s MCP servers: Video Analytics MCP (port |
Maximum flexibility — bring any model, framework, or language; lightweight; easy to embed into existing agent stacks; reuses VSS’s existing tool surface without running the full VSS Agent. |
You implement orchestration, retries, multi-turn memory, and streaming yourself; no out-of-the-box Phoenix tracing or Reference UI integration. |
Direct REST API (no LLM in the loop) |
Custom HTTP client calling the Video Analytics API (port |
No agent runtime required; lowest latency; ideal for embedding VSS into existing applications, dashboards, or batch pipelines; deterministic. |
No reasoning or tool routing — caller must know exactly which API to invoke; not suitable for natural-language workflows. |
Note
These harnesses are not mutually exclusive. A common pattern is to run the default NAT-based VSS Agent for end-user chat, while a separate service (NemoClaw, a custom MCP client, or a REST integration) handles deployment automation or back-office workflows against the same VSS microservices.
Prerequisites#
Before you begin, ensure all of the prerequisites are met. See Prerequisites for more details.
Download Sample Data and Deployment Package#
Configure NGC Access#
Note
Before proceeding, ensure that NGC CLI is installed on your system. For installation instructions, see Install NGC CLI in the Prerequisites.
Download Sample Data From NGC#
Perform this on the machine from which you may use the web-browser.
This can be done using NGC CLI as documented below, or downloaded from the NGC UI directly.
The nvidia/vss-developer/dev-profile-sample-data resource requires authenticated
NGC CLI access with an org selected. If you see Artifact is not Guest accessible
or Missing org, configure NGC with an API key and org before retrying.
See Prerequisites for NGC setup.
Download the Deployment Package#
Perform this on the machine where you intend to deploy the agent.
Note
Git LFS required: The repository uses Git LFS for large files. Install it before cloning or pulling. For example, on Ubuntu/Debian: sudo apt-get install git-lfs. On other systems, see Git LFS installation.
git clone https://github.com/NVIDIA-AI-Blueprints/video-search-and-summarization.git
cd video-search-and-summarization
git checkout tags/v3.2.0
git lfs install
git lfs pull
Deploy#
Step 1: Deploy the Agent#
Note
Set the NGC CLI API key and Hugging Face token (
HF_TOKEN), then run the deploy commands for your GPU type. See NGC + Hugging Face API Keys.Refer to VSS-Agent-Customization-configure-llm and VSS-Agent-Customization-configure-vlm for all LLM and VLM (local and remote) configuration options.
For Nemotron Omni video+audio with a remote VLM, set
ENABLE_AUDIO=trueand follow Using Nemotron Omni (audio-enabled remote VLM) in configure-vlm.For advanced settings and Agent Customization, see the deploy command help.
# Set NGC CLI API key and Hugging Face access token (HF_TOKEN)
export NGC_CLI_API_KEY='<your-ngc-api-key>'
export HF_TOKEN='<hf-token>'

# View all available options
deploy/docker/scripts/dev-profile.sh --help
Select a hardware tab, then a deployment mode. Shared GPU runs the LLM and VLM NIMs on the same GPU; Dedicated GPU assigns each model its own GPU (via --llm-device-id and --vlm-device-id).
deploy/docker/scripts/dev-profile.sh up -p base -H H100
deploy/docker/scripts/dev-profile.sh up -p base -H H100 --llm-device-id 0 --vlm-device-id 1
export LLM_ENDPOINT_URL=https://<llm-endpoint>
deploy/docker/scripts/dev-profile.sh up -p base -H H100 --use-remote-llm
export VLM_ENDPOINT_URL=https://<vlm-endpoint>
deploy/docker/scripts/dev-profile.sh up -p base -H H100 --use-remote-vlm
export LLM_ENDPOINT_URL=https://<llm-endpoint>
export VLM_ENDPOINT_URL=https://<vlm-endpoint>
deploy/docker/scripts/dev-profile.sh up -p base -H H100 --use-remote-llm --use-remote-vlm
deploy/docker/scripts/dev-profile.sh up -p base -H RTXPRO6000BW
deploy/docker/scripts/dev-profile.sh up -p base -H RTXPRO6000BW --llm-device-id 0 --vlm-device-id 1
export LLM_ENDPOINT_URL=https://<llm-endpoint>
deploy/docker/scripts/dev-profile.sh up -p base -H RTXPRO6000BW --use-remote-llm
export VLM_ENDPOINT_URL=https://<vlm-endpoint>
deploy/docker/scripts/dev-profile.sh up -p base -H RTXPRO6000BW --use-remote-vlm
export LLM_ENDPOINT_URL=https://<llm-endpoint>
export VLM_ENDPOINT_URL=https://<vlm-endpoint>
deploy/docker/scripts/dev-profile.sh up -p base -H RTXPRO6000BW --use-remote-llm --use-remote-vlm
deploy/docker/scripts/dev-profile.sh up -p base -H L40S --llm-device-id 0 --vlm-device-id 1
export LLM_ENDPOINT_URL=https://<llm-endpoint>
deploy/docker/scripts/dev-profile.sh up -p base -H L40S --use-remote-llm
export VLM_ENDPOINT_URL=https://<vlm-endpoint>
deploy/docker/scripts/dev-profile.sh up -p base -H L40S --use-remote-vlm
export LLM_ENDPOINT_URL=https://<llm-endpoint>
export VLM_ENDPOINT_URL=https://<vlm-endpoint>
deploy/docker/scripts/dev-profile.sh up -p base -H L40S --use-remote-llm --use-remote-vlm
See VSS-Agent-Customization-configure-llm for remote LLM endpoint options, and Edge Deployment for this particular setup.
export LLM_ENDPOINT_URL=https://<llm-endpoint>
deploy/docker/scripts/dev-profile.sh up -p base -H DGX-SPARK --use-remote-llm
See VSS-Agent-Customization-configure-llm for remote LLM endpoint options, and Edge Deployment for this particular setup.
export LLM_ENDPOINT_URL=https://<llm-endpoint>
deploy/docker/scripts/dev-profile.sh up -p base -H IGX-THOR --use-remote-llm
See VSS-Agent-Customization-configure-llm for remote LLM endpoint options, and Edge Deployment for this particular setup.
export LLM_ENDPOINT_URL=https://<llm-endpoint>
deploy/docker/scripts/dev-profile.sh up -p base -H AGX-THOR --use-remote-llm
See Local LLM and VLM deployments on OTHER hardware for known limitations and constraints.
deploy/docker/scripts/dev-profile.sh up -p base -H OTHER [ --llm-env-file /path/to/llm.env --vlm-env-file /path/to/vlm.env ]
deploy/docker/scripts/dev-profile.sh up -p base -H OTHER --llm-device-id 0 --vlm-device-id 1 [ --llm-env-file /path/to/llm.env --vlm-env-file /path/to/vlm.env ]
export LLM_ENDPOINT_URL=https://<llm-endpoint>
deploy/docker/scripts/dev-profile.sh up -p base -H OTHER --use-remote-llm [ --vlm-env-file /path/to/vlm.env ]
export VLM_ENDPOINT_URL=https://<vlm-endpoint>
deploy/docker/scripts/dev-profile.sh up -p base -H OTHER --use-remote-vlm [ --llm-env-file /path/to/llm.env ]
export LLM_ENDPOINT_URL=https://<llm-endpoint>
export VLM_ENDPOINT_URL=https://<vlm-endpoint>
deploy/docker/scripts/dev-profile.sh up -p base -H OTHER --use-remote-llm --use-remote-vlm
This command will download the necessary containers from the NGC Docker registry and start the agent. Depending on your network speed, this may take a few minutes.
This deployment uses the following defaults:
Host IP: src IP from
ip route get 1.1.1.1, which is the default IP address for the agent.
Override IP than the one derived:
-i: Manually specify the host IP address.-e/--external-ip: Optionally specify an externally accessible IP address for services that need to be reached from outside the host. For VSS on a cloud machine, this flag is required — pass the instance’s external IP (for example, its public address).
Note
When using a remote VLM of model-type nim (not openai), see How does a remote nim VLM access videos? for access requirements.
Note
Switch Agent Workflows: You can deploy different agent workflows by changing the -p (profile) argument. For alerts, also specify -m (mode):
base: Base vision agent (this quickstart)search: Search Workflowalerts: Alert workflows (requires-m verificationor-m real-time)Alert Verification Workflow — use
-m verificationReal-Time Alert Workflow — use
-m real-time
Once the deployment is complete, check that all the containers are running and healthy:
docker ps
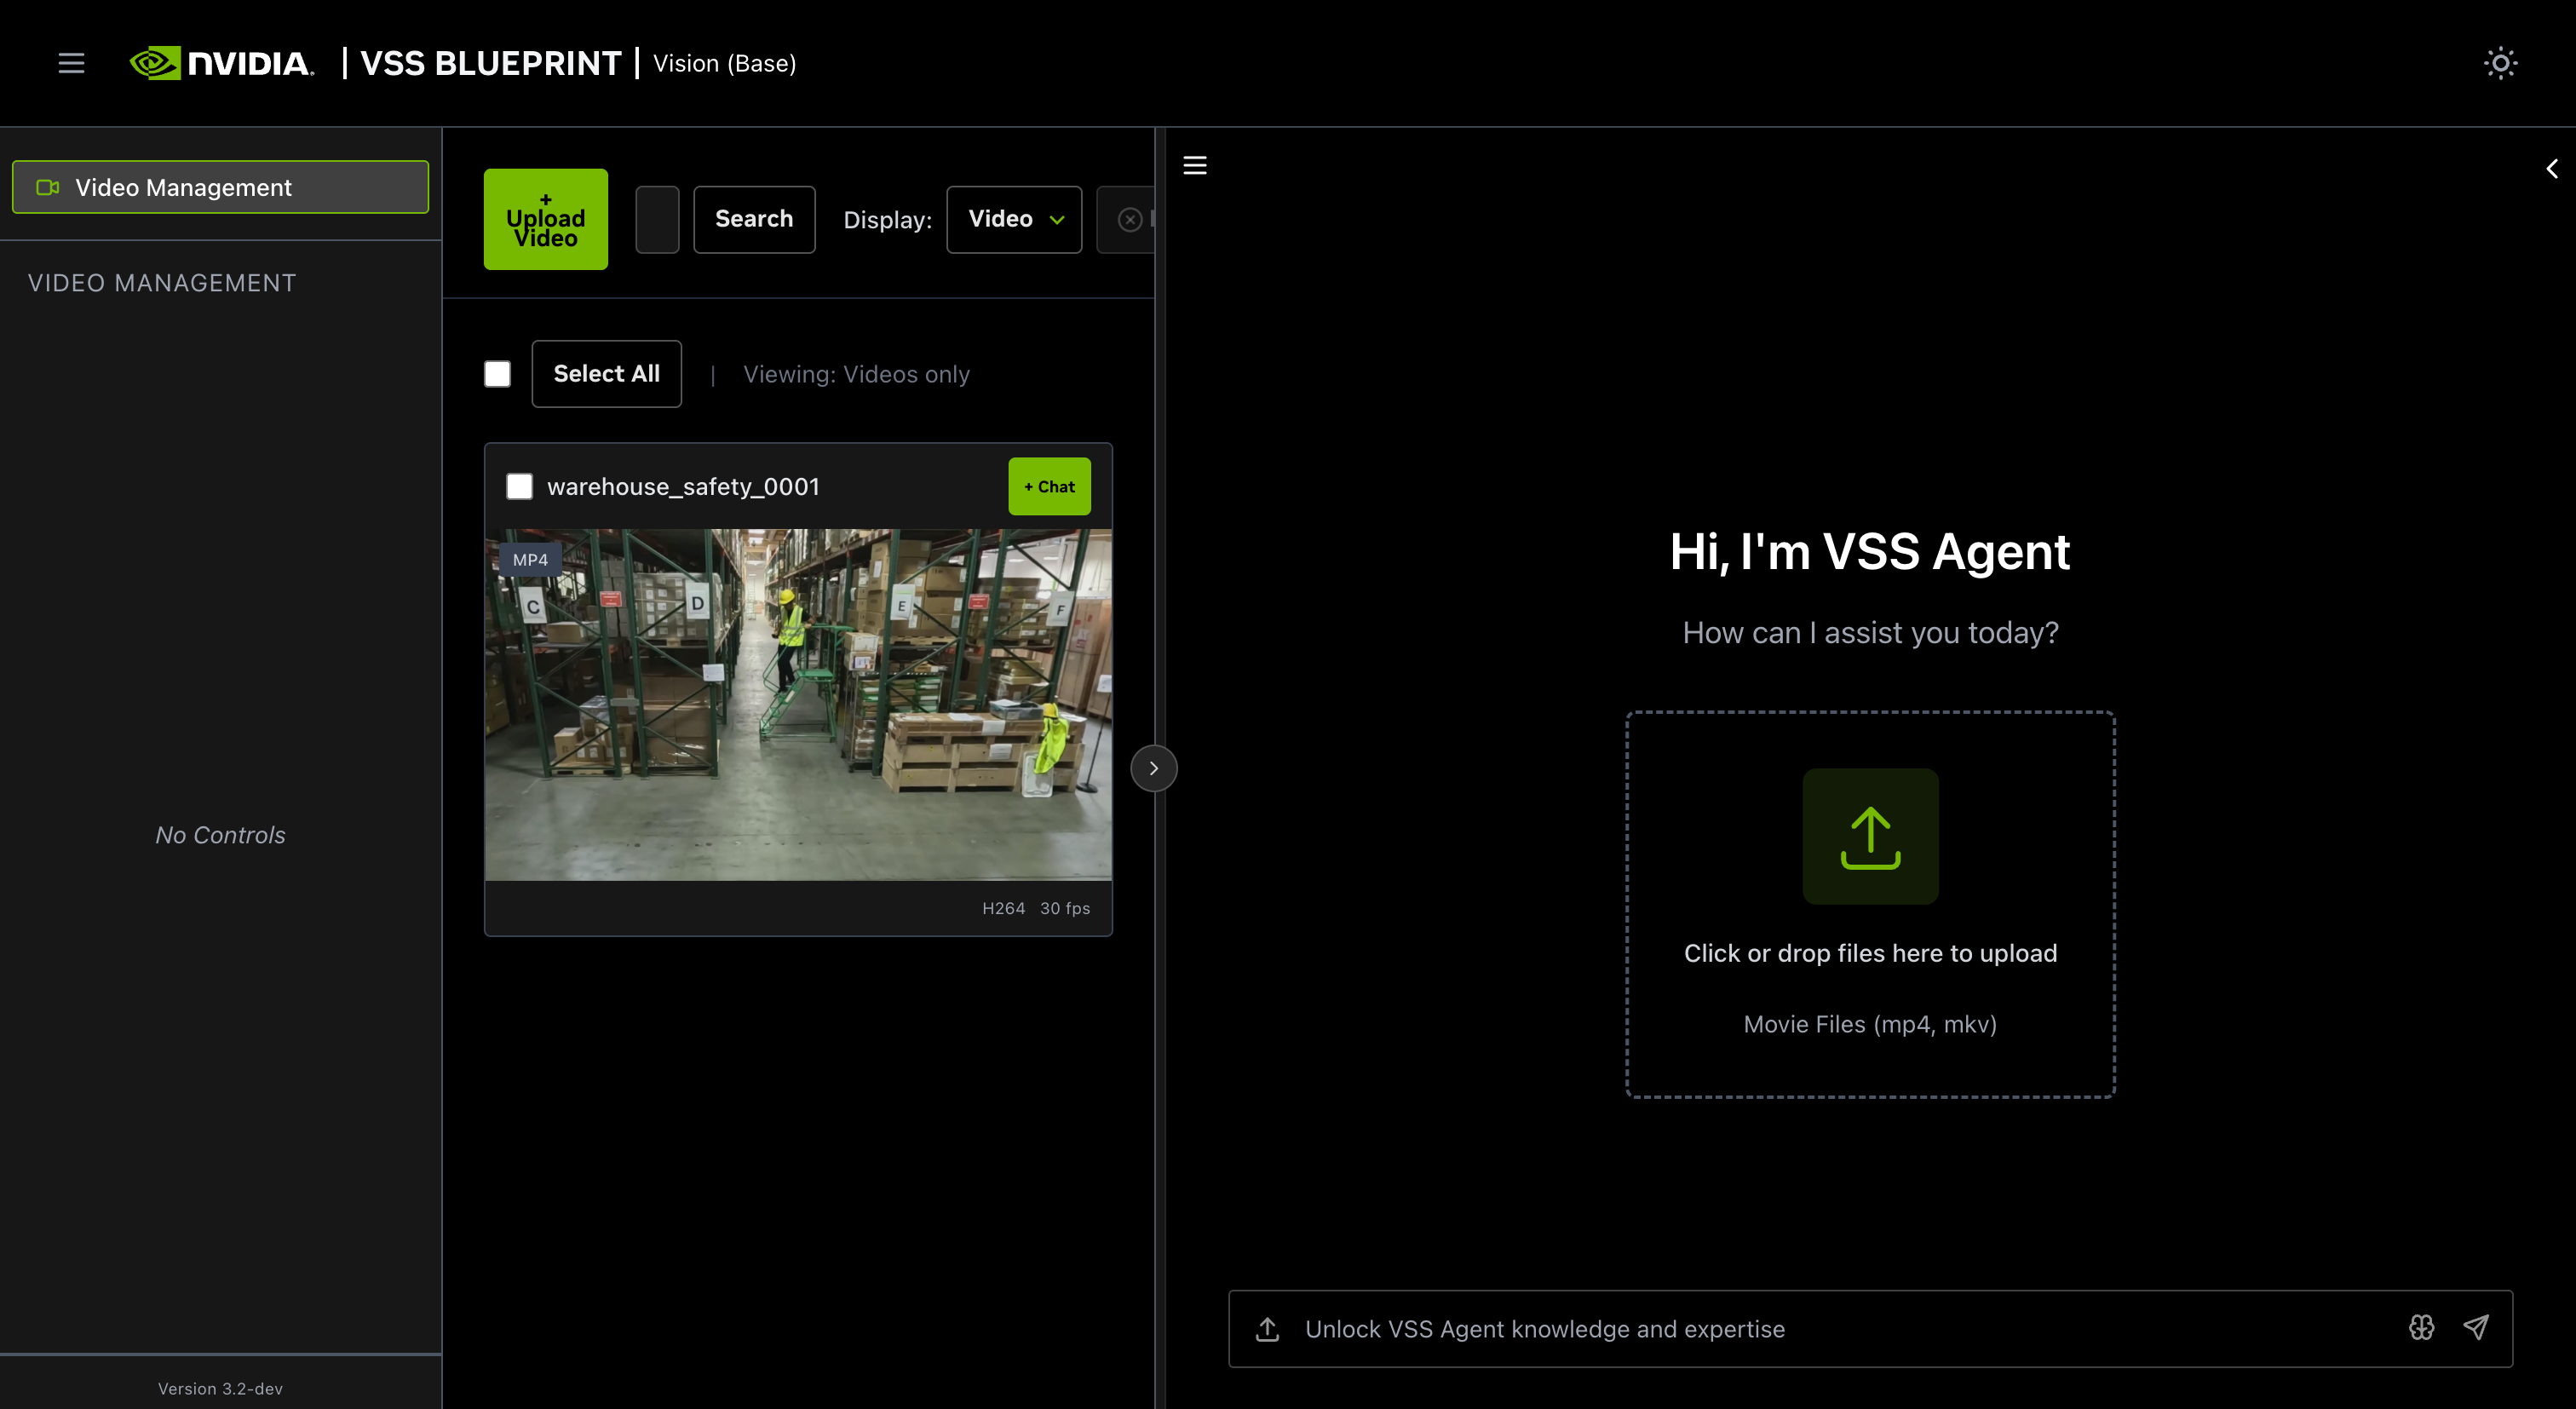
Once all the containers are running, you can access the agent UI at http://<HOST_IP>:7777/.
If the UI Doesn’t Load#
If http://<HOST_IP>:7777/ does not open, run these checks before redeploying:
Check the VSS Agent health endpoint:
HOST_IP=$(ip route get 1.1.1.1 | awk '{print $7; exit}')
curl -fsS "http://${HOST_IP}:8000/health"
Confirm the expected base-profile containers are running and healthy:
docker ps --format "table {{.Names}}\t{{.Status}}\t{{.Ports}}"
Look for the VSS Agent, VSS Agent UI, VIOS/VST, Nemotron LLM, Cosmos Reason2 NIM, and Phoenix containers.
If containers are unhealthy or certain services are unresponsive, check the corresponding container logs for startup, or configuration errors.
If containers are healthy but the UI or workflow is still unavailable, check whether the host firewall is blocking container-to-host traffic. See Bridge-network container cannot reach a VSS service on the host.
If the
cosmos-reason2-8bcontainer stopped or crashed in shared GPU mode, redeploy the full blueprint instead of restarting only that container. With dedicated GPUs, restarting the container is sufficient. See Agent Known Issues.
Deploy with Agent Skills#
As an alternative to running the deployment command manually, you can use VSS Agent Skills from a coding agent such as Claude Code, Codex, or NemoClaw. For the complete prompt flow (deploy, upload, ask, report, teardown), see Agent Skills walkthrough below.
Step 2: Upload a video#
In the chat interface, drag and drop the video warehouse_safety_0001.mp4 into the chat window.
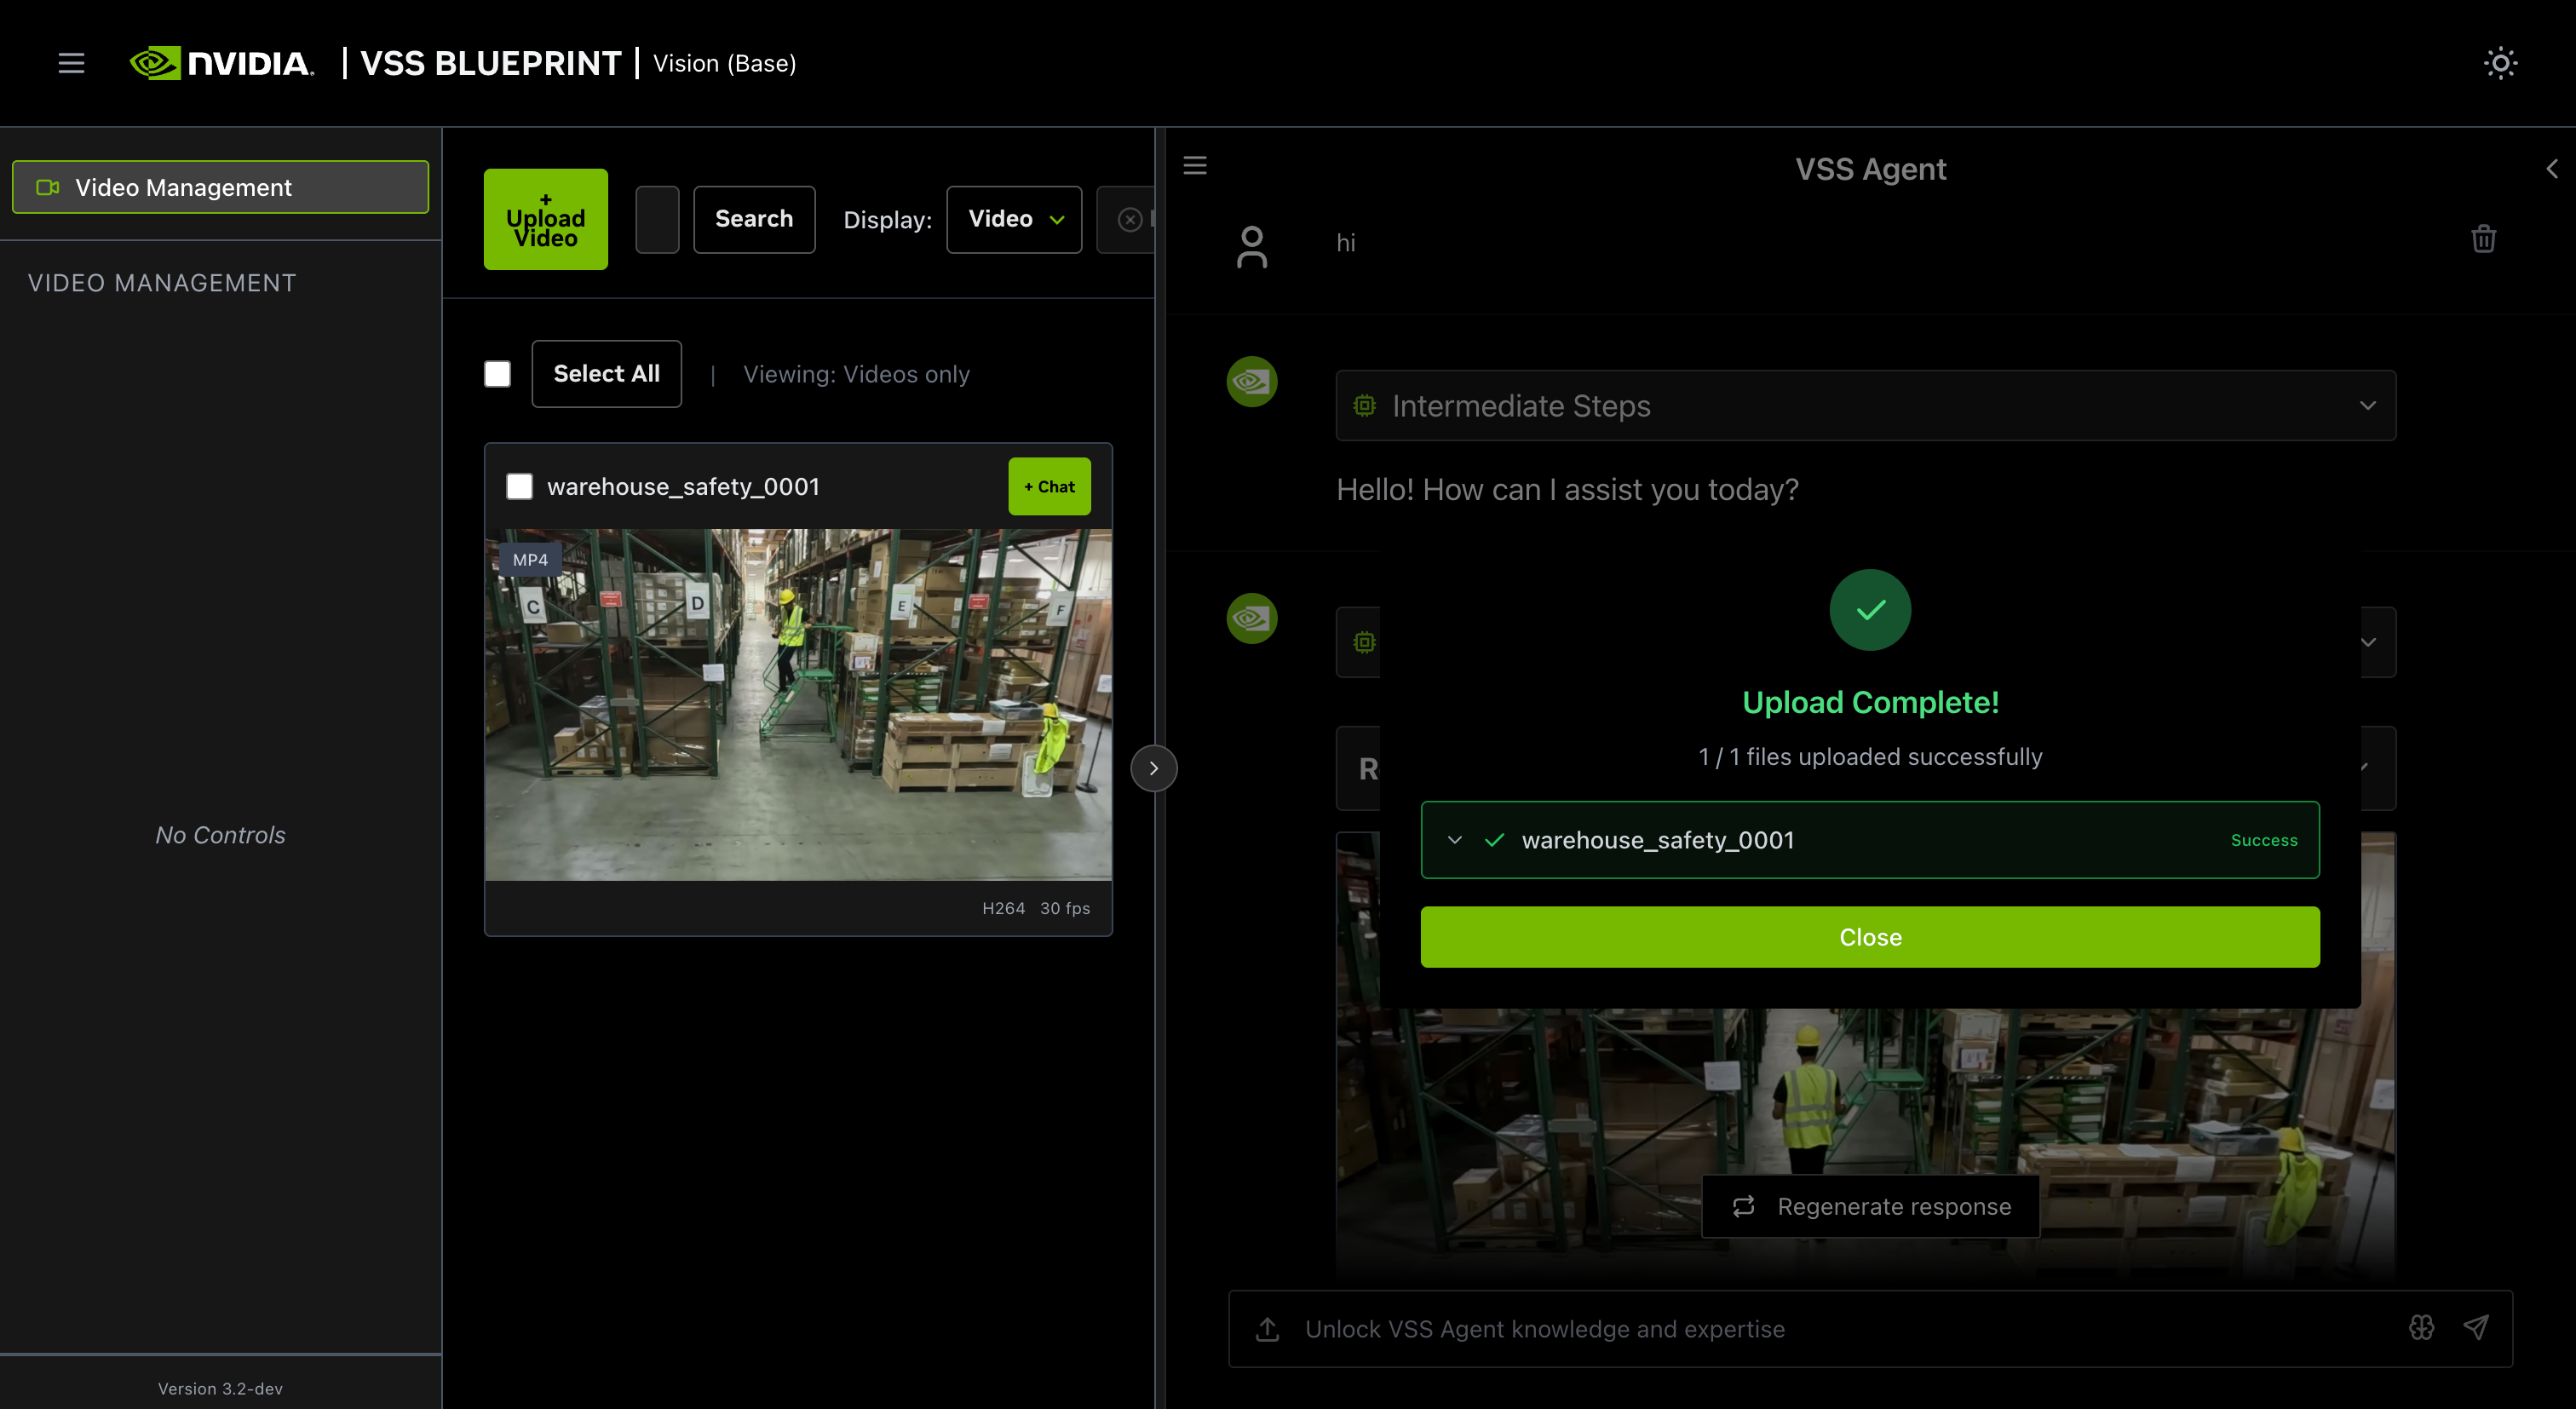
Once the video is uploaded, the agent will respond with the playback clip.
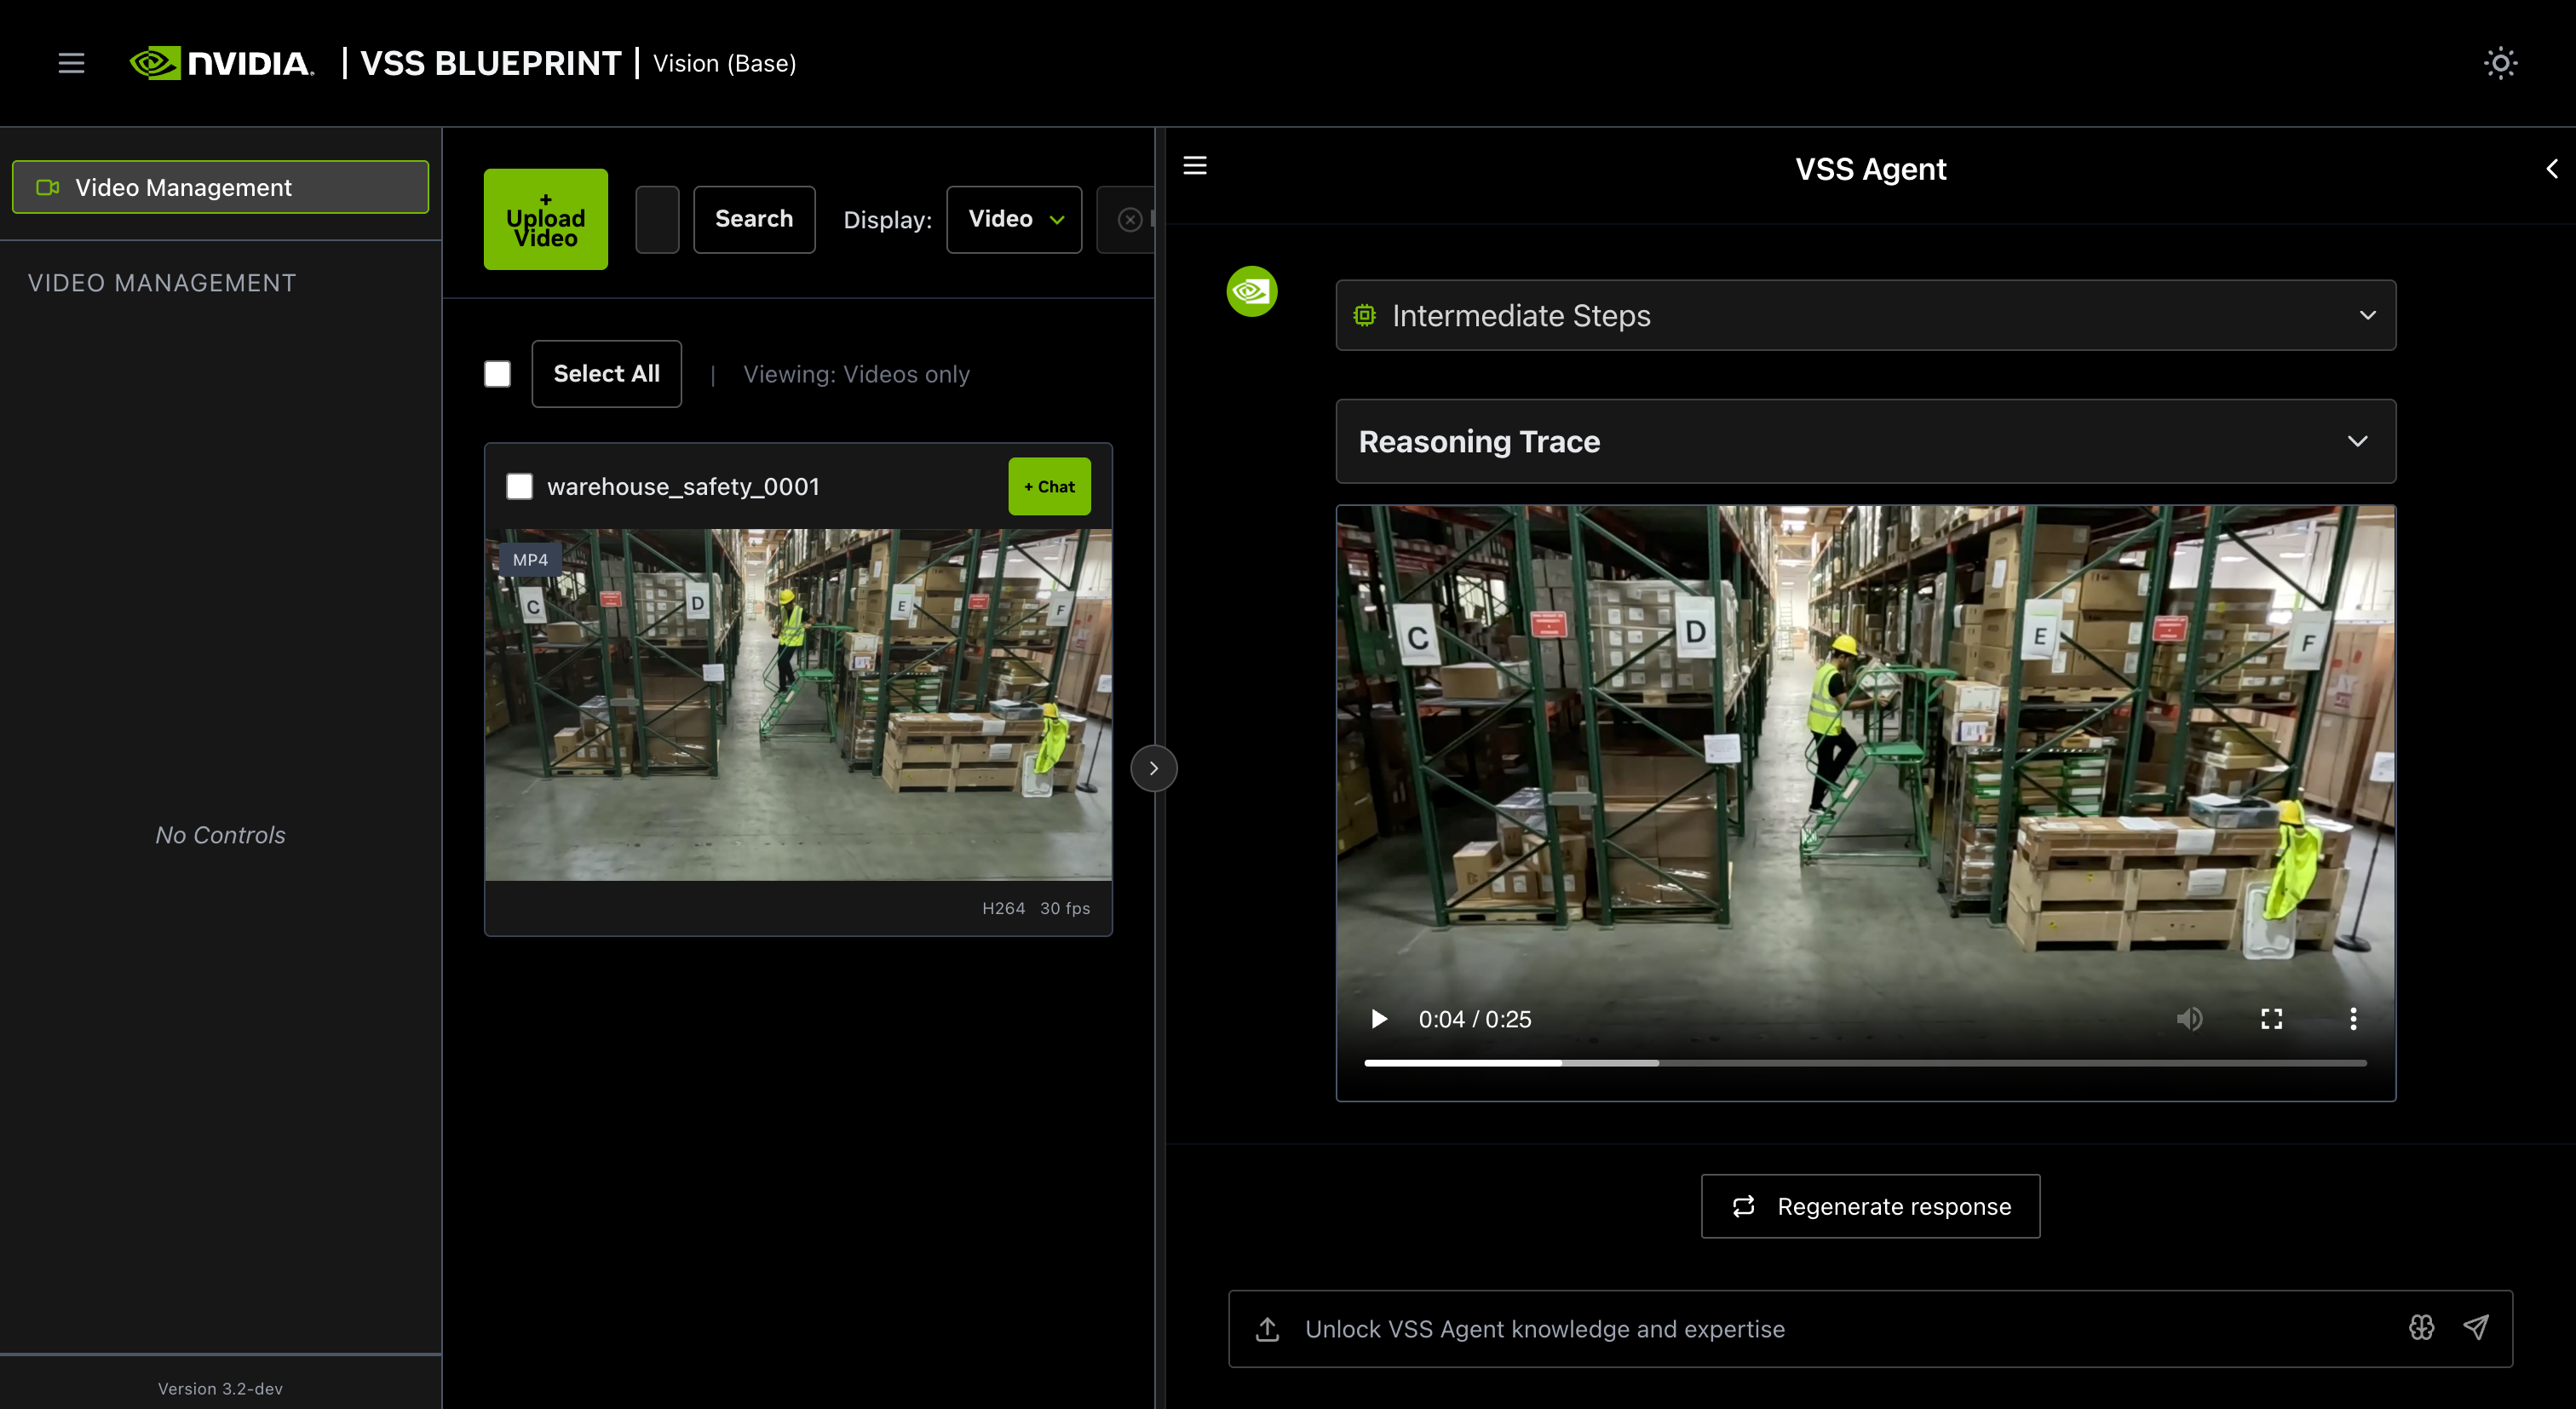
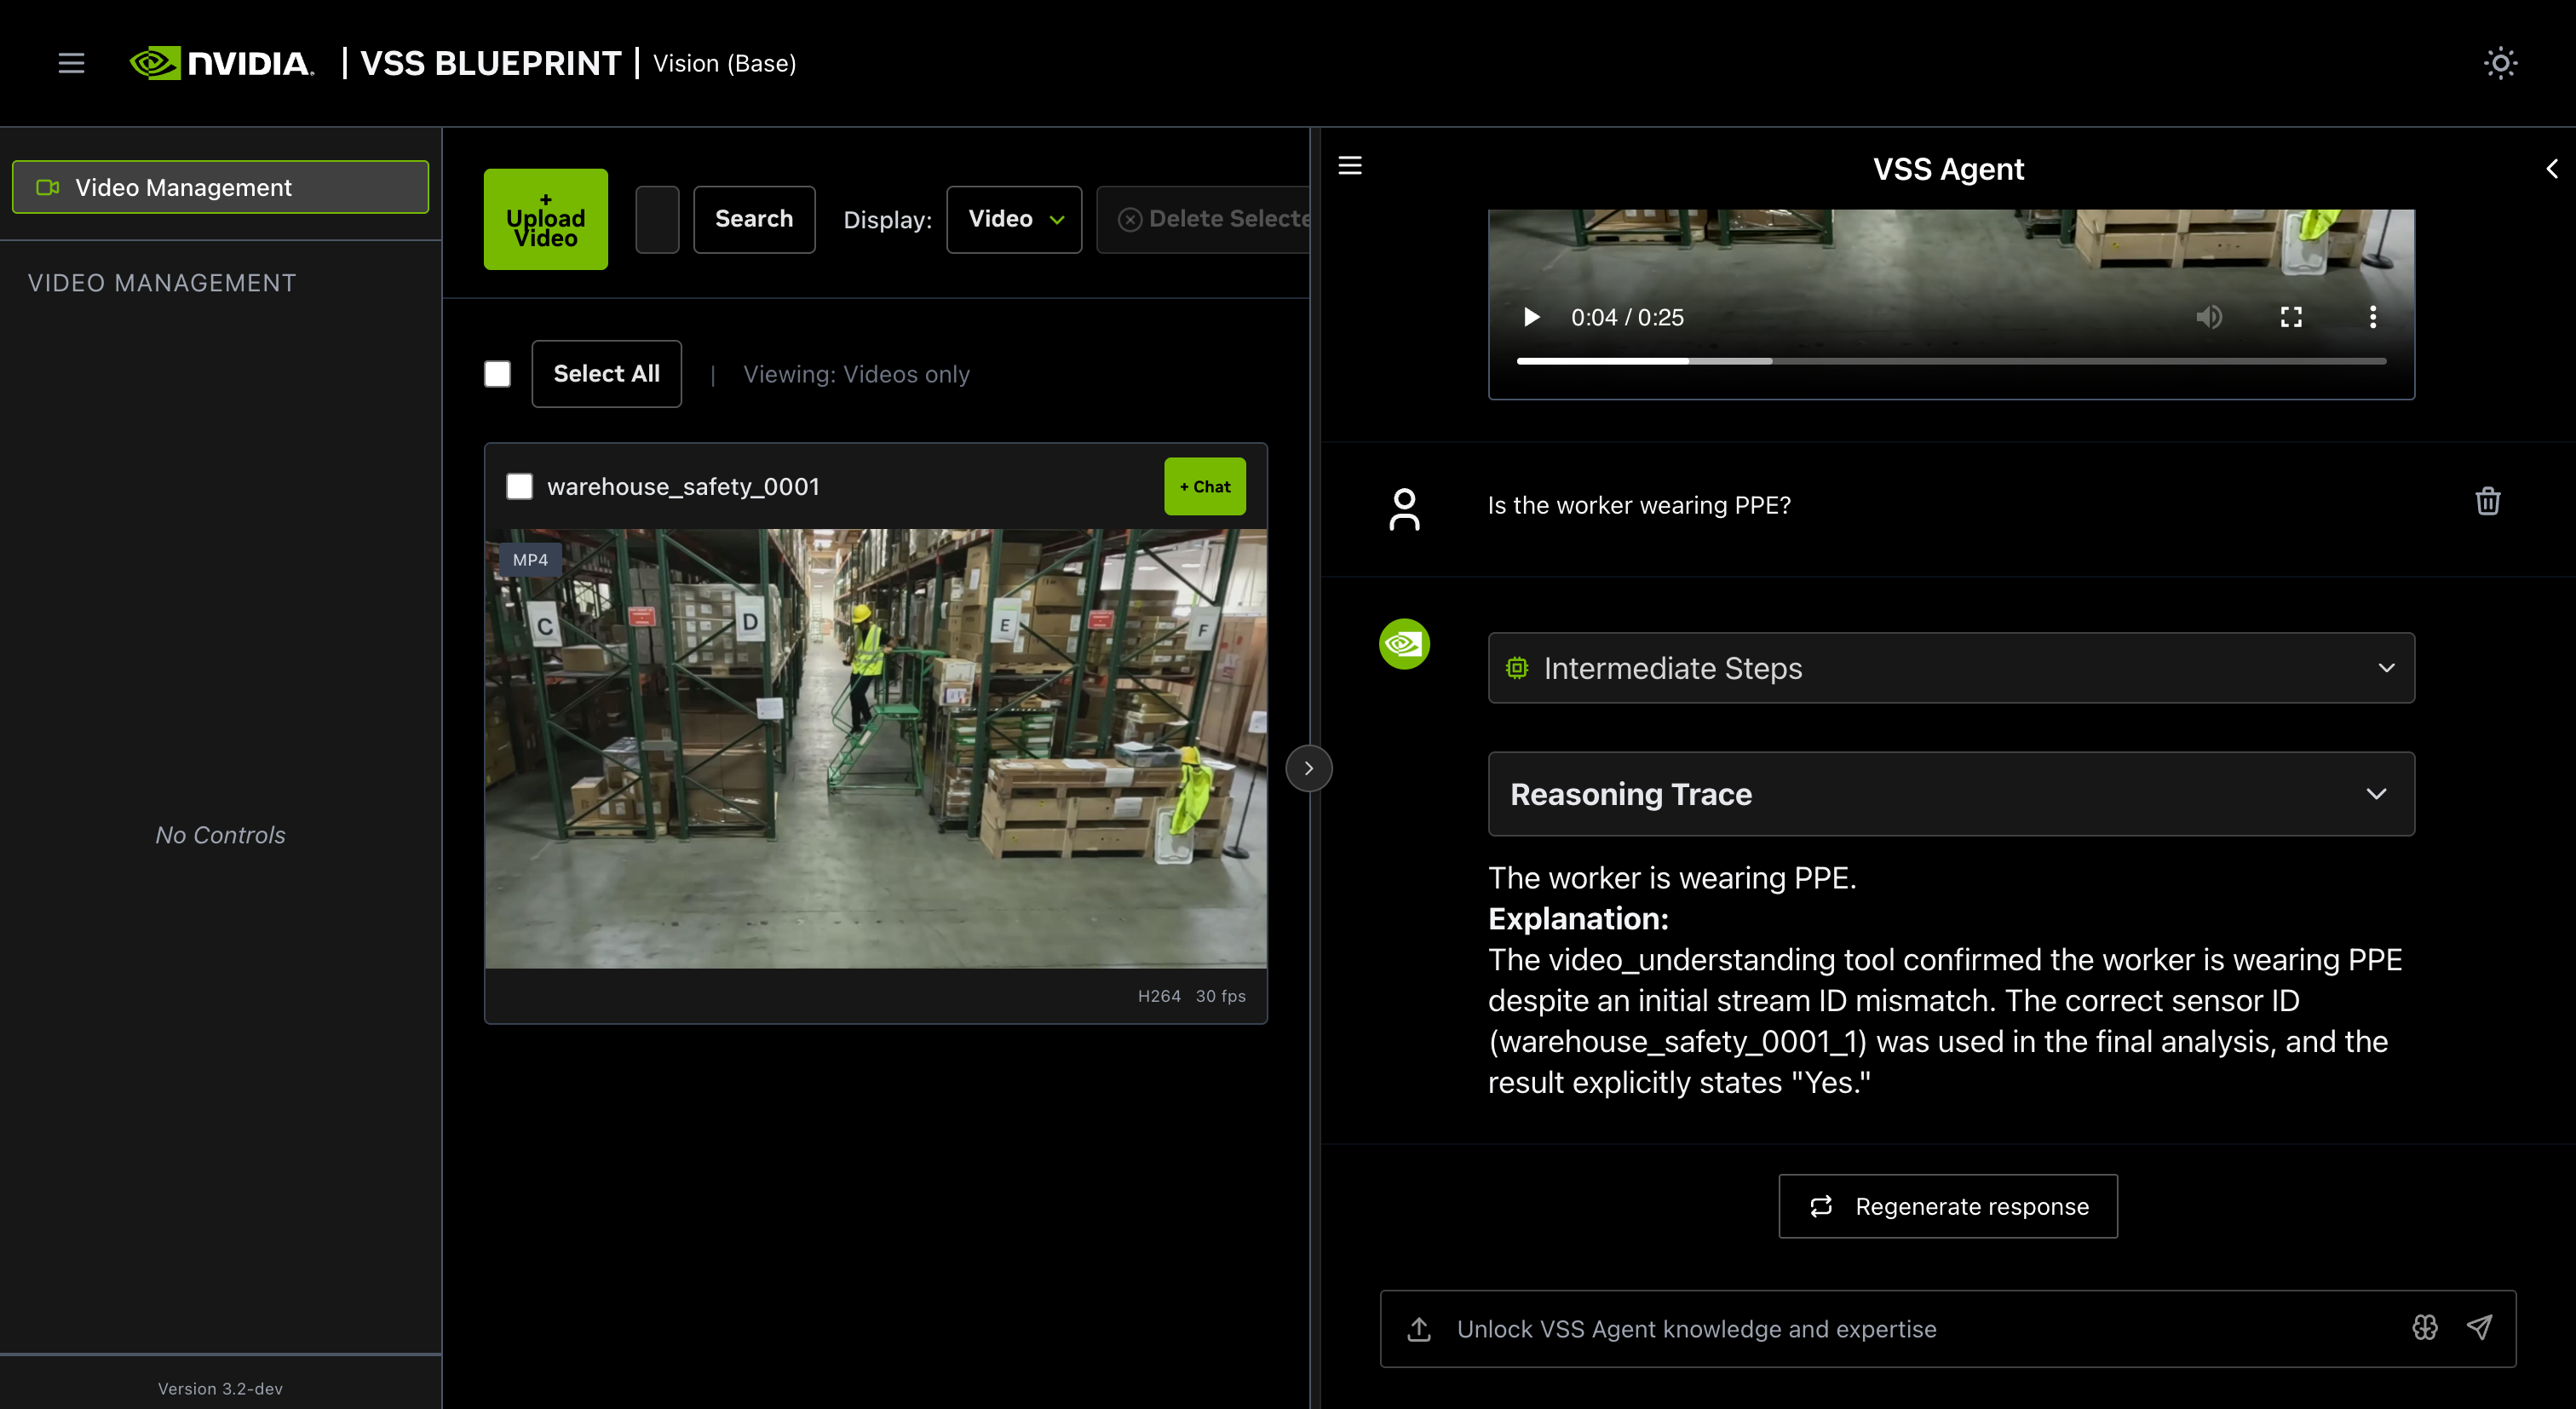
Step 3: Ask the Agent questions#
You can now ask the agent questions about the video. Here is an example:
Is the worker wearing PPE?
The agent will show the intermediate steps of the agent’s reasoning while the response is being generated and then output the final answer.
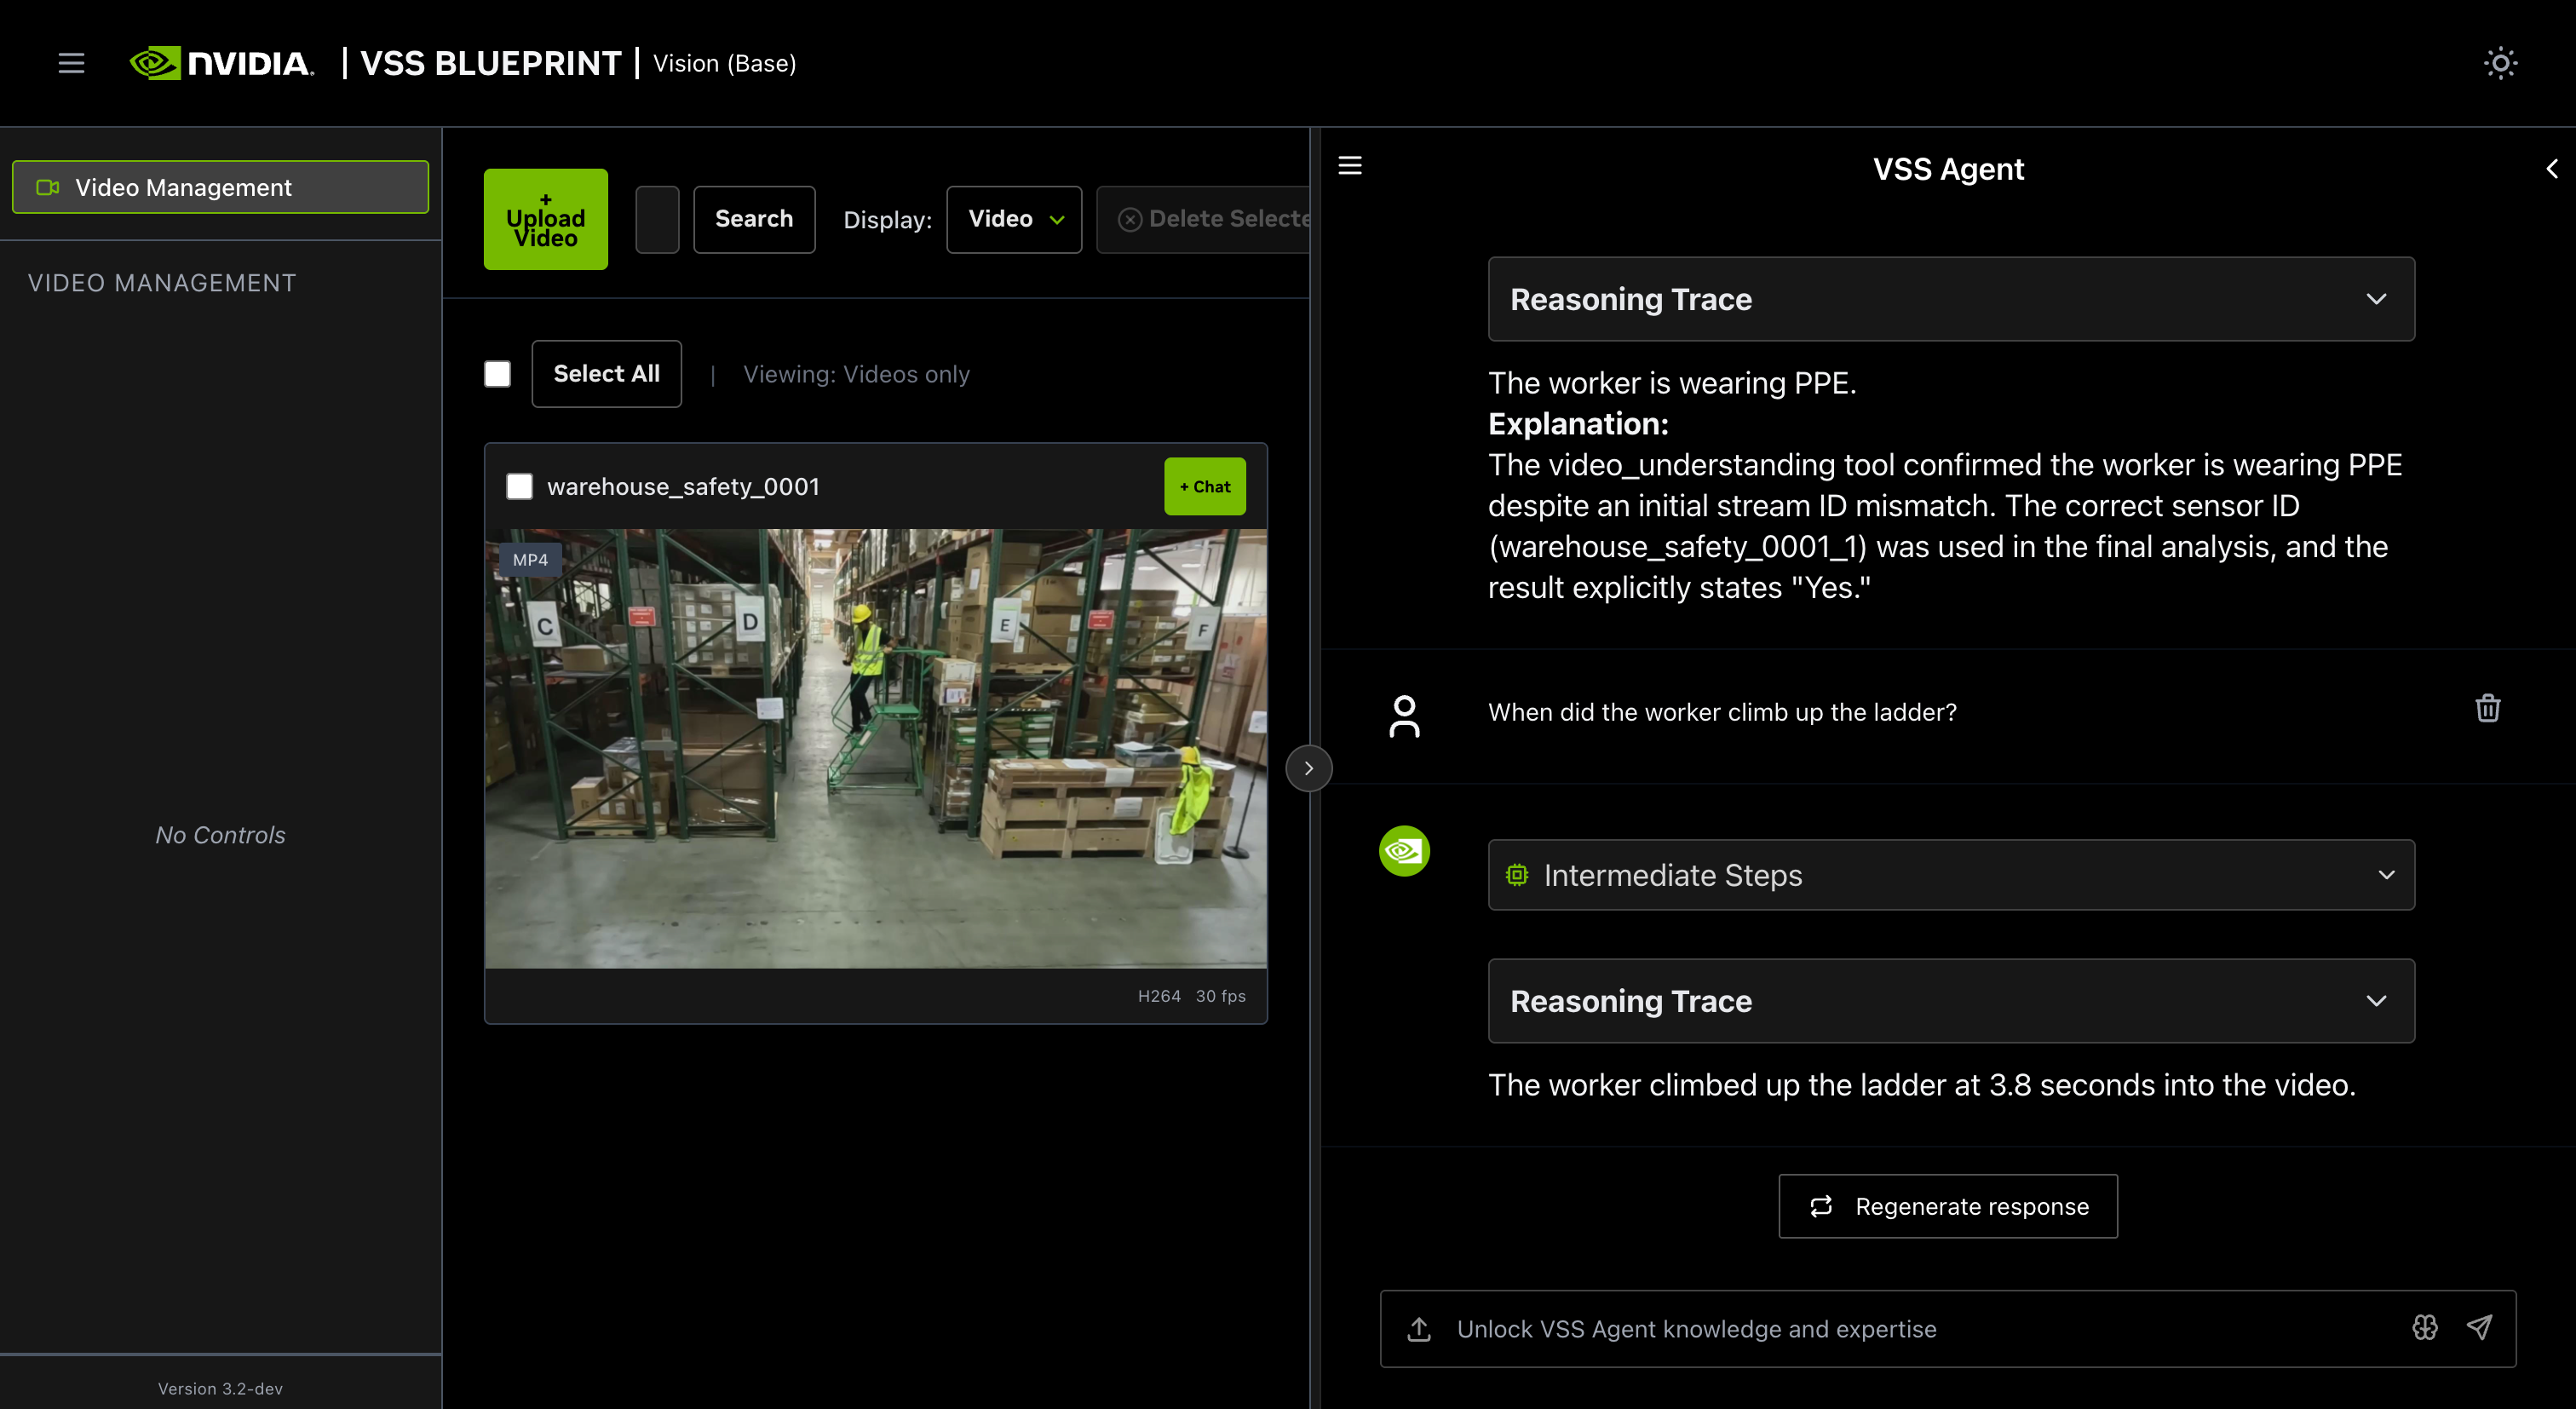
Follow up questions can be asked, for example:
When did the worker climb up the ladder?
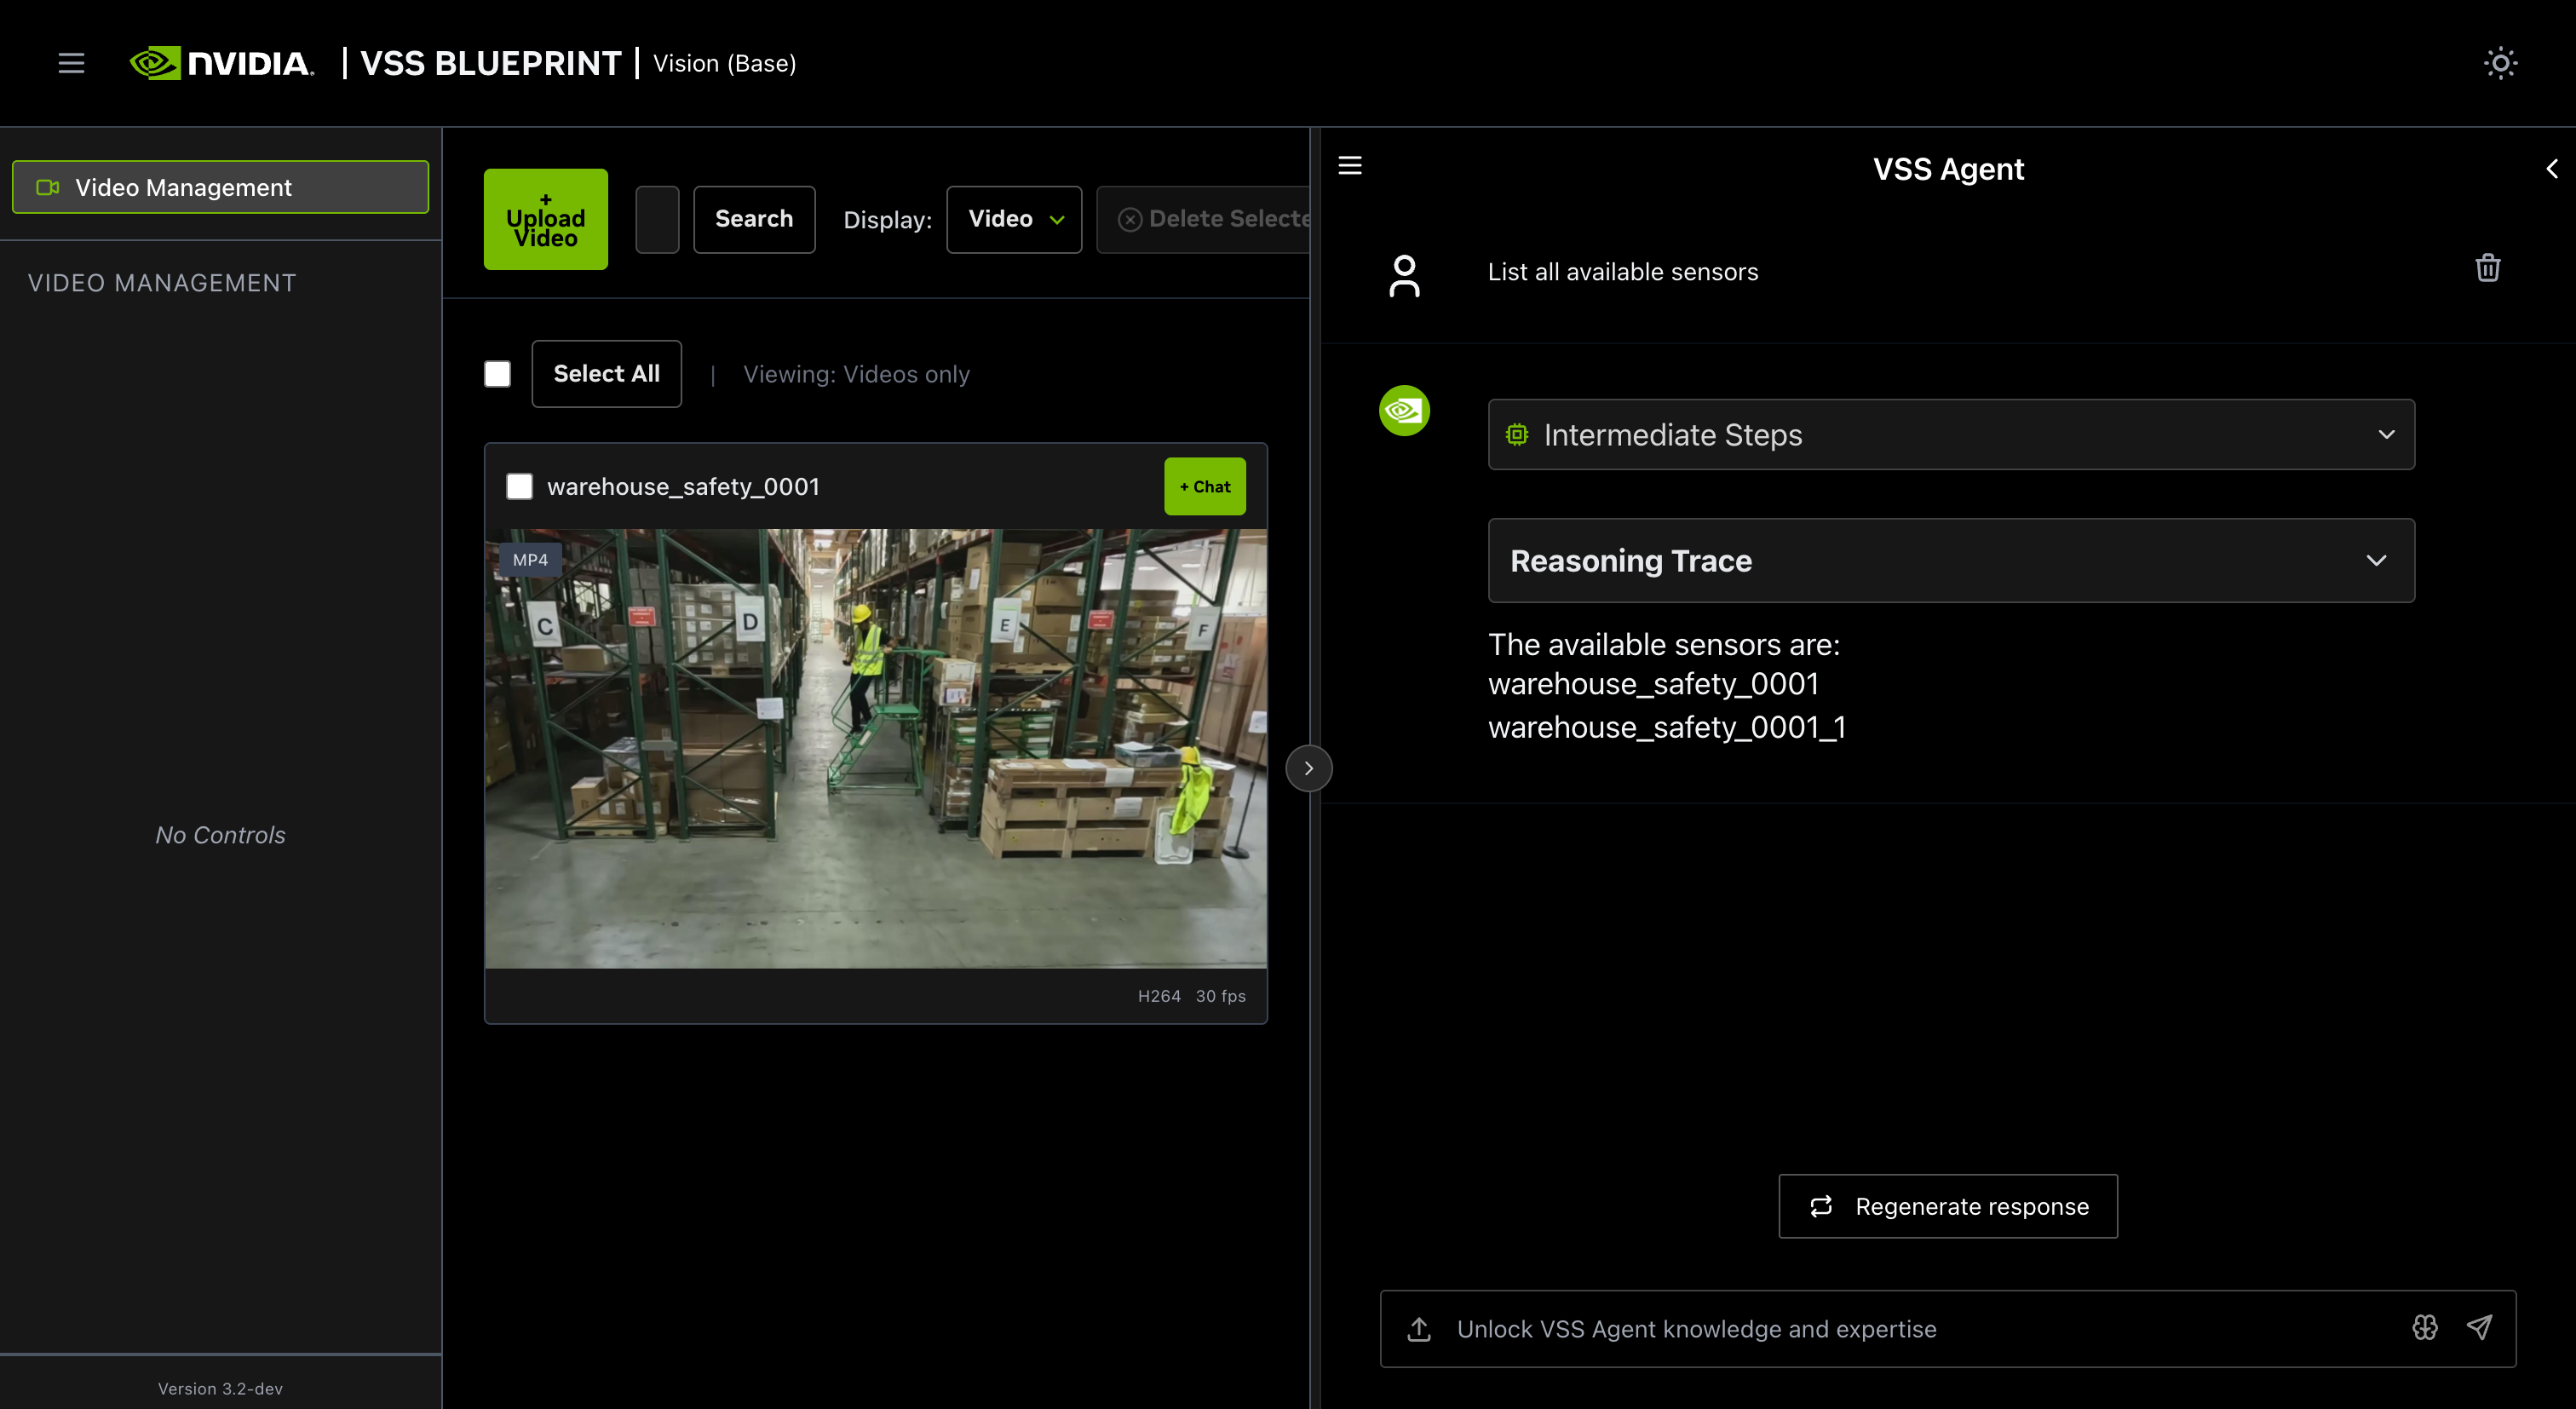
Other examples of general supported queries include:
List all available sensors
Fetch the video for
<sensor-id>or<video-file-name>Take a snapshot of
<sensor-id>or<video-file-name>at<timestamp>
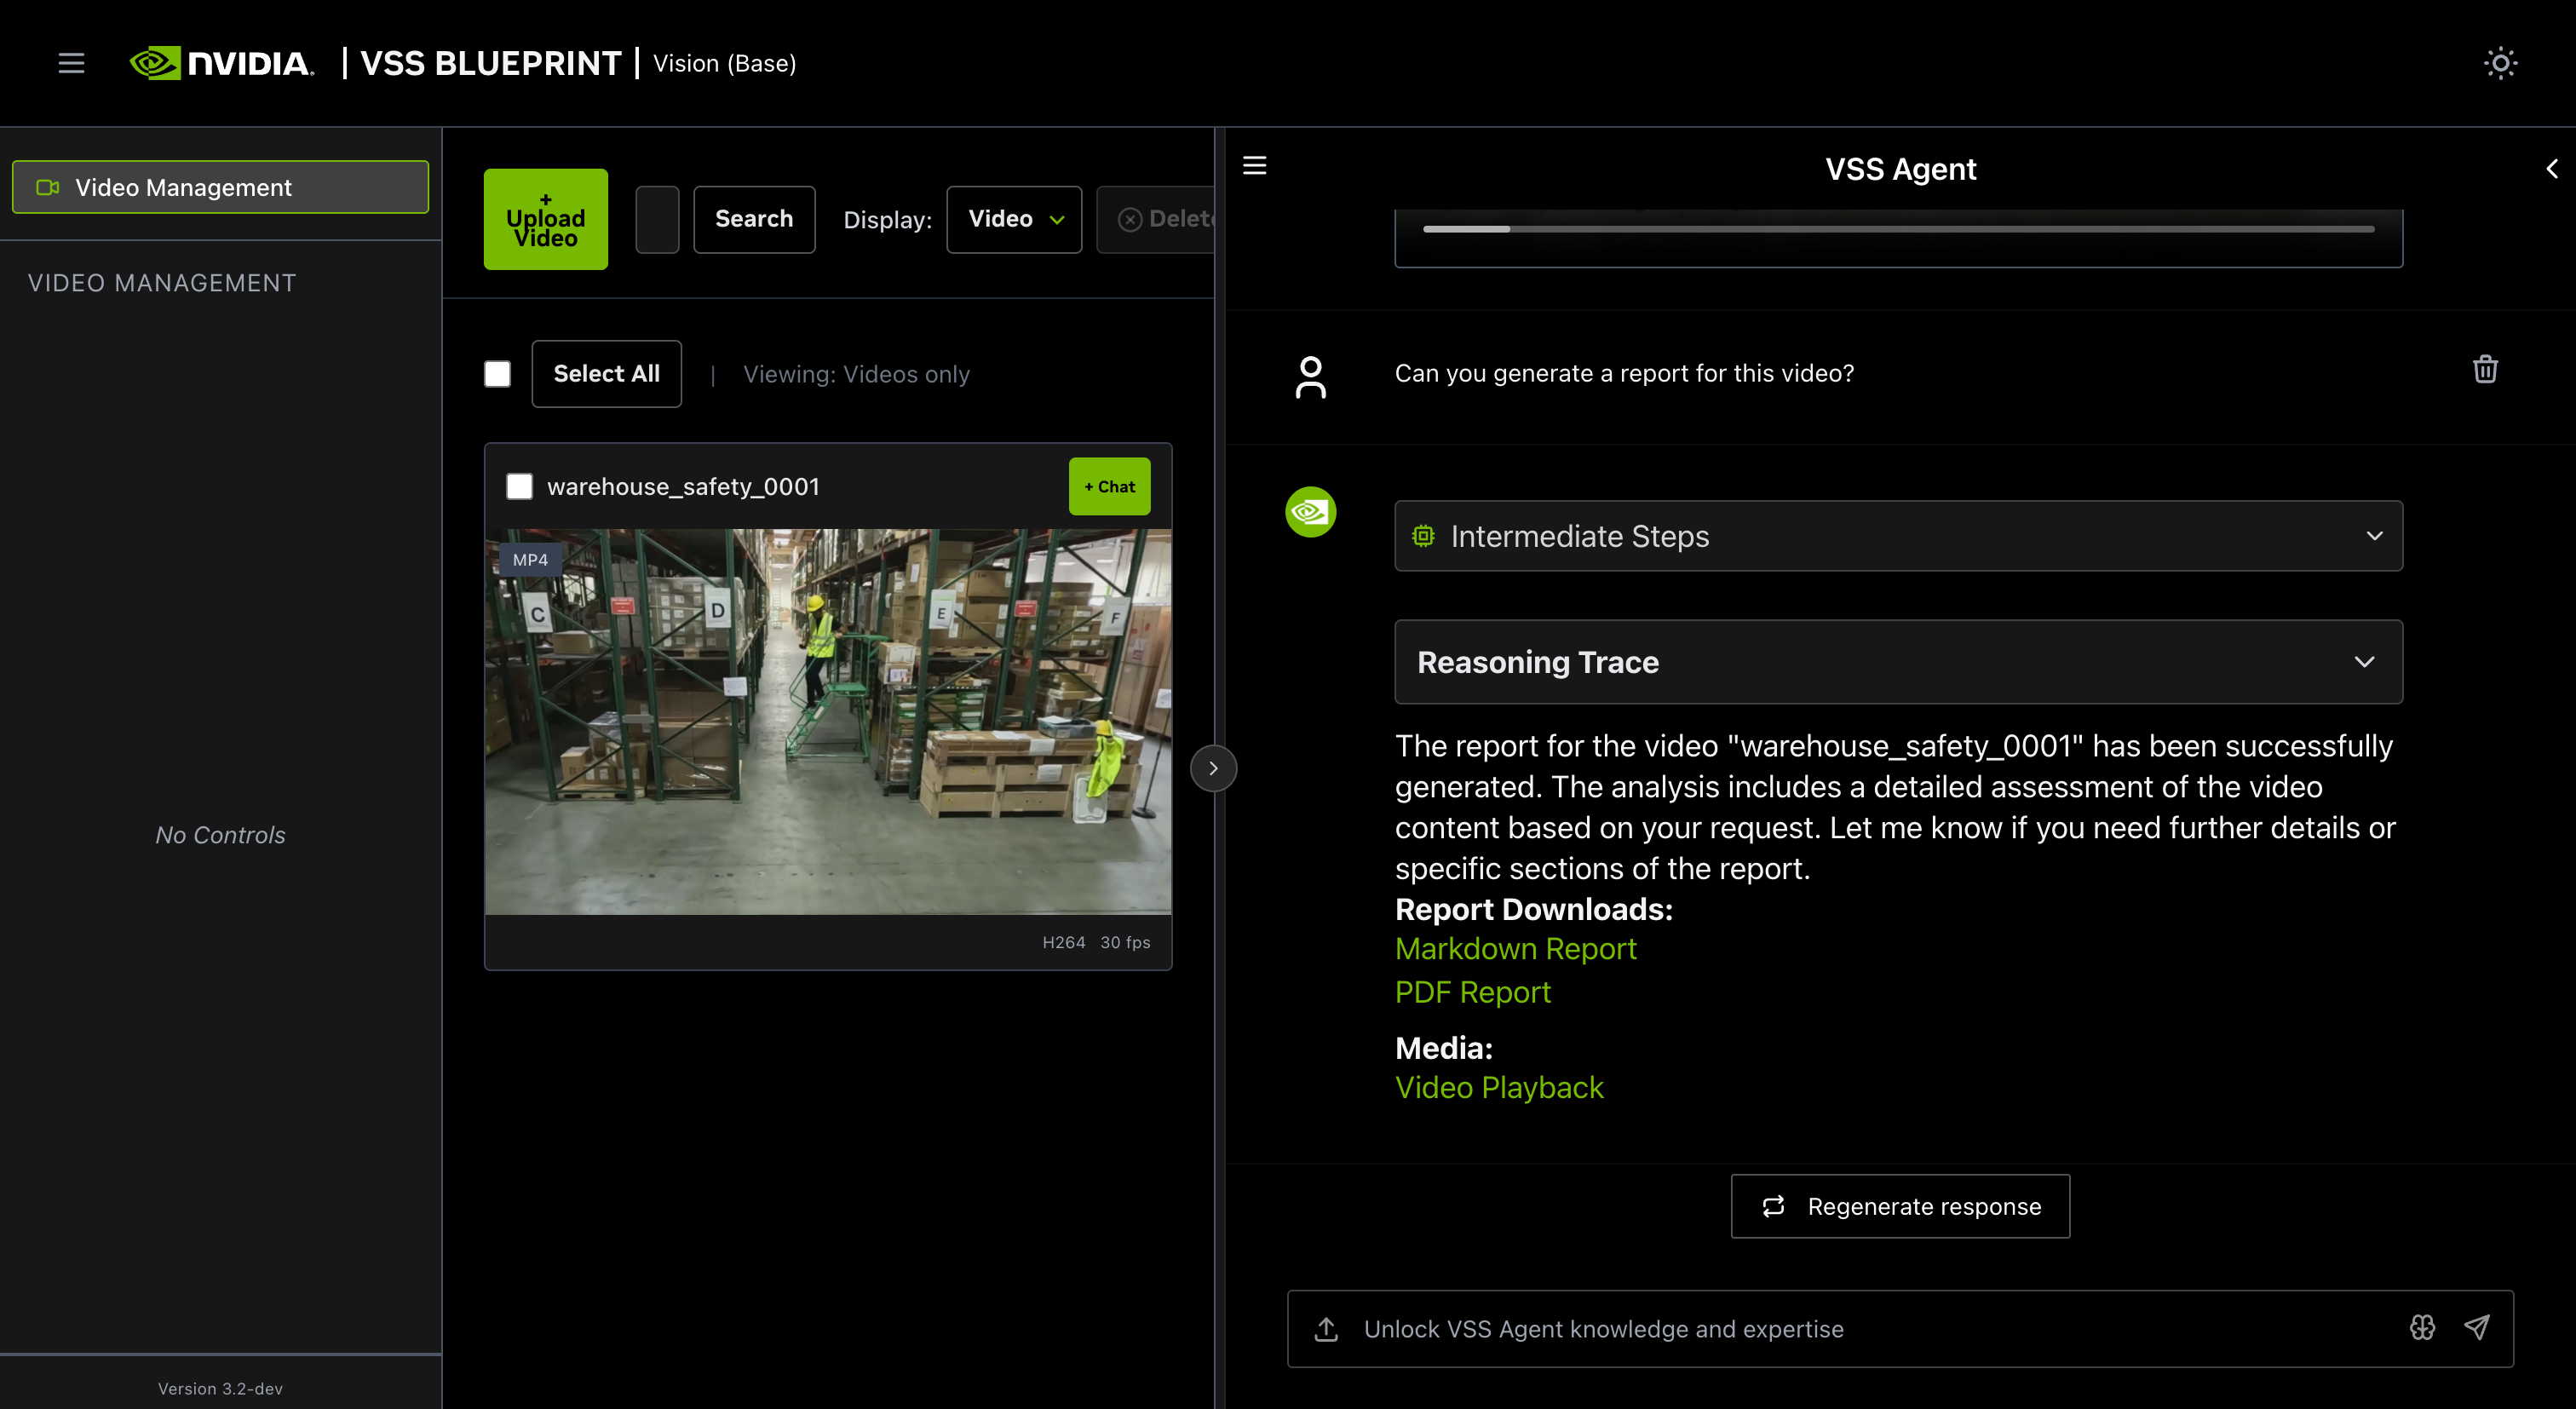
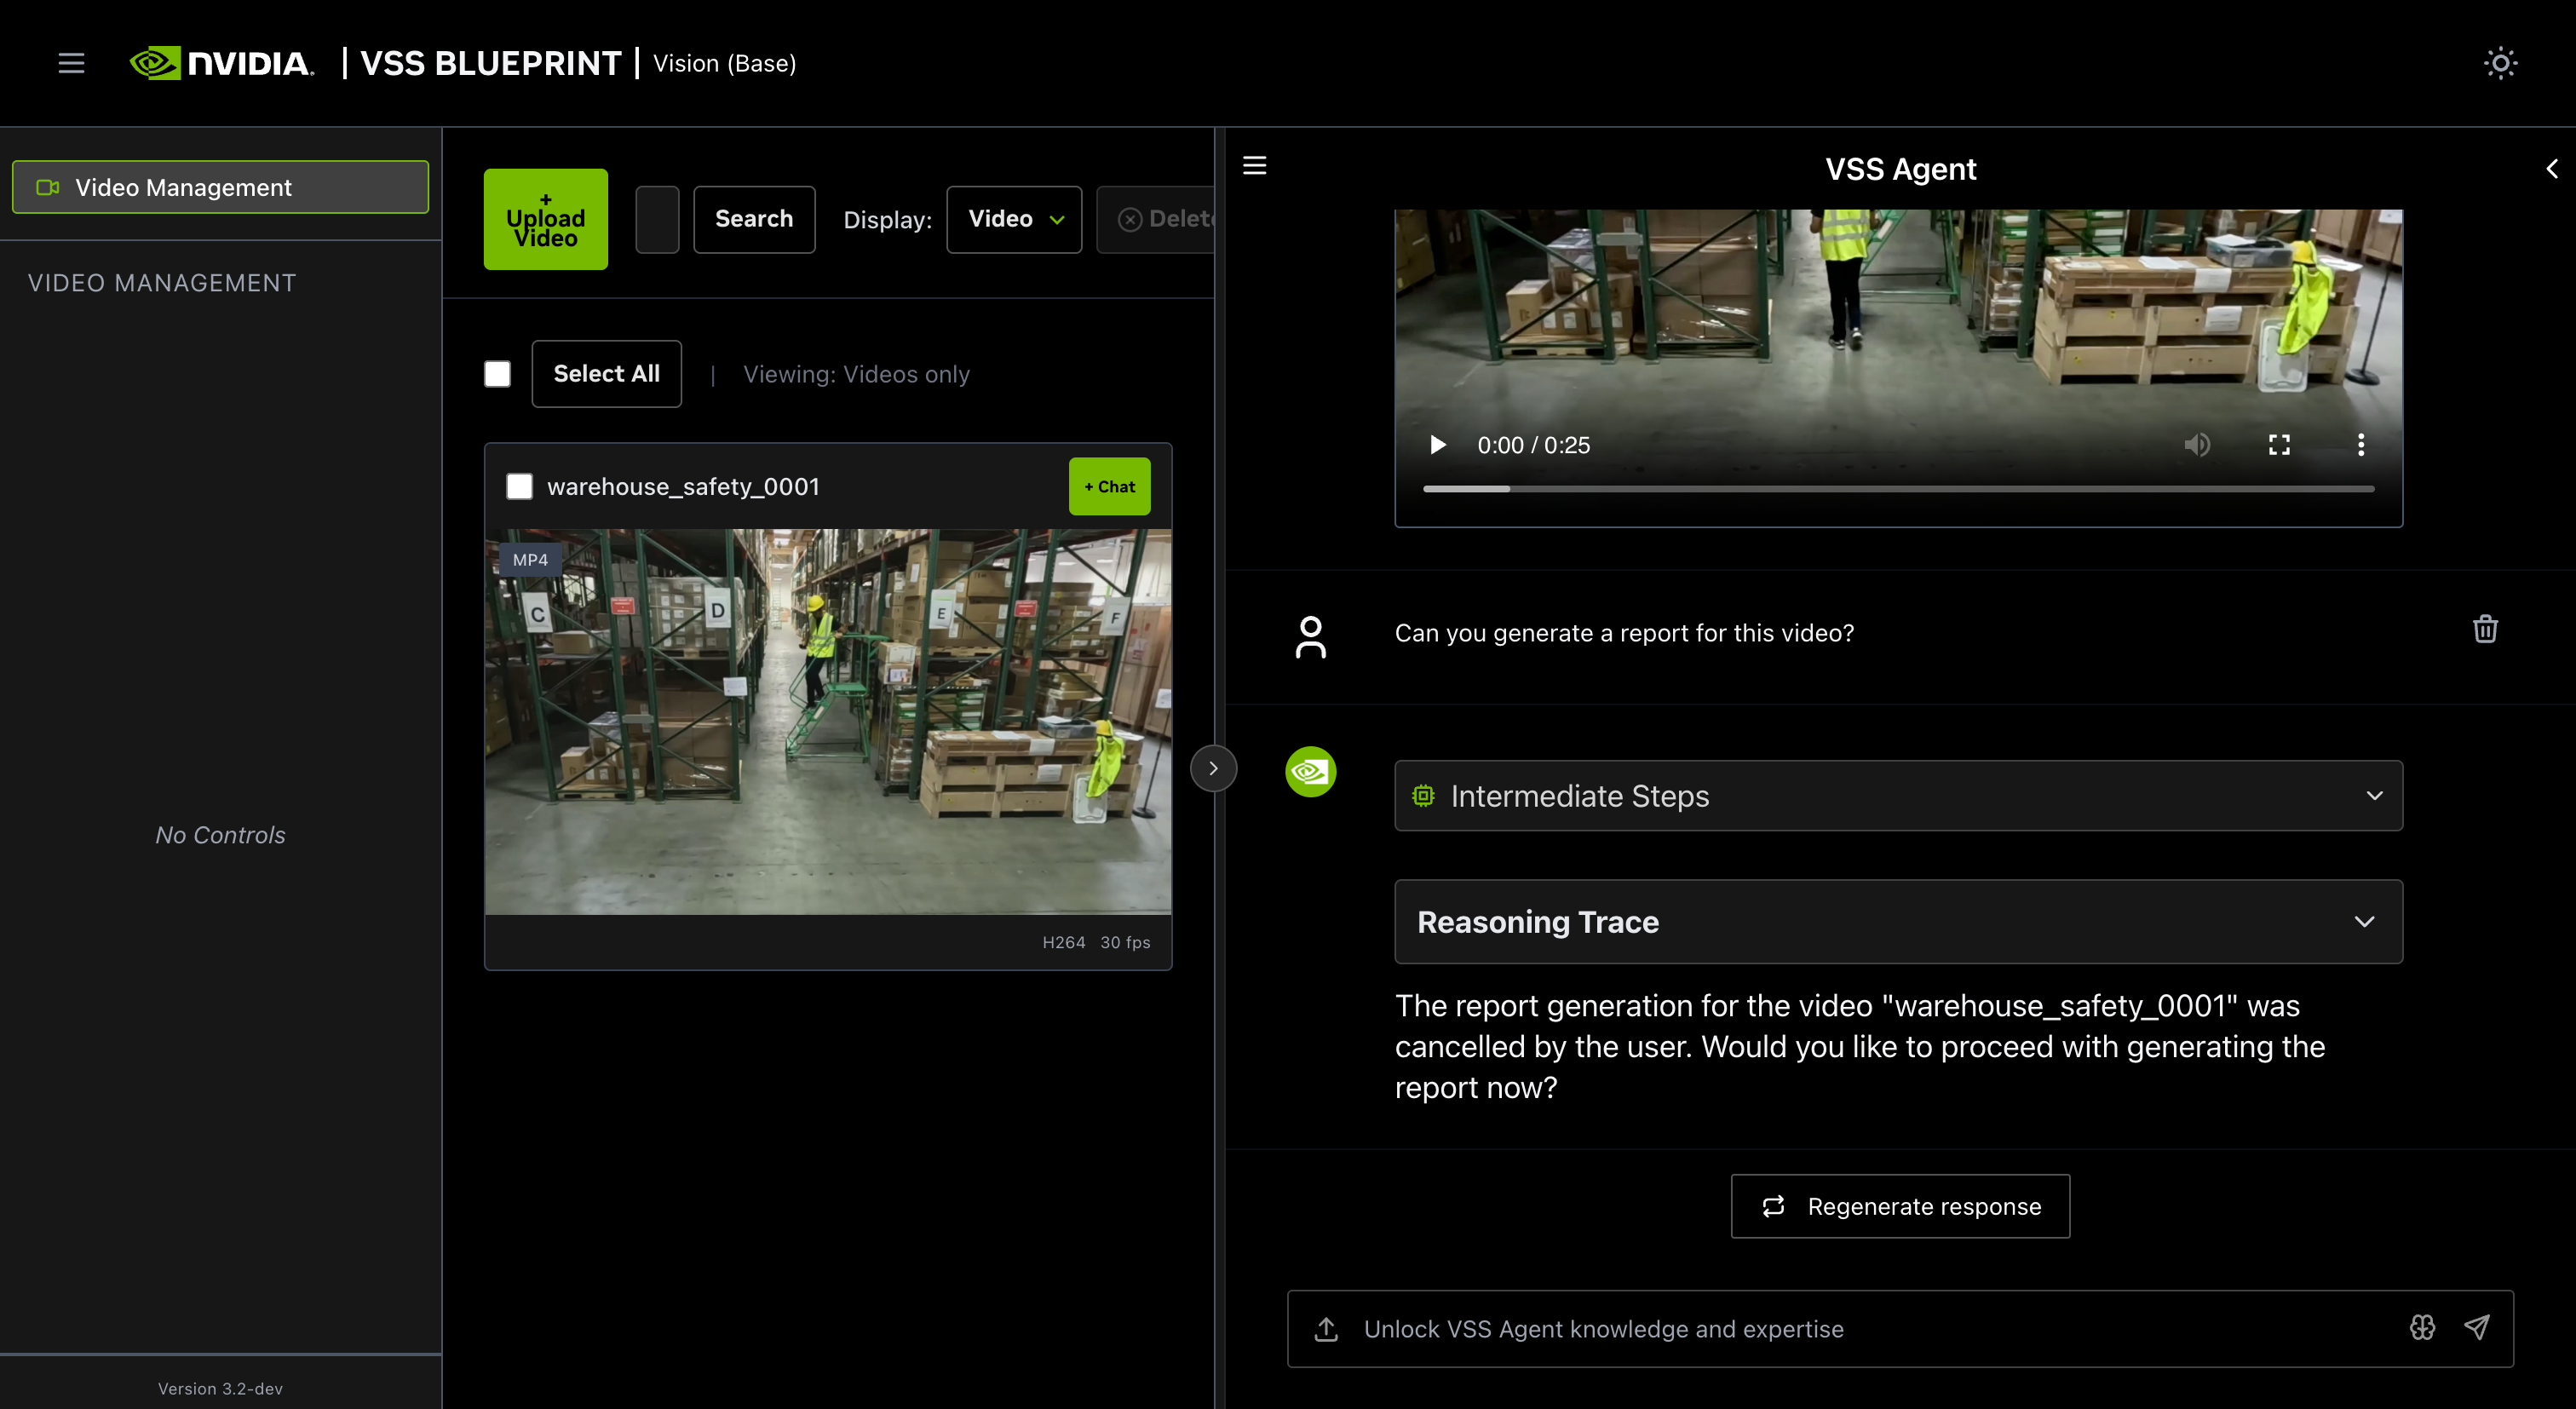
Step 4: Generate a report#
You can also ask the agent to generate a report about the video. Here is an example prompt to generate a report about the video:
Can you generate a report for this video?
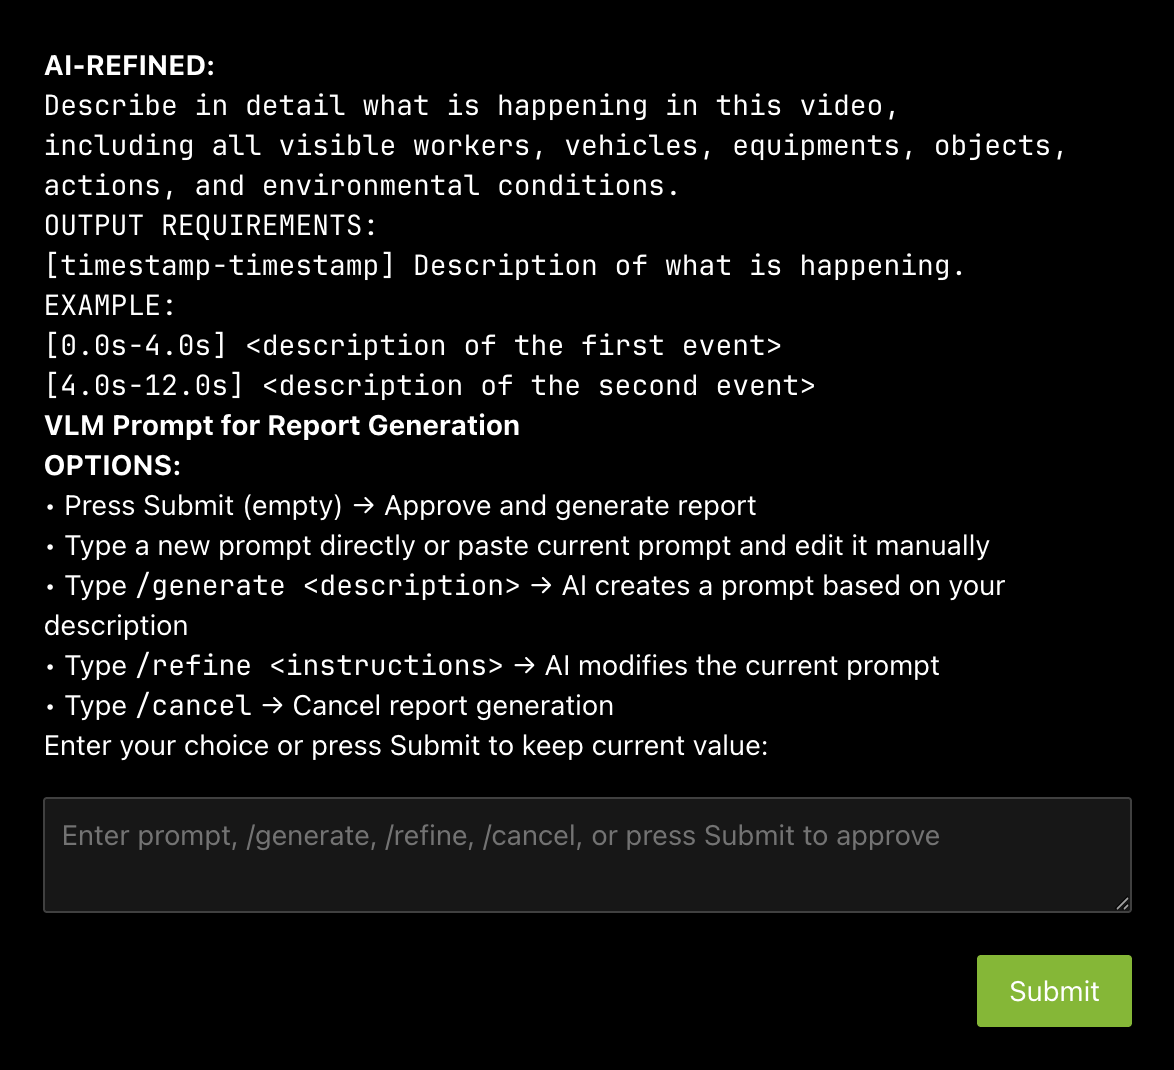
Human in the loop (HITL) prompt editing:#
When generating a report, the agent will prompt the user to review the vlm prompt for report generation. This allows the user to edit the vlm prompt for report generation to improve the specificity and accuracy of the report.
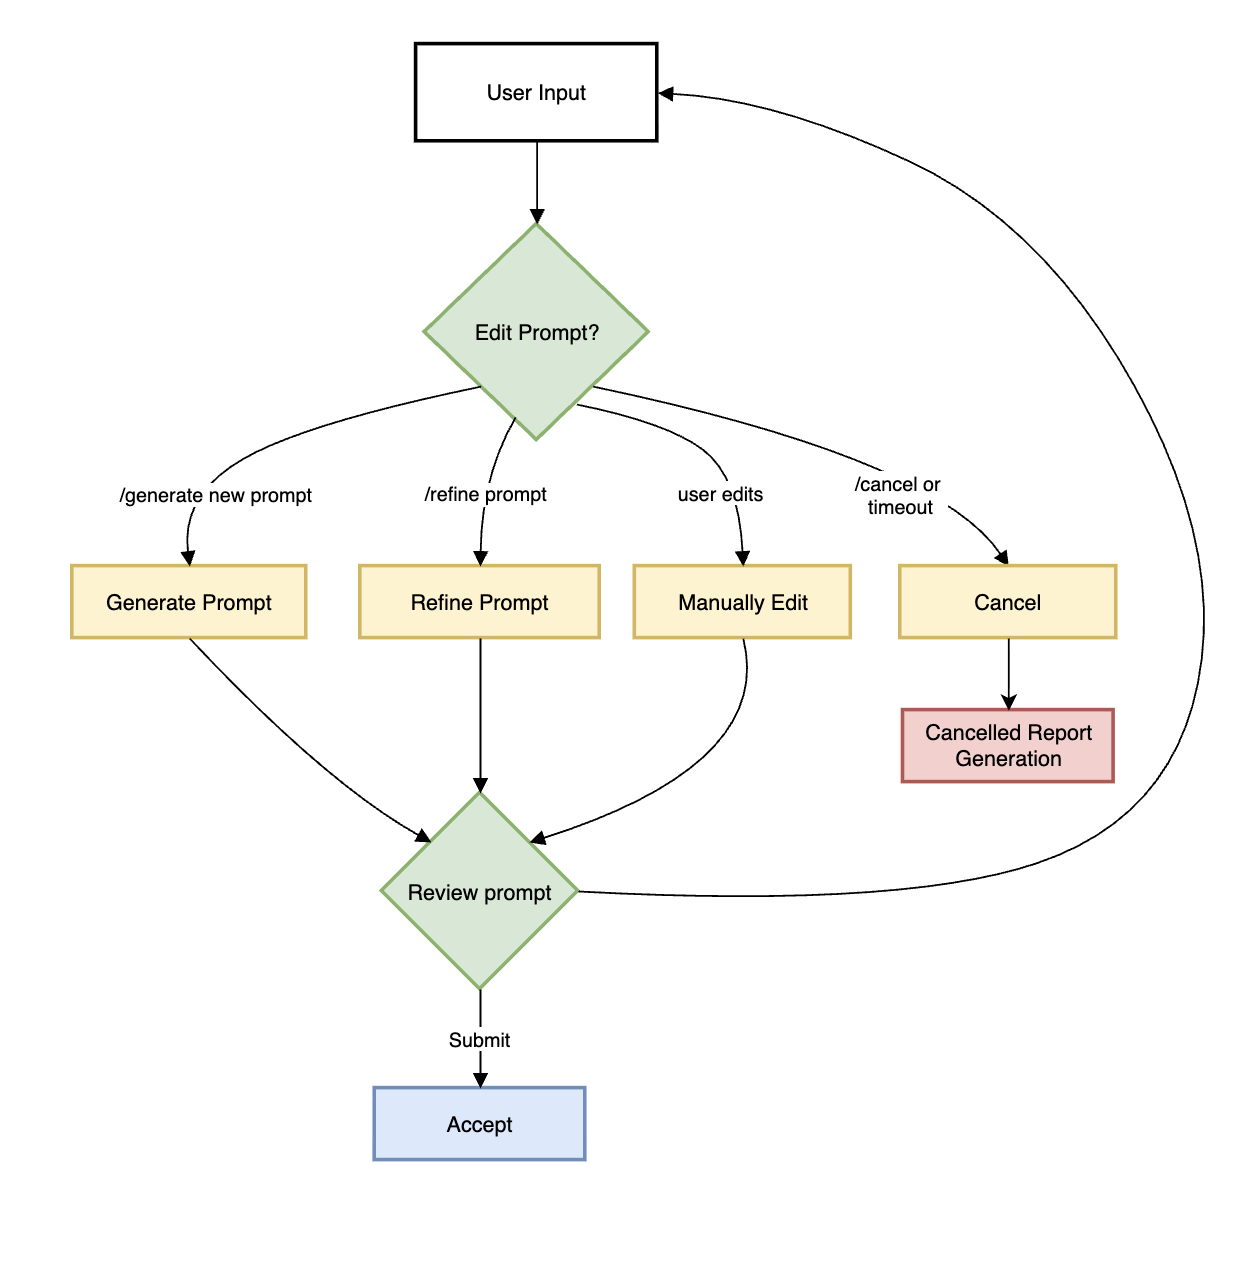
The HITL options for prompt-editing include:
Press Submit (empty) → Approve and generate report
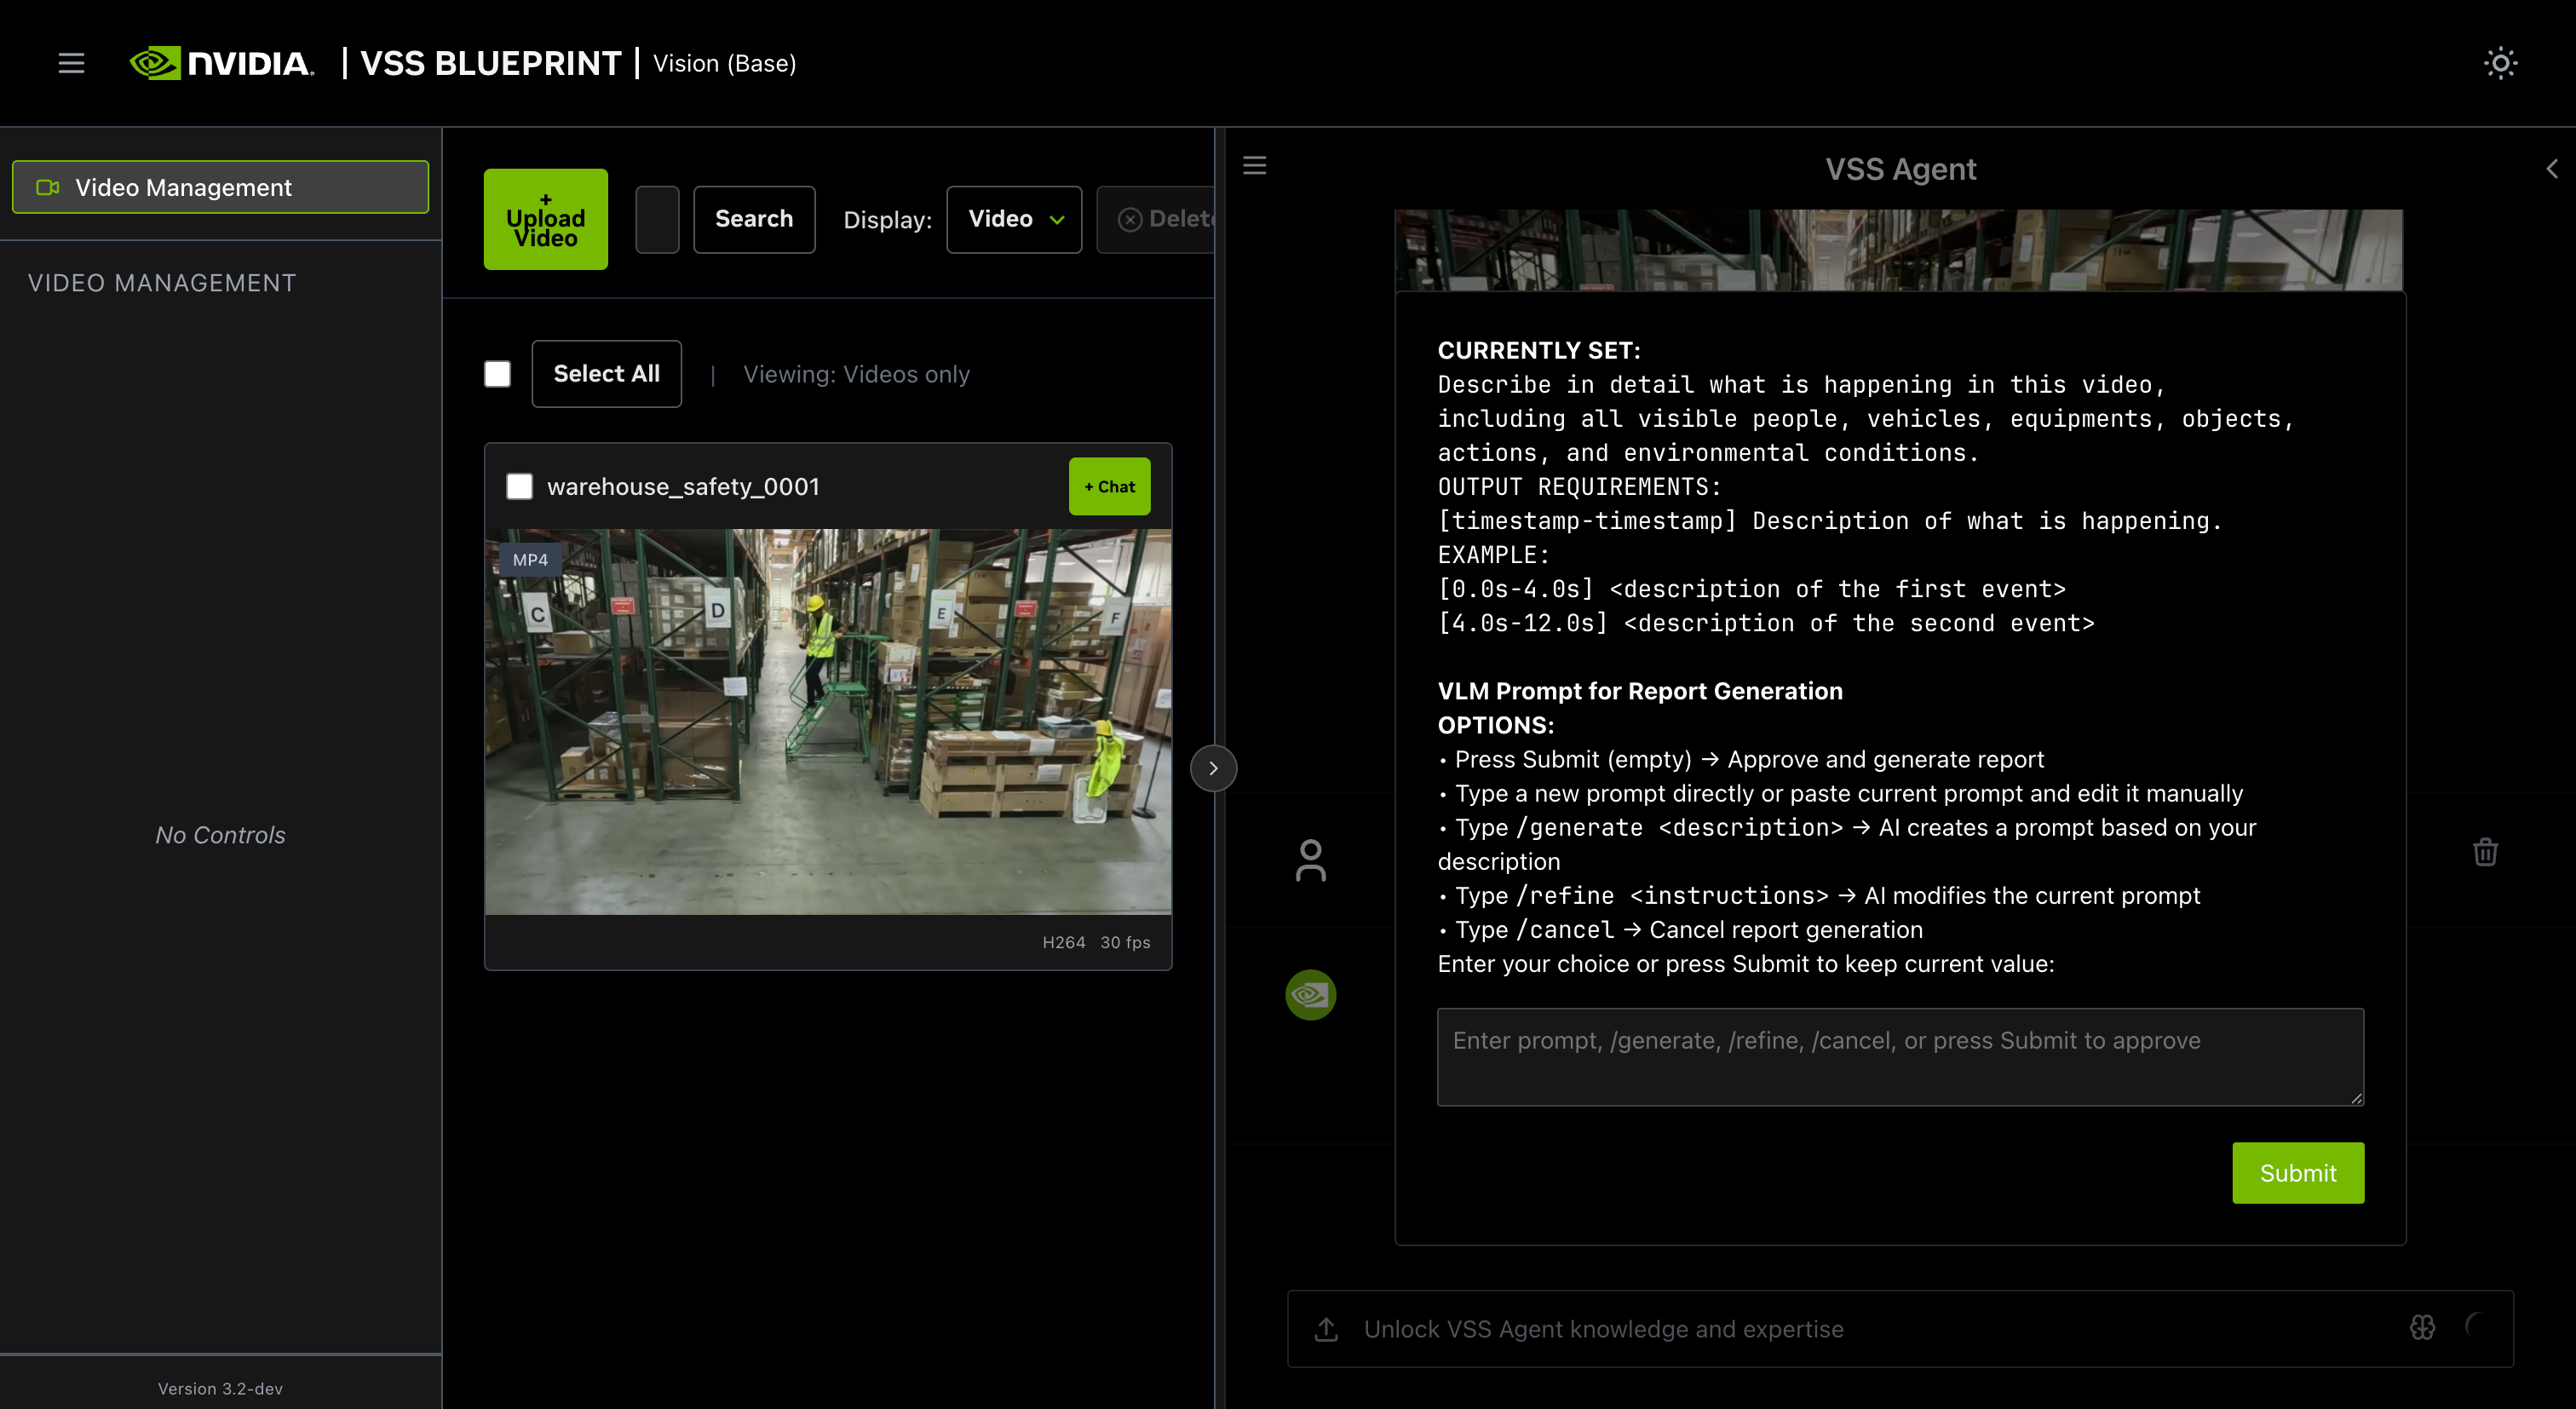
Type a new prompt directly or paste current prompt and edit it manually
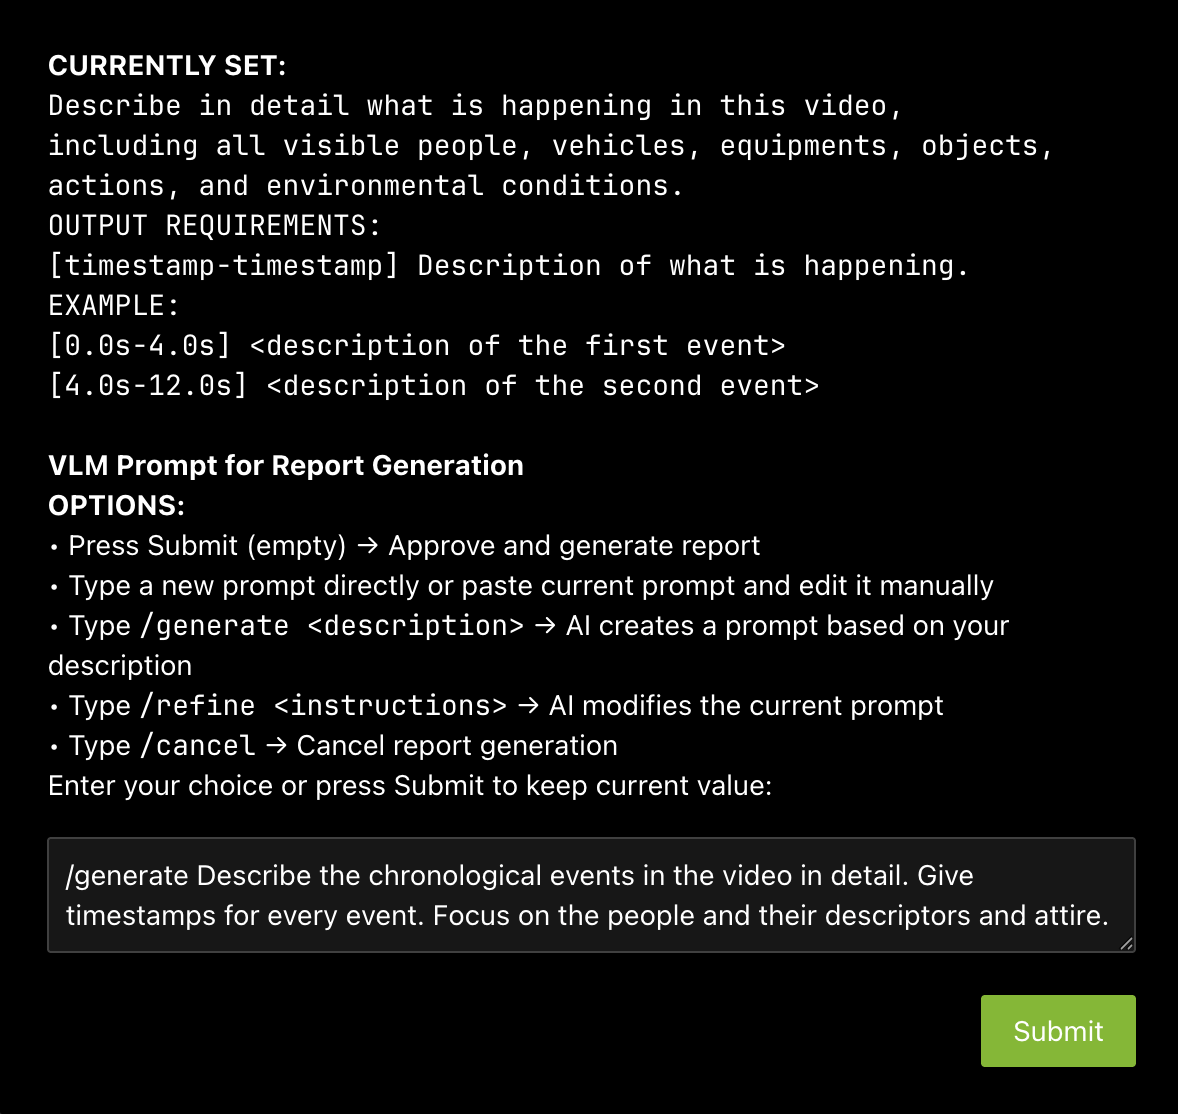
Type
/generate <description>: LLM creates a prompt based on the description
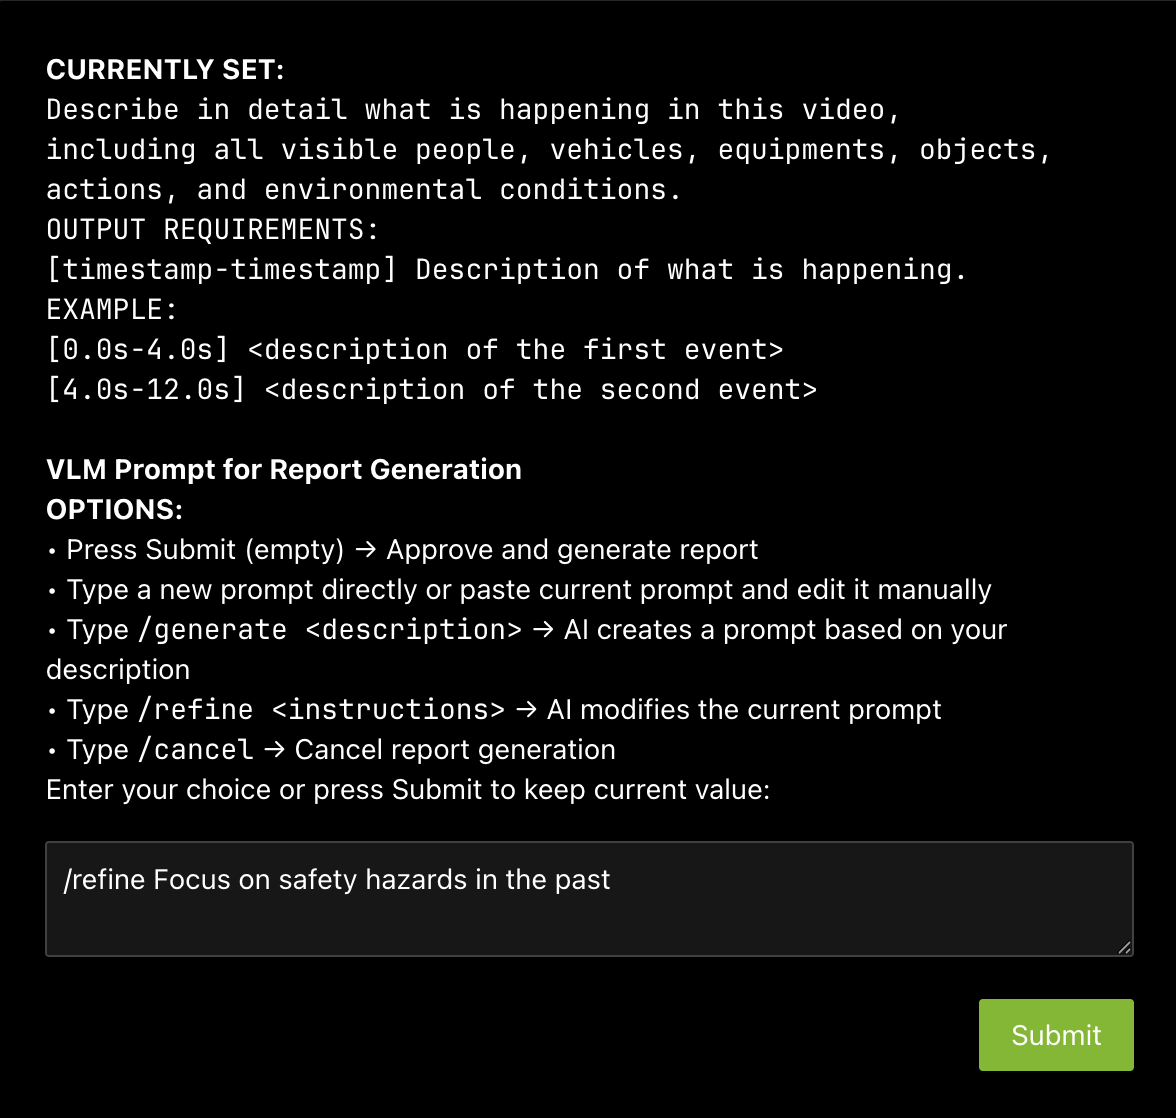
Type
/refine <instructions>: LLM modifies the current prompt based on the description
Type /cancel → Cancel report generation
After the prompt is edited using LLM, the user can review the prompt once more and make more edits or approve.
For any video clip, a report can be generated and then follow-up questions can be asked about the report or video content. Here is what this may look like:
Can you generate a report for
<sensor-id>or<video-file-name>Follow up questions (Example: If the report mentions a truck at 0:05, you may ask: “What color was the truck at 0:05?”)
Give me a snapshot of the video at
<timestamp>.
Note
The agent generates both Markdown (.md) and PDF (.pdf) reports. Generated reports are accessible at
http://<HOST_IP>:8000/static/agent_report_<DATE>.md and http://<HOST_IP>:8000/static/agent_report_<DATE>.pdf.
By default, the agent uses an in-memory object store (_type: in_memory), so reports will be lost when the
vss-agent container restarts. To persist reports, enable save_local_copy in the agent configuration and
mount a host directory as a Docker volume. For details, refer to Report Generation.
Step 5: Teardown the Agent#
To teardown the agent, run the following command:
deploy/docker/scripts/dev-profile.sh down
This command will stop and remove the agent containers.
Service Endpoints#
Once deployed, the following services are available:
Service |
URL |
|---|---|
VSS UI |
|
VST UI |
|
Phoenix UI |
|
Agent Skills walkthrough#
The steps above drive the base vision agent through the UI and the
dev-profile.sh command. This section re-walks the same journey — deploy,
upload, ask, report, tear down — using a coding agent (Claude Code, Codex, or
NemoClaw) and the VSS Agent Skills instead. For each skill
it documents the example prompt you give the agent and what the agent
does in response.
This walkthrough is written for developers and users who want to operate VSS from natural language.
Note
Install the skills into your coding agent first (see Agent Skills for the install flow) and confirm your host meets the Prerequisites. For how each harness loads skills, see Agent Harnesses.
The base profile journey exercises four skills:
Quickstart step |
Skill |
What it does |
|---|---|---|
Deploy the agent (Step 1) |
|
Configures and brings up the base Docker Compose stack. |
Upload a video (Step 2) |
|
Ingests files and manages sensors, snapshots, and clips via VIOS/VST. |
Ask questions (Step 3) |
|
Routes a text question to the agent’s |
Generate a report (Step 4) |
|
Generates a report through Mode A (VIOS clip + direct VLM call) or Mode B (incident query via analytics), depending on the prompt. |
Tear down (Step 5) |
|
Stops and removes the stack. |
Deploy the base profile#
Deploy the VSS base profile on this machine.
Deploy VSS base with a remote LLM at https://integrate.api.nvidia.com.
Note
On edge platforms (DGX Spark, IGX Thor, AGX Thor), local LLM/VLM sharing is supported, but a remote LLM is recommended for better response time — add “with a remote LLM” to the prompt (for example, “Deploy the VSS base profile on this DGX-SPARK machine with a remote LLM.”). See Configure LLM for endpoint options.
The deploy skill chooses the <platform> and <mode> to match your host,
as documented in Development Profile GPU Requirements.
What the agent does:
Loads the
vss-deploy-profileskill for thebaseprofile.Collects the required deployment context (repo path, GPU hardware, local/remote LLM-VLM mode, credentials, and host/ingress settings) and asks for anything missing.
Runs pre-flight checks and credential validation before deployment.
Creates a working
generated.envfrom the checked-in.envdefaults.Generates and validates a dry-run compose plan (
resolved.yml), then shows a review summary (services, model placement, and key endpoints).Waits for your confirmation before starting containers.
Deploys with
up -dand waits for readiness gates (container state and core health checks).Returns a browser-reachable ingress URL (for example
http://<HOST_IP>:7777/) for opening the UI.
The base defaults are the nvidia/nvidia-nemotron-nano-9b-v2 LLM NIM (port
30081) and the nvidia/cosmos-reason2-8b VLM NIM (port 30082). To use
a different model or a remote endpoint, name it in the prompt and the agent
sets LLM_MODE / VLM_MODE accordingly.
Upload a video and manage storage#
Upload the sample video warehouse_safety_0001.mp4 from the sample-data directory to VSS.
List all available sensors.
Take a snapshot of warehouse_safety_0001 at 0:05.
What the agent does:
Loads the
vss-manage-video-io-storageskill, which drives the Video IO & Storage (VIOS / VST) microservices.For an upload, it uploads the file via HTTP PUT to VST and confirms a sensor is registered for it.
For “list sensors,” it queries the VIOS sensor list and returns the registered sensors and file names.
For snapshots, clips, or recording timelines, it calls the matching VIOS endpoint at the requested timestamp/range and returns the artifact.
Ask questions about the video#
Is the worker in warehouse_safety_0001 wearing PPE?
What the agent does:
Loads the
vss-ask-videoskill.Forwards the question to the deployed VSS agent’s
video_understandingtool, which runs frame-level VLM analysis on the VLM NIM.Returns a grounded natural-language answer. Follow-up questions are supported in the same thread.
Generate a report#
Generate a report for warehouse_safety_0001.
What the agent does:
Loads the
vss-generate-video-reportskill.Resolves the clip URL through
vss-manage-video-io-storage, calls the selected VLM, and renders the markdown report from that output. (Does not use the VSS agent/generateendpoint.)Returns the rendered markdown report to the user.
Tear down the deployment#
Tear down the VSS deployment.
What the agent does:
Loads the
vss-deploy-profileskill and runs its teardown flow (docker compose -f resolved.yml down).When switching profiles, it also clears stale data volumes before any redeploy.
Next steps#
Once you’ve familiarized yourself with the base vision agent, you can test other videos and explore adding agent workflows, such as video summarization, search, and alerting.
Additionally, you can dive deeper into the agent tools for report generation, video understanding, and video management.
Known Issues#
For current agent limitations, see Agent Known Issues.