Quickstart#
This guide provides a comprehensive step-by-step walkthrough to help you quickly set up and start using the Warehouse Blueprint.
The Warehouse Blueprint is a video analytics solution that supports real-time object detection, tracking, and analytics. It offers two message broker options to accommodate different deployment scenarios:
Kafka: High-throughput message broker optimized for datacenter deployments with robust persistence and scalability.
Redis Streams: Lightweight message broker ideal for edge deployments with minimal memory footprint and low-latency requirements.
Choose the message broker based on your deployment environment: Kafka for centralized datacenter installations, or Redis for distributed edge locations where resources are constrained.
Components Overview#
The high-level diagram illustrates the components of the Warehouse Blueprint. The diagram features the 2D, 3D, or MV3DT blueprint. The Agent communicates with the Blueprint’s data services through APIs.
The following diagram shows the major components of the Warehouse Blueprint:
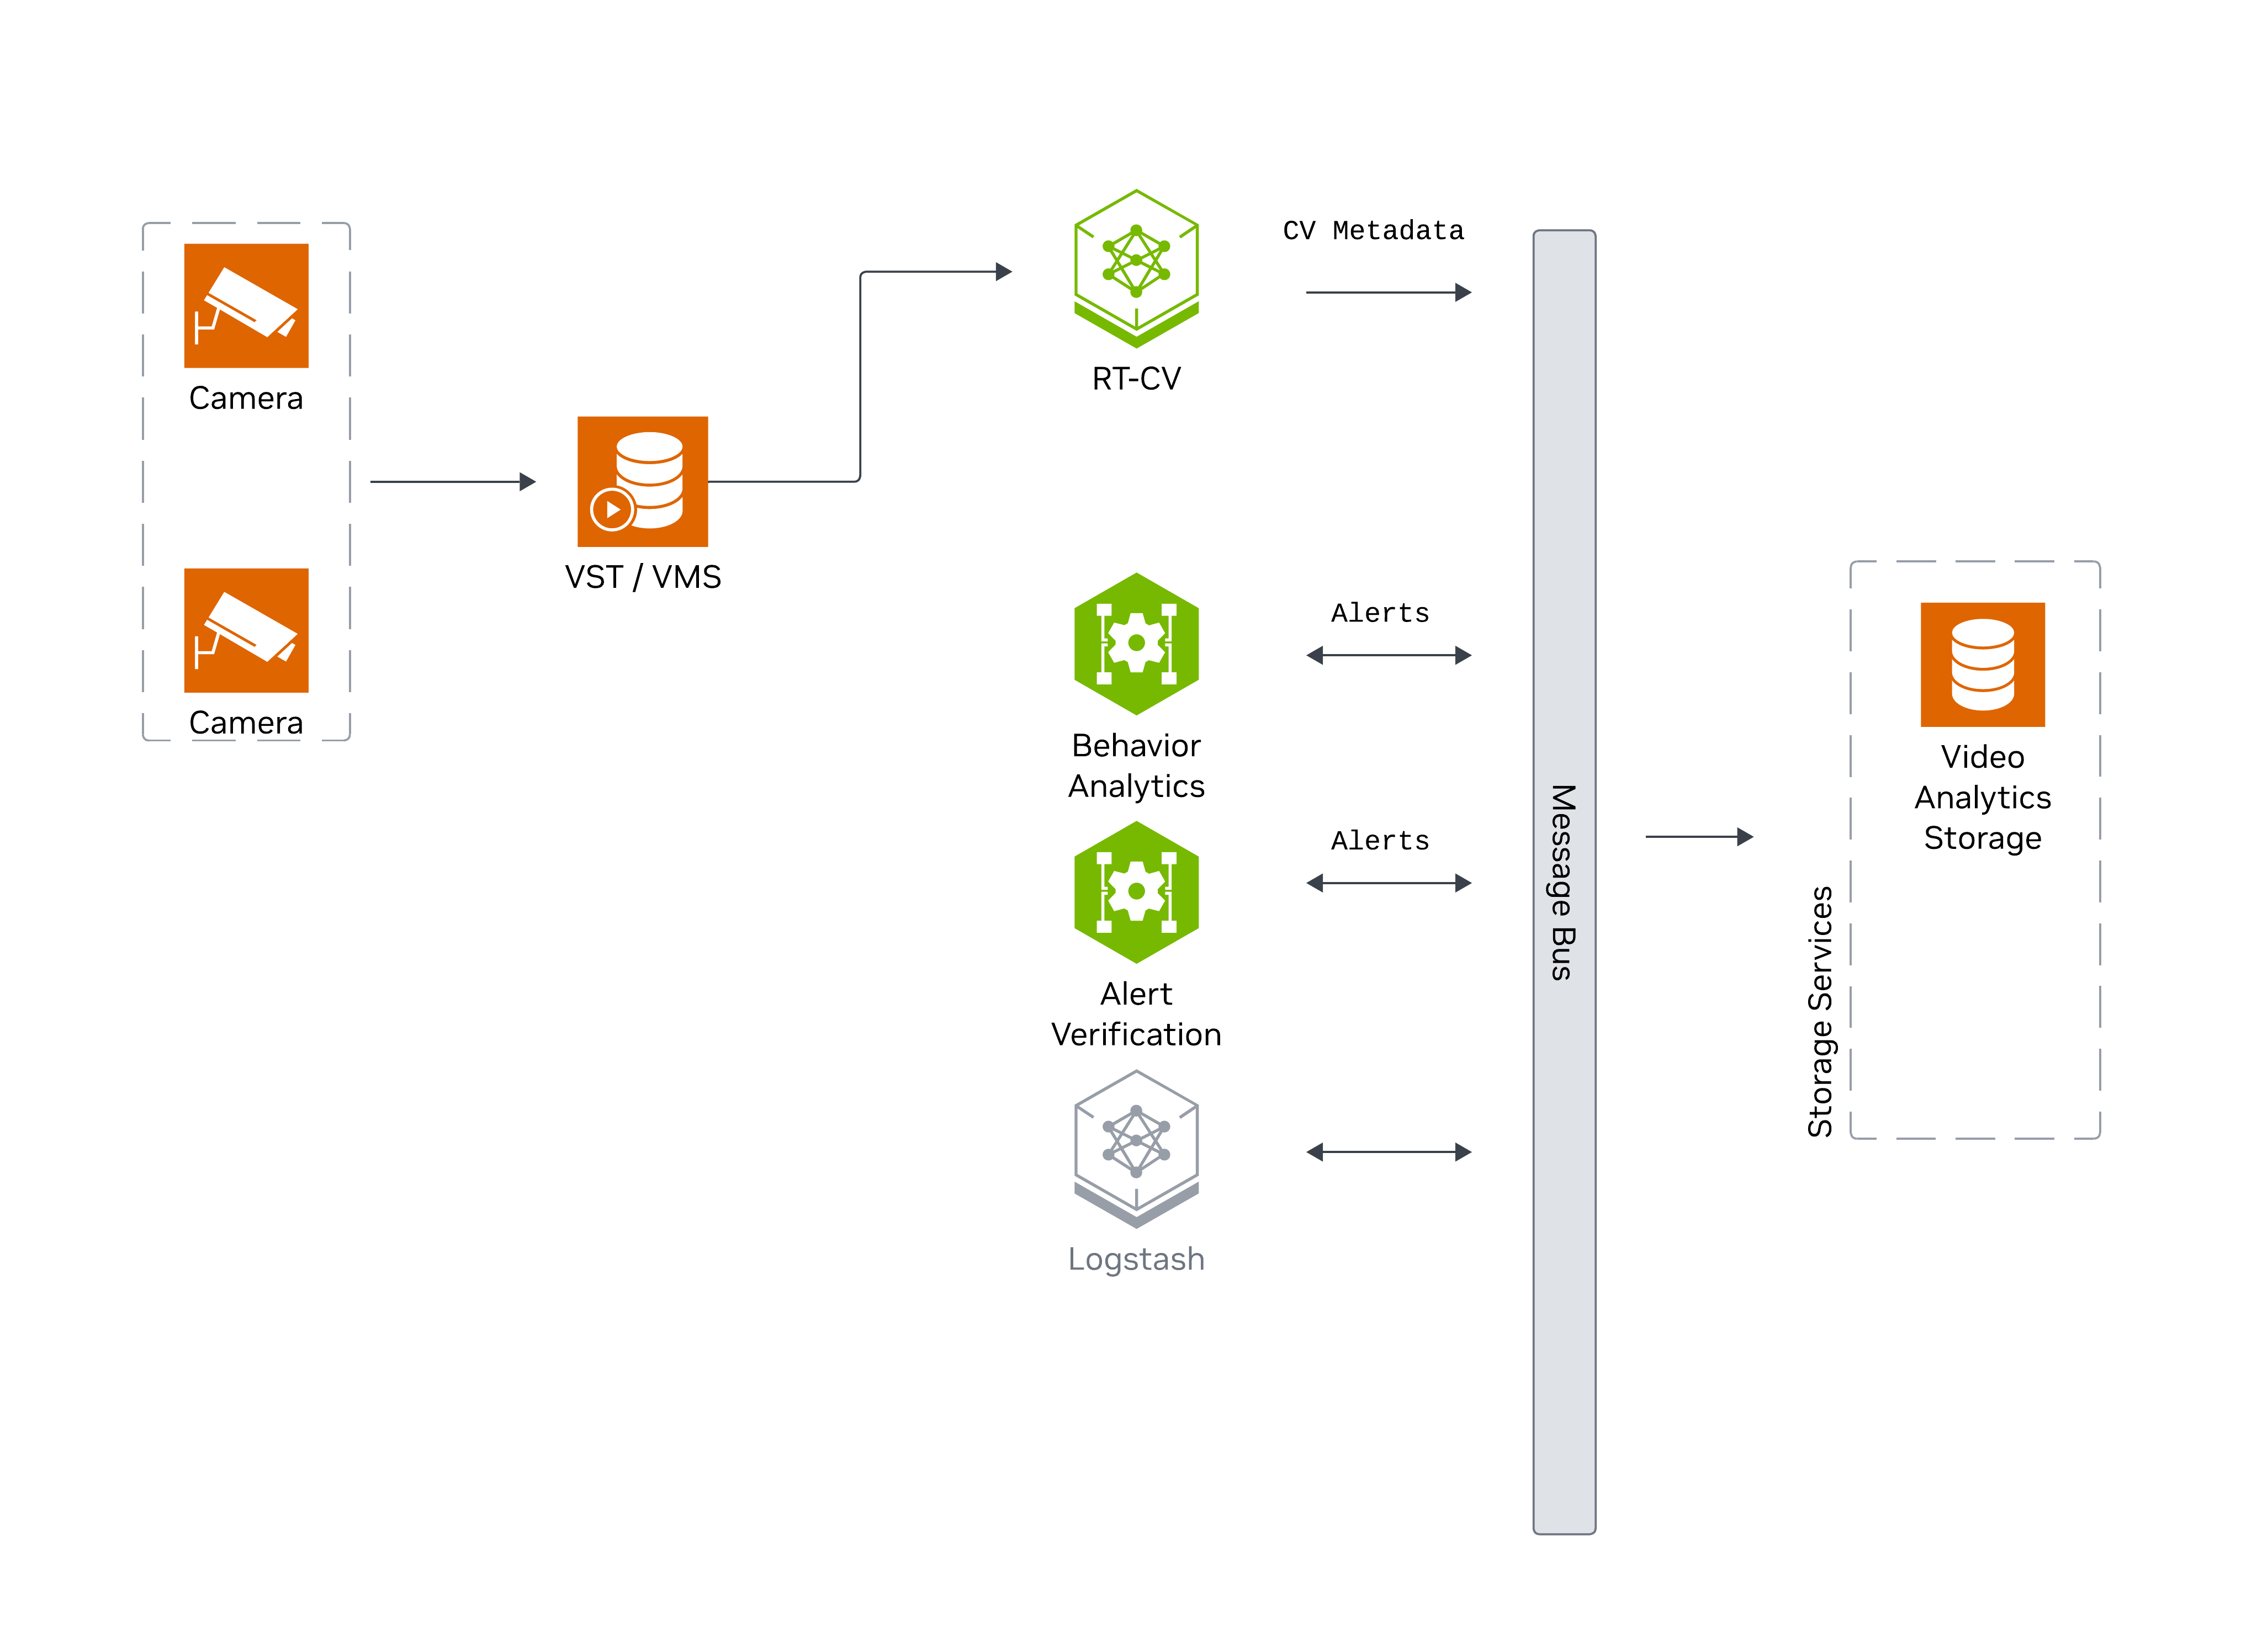
Camera streams are ingested by VST/VMS, processed by RT-CV (perception) and Behavior Analytics microservices, with CV metadata and alerts published to the Message Bus and persisted via Storage Services.
The following diagram shows how AI Agents interact with the Warehouse Blueprint:
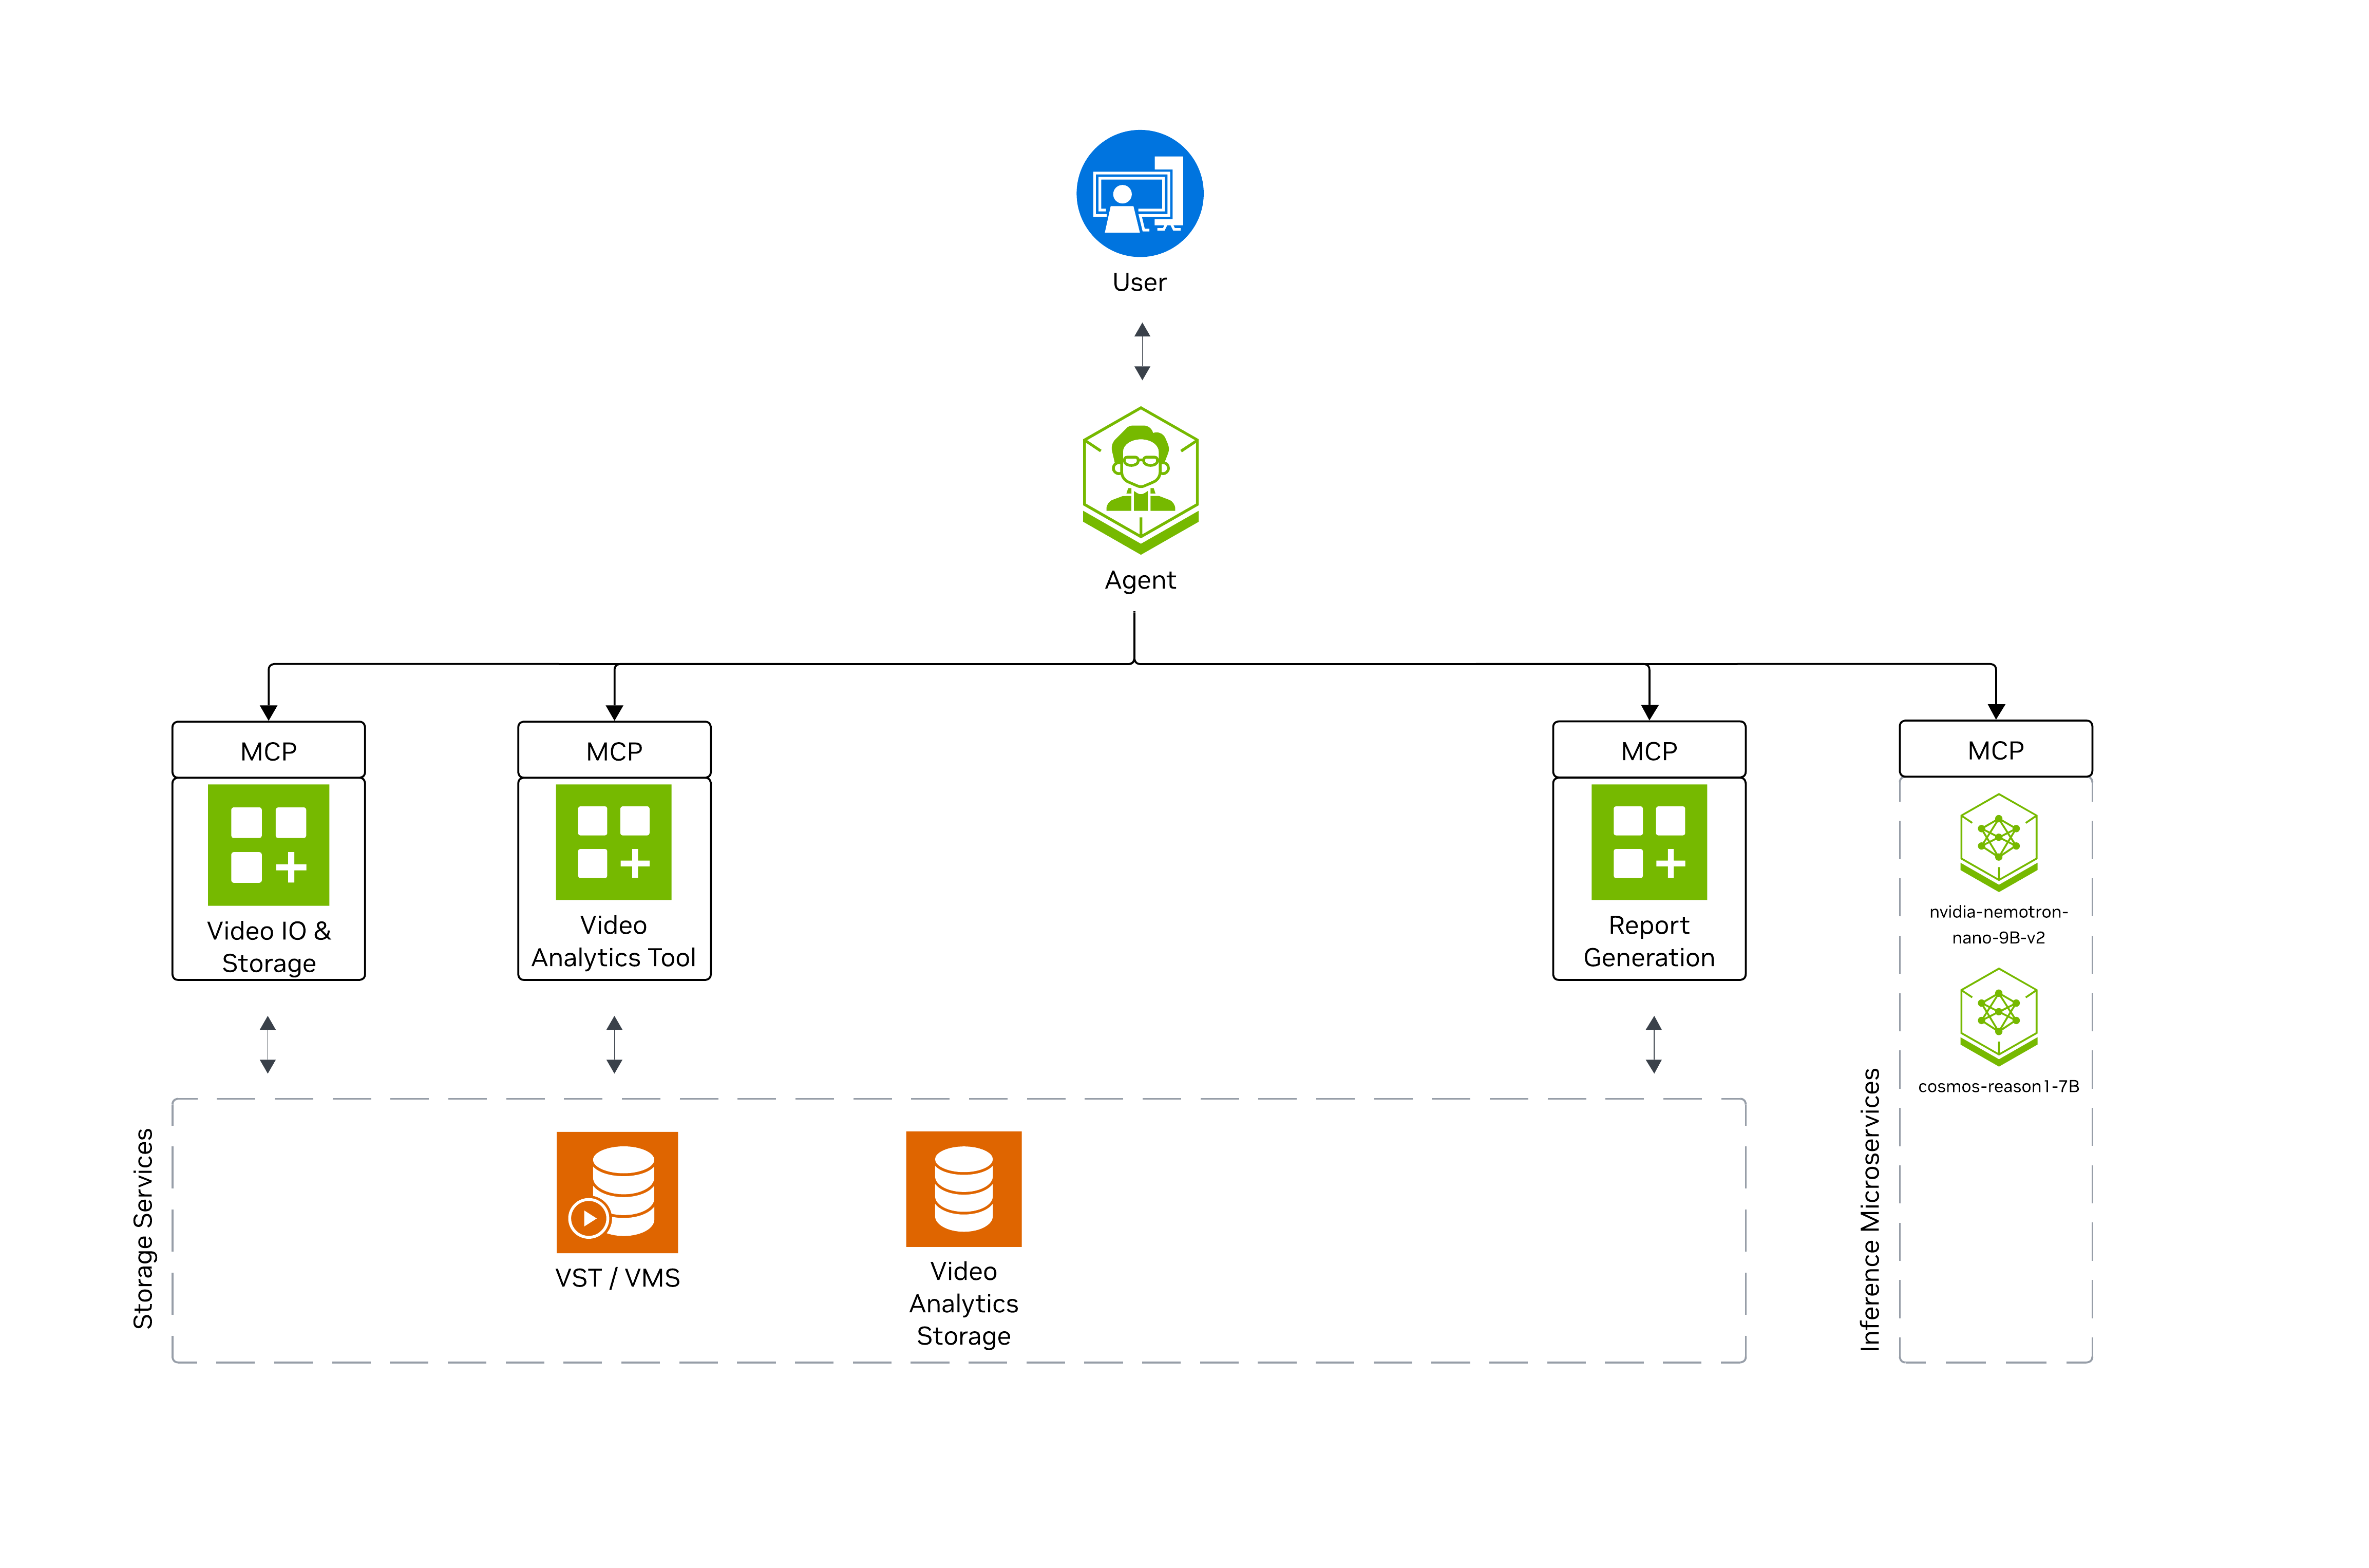
The Agent orchestrates MCP servers for Video IO, Video Analytics, and Report Generation, leveraging Nemotron (LLM) and Cosmos-Reason (RTVI-VLM) inference microservices.
Prerequisites#
Before you begin, ensure all of the prerequisites are met. See Prerequisites for more details.
Deployment Options#
The Warehouse Blueprint offers flexible deployment options with the following profiles:
2D Vision AI Profile - 2D detection and tracking (bp_wh_kafka, bp_wh_redis, bp_wh_auto_calib)
2D Vision AI with Agents Profile - 2D detection and tracking with VSS agent integration (bp_wh)
3D Vision AI Profile - 3D multi-camera detection, tracking, and analytics using Sparse4D (bp_wh_kafka, bp_wh_redis, bp_wh_auto_calib)
MV3DT Vision AI Profile - 3D multi-camera detection, tracking, and analytics using RT-DETR + MV3DT (bp_wh_kafka, bp_wh_redis, bp_wh_auto_calib)
Profile Type |
Features |
Constraints |
Supported GPUs |
|---|---|---|---|
2D Vision AI Profile |
2D single-camera detection, tracking, and analytics |
Model trained on real-world data |
RTX PRO 6000 BW, H100 NVL, H100 SXM HBM3, L40S, IGX-THOR, DGX-SPARK |
2D Vision AI with Agents Profile |
2D single-camera detection, tracking, analytics, and VSS agent integration |
Model trained on real and synthetic data |
RTX PRO 6000 BW, H100 NVL, H100 SXM HBM3, L40S, IGX-THOR |
3D Vision AI Profile |
3D multi-camera detection, tracking, and analytics |
Model trained on synthetic data, recommended for simulated environments |
RTX PRO 6000 BW, H100 NVL, H100 SXM HBM3, L40S, IGX-THOR, DGX-SPARK |
MV3DT Vision AI Profile |
3D multi-camera detection, tracking, and analytics using RT-DETR + MV3DT |
RT-DETR model trained on real-world data, MV3DT distributed 3D tracking via camera projection matrices |
RTX PRO 6000 BW, H100 NVL, H100 SXM HBM3, L40S, IGX-THOR, DGX-SPARK |
Supported GPU Hardware#
This section provides an overview of the hardware profiles supporting the various deployment options described in the previous section. Each profile is designed to meet specific use case performance and resource requirements, ensuring optimal operation of the blueprint.
See supported deployment options per GPU type for 2D, 3D, and MV3DT Warehouse Blueprint further in this section.
Warehouse blueprints are optimized to work on a single supported GPU serving 4 real-time camera streams. When you choose to install the Agents, you have the following options:
Download and locally run the required NVIDIA NIM services (requires additional GPU resources)
Use a remote NVIDIA NIM endpoint or any OpenAI API compatible endpoint (no additional GPU required)
NVIDIA Certified GPU Servers and Workstations
GPU Type |
Number of streams |
2D Vision AI Profile (Number of GPUs) |
2D Vision AI with Agents Profile (Number of GPUs) |
|---|---|---|---|
RTX PRO 6000 BW |
16 |
1 |
2 (remote LLM + local RTVI-VLM)
3 (local LLM + local RTVI-VLM (dedicated GPU each) (default))
|
H100 (NVL, SXM HBM3) |
26 |
1 |
2 (remote LLM + local RTVI-VLM)
3 (local LLM + local RTVI-VLM (dedicated GPU each) (default))
|
L40S |
12 |
1 |
2 (remote LLM + local RTVI-VLM)
3 (local LLM + local RTVI-VLM (dedicated GPU each) (default))
|
IGX-THOR |
7 |
1 |
2 (remote LLM + local RTVI-VLM)
Local RTVI-VLM is supported only on IGX-THOR systems with an iGPU and dGPU.
|
DGX-SPARK |
7 |
1 |
Not supported |
Note
Recommended GPUs:
2D Vision AI Profile: RTX PRO 6000 BW, H100 NVL, H100 SXM HBM3, L40S, IGX-THOR, DGX-SPARK
2D Vision AI with Agents Profile: RTX PRO 6000 BW, H100 NVL, H100 SXM HBM3, L40S
When you choose to install the agents, you have the following options:
Download and locally run the required NVIDIA NIM services (requires additional GPU resources).
GPU Type |
Number of Streams |
FPS |
3D Vision AI Profile (Number of GPUs) |
|---|---|---|---|
RTX PRO 6000 Blackwell |
19 |
30 |
1 |
H100 (NVL, SXM HBM3) |
16 |
30 |
1 |
L40S |
6 |
30 |
1 |
IGX THOR |
7 |
15 |
1 |
DGX SPARK |
7 |
15 |
1 |
Note
We recommend RTX PRO 6000 BW, H100 NVL, H100 SXM HBM3, L40S, IGX-THOR, DGX-SPARK GPUs for 3D Vision AI Profile.
GPU Type |
Number of Streams |
FPS |
MV3DT Vision AI Profile (Number of GPUs) |
|---|---|---|---|
RTX PRO 6000 Blackwell |
18 |
30 |
1 |
H100 (NVL, SXM HBM3) |
13 |
30 |
1 |
L40S |
7 |
30 |
1 |
IGX THOR |
4 |
30 |
1 |
DGX SPARK |
4 |
30 |
1 |
Note
We recommend RTX PRO 6000 BW, H100 NVL, H100 SXM HBM3, L40S, IGX-THOR, DGX-SPARK GPUs for MV3DT Vision AI Profile.
Note
To use different hardware than the ones listed above, you can use the VSS Configurator. Add a new hardware profile in blueprint_config.yml with stream limits (and optional config overrides), then set HARDWARE_PROFILE to that profile name when deploying. For a step-by-step guide and examples, see Adding a New Hardware Profile in the VSS Configurator documentation.
Download Warehouse Artifacts#
This section guides you through the steps to download the Warehouse Blueprint artifacts.
Setup NGC Access#
# Setup NGC access
export NGC_CLI_API_KEY=<NGC_CLI_API_KEY>
export NGC_CLI_ORG='nvidia'
Download the Deployment Package#
Perform this on the machine where you intend to deploy the blueprint.
Note
Git LFS required: The repository uses Git LFS for large files. Install it before cloning or pulling. For example, on Ubuntu/Debian: sudo apt-get install git-lfs. On other systems, see Git LFS installation.
git clone https://github.com/NVIDIA-AI-Blueprints/video-search-and-summarization.git
cd video-search-and-summarization
git checkout tags/v3.2.0
git lfs install
git lfs pull
cd deploy/docker
# This is the path to the deployments directory. It is set in the industry-profiles/warehouse-operations/.env file for env VSS_APPS_DIR.
#VSS_APPS_DIR="/path/to/deploy/docker"
Warehouse App Data#
Warehouse App Data contains sample video datasets, pre-trained TensorRT models (RT-DETR for 2D and MV3DT, Sparse4D for 3D, NvDCF tracker, BodyPose3DNet for MV3DT), camera calibration data, and configuration templates for deploying 2D, 3D, and MV3DT warehouse profiles.
The package includes the following MP4 datasets at 1920x1080 and 30 FPS:
Dataset |
Applies To |
Cameras |
Duration |
Scene Details |
|---|---|---|---|---|
|
2D with Agents, and Auto-Calibration profile |
4 |
Approximately 10 minutes per camera (600 seconds) |
Real-world high-angle aisle footage with racks, palletized inventory, workers in safety vests, boxes, shrink-wrapped pallets, forklift activity, and pallet movement. |
|
2D Kafka, Redis, and Auto-Calibration profiles |
3 |
4 minutes per camera (240 seconds) |
Synthetic loading dock footage with overhead views, loading bays, yellow-and-black floor safety zones, boxes on pallets, and forklift equipment. |
|
3D and MV3DT Kafka, Redis, and Auto-Calibration profiles |
4 |
5 minutes per camera (300 seconds) |
Synthetic 20mx20m 3D warehouse scene with overlapping corner-mounted camera views, numbered zones, palletized boxes, forklifts, workers, safety boundaries, and barriers. Used for multi-camera tracking, spatial analytics, and cross-camera object re-identification. |
|
2D Kafka, Redis, and Auto-Calibration profiles |
3 |
4 minutes per camera (240 seconds) |
Degraded synthetic loading dock footage with low-light and lower-quality camera visuals, representing deployments where camera feeds vary in quality. Used for testing detection, tracking, and analytics under degraded visibility. |
Note
After extracting the package, set VSS_DATA_DIR in industry-profiles/warehouse-operations/.env to point to the extracted data directory.
ngc \
   registry \
   resource \
   download-version \
   nvidia/vss-warehouse/vss-warehouse-app-data:3.2.0

# OR Manually download the tar file from NGC
# URL https://catalog.ngc.nvidia.com/orgs/nvidia/teams/vss-warehouse/resources/vss-warehouse-app-data?version=3.2.0

# Extract the package

cd vss-warehouse-app-data_v3.2.0
tar -xvf vss-warehouse-app-data.tar.gz

# Set permissions

sudo chmod -R 777 /path/to/vss-warehouse-app-data

# This is the path to the data directory. It is set in the industry-profiles/warehouse-operations/.env file for VSS_DATA_DIR.
#VSS_DATA_DIR="/path/to/vss-warehouse-app-data"
Deploy Warehouse Blueprint#
Configure Environment settings#
This section explains the most commonly edited variables in industry-profiles/warehouse-operations/.env.
Deployment Selection#
Select the appropriate configuration based on your deployment profile:
Profile |
MODE |
BP_PROFILE |
SAMPLE_VIDEO_DATASET |
NUM_STREAMS |
|---|---|---|---|---|
2D Vision AI with Agents Profile |
|
|
|
4 |
2D Vision AI Profile |
|
|
|
3 |
3D Vision AI Profile |
|
|
|
4 |
MV3DT Vision AI Profile |
|
|
|
4 |
Hardware Profile Configuration#
Determine your HARDWARE_PROFILE by running nvidia-smi -L to identify your GPU model.
GPU |
HARDWARE_PROFILE Value |
|---|---|
RTX PRO 6000 BW |
|
H100 (NVL, SXM HBM3) |
|
L40S |
|
IGX-THOR |
|
DGX-SPARK |
|
Note
To update the existing configs of a hardware profile or to add a GPU which is not present in the above list, see Adding a New Hardware Profile in the VSS Configurator documentation.
Deployment Paths and Services#
Variable |
Description |
|---|---|
VSS_APPS_DIR |
(Required) Path to your deploy/docker directory |
VSS_DATA_DIR |
(Required) Path to the extracted warehouse app data directory |
HOST_IP |
(Required) Host IP address of the machine where the blueprint is deployed.
For hosts that cannot be accessed from the browser via the HOST_IP, such as cloud VMs, set HOST_IP to the private IP address of the instance and set EXTERNAL_IP to the public IP address of the instance.
|
EXTERNAL_IP |
(Required only if HOST_IP is not accessible from the browser) External IP address of the machine where the blueprint is deployed |
STREAM_TYPE |
kafka or redis.Default:
kafka |
PERCEPTION_TAG |
Tag for RTVI CV container image.
Use
3.2.0-<version> for x86_64/aarch64 (IGX-THOR), or 3.2.0-sbsa-<version> for aarch64 (DGX-SPARK). |
BEV_FUSION_MV3DT_TAG |
Tag for the BEV Fusion MV3DT container image (
mv3dt mode).Use
3.2.0-<version>. |
RTVI_VLM_IMAGE_TAG |
Tag for the RTVI-VLM container image (VLM inference for the
bp_wh 2D agent profile).Use
3.2.0-<version> for x86_64/aarch64 (IGX-THOR), or 3.2.0-<version>-sbsa for aarch64 (DGX-SPARK). |
VST_STREAM_PROCESSOR_IMAGE_TAG
VST_SENSOR_IMAGE_TAG
NVSTREAMER_IMAGE_TAG
VST_INGRESS_IMAGE_TAG
|
Tags for the VIOS / VST (Video IO and Storage) container images — stream processor, sensor manager, NvStreamer, and ingress.
Common across all platforms.
|
NUM_STREAMS |
Number of concurrent streams to process.
Default:
4 |
Note
Switch between Kafka and Redis
With ENABLE_PROFILE_CONFIGURATOR=true, the VSS Configurator uses STREAM_TYPE to toggle Kafka or Redis settings for these services:
DeepStream perception: updates broker connection string, broker config file, and protocol library.
Behavior Analytics: updates source and sink type to
kafkaorredisStream.VST: updates notification message broker consumer settings.
Video Analytics API: sets
kafka.brokersto["localhost:9092"]for Kafka ornullfor Redis.
For the common configuration pattern and examples of file updates automated by the VSS Configurator, see VSS Configurator commons and profiles.
Minimal Profile#
The minimal profile applies to 2D Vision AI Profile, 3D Vision AI Profile, and MV3DT Vision AI Profile only. It is recommended for Thor deployment. The default is the minimal profile.
Set MINIMAL_PROFILE="true" in industry-profiles/warehouse-operations/.env for a minimal deployment. This excludes ELK (Elasticsearch, Logstash, Kibana), Video Analytics API, monitoring, and their dependent services.
For a full extended deployment (ELK, Video Analytics API, and monitoring included), set MINIMAL_PROFILE="" in industry-profiles/warehouse-operations/.env.
Note
In the VST UI, metadata for live streams is read from Kafka or Redis, while metadata for recorded streams is read from Elasticsearch. In the minimal profile, bounding boxes (bboxes) do not appear for recorded streams in the VST UI because Elasticsearch is not deployed.
Elasticsearch ILM policy retention period#
Note
Elasticsearch data is cleaned up every 4 hours as part of the ILM policy provided as part of the blueprint.
To increase the retention period, adjust index lifecycle (ILM) time by setting ELASTICSEARCH_ILM_MIN_AGE in industry-profiles/warehouse-operations/.env (for example 12h or 1d). This value is passed to the Elasticsearch init container when ILM policies are applied.
Default: 4h
ELASTICSEARCH_ILM_MIN_AGE=4h
For how ILM policies are defined and other tuning options, see ELK (Elasticsearch, Logstash, Kibana).
NIM Deployment Modes#
The following modes apply to the LLM_MODE environment variable.
NIM |
Required Settings |
Description |
|---|---|---|
|
MODE=2dBP_PROFILE=bp_whNGC_CLI_API_KEY |
Download and run NIMs locally (requires additional GPU resources), Run LLM on a dedicated GPU device. |
|
MODE=2dBP_PROFILE=bp_whLLM_BASE_URLNVIDIA_API_KEY |
Use remote NIM endpoints (no additional GPU resources required).
Obtain a valid
NVIDIA_API_KEY via https://build.nvidia.com/explore/discover or via the NVIDIA Developer Program website. |
|
MODE=2d/3d/mv3dtBP_PROFILE=bp_wh_kafka/bp_wh_redis/bp_wh_auto_calib |
Deploy 2D, 3D, or MV3DT Vision AI profiles without agents. NIM is not required for |
Note
The Warehouse Blueprint uses rtvi-vlm for VLM inference. Configure the local rtvi-vlm service with RTVI_VLM_BASE_URL, RTVI_VLM_ENDPOINT, RTVI_VLM_MODEL_PATH, and RTVI_VLM_MODEL_TO_USE in industry-profiles/warehouse-operations/.env.
RTVI-VLM is not supported on DGX-SPARK.
For details on the RTVI-VLM microservice (configuration, supported models, and APIs), see Real-Time VLM.
Model Configuration#
Variable |
Description |
|---|---|
LLM_NAME |
Model selection for the agent when NIM is enabled |
Note
For the full set of variables (ports, agent settings, VST adaptor, calibration, etc.), use the inline comments in the shipped industry-profiles/warehouse-operations/.env.
For DGX-SPARK (SBSA), RTVI CV(Perception) and VST separate container tags to be used ( Refer warehouse/.env for the latest tags commented out in the file, use the uncommented tags for the deployment and make sure to comment out the default multi-arch tags).
Deploy the Blueprint#
Warning
Ensure industry-profiles/warehouse-operations/.env is configured for your deployment before proceeding. Review the Deployment Selection and environment settings sections above.
source /path/to/deploy/docker/industry-profiles/warehouse-operations/.env
cd /path/to/deploy/docker

# Docker login to the NGC docker registry
docker login \
    --username '$oauthtoken' \
    --password "${NGC_CLI_API_KEY}" \
    nvcr.io

# Start the blueprint
docker compose \
    --env-file industry-profiles/warehouse-operations/.env \
    up \
    --detach \
    --pull always \
    --force-recreate \
    --build
Note
Initialization of some components might take a while, especially the first time as large containers will be pulled.
Verify Deployment#
Verify if containers are in running state:
docker ps
docker compose ls
Check to make sure streams were properly added to VST. To do so, navigate to the VST UI (see endpoint below) and check the Dashboard to confirm your streams are in a healthy state. If you do not see them there, check NVStreamer or your source to make sure they are active.
Check vss-rtvi-cv FPS to make sure DeepStream is running properly. View the vss-rtvi-cv logs by running the below command and looking for FPS lines in the logs. Ensure it is running at the desired FPS. If this is lower than expected, make sure your GPU is not oversaturated.
# For 2D/3D Vision AI Profile
docker logs -f vss-rtvi-cv

# For MV3DT Vision AI Profile
docker logs -f vss-rtvi-cv-mv3dt
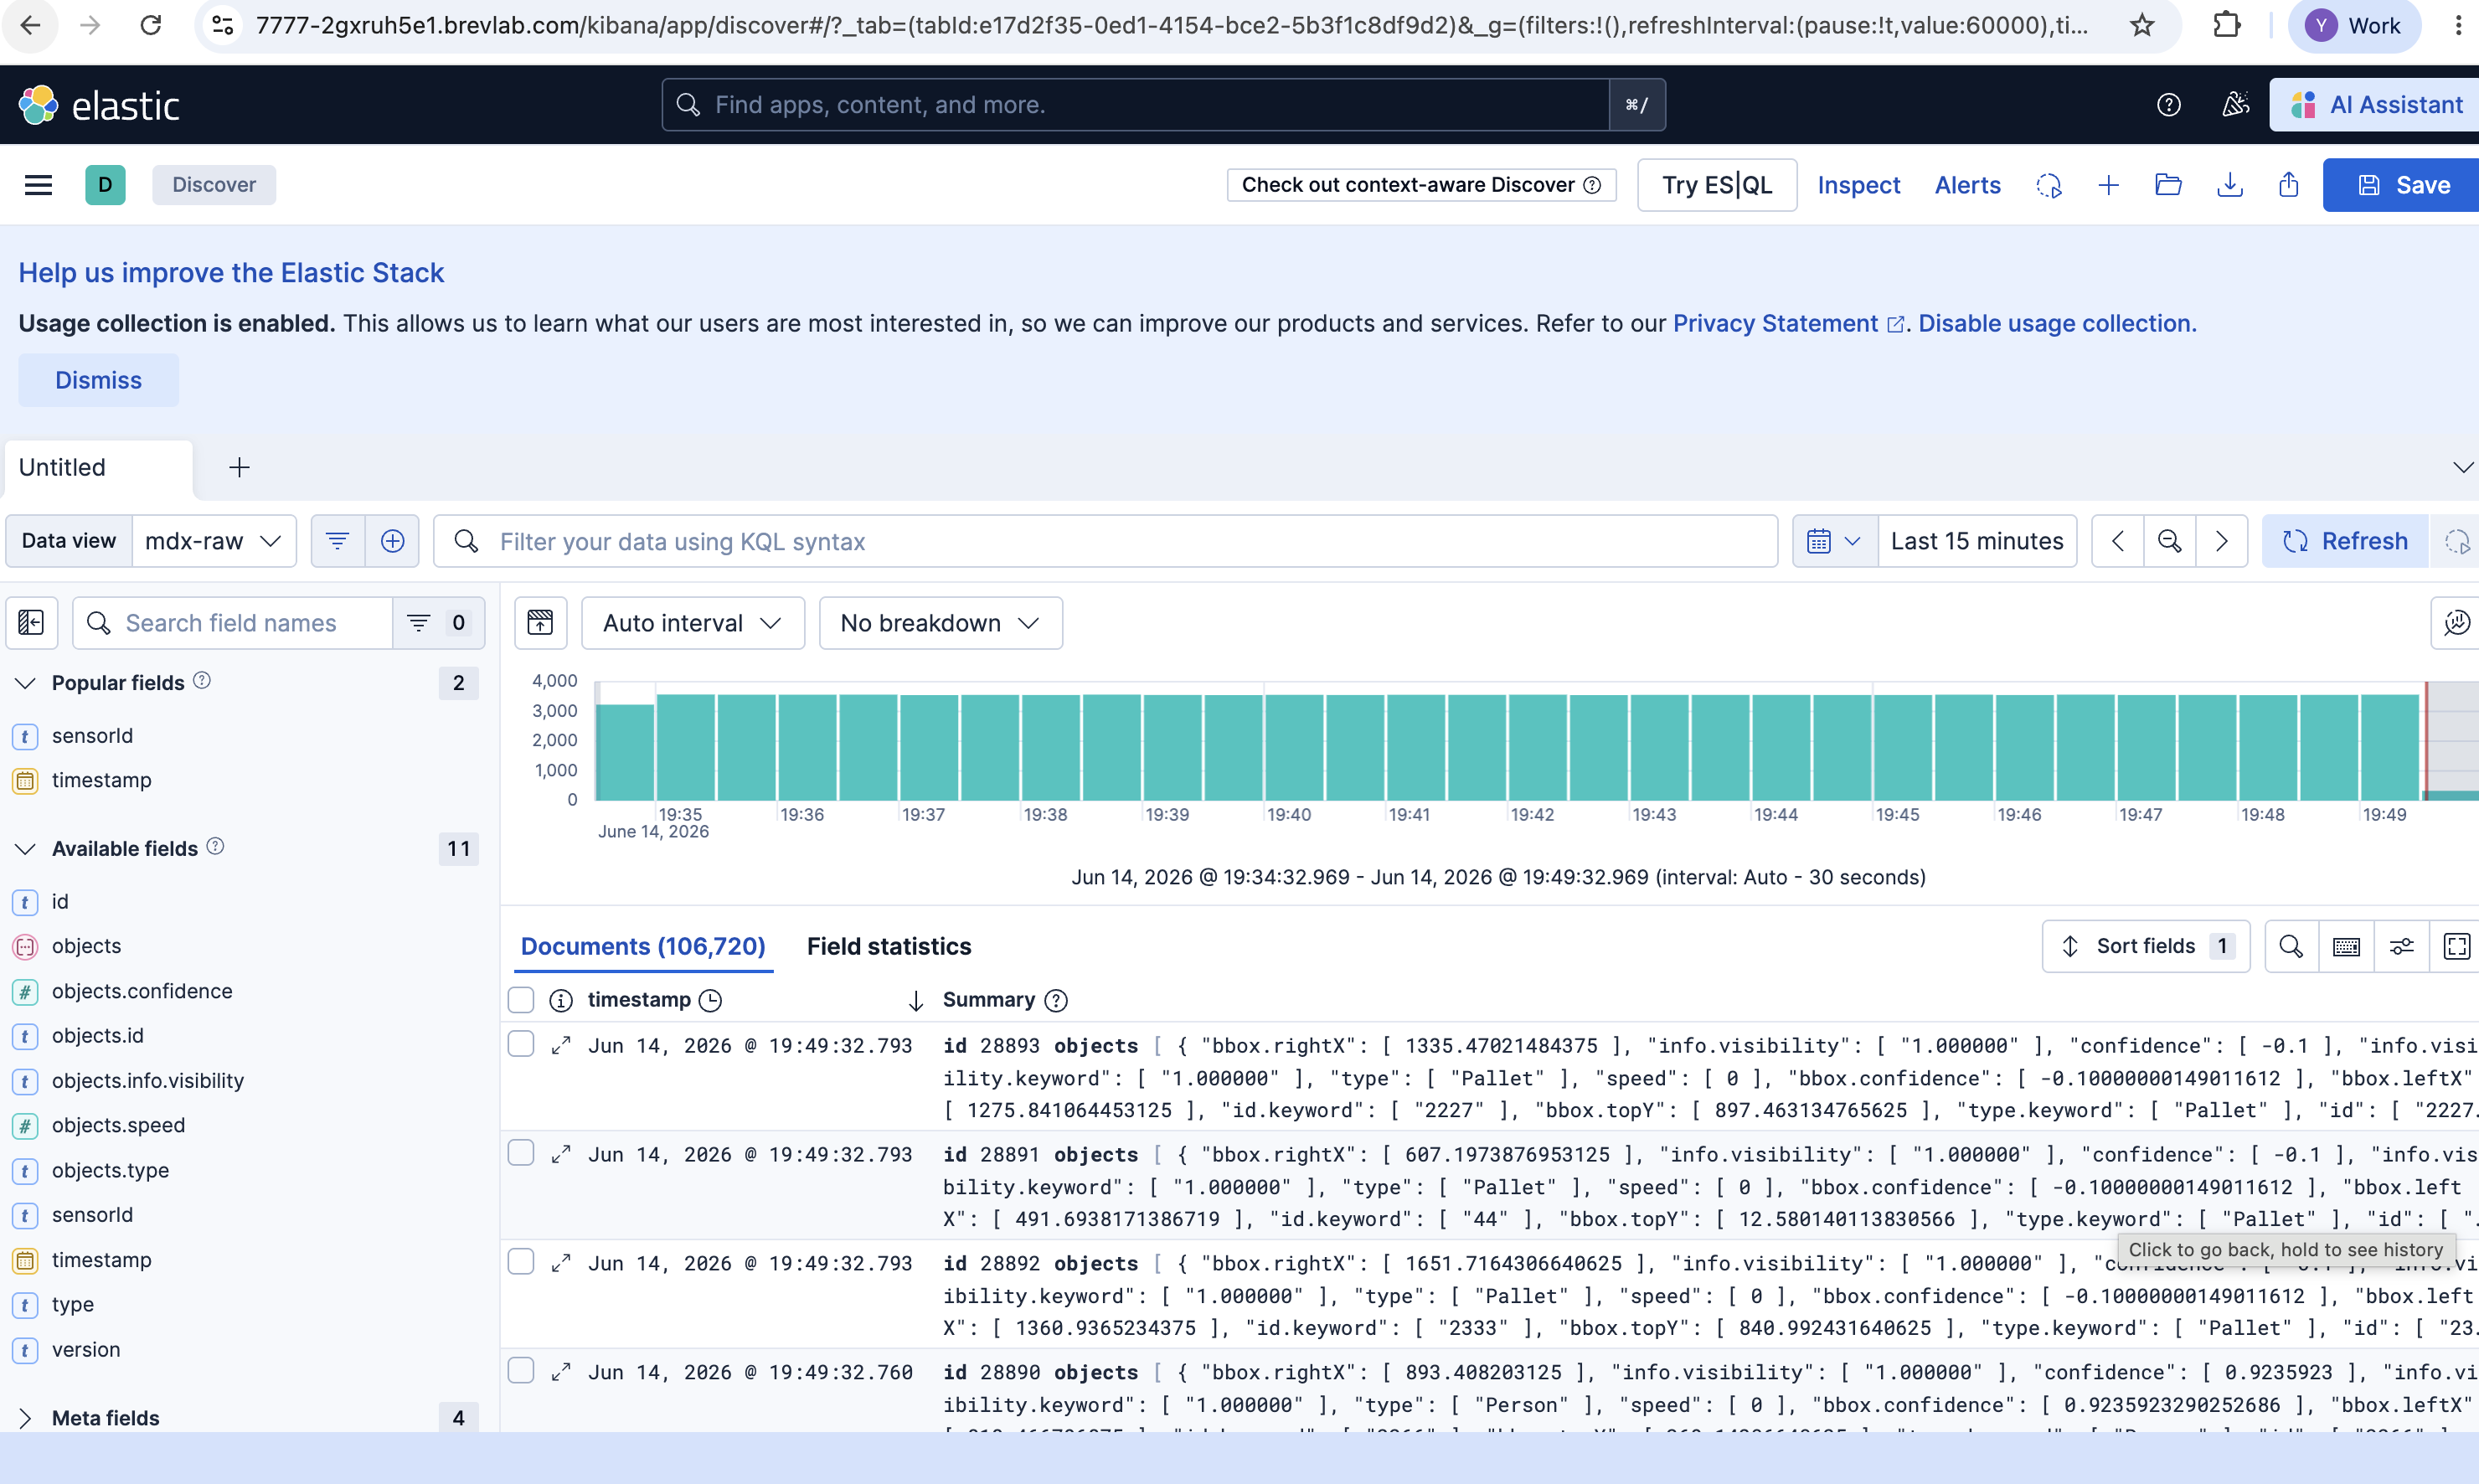
Check Kibana for indexed analytics data and alerts. Go to the endpoint listed below and navigate to the dashboard.
Check the VSS UI (see endpoint below) and test a few prompts after the system is up for a few minutes and a few alerts are present.
For detailed testing and validation steps, refer to:
Service Access Points#
Once deployed, the following service access points are available:
Service |
URL |
|---|---|
VSS-UI (2D Vision AI with Agents Profile) |
|
Kibana-UI(2D/3D/MV3DT) |
|
VST-UI(2D/3D/MV3DT) |
|
NvStreamer-UI(2D/3D/MV3DT) |
|
Auto-Calibration UI (2D/3D/MV3DT auto-calibration profiles only) |
|
Phoenix-UI (Telemetry)(2D Vision AI with Agents Profile) |
|
Note
The Phoenix UI is only available when agent telemetry is enabled. For how to enable telemetry and inspect traces, see VSS Agents Observability.
Observability stack access details (Grafana, Prometheus, and exporters) are documented in Observability.
Service |
Access Point |
|---|---|
Video-Analytics-API |
|
VST-MCP |
|
VA-MCP |
|
LLM-NIM |
|
Teardown the Deployment#
To stop and remove the Warehouse Blueprint deployment:
# Stop the running deployment

docker compose --env-file industry-profiles/warehouse-operations/.env down

# Alternatively to remove all the containers, images and volume

docker compose --env-file industry-profiles/warehouse-operations/.env down -v --rmi all

# Tear down all dangling volumes

docker volume ls -q -f "dangling=true" | xargs docker volume rm

# Cleanup all data (from deployments directory)

bash scripts/cleanup_all_datalog.sh -e industry-profiles/warehouse-operations/.env
Customization#
The Blueprint supports several levels of customization, including but not limited to adding new cameras and updating models. For details, refer to the following sections under the Blueprint deep dive pages:
Warehouse Blueprint Skill#
Agent Skills are reusable capabilities that coding agents such as Claude Code or Codex
can load to deploy and operate the VSS Blueprint from natural-language requests. For the
Warehouse Blueprint, the primary deployment Skill is vss-deploy-profile. It can
select a warehouse profile, validate prerequisites, prepare environment overrides, run a
compose dry-run, bring up the stack, and monitor readiness without requiring the operator
to memorize every deployment command.
For the complete VSS Skills catalog and installation model, see Agent Skills.
Note
The screenshots in this section show the Claude UI. Use the same prompts in Codex or another supported coding-agent host when that host has access to the cloned VSS Blueprint repository.
Installing Skills#
Install the Skills the same way as any other VSS Agent Skill. See Installing Skills for the full installation flow. Follow these steps to install and deploy the Warehouse Blueprint using the Skills:
Clone the VSS Blueprint repository and open it in your coding agent.
git clone https://github.com/NVIDIA-AI-Blueprints/video-search-and-summarization.git
cd video-search-and-summarization
git checkout tags/v3.2.0
Ask the coding agent to install the repository Skills:
Read skills/README.md and every SKILL.md file under skills/. For each skill in the
catalog, install it for this host so I can invoke it from a shell or chat session.
Use the host's standard skills directory. Symlink each skill folder rather than
copying it so a git pull here keeps every install up to date. Skip skills that are
already installed and pointing at this checkout. When you're done, list the skills
you registered and which directory you used.
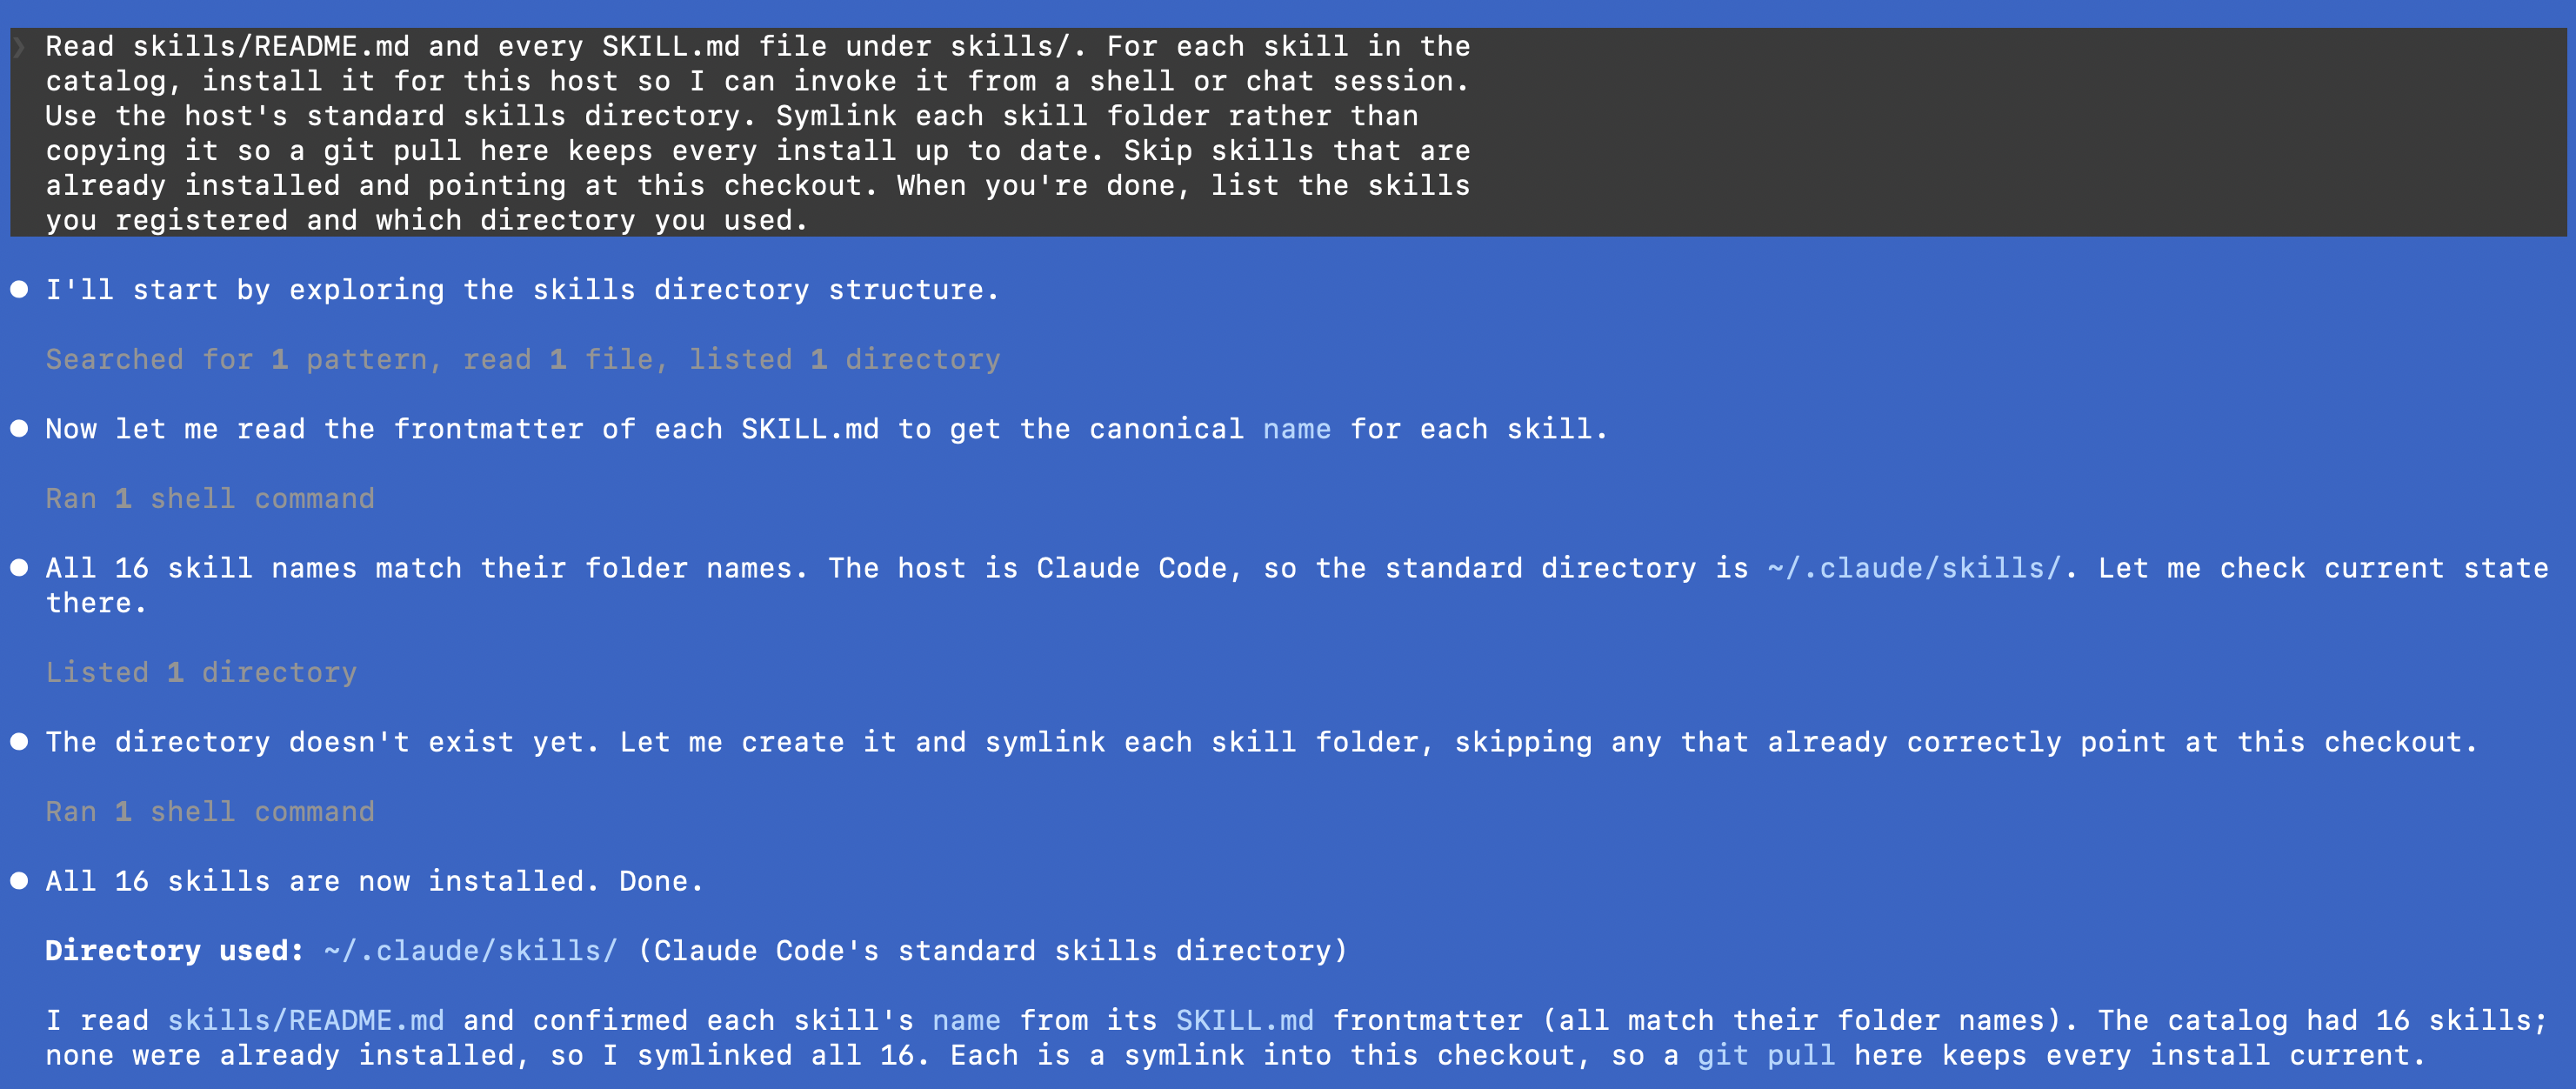
Install the VSS Skills from the cloned repository.#
Note
After installation, each Skill is invokable by name in any new coding-agent session. It also works in your current session without restarting — the agent can read the
SKILL.mdfiles directly as a reference and follow the instructions.Deploy the Warehouse Blueprint from your coding agent.
Example warehouse deployment prompts#Deploy the VSS warehouse blueprint on this host. Bring up the warehouse blueprint with the bp_wh agent profile and a remote LLM. Deploy warehouse in 3D mode with the kafka broker, extended profile. Deploy warehouse mv3dt against my own RTSP streams and generate calibration first.
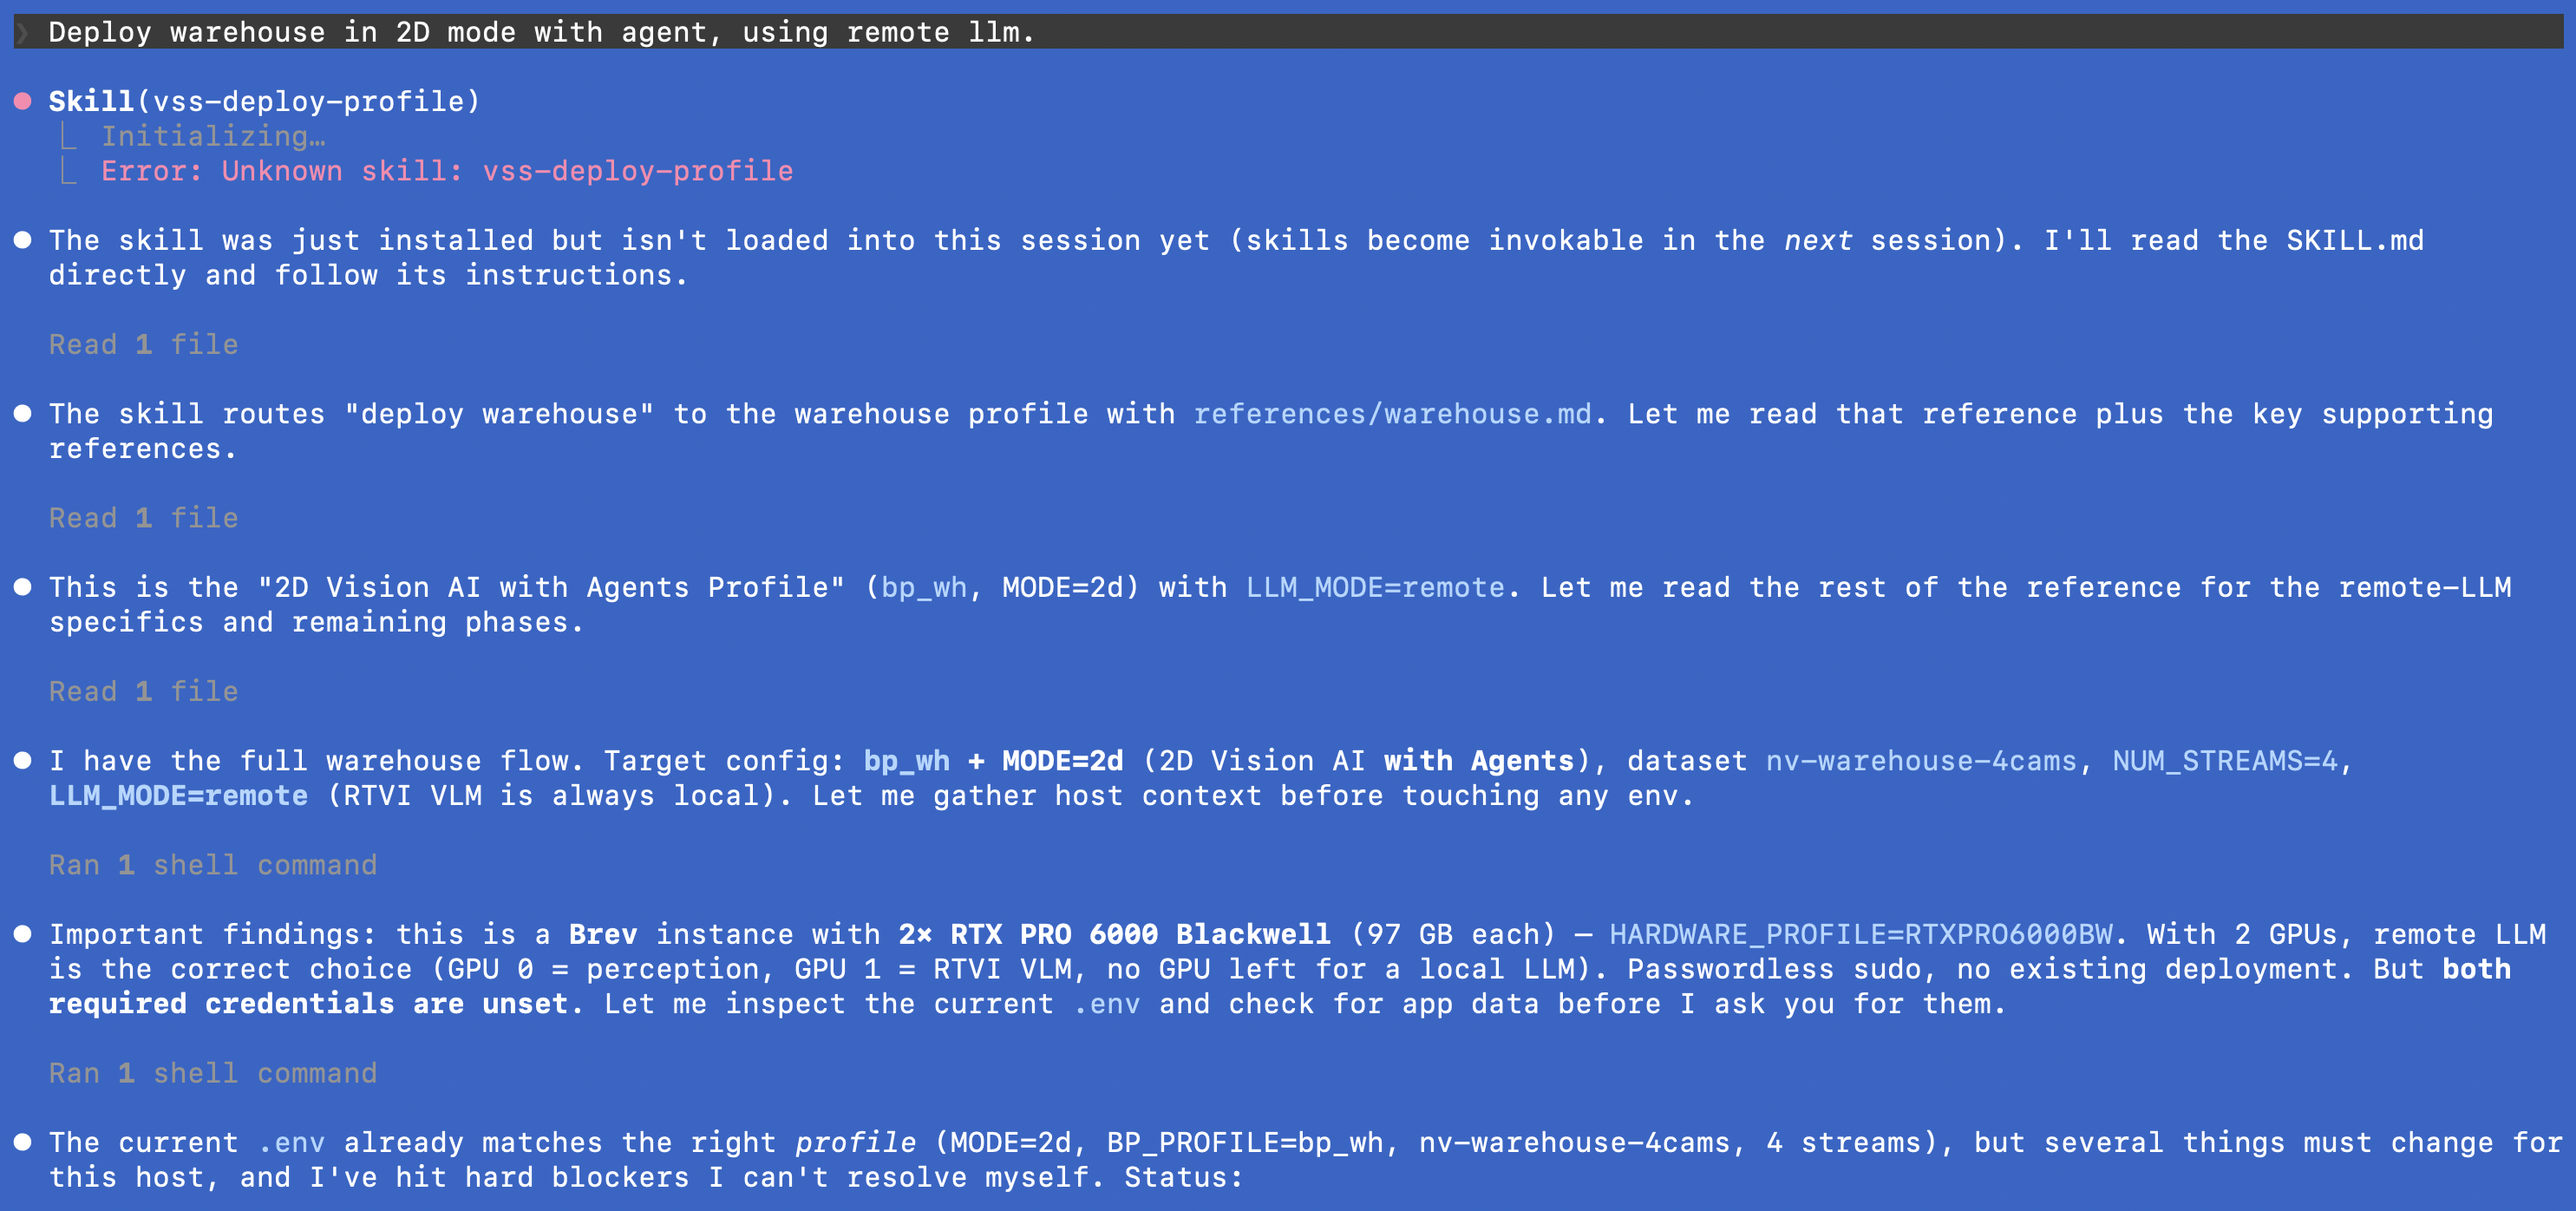
Deploy warehouse in 2D mode with agent, using remote LLM.#
Run pre-flight checks and provide deployment inputs.
The Skill first checks the host hardware profile, GPU and driver visibility, Docker and Compose access, NVIDIA Container Toolkit, writable data paths, and Brev or edge-specific prerequisites when they apply. If a check fails, the Skill fixes and re-verifies it when possible, and stops only for requirements that cannot be satisfied automatically.
After the pre-flight checks pass, the Skill may ask for an NGC API key and the
vss-warehouseapp data location before it generates the Docker Compose configuration. When the deployment uses a remote LLM, the Skill also asks you to choose the remote LLM option and to provide an API key for accessing the remote endpoint.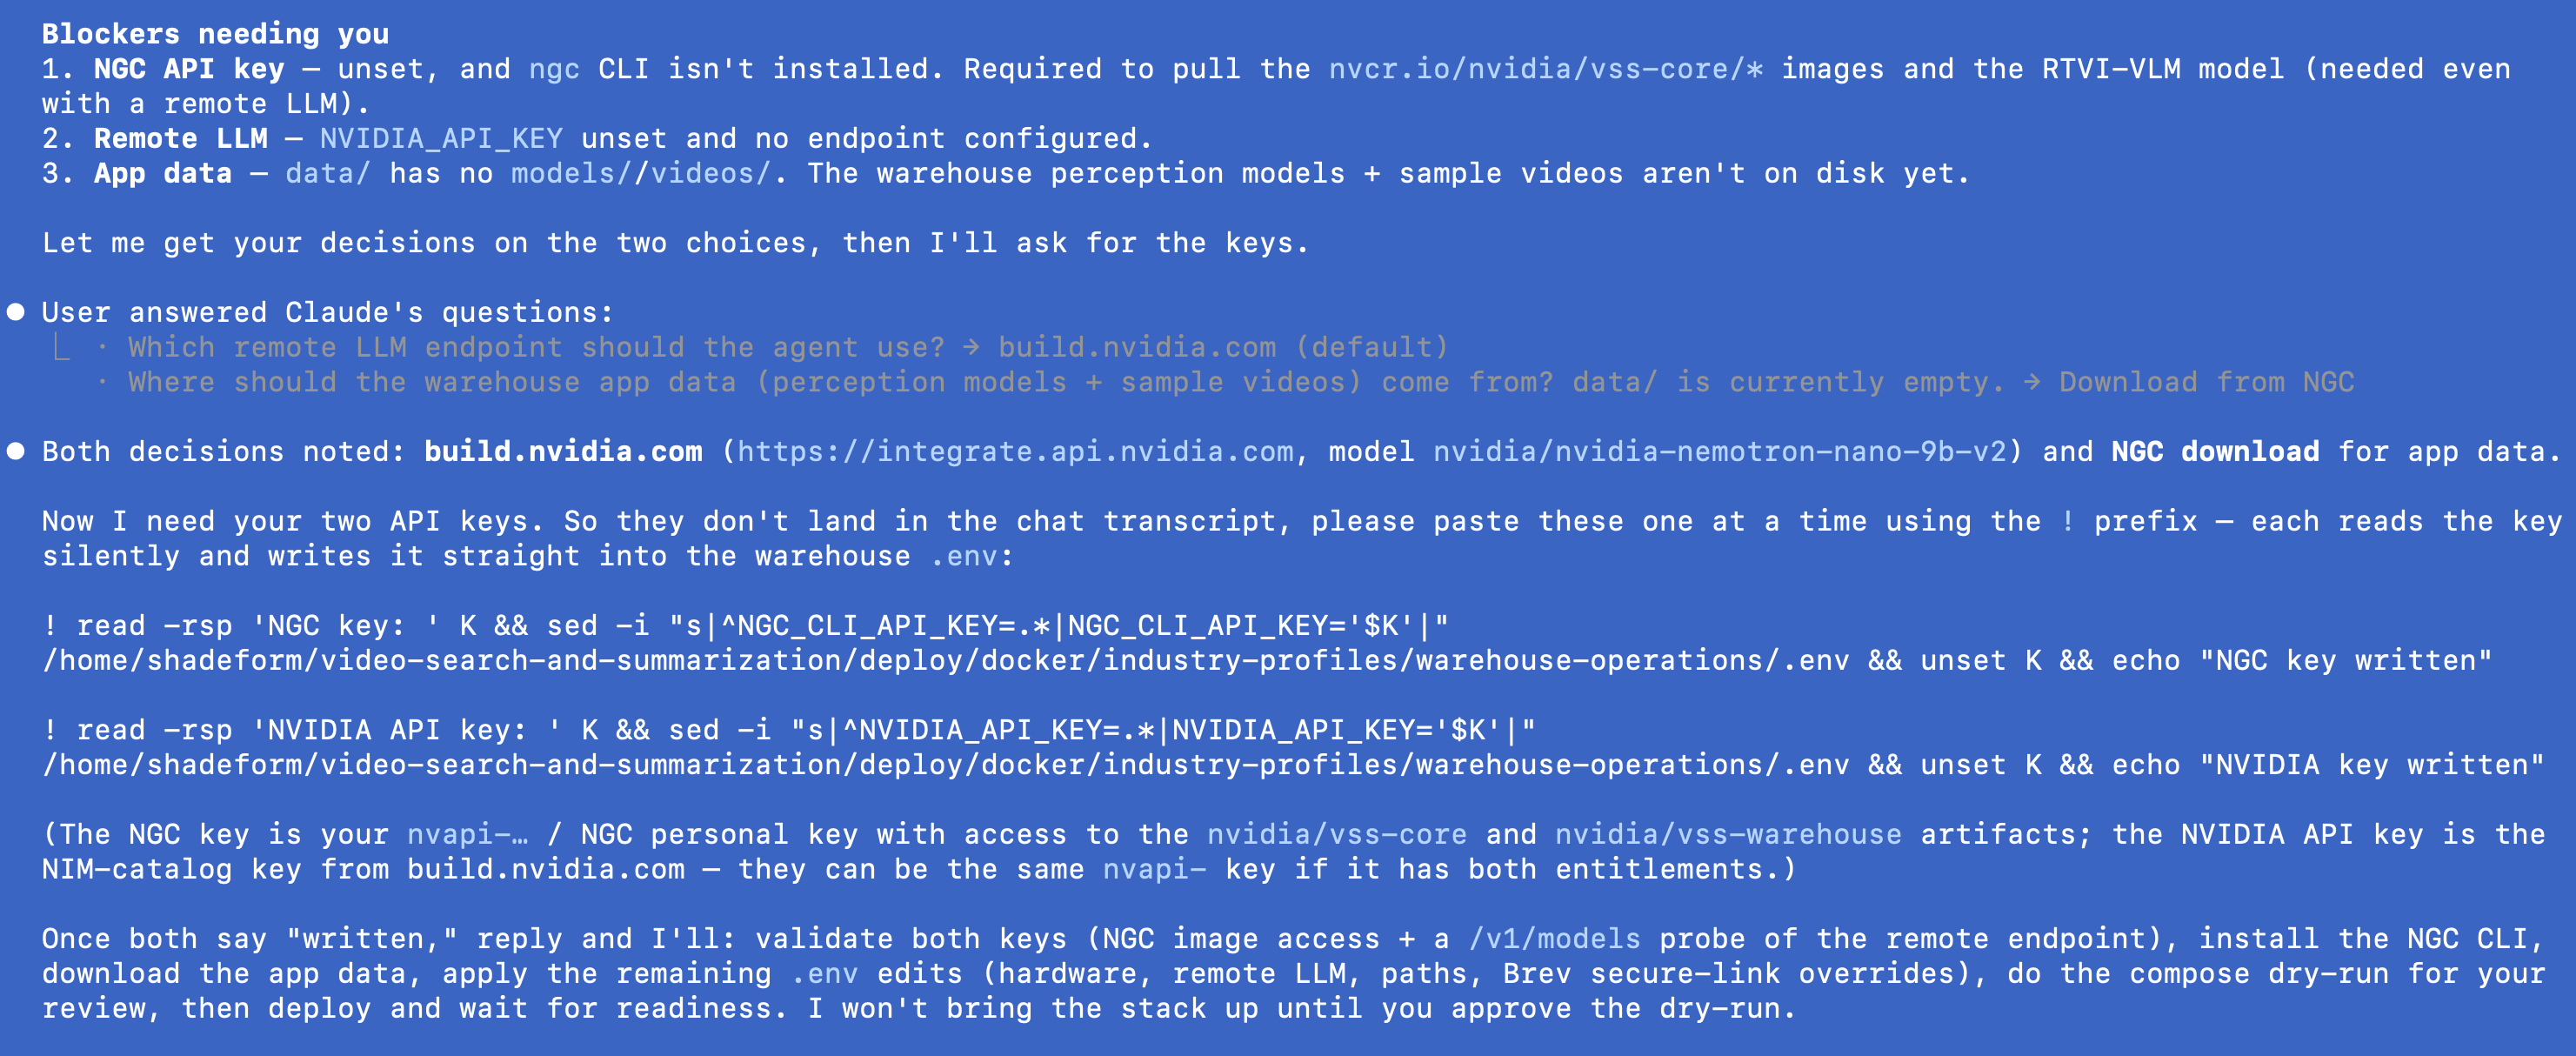
Provide the required NGC API key and vss warehouse app data inputs for the deployment.#
Review the dry-run output before the stack starts.
The Skill generates the Docker Compose configuration and shows the services that will start.
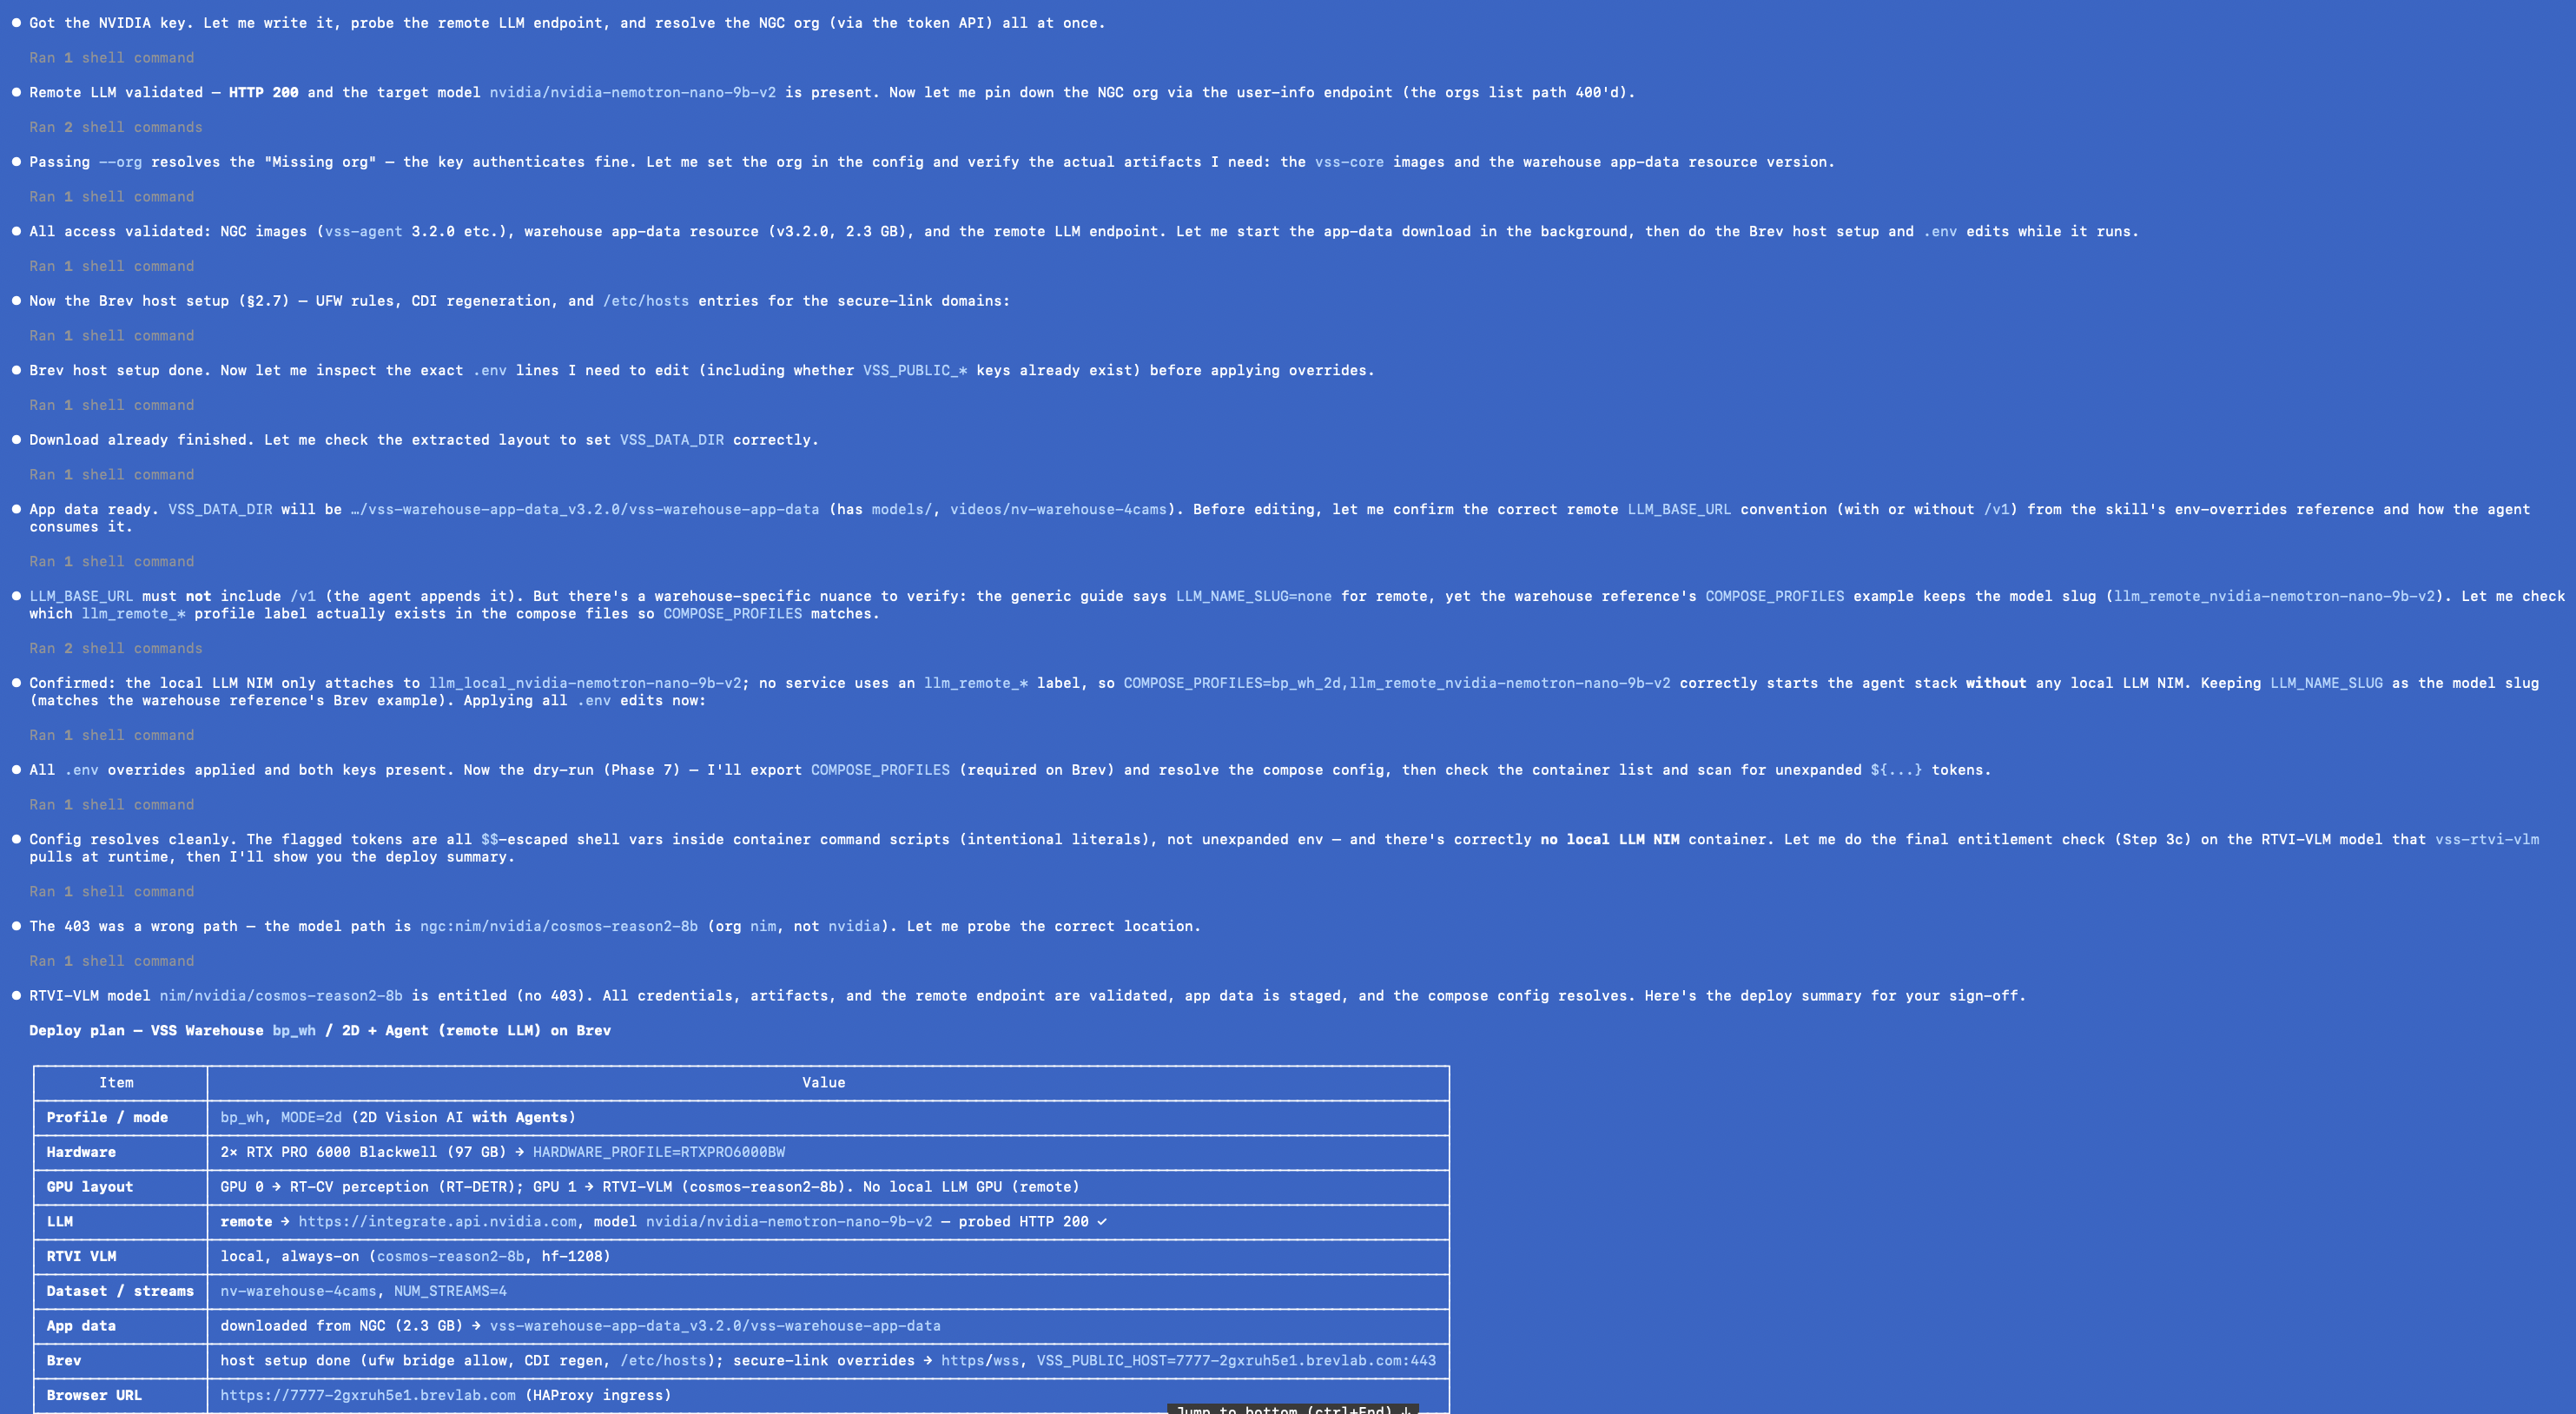
Review the generated configuration and dry-run output.#
Let the Skill bring up the docker compose stack and monitor readiness.
The Skill starts the Docker Compose stack and polls deployment status until the expected services are ready.
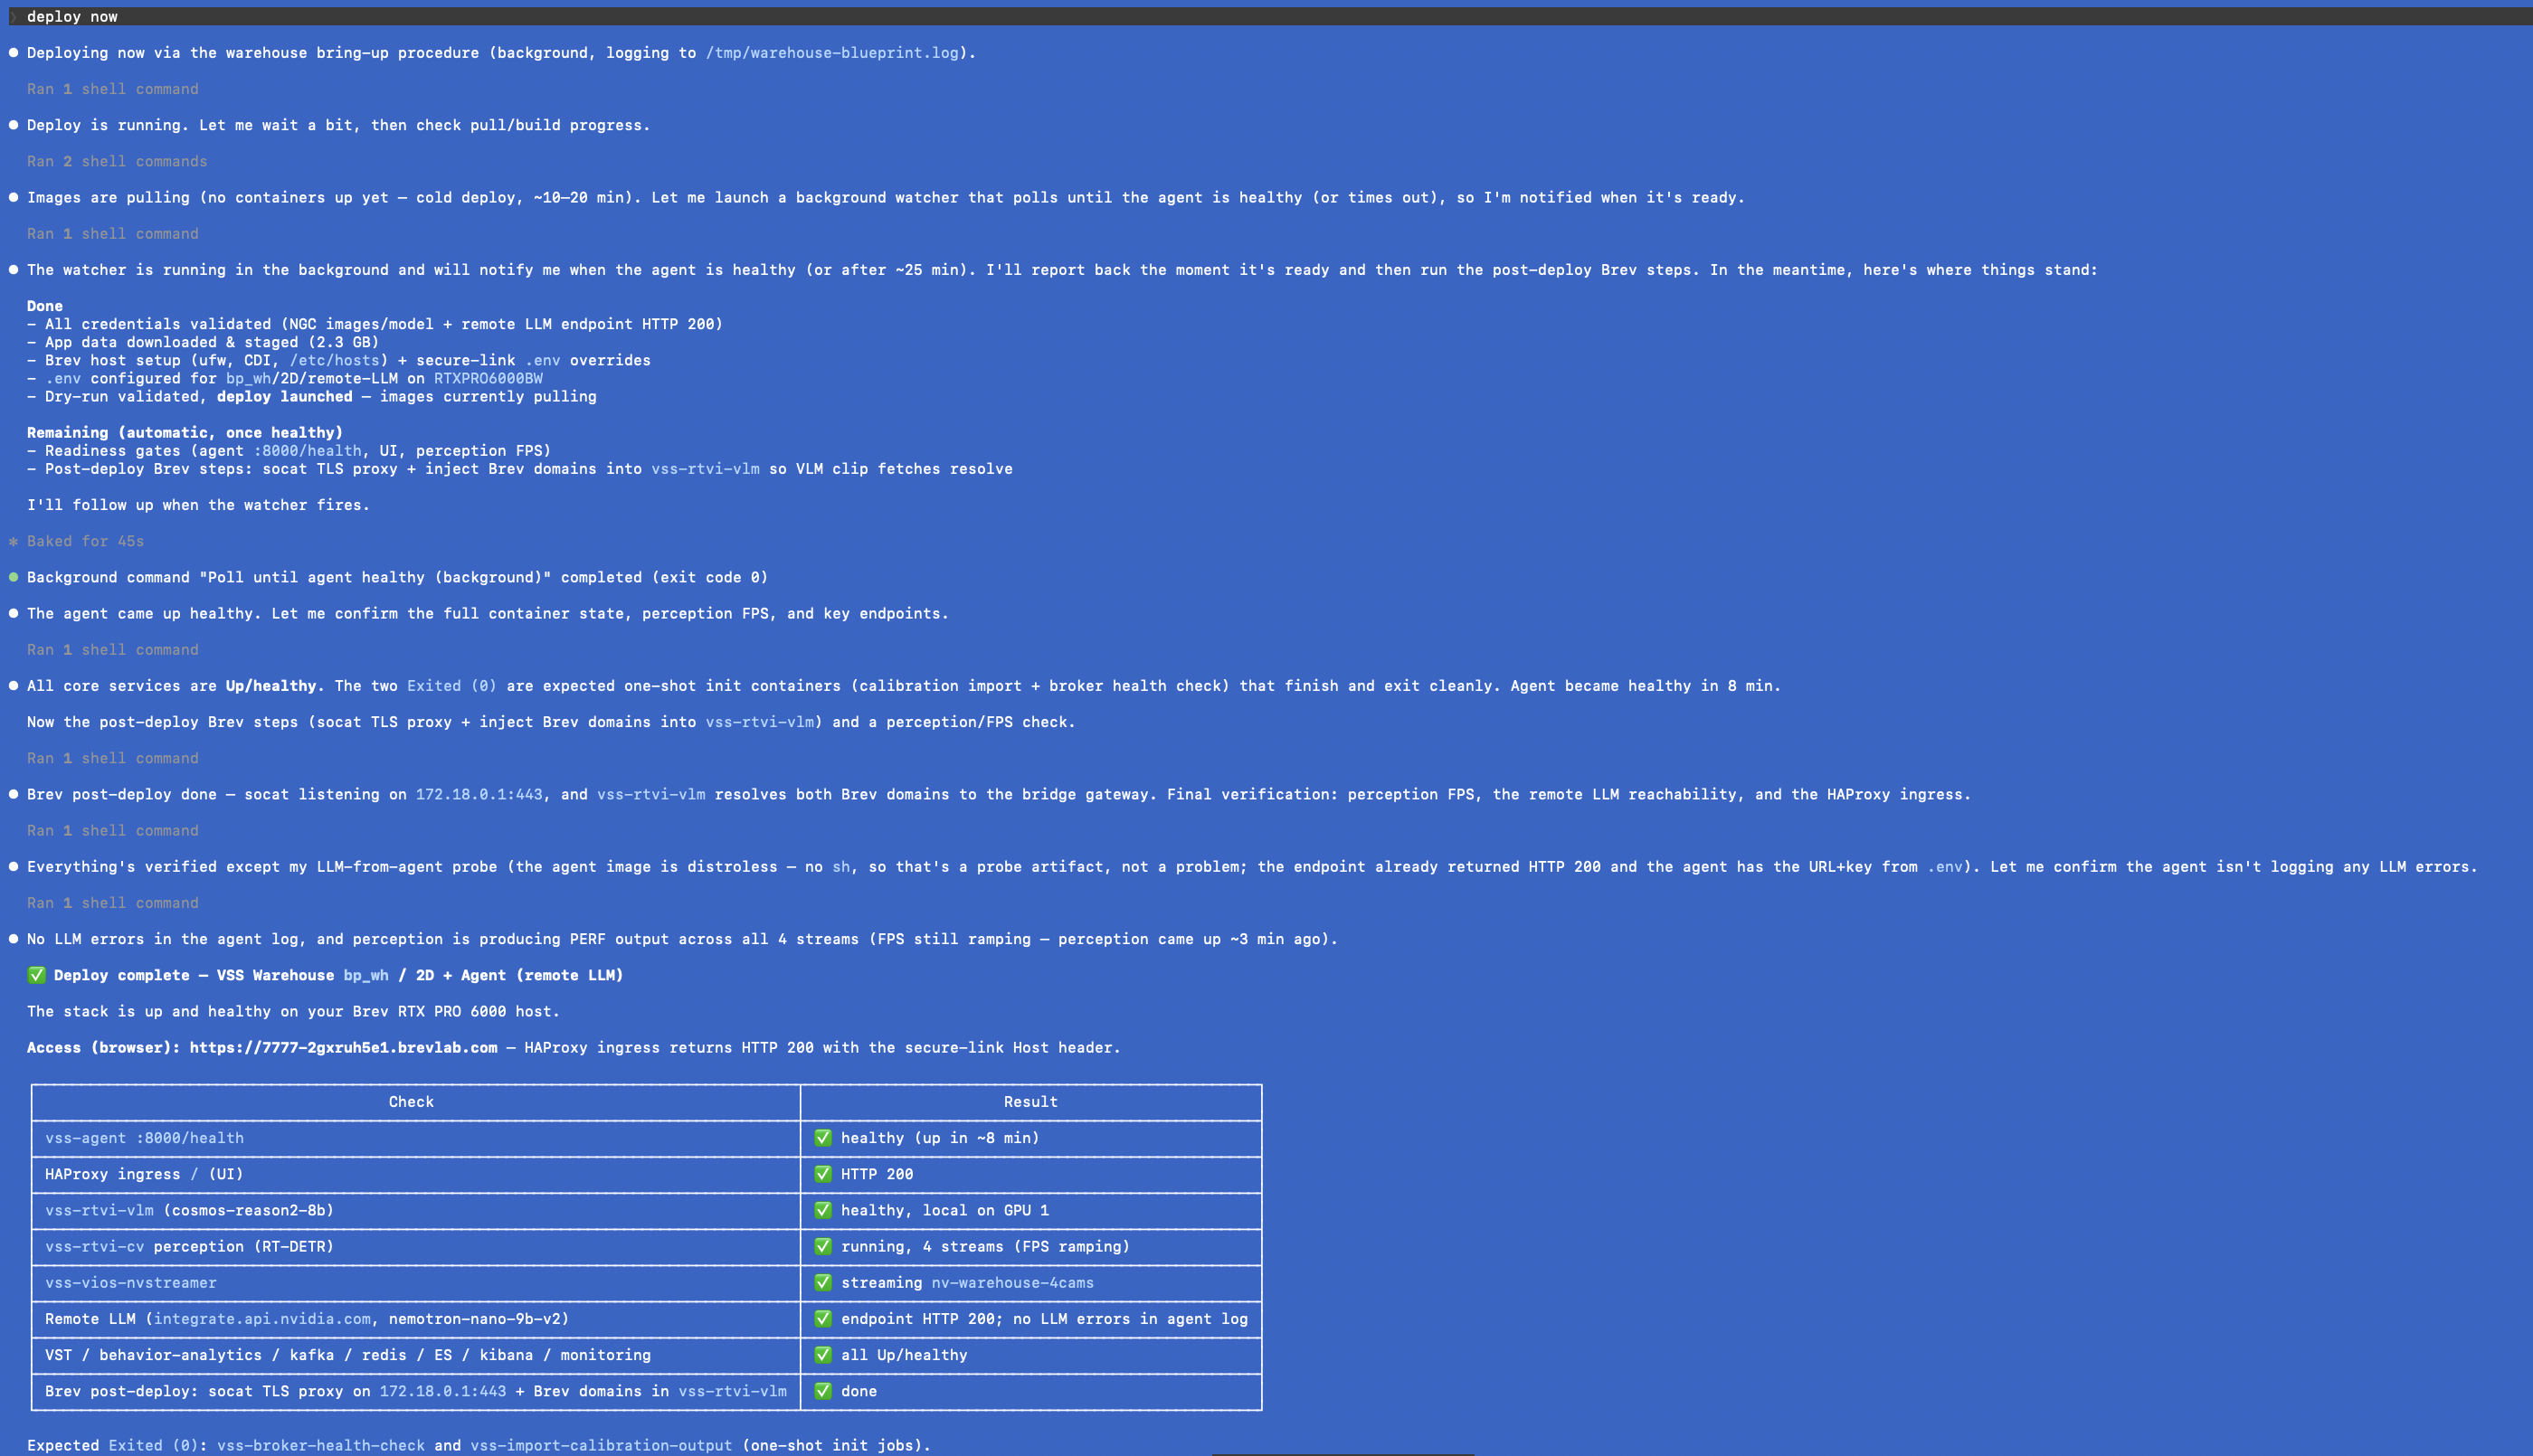
Confirm that the warehouse blueprint deployment completed successfully.#
After the stack is running, use the Warehouse Blueprint VSS UI and analytics views to verify that the deployment is serving data.
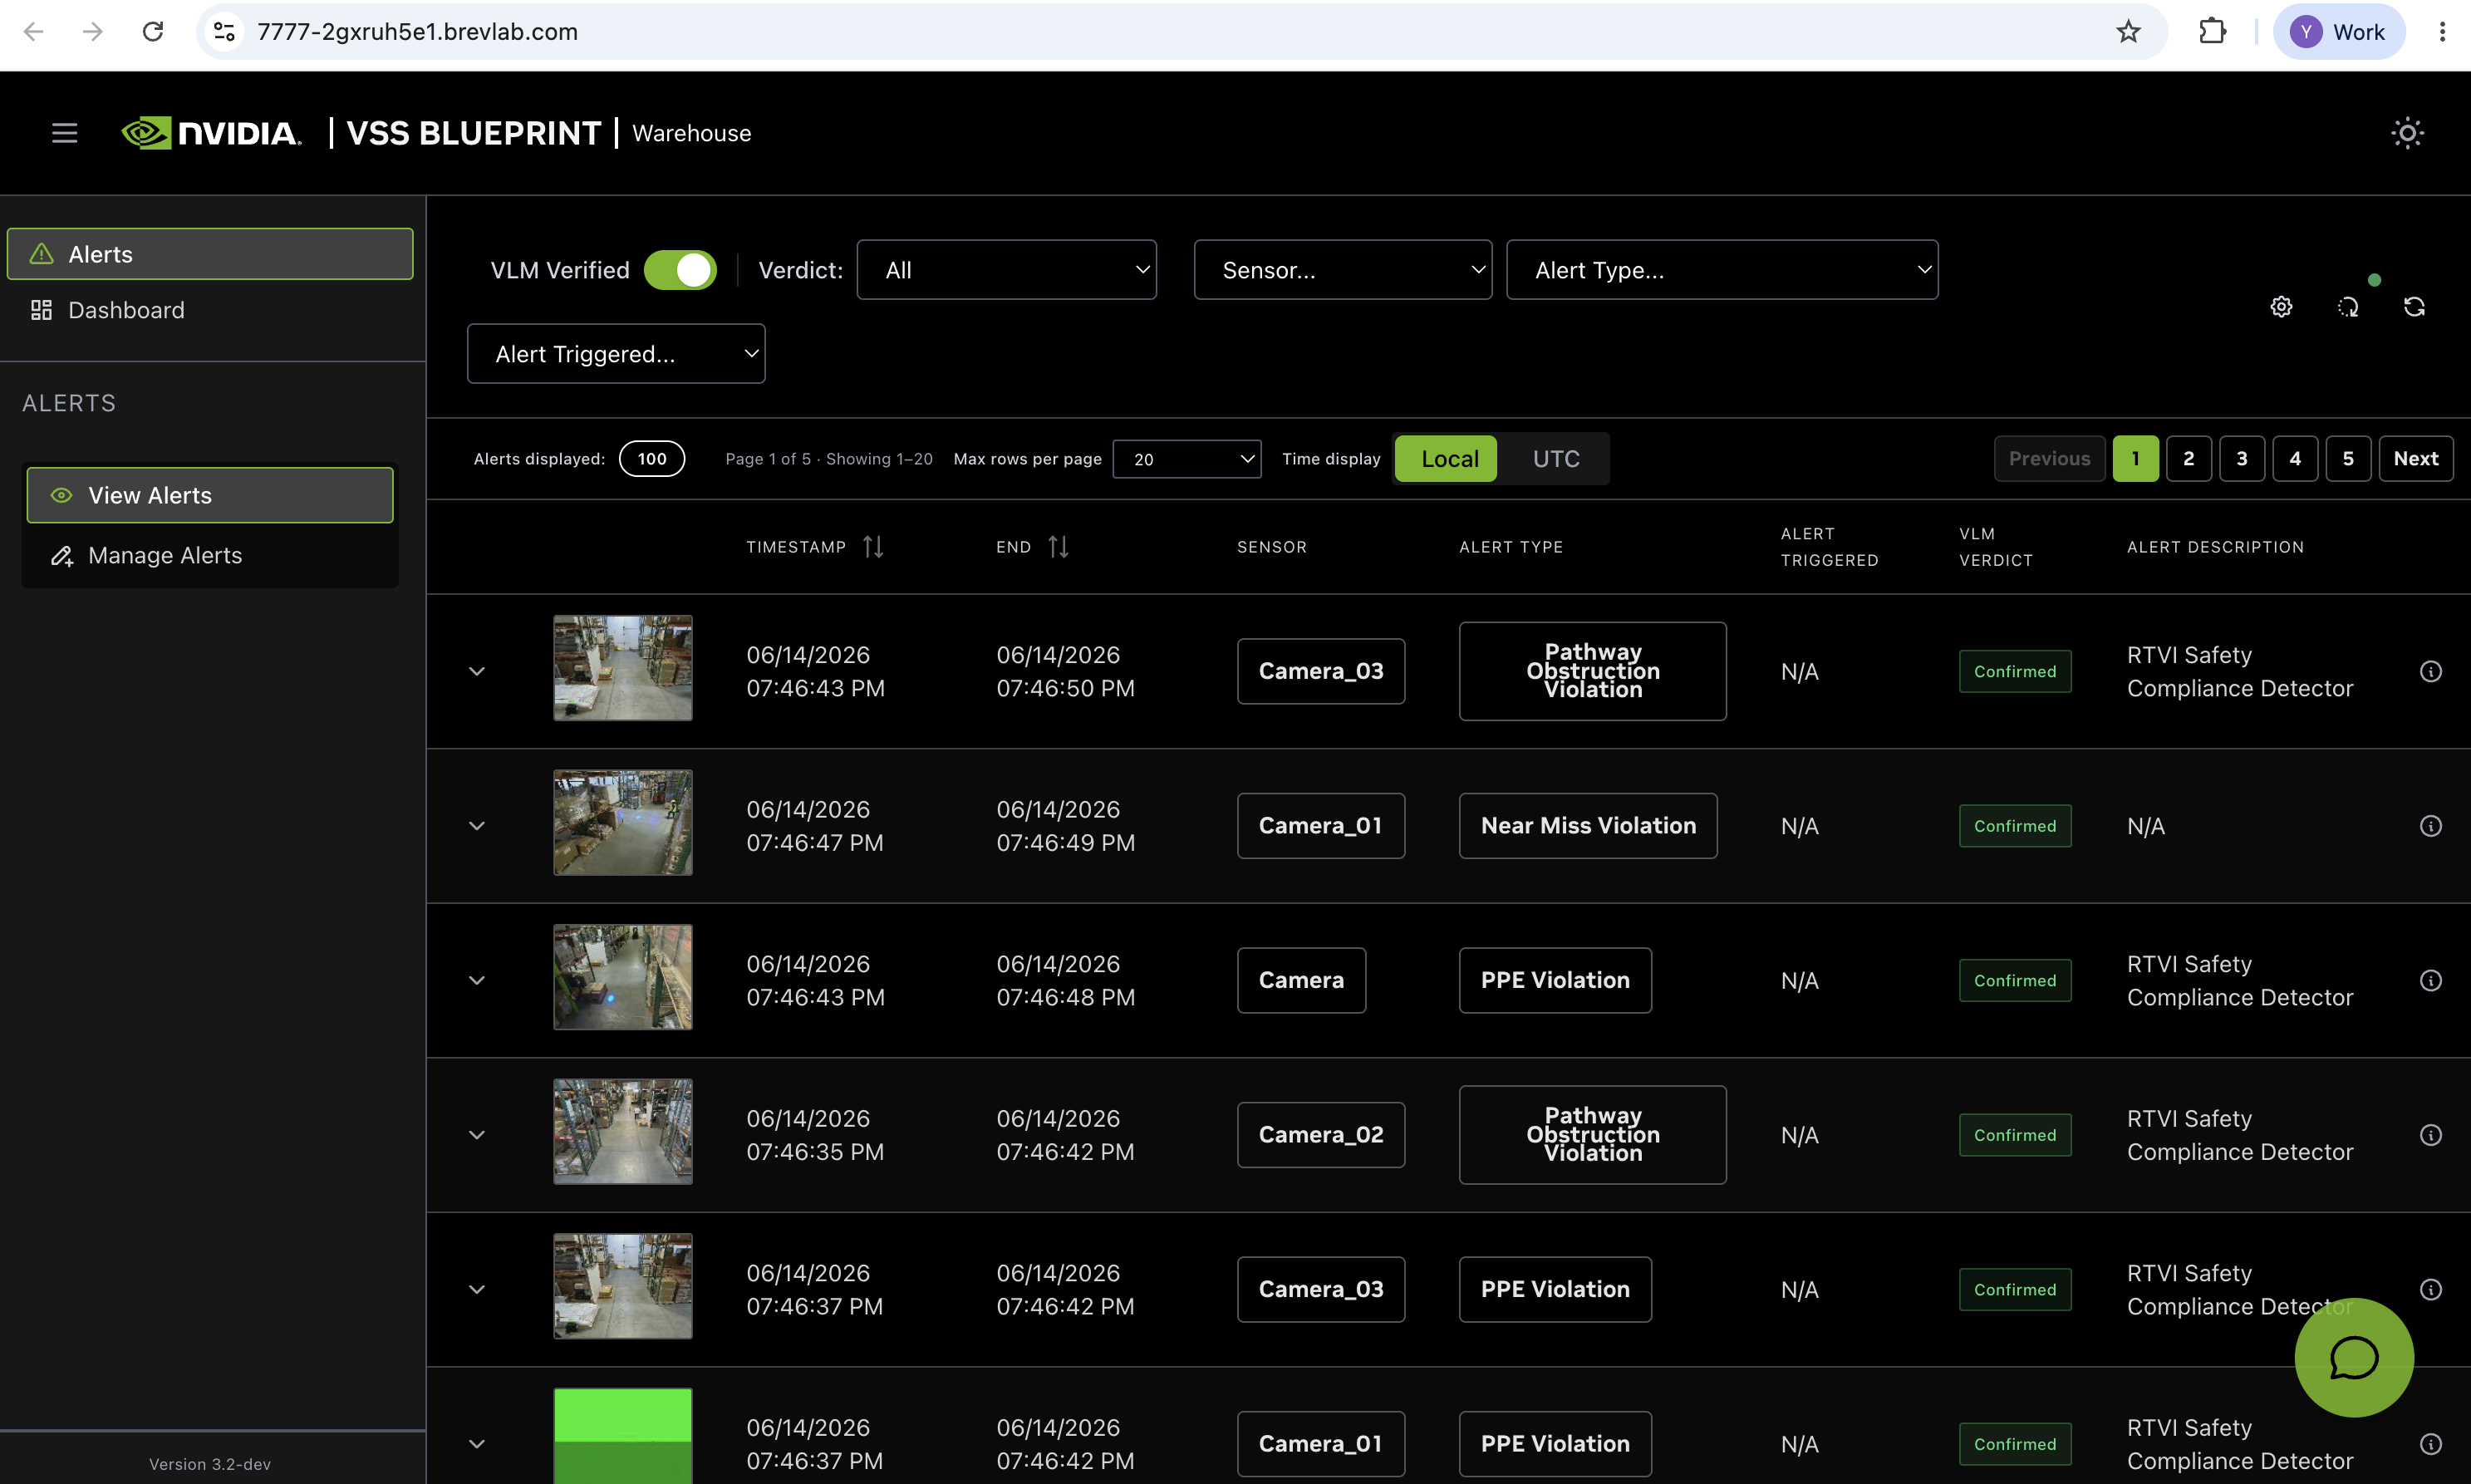
Verify the running deployment in the VSS UI.#
Verify analytics output in Kibana.#
How the Skill Configures and Runs the Deployment#
For the Warehouse Blueprint, vss-deploy-profile loads
skills/vss-deploy-profile/references/warehouse.md in the VSS Blueprint repository
as its per-profile playbook. That reference owns the warehouse-specific decisions the
Skill makes on the operator’s behalf:
Profile variants - picks one of
bp_wh,bp_wh_kafka,bp_wh_redis, orbp_wh_auto_calibagainstMODE=2d|3d|mv3dt, including the recommendedSAMPLE_VIDEO_DATASETandNUM_STREAMSfor each combination. See Deployment Options.Minimal vs extended - for
bp_wh_kafkaandbp_wh_redis, chooses whether to deploy ELK, Video Analytics API, and monitoring on top of the core CV pipeline. See the Minimal Profile section above for the comparison.GPU layout - assigns
RT_CV_DEVICE_ID,RT_VLM_DEVICE_ID, and, forbp_wh,LLM_DEVICE_IDorSHARED_LLM_VLM_DEVICE_IDagainst the host GPUs.LLM placement - for the
bp_wh2D agent profile, picksLLM_MODE=localorLLM_MODE=remotefrom the user’s hardware and request. Forbp_wh_kafka,bp_wh_redis, andbp_wh_auto_calibin 2D, 3D, or MV3DT mode, setsLLM_MODE=none.App data source - chooses between
<repo>/data, a custom local path, or thenvidia/vss-warehouse/vss-warehouse-app-dataNGC resource.Calibration - for own-data deployments, routes to the standalone or warehouse auto-calibration profile to generate calibration JSON before the full warehouse stack comes up.
Bring up and monitor - runs
docker compose ... upagainstindustry-profiles/warehouse-operations/.env, then watches logs anddocker psuntil every expected container reportsUpand FPS is flowing throughvss-rtvi-cvorvss-rtvi-cv-mv3dtfor MV3DT.
Debugging and Updating Skills#
For warehouse-specific debugging prompts such as “warehouse FPS low”, “BEV out of
sync”, or “perception not starting”, the Skill loads the companion
skills/vss-deploy-profile/references/warehouse-debug.md reference.
After a git pull of the VSS Blueprint repository, symlinked Skills automatically
point at the updated content. If new Skills were added, ask the coding agent:
Re-read skills/README.md and add any new skills missing from this host's skills
directory.
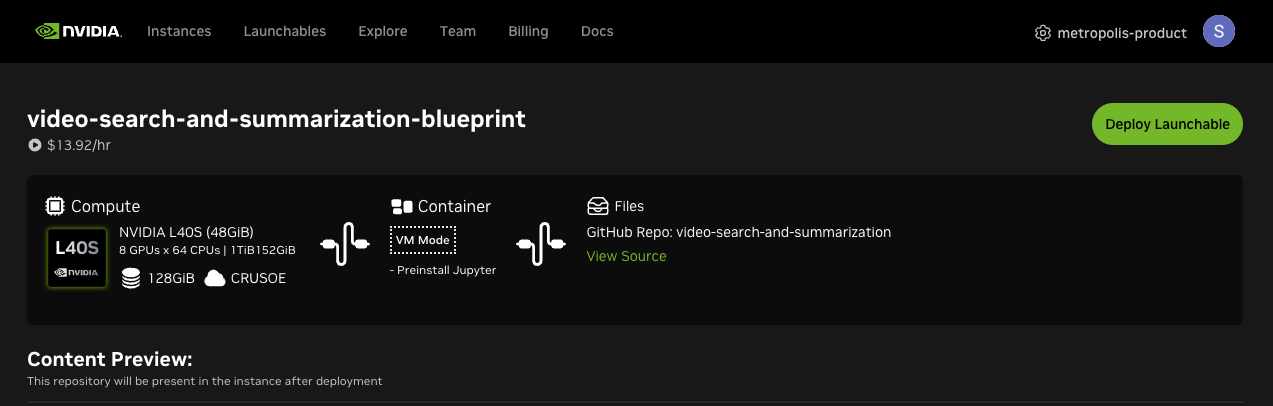
Brev Launchable#
Launchables are a part of NVIDIA Brev that deliver preconfigured, fully optimized compute and software environments.
This deployment uses the Docker Compose deployment method to set up the Warehouse Blueprint.
Link to GitHub Repository used in this launchable.
Launch BlueprintPrerequisites#
Host System Prerequisites#
Brev Launchable takes care of all these requirements. The provided notebook adjusts the system requirements.
Ubuntu 22.04 or Ubuntu 24.04
Minimum NVIDIA driver - 580
The notebook pins Docker to a known-good combination if the host Docker stack is outside the supported version range
Obtain NGC API Key#
To obtain the required NGC API Key, follow the steps in:
Deployment Profiles#
The launchable notebook uses the same MODE, BP_PROFILE, STREAM_TYPE, SAMPLE_VIDEO_DATASET, and NUM_STREAMS values described in the Deployment Selection section above. In the notebook’s first code cell, set them to match your chosen profile.
See Deployment Options for full details on each profile.
Steps to Launch the Blueprint#
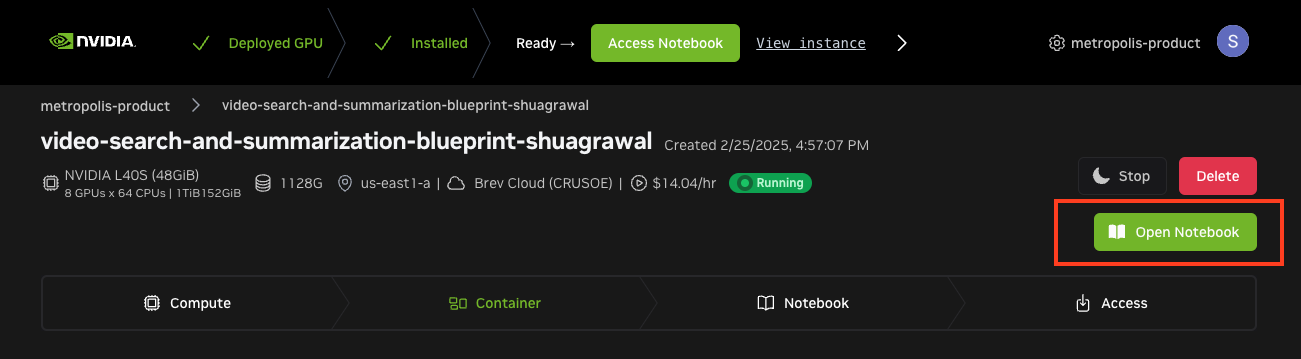
Go to the Launchable page.
Click on ‘Deploy Launchable’ on top right.
Click on ‘Go to Instance Page’.
Click on ‘Open Notebook’ button after it is enabled (this could take a couple of minutes).
Close any warnings on the Jupyter Lab tab.
Navigate to and open the
video-search-and-summarization/deploy/docker/scripts/deploy_warehouse_launchable.ipynbnotebook.In Warehouse Blueprint 3.2, the compose files ship in-tree in the
video-search-and-summarizationrepo — there is no separate compose tarball to download. On Brev, the repo is cloned onto the instance automatically; setDEPLOY_SOURCE_PATHin Section 1 to that path (typically~/video-search-and-summarization).In Section 1, set
NGC_CLI_API_KEYand select your deployment profile (MODE,BP_PROFILE,STREAM_TYPE,HARDWARE_PROFILE, etc.) — see the table above.Run each cell in order and follow the instructions in the notebook to access the Warehouse Blueprint UI through the HAProxy ingress (port
7777).
Note
The complete setup takes around 20 minutes on first run as it downloads containers, pulls warehouse app data from NGC, and (for perception) compiles the TensorRT engine. Subsequent runs are faster — images stay cached locally and the engine is cached under $VSS_DATA_DIR/models/.
Accessing the UI#
Browser-facing services are reached through their service ports:
Agent UI →
<secure_link>directly (the HAProxy ingress serves the Agent UI at the root path)Kibana →
<secure_link>/kibana/(requires extended profile,MINIMAL_PROFILE="")VST UI →
<secure_link>/vst
Note
The Brev Launchable has known limitations with VST video playback, 2D with Agent profile, and auto-calibration profiles. See Brev Launchable Known Limitations.
For the full set of service access points (including direct ports for Video Analytics API, MCP servers, and NIM endpoints), see Service Access Points.