VSS Warehouse Blueprint - MV3DT Vision AI Profile#
Overview#
Introduction#
The VSS Warehouse Blueprint’s MV3DT Vision AI Profile is a comprehensive guide to building a 3D intelligent video analytics system using RT-DETR object detection and Multi-View 3D Tracking (MV3DT). Unlike the 3D Vision AI Profile, which uses the Sparse4D end-to-end 3D perception model, this profile pipelines a 2D detector (RT-DETR) with a distributed multi-view 3D tracking framework (MV3DT) to produce 3D Bird’s Eye View (BEV) outputs from multiple overlapping cameras. It provides a detailed overview of the system architecture, data flow, and key components.
Deployment Architecture#
Components and Interactions#
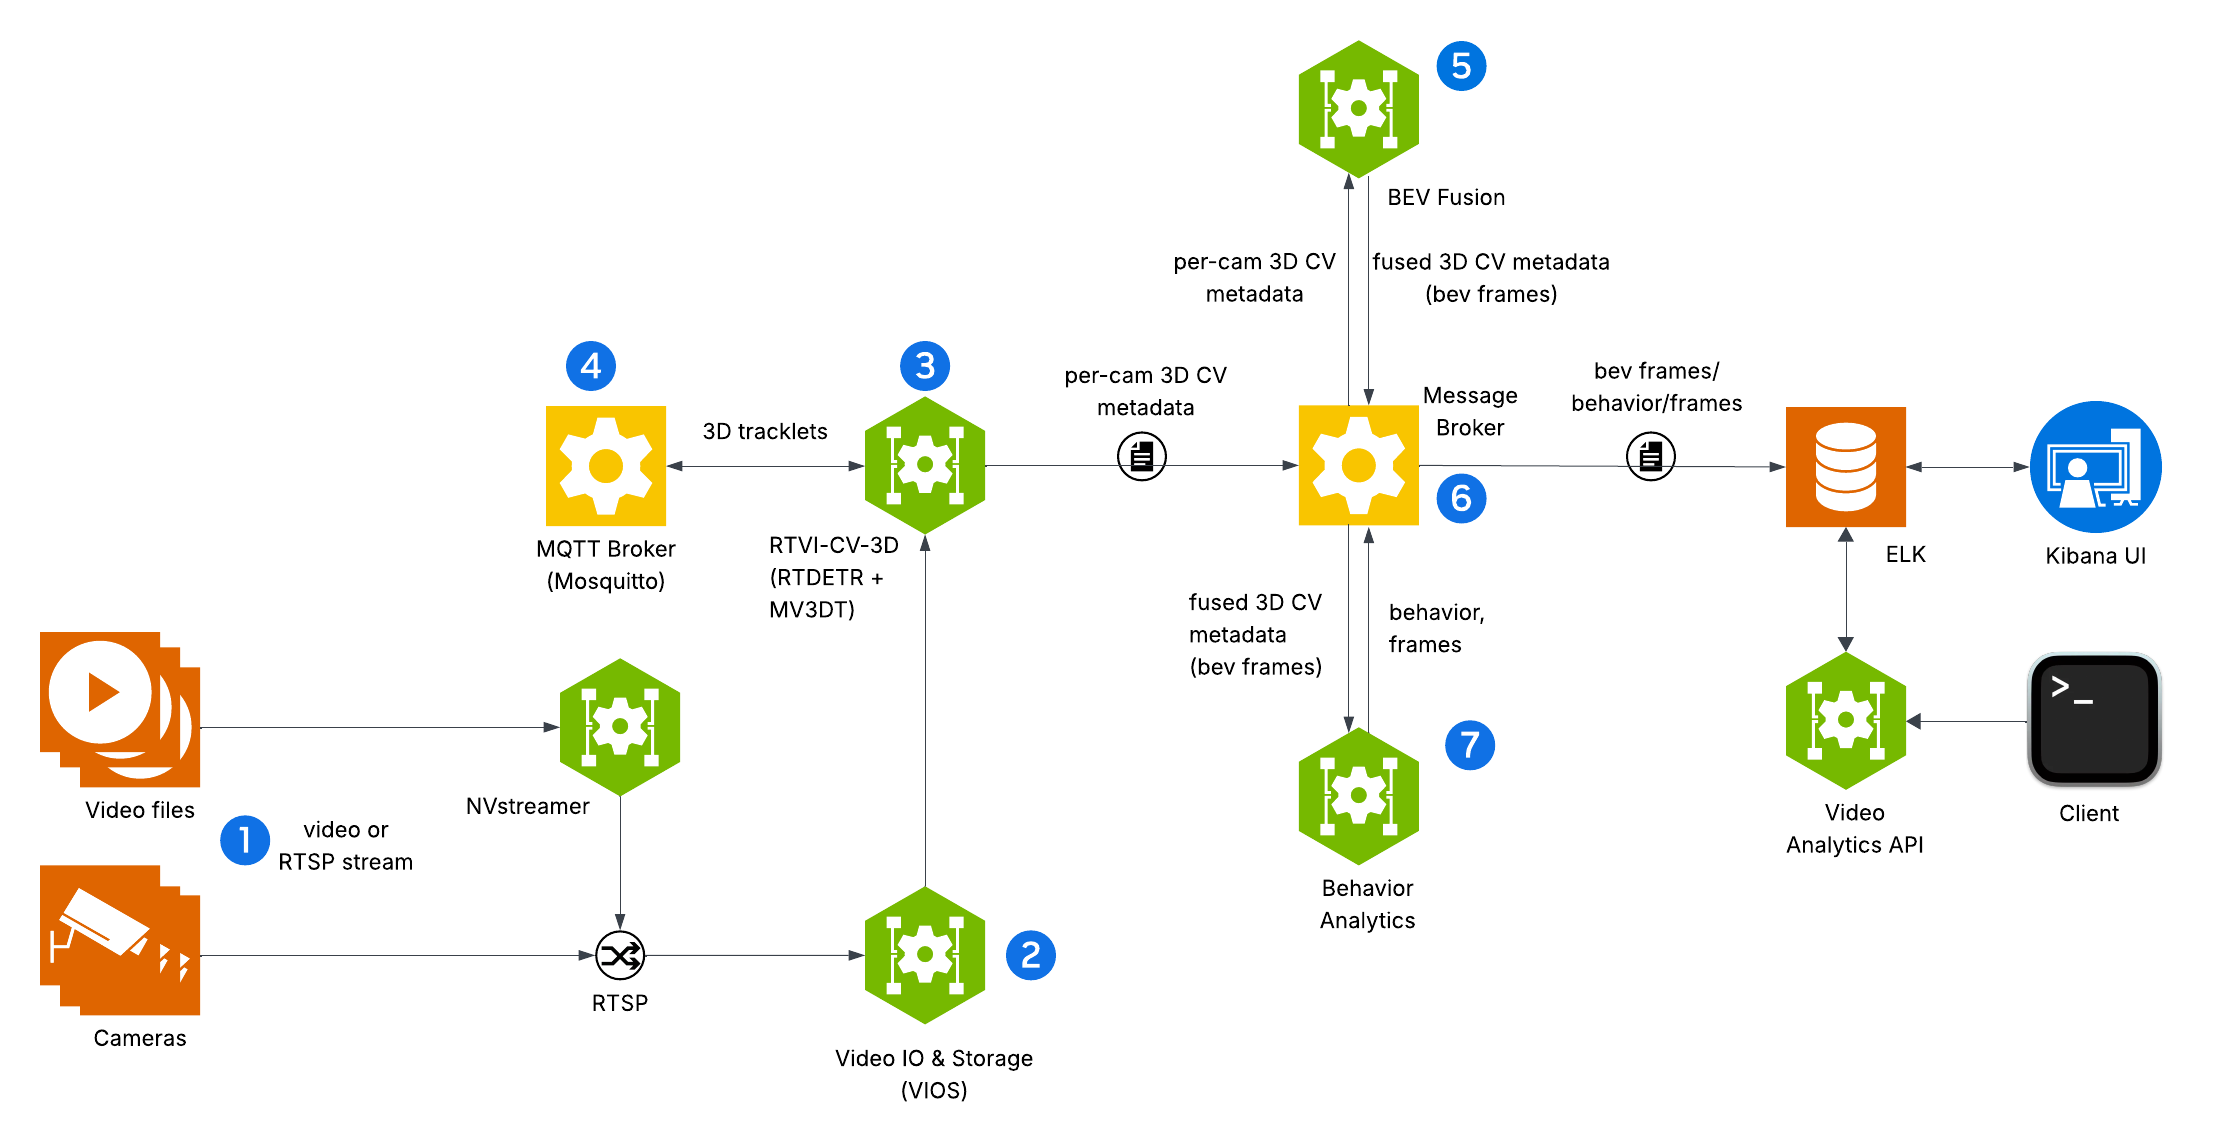
The VSS Warehouse MV3DT Blueprint emphasizes 3D multi-camera detection, tracking, and behavior analytics for safety events and metrics using RT-DETR and MV3DT. Below is a breakdown of the components and their interactions.
Input Source
Videos: Raw video data stored in a filesystem, serving as input for processing.
NvStreamer (link): A microservice that streams videos via RTSP (Real-Time Streaming Protocol) to the VIOS (Video IO & Storage). NvStreamer can be swapped with real-world cameras.
Video IO & Storage (VIOS) (link)
VIOS ingests video streams from NvStreamer via RTSP.
It records the streams and forwards them (via RTSP) to the DeepStream microservice for further processing.
DeepStream (RT-DETR + MV3DT) (link)
DeepStream processes RTSP streams for 3D multi-camera detection and tracking, combining the RT-DETR detector (link) with the MV3DT distributed tracking module.
RT-DETR generates 2D bounding boxes for warehouse-relevant object classes. The MV3DT module back-projects these 2D detections into 3D world coordinates using each camera’s projection matrix and 3D object models, and fuses measurements across cameras with overlapping fields of view.
Cameras exchange 3D tracklets with their vision neighbors through an MQTT Broker for decentralized ID negotiation, cross-camera ID propagation, and multi-view measurement fusion.
It sends per-camera frame data, including detected and tracked object IDs with 3D foot locations, in Protobuf format to the message broker via the
mdx-rawtopic.
MQTT Broker (Mosquitto)
An Eclipse Mosquitto MQTT message broker used exclusively for inter-camera MV3DT communication.
Each camera publishes its 3D tracklets to a dedicated MQTT topic and subscribes to topics from its vision neighbors (cameras with overlapping fields of view).
This enables decentralized, globally unique ID assignment and cross-camera handover without a central coordinator.
BEV Fusion (link)
This microservice consumes per-camera
mdx-rawdata (Protobuf) from the message broker.It fuses 3D measurements from multiple cameras into unified Bird’s Eye View (BEV) frames.
The resulting fused BEV data is published to the message broker via the
mdx-bevtopic for downstream consumption.
Message Broker (Kafka or Redis)
The message broker serves as the central hub for data distribution, using Protobuf for all data exchanges.
Kafka (Kafka): High-throughput message broker optimized for datacenter deployments with robust persistence and scalability.
Redis Streams: Lightweight message broker ideal for edge deployments with minimal memory footprint and low-latency requirements.
It also functions as a control bus, managing notifications (in JSON, via
mdx-notification) for calibration updates, such as new ROI or tripwire definitions.
Behavior Analytics (link)
This microservice consumes
mdx-bevdata (Protobuf) from the message broker.It processes the data to generate behavior analytics, safety insights, and metrics.
The resulting data, in Protobuf format, is sent back to the message broker for indexing into Elasticsearch.
Storage
ELK (Elasticsearch, Logstash, Kibana) (ELK): Logstash retrieves BEV outputs and safety violation frames from the message broker, converts Protobuf to JSON, stores the data in Elasticsearch, and supports querying and visualization.
Visualization
External Interfaces
API Gateway and MCP (API Gateway/MCP): Enables external systems to interact with the events data through API calls.
Key Technologies#
Microservices: Components like NvStreamer, VIOS, DeepStream, BEV Fusion, and Behavior Analytics are modular microservices.
RT-DETR: Real-Time Detection Transformer for 2D object detection, pretrained on warehouse datasets.
MV3DT: Multi-View 3D Tracking framework for distributed cross-camera 3D tracking using camera projection matrices and object models.
MQTT: Lightweight publish/subscribe protocol for inter-camera tracklet exchange.
RTSP: Facilitates real-time video streaming.
Protobuf: Ensures efficient, compact data exchange.
Message Broker: Manages data distribution and control messaging.
ELK Stack: Supports storage, logging, and visualization.
JSON: Used for notifications and calibration data.
Setup and Configuration#
Note
For standalone RTVI-CV-3D/MV3DT deployment, follow the Agents skills walkthrough below. For the complete Warehouse Blueprint MV3DT deployment, follow the Skill section in the Quickstart Guide.
For detailed steps, see the Quickstart Guide.
Agent Skills walkthrough#
This section walks through the end-to-end MV3DT/RTVI-CV-3D journey using a coding agent (Claude Code, Codex, or NemoClaw) and the VSS Agent Skills instead. For each step it documents the example prompt you give the agent and what the agent does in response.
Use this walkthrough when you want to deploy and operate only the
RTVI-CV-3D / MV3DT stack without the full Warehouse agent, LLM, or VLM stack.
For the full Warehouse Blueprint, use the vss-deploy-profile skill as
described in the Warehouse Quickstart Skill section.
Note
Install the skills into your coding agent first (see Installing Skills for the install flow) and confirm your host meets the Prerequisites. For how each harness loads skills, see Agent Harnesses.
The MV3DT journey exercises two skills:
Journey step |
Skill |
What it does |
|---|---|---|
Deploy and operate MV3DT |
|
Deploys RTVI-CV-3D / MV3DT perception, BEV Fusion, VST, the broker, and optional overlay services for sample data, custom videos, or RTSP inputs. |
Generate calibration when needed |
|
Runs AutoMagicCalib (AMC) and exports the calibration files that MV3DT needs. The MV3DT skill invokes this skill automatically when calibration is missing. |
The agent may pause for user input during the journey. Common prompts include
NGC_CLI_API_KEY for NGC image and resource access, profile size
(extended for VST overlays or minimal for a smaller stack), dataset slug,
video or RTSP locations, detector choice (resnet or transformer), and
confirmation before starting containers or clearing state. For custom inputs, replace
<path/to/files> with the directory that contains the synchronized camera
MP4s, replace <rtsp-url-1>, <rtsp-url-2>, … with the ordered RTSP
stream list, and replace <dataset-slug> with a short name for the
camera set. Calibration flows may also ask for a Hugging Face token to stage
VGGT refinement, or direct you to the AMC UI when layout files, alignment data,
or alignment points are missing, or when you want to edit calibration
parameters, ROI/tripwire definitions, or MV3DT group / region metadata.
Deploy the bundled sample dataset#
Example prompts:
Enable multi-camera tracking on the sample dataset.Deploy the standalone MV3DT stack with the bundled sample dataset.
What the agent does:
Loads the
vss-deploy-detection-tracking-3dskill and selects thesamplepath, which uses the bundledwarehouse-4cams-20mx20m-syntheticdataset and its in-tree calibration.Chooses the extended profile by default so Elasticsearch, Logstash, Kibana,
vss-video-analytics-api-mv3dt, and the calibration importer are deployed for VST video wall overlay rendering.Detects the VSS repository path, GPU hardware profile,
VSS_APPS_DIR,VSS_DATA_DIR,HOST_IP, andNGC_CLI_API_KEY.Validates app-data, model, calibration, and data-log paths before starting containers. If host data-log permissions need to change, it asks before applying scoped ACLs.
Writes the MV3DT environment recipe (for example
MODE=mv3dt,BP_PROFILE=bp_wh_kafka,STREAM_TYPE=kafka,LLM_MODE=none, andVLM_MODE=none), runs a compose dry run, and summarizes the deployment plan.Waits for your confirmation before starting containers.
Deploys the stack and waits for readiness gates across
vss-rtvi-cv-mv3dt,vss-rtvi-cv-bev-fusion, the broker, VST, configurator, behavior analytics, and the overlay services.
Deploy custom synchronized videos#
Example prompts:
Enable multi-camera tracking on local video files at <path/to/files>.Deploy standalone MV3DT with local videos at <path/to/files>.
What the agent does:
Loads the
vss-deploy-detection-tracking-3dskill and selects thevideospath.Asks for any missing inputs: video directory (
<path/to/files>), dataset slug (<dataset-slug>), extended versus minimal profile, detector choice,NGC_CLI_API_KEY, and whether to use VGGT refinement when calibration must be generated.Checks whether
calibration.jsonand matchingcamInfo/*.ymlorcamInfo/*.yamlfiles already exist for the requested dataset slug under the MV3DT calibration mount path.If calibration is present, validates camera count, updates MV3DT camera configuration, and proceeds to deployment.
If calibration is missing, invokes
vss-generate-video-calibrationto deploy AMC, create a project from the synchronized videos at<path/to/files>, run calibration with the requested detector, optionally stage and run VGGT refinement using a Hugging Face token, and export both MV3DTcamInfofiles andcalibration.json.If layout or alignment data is missing, pauses and directs you to the AMC UI to upload
layout.png/alignment_data.jsonor mark and save correspondence points before calibration continues.Lands the exported calibration under
warehouse-mv3dt-app/calibration/sample-data/<dataset-slug>/and makes the files readable by the containers.Deploys the MV3DT stack using the custom dataset and verifies that the configured stream count matches the generated calibration.
Deploy live RTSP streams#
Example prompts:
Enable multi-camera tracking on RTSP streams <rtsp-url-1>, <rtsp-url-2>, ...Deploy standalone MV3DT against RTSP streams <rtsp-url-1>, <rtsp-url-2>, <rtsp-url-3>, <rtsp-url-4> and generate calibration first.
What the agent does:
Loads the
vss-deploy-detection-tracking-3dskill and selects thertsppath.Collects the ordered RTSP URL list (
<rtsp-url-1>,<rtsp-url-2>, …), dataset slug (<dataset-slug>), detector choice, profile size, and any user-supplied calibration path. It also checks forNGC_CLI_API_KEYand asks for a VIOS endpoint if AMC needs VIOS to capture the streams.If calibration is missing, invokes
vss-generate-video-calibrationin RTSP mode, verifies VIOS reachability for AMC capture, creates the AMC project, runs calibration, and exports MV3DT-ready files.If VGGT refinement is used for the calibration, stages the VGGT model with a Hugging Face token and falls back to the AMC result if VGGT does not complete.
If calibration settings, layout files, alignment data, or alignment points are missing, pauses and directs you to the AMC UI to provide them before calibration continues.
Generates or updates MV3DT camera configuration from the calibration file, including stream count and per-camera
camInfofiles.Deploys the MV3DT stack against the live streams and verifies that VST sensors are registered and online.
Verify and view the deployment#
Example prompts:
Verify the MV3DT deployment and give me the VST and Kibana URLs.Check whether mdx-raw and mdx-bev are flowing.
What the agent does:
Checks container health for perception, BEV Fusion, mosquitto, Kafka or Redis, VST, configurator, behavior analytics, and the extended overlay services when enabled.
Reads
vss-rtvi-cv-mv3dtlogs for TensorRT engine build status, active sources, and per-camera FPS.Checks the BEV Fusion health status and confirms the
mdx-rawandmdx-bevbroker offsets are growing.Queries the VST sensor list and verifies that registered sensors match the calibration camera set and are online.
Returns the browser URLs for VST (
http://<HOST_IP>:30888/vst) and, when the extended profile is deployed, Kibana (http://<HOST_IP>:7777/kibana).
Tear down or redeploy MV3DT#
Example prompts:
Tear down the standalone MV3DT deployment.Stop MV3DT but keep calibration outputs for the next run.
What the agent does:
Loads the
vss-deploy-detection-tracking-3dteardown flow.Explains whether the request requires a plain
docker compose downor a reset withdown -v. For camera-set or dataset changes, it recommends resetting named volumes so stale VST sensor records and broker state do not break the next deployment.Asks for confirmation before destructive cleanup such as removing named volumes, clearing
data_log, or deleting AMC project state.Preserves calibration outputs under
warehouse-mv3dt-app/calibration/sample-data/<dataset-slug>/unless you explicitly ask to remove them.Reports the remaining preserved state and the next redeploy command path.
Testing and Validation#
Kibana UI#
Note
In the new Kibana UI (versions 8.0 and later), “Index Patterns” have been renamed to “Data Views”.
Check for BEV, Frames and Behavior Data Views in Kibana:
Launch Chrome browser
In the address bar enter
http://<IP_address>:7777/kibana
In the user interface, navigate to the Management -> Stack Management section and select Data Views under Kibana. If the data views are not visible, create new data view (via “Create data view” button on the top right corner) for mdx-bev, mdx-frames and mdx-behavior.
Browse the Kibana UI, discover the data views and visualize the data.
Note
BEV frames are created by the BEV Fusion microservice, which combines per-camera frames from individual cameras.
For better accuracy, the timestamps of the frames across the cameras should be synchronized. These timestamps can be found under the
infoattribute of the frame.
VIOS UI#
Note
At this point the web-based application is only available for Chrome browser running on Linux, Windows or MacOS, details can be found in VST docs.
Launch Chrome browser.
In the address bar enter
http://<IP_address>:30888/vst/.
Configure
Use the VIOS UI to configure camera streams and verify that video feeds are active.
View VIOS Video Wall
Enable Overlay settings (instructions here), to view 3D object detection and tracking results.
Events and Incidents#
Events#
The VSS Warehouse MV3DT Blueprint performs multi-view 3D detection and tracking (MV3DT) across calibrated multi-camera feeds, tracking objects in 3D world coordinates, and generates events based on configurable logic.
One type of event is supported:
ROI Events: Triggered when objects enter or exit a predefined region of interest (ROI).
For more details, see Event Detection. All event data is stored in Elasticsearch, and can be queried and visualized in Kibana and the VIOS UI.
Incidents#
The MV3DT profile does not generate confirmed incidents. The per-frame violation data (such as proximity and zone analytics) is still computed and written to the enhanced frames, so downstream consumers can read it directly from the message stream or Elasticsearch—but it is not promoted to tracked incidents. For the enhanced-frame violation fields, see Enhanced Frame Data.
Use Cases#
ROI events provide the foundation for occupancy monitoring and safe-zone enforcement across calibrated multi-camera 3D scenes—continuously tracking whether designated zones remain clear and maintaining accurate enter/exit occupancy counts for spatial analytics and capacity management.
Latency Measurements#
Platform |
Profile |
#Streams |
FPS |
Interval |
(NvStreamer + VIOS + DeepStream) latency |
Behavior-analytics latency |
E2E latency |
|---|---|---|---|---|---|---|---|
RTX 6000 PRO SE |
Kafka |
4 |
30 |
0 |
51 ms |
23 ms |
74 ms |
IGX THOR |
Kafka |
4 |
30 |
0 |
132 ms |
21 ms |
153 ms |
DGX SPARK |
Kafka |
4 |
30 |
0 |
67 ms |
18 ms |
85 ms |
Note
The latency may vary based on the hardware, the number of objects in a scene, the number of ROIs and tripwires, and the machine’s load.
Customization#
The Blueprint supports several levels of customization:
Data Level: Add, remove, or replace cameras while maintaining the existing workflow.
Model Level: Fine-tune the RT-DETR perception model to better suit your use cases.
Application Level: Build new microservices or applications using the provided APIs and components.
Microservice Level: Modify existing microservices from source code to extend functionality.
Adding New Cameras or Custom Datasets#
Step 1: Prepare video sources#
Choose one of the following options to provide video sources for the MV3DT profile:
Using recorded videos
Use this option to run the VSS with local video files instead of live camera feeds. Place your videos in the
videosdirectory under the path configured byVSS_DATA_DIRin$VSS_APPS_DIR/industry-profiles/warehouse-operations/.env.Using live RTSP streams
Use this option when you want to use live RTSP endpoints. Define each camera in
$VSS_APPS_DIR/industry-profiles/warehouse-operations/camera_configs/camera_info.jsonso the VSS Configurator can read the camera list and generate the required configuration. The following steps apply when using live RTSP streams.Create a Sensor Info File (
camera_info.json):
{
  "sensors": [
    {
      "camera_name": "camera-01",
      "rtsp_url": "rtsp://<IP_address:port>/stream1",
      "group_id": "<group_id_1>",
      "region": "<region_1>"
    },
    {
      "camera_name": "camera-02",
      "rtsp_url": "rtsp://<IP_address:port>/stream1",
      "group_id": "<group_id_1>",
      "region": "<region_1>"
    }
  ]
}
The
camera_namevalue should be unique for each camera, andrtsp_urlshould point to the camera stream. Thegroup_idfield defines camera groups with overlapping fields of view, which is required for multi-camera 3D tracking and BEV fusion. Theregionfield identifies the camera location or area and is required for MV3DT profile camera configuration.Required fields:
camera_name,rtsp_url,group_id,regionTip
You do not have to assign
group_idby hand. Thespatialai_data_utils(SDU) camera grouping tools derive the camera-to-BEV-group partition directly from your camera calibration. Run create_camera_clusters.py to partition cameras into non-overlapping BEV groups; cameras placed in the same cluster share agroup_id(the generated group name, such asbev-sensor-1). The warehouse MV3DT compose setup uses a single BEV group, so run the clustering tool with--n_clusters 1to place every camera inbev-sensor-1. These tools also populate the matching per-sensorgroupandregionblocks (origin, dimensions, place level) incalibration.jsonthat must be filled in before deployment (see the note under Step 3). For installation and the full command reference, see Camera Grouping Utilities.Configure VSS Configurator environment variables: Set the following in
$VSS_APPS_DIR/industry-profiles/warehouse-operations/.env:
SENSOR_INFO_SOURCE=file
SENSOR_FILE_PATH=<path_to_camera_info.json>
Step 2: Configure number of streams#
Configuring Number of Streams
Number of streams to be processed can be configured in two ways:
Static Configuration: Set the
NUM_STREAMSenvironment variable to specify the desired number of streams for video dataset or RTSP streams.NUM_STREAMS=4
The configured number of streams should be less than or equal to the maximum streams supported by your hardware profile and deployment mode. VSS Configurator can be used to automatically cap the stream count using the formula:
final_stream_count = min(NUM_STREAMS, max_streams_supported). For more details, refer to the How to Count Files Dynamically (Prerequisites) section in VSS Configurator Documentation.Dynamic Configuration: Use the VSS Configurator’s prerequisite operations to automatically count the number of video files in the recorded videos directory and use that count for configuration updates.
Note
Dynamic Configuration cannot be used for live RTSP streams.
Example: Automatically determine stream count from video files in the dataset directory:
# In blueprint_config.yml
commons:
  # Step 1: Count video files BEFORE variable processing
  prerequisites:
    mv3dt:
      - operation_type: "file_management"
        target_directories:
          - "${VSS_DATA_DIR}/videos/warehouse-mv3dt-app"
        file_management:
          action: "file_count"
          parameters:
            pattern: "*.mp4"
          output_variable: "available_video_count"  # Stores count (e.g., 6)

  # Step 2: Use the count to compute final stream count
  variables:
    mv3dt:
      # Cap to minimum of: available videos, GPU limit
      - final_stream_count: "min(${available_video_count}, ${max_streams_supported})"

  # Step 3: Use computed variable in config file updates
  file_operations:
    mv3dt:
      - operation_type: "text_config_update"
        target_file: "${DS_CONFIG_DIR}/ds-main-config-mv3dt.txt"
        updates:
          max-batch-size: ${final_stream_count}
          batch-size: ${final_stream_count}
How it works: If your dataset directory has 6 video files and the GPU supports a maximum of 4 streams, the configurator computes:
final_stream_count = min(6, 4) = 4. For more details, refer to the How to Count Files Dynamically (Prerequisites) section in VSS Configurator Documentation.
When using a custom recorded-video dataset, NUM_STREAMS depends on the number of video files available in that dataset. Make sure NUM_STREAMS is less than or equal to the number of videos you want to process.
To use a custom dataset:
Set
SAMPLE_VIDEO_DATASETin$VSS_APPS_DIR/industry-profiles/warehouse-operations/.envto the name of your dataset.Place the video files in
$VSS_DATA_DIR/videos/$SAMPLE_VIDEO_DATASET/.Add the image metadata, calibration, floor map and camInfo files under
$VSS_APPS_DIR/industry-profiles/warehouse-operations/warehouse-mv3dt-app/calibration/sample-data/${SAMPLE_VIDEO_DATASET}. You can refer to sample datasets provided in the repository for the expected file structure and sample contents.
Step 3: Deploy and generate new calibration#
Deploy the auto-calibration profile (bp_wh_auto_calib_mv3dt) to generate a new calibration against live RTSP streams served by nvstreamer, using the warehouse dataset and VST stack. For steps to generate calibration, see VSS Auto Calibration quickstart. Once the calibration is generated, store it, bring the Docker Compose stack down, and update the calibration file at $VSS_APPS_DIR/industry-profiles/warehouse-operations/warehouse-mv3dt-app/calibration/sample-data/${SAMPLE_VIDEO_DATASET}/calibration.json.
Note
Maintain a single
calibration.jsonfile per deployment.The AMC UI exports the
groupandregionblocks under each entry insensors[]with empty values. The MV3DT profile uses these fields for multi-camera grouping and BEV fusion, so populate them with valid values for each sensor before deploying the blueprint.Add new camera information following the schema defined in Calibration Schema.
The
imageMetadatafile needs to be generated manually.Manually add any other attributes that are missing from the generated calibration file but are required for your use case.
Auto Calibration requires time-synchronized videos as input. For RTSP cameras, record videos from the RTSP source (e.g. using ffmpeg or similar tools), manually trim the videos to time-synchronize them if needed, then provide them to Auto Calibration.
Step 4: Update MV3DT-specific configurations#
After the MV3DT calibration file is generated and placed in the deployment sample-data directory, update the MV3DT-specific configuration files using the utility scripts under tools/rtvi-cv-mv3dt-utils. Complete these updates before running camera clustering.
When adding new cameras to the MV3DT profile, you must update the following MV3DT-specific configuration files:
Camera Information Files (
camInfo/<sensor_id>.yml): Each camera requires acamInfofile containing the 3x4 projection matrix and per-class object model dimensions. Generate these from yourcalibration.jsonusing the provided utility script. See Update Camera Information Configuration for details.MQTT Publish/Subscribe Configuration (
pub_sub_info_config.yml): Defines the inter-camera communication graph for MV3DT. Generate a vision-neighbor graph from camera calibration data. See Update Publish/Subscribe Configuration for details.Tracker Configuration (
ds-mv3dt-tracker-config.yml): Update theObjectModelProjection.cameraModelFilepathsection to map each new sensor ID to its correspondingcamInfofile.
Step 5: Camera Clustering#
After the MV3DT-specific configuration files are updated, use create_camera_clusters.py to partition cameras into non-overlapping groups for separate 3D model instances. The warehouse MV3DT compose setup uses one BEV group, so run the clustering tool with --n_clusters 1 and verify that sensors[].group is present in calibration.json. For command examples and available options, see Camera Clustering.
Step 6: Redeploy the stack to apply the new calibration#
To redeploy the stack to apply the new calibration, follow the Quickstart Guide.
Camera Grouping Utilities#
The MV3DT Blueprint uses multi-camera BEV (Bird’s Eye View) perception systems that require cameras to be organized into groups. Each camera group defines a set of cameras with overlapping fields of view that work together for 3D detection and tracking.
The spatialai_data_utils library provides the following functionality:
Calculate BEV origin and dimensions for each camera group.
Partition cameras into clusters using spatial clustering algorithms for distributed 3D model deployment.
Filter and select specific cameras for processing.
Generate FOV polygons from camera intrinsic/extrinsic matrices.
Visualize camera coverage and group assignments.
To install the library:
pip install spatialai-data-utils==2.0.0 --extra-index-url=https://edge.urm.nvidia.com/artifactory/api/pypi/sw-metropolis-pypi/simple
The camera grouping tools are shipped with the full spatialai-data-utils package in the VSS repository. The examples below run the scripts from the package’s tools/camera_grouping directory.
BEV Group Origin Calculation#
Use calculate_origin.py to calculate BEV origin and dimensions for camera groups, filter cameras, and generate FOV visualizations.
The algorithm works as follows:
FOV Calculation: By default, the tool uses frustum-based FOV generation. It projects camera view frustums onto the ground plane using camera intrinsic (focal length, principal point) and extrinsic (rotation, translation) matrices. The frustum is intersected with a configurable height range to create a polygon representing the camera’s ground coverage.
Group Bounds: For each camera group, the tool computes the union of all camera FOV polygons and calculates the bounding box with optional dilation.
Origin Calculation: The BEV origin is computed as the centroid of the union FOV polygon, and dimensions are derived from the bounding box of the union, providing the coordinate reference for multi-camera tracking.
Origin calculation is required when setting up a new multi-camera deployment or when camera configurations change. This functionality is already integrated into the VSS Configurator, so manual execution is typically not necessary. However, if you need to run it as a standalone script for debugging, custom workflows, or batch processing, the example commands below demonstrate the available options.
export VSS_REPO_DIR=/path/to/video-search-and-summarization
cd $VSS_REPO_DIR/libs/analytics/spatialai-data-utils/tools/camera_grouping/
# Using dataset folder (auto-detects calibration.json)
python calculate_origin.py data/scene

# Using direct path to calibration file
python calculate_origin.py data/scene/calibration.json

# Custom height range for ground plane intersection
python calculate_origin.py data/scene/calibration.json --height-range 0.5 2.5

# Process only specific sensors
python calculate_origin.py data/scene/calibration.json --sensor-names Camera1,Camera2,Camera3

# Specify output file
python calculate_origin.py data/scene/calibration.json -o calibration_with_origins.json

# Overwrite the original calibration file
python calculate_origin.py data/scene/calibration.json --overwrite

# Include visualization (uses black background if map file not provided)
python calculate_origin.py data/scene/calibration.json --visualize

# Include visualization with map file
python calculate_origin.py data/scene/calibration.json --map_file data/scene/Top.png --visualize

# Use existing FOV polygons from calibration instead of frustum calculation
python calculate_origin.py data/scene/calibration.json --prefer-existing-fov

# Constrain FOV with scene bounds
python calculate_origin.py data/scene/calibration.json \
    --scene-bounds -30 -40 30 40 --max-camera-distance 25.0
Use --help to list all available arguments.
Key options:
--output,-o: Output calibration file path (default: input_with_origins.json).--overwrite: Overwrite the input calibration file (mutually exclusive with--output).--map_file: Path to map image for visualization (uses black background if not provided).--sensor-names: Filter to process only specified sensor names (comma-separated).--n-sensor-groups: Number of sensor groups to create when group field is missing (default: 1).--dilation: Dilation distance in meters for group bounds calculation (default: 1.0).--height-range: Height range (min, max) in meters for ground plane intersection (default: 1.0 3.0).--max-camera-distance: Maximum distance in meters to constrain frustum polygons (default: 30.0).--scene-bounds: Scene bounds (min_x, min_y, max_x, max_y) in meters to clip frustum polygons.--prefer-existing-fov: Use existing FOV from calibration file, fall back to frustum if not available.--visualize: Generate visualization of groups.--vis_separate_images: Generate separate visualization images per group instead of combined.
Camera Clustering#
For 3D model inference and deployment, cameras need to be partitioned into non-overlapping groups where each group is handled by a separate 3D model instance. Use create_camera_clusters.py to partition cameras into spatially compact clusters based on FOV coverage and spatial proximity. This tool assigns ALL cameras to exactly N clusters, ensuring efficient distribution of camera workloads across multiple model instances.
Note
The clustering algorithm may not always produce optimal results depending on camera layout and configuration. Always use visualization (enabled by default) to verify the clustering results and manually adjust using reassign_camera_groups.py if needed.
Note
By default, the tool auto-tunes clustering parameters (start camera index, overlap threshold, distance threshold) using a grid search to find optimal settings. Use --disable_param_tuning to skip auto-tuning and use the provided parameters directly.
Running Camera Clustering#
export VSS_REPO_DIR=/path/to/video-search-and-summarization
cd $VSS_REPO_DIR/libs/analytics/spatialai-data-utils/tools/camera_grouping/
# Basic usage with densify mode (default, visualization on by default)
python create_camera_clusters.py data/scene --max_camera_per_group 10

# Use balanced mode for evenly distributed clusters
python create_camera_clusters.py data/scene --max_camera_per_group 10 --mode balanced

# Densify mode with custom thresholds (disabling auto-tuning)
python create_camera_clusters.py data/scene --max_camera_per_group 10 --mode densify \
    --min_overlap_threshold 0.3 --max_distance_threshold 10.0 --disable_param_tuning

# Balanced mode with specific number of clusters
python create_camera_clusters.py data/scene --max_camera_per_group 8 --mode balanced \
    --n_clusters 5

# Specify output path and overwrite input file
python create_camera_clusters.py data/scene --max_camera_per_group 10 \
    --output data/scene/calibration_clustered.json --overwrite

# Use existing FOV polygons from calibration instead of frustum calculation
python create_camera_clusters.py data/scene --max_camera_per_group 10 --prefer_existing_fov

# Custom auto-tuning search grids
python create_camera_clusters.py data/scene --max_camera_per_group 10 \
    --tuning_overlap_grid 0.1 0.2 0.3 --tuning_distance_grid 5.0 8.0 10.0
Use --help to list all available arguments.
Key options:
--max_camera_per_group: Maximum cameras per cluster (required). Has higher priority than--n_clusters.--n_clusters: Override auto-calculated number of clusters.--mode: Clustering mode - “balanced” or “densify” (default: densify).--output: Output path for the clustered calibration file.--overwrite: Overwrite the input calibration file.--output_suffix: Suffix for output files (default: “clustered”).--start_camera_index: Starting camera index for seeding (default: 0).--min_overlap_threshold: Minimum required FOV overlap (default: 0.2).--max_distance_threshold: Maximum allowed centroid distance in meters (default: 8.0).--max_cascade_depth: Maximum recursion depth for densify-mode cascade reassignment (default: 3).--prefer_existing_fov: Use existing FOV polygons in calibration instead of calculating from frustum.--height_range: Height range (min, max) in meters for ground plane intersection (default: 1.0 3.0).--image_size: Image dimensions (width, height) in pixels for frustum calculation (default: 1920 1080).--max_camera_distance: Maximum distance in meters for frustum calculation (default: 30.0).--dilation: Buffer distance in meters for cluster bounding boxes (default: 8.0).--disable_param_tuning: Disable auto-tuning of clustering parameters.--tuning_overlap_grid: Custom overlap thresholds (0-1) to search when auto-tuning.--tuning_distance_grid: Custom centroid distance thresholds (meters) to search when auto-tuning.--tuning_start_index_grid: Seed camera indices to try when auto-tuning.--tuning_workers: Number of parallel workers for auto-tuning (0=auto, 1=disable parallelism).--vis_no_camera_id_labels: Disable drawing camera IDs on the visualization.--vis_separate_images: Generate separate visualization images per cluster instead of combined.
Clustering Modes
densify(default): Prioritizes creating full, densely-packed clusters. Uses cascade reassignment to handle unassigned cameras by recursively attempting to place them in nearby clusters.balanced: Enforces strict thresholds for overlap and distance. Splits oversized clusters to maintain balance across all groups.
Cluster Count Calculation
The number of clusters is determined by the following logic:
If
--n_clustersis not provided, it is auto-calculated asceil(total_cameras / max_camera_per_group).If
--n_clustersis explicitly set but would violate the--max_camera_per_groupconstraint (i.e., requires more clusters than specified), the tool overrides--n_clusterswith the minimum required value and logs a warning.If
--n_clusters=1is set buttotal_cameras > max_camera_per_group, an error is raised.
This ensures --max_camera_per_group always takes priority to guarantee each cluster stays within the specified camera limit.
Finding Optimal Clustering Parameters#
Use find_suggested_cluster_params.py to search for optimal clustering parameters. This tool performs a grid search over overlap thresholds, distance thresholds, and seed camera indices to find settings that produce compact, capacity-respecting clusters:
# Basic usage - find best parameters for clustering
python find_suggested_cluster_params.py data/scene --max_camera_per_group 10

# Custom search grids
python find_suggested_cluster_params.py data/scene --max_camera_per_group 10 \
    --overlap_grid 0.1 0.2 0.3 --distance_grid 5.0 8.0 10.0

# Specify seed camera indices to try
python find_suggested_cluster_params.py data/scene --max_camera_per_group 10 \
    --start_index_grid 0 5 10

# Use random sampling for start indices
python find_suggested_cluster_params.py data/scene --max_camera_per_group 10 \
    --start_index_seed 42

# Show more candidates with verbose output
python find_suggested_cluster_params.py data/scene --max_camera_per_group 10 \
    --top_k 10 --verbose
Key options:
--max_camera_per_group: Maximum cameras per cluster (required).--mode: Clustering mode to evaluate - “balanced” or “densify” (default: densify).--prefer_existing_fov: Use existing FOV polygons instead of calculating from frustum.--max_camera_distance: Maximum distance in meters for frustum calculation (default: 30.0).--height_range: Height range (min, max) in meters for ground plane intersection (default: 1.0 3.0).--image_size: Image dimensions (width, height) in pixels for frustum calculation (default: 1920 1080).--max_cascade_depth: Maximum recursion depth for densify-mode cascade (default: 3).--overlap_grid: List of overlap thresholds (0-1) to search.--distance_grid: List of centroid distance thresholds (meters) to search.--start_index_grid: Seed camera indices to try.--start_index_seed: Random seed for auto-generated start camera indices.--top_k: Number of top candidates to display (default: 5).--workers: Number of parallel workers for the sweep (0=auto, 1=disable parallelism).--verbose: Enable verbose logging.
The output ranks candidates by score (lower is better), showing unassigned camera count, overflow, and scatter metrics for each parameter combination.
Camera Group Reassigning#
Use reassign_camera_groups.py to manually reassign cameras to different existing BEV groups. Common use cases include:
Fixing suboptimal clustering: Move cameras that were incorrectly assigned by the automatic clustering algorithm.
Balancing cluster sizes: Redistribute cameras between groups to achieve more even workload distribution.
Iterative refinement: Fine-tune cluster assignments after reviewing visualization results.
export VSS_REPO_DIR=/path/to/video-search-and-summarization
cd $VSS_REPO_DIR/libs/analytics/spatialai-data-utils/tools/camera_grouping/
# Move cameras to different groups
python reassign_camera_groups.py data/calibration.json \
    --move cam-01:bev-sensor-2 cam-05:bev-sensor-3

# Specify output path
python reassign_camera_groups.py data/calibration.json \
    --move cam-01:bev-sensor-2 --output data/calibration_updated.json

# Overwrite the original file
python reassign_camera_groups.py data/calibration.json \
    --move cam-01:bev-sensor-2 --overwrite

# Strict mode - fail if camera or group is missing
python reassign_camera_groups.py data/calibration.json \
    --move cam-01:bev-sensor-2 --strict

# Use existing FOV polygons instead of frustum calculation
python reassign_camera_groups.py data/calibration.json \
    --move cam-01:bev-sensor-2 --prefer_existing_fov
Key options:
--move: Mappings ofcamera_id:group_name(space separated) to reassign (required).--output: Output path for updated calibration (default:<input>_reassigned.json).--overwrite: Overwrite the input calibration file in-place.--output_suffix: Suffix for output files (default: “reassigned”).--strict: Fail if a camera or target group is missing; otherwise skip with warning.--prefer_existing_fov: Use existing FOV from calibration, fall back to frustum if not available.--map_file: Path to map image for visualization (auto-detectsTop.pngif omitted).--dilation: Dilation distance in meters when recomputing group bounds (default: 1.0).--height_range: Height range (min, max) in meters for ground plane intersection (default: 1.0 3.0).--image_size: Image dimensions (width, height) in pixels for frustum calculation (default: 1920 1080).--max_camera_distance: Maximum distance in meters for frustum calculation (default: 30.0).--vis_no_camera_id_labels: Disable drawing camera IDs on the visualization.
Model Customization#
Perception Model Fine-tuning#
The MV3DT profile uses RT-DETR (Real-Time Detection Transformer) as its 2D perception model and the MV3DT module for 3D multi-camera tracking. To customize:
Fine-tune RT-DETR using TAO (RT-DETR model page)
Configure DeepStream to use your custom model (model configuration guide)
For detailed instructions on integrating a new RT-DETR model with the MV3DT pipeline, including model compatibility requirements and configuration steps, refer to the MV3DT Perception Microservice documentation.
Application Customization#
The Blueprint uses a modular microservices architecture with the following communication channels:
Message Broker (Kafka or Redis)
Elasticsearch database
REST APIs
Users can build their own microservices by consuming data from the above channels.
For complete API documentation, see API Reference Page.
Available Service Ports#
The following ports are used during deployment, and users can leverage them for any potential integration:
Service Component |
Port Number |
|---|---|
Kafka |
9092 |
MQTT Broker (Mosquitto) |
1883 |
Elasticsearch |
9200 |
Kibana |
7777/kibana |
NvStreamer |
31000 |
VIOS |
30888/vst |
VSS Video Analytics API |
8081 |
Analytics Microservices Customization (Advanced)#
For detailed information about customizing specific analytics microservices, refer to:
For detailed information about customizing the MV3DT perception pipeline, including DeepStream configuration, tracker parameters, camera information files, and MQTT publish/subscribe topology, refer to the MV3DT Perception Microservice documentation.
Hardware Config Customization#
The MV3DT Warehouse Blueprint requires several configuration files to be properly tuned based on your GPU hardware and deployment requirements. When changing hardware (e.g., switching from H100 to L4 GPU) or adjusting the number of video streams, multiple configuration files must be updated to ensure optimal performance and prevent GPU overload.
Configuration Files Requiring Hardware-Based Updates#
The following table lists the configuration files that typically require updates when hardware changes:
Configuration File |
Parameters to Update |
Why Update is Needed |
|---|---|---|
|
|
Batch sizes must match stream count; timeout values vary by GPU processing speed |
|
|
Same as above for Redis-based deployments |
|
|
Must align with GPU capacity and stream count |
|
|
Device limits must match GPU capacity; message broker consumer and overlay settings vary by GPU capability |
Certain GPUs require additional optimizations. For example, IGX-THOR and DGX-SPARK get:
Extended
batched-push-timeout(67000ms) for DeepStream configsenable_overlay_skip_frameenabled in VST configs for better performance
There are two approaches to customize these configuration files:
Approach 1: Manual Configuration#
Manually update all required configuration files before deploying the blueprint. This is time consuming, error prone and often not suitable for production deployments.
# Update DeepStream main config
vi <PATH_TO_DS_CONFIG_DIR>/ds-main-config-mv3dt.txt
# Set: max-batch-size=<stream_count>, batch-size=<stream_count>

# Update NvStreamer config
vi <PATH_TO_NVSTREAMER_CONFIG_DIR>/vst-config.json
# Set: "nv_streamer_sync_file_count": <stream_count>, "max_devices_supported": <max_streams>

# Update VIOS (VST) config
vi <PATH_TO_VST_CONFIG_DIR>/vst_config.json
# Set: "onvif.max_devices_supported": <max_streams>, "data.always_recording": true,
#      "notifications.use_message_broker_consumer": "<deployment_mode>"
Approach 2: Automatic Config Management using VSS Configurator#
The VSS Configurator provides a declarative approach to automatically update all required configuration files based on your hardware profile and deployment mode. This is the recommended approach for production deployments and simplifies the configuration management process.
To enable the VSS Configurator, in VSS Configurator’s environment variables you must set:
ENABLE_PROFILE_CONFIGURATOR=true
By default, the VSS Configurator is disabled (ENABLE_PROFILE_CONFIGURATOR=false).
When enabled, it runs before the Blueprint Deployment starts and adjusts configuration files based on the hardware profile and deployment mode as defined in the HARDWARE_PROFILE and MODE environment variables.
The VSS Configurator provides a comprehensive set of features for automated profile configuration management:
Feature |
Description |
|---|---|
Configuration File Updates |
Automatically update configuration files in multiple formats:
|
Environment Variable Validation |
Validate environment variables before deployment to catch configuration errors early:
|
Prerequisite Operations |
Run operations before variable processing to dynamically determine values:
|
Variable Computations |
Create computed variables for intermediate calculations and condition checking. Use case: Automatically cap stream count to GPU limits using
|
Execution Order: Prerequisite Operations → Environment Variable Validation → Variable Computations → Configuration File Updates
For detailed information on how to create custom hardware profiles and advanced configuration options, refer to the Profile Configuration Manager section in VSS Configurator Documentation.