Video IO & Storage (VIOS) Microservice#
Overview#
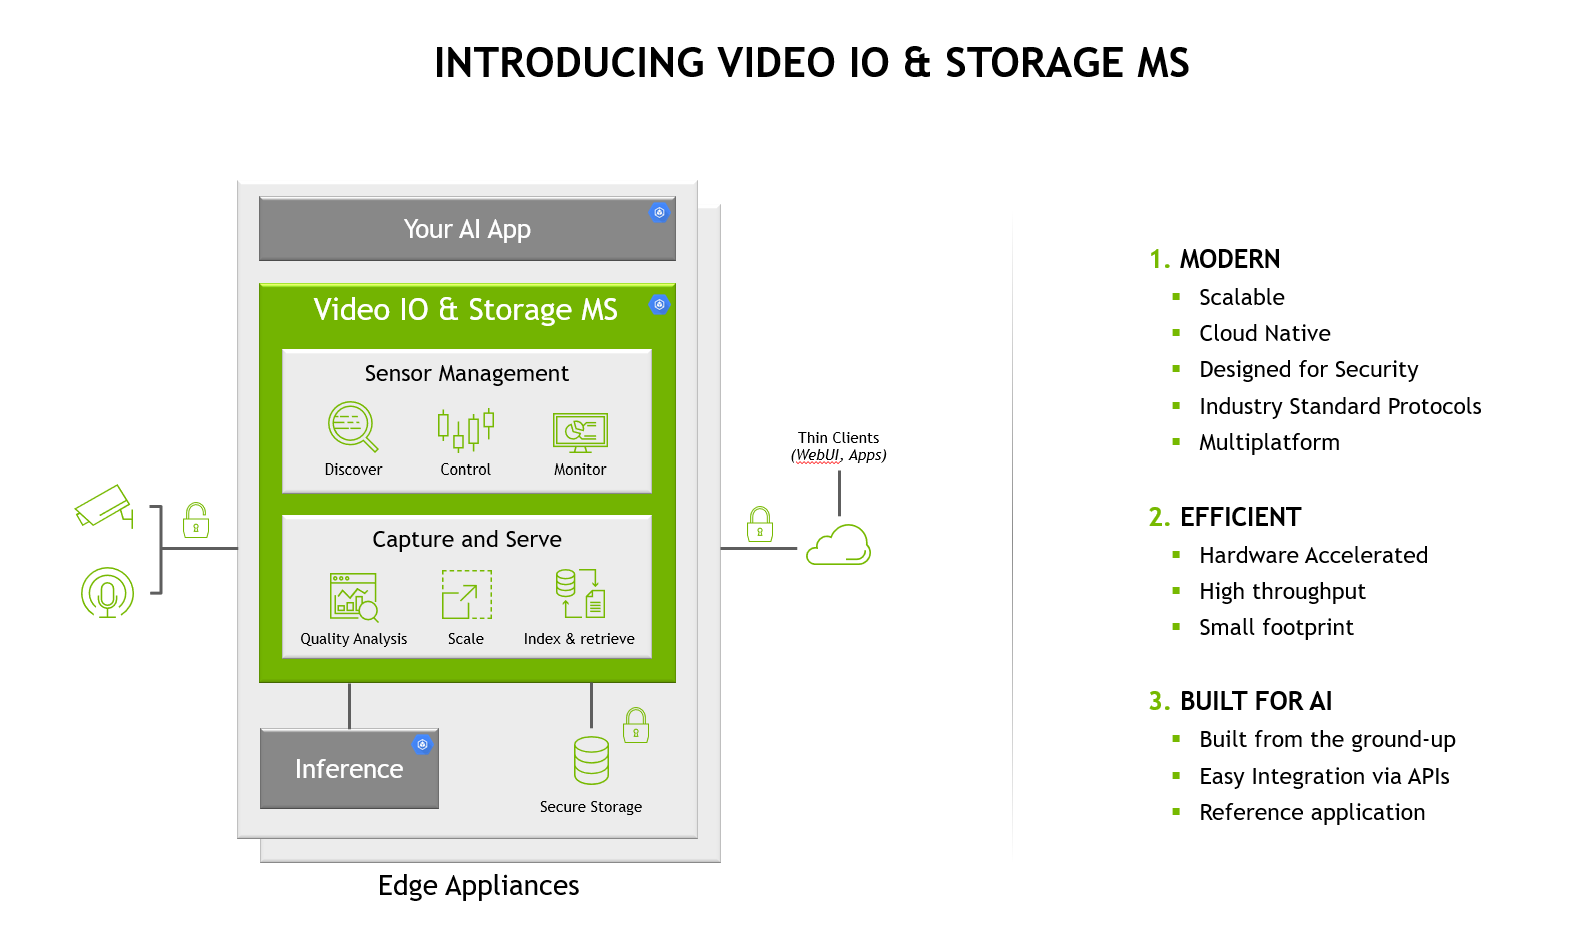
Video IO & Storage (VIOS) Microservice provides an efficient way to manage cameras and videos, especially in scenarios where AI is the main functionality.
VIOS features hardware-accelerated video decoding, streaming, and storage. VIOS is easy to integrate with your video analytics application, through its REST API. It also includes a reference web UI for efficient management of your devices.
Key Features#
VIOS auto-discovers ONVIF-S compliant IP cameras, and allows use of custom IP stream as video source. It then allows for video to be stored, played back at various speeds, or paused at any frame:
Support ONVIF S-profile devices, ONVIF profile-T for H.265 encoding devices, ONVIF discovery with control and data flow.
Manage devices manually by IP address and/or RTSP URLs.
Video storage and recording with aging policy.
RTSP proxy URL in pass-through and multi-cast mode.
Media streaming using hardware-accelerated WebRTC protocol for live and recorded videos.
Recorded playback supported with 2x,4x,8x FF, overlay & snapshot support.
Supports both H.264 and H.265 video formats.
Video wall feature which provides composite view of multiple webrtc streams.
Provide REST APIs to write client application to control and configure VIOS.
Support Redis/Kafka message bus to publish device add/remove events.
Prometheus/Grafana integration for publishing VIOS statistics.
Derive insights about the current status of VIOS.
Cloud native. Deploy as a container.
Supports milestone adaptor for fetching data from milestone VMS.
We included binary for a web-based client that allows to view live and recorded content, as well as to modify camera and stream configuration (Web-UI Viewer).
VIOS Modular Diagram#
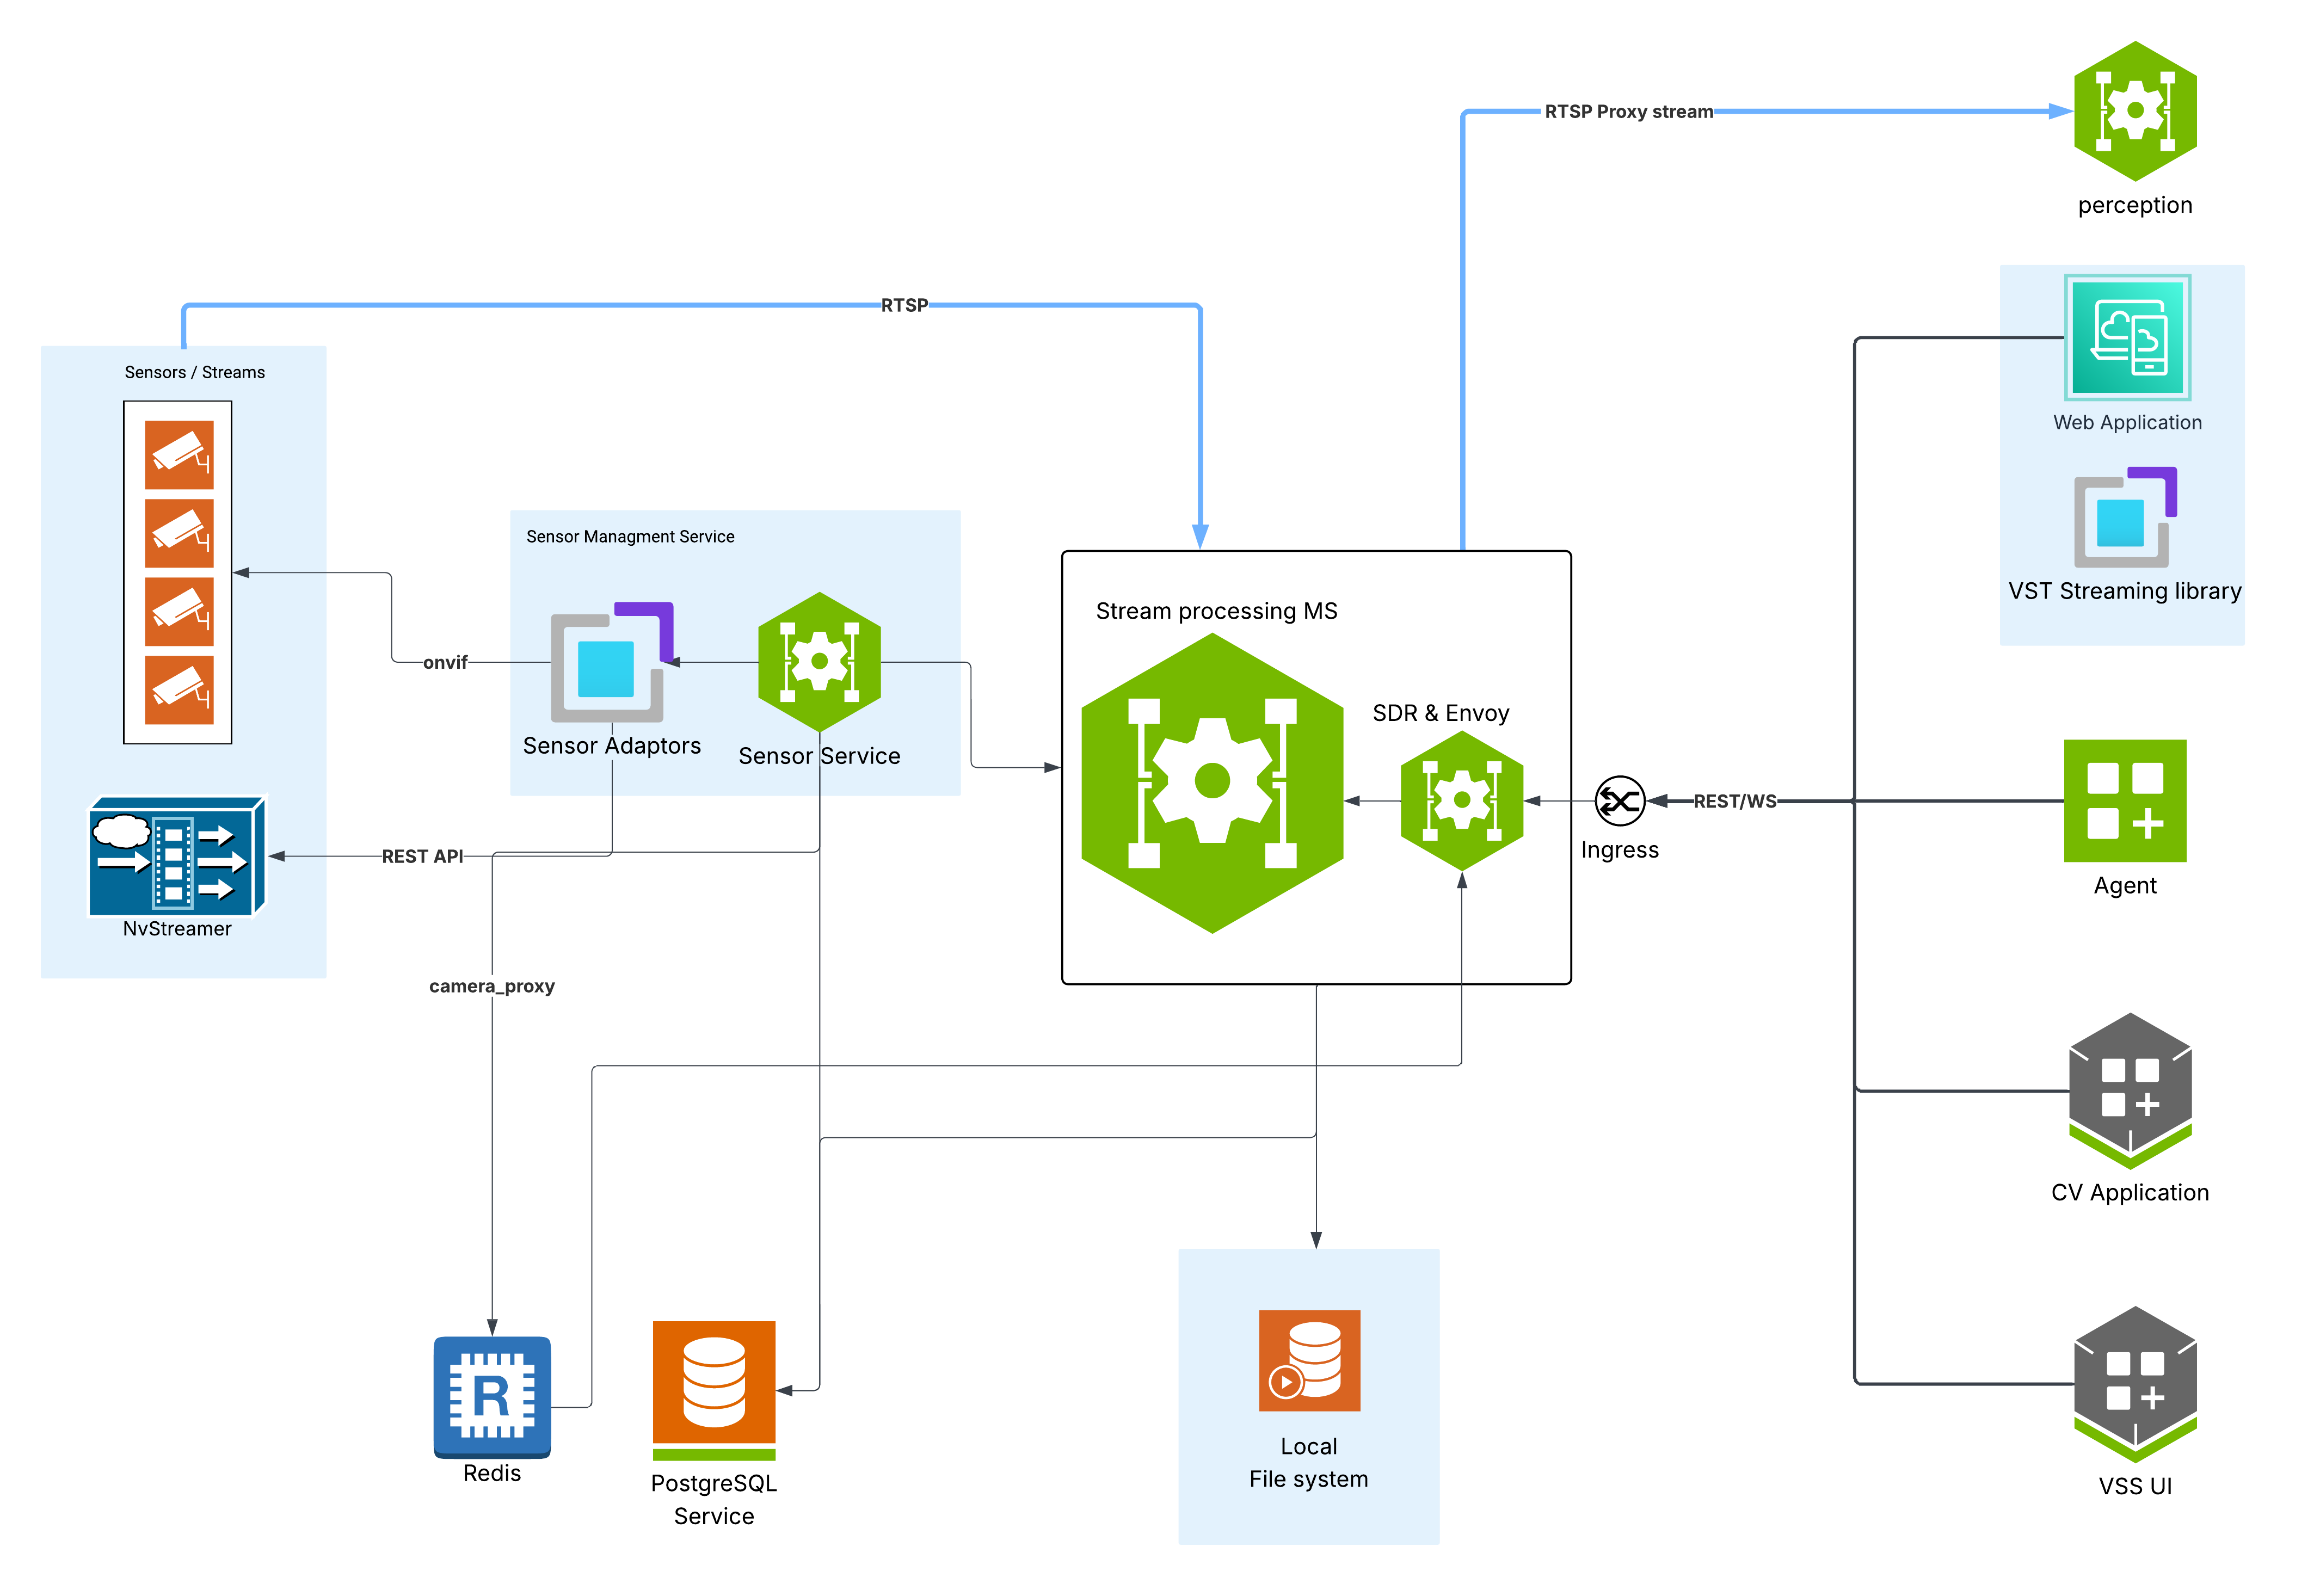
VIOS is built as a collection of cooperating microservices that together provide a unified platform for video streaming and processing. It integrates RTSP proxying, WebRTC streaming, recording, and storage into a single solution capable of real-time video ingestion, low-latency playback, and long-term archival.
The following diagram illustrates the high-level architecture of VIOS. Each service is responsible for a specific aspect of the system, and the list that follows describes the role of each component.
Sensor Management Service: A comprehensive system designed to facilitate the administration and control of sensor-related functionalities. It handles sensor discovery, configuration, and stream management through dedicated sensor services and adaptors, and provides efficient management of sensors across the network. This service exclusively owns the sensor REST API surface — Sensor Management API (prefixed with
/v1/sensor).Unified Stream Processing MS: A unified microservice that consolidates RTSP proxying, live and replay (recorded) WebRTC streaming, recording, and media storage into a single service. It handles video stream transformation, file ingestion, content download from ingested files, routing, and protocol conversion for real-time video ingestion, low-latency playback, and long-term archival. It exposes every stream- and media-related REST API in VIOS — Proxy Stream Management API (
/v1/proxy), Live Stream Management API (/v1/live), Record Stream Management API (/v1/record), Replay Stream Management API (/v1/replay), and Storage Management API (/v1/storage) — covering the entire VIOS API surface except the sensor APIs, which are owned by the Sensor Management Service.Storage Layer: Multi-tier storage system supporting Redis for caching, PostgreSQL for metadata, and local filesystem object storage for video content.
Client Interfaces: Support for various client types including web applications, perception services, computer vision applications, and the VSS UI.
Ingress: A service that handles the ingress of the HTTP requests to the VIOS microservices.
SDR Agent: A service that handles the workload distribution and service discovery for the scalable Unified Stream Processing MS instances.
Envoy: A service that handles the Envoy proxy for load balancing and routing requests to the scalable Unified Stream Processing MS instances.
VIOS MS Horizontal Scaling#
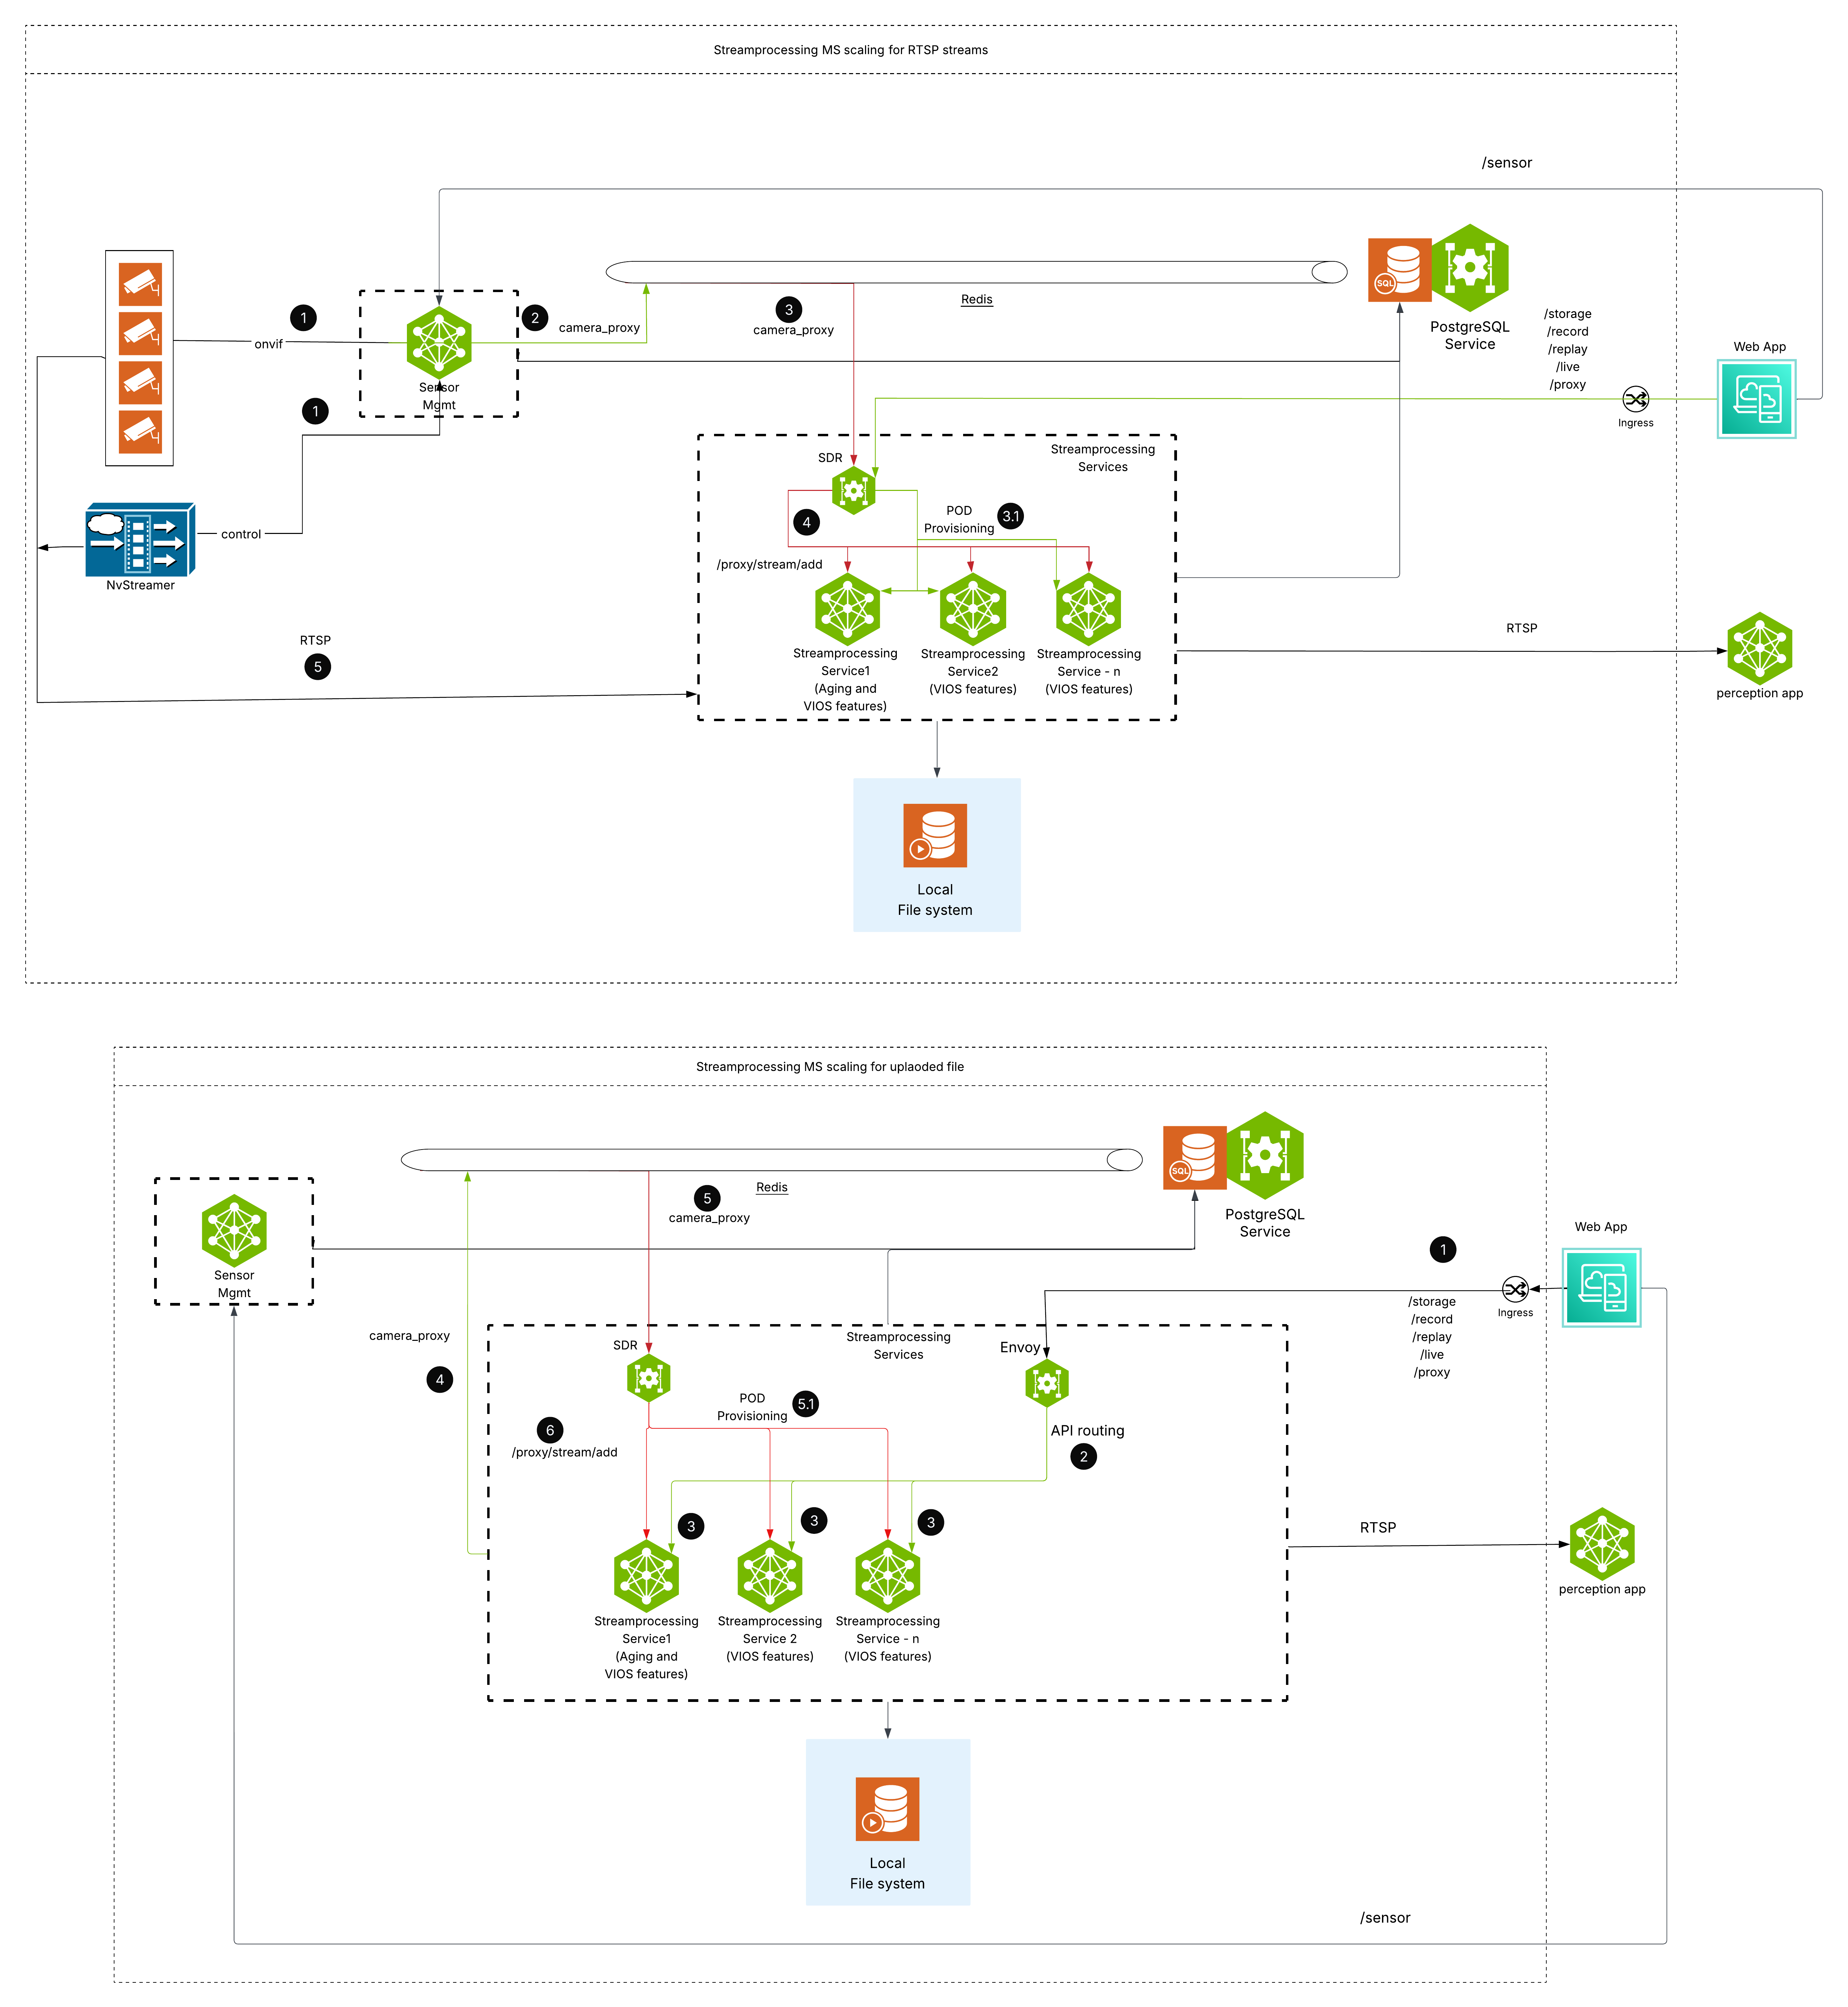
The Unified Stream Processing MS is designed to scale horizontally to handle increased workloads and provide high availability. The Sensor Management Service runs as a single instance and is not part of the horizontal-scaling fleet.
Horizontal Scaling Capabilities:
Multiple Stream Processing instances: Deploy multiple Unified Stream Processing MS replicas behind the SDR Agent and Envoy proxy to distribute the workload.
Load Distribution: Camera streams and video processing are distributed across the Stream Processing MS replicas.
High Availability: Continuous operation is preserved even if individual Stream Processing MS instances fail.
Shared Storage: All Stream Processing MS replicas access the same shared storage backend (local filesystem).
Centralized Database: A single PostgreSQL database provides centralized configuration and metadata management shared by all Stream Processing MS replicas and the Sensor Management Service.
The diagram below illustrates the horizontal scaling architecture:
VIOS Microservices#
The following table lists the microservices and containers that make up the VIOS Docker Compose deployment.
| Microservice Name | Container Name | Functionality |
|---|---|---|
| Postgres | vss-vios-postgres |
Centralized PostgreSQL database for sensor configurations, stream metadata, and system state shared across all VIOS services. |
| Sensor | vss-vios-sensor |
Sensor Management Service: handles camera/sensor discovery, registration, configuration, and stream monitoring. Exposes the Sensor Management API (/v1/sensor). |
| Unified Stream Processing MS | vss-vios-streamprocessing |
Unified Stream Processing MS that consolidates RTSP proxying, live and replay WebRTC streaming, recording, and media storage. Exposes the Proxy (/v1/proxy), Live (/v1/live), Record (/v1/record), Replay (/v1/replay), and Storage (/v1/storage) APIs. |
| Ingress (NGINX) | vss-vios-ingress |
NGINX reverse proxy that terminates external HTTP/HTTPS traffic and routes requests to the appropriate VIOS microservices. |
| SDR | vss-vios-sdr |
Sensor Distribution and Routing agent. Handles workload distribution and service discovery for the scalable Unified Stream Processing MS instances. |
| Envoy Proxy | vss-vios-envoy |
Envoy proxy that provides load balancing and routing across the scalable Unified Stream Processing MS instances registered with SDR. |
Notes:
1) The container names shown above apply to the Docker Compose deployment of VIOS.
2) The Sensor and Unified Stream Processing MS share a single container name across all four deployment profile variants.
Storage Calculation#
The required storage can be calculated using the following formula:
Storage (GB) = (Bitrate (Mbps) × Duration (seconds)) / 8 / 1024
Example Calculation for 1 stream at 8 Mbps for 1 day:
Bitrate: 8 Mbps
Duration: 1 day = 24 hours × 60 minutes × 60 seconds = 86,400 seconds
Storage = (8 × 86,400) / 8 / 1024 = 84.375 GB per stream per day
General Formula:
Storage (GB/day) = Bitrate (Mbps) × 10.546875
For multiple streams, multiply by the stream count:
Total Storage (GB) = Number of Streams × Bitrate (Mbps) × Days × 10.546875
Note
For operational planning, actual storage requirements may vary based on encoding efficiency, variable bitrate settings etc. So add a buffer of ~10–20% to the calculated storage requirements.
To configure required storage, set the total_video_storage_size_MB parameter in the vst_storage.json file, refer to Storage Config.
Cameras Tested in VIOS#
Manufacturer |
Model |
|---|---|
ANNKE |
C500 |
ANNKE |
NC400 |
AMCREST |
IP8M-2493EW |
AMCREST |
IP8M-T2499E |
AMCREST |
IP8M-2496E |
AMCREST |
IP2M-841W-V3 |
AMCREST |
IP4M-1026E |
AMCREST |
IP5M-T1179E |
AXIS |
P3301 |
BOSCH |
Flexidome_IP_4000I |
CP PLUS |
CP-UNC-TB41L3-MDS-0360 |
JIDETECH |
IPC-3C1-5MP |
HANWHA |
QND-6012R |
HANWHA |
QND-6072R |
QSEE |
QTN8083B |
QSEE |
QTN8098B-N |
SONY |
SNV-VB640 |
SONY |
SNC-VB770 |
SONY |
SNC-XM632 |
SONY |
SNC-EM630 |
HIKVISION |
DS-2CD2043G0-I |
HIKVISION |
DS-2CD2T43G0-I5 |
HIKVISION |
DS-2CD2045FWD-I |
HIKVISION |
DS-2CD3121G0-I |
HIKVISION |
DS-2CD3023G0E-I |
Usage & Configuration#
Reference Web App#
Default URL: http://<IP_address>:30888/vst/
VIOS deployment can be verified using a web-based application binary. Please note: at this point the web-based application is only available for Chrome browser running on Linux, Windows or MacOS. The UI can be accessed on any viewing machine on local subnet. The following instructions refer to same host. Substitute ‘localhost’ with IP address of your viewing machine.
Launch Chrome browser
In the address bar enter
http://<IP_address>:30888/vst/
The VIOS web-based UI allows for seamless and hassle-free discovery of most ONVIF-S compliant cameras.
Although a relatively short list of models are guaranteed to work with VIOS release, any fully ONVIF-S compliant camera you might already have purchased should work with this release as well. Contact us if your cameras are not working.
VIOS will auto-discover, and attempt to communicate with any ONVIF-S camera attached downstream of the host. Once discovered, VIOS will attempt to communicate with the camera, to retrieve its settings and parameters, and populate the web UI.
There is a good chance that your camera has been secured by a custom username and password prior to the first VIOS use. In such a case (even though the camera would be discovered) VIOS might not be able to communicate with it immediately.
This short guide will explain how to ensure that you can see live and recorded content from new or previously used ONVIF-S cameras.
Dashboard#
Open a web browser (Chrome is required for best video streaming experience) at http://<IP_address>:30888/vst/. Enter admin for username and password if prompted otherwise ignore it. The following page will be displayed upon successful login:
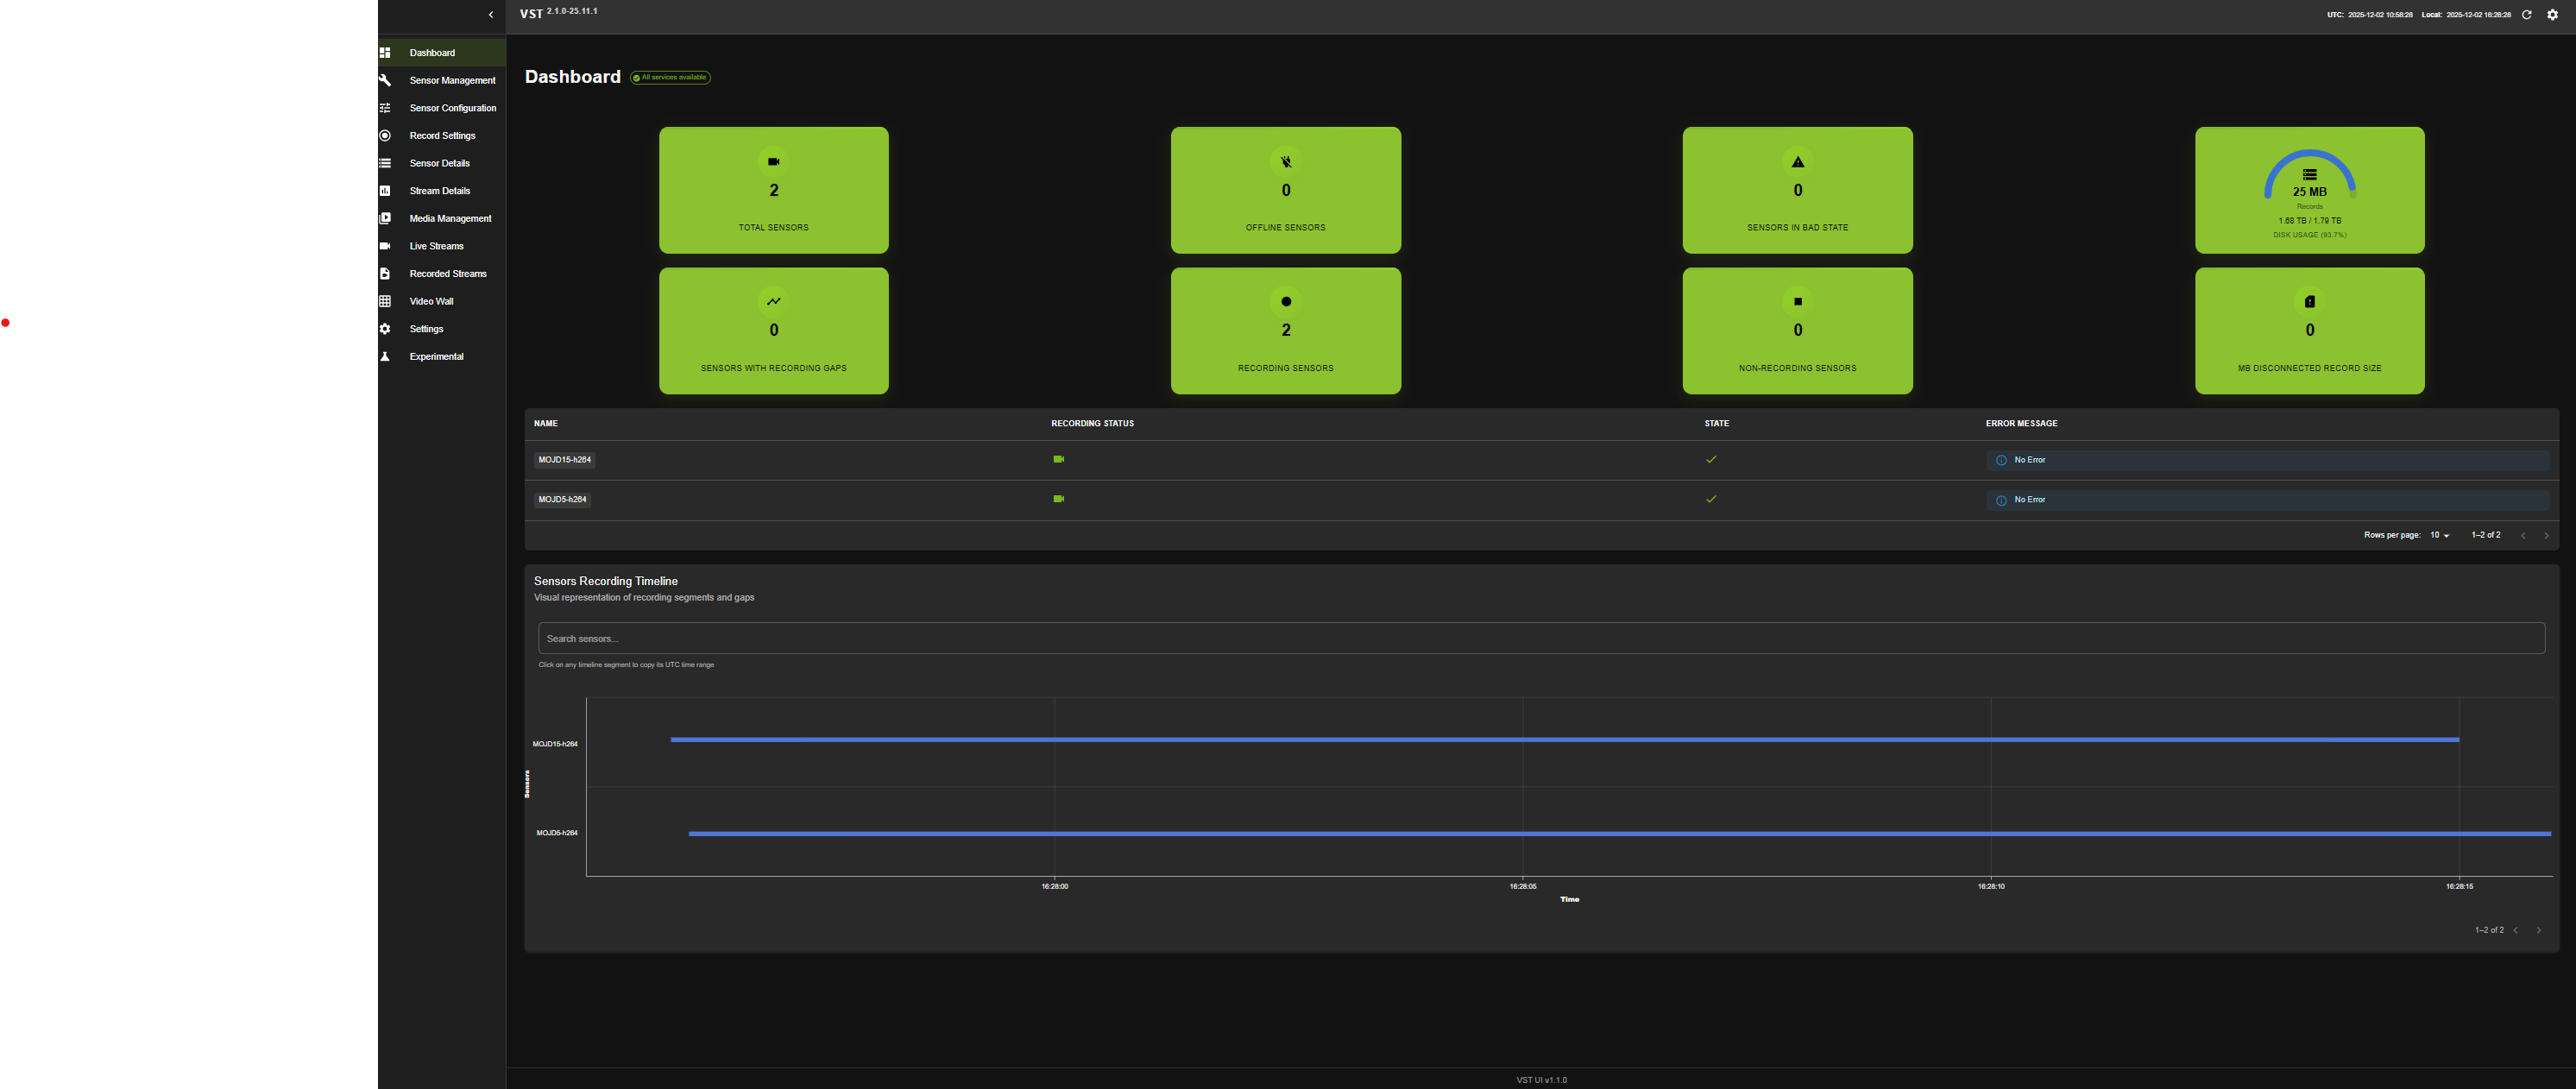
As the page opens, it shows overall health of VIOS, information about VIOS Devices, Sensors discovered, Record Size. Also, it shows the vital information about sensors such as Record Status, Sensor Status etc.,
Note
User options like Home, Profile, Settings, etc., are not implemented in current release.
Sensor management#
Cameras that had been discovered will be listed. If VIOS discovered the camera, but was not able to communicate with it, the camera status indicates a lock icon. If the lock icon appears, navigate to ‘Sensor Management’ tab, and click on ‘Sensor Credentials’ section as displayed in the following image:
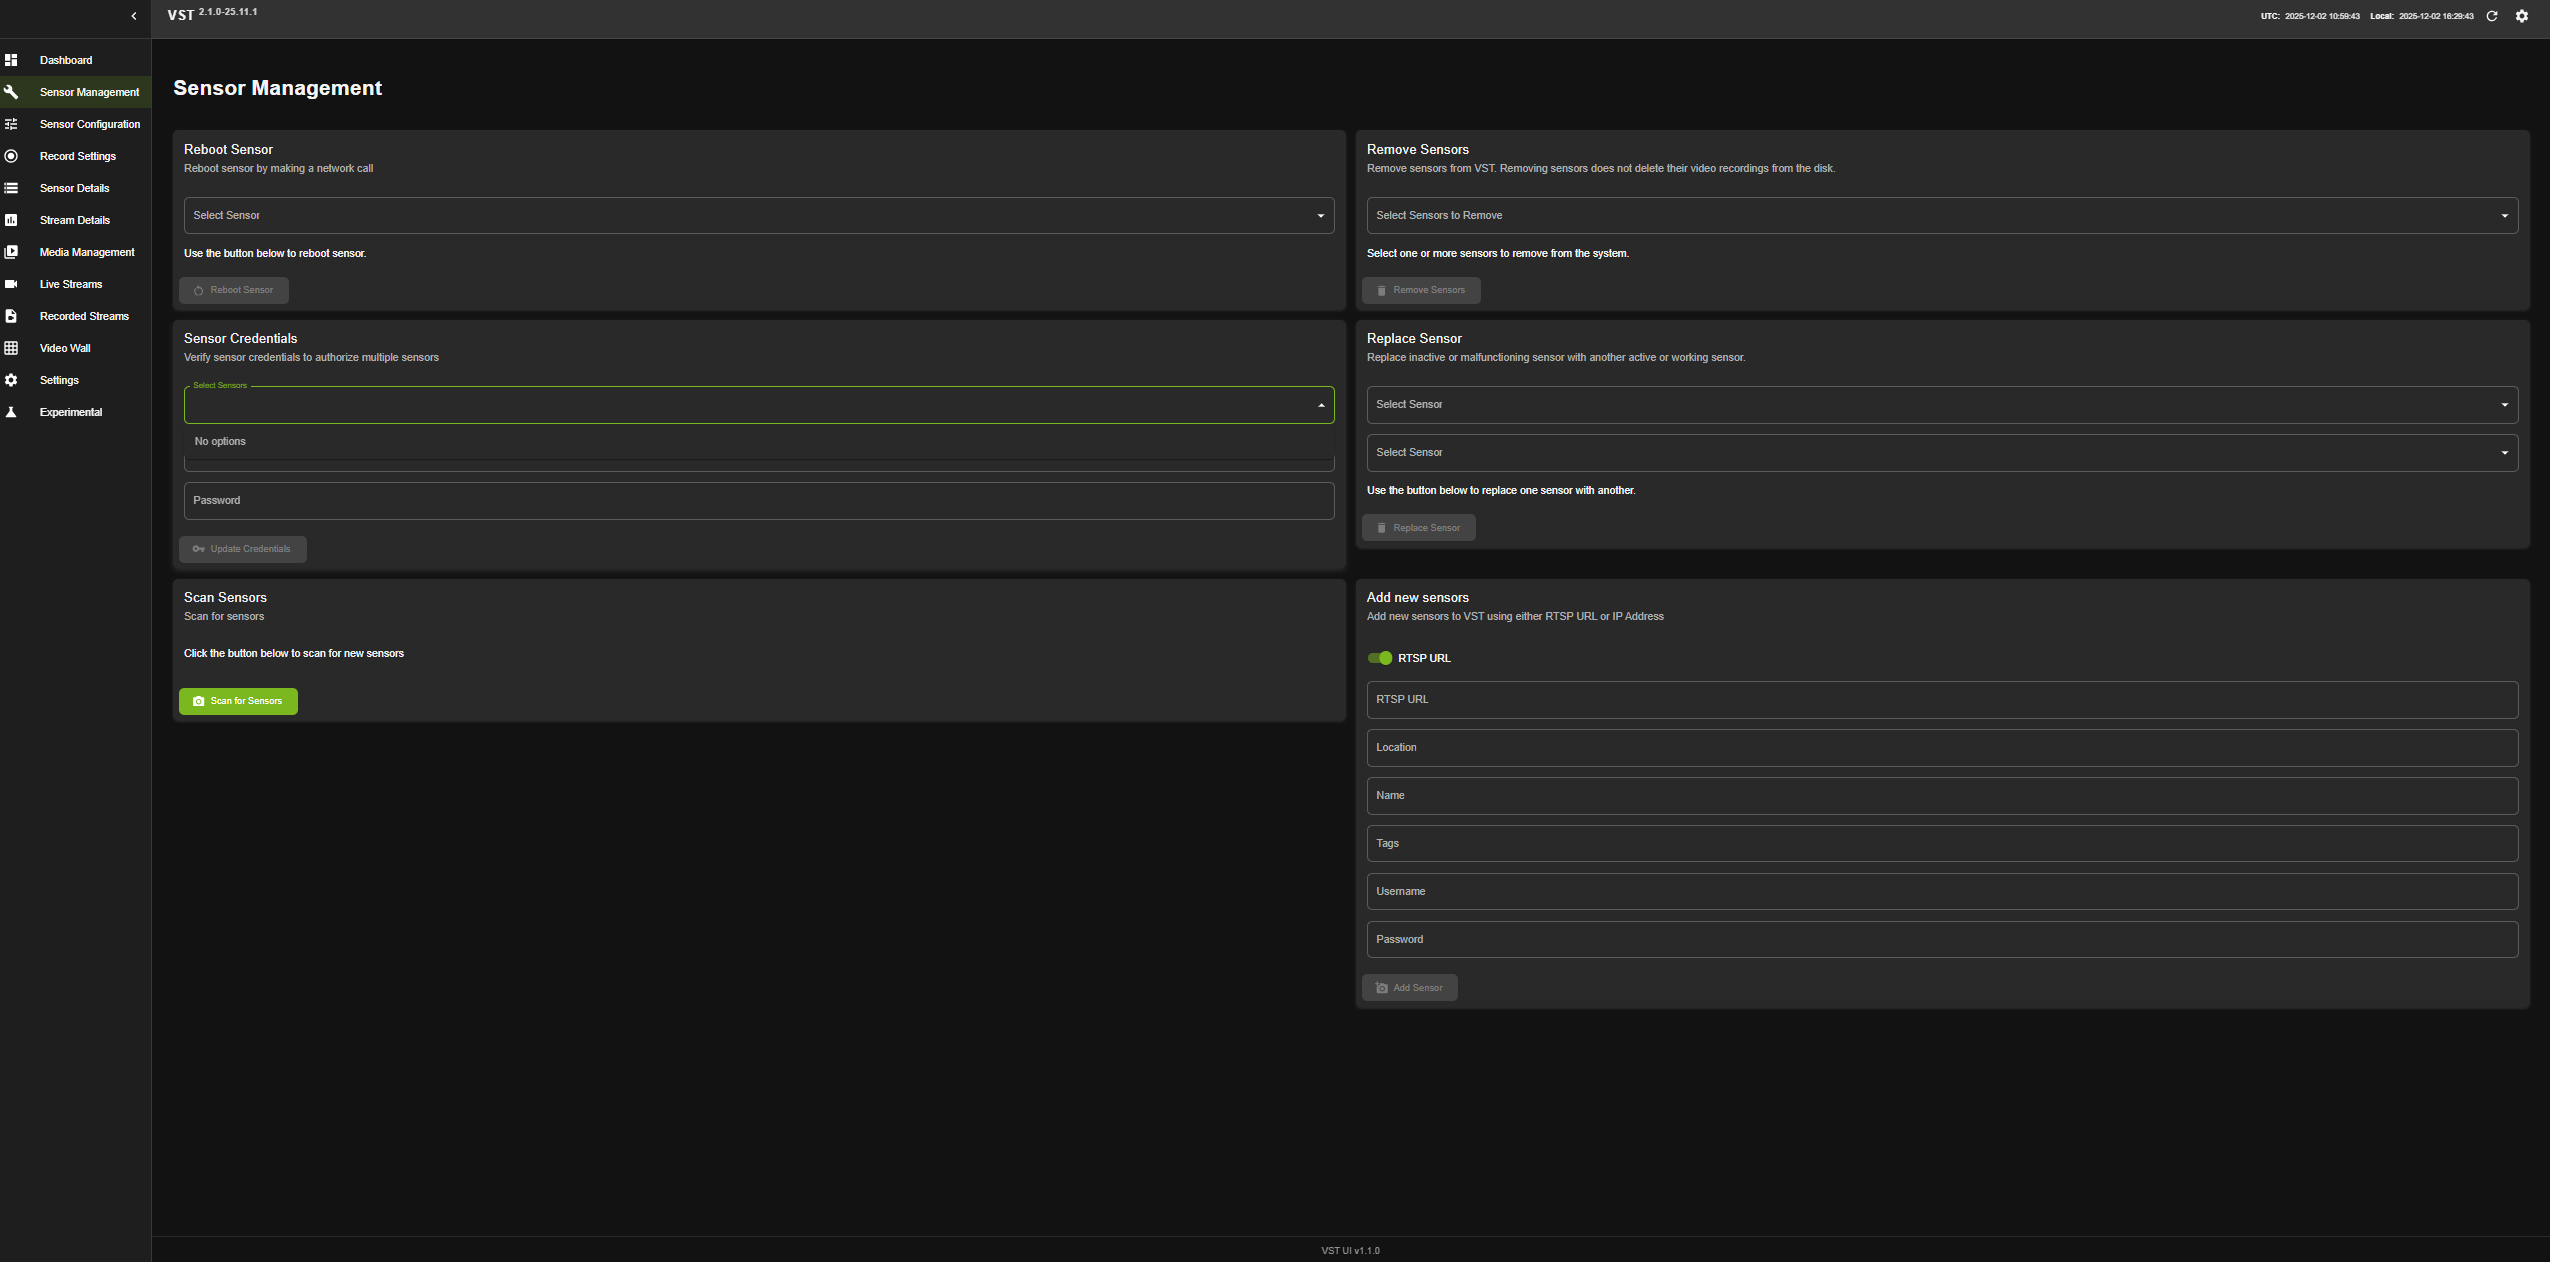
Click on the ‘Select Sensor’ drop down list, and select the sensor that cannot be streamed from. Then input that sensor’s username and password, and click ‘Submit’. An instantaneous message box will confirm if your credentials are valid. Repeat the same procedure for all cameras that cannot be streamed from.
It should now be possible to stream from all the cameras attached to VIOS.
If you do not remember your camera’s custom username or password, you might need to perform a hardware factory reset for that camera, re-start VIOS, and consult that camera’s guide to set its username and password again.
VIOS is now aware of usernames and passwords for all cameras, and is ready to stream live video from the auto-discovered ONVIF-S sources.
Add sensors#
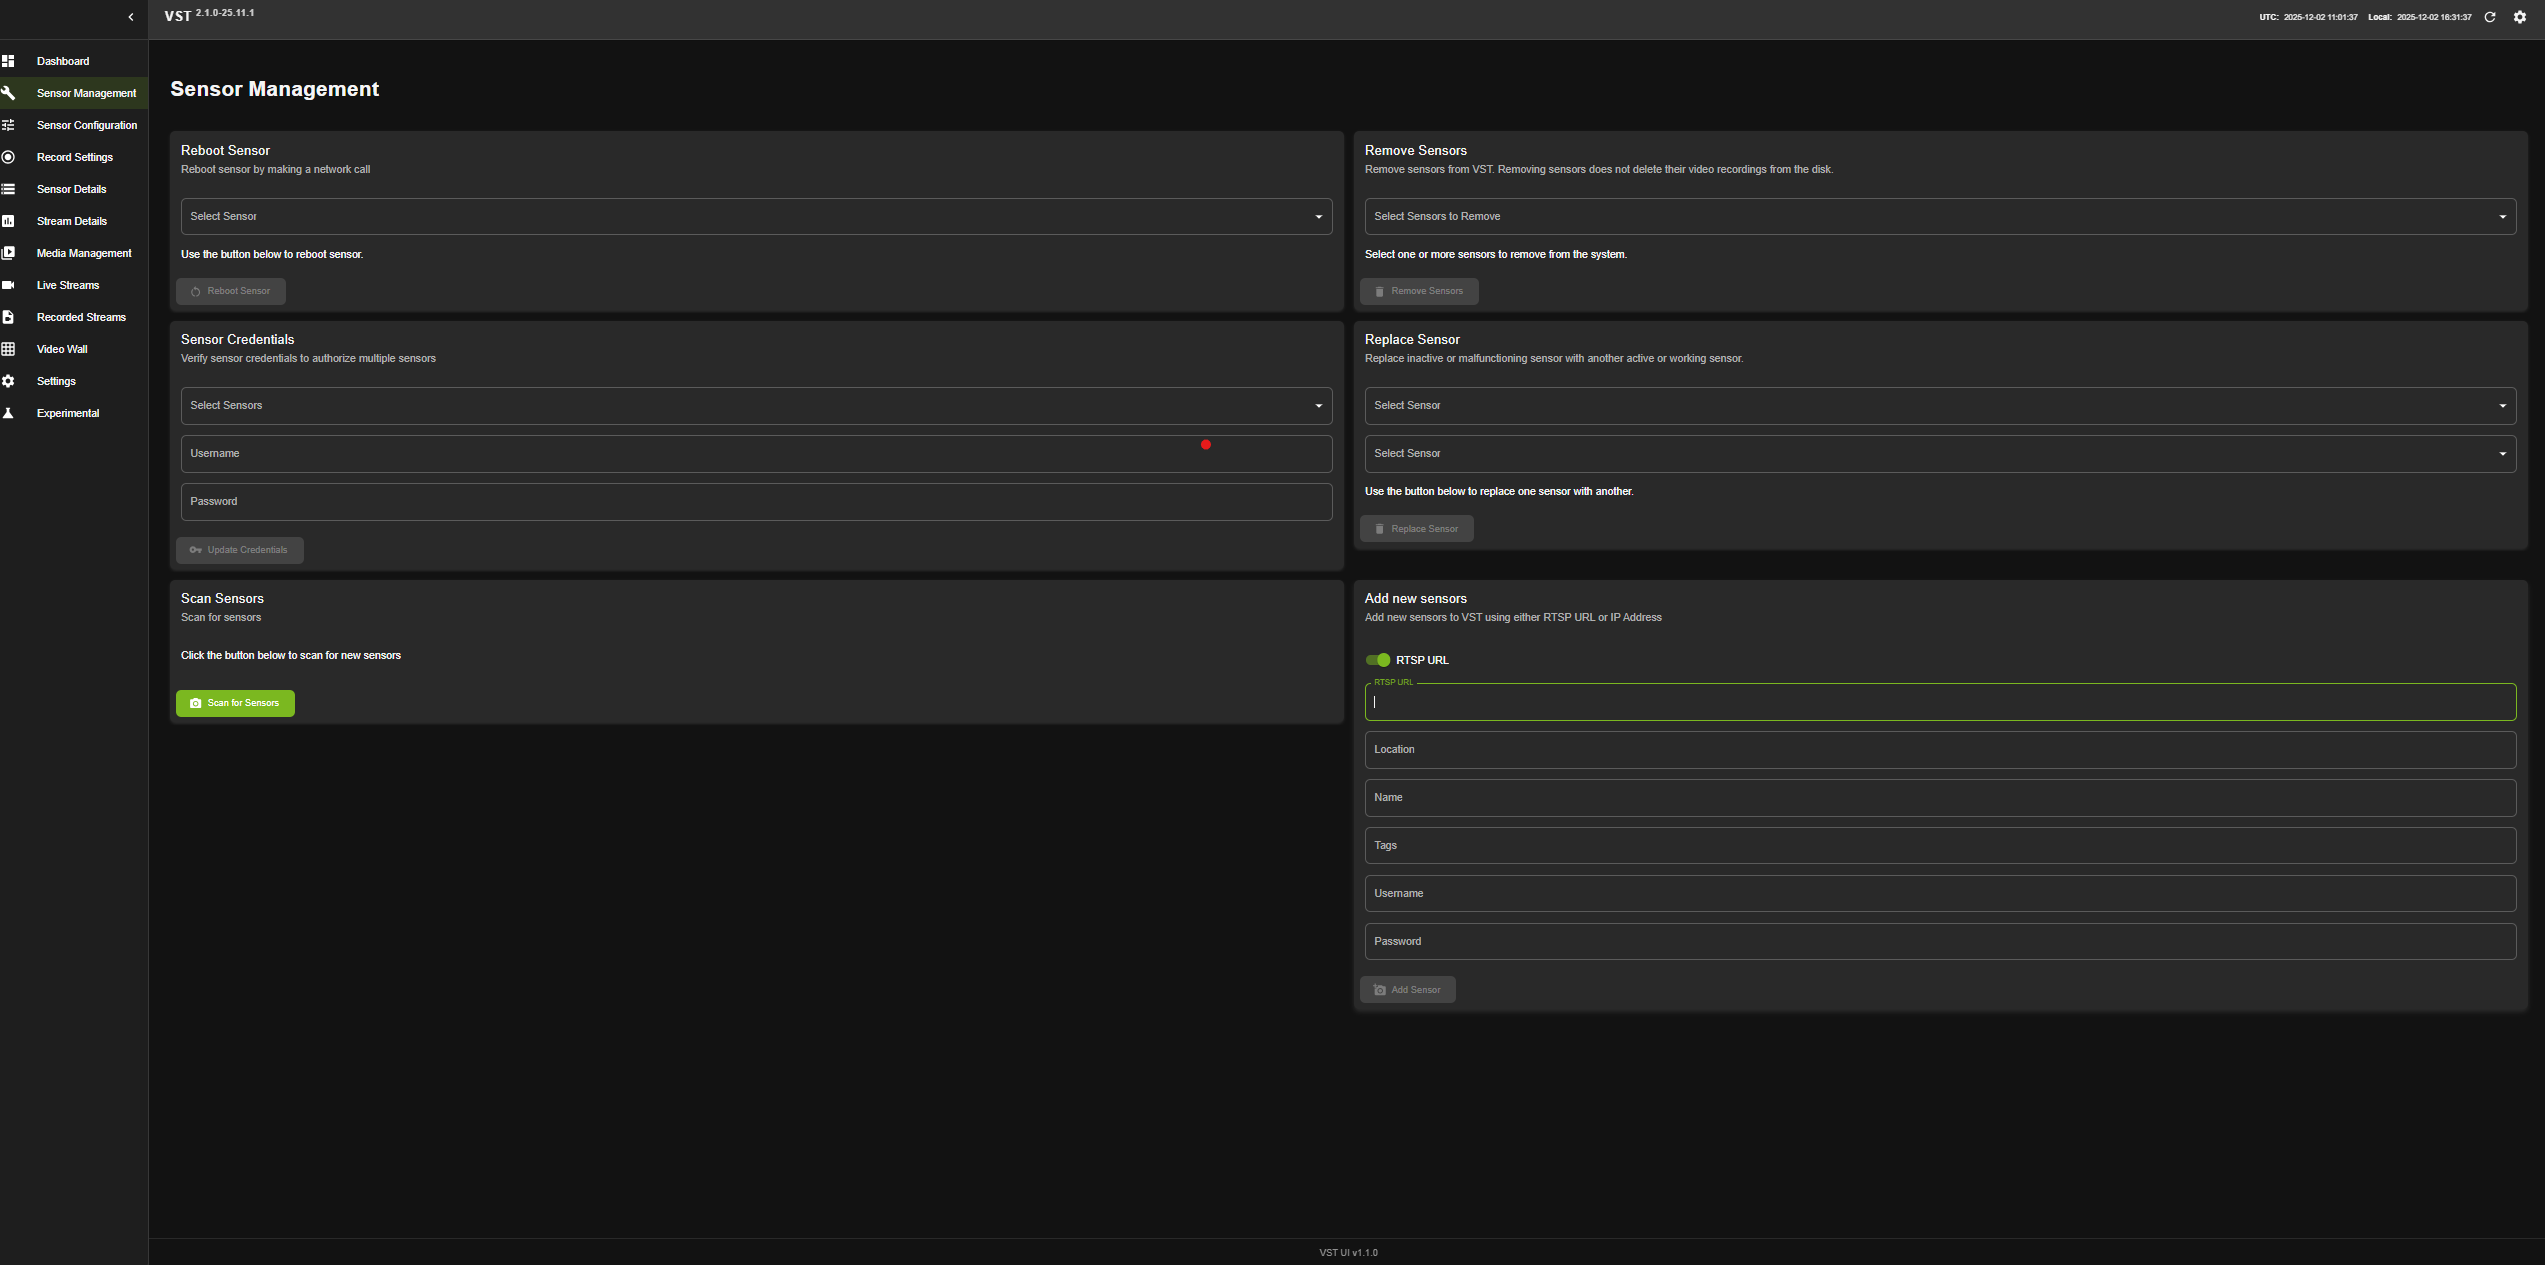
Add Cameras/Streams from VIOS webUI: To manually add camera into VIOS, navigate to Sensor Management tab, and go to Add device manually option. To Add ONVIF compliant camera using IP option click on IP button then provide ip address, username, password fields. Remaining fields are optional. If you want to add directly RTSP url, click on RTSP option and provide RTSP url, username, password.
Add Cameras/Streams from NVStreamer: To add streams from NVStreamer, VIOS provides a mechanism with the help of RTSP Stream Config file. You can provide the NVStreamer endpoint.
Add Cameras/Streams using RTSP URLs: To add streams from RTSP URLs, VIOS provides a mechanism with the help of RTSP Stream Config file. You can provide the RTSP URL, username, password.
You can see a screen as displayed in the following image:
Remove sensors#
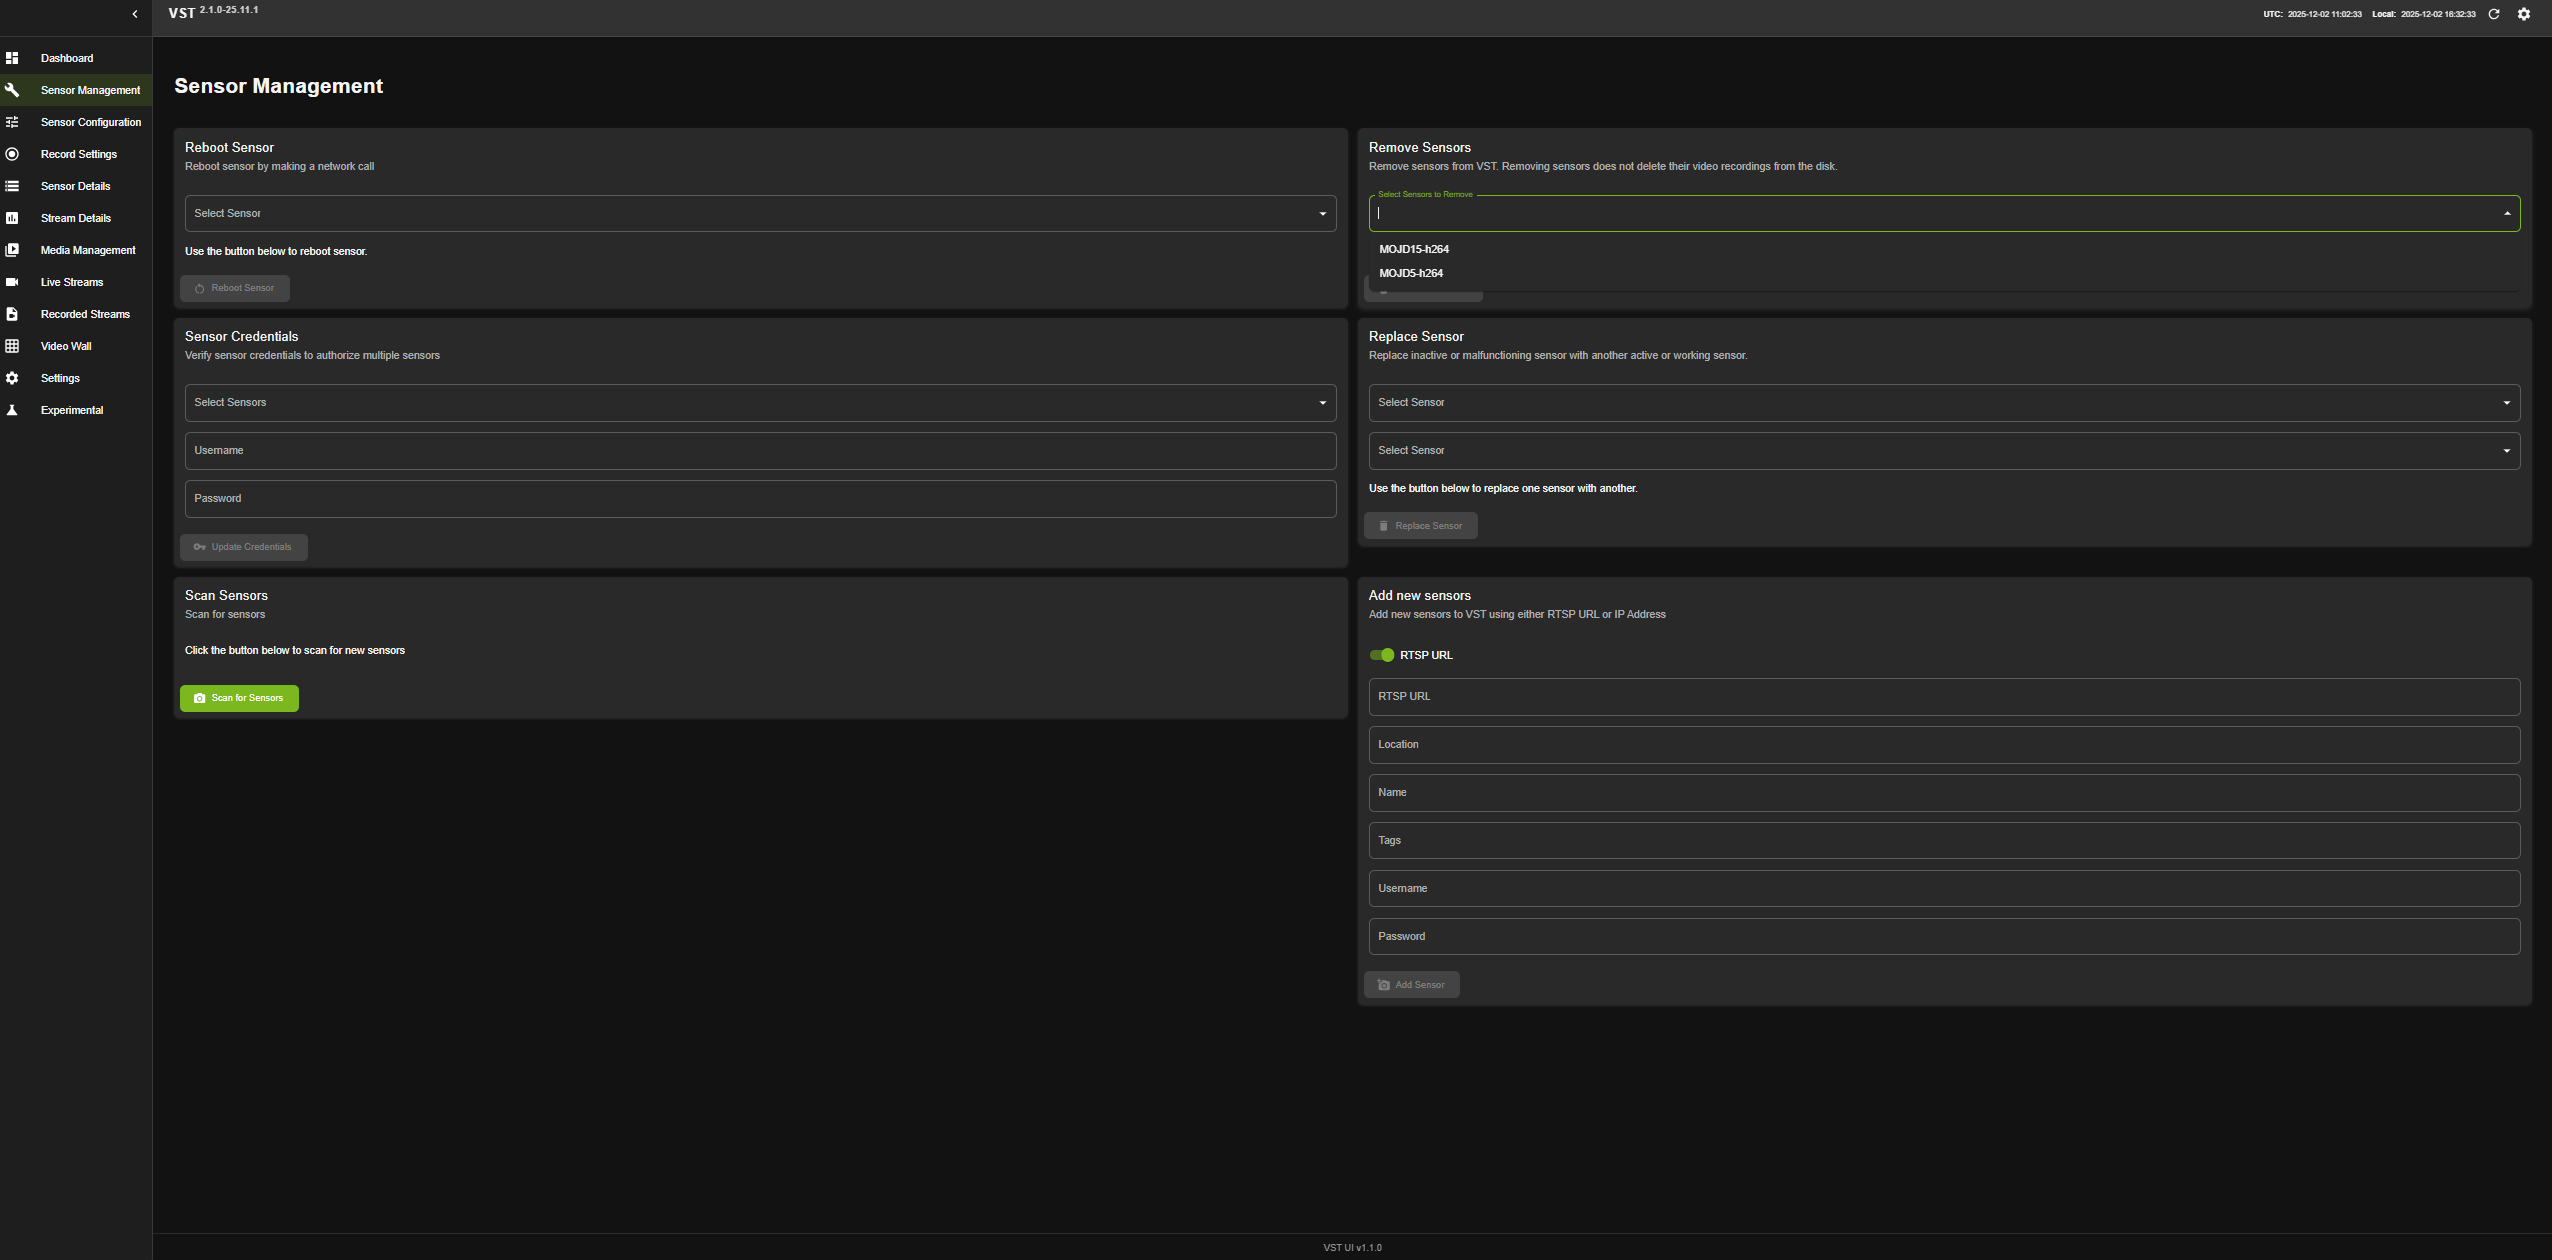
To remove the sensor from VIOS, navigate to Sensor Management tab, and go to Remove sensor option. Select the sensor from dropdown list and click on Remove button as displayed in the following image:
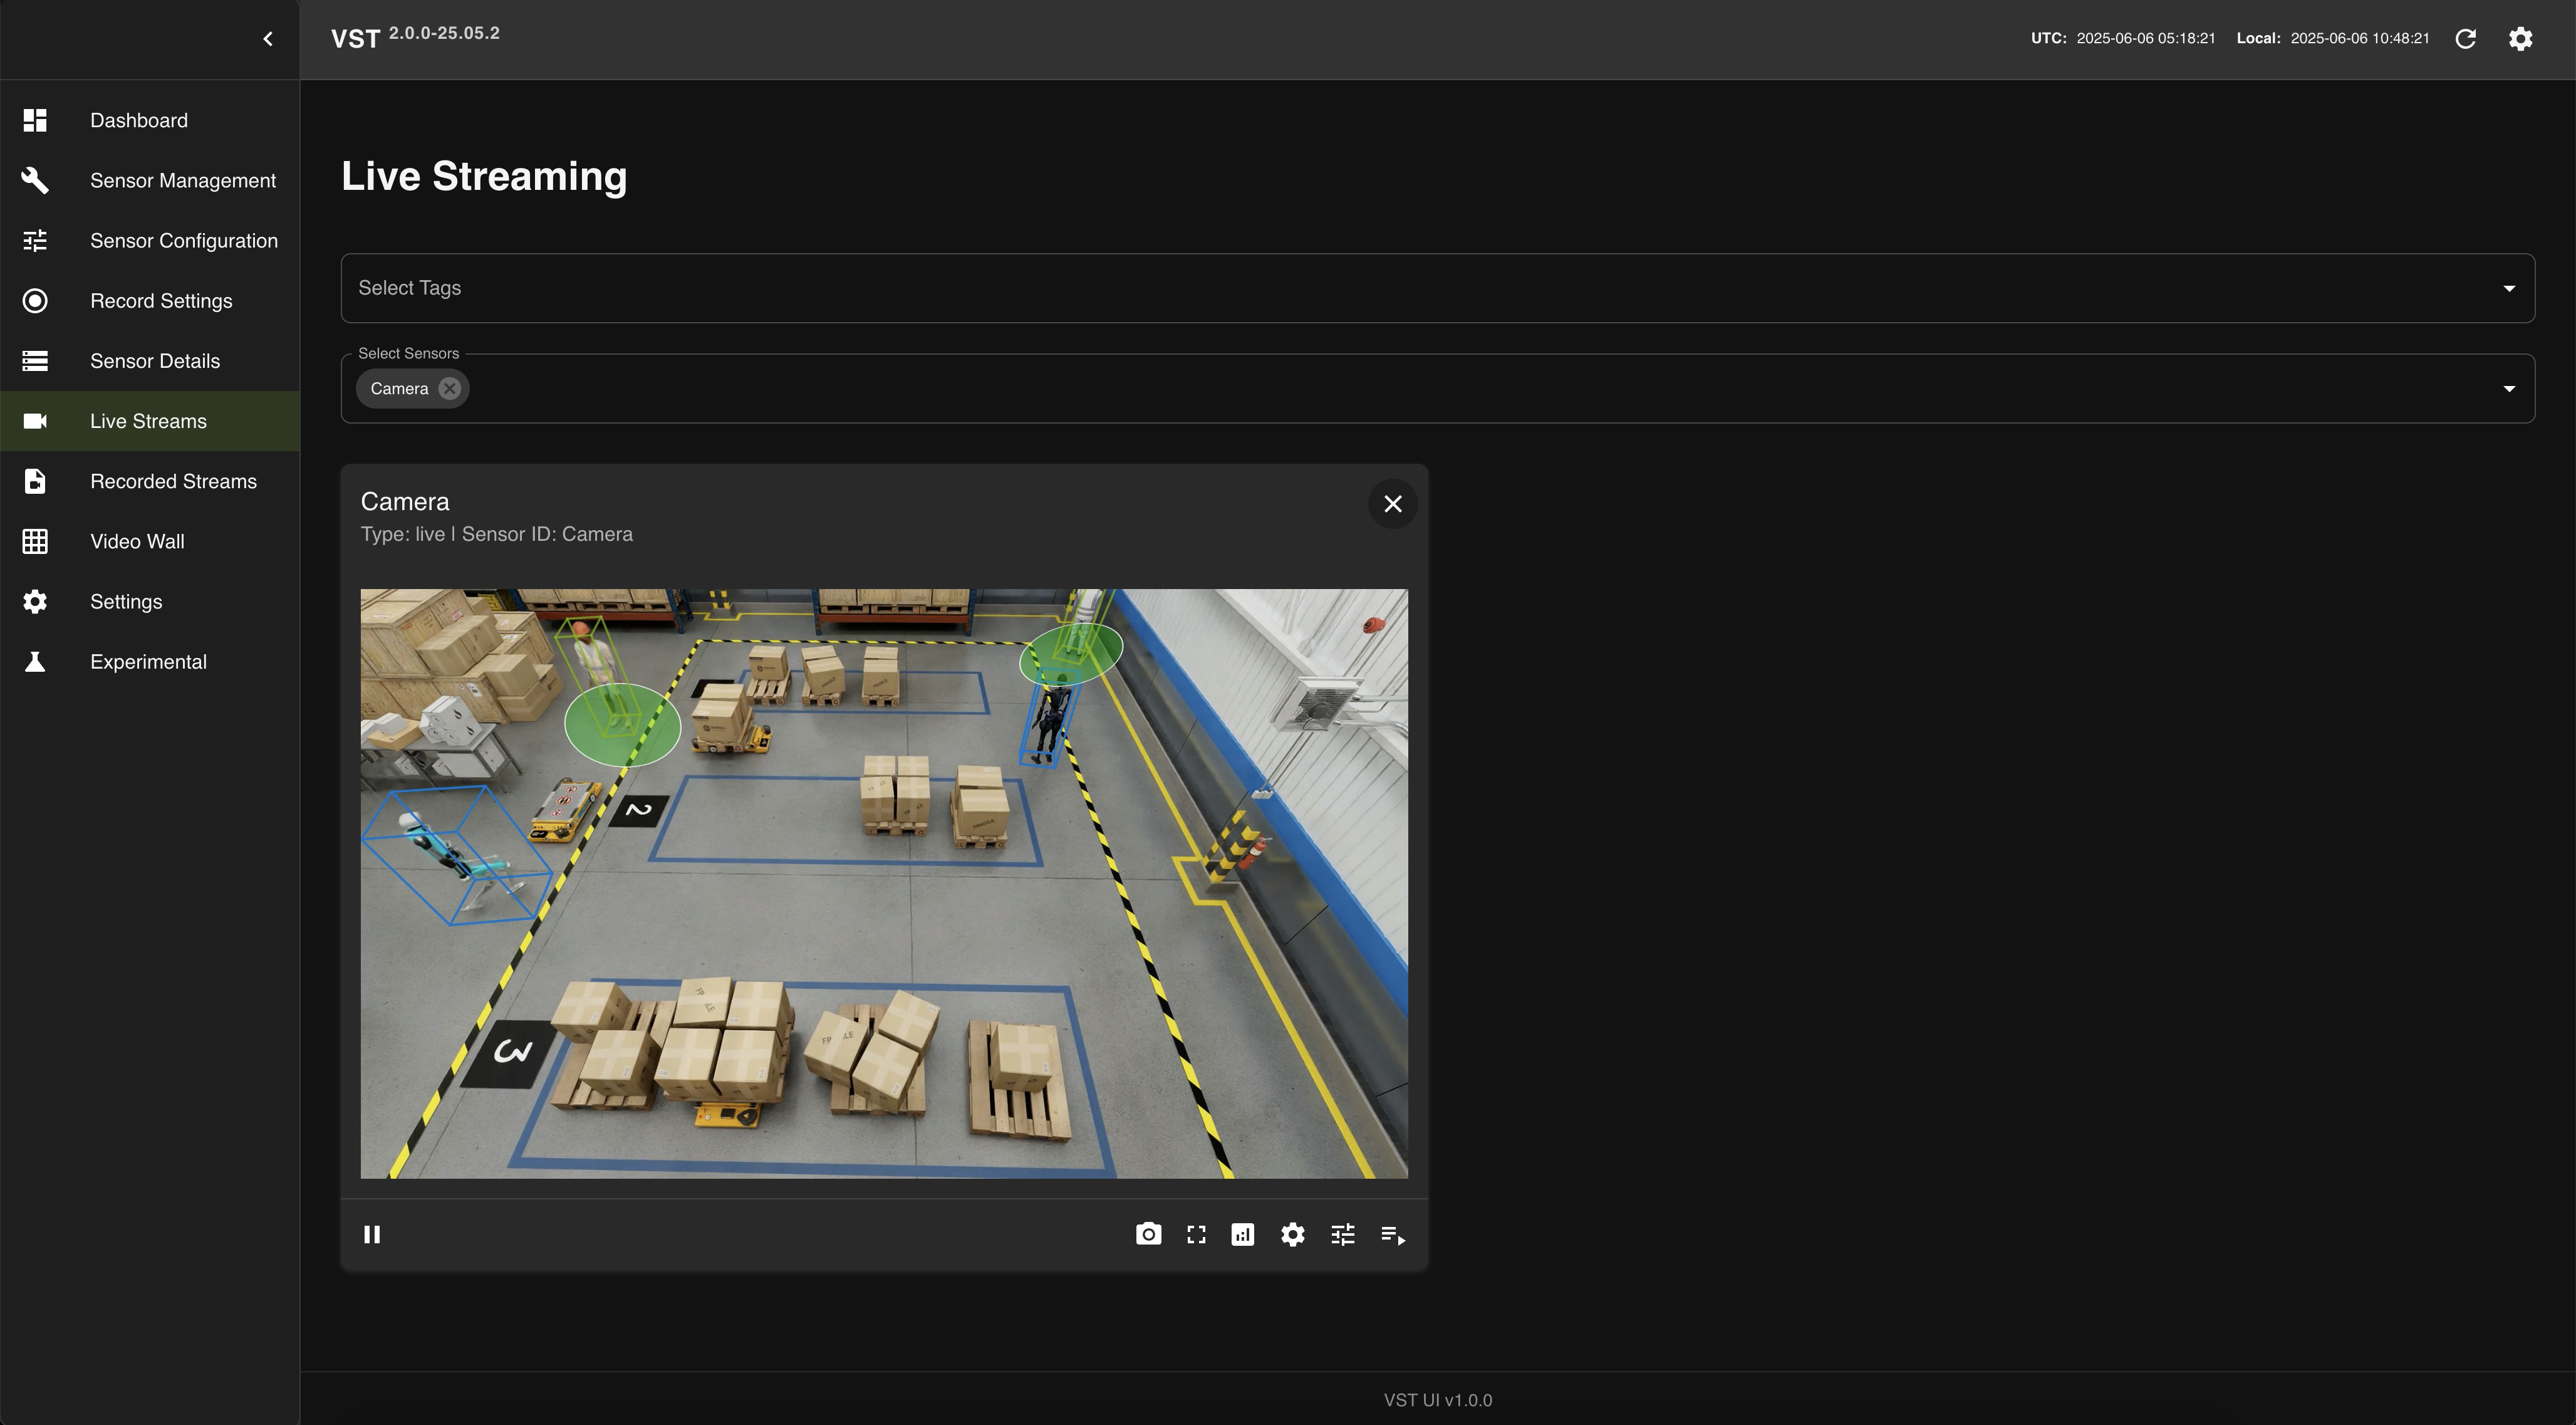
Live streams#
Navigate back to the Live Streams tab, click on the center drop-down list, and select the first camera on the list. A black rectangle will appear on the UI, and the camera’s IP address will be displayed on top of the drop-down list. Repeat the same with up to max cameras supported. You should see a screen similar to the following:
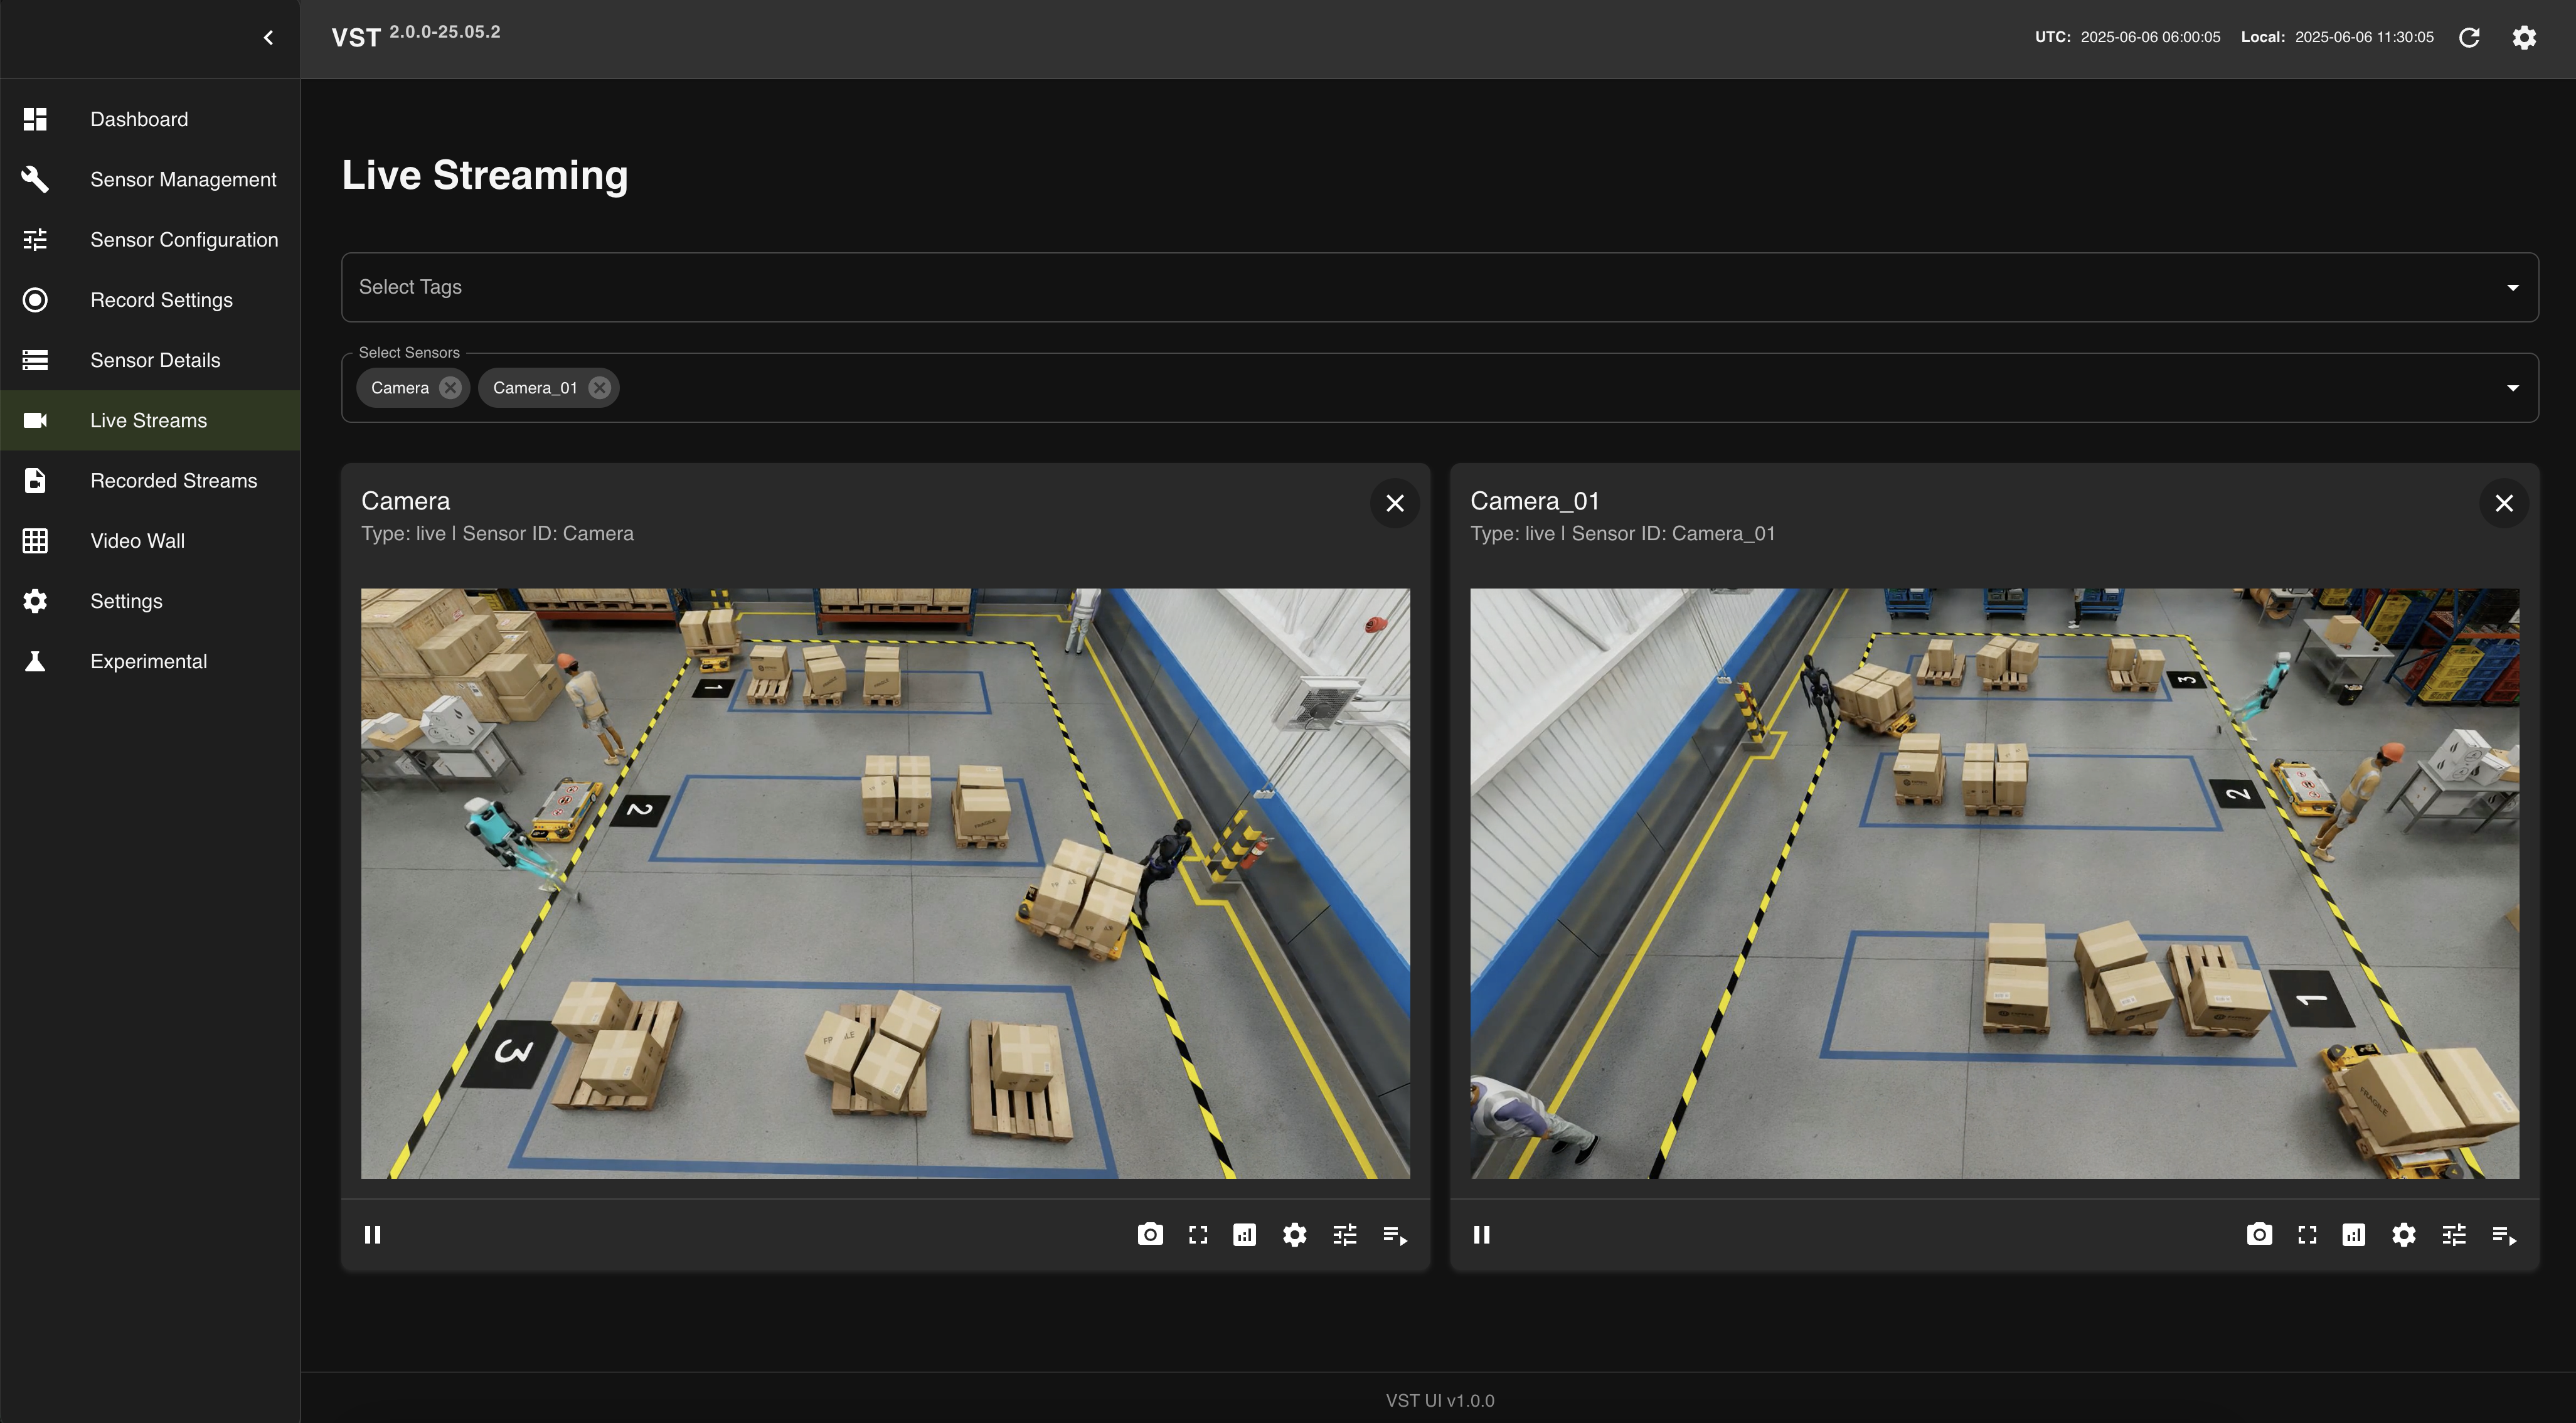
From here on, you can control each of the video streams independently. Click on each triangle to see live video from your camera.
Note
It can take a few seconds for the VIOS to commence live streaming. If you see a constantly revolving crescent for a prolonged amount of time - please try to restart the browser.
VIOS has been tested extensively with Chrome and we are aware of existing problems while streaming through alternative browsers.
Recording management#
Setting#
Now that you are able to stream live video, it is time to try out recording. Navigate to the Record Setting tab, and select camera from drop down list:
Note
All recordings will be saved to your local storage; older recordings will be overwritten with newer ones automatically should VIOS run out of the disk space.
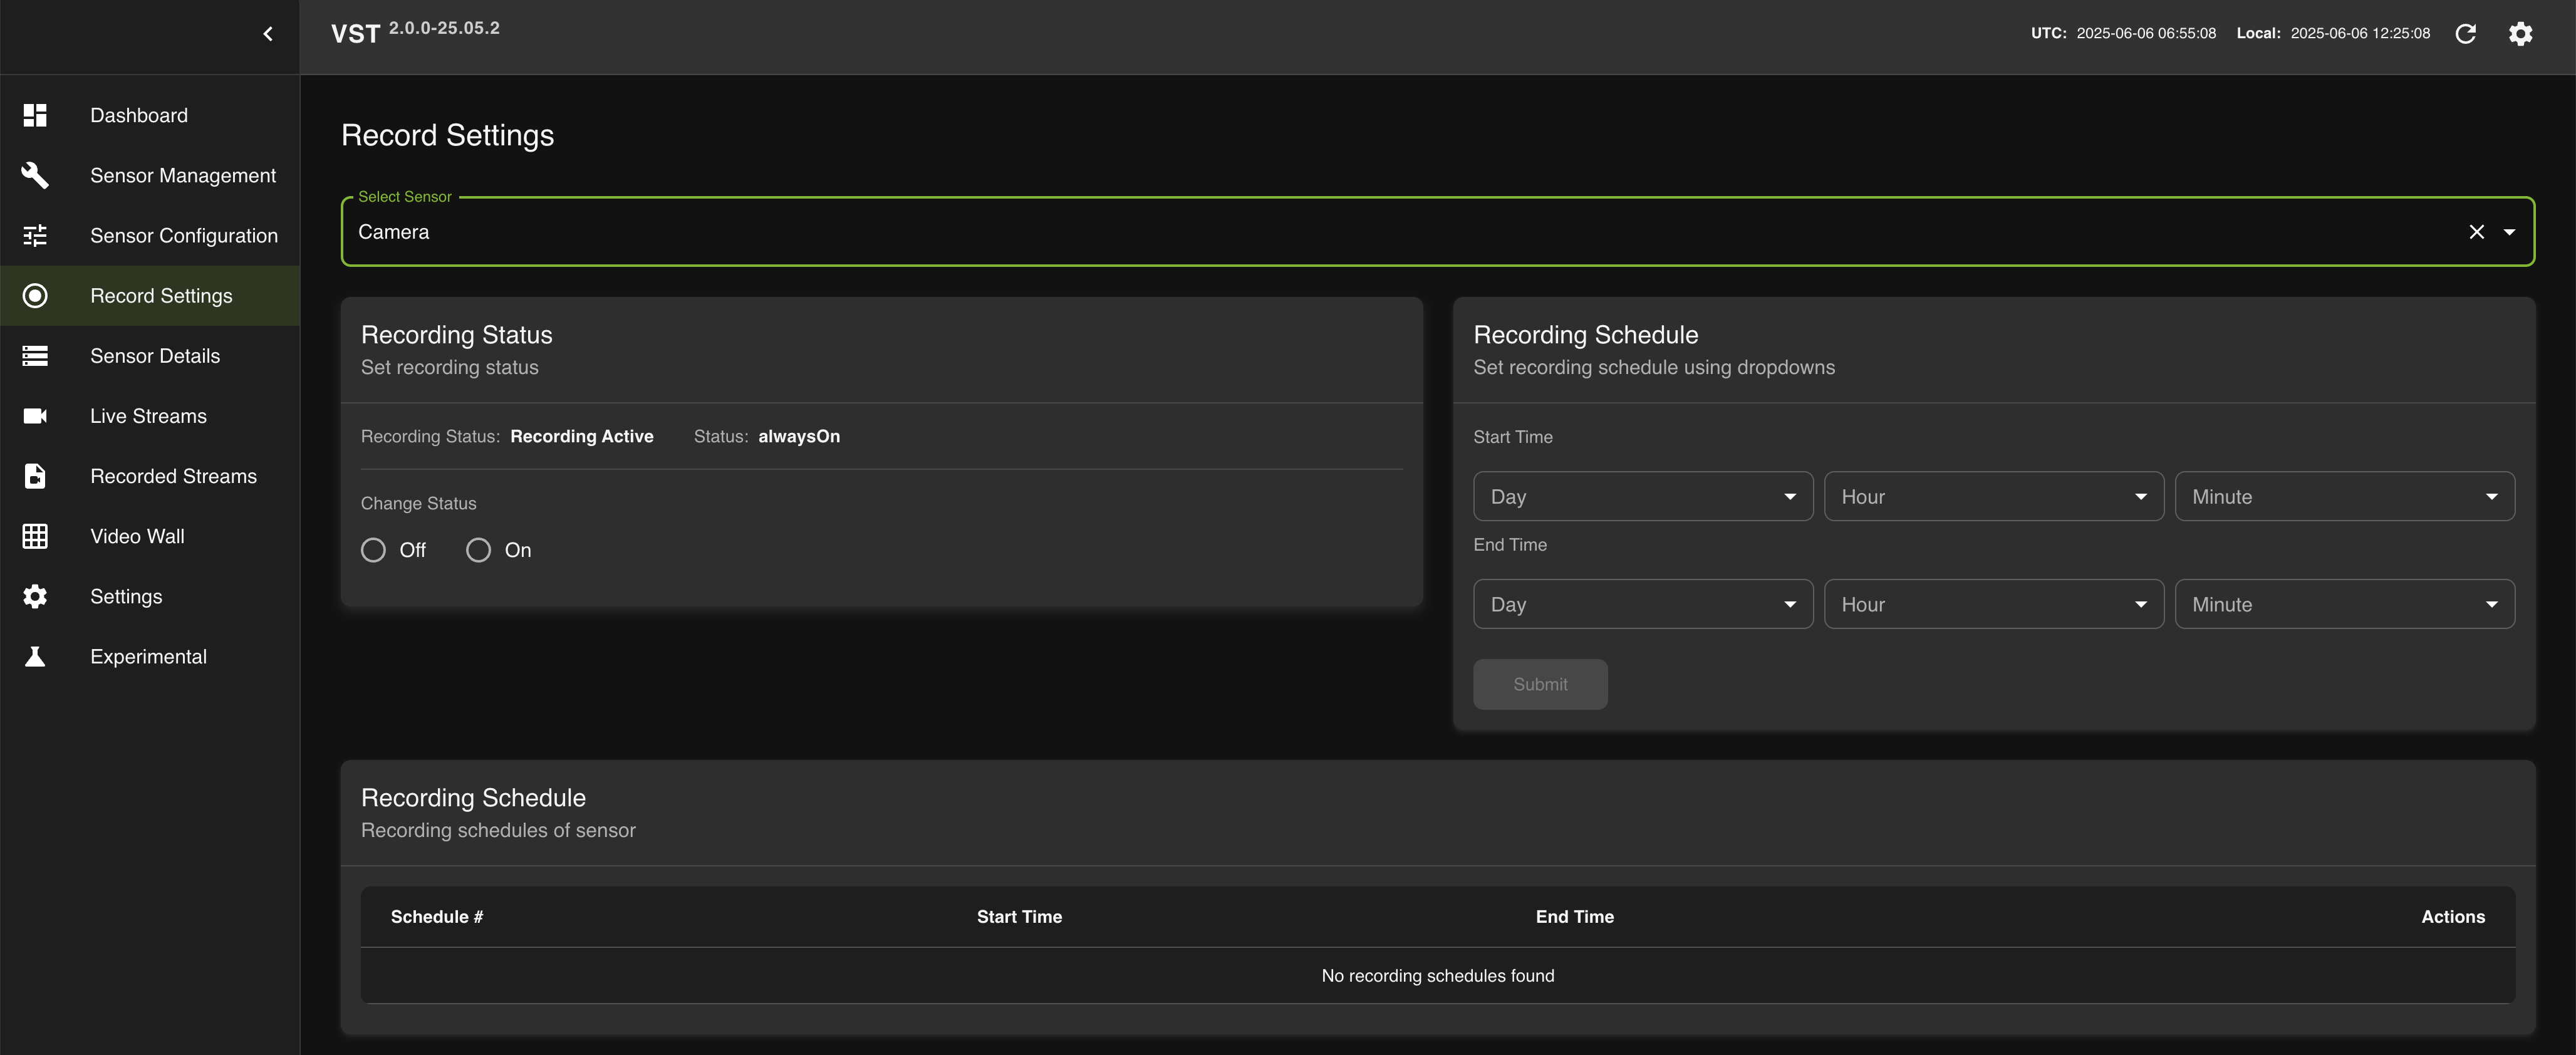
You can select a particular camera from the drop down list and set recording of that camera only.
Each camera can be assigned a separate recording schedule.
Click on the Live Streams tab again, and verify a red dot is displayed at the top right of the live video.
Click on the Recorded Streams tab, you can use a scrubber at the bottom of the video stream to go back in time and play back the recorded content for cameras the recordings are available.
Click back on the Live Streams tab to go back to view the live feeds.
Recorded videos will be stored at directory set to ‘“video_path”’ config parameter in ‘“storage_config_file”’ (Storage Config.) config parameter in ‘vst_config.json’ file and default video directory path is located at installation path inside ‘vst_video’ directory.
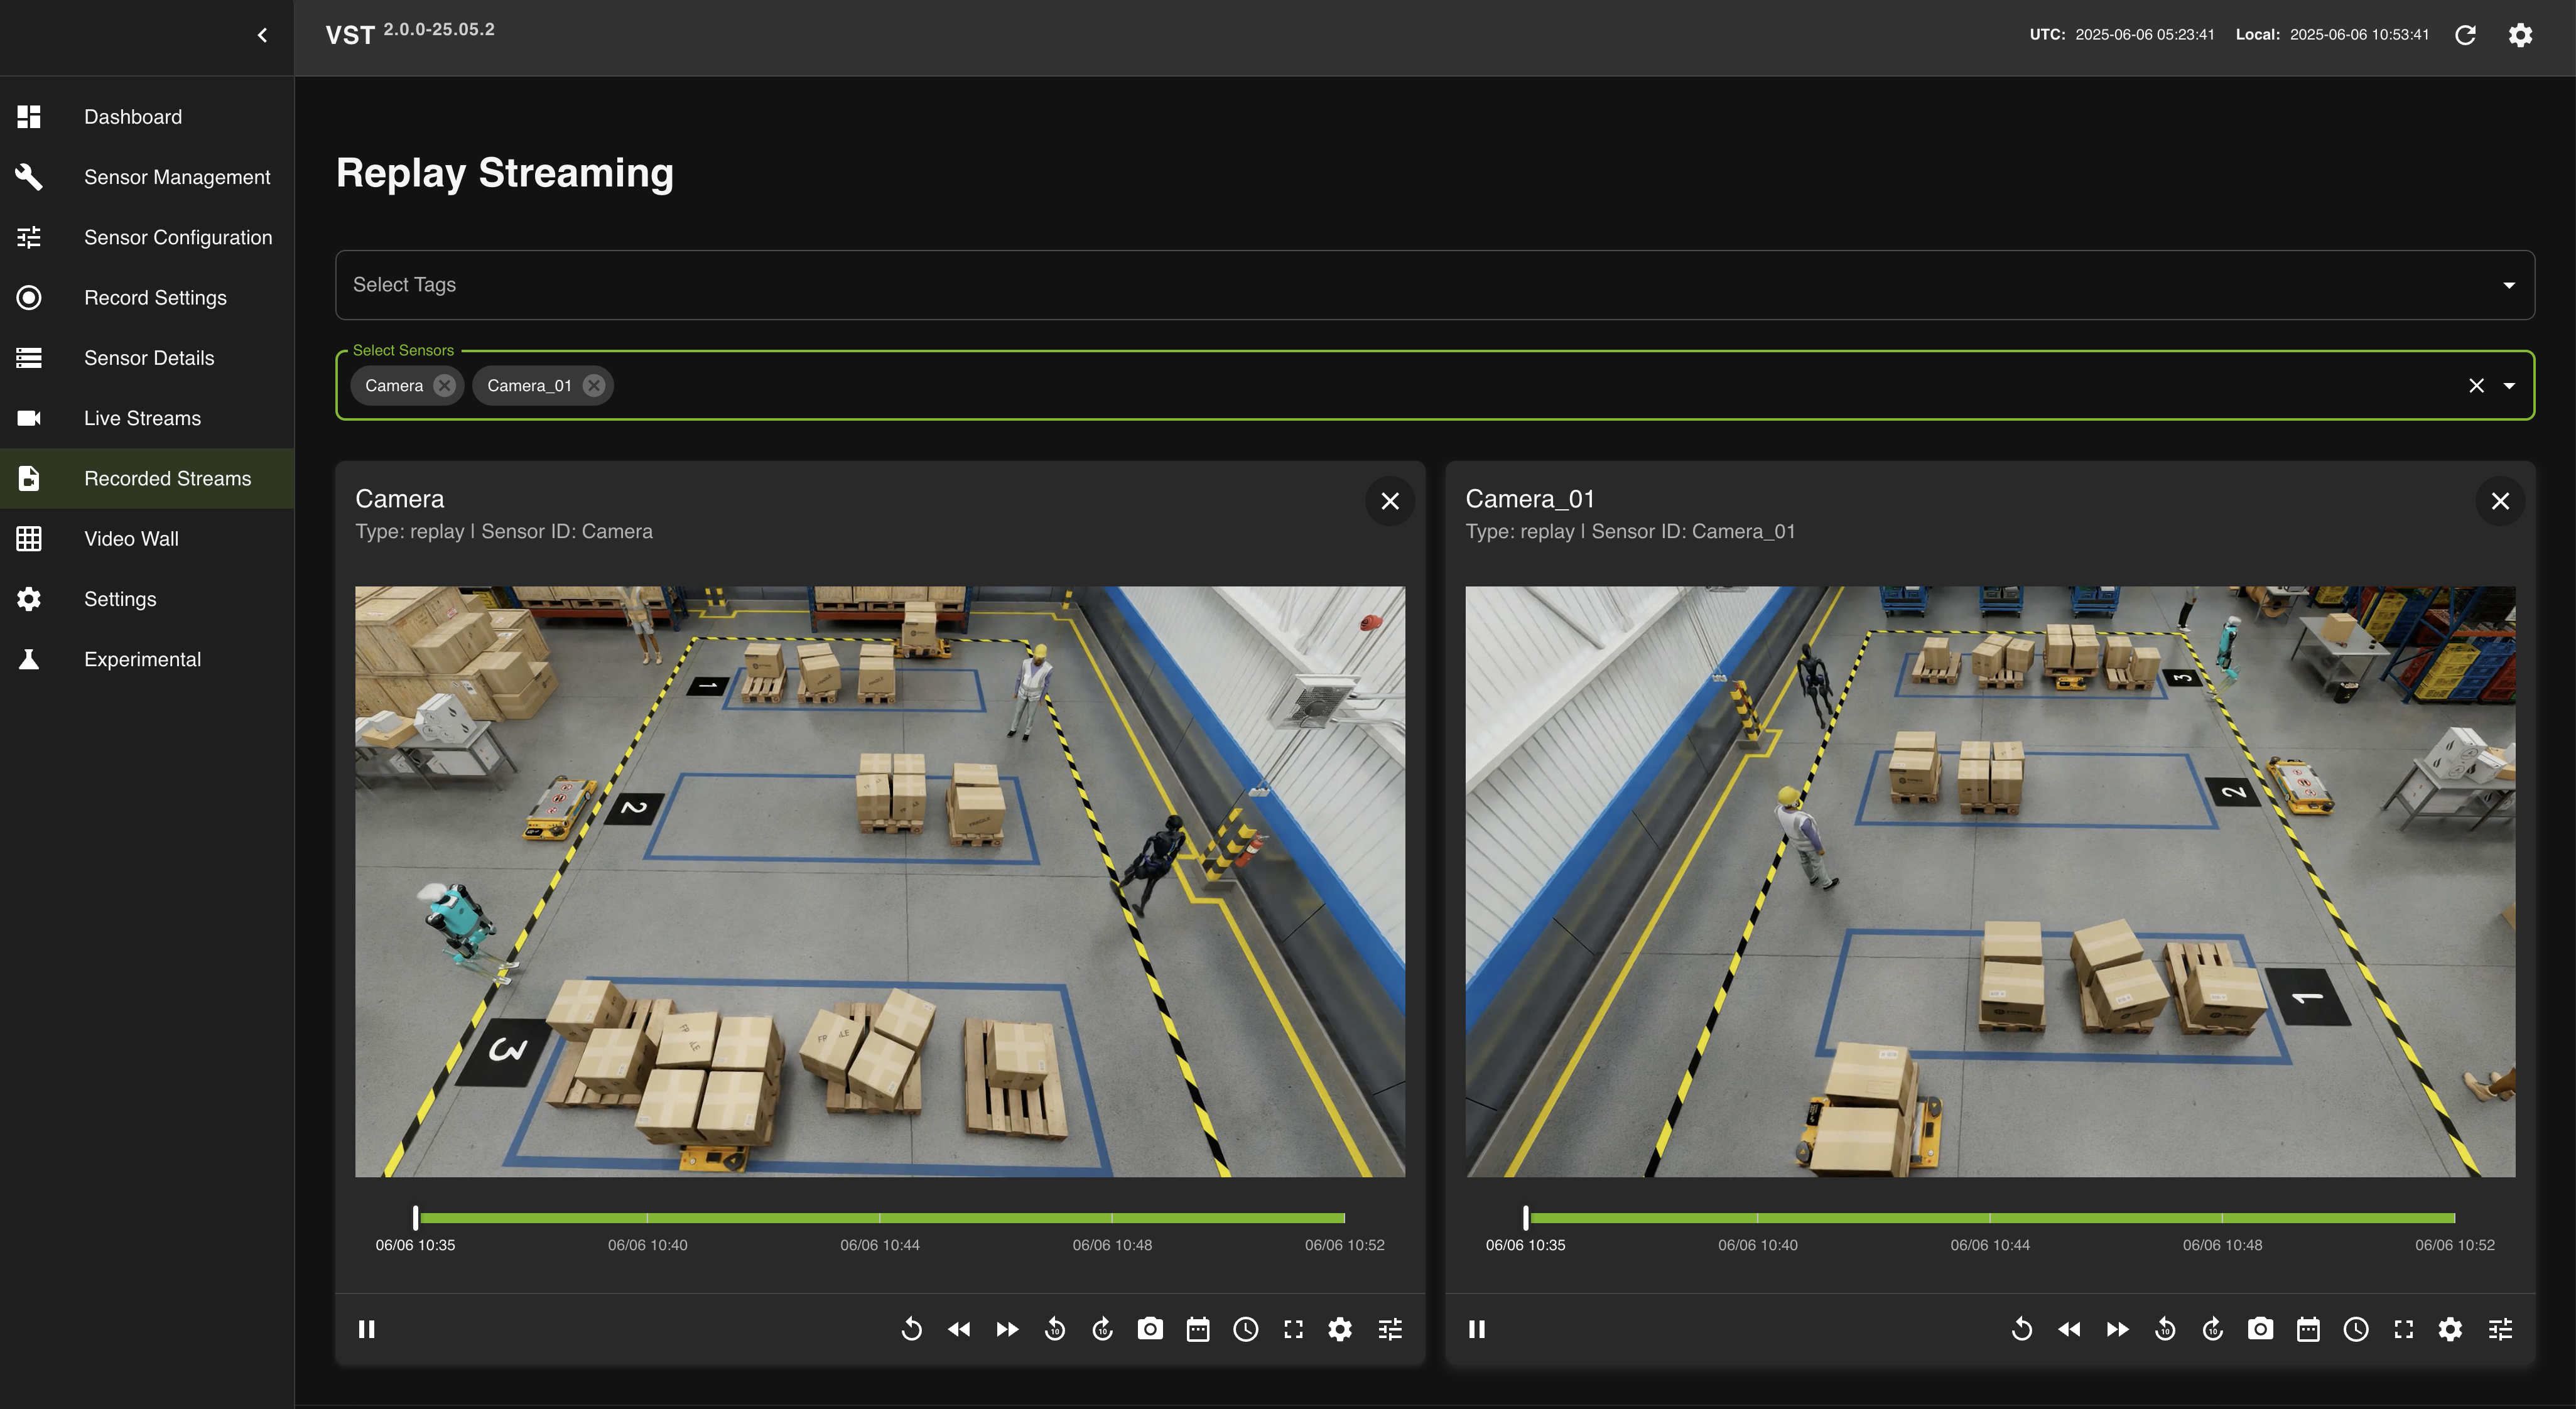
Playback recordings#
Now that you are able to record video, it is time to try out recorded playback feature of VIOS. To playback the recordings, navigate to Recorded Streams tab and select a video stream.
Some options:
It provides options such as pause, fast playback 2x,4x,8x etc.
Snapshot option to take screenshot of currently playing frame.
Other options like overlay, time-range playback, quality selection etc.
Playback overlay on Live and Recorded Streams#
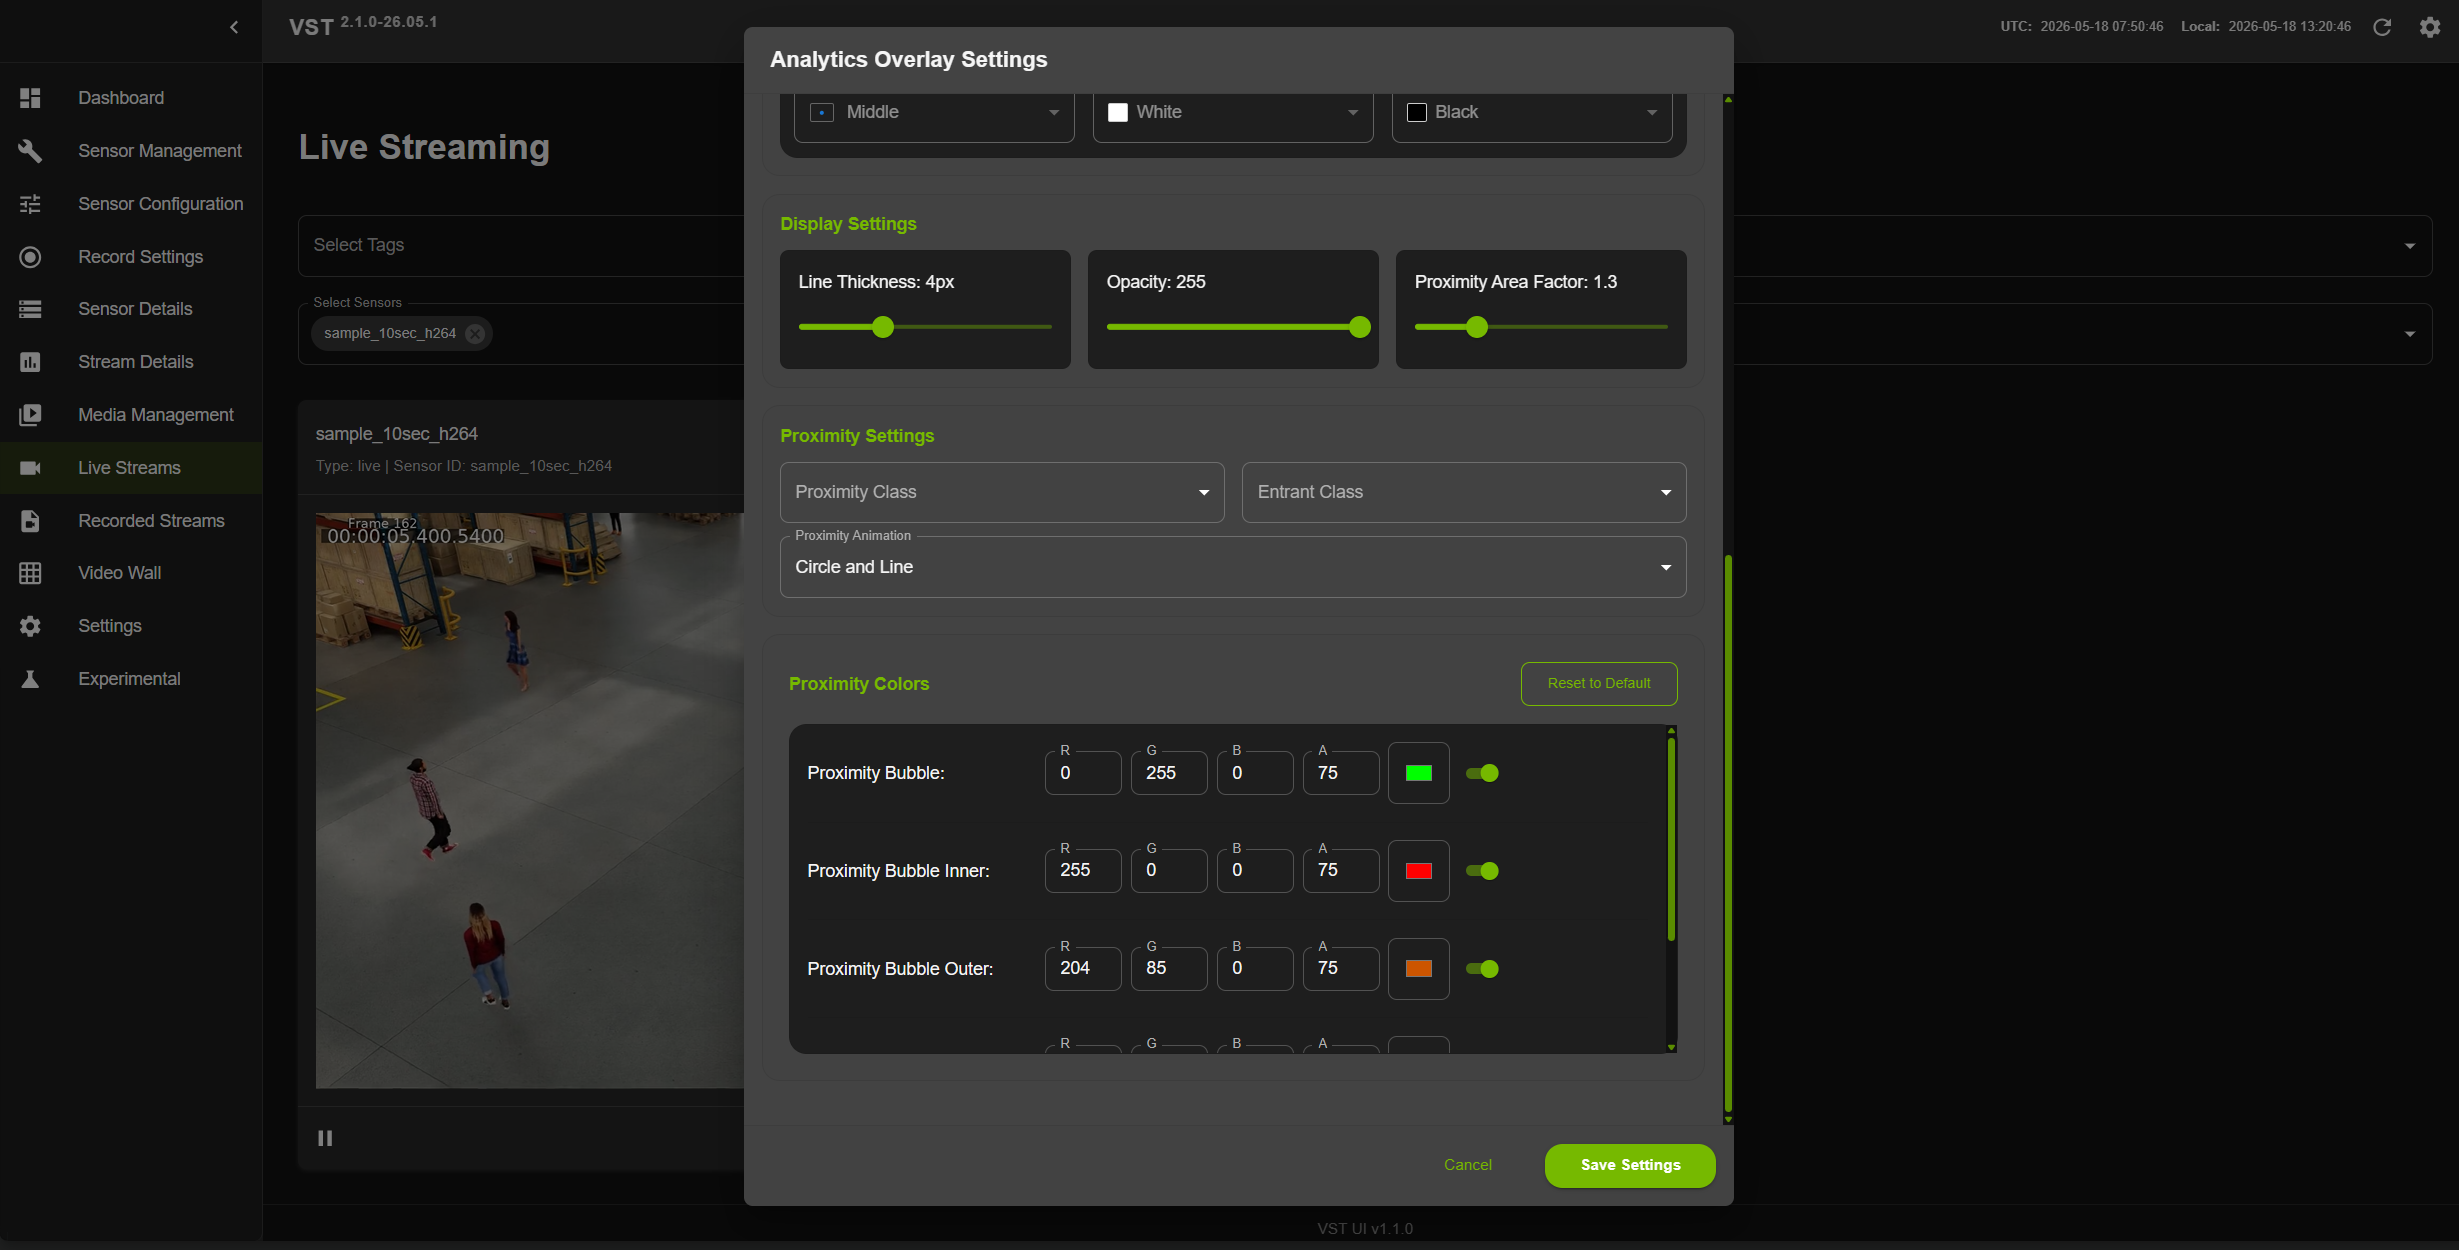
Now that you are able to playback recorded video, it is time to try out Overlay Feature of VIOS in Live and Recorded Streams. To enable bounding boxes on the video, navigate to Recorded Streams tab or Live Streams tab and select a video stream then select overlay option from the video player and enable it.
Some options:
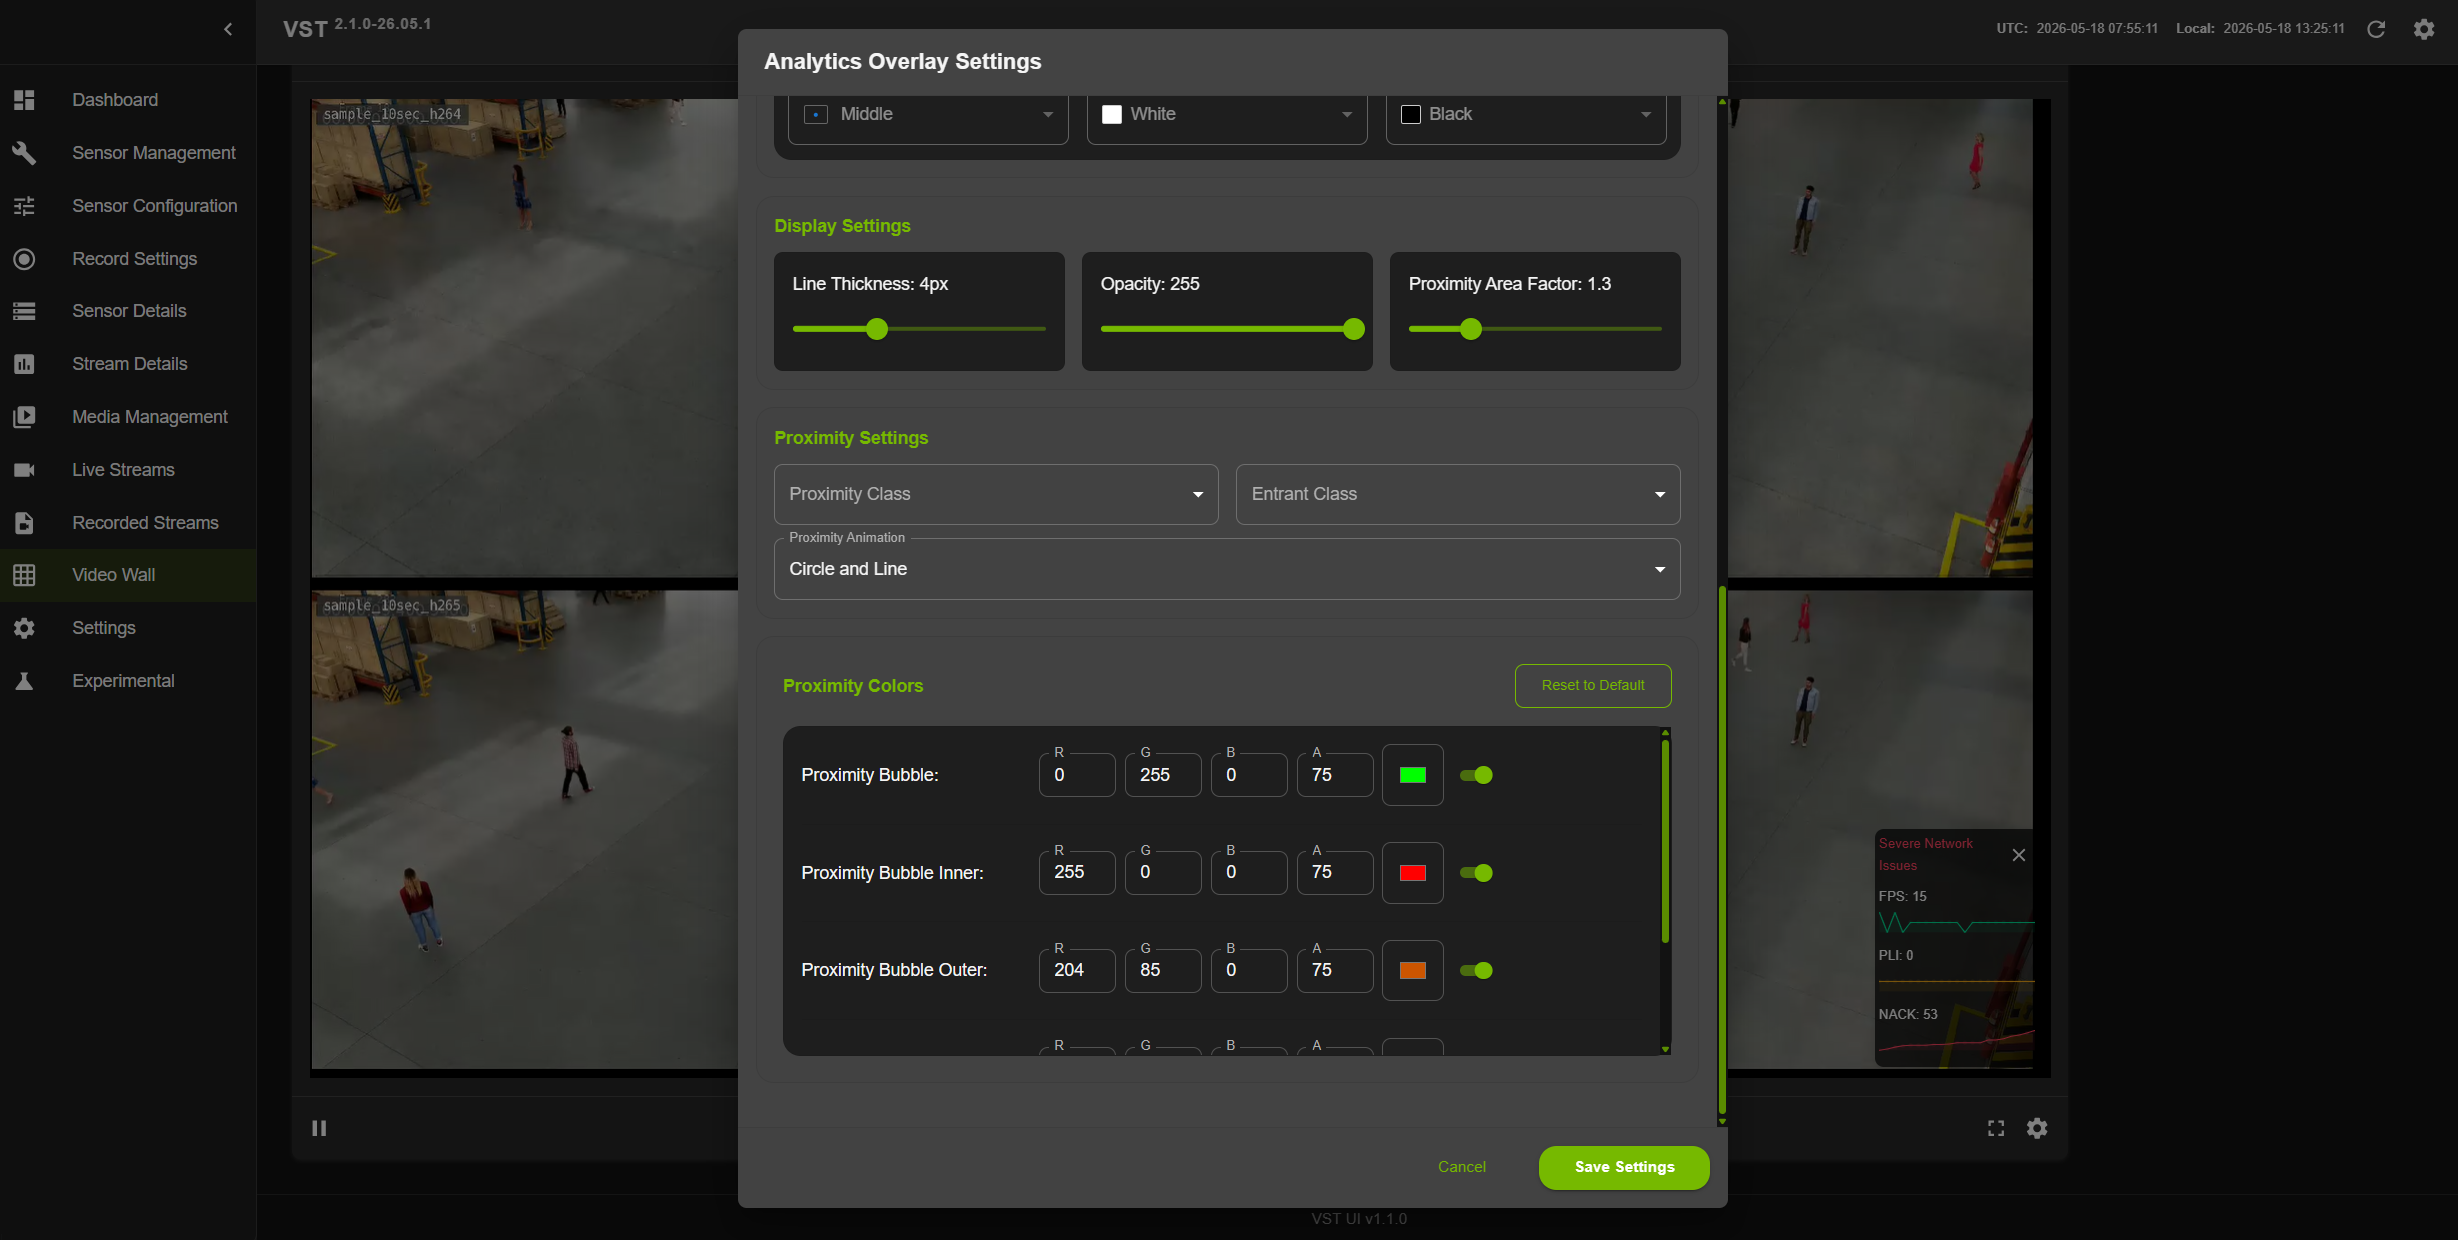
Analytics Overlay Settings tab is used to enable / disable Bounding Boxes, Debug Mode
Proximity Settings tab is used to set the proximity classes and entrant classes of the objects, along with the area factor and proximity animation.
Color Settings tab is used to set the color of the bounding boxes for different object classes also the proximity bubble colors.

Playback overlay on Video Wall#
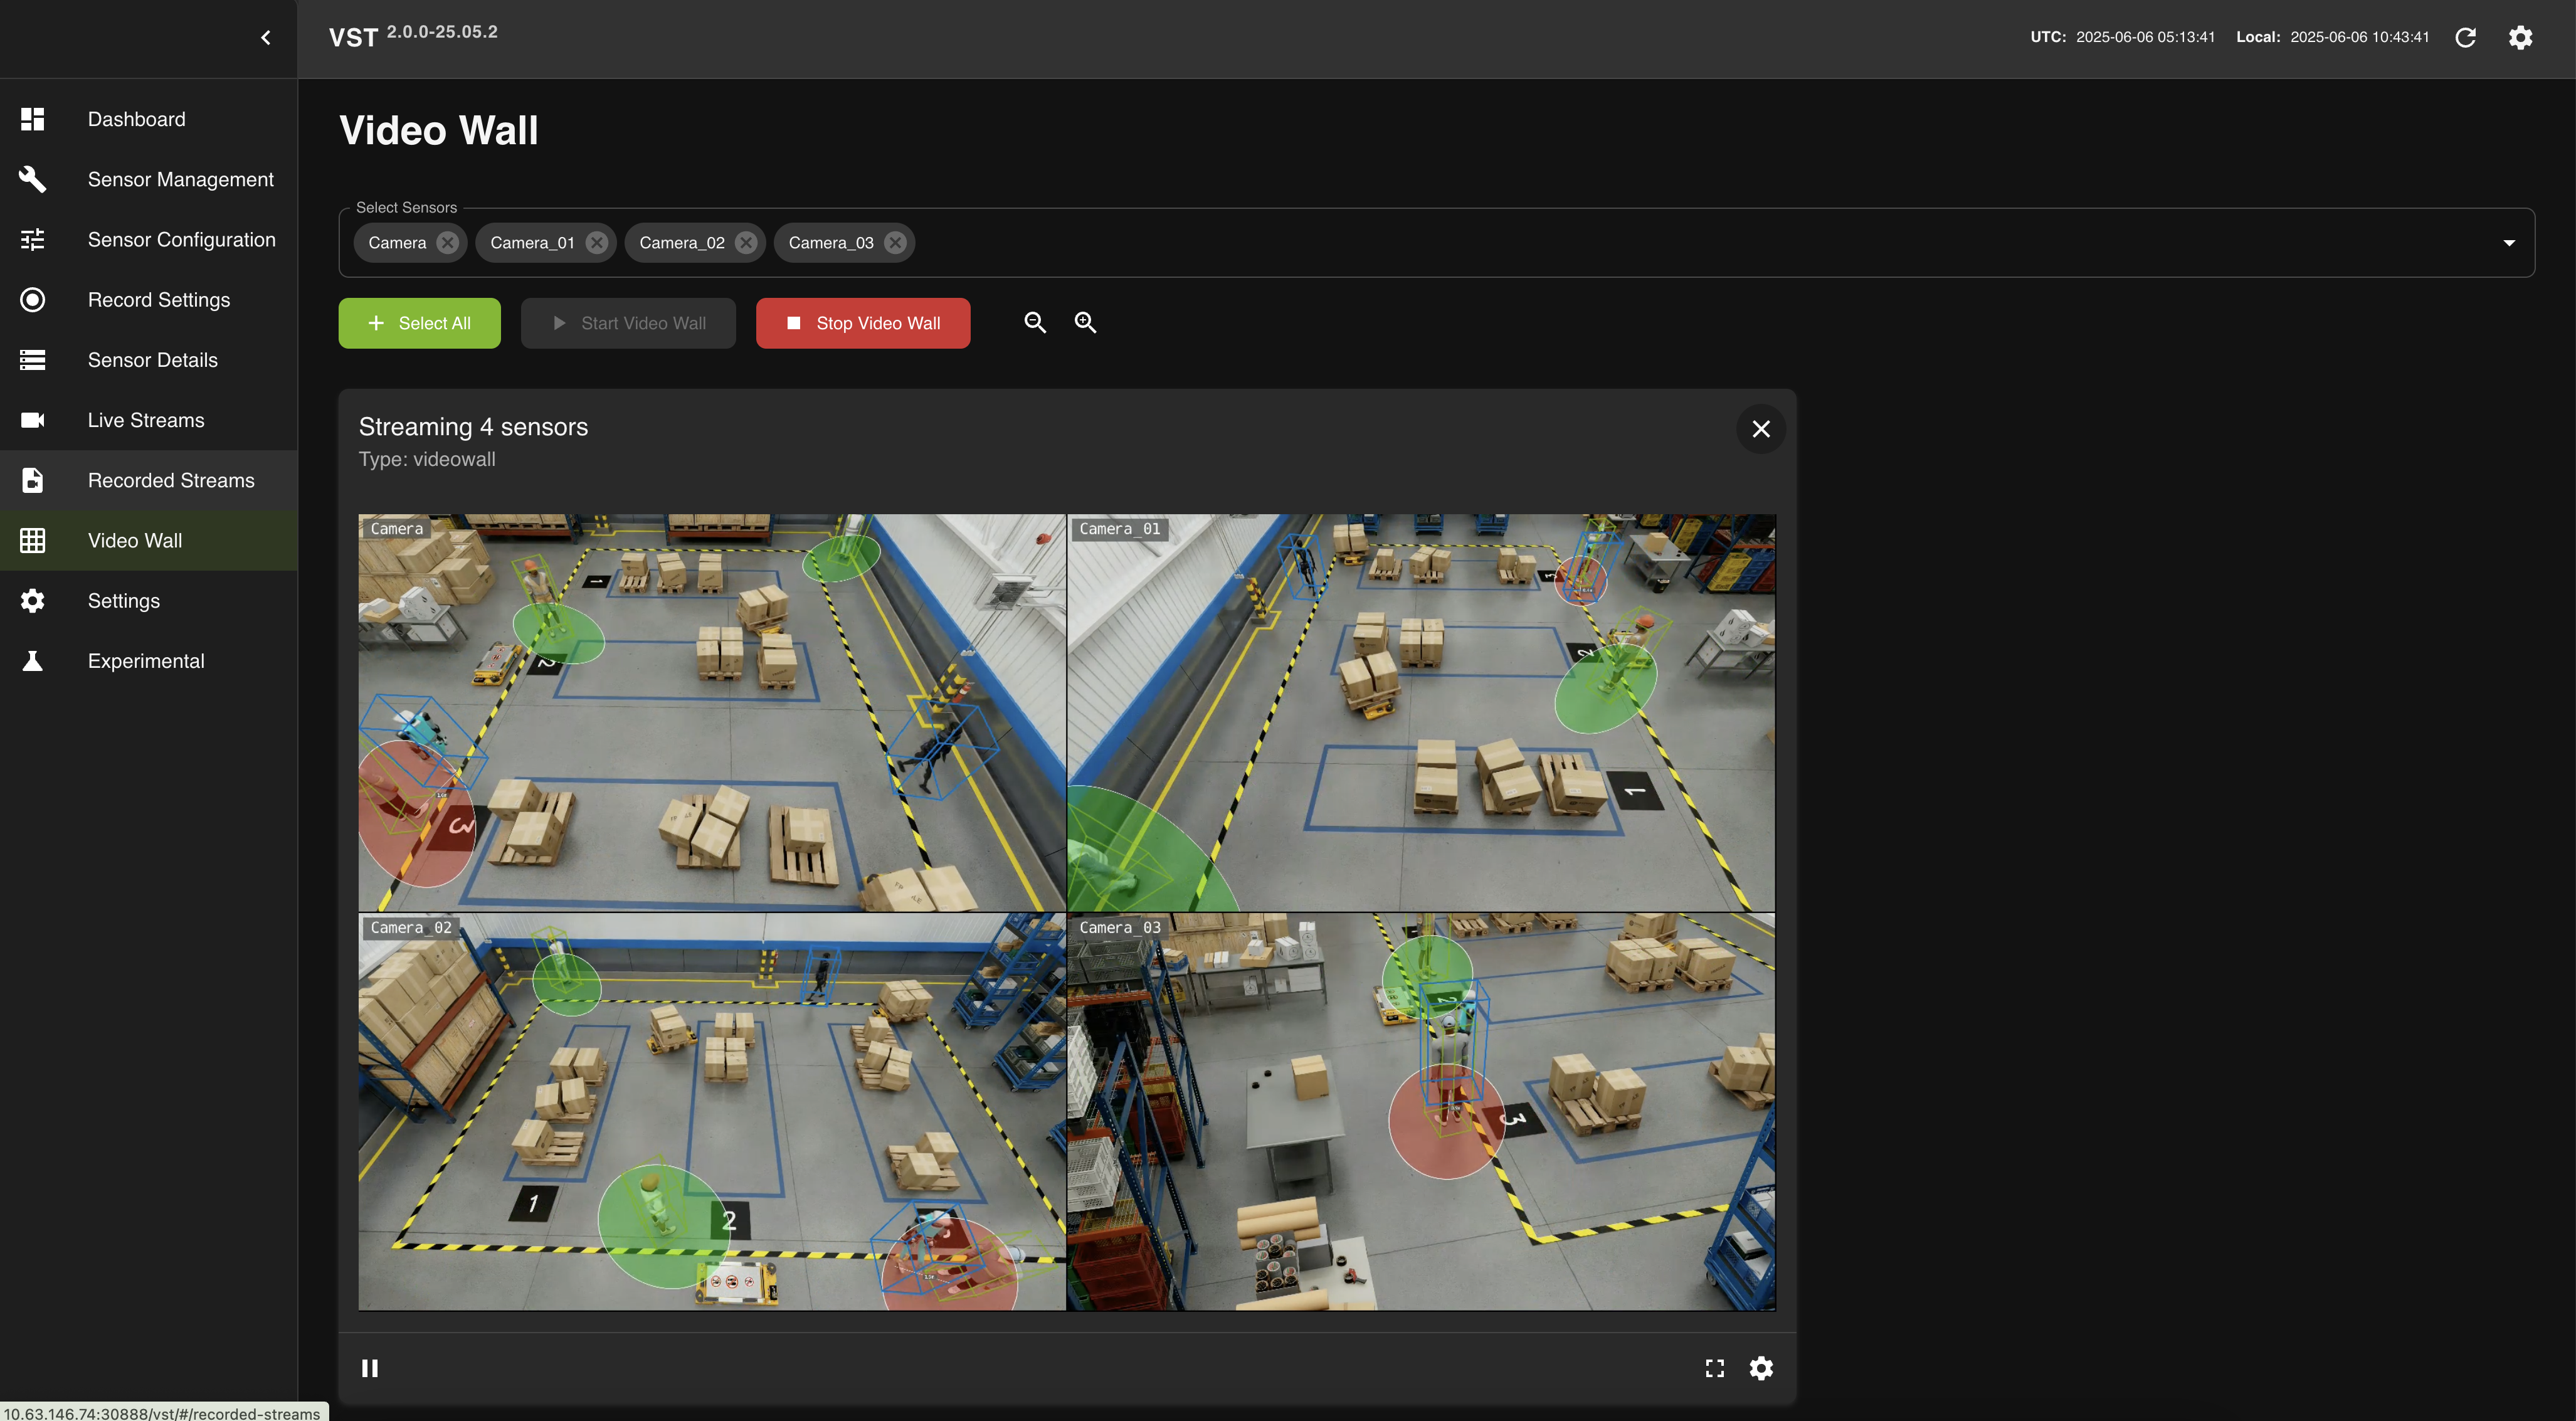
Now that you are able to enable Overlay Feature of VIOS in Live and Recorded Streams, it is time to extend the Overlay Feature of VIOS in Video Wall. To enable bounding boxes on the video, navigate to Video Wall tab and select streams from the dropdown list and enable overlay option from the video player and enable it.
Some options:
Analytics Overlay Settings tab is used to enable / disable Bounding Boxes, Debug Mode, Include Floor Plan and setting the thickness of the bounding boxes.
Proximity Settings tab is used to set the proximity classes and entrant classes of the objects, along with the area factor and proximity animation.
Color Settings tab is used to set the color of the bounding boxes for different object classes also the proximity bubble colors.
Features:
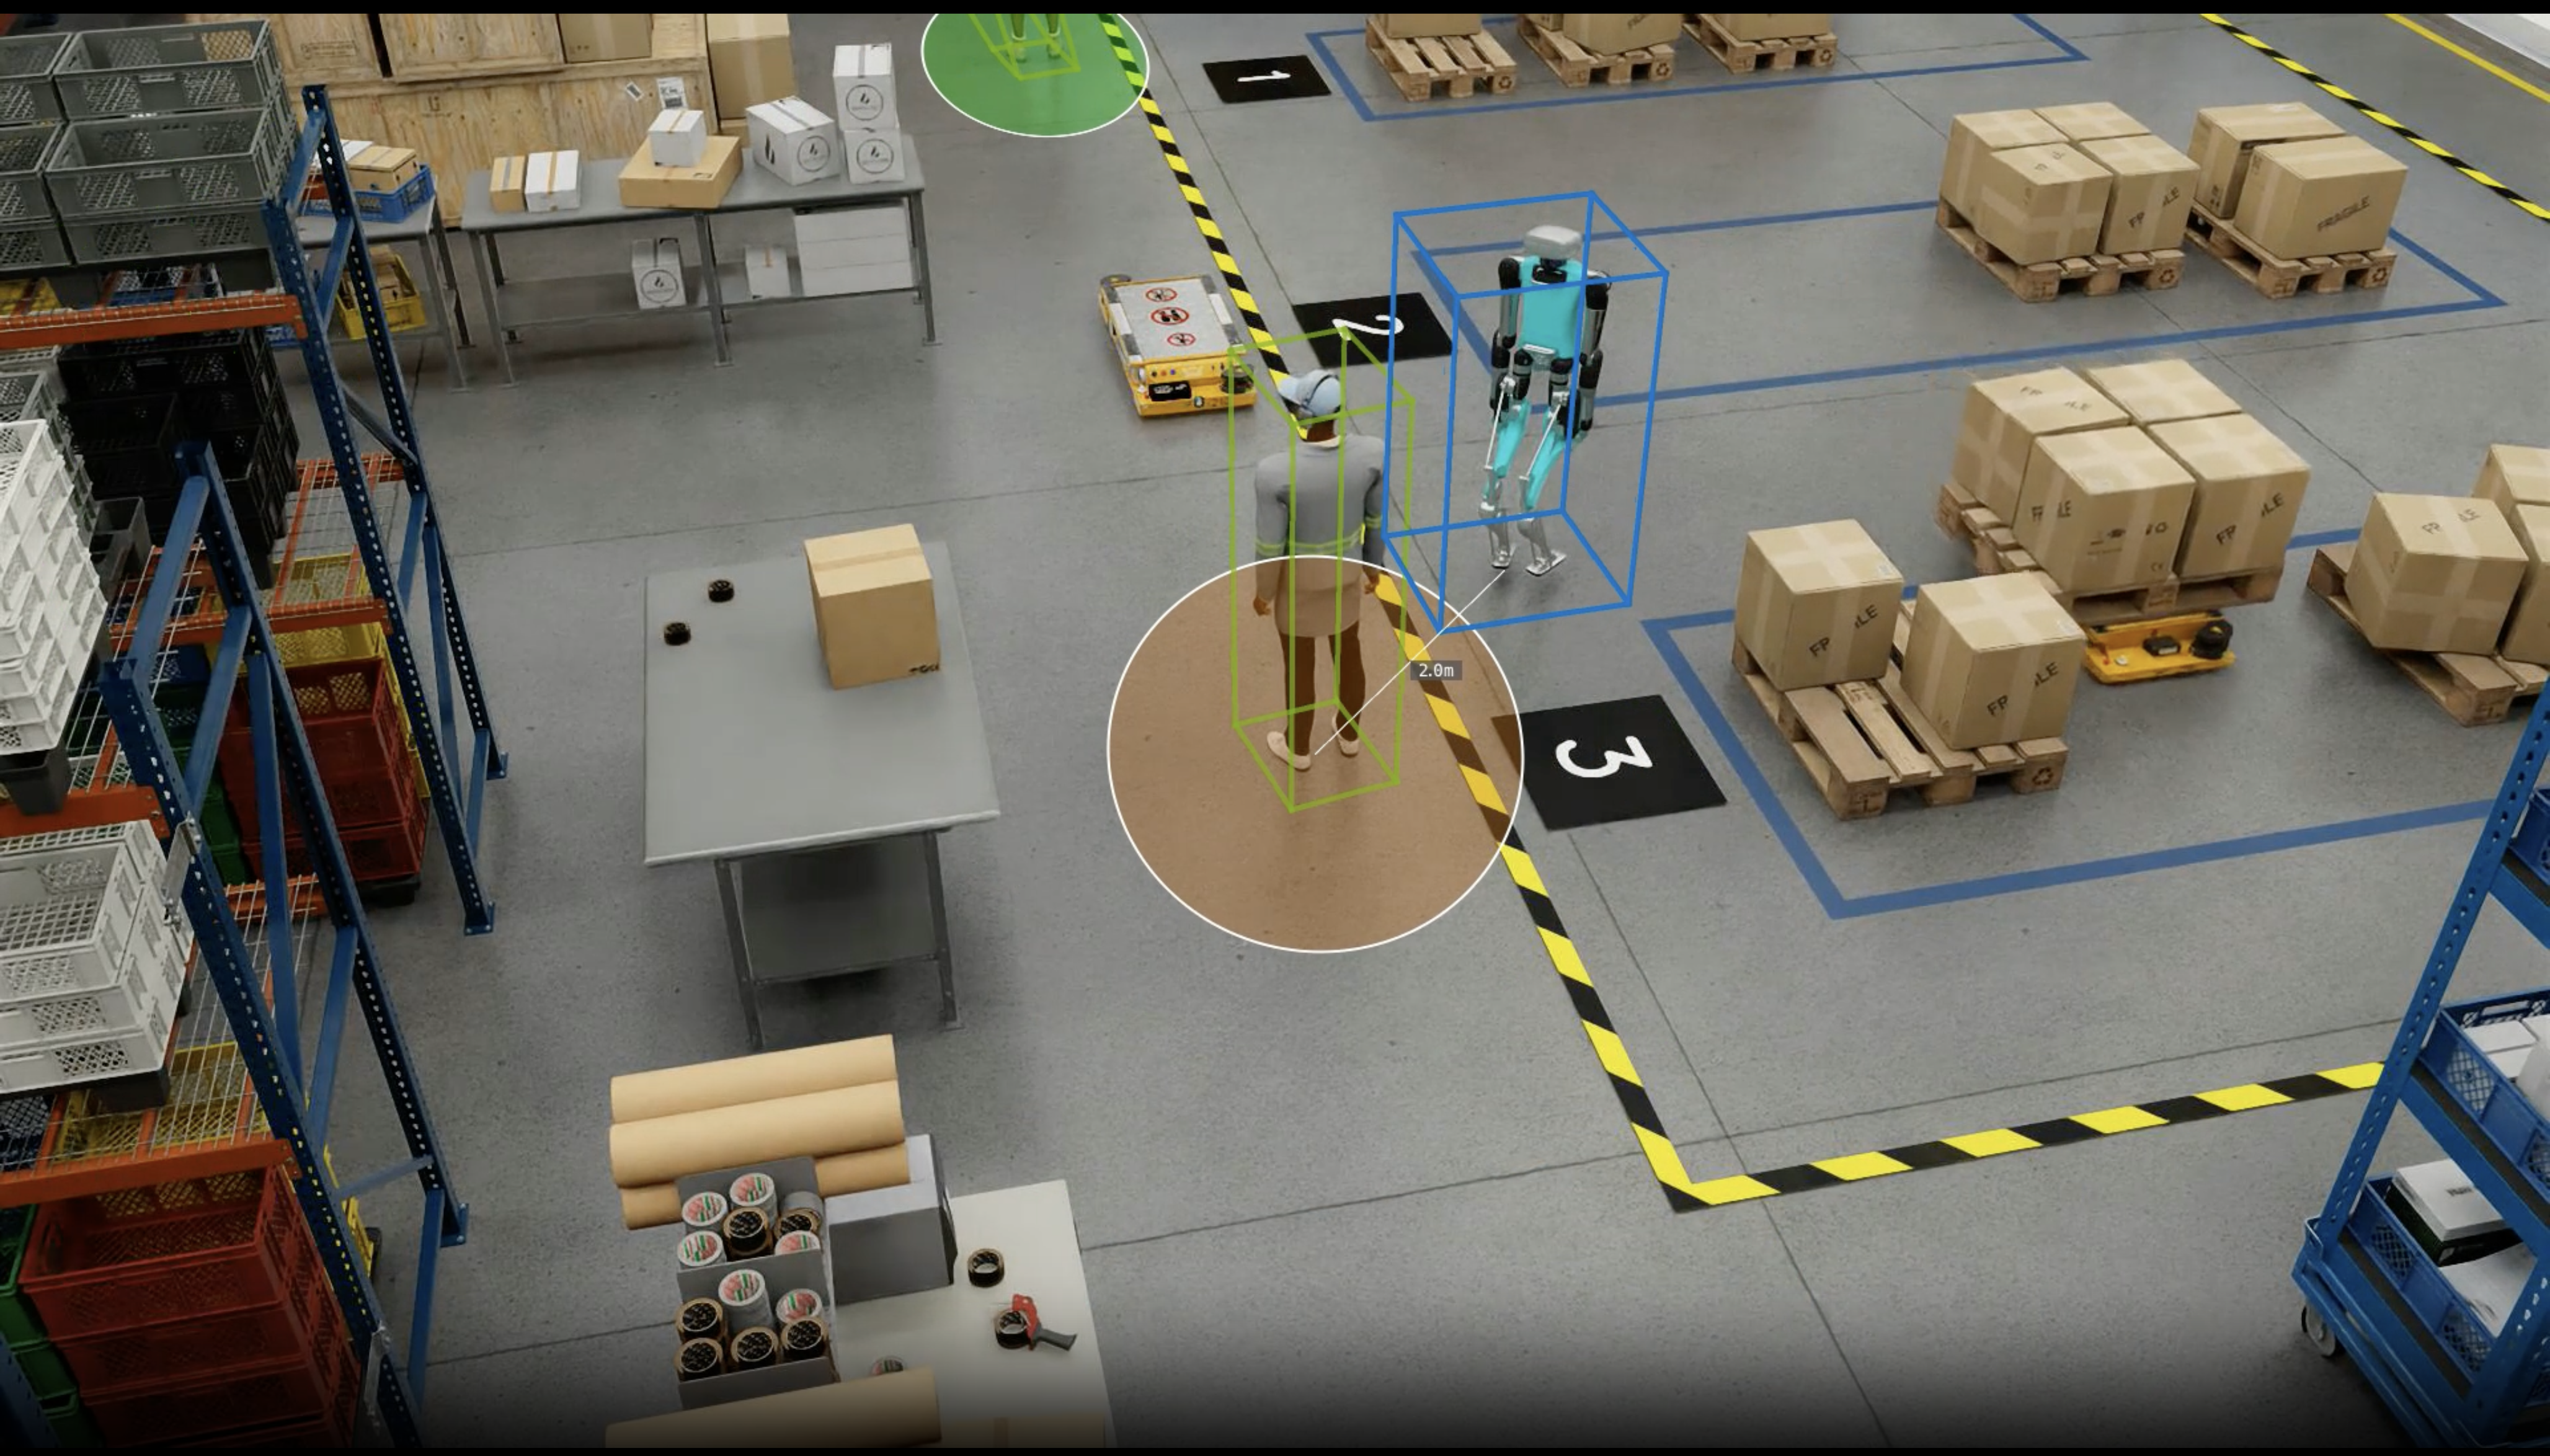
Proximity Alert Bubble : a proximity bubble is drawn around the object of
Proximity class, the color of the bubble changes according to the distance of the object from theEntrant classobject. The default color of the bubble is green marking as safe zone and turns orange when the object is in the close proximity of the threshold and turns red when the object is in the danger zone.Proximity Alert Line : when an object is in the close proximity of the threshold or in the danger zone, a proximity line with approximate distance is drawn between the object of
Proximity class, and the object ofEntrant class.

Proximity Alert Bubble and Lines in Video Wall#
Proximity Alert Bubble and Line in Live Stream#
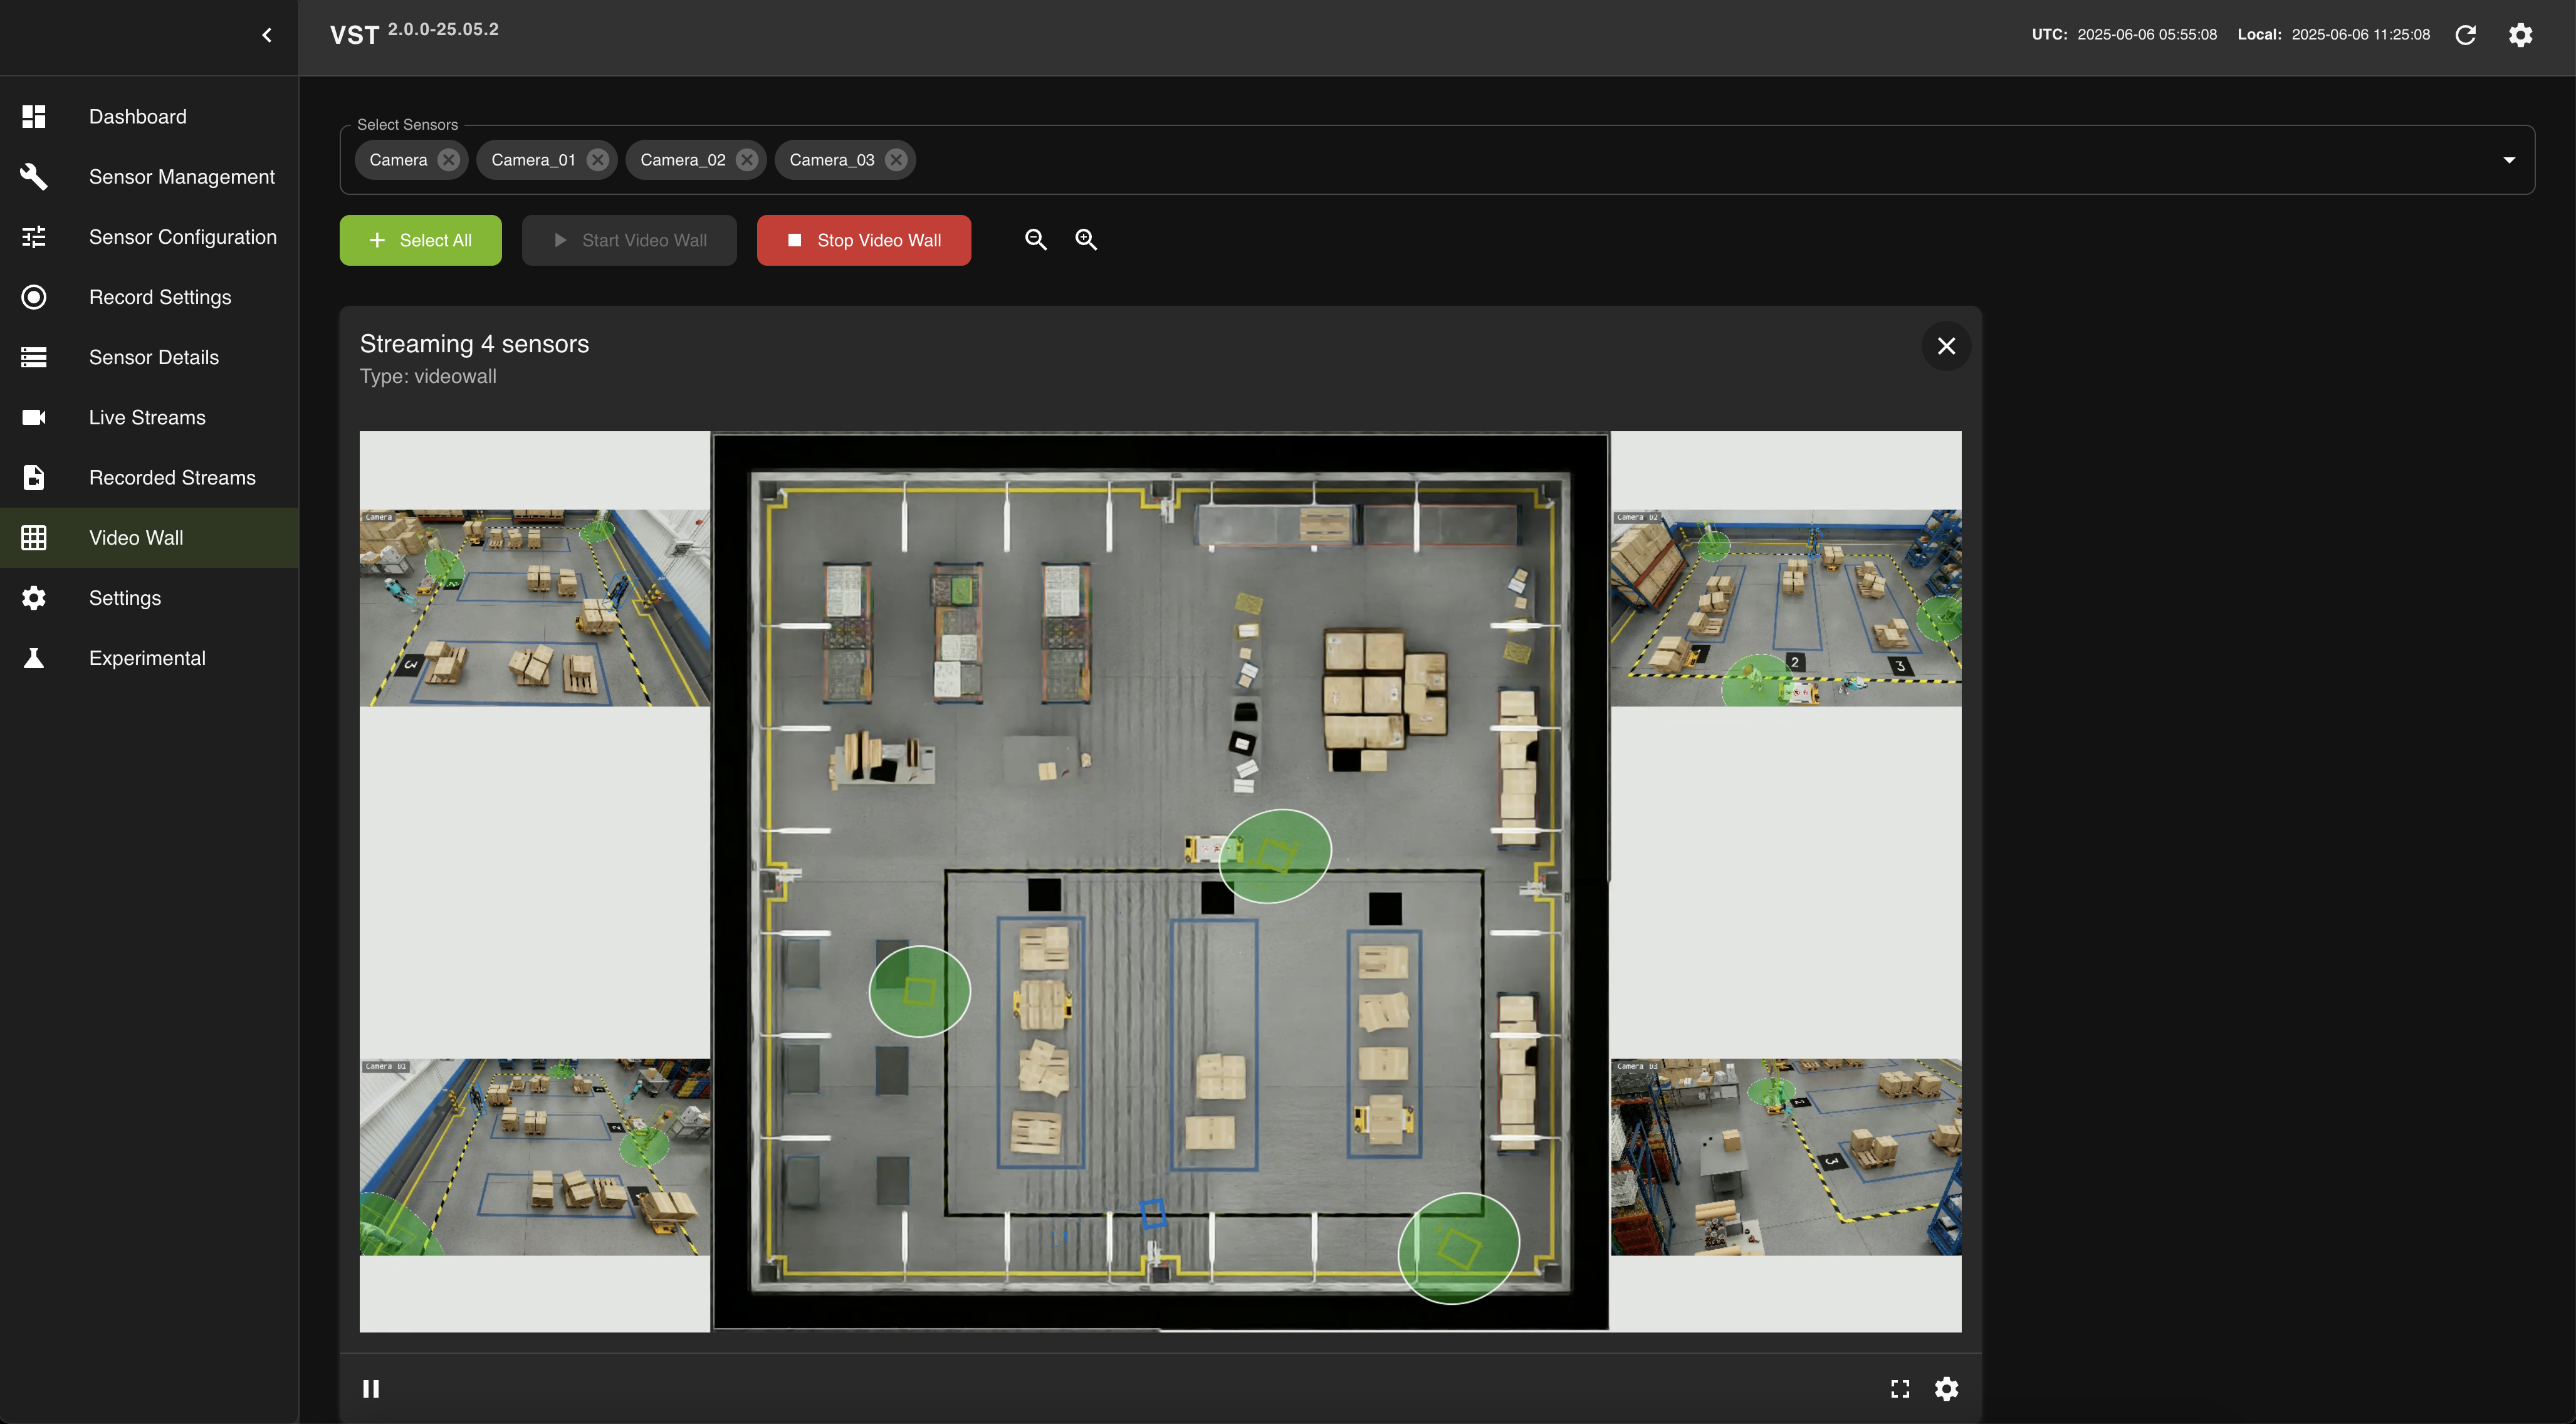
Floor Plan in Video Wall#
To display a floor plan in the Video Wall, enable Include Floor Plan in the Analytics Overlay Settings. Set the floor plan image path in vst_config.json using the floor_map_file_path field. The supported image formats are PNG, JPEG, and SVG.
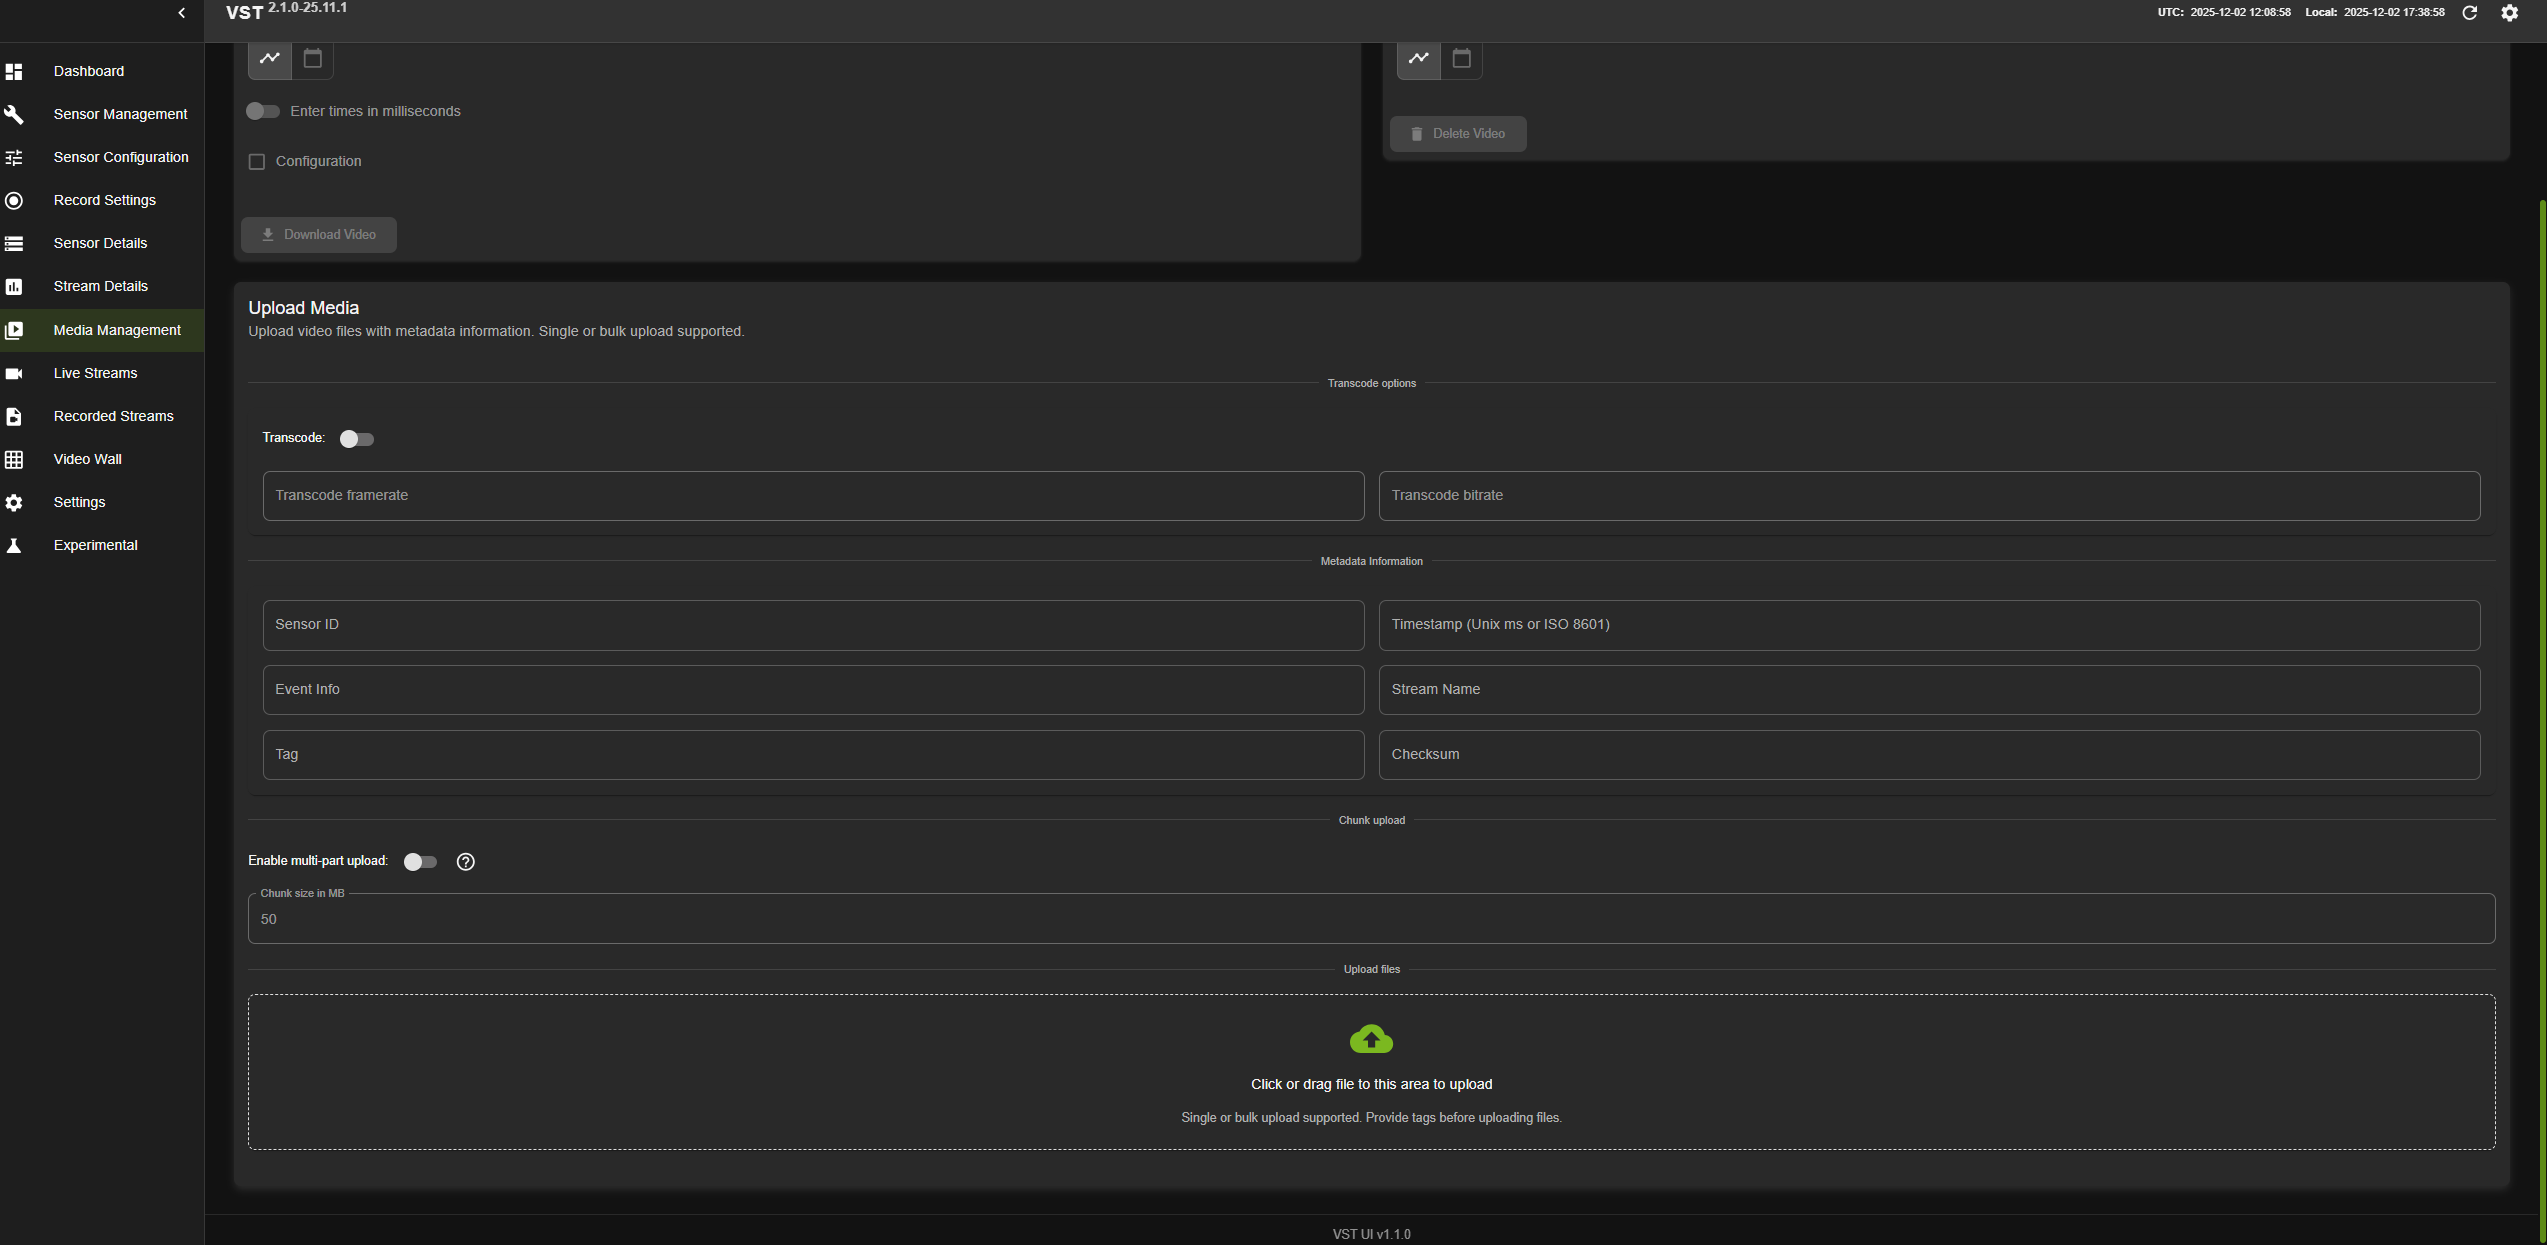
Upload media#
To upload media, navigate to Upload Media option in Media Management tab. You can drag and drop files or choose files to be uploaded with several optional configurations:
Transcode: Enable video transcoding if needed
Metadata Info: Add metadata information such as:
Sensor ID
Timestamp
Event Info
Stream Name
Tag
Checksum
Enable multi-part upload: Enable this option for large file uploads
Configuring upload file size limit#
The maximum upload file size in VIOS is controlled by two settings. The effective upload limit is the minimum of these two values, so both must be configured to allow larger uploads.
Stream-processor NGINX configuration (
client_max_body_size):Controls the maximum request body size accepted by the NGINX reverse proxy in the stream-processor. The default value is 500 MB. To allow larger uploads (for example, 10–20 GB), increase this value before deployment:
client_max_body_size 20G;
VIOS configuration (
nv_streamer_max_upload_file_size_MB):Controls the maximum file size accepted for upload in both VIOS and NVStreamer. The default value is 1000 MB. To allow larger uploads, set this parameter in the
datasection of the VIOS configuration file (refer to VIOS Config):{ "data": { "nv_streamer_max_upload_file_size_MB": 10000 } }
Note
Both settings are configurable pre-deployment. Set them according to your upload size requirements. The effective upload limit is determined by whichever value is lower.
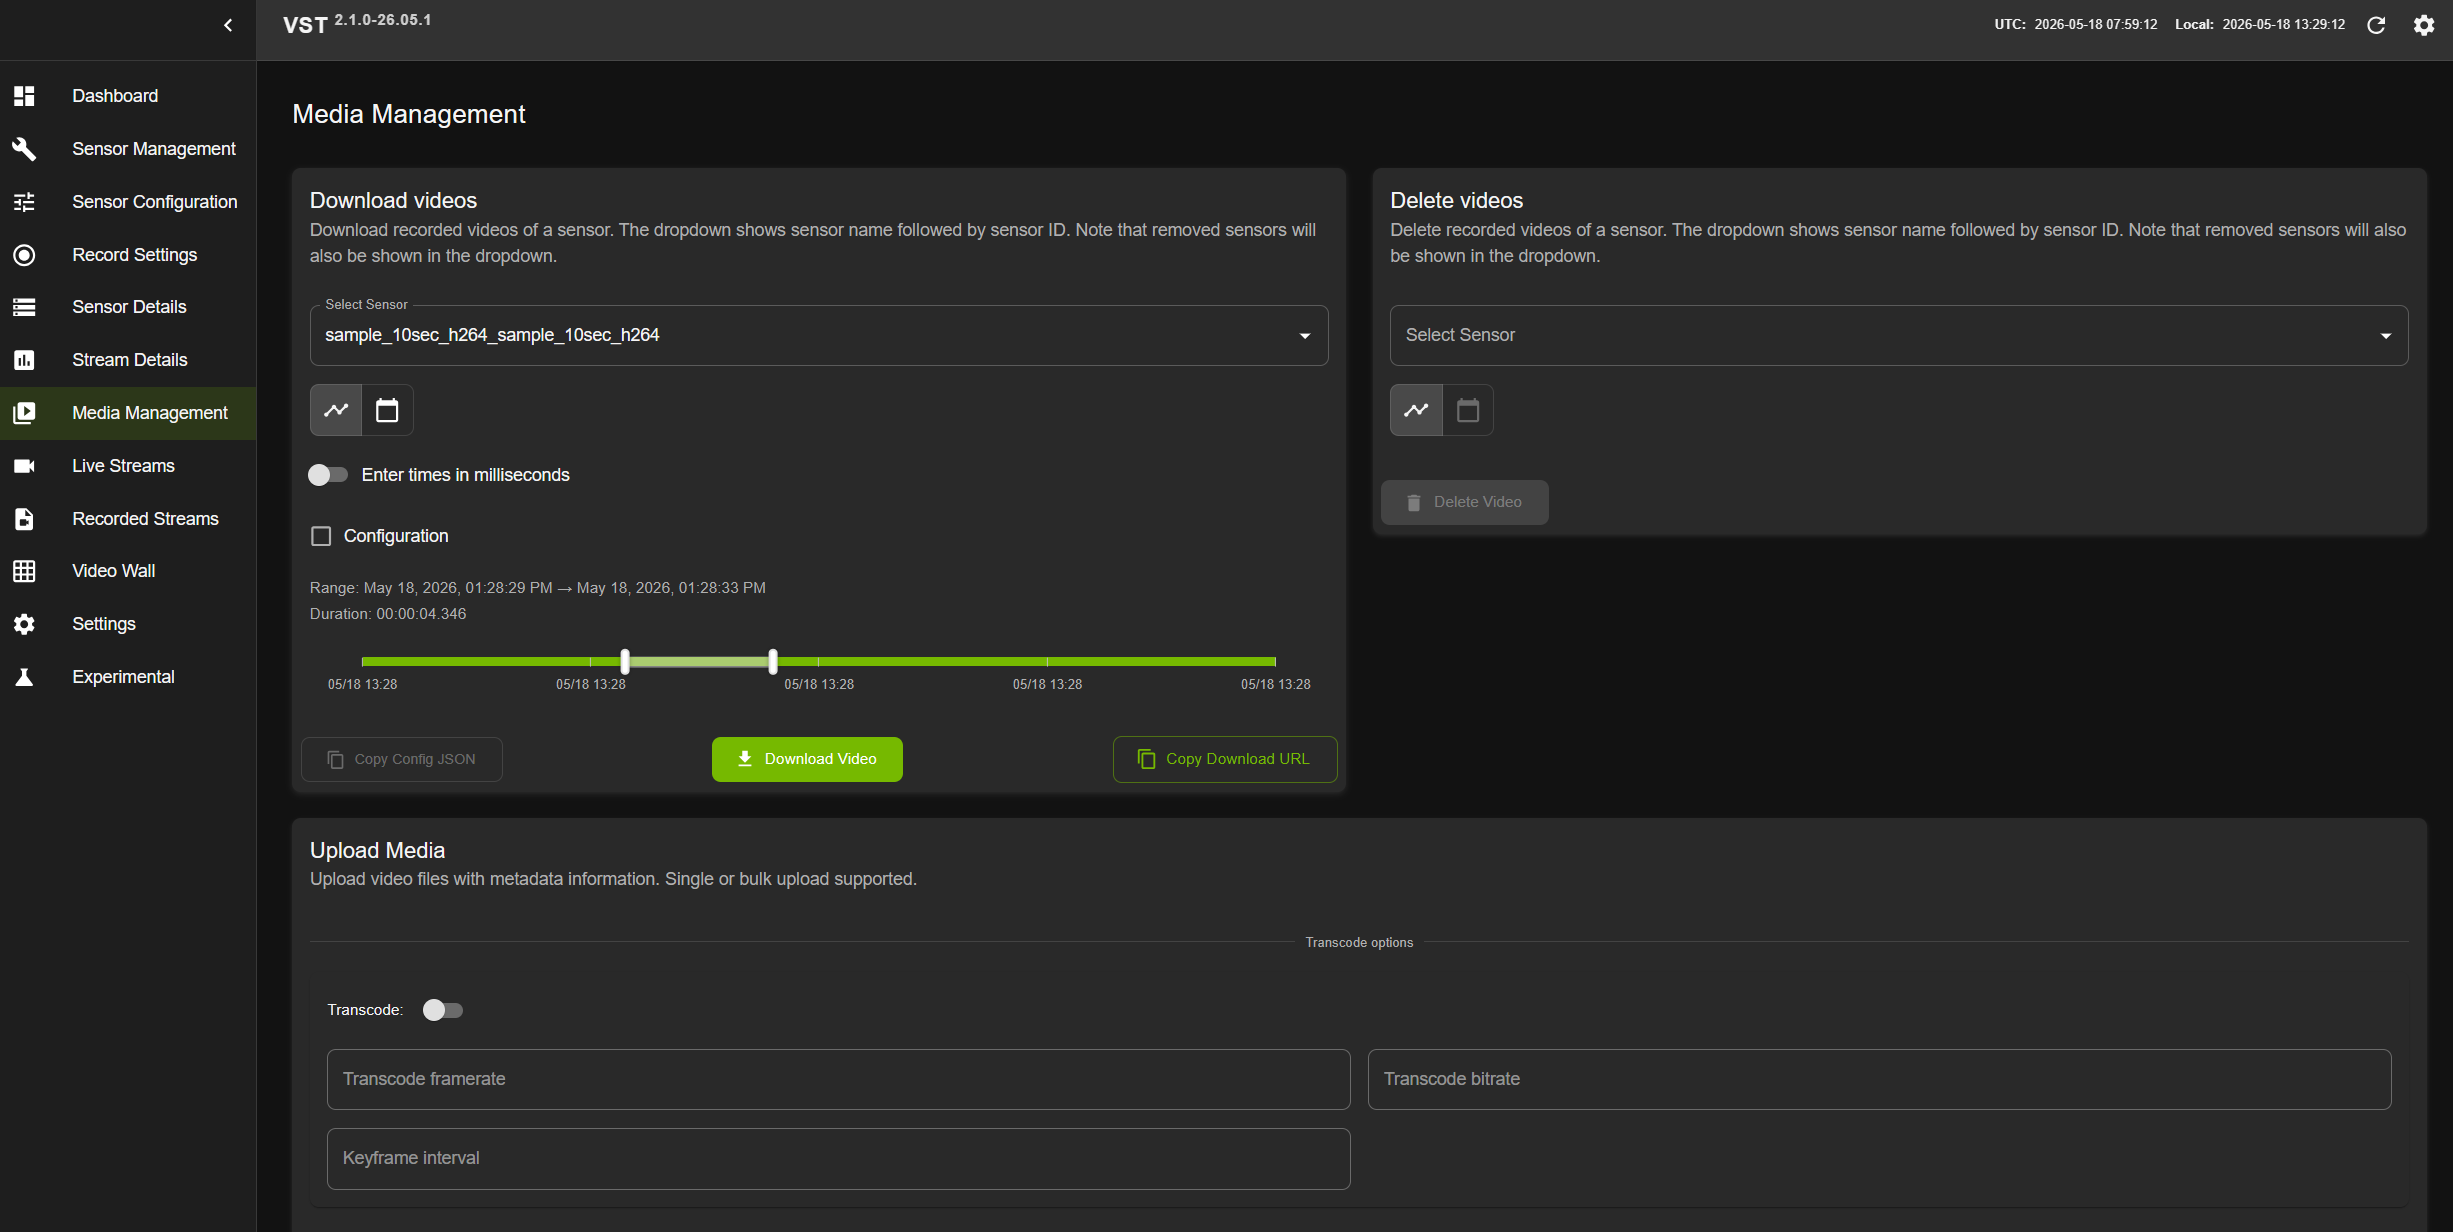
Download recordings#
To download recorded video, select Download videos option in Media Management tab. Then choose the device and corresponding timeline.
Note
In case video download fails then you need to redeploy the VIOS with VST_INSTALL_ADDITIONAL_PACKAGES set to true
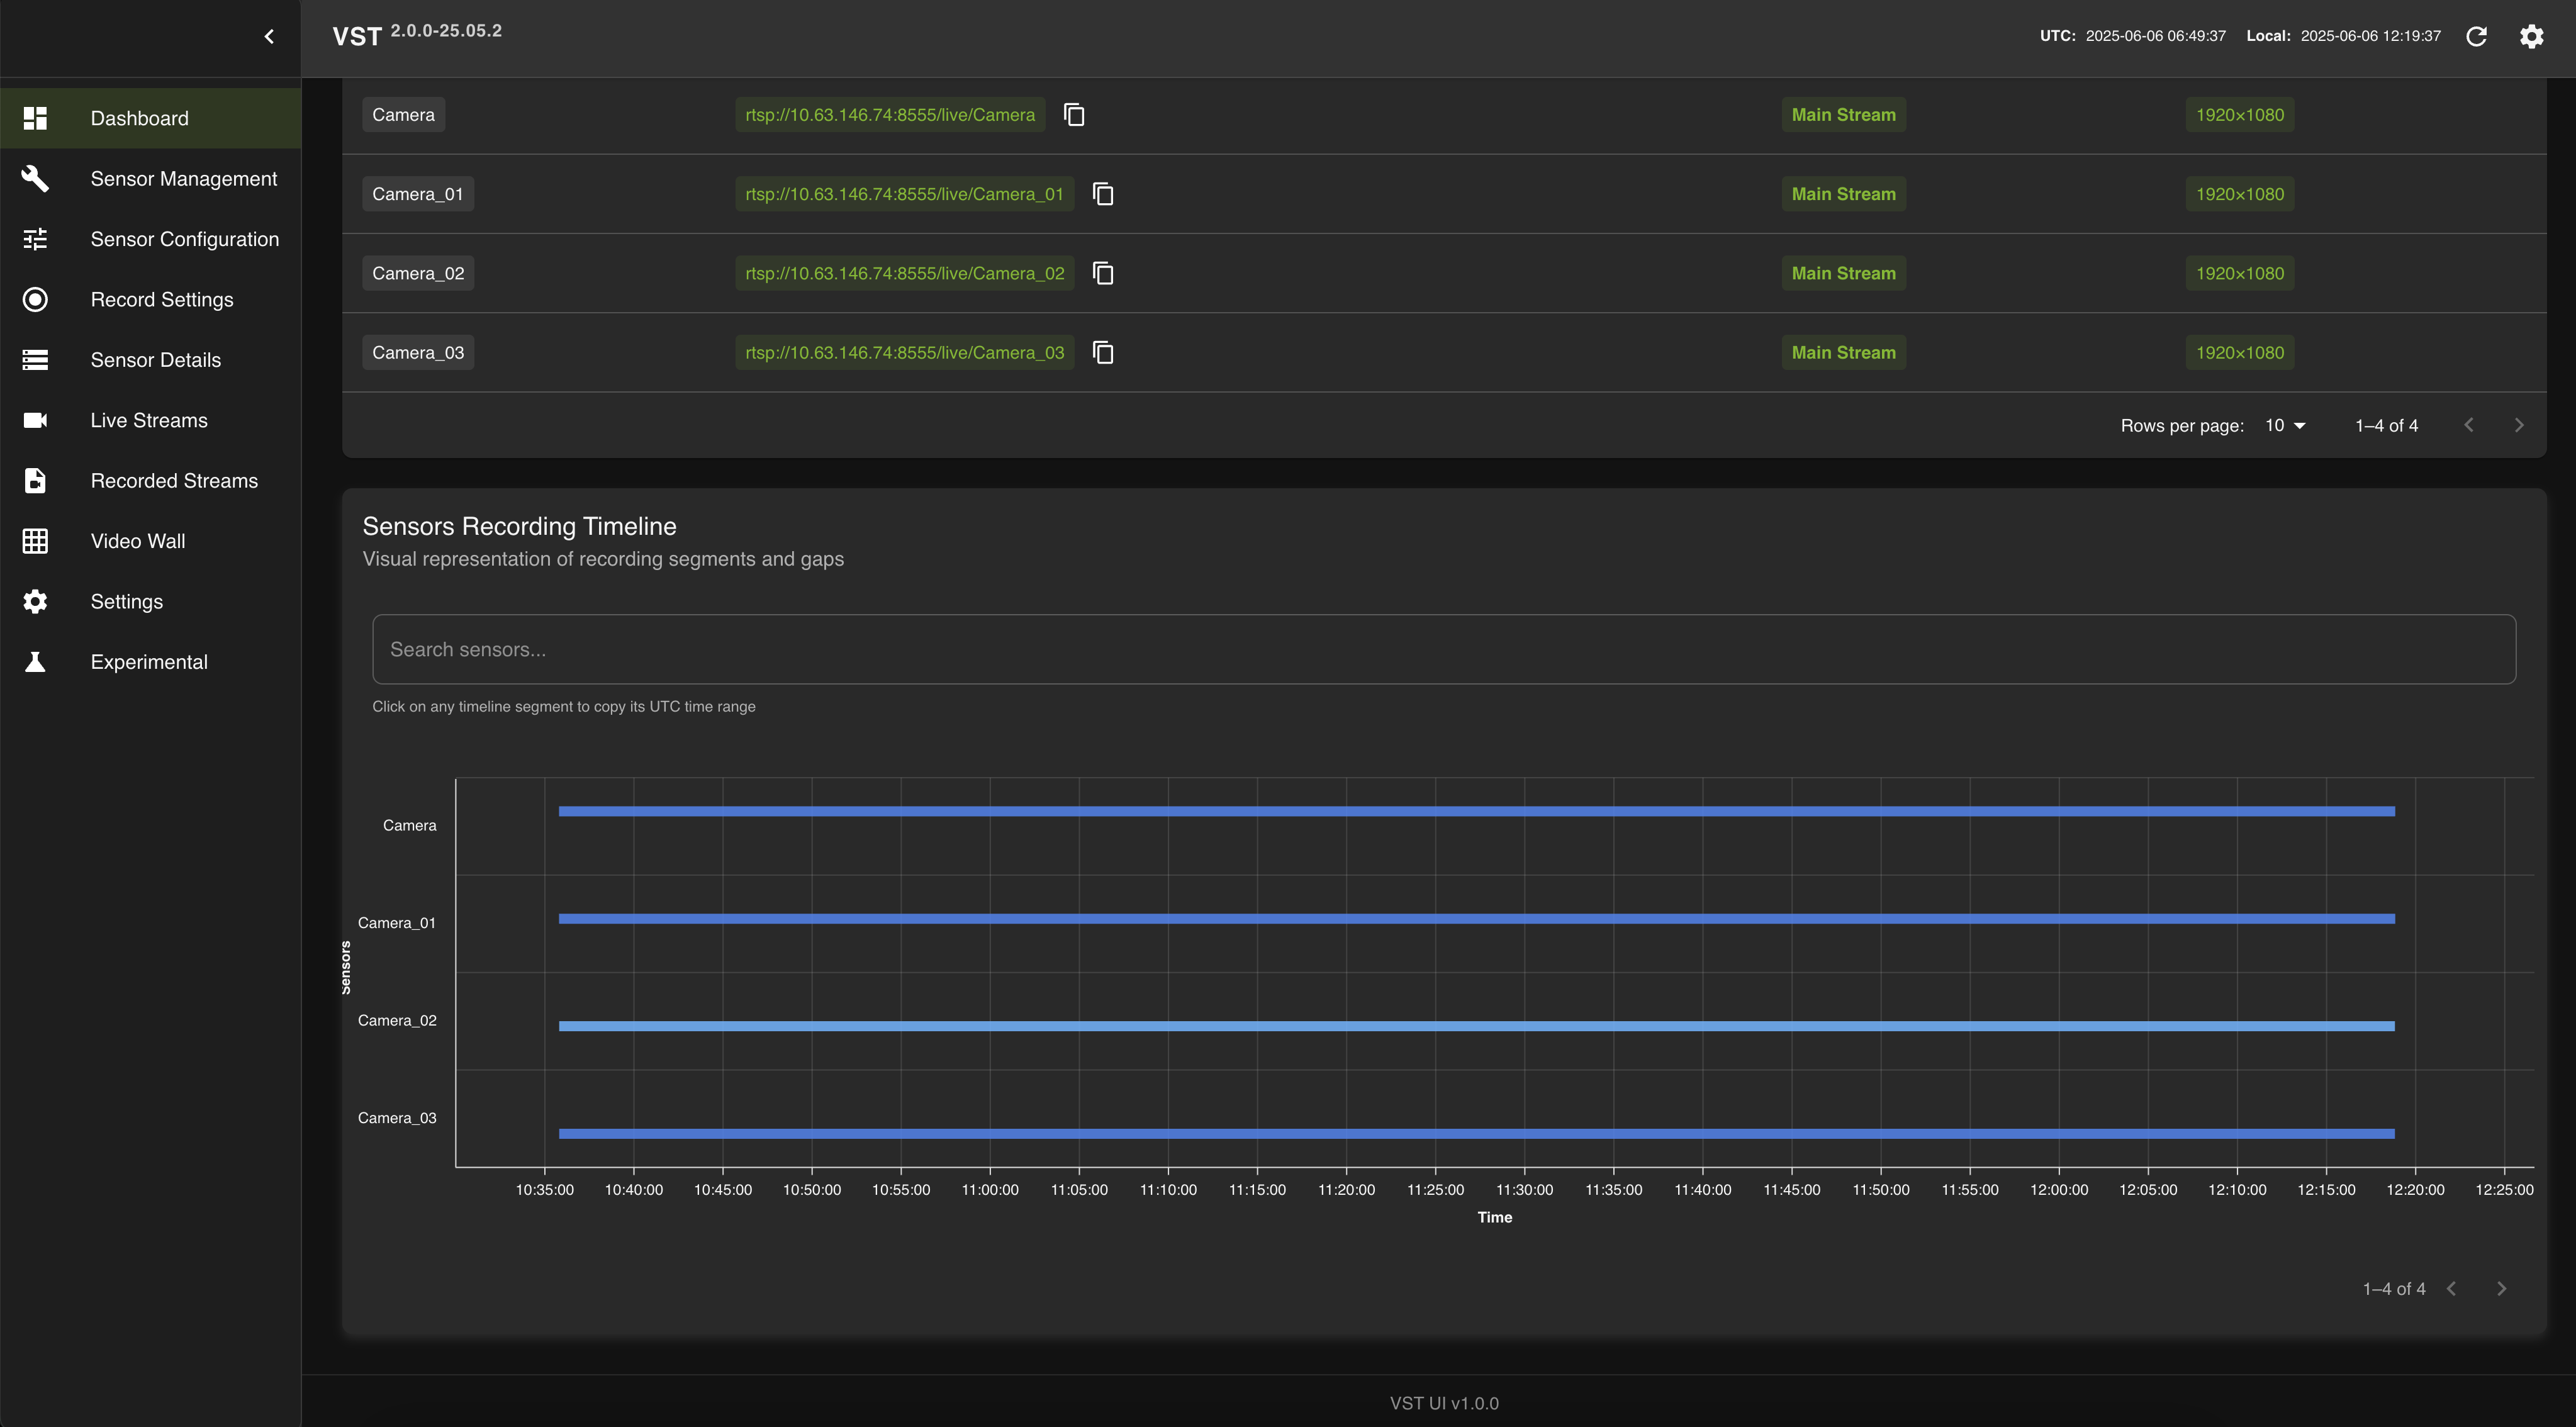
Storage utilization#
You can examine the amount of disk space used by clicking on Dashboard tab:
Configuration#
The active VIOS configuration can be viewed from the Settings tab:
Experimental#
Finally, the Experimental tab will allow you to create and examine a debug package. It will come handy if you ever need to contact us. Enjoy the VIOS experience!
Milestone VMS#
What is Milestone VMS?
Milestone XProtect is a professional Video Management System (VMS) that provides centralized management of IP cameras and video streams. VIOS integrates with Milestone VMS through the ONVIF Bridge, enabling seamless access to cameras managed by Milestone.
Using Milestone VMS with VIOS
VIOS uses the Open Network Video Interface Forum (ONVIF) Bridge and AI Bridge from Milestone VMS to provide the following capabilities:
Retrieve RTSP live and Video on Demand (VOD) RTSP streams from Milestone VMS
Play live and VOD video streams
Download Video clips
Capture snapshots (download pictures)
Milestone VMS Configuration
To configure VIOS in MMS (Milestone Management System) mode, you need to:
Step 1: Adaptor Configuration
Add the following adaptor configuration to enable Milestone VMS integration (refer to Adaptor Config for complete configuration details):
{
    "enabled": true,
    "id": "<unique-adaptor-id>",
    "name": "milestone_onvif",
    "type": "mms",
    "ip": "<milestone-server-ip>",
    "user": "<onvif-username>",
    "password": "<onvif-password>",
    "port": "580",
    "need_rtsp_server": true,
    "need_stream_monitoring": true,
    "need_recording": true,
    "need_storage_management": true,
    "control_adaptor_lib_path": "prebuilts/arch/onvif_client.so",
    "media_adaptor_lib_path": "prebuilts/arch/vms_media.so"
}
Configuration Parameters:
enabled: Set to
trueto enable the adaptorid: Unique identifier for the adaptor (UUID format)
name: Name of the adaptor (e.g.,
"milestone_onvif")type: Set to
"mms"for Milestone VMS integrationip: IP address of the Milestone XProtect server
user: ONVIF username configured in Milestone
password: ONVIF password for authentication
port: Port number for ONVIF communication (typically
"580")need_rtsp_server: Enable RTSP server for video streaming
need_stream_monitoring: Enable stream health monitoring
need_recording: Enable recording capabilities
need_storage_management: Enable storage management features
control_adaptor_lib_path: Path to the ONVIF client control library
media_adaptor_lib_path: Path to the VMS media library
Environment Variables for Deployments Using Milestone VMS
For deployments using Milestone VMS, set the following environment variables:
VST_ADAPTOR=milestone_onvif
NGINX_MODE=mms
ADAPTOR_IP="<milestone-server-ip>"
ADAPTOR_USER="<onvif-username>"
ADAPTOR_PASSWORD="<onvif-password>"
AI_BRIDGE_ENDPOINT="<ai-bridge-endpoint-url>"
Step 2: AI Bridge Endpoint Configuration
Add the AI Bridge endpoint to the network section of your VIOS configuration (refer to VIOS Config for complete configuration details):
{
    "ai_bridge_endpoint": "http://<ai-bridge-domain>:<port>/api/bridge/graphql"
}
Step 3: (Optional) Add AI Bridge Domain to Hosts File
If the AI Bridge domain is not resolvable via DNS, add an entry to the /etc/hosts file:
<ai-bridge-ip> <ai-bridge-domain>
Once configured, VIOS will connect to Milestone VMS through the ONVIF Bridge and provide access to all cameras and recordings managed by the VMS.
Remote Access Options#
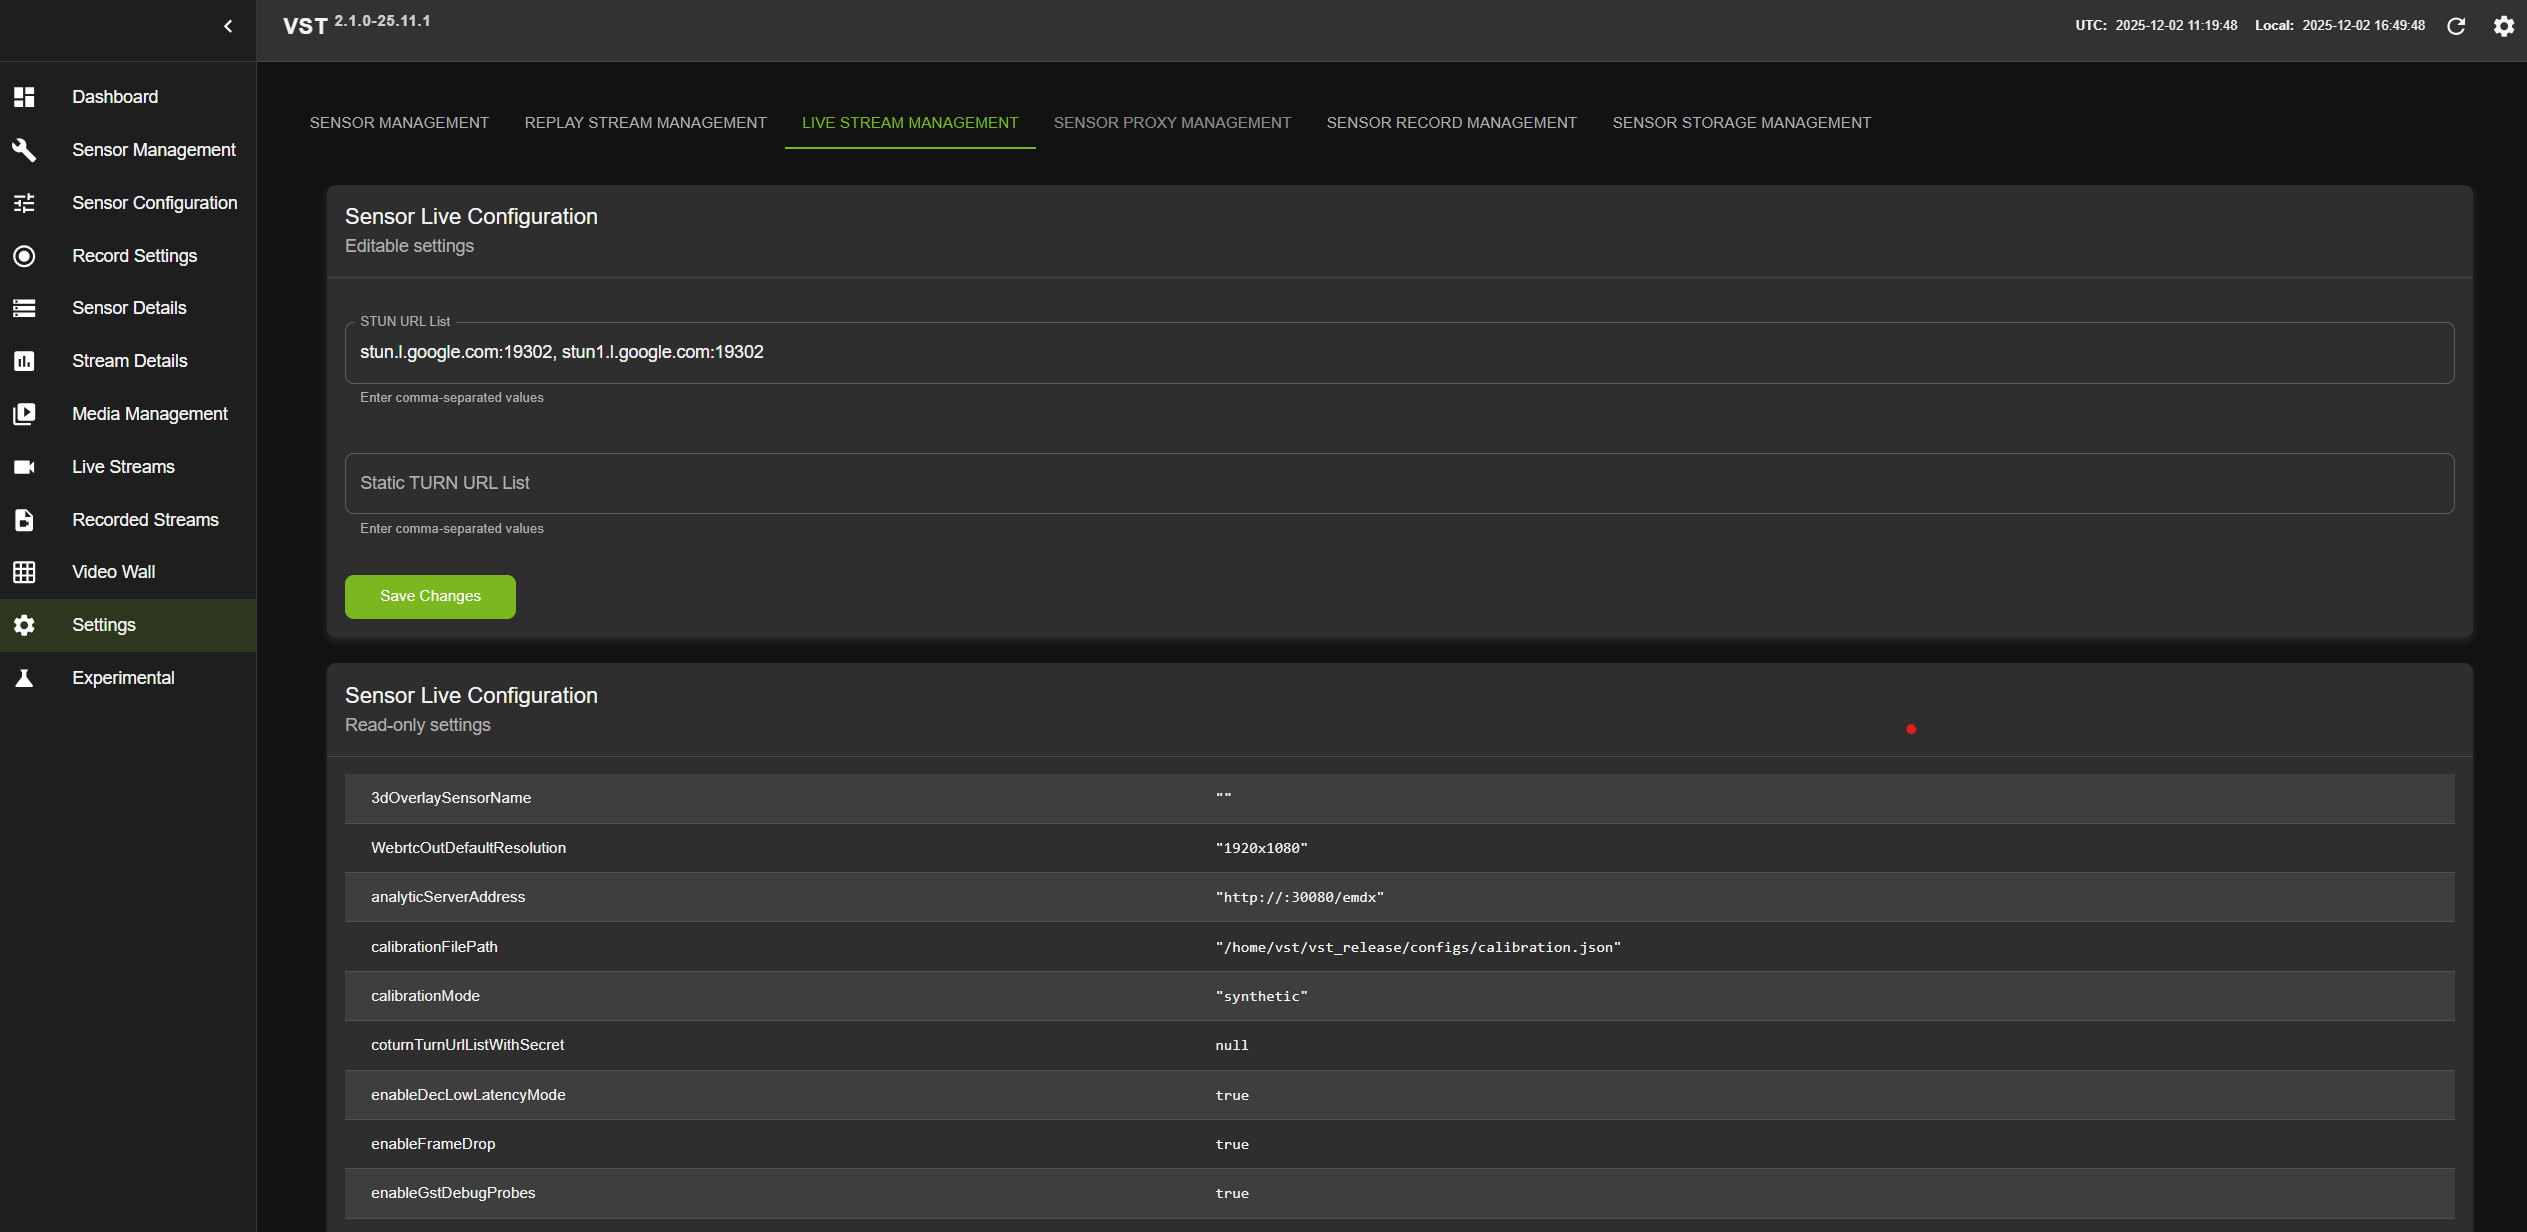
Installation of STUN / TURN Server#
Installation and configuration of these servers are mandatory for WebRTC streaming. Below are the NAT type requirements for STUN/TURN:
Case |
NAT types |
STUN/TURN requirement |
|---|---|---|
1 |
Symmetric to Symmetric |
TURN |
2 |
Symmetric to Port-Restricted Cone |
TURN |
3 |
Symmetric to Address-Restricted Cone |
STUN (but probably not reliable) |
4 |
Symmetric to Full Cone |
STUN |
5 |
Everything else |
STUN |
Depending on your network type, you may choose to install STUN and/or TURN servers:
You can set the STUN server using
stunurlconfig parameter.You can set the TURN server using
turnurlconfig parameter.
VIOS web UI is verified with coturn server. To install, run the following command:
sudo apt-get install coturn
Note
TURN server is not mandatory, this is required only if Client and Server are in different networks.
VIOS configuration details can be found here: VIOS Config.
VIOS Storage Config details can be found here: Storage Config.
RTSP streams config file details can be found here: RTSP Stream Config.
VIOS Config#
Following table describes the parameters in VIOS config file, which should be provided as command-line option deploying helm chart:
VIOS config file# Key
Description
Typical Value
network
Section to define all Network related parameters
“server_domain_name”
Server domain name
“vst-service”
“stunurl_list”
STUN server address
[“stun.l.google.com:19302”]
“static_turnurl_list”
TURN server address
[]
“coturn_turnurl_list_with_secret”
Coturn Turnurl list with secret
[]
“use_coturn_auth_secret”
Enable/Disable Coturn Auth secret
FALSE
“use_twilio_stun_turn”
Enable/Disable Twilio
FALSE
“twilio_account_sid”
Twilio Account Sid
“”
“rx_socket_buffer_size”
RX socket buffer size
1000000
“tx_socket_buffer_size”
TX socket buffer size
1000000
“twilio_auth_token”
Auth token for Twilio
“”
“ntp_servers”
NTP server address
[“time.google.com”]
“use_sensor_ntp_time”
If true then forward camera/nvstreamer ntp time in SR reports to the clients. Otherwise provide current ntp time in SR report.
TRUE
“max_webrtc_out_connections”
Max number of webrtc output connections at a given time
8
“webservice_access_control_list”
An Access Control List allows restrictions to be put on the list of IP addresses which have access to the web server. The ACL is a comma separated list of IP subnets, where each subnet is pre-pended by either a - or a + sign. A plus sign means allow, where a minus sign means deny. If a subnet mask is omitted, such as -1.2.3.4, this means to deny only that single IP address.
“+10.42.0.0/32”
“rtsp_server_port”
User given rtsp port number
8554
“rtsp_preferred_network_iface”
Preferred network interface for RTSP streaming
“eth1”
“rtsp_streaming_over_tcp”
Enable / Disable RTSP Streaming over TCP
FALSE
“rtsp_server_reclamation_client_timeout_sec”
Timeout for RTSP Server reclamation client
10
“stream_monitor_interval_secs”
Stream Monitor interval in seconds
2
“webrtc_latency_ms”
Latency for webrtc in milliseconds
500
“enable_frame_drop”
Enable/Disable frame drop
TRUE
“webrtc_video_quality_tunning”
webRTC video quality tunning
{“resolution_2160”:{“bitrate_start”:20000,”bitrate_range”:[15000,25000],”qp_range_I”:[0,30],”qp_range_P”:[0,51]},”resolution_1440”:{“bitrate_start”:10000,”bitrate_range”:[8000,15000],”qp_range_I”:[10,30],”qp_range_P”:[10,30]},”resolution_1080”:{“bitrate_start”:5000,”bitrate_range”:[3000,8000],”qp_range_I”:[10,30],”qp_range_P”:[10,30]},”resolution_720”:{“bitrate_start”:3000,”bitrate_range”:[2000,5000],”qp_range_I”:[10,30],”qp_range_P”:[10,30]},”resolution_480”:{“bitrate_start”:1000,”bitrate_range”:[800,3000],”qp_range_I”:[10,30],”qp_range_P”:[10,30]}}
“webrtc_peer_conn_timeout_sec”
Timeout duration in seconds for peer connection establishment
10
“remote_vst_address”
Cloud VIOS Address
13.0.0.1:30000
“webrtc_port_range”
Min and Max Port Range for webRTC
“{min”:0 “max”:0}”””
“enable_websocket_pingpong”
Enable/Disable websocket ping pong messages
FALSE
“websocket_keep_alive_ms”
Timeout for websocket to keep alive
5000
“ai_bridge_endpoint”
AI Bridge endpoint URL
“http://<ai-bridge-domain>:<port>/api/bridge/graphql”
onvif
Section to define all ONVIF related parameters
“device_discovery_timeout_secs”
Device discovery timeout to receive probe match message from device
10
“onvif_request_timeout_secs”
Timeout to receive ONVIF command response from device
10
“device_discovery_freq_secs”
device discovery frequency in secs
15
“device_discovery_interfaces”
Network interface for device discovery e.g eth0, eth1
[]
“max_devices_supported”
Limiting maximum number of devices
16
“onvif_sensor_time_sync_interval_secs”
Interval in seconds for syncing time between the ONVIF sensor and VIOS
60
“onvif_sensor_time_sync_compensation_ms”
Compensation in milliseconds applied to time-sync requests with the ONVIF sensor
20
data
Section to define all VIOS data related parameters
“storage_config_file”
Path to storage configuration JSON file
./configs/vst_storage.json
“storage_threshold_percentage”
% value of storage occupancy when aging policy triggers
95
“storage_monitoring_frequency_secs”
Monitor storage usage with frequency in seconds
2
“supported_video_codecs”
Video codec supported for video recording
[“h264”,”h265”]
“supported_audio_codecs”
Audio codec supported for audio recording and decode
[“pcmu”,”pcma”,”mpeg4-generic”]
“nv_streamer_max_upload_file_size_MB”
Maximum file upload size in MB. Applicable for file upload in both VIOS and NVStreamer.
1000
“max_video_download_size_MB”
Limiting the maximum video download size
1000
“always_recording”
Enable/Disable always ON recording
FALSE
“use_software_path”
Enable allows processing on CPU otherwise on GPU
FALSE
“webrtc_sender_quality”
webrtc input quality
“pass_through”
“enable_rtsp_server_sei_metadata”
Enable SEI support for rtsp server
TRUE
“enable_proxy_server_sei_metadata”
Enable SEI support for proxy server
TRUE
“gpu_indices”
GPU indices
[]
“webrtc_out_enable_insert_sps_pps”
webRTC Out Enable / Disable SPS PPS insertion
TRUE
“webrtc_out_set_iframe_interval”
webRTC Out set I-Frame Interval
30
“webrtc_out_set_idr_interval”
webRTC Out set IDR Interval
256
“webrtc_out_min_drc_interval”
webRTC Out minimum interval between DRC requests
5
“device_name”
Device Name for edge VIOS
“VST_EDGE”
“device_location”
Device Location for edge VIOS
“6th_Floor”
“enable_dec_low_latency_mode”
Enable/Disable low latency in decoder
FALSE
“use_centralize_local_db”
Enable/Disable Centralized local db
TRUE
“restore_rtsp_streams_on_startup”
When enabled, on container startup previously configured RTSP proxy streams are re-read from the central database and re-registered on the RTSP server, so that previously added streams survive restarts.
TRUE
“max_network_db_connections”
Maximum number of connections to the centralized network database
10
“default_file_expiry_minutes”
Default file expiry time in minutes (e.g., 10080 = 7 days)
10080
“download_files_timeout_secs”
Timeout in seconds for video download operations
120
“picture_api_timeout_secs”
Timeout in seconds for picture (snapshot) API operations
20
notifications
Section to define all Notifications related parameters
“enable_notification”
Enable notification of device events on message broker
FALSE
“use_message_broker”
Message Broker to use (Kafka/Redis)
“kafka”
“message_broker_topic”
Topic/event used in message broker
“vst.event”
“enable_notification_consumer”
Enable/Disable notification consumer
TRUE
“use_message_broker_consumer”
Message Broker to use (Kafka/Redis)
“kafka”
“message_broker_topic_consumer”
Topic/event used in message broker
“mdx-bev”
“message_broker_payload_key”
Payload key used in message broker
“sensor.id”
“redis_server_env_var”
Redis server address:port
REDIS_SVC_SERVICE_HOST:6379
“kafka_server_address”
Kafka server address and port
“10.0.0.1:9092”
“message_broker_metadata_topic”
Topic used by the message broker for metadata events
“mdx-raw”
“mqtt_broker_address”
MQTT broker address used for notifications
debug
Section to define all Debug related parameters
“enable_perf_logging”
Enable/Disable perf logging
TRUE
“enable_qos_monitoring”
Enable/Disable QOS logging
TRUE
“qos_logfile_path”
QOS log file path
/root/vst_release/webroot/log/
“qos_data_capture_interval_sec”
QOS log capture interval
1
“qos_data_publish_interval_sec”
QOS log publish interval
5
“enable_gst_debug_probes”
Enable/Disable gstreamer probes
TRUE
“enable_prometheus”
Enable/Disable stats update on prometheus
FALSE
“prometheus_port”
prometheus port number
8080
“enable_highlighting_logs”
Enable certain logs highlighting by special colors
TRUE
“enable_debug_apis”
Enable/Disable Debug apis
TRUE
“dump_webrtc_input_stats”
Enable/Disable webRTC IN stats
FALSE
“enable_frameid_in_webrtc_stream”
Enable/Disable frameid in webRTC Stream
FALSE
“enable_network_bandwidth_notification”
Enable/Disable network bandwidth notification
FALSE
“enable_latency_logging”
Enable/Disable latency logging
FALSE
“update_record_details_in_sec”
Update record details in seconds
70
overlay
Section to define all overlay related parameters
“video_metadata_server”
Server to fetch Metadata from
“10.0.0.1:9200/mdx-raw*”
“video_metadata_query_batch_size_num_frames”
Size of metadata to fetch
300
“use_video_metadata_protobuf”
Use Protobuf spec for metadata parsing
TRUE
“enable_gem_drawing”
Enable/Disable GEM drawing
TRUE
“calibration_file_path”
Path to calibration file
“/home/vst/vst_release/configs/calibration.json”
“calibration_mode”
Calibration mode
“synthetic”
“use_camera_groups”
Enable/Disable camera groups
TRUE
“enable_recentering”
Enable/Disable recentering
FALSE
“floor_map_file_path”
Path to floor map file
“/home/vst/vst_release/configs/Top.png”
“3d_overlay_sensor_name”
3D overlay sensor name
“bev-sensor-1”
“bbox_tolerance_ms”
Bounding box tolerance in milliseconds
0
“analytic_server_address”
Analytic server address
“”
“overlay_color_code”
Overlay color code
“halo_safety_udp_port”
UDP port for halo safety communication
-1
“halo_safety_proximity_class”
Proximity class for halo safety detection
“Forklift”
“halo_safety_active_text”
Text displayed in halo safety active mode
“Standard Mode”
“halo_safety_active_text_color”
Text color in halo safety active mode
“black”
“halo_safety_active_text_bg_color”
Background color for text in halo safety active mode
“white”
“halo_safety_inactive_text”
Text displayed in halo safety inactive mode
“Efficient Mode”
“halo_safety_inactive_text_color”
Text color in halo safety inactive mode
“green”
“halo_safety_inactive_text_bg_color”
Background color for text in halo safety inactive mode
“white”
“halo_safety_text_size”
Text size for halo safety display
16
“overlay_text_font_type”
Font type used for overlay text rendering
“DejaVuSansMono.ttf”
“enable_overlay_skip_frame”
Enable/Disable frame skipping in the overlay rendering pipeline
FALSE
security
Section to define all security related parameters
“use_https”
Enable/Disable https
FALSE
“use_rtsp_authentication”
Enable/Disable RTSP proxy stream authentication
TRUE
“use_http_digest_authentication”
Enable/Disable HTTP user authentication
TRUE
“nv_org_id”
NGC ORG ID
ngc_org_id
“nv_ngc_key”
NGC Key
ngc_key
observability
Section to define all observability / telemetry parameters
“enable_telemetry”
Enable/Disable OpenTelemetry tracing
FALSE
“otlp_endpoint”
OTLP endpoint URL for OpenTelemetry trace export
Note
When the Unified Stream Processing MS is scaled to multiple replicas, set restore_rtsp_streams_on_startup to false. Otherwise, on container restart or redeploy every replica will independently re-read the previously configured RTSP proxy streams from the central database and re-register them on the RTSP server, resulting in duplicate registrations and conflicts across replicas. Leave it set to true only when running a single Stream Processing replica.
Adaptor Config#
Following table describes the parameters in VIOS adaptor config file:
VIOS adaptor config file# Key
Description
Typical Value
“enabled”
Enable/Disable the adaptor
true
“id”
Unique identifier for the adaptor
“8ada39c7-5e93-43c5-ae5e-21451c8a8d1b”
“name”
Name of the adaptor
“milestone_onvif”
“type”
Type of the adaptor (e.g., mms)
“mms”
“ip”
IP address of the adaptor server
“<milestone-server-ip>”
“user”
Username for adaptor authentication
“<onvif-username>”
“password”
Password for adaptor authentication
“<onvif-password>”
“port”
Port number for adaptor connection
“580”
“need_rtsp_server”
Enable/Disable RTSP server for this adaptor
true
“need_stream_monitoring”
Enable/Disable stream monitoring for this adaptor
true
“need_recording”
Enable/Disable recording for this adaptor
true
“need_storage_management”
Enable/Disable storage management for this adaptor
true
“control_adaptor_lib_path”
Path to the control adaptor library
“prebuilts/arch/onvif_client.so”
“media_adaptor_lib_path”
Path to the media adaptor library
“prebuilts/arch/vms_media.so”
Storage Config#
Following table describes the parameters in VIOS storage config file:
VIOS storage config file# Key
Description
Typical Value
“data_path”
Path where VIOS related data files are created
“./vst_data/”
“video_path”
Path to root folder where recorded videos to be stored
“./vst_video/”
“total_video_storage_size_MB”
Total size available to store recorded videos
1000000
RTSP Stream Config#
Following table describes the parameters in RTSP Streams config file:
RTSP Streams config file# Key
Description
Typical Value
streams
Array of streams in JSON format
“”
“enabled”
Enable / Disable stream
TRUE / FALSE
“stream_in”
Actual RTSP URL of camera
“rtsp://admin:admin@10.xx.xx.xx/h264”
“name”
Stream Name
Camera_Front_Door
“Nvstreamer”
Nvstreamer configuration
“enabled”
Enable / Disable Nvstreamer
TRUE / FALSE
“endpoint”
Nvstreamer endpoint
“localhost:31000”
“api”
Nvstreamer API
“/api/v1/sensor/streams”
“max_stream_count”
Maximum number of streams
4
{
    "streams":
    [
        {
            "enabled":false,
            "stream_in":"rtsp://admin:admin@10.xx.xx.xx/h264",
            "name":"Camera_1"
        },
        {
            "enabled":false,
            "stream_in":"rtsp://admin:admin@10.xx.xx.xx/h265",
            "name":"Camera_2"
        }
    ],
    "Nvstreamer":
    [
        {
            "enabled": false,
            "endpoint": "10.xx.xx.xx:31000",
            "api": "/api/v1/sensor/streams",
            "max_stream_count": 4
        },
        {
            "enabled": false,
            "endpoint": "10.yy.yy.yy:31000",
            "api": "/api/v1/sensor/streams",
            "max_stream_count": 4
        }
    ]
}
APIs#
VIOS microservice API documentation can be found in the following VIOS API references:
Components & Customization#
Adaptor Architecture#
Adaptor architecture has 3 interfaces. All the interfaces can be loaded automatically by the Adaptor loader in VIOS microservices — the Sensor Management Service (for sensor discovery and control adaptors) and the Unified Stream Processing MS (for media and storage adaptors).
1) Device Discovery Interface#
This adaptor interface is used to discover devices, for example, ONVIF Protocol or UPnP Protocol:
A new Device Discovery Adaptor should implement *ISensorDiscoveryInterface* Class (refer to the
include/sensor_discovery_adaptor.hheader file from VIOS container)Implement the following methods to create and destroy adaptor object:
typedef ISensorDiscoveryInterface* createDiscoveryObject();
typedef void destroyDiscoveryObject ( ISensorDiscoveryInterface* object );
2) Device Control Interface#
This adaptor interface controls the devices, for example, ONVIF Control Protocol:
A new Device Control Adaptor should implement
ISensorControlInterfaceClass (refer to theinclude/sensor_control_adaptor.hheader file from VIOS container)Implement the following methods to create and destroy adaptor object:
typedef ISensorControlInterface* createObject();
typedef void destroyObject( ISensorControlInterface* object );
3) Milestone Media Interface#
This adaptor interface to get media(snapshot and video recordings) from Milestone VMS using grpc protocol:
A new Milestone Media Adaptor should implement
IMediaInterfaceClass (refer to theinclude/vms_media_interface.hheader file from VIOS container)Implement the following methods to get media(snapshot and video recordings) from Milestone VMS server using grpc protocol:
typedef IMediaInterface* createMediaObject();
typedef void destroyMediaObject( IMediaInterface* object );
KPI#
For detailed VIOS performance benchmarks including stream profiling, per-replica stream counts, and per-request latency benchmarks, see VIOS Performance.
Troubleshooting#
Common Issues#
Container fails to start#
Check for the following issues:
Examine container logs for error messages:
$ docker logs <container_name>
Verify GPU access: Ensure NVIDIA Container Toolkit is installed and
nvidia-smicommand works properly
Container reboots or becomes unresponsive after long period#
This issue can be resolved by configuring Docker to use the cgroupfs driver.
Configuration Steps:
Add or confirm the following entry in
/etc/docker/daemon.json:{ "data-root": "/var/lib/docker", "default-address-pools": [ { "base": "192.168.2.0/16", "size": 24 } ], "default-runtime": "nvidia", "runtimes": { "nvidia": { "path": "/usr/bin/nvidia-container-runtime", "runtimeArgs": [] } }, "exec-opts": ["native.cgroupdriver=cgroupfs"] }
Apply the configuration by running the following commands:
$ sudo systemctl daemon-reload
$ sudo systemctl restart docker
Uploads succeed but files are not visible#
Check available disk space on the storage backend. Ideally, maintain more than 5% of total disk space free to avoid automatic file deletion.
VST uses the storage_threshold_percentage configuration parameter (default: 95) to control when aging policy triggers file deletion. When disk space consumption reaches the threshold (e.g., 95%), VST automatically deletes old files to maintain storage limits, which may include recently uploaded files.
Aging Policy Configuration:
The aging policy can be configured using these VST storage configuration parameters (see Storage Config):
storage_threshold_percentage- Disk usage percentage threshold for aging policystorage_monitoring_frequency_secs- Frequency of storage monitoring checkstotal_video_storage_size_MB- Total storage size allocated for videos
Note
It is best to leave these values as default unless absolutely necessary to change them.
Monitor storage utilization from the Dashboard tab to track available space.
Download or video URL generation fails#
The disableAudio query parameter is required in VST video download REST API calls for video download and URL generation to work properly.
Verification Steps:
Check the Stream Processing MS logs when the download API is called:
$ docker logs vss-vios-streamprocessing | grep downloadVideoFile
Look for a log line similar to:
[YYYY-MM-DDTHH:mm:ss.sssZ:THREAD_ID:video_download.cpp:184: downloadVideoFile] Params: container: mp4, transcode: full, disable_audio: true, enable_overlay: true, is_cloud_stream: 0
Check
disable_audioin the log output:Default (
ENABLE_AUDIO=falsein the VSS profile.env): expectdisable_audio: true.Nemotron Omni / audio-aware agent (
ENABLE_AUDIO=true): expectdisable_audio: false.
If the value does not match your profile, confirm
ENABLE_AUDIOingenerated.envand that you uploaded video after enabling audio; then retry the operation.
VST services are up but common functionalities do not work#
This issue is typically related to Redis connectivity problems.
Diagnostic Steps:
Check if Redis is running properly:
$ docker ps | grep redis
$ docker logs <redis-container-name>
If Redis keeps restarting, check for port conflicts (Redis port may be blocked due to another process):
$ sudo netstat -tulpn | grep <redis-port>
Verify Redis Connectivity:
Check all VST container logs for successful Redis connection messages:
$ docker logs <vst-container-name> | grep redis_init
You should see a log line similar to:
[YYYY-MM-DDTHH:mm:ss.sssZ:THREAD_ID:redis_publisher.cpp:215: redis_init] Redis connect success.
Ensure all VIOS containers (vss-vios-sensor and vss-vios-streamprocessing) show successful Redis connection logs. Restart the Redis container if necessary after resolving port conflicts.
VST APIs do not respond even after waiting several minutes post-deployment#
VST installs required packages during every deployment. If apt package servers are slow or experiencing high latency, package downloads may take considerable time, delaying service readiness.
The package installation script is mounted to all VST containers:
deployments/vst/scripts/user_additional_install.sh
Monitoring Installation Progress:
Check container logs to monitor package installation progress:
$ docker logs -f <vst-container-name>
Verify package installation is complete by checking all VST container logs for the confirmation message:
Installation completed successfully!
Wait for this message to appear in all VST containers before attempting to use VST APIs
Configurable Installation Parameters:
If installation times out frequently, you can adjust the following parameters in user_additional_install.sh:
APT_UPDATE_TIMEOUT=$((60 + RANDOM % 41))- Timeout for apt-get update (60-100 seconds)PKG_INSTALL_TIMEOUT=$((100 + RANDOM % 101))- Timeout for package installation (100-200 seconds)MAX_RETRIES=3- Maximum number of retry attempts for failed installations
Increase these values if your network or apt servers are consistently slow.
Image capture failure#
The VIOS replay service has a known issue: when an RTSP stream encoded with H265 is removed from VIOS, the image capture API may not operate as intended.
Handling time drift in ONVIF cameras#
Time drift in ONVIF cameras can cause incorrect timestamps on recorded video, challenges correlating frames across multiple cameras, and difficulties during incident investigation. It typically arises from the following:
The camera’s internal clock lacks high precision.
Irregular or absent synchronization with a Network Time Protocol (NTP) server.
Network latency or instability.
Power outages or firmware-related issues.
Recommended approach:
Use a dual-pronged strategy to mitigate time drift:
Disable sensor NTP time in VIOS – By default, the configuration parameter
use_sensor_ntp_timeis set totrue. In this mode, VIOS uses the SenderReport and RTP-timestamp provided by the camera and forwards the same timestamp to downstream services such as Perception.However, if time drift is observed between the camera clock and the system clock, set
use_sensor_ntp_timetofalse:{ "data": { "use_sensor_ntp_time": false } }
When this option is disabled, VIOS ignores the SenderReport and RTP-timestamp from the camera and assigns its own system timestamp when forwarding frames to downstream services like Perception. This ensures consistent and reliable timestamps based on the system clock, helping mitigate issues caused by camera time drift.
Enable NTP synchronization on the camera – Configure each ONVIF camera to synchronize with a reliable NTP server (for example,
pool.ntp.orgor a local enterprise NTP server). Set synchronization to occur at regular intervals (for example, every hour) to minimize drift.Most ONVIF cameras allow NTP setup through their web interface (typically under Admin Settings > Time Settings > NTP Configuration) or via the ONVIF Device Management API. Ensure the NTP server address is reachable by the camera and that the time zone and Daylight Saving Time settings are correct.
Note
NTP synchronization alone may not be precise or frequent enough for time-sensitive applications. Disabling use_sensor_ntp_time remains the preferred and more reliable approach for maintaining accurate timing.
If the camera does not support NTP or cannot sync correctly:
Set
use_sensor_ntp_timetofalseso that VIOS applies the system timestamp to each frame when received.If feasible, replace the camera with one that fully supports NTP and ONVIF time configuration.
If the cameras are already well-synchronized and show no drift:
Developers can choose to enable the following VIOS configuration to propagate the original camera timestamp to downstream services:
{
    "data": {
        "use_sensor_ntp_time": true
    }
}