Search Workflow#
The Search Workflow enables natural language queries across video archives to locate specific events, objects, or actions.
Use Cases
Event retrieval from large video archives
Cross-video search for specific objects or actions
Forensic analysis of recorded footage
Estimated Deployment Time: 15-20 minutes
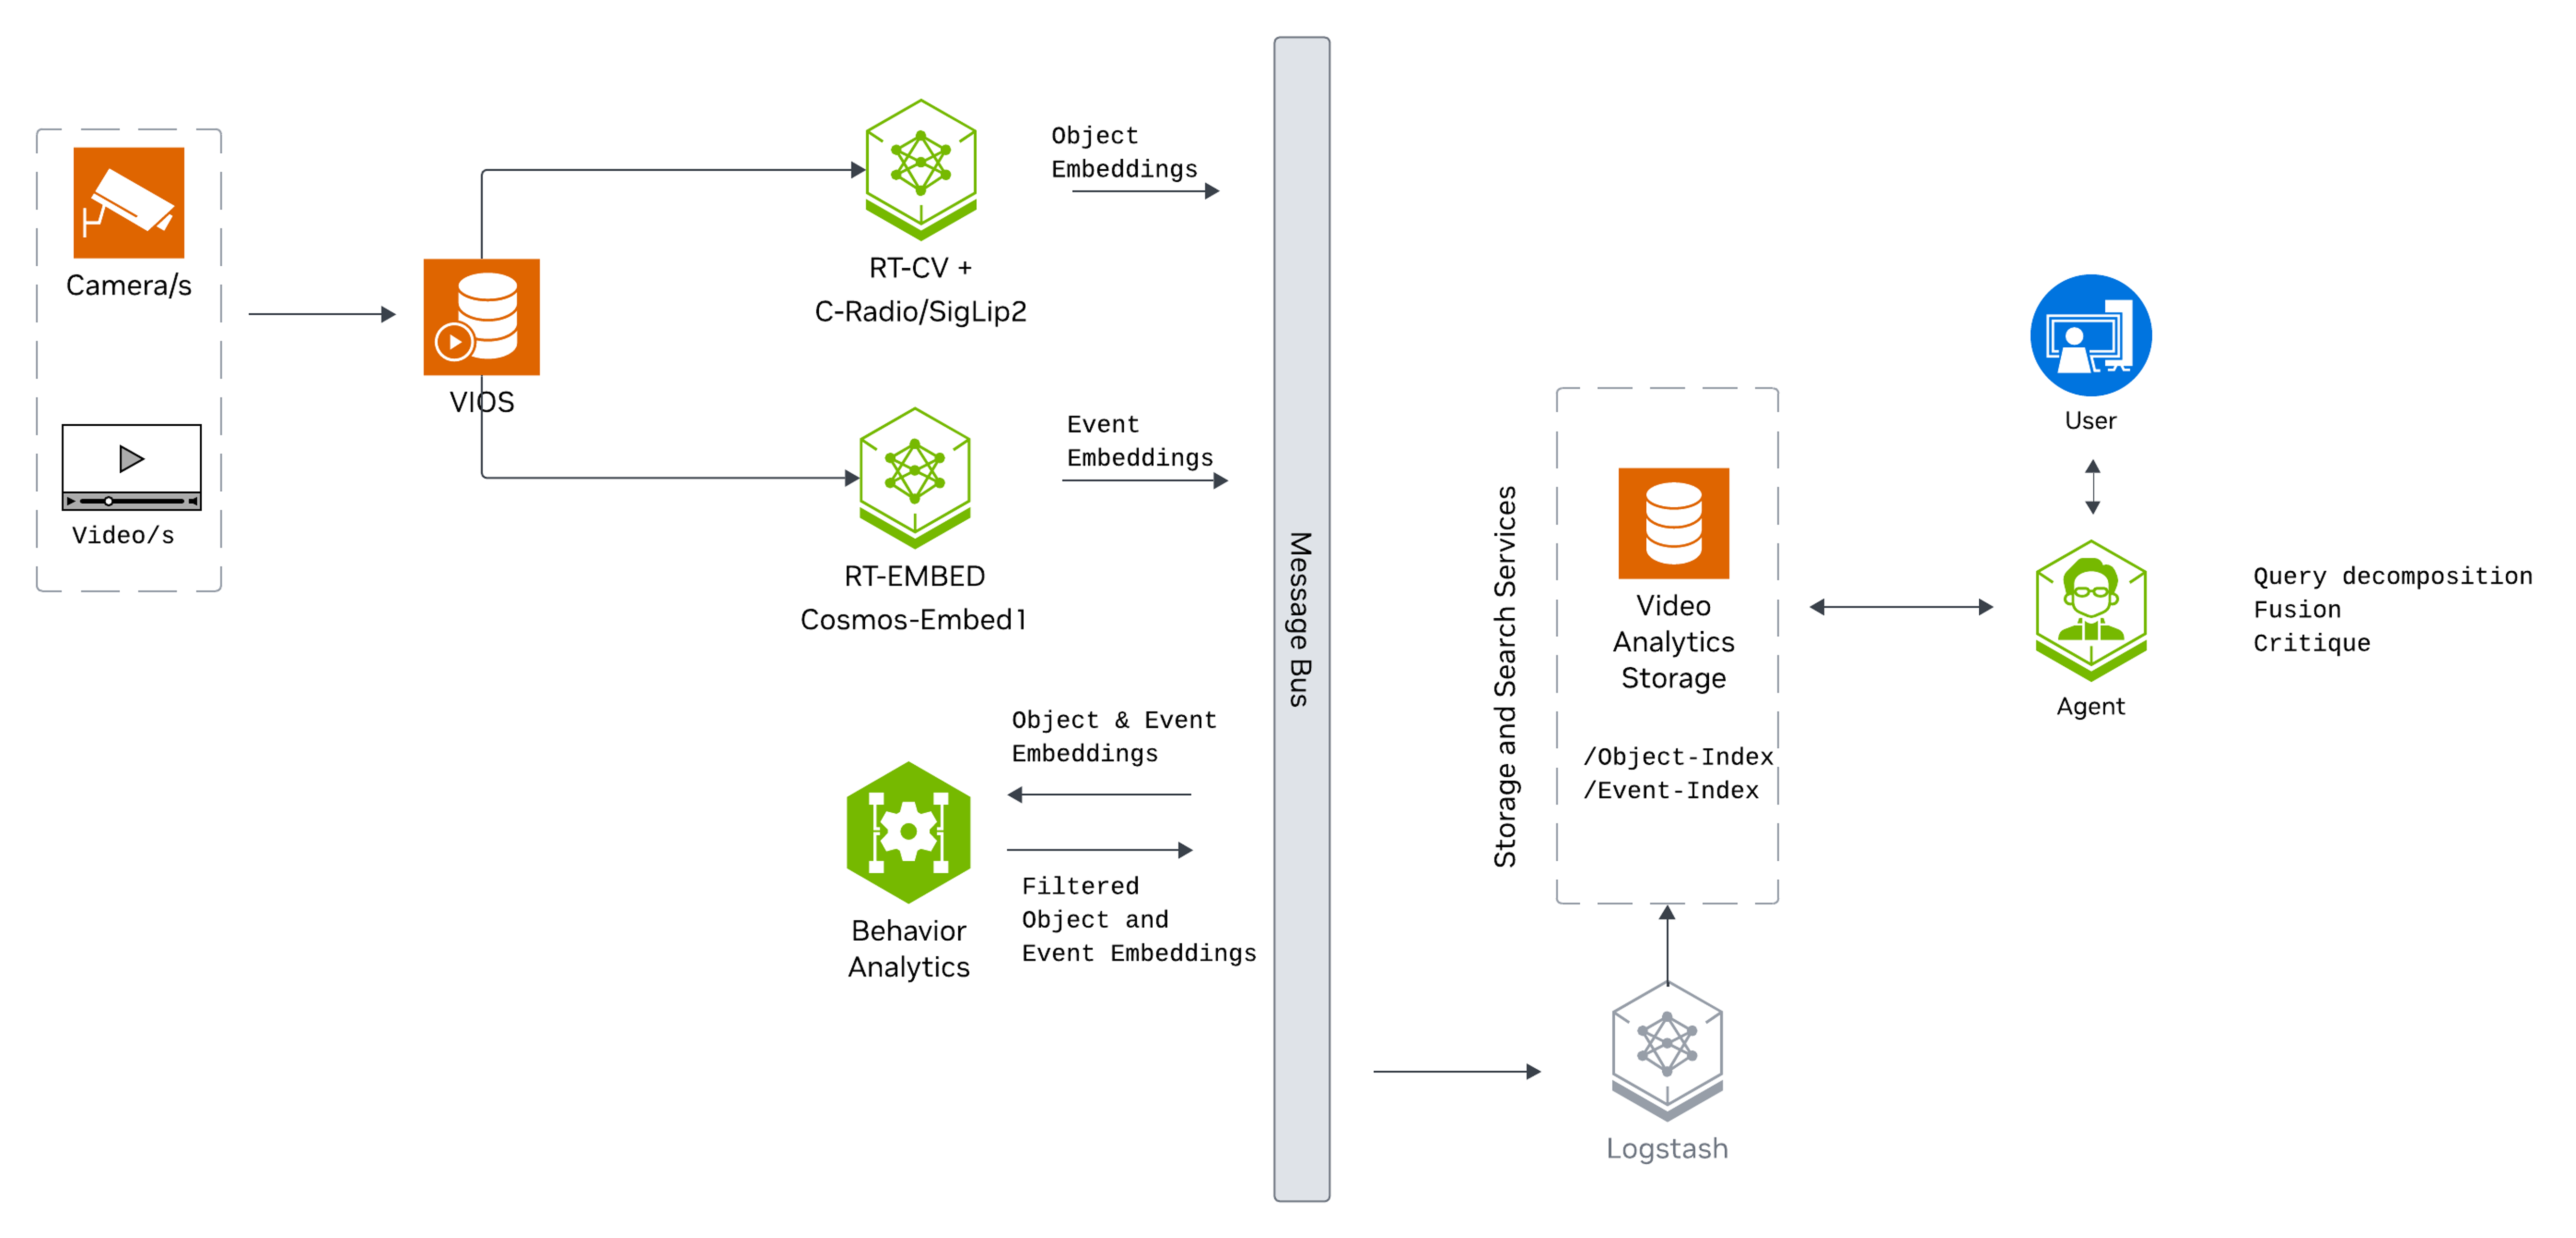
The following diagram illustrates the search workflow architecture:
Key Features of the Vision Agent with Search:
Upload videos to the agent for search.
Semantic search of videos for key actions, events, and object attributes using embedding-based video indexing.
Natural language query support (e.g., “find all instances of forklifts”).
Automatic query decomposition for chat requests. The search agent extracts refined query text, source names, time windows, visual attributes, action intent, image-search context, and result-count hints.
Four search routes: embed search for actions/events, attribute search for visual descriptors, fusion search for queries that combine actions and visual descriptors, and Search by Image for finding visually similar objects from selected bounding boxes on paused video frames.
Filter and retrieve timestamped results using similarity scores, time range, video/stream names, and source types.
What’s being deployed#
VSS Agent: Agent service that uses a configured LLM endpoint to route requests and orchestrate tool calls to VSS microservices and model endpoints (LLM/VLM NIMs) to answer questions and generate outputs
VSS Agent UI: Web UI with chat, video upload, and different views
VSS Video IO & Storage (VIOS): Video ingestion, recording, and playback services used by the agent for video access and management
Nemotron LLM (NIM): LLM inference service used for reasoning, tool selection, and response generation
Cosmos Reason2 8B VLM (NIM): VLM inference service used by the critic agent to verify search results (enabled by default)
Phoenix: Observability and telemetry service for agent workflow monitoring
ELK: Elasticsearch, Logstash and Kibana stack to index and search embeddings of video clips
Kafka: A real-time message bus to publish embeddings, to be consumed and indexed by ELK for search
RTVI-Embed: Real Time Video Intelligence Embed Microservice to generate action/event embeddings for videos and text, based on Cosmos-Embed1-448p-Anomaly-Detection
RTVI-CV: Real Time Video Intelligence Computer Vision Microservice to generate object attribute embeddings for videos
Behavior Analytics: Behavior Analytics microservice to perform sequential frame analysis for object detection and tracking in videos/streams.
Search Workflow Data Flow#
The search workflow has two related paths: ingestion and query execution.
During ingestion, uploaded videos and RTSP streams are registered with VSS Video IO & Storage (VIOS). The agent then sends the media to RTVI-Embed to generate video/action embeddings and to RTVI-CV/Behavior Analytics to generate object-level behavior embeddings. Elasticsearch stores these embeddings in separate indices:
mdx-embed-filtered-*for video/action embeddings used by embed search.mdx-behavior-*for object behavior embeddings used by attribute search and Search by Image.mdx-raw-*for raw frame/object data used when frame lookup is enabled for attribute search.
During query execution, the UI can call either the direct search API or the Vision Agent chat interface:
The Search text box calls
/api/v1/searchand is optimized for direct embedding search with explicit filters.The Vision Agent chat interface calls the streaming
search_agentthrough/chat/stream. This mode uses an LLM to decompose the user’s natural language query and automatically select the best search route.
The Vision Agent chat path can run:
Embed search: Generates a text embedding with RTVI-Embed/Cosmos-Embed1-448p-Anomaly-Detection and searches video/action embeddings in Elasticsearch.
Attribute search: Generates text embeddings with RTVI-CV and searches behavior embeddings for visual descriptors such as clothing, color, or carried objects.
Fusion search: Runs embed search first, then runs attribute search over each candidate window and reranks with a fusion score.
Search by Image: When the user starts from a selected bounding box on a paused video frame, the workflow uses the selected object’s embedding from the behavior index to search for visually similar objects.
Prerequisites#
Before you begin, ensure all of the prerequisites are met. See Prerequisites for more details.
Manual Workflow#
Note
For instructions on downloading the deployment package, see Download the Deployment Package in the Quickstart guide.
Step 1: Deploy the Search Agent#
Note
Set the NGC CLI API key, then run the deploy commands for your GPU type.
# Set NGC CLI API key
export NGC_CLI_API_KEY='your_ngc_api_key'
Refer to VSS-Agent-Customization-configure-llm and VSS-Agent-Customization-configure-vlm for all LLM and VLM (local and remote) configuration options.
For advanced settings and Agent Customization, see the deploy command help.
# View all available options
deploy/docker/scripts/dev-profile.sh --help
Critic Agent (enabled by default):
To disable the Critic Agent and skip the local VLM deployment (saves 1 GPU), set ENABLE_CRITIC=false before deploying:
export ENABLE_CRITIC=false
Note
Critic Agent
The critic agent is enabled by default. It uses a VLM (Cosmos Reason2 8B) to verify search results and runs during search in agent/chat mode.
End users can turn the critic agent on or off on a per-query basis using the Enable Critic toggle in the Vision Agent chat settings (see Critic Agent Overview). This toggle maps to the request-level use_critic flag and is on by default.
Ensure that the VLM endpoint URL has been configured for the deployment; see VLM configuration in deployment commands for details.
To re-enable, unset the variable or set it to true:
export ENABLE_CRITIC=true
GPU requirements:
The search profile uses 2 base GPUs: GPU 0 is shared by RTVI-CV and VIOS Stream Processing, and GPU 1 runs RTVI-Embed. A local VLM is deployed by default (critic agent enabled). The LLM shares a base GPU; the VLM gets a dedicated GPU. The total GPU count depends on how LLM and VLM are deployed:
Default: 3 GPUs – 2 base (LLM shared) + 1 dedicated VLM.
Dedicated LLM + VLM: 4 GPUs – 2 base + 1 dedicated LLM + 1 dedicated VLM.
Remote LLM: 3 GPUs – 2 base + 1 dedicated VLM (LLM offloaded).
Remote VLM: 2 GPUs – 2 base with LLM shared (VLM offloaded).
Remote LLM + VLM: 2 GPUs – base services only.
3 GPUs. LLM shares a base GPU; VLM gets a dedicated GPU.
deploy/docker/scripts/dev-profile.sh up -p search -H H100
4 GPUs. Both LLM and VLM get dedicated GPUs. To use the default layout (3 GPUs, LLM shared), omit both device ID flags.
deploy/docker/scripts/dev-profile.sh up -p search -H H100 \
    --llm-device-id 2 --vlm-device-id 3
3 GPUs. VLM gets a dedicated GPU; LLM is offloaded.
export LLM_ENDPOINT_URL=https://your-llm-endpoint.com
deploy/docker/scripts/dev-profile.sh up -p search -H H100 \
    --use-remote-llm
2 GPUs. LLM time-shares with base service GPUs.
export VLM_ENDPOINT_URL=https://your-vlm-endpoint.com
deploy/docker/scripts/dev-profile.sh up -p search -H H100 \
    --use-remote-vlm
2 GPUs.
export LLM_ENDPOINT_URL=https://your-llm-endpoint.com
export VLM_ENDPOINT_URL=https://your-vlm-endpoint.com
deploy/docker/scripts/dev-profile.sh up -p search -H H100 \
    --use-remote-llm --use-remote-vlm
3 GPUs. LLM shares a base GPU; VLM gets a dedicated GPU.
deploy/docker/scripts/dev-profile.sh up -p search -H RTXPRO6000BW
4 GPUs. Both LLM and VLM get dedicated GPUs. To use the default layout (3 GPUs, LLM shared), omit both device ID flags.
deploy/docker/scripts/dev-profile.sh up -p search -H RTXPRO6000BW \
    --llm-device-id 2 --vlm-device-id 3
3 GPUs. VLM gets a dedicated GPU; LLM is offloaded.
export LLM_ENDPOINT_URL=https://your-llm-endpoint.com
deploy/docker/scripts/dev-profile.sh up -p search -H RTXPRO6000BW \
    --use-remote-llm
2 GPUs. LLM time-shares with base service GPUs.
export VLM_ENDPOINT_URL=https://your-vlm-endpoint.com
deploy/docker/scripts/dev-profile.sh up -p search -H RTXPRO6000BW \
    --use-remote-vlm
2 GPUs.
export LLM_ENDPOINT_URL=https://your-llm-endpoint.com
export VLM_ENDPOINT_URL=https://your-vlm-endpoint.com
deploy/docker/scripts/dev-profile.sh up -p search -H RTXPRO6000BW \
    --use-remote-llm --use-remote-vlm
4 GPUs. L40S requires dedicated GPUs for LLM and VLM (GPU sharing is not supported).
deploy/docker/scripts/dev-profile.sh up -p search -H L40S \
    --llm-device-id 2 --vlm-device-id 3
3 GPUs. VLM gets a dedicated GPU; LLM is offloaded.
export LLM_ENDPOINT_URL=https://your-llm-endpoint.com
deploy/docker/scripts/dev-profile.sh up -p search -H L40S \
    --use-remote-llm --vlm-device-id 2
3 GPUs. LLM gets a dedicated GPU; VLM is offloaded.
export VLM_ENDPOINT_URL=https://your-vlm-endpoint.com
deploy/docker/scripts/dev-profile.sh up -p search -H L40S \
    --use-remote-vlm --llm-device-id 2
2 GPUs.
export LLM_ENDPOINT_URL=https://your-llm-endpoint.com
export VLM_ENDPOINT_URL=https://your-vlm-endpoint.com
deploy/docker/scripts/dev-profile.sh up -p search -H L40S \
    --use-remote-llm --use-remote-vlm
See Local LLM and VLM deployments on OTHER hardware for known limitations and constraints.
3 GPUs. LLM shares a base GPU; VLM gets a dedicated GPU.
deploy/docker/scripts/dev-profile.sh up -p search -H OTHER \
    --llm-env-file /path/to/llm.env
4 GPUs. Both LLM and VLM get dedicated GPUs. To use the default layout (3 GPUs, LLM shared), omit both device ID flags.
deploy/docker/scripts/dev-profile.sh up -p search -H OTHER \
    --llm-device-id 2 --vlm-device-id 3 \
    --llm-env-file /path/to/llm.env
3 GPUs. VLM gets a dedicated GPU; LLM is offloaded.
export LLM_ENDPOINT_URL=https://your-llm-endpoint.com
deploy/docker/scripts/dev-profile.sh up -p search -H OTHER \
    --use-remote-llm
2 GPUs. LLM time-shares with base service GPUs.
export VLM_ENDPOINT_URL=https://your-vlm-endpoint.com
deploy/docker/scripts/dev-profile.sh up -p search -H OTHER \
    --use-remote-vlm
2 GPUs.
export LLM_ENDPOINT_URL=https://your-llm-endpoint.com
export VLM_ENDPOINT_URL=https://your-vlm-endpoint.com
deploy/docker/scripts/dev-profile.sh up -p search -H OTHER \
    --use-remote-llm --use-remote-vlm
This command will download the necessary containers from the NGC Docker registry and start the agent. Depending on your network speed, this may take a few minutes.
Once the deployment is complete, check that all the containers are running and healthy:
docker ps
You can now access the agent UI at http://<HOST_IP>:7777/.
This deployment uses the following defaults:
Host IP: src IP from
ip route get 1.1.1.1LLM model: nvidia/nvidia-nemotron-nano-9b-v2
VLM model: nvidia/cosmos-reason2-8b (critic agent)
Critic agent: enabled
To use a different IP than the one derived:
-i: Manually specify the host IP address.-e: Optionally specify an externally accessible IP address for services that need to be reached from outside the host.
Note
When using a remote VLM of model-type nim (not openai), see How does a remote nim VLM access videos? for access requirements.
Embedding Models
The search profile deploys with Cosmos-Embed1-448p-anomaly-detection for RT-Embed and SigLIP2 for RTVI-CV by default.
To use different embedding models, see Changing Embedding Models below.
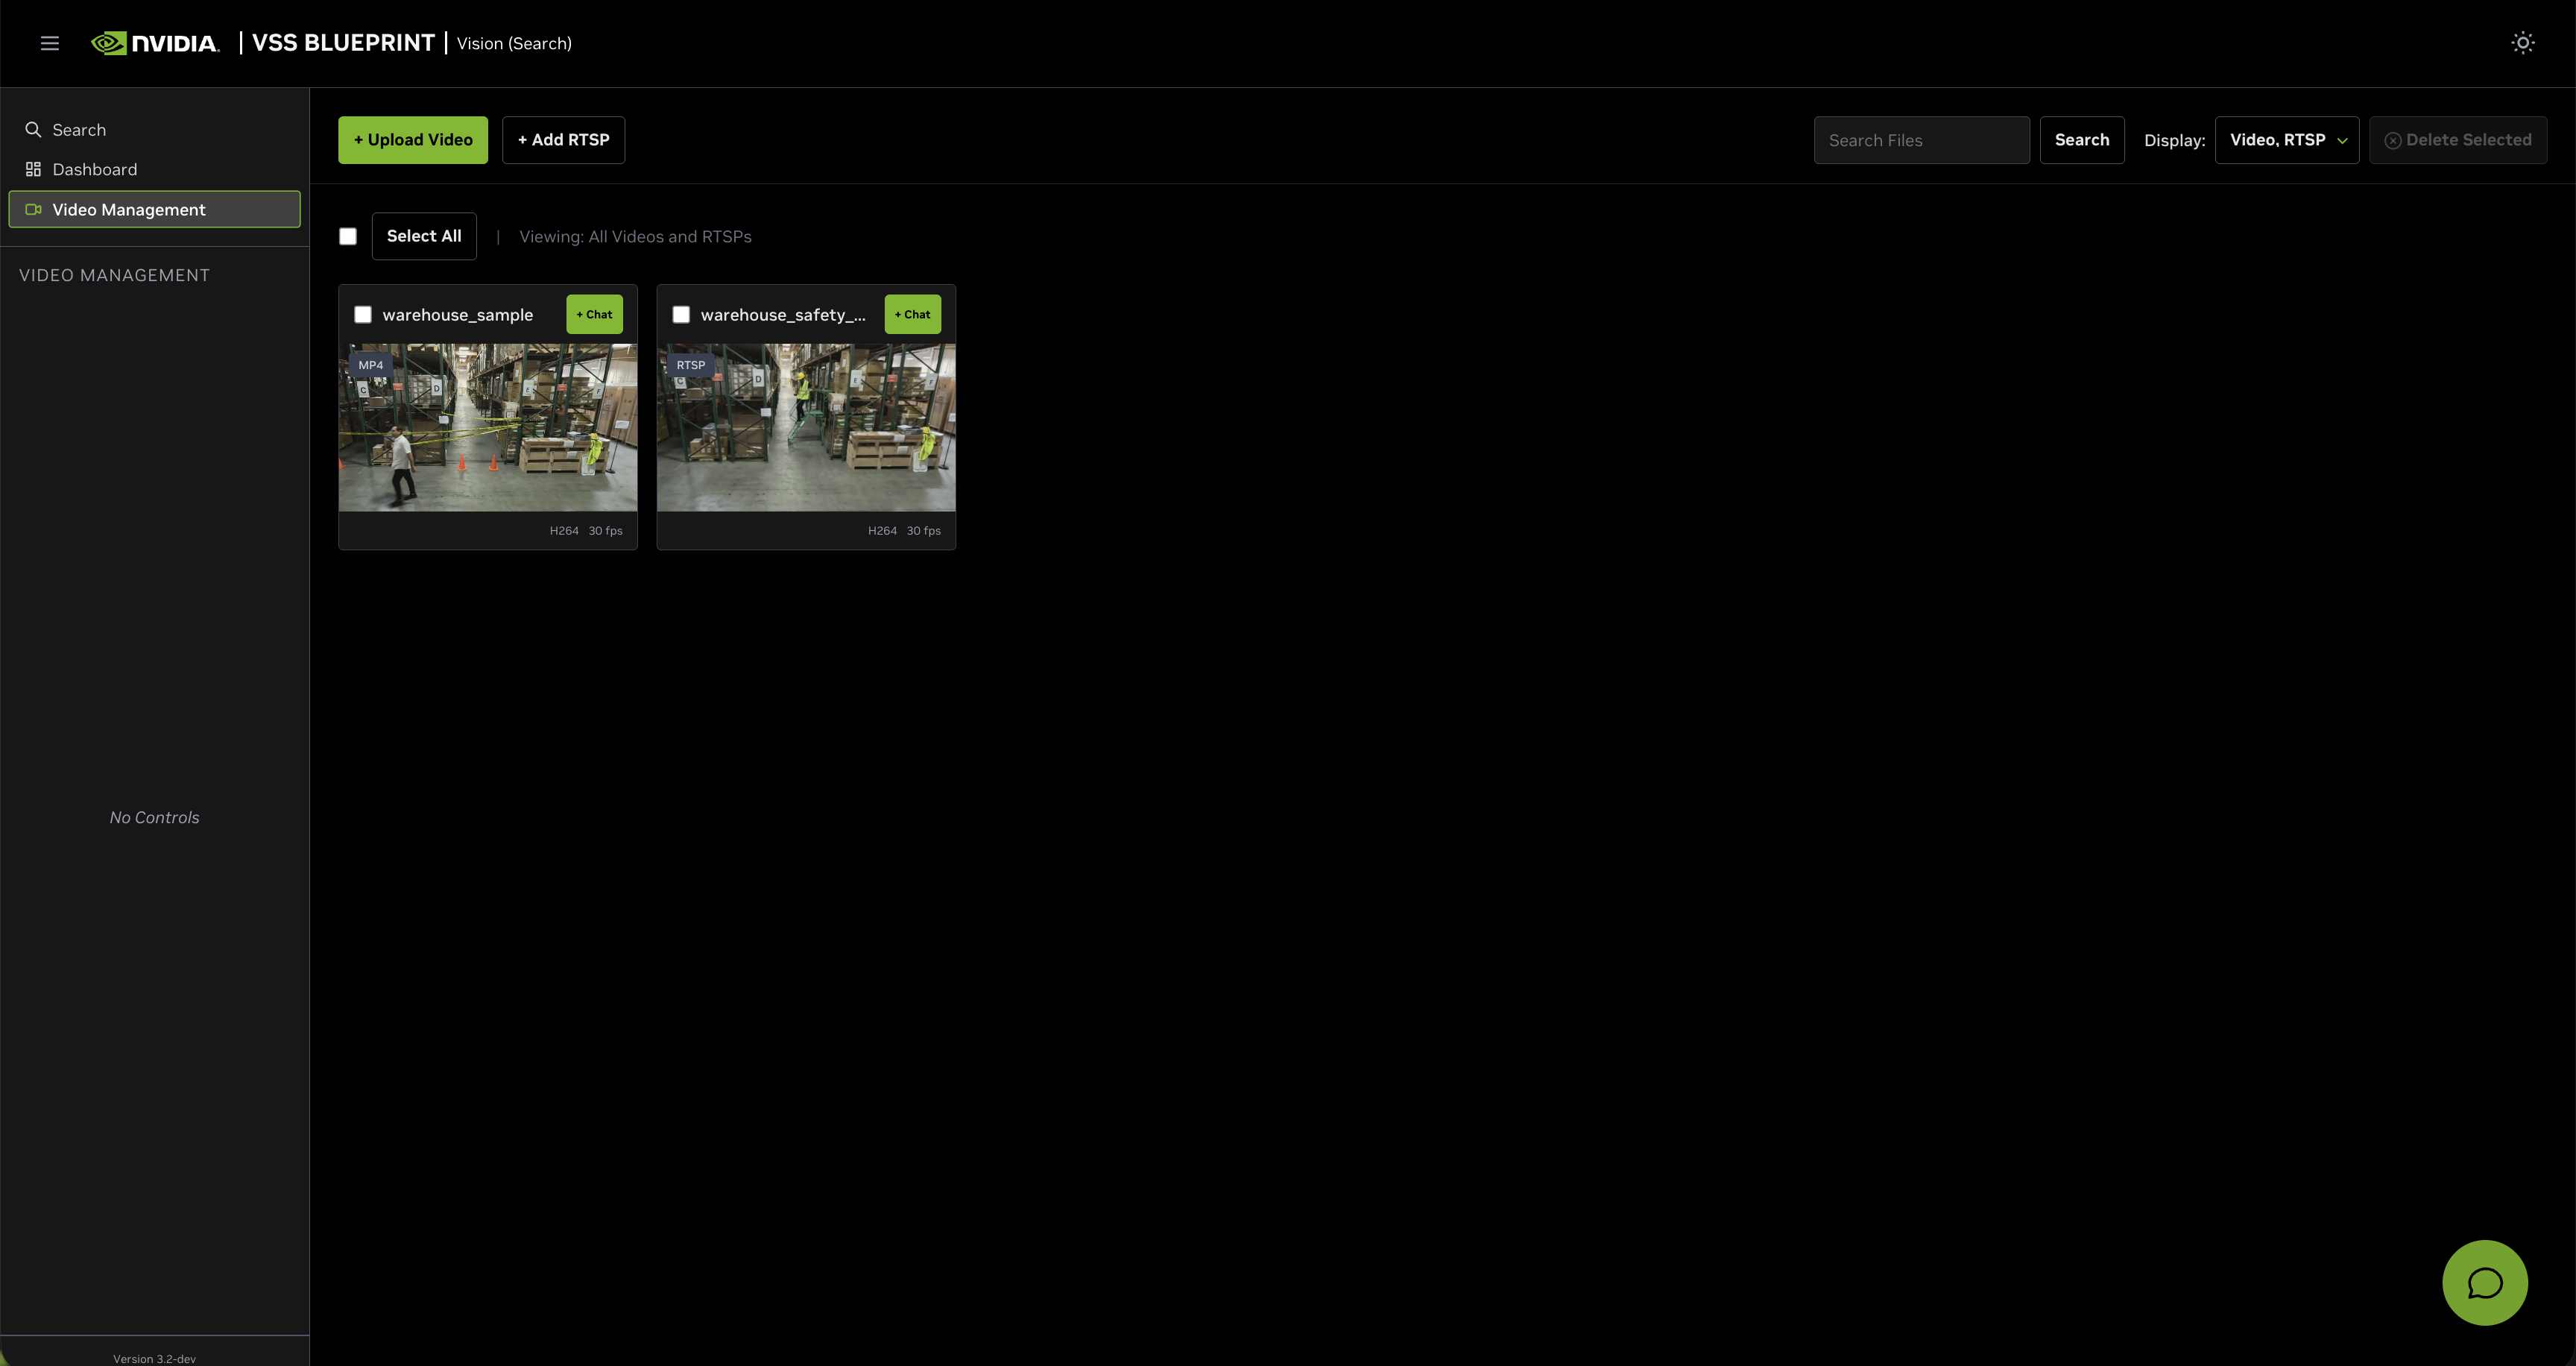
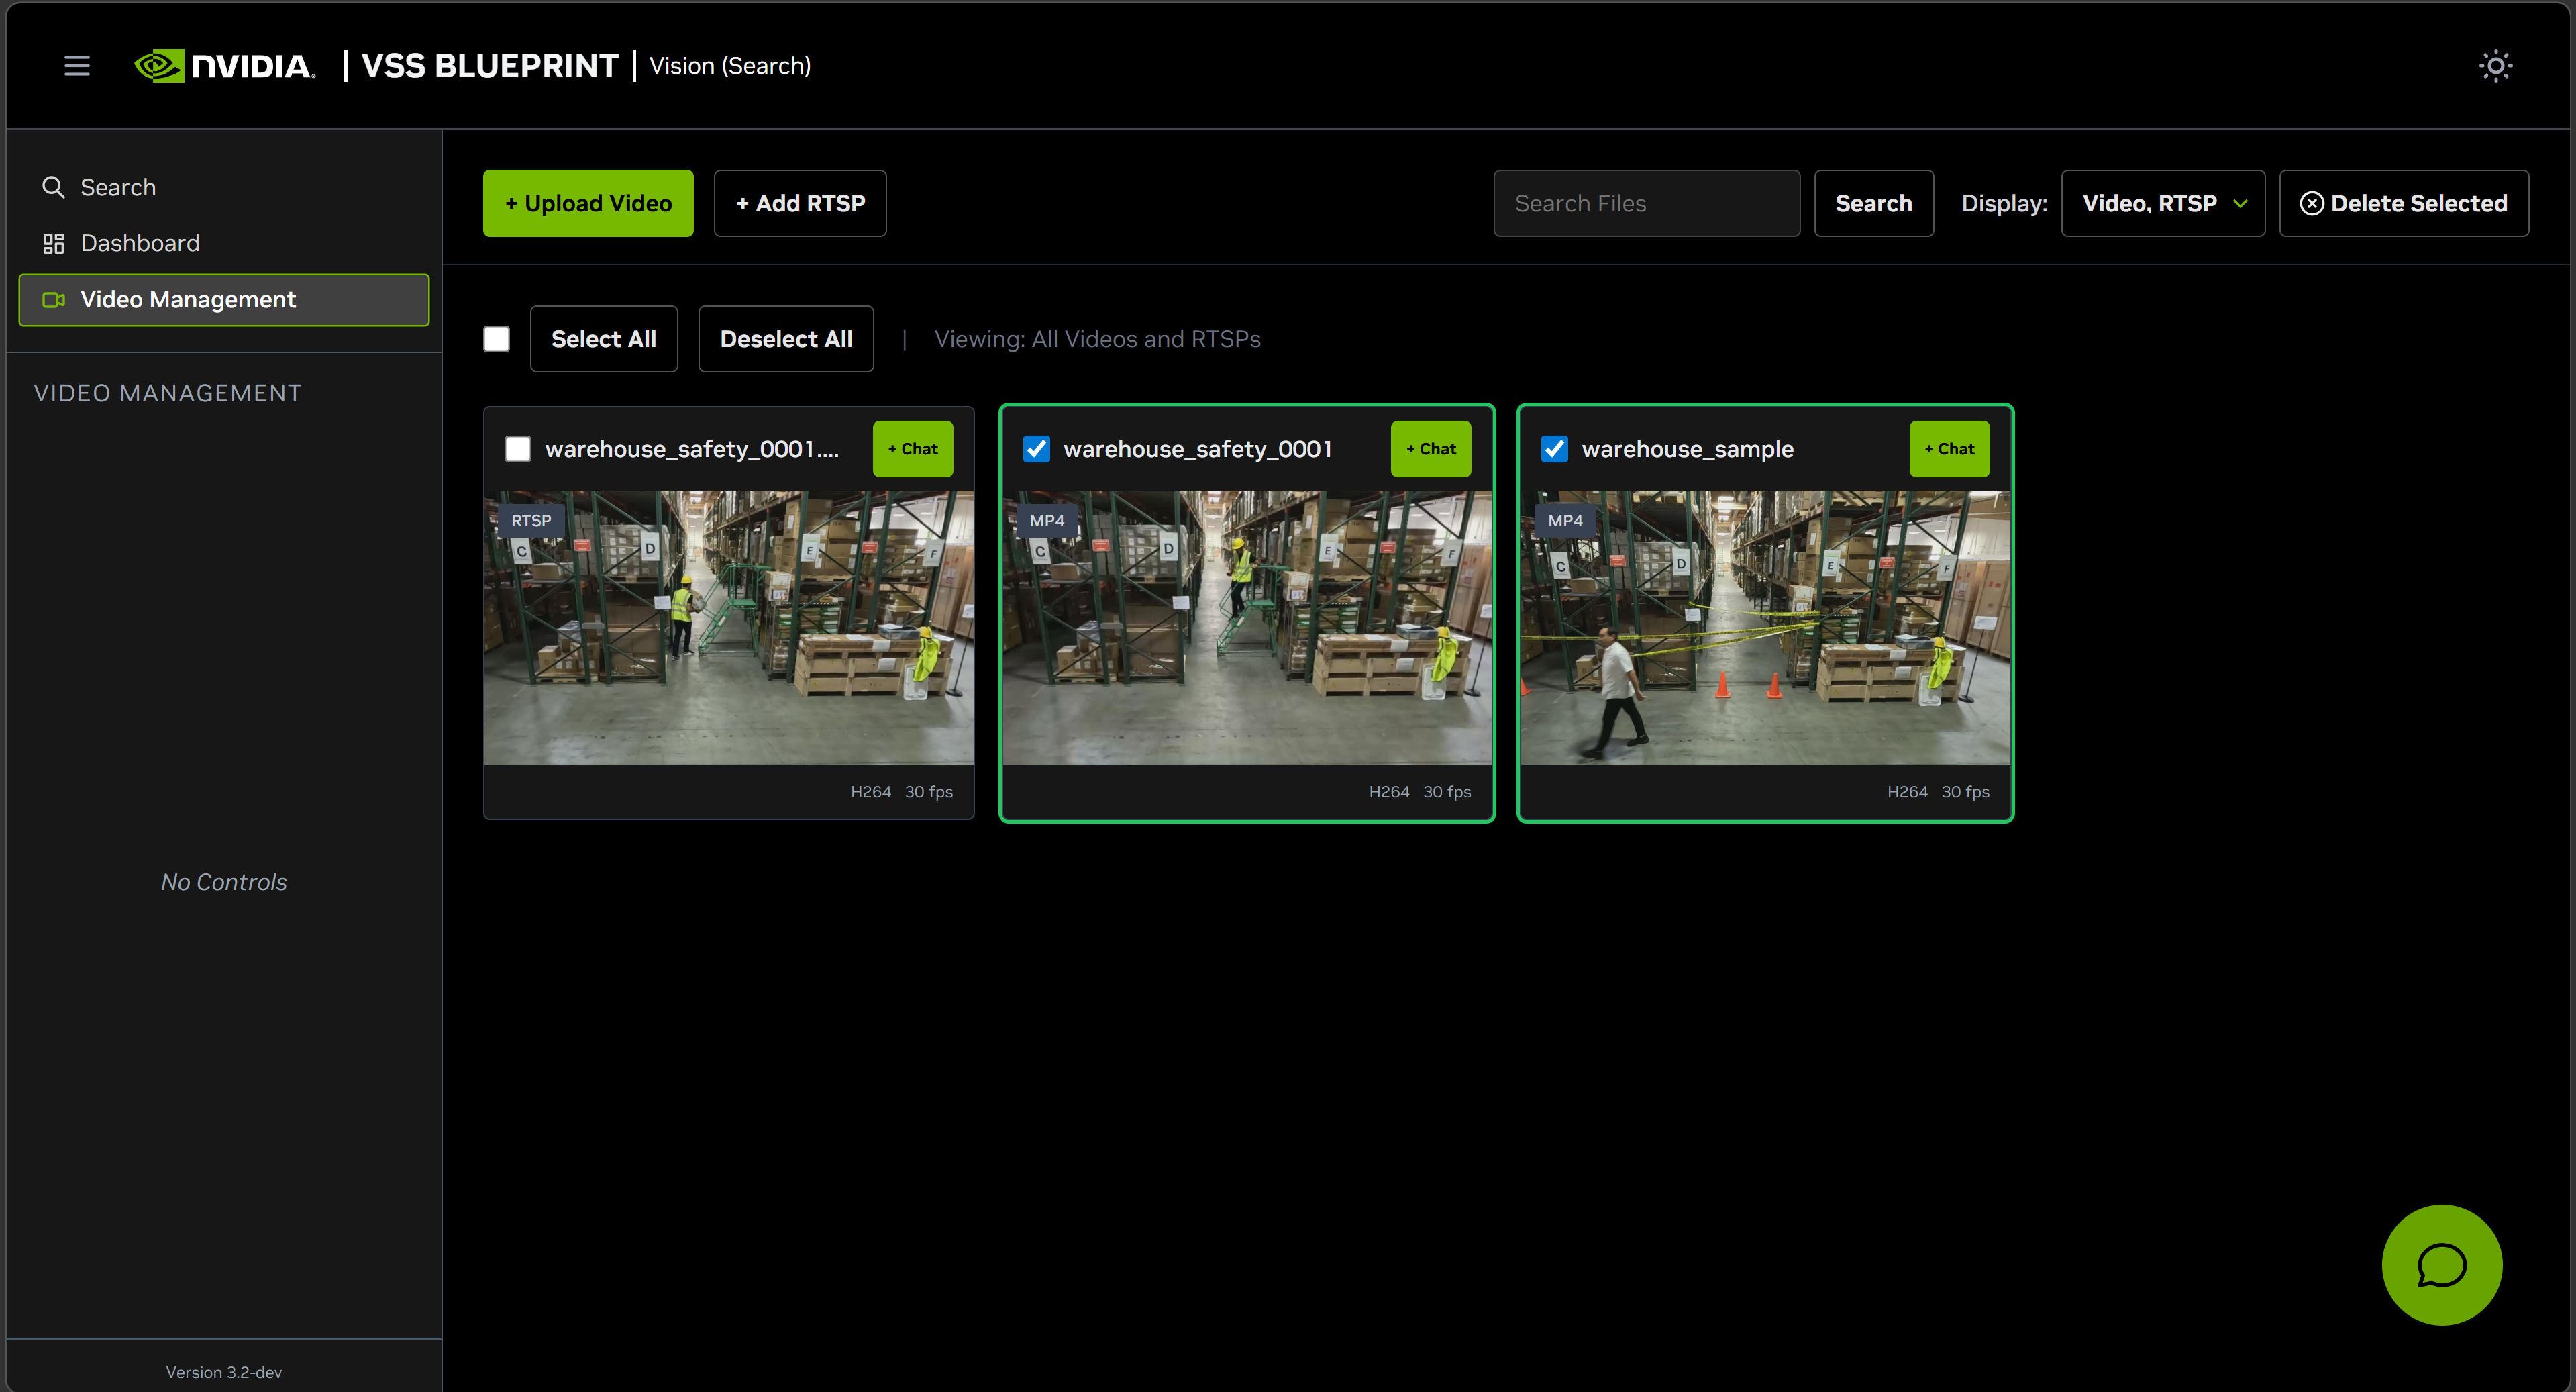
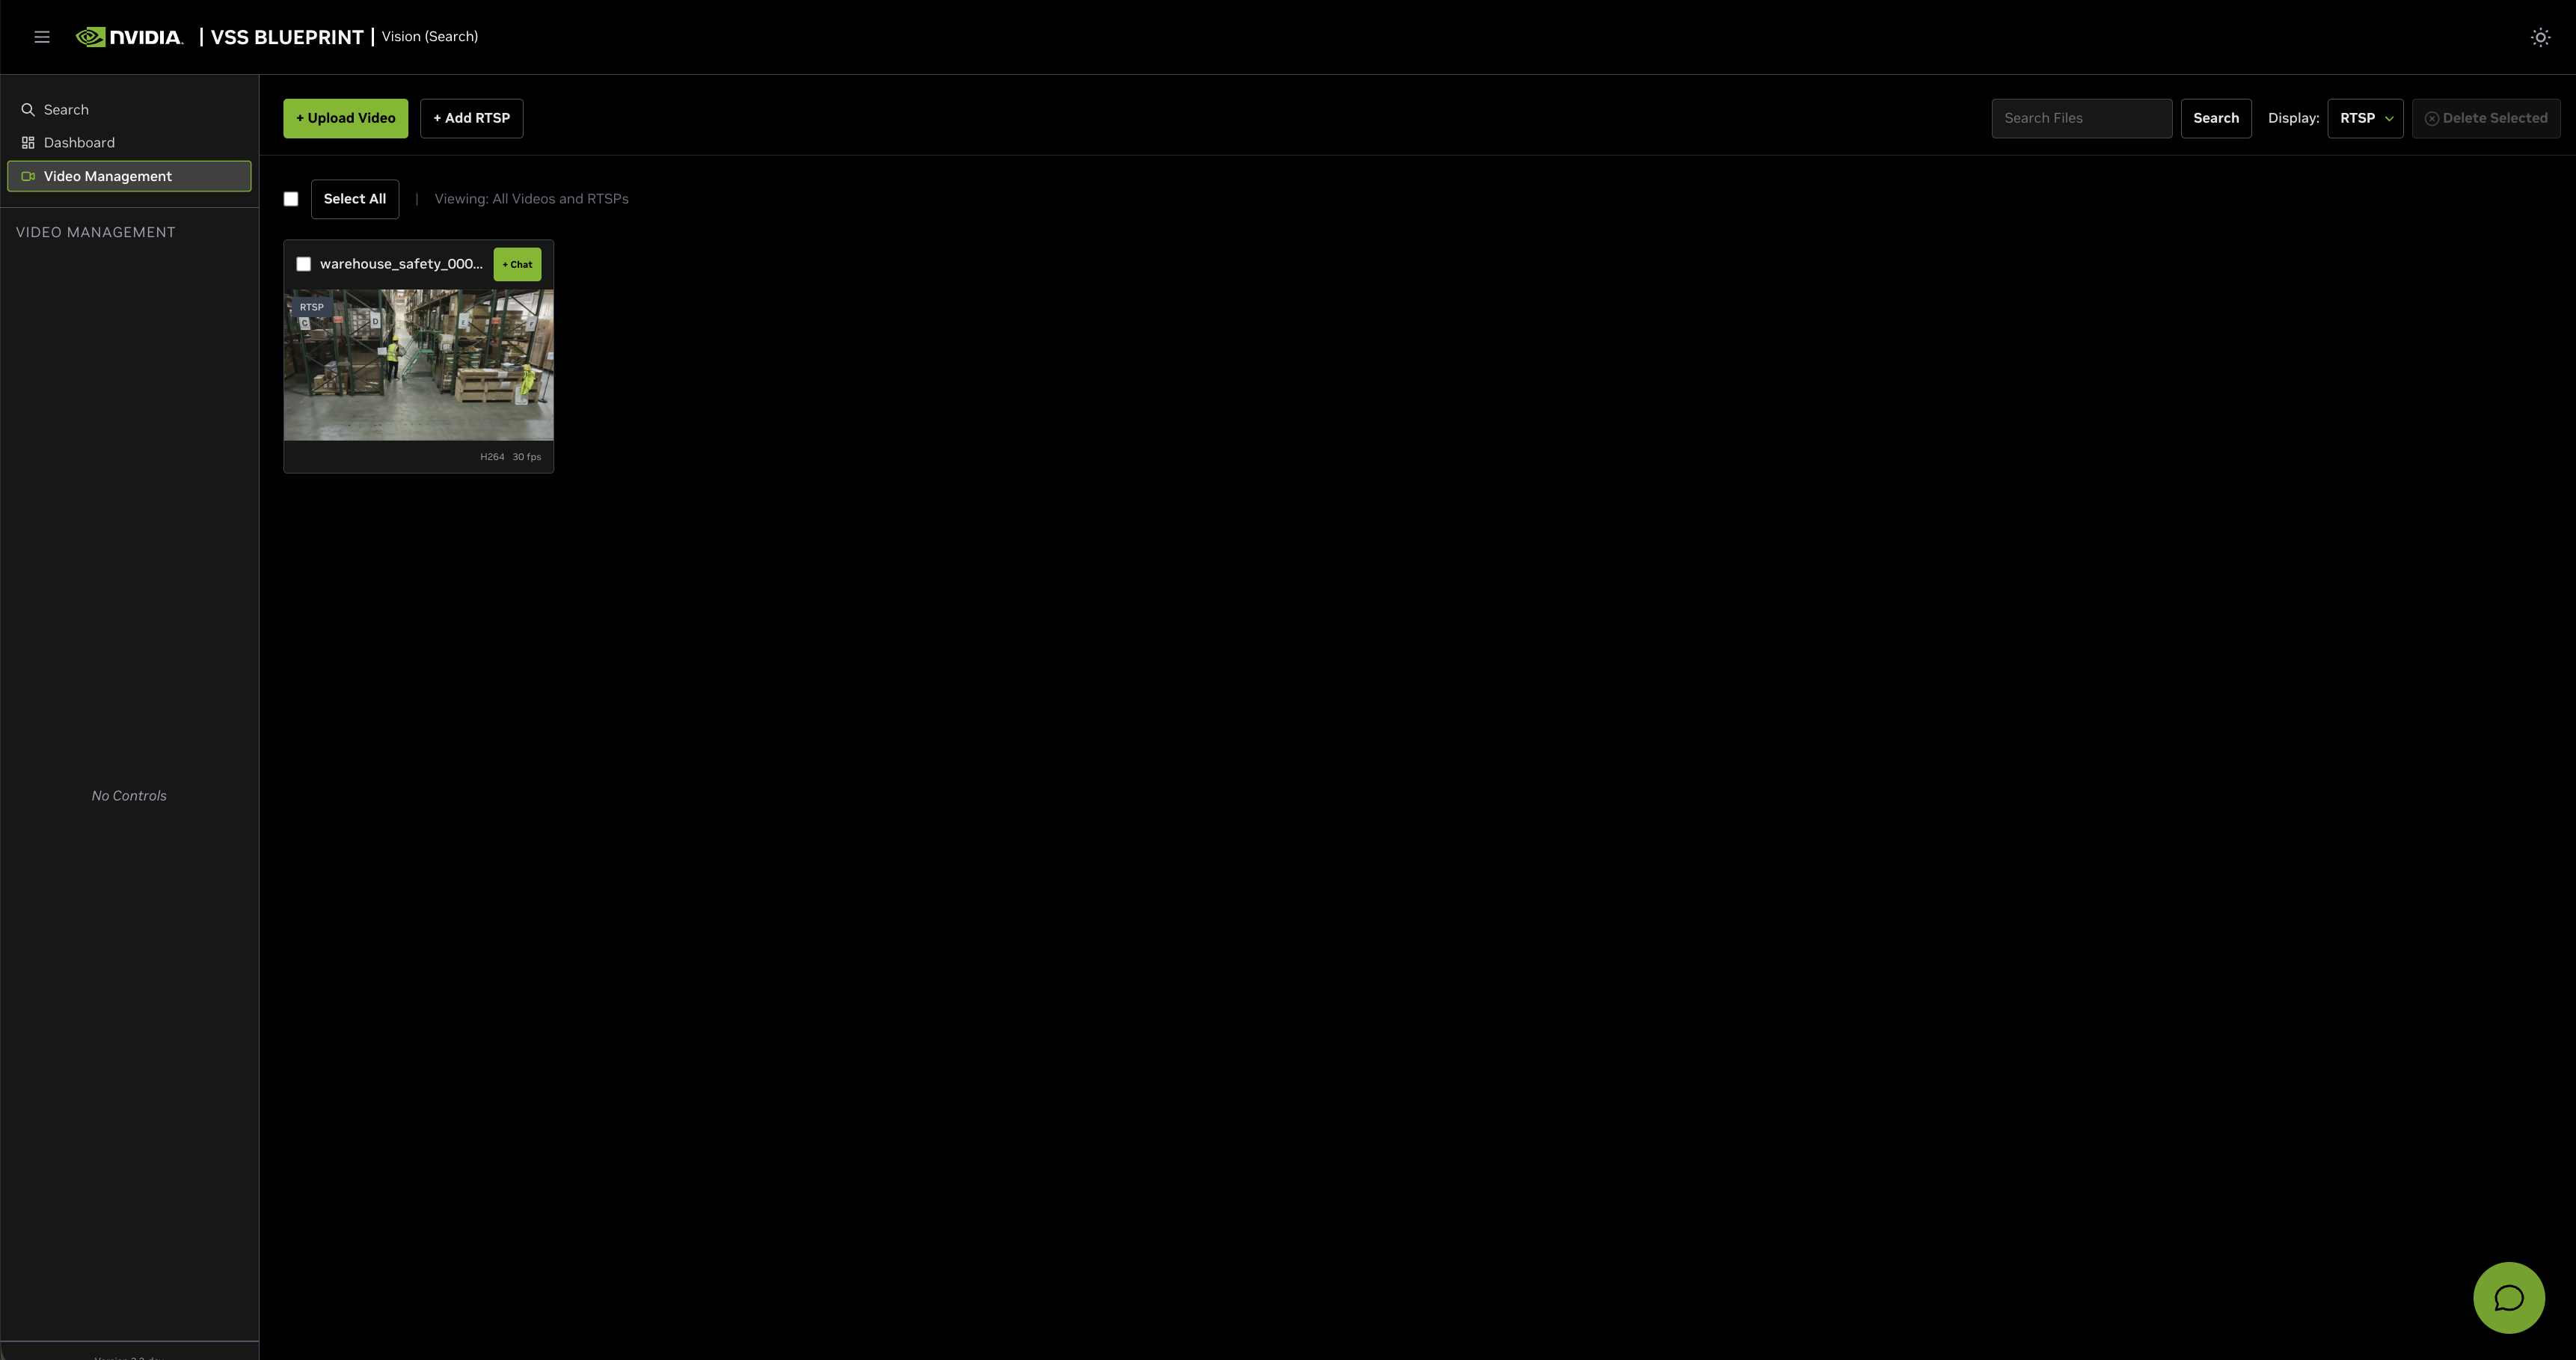
Step 2: Video Management#
Click on the Video Management tab in the left sidebar to access video management features. You can add video sources by uploading video files or adding RTSP streams.
Note
For instructions on downloading sample data, see Download Sample Data From NGC in the Quickstart guide.
Upload a Video#
Click on the Video Management tab.
Click the Upload Video button.
Select the video file
warehouse_sample.mp4from your local machine.
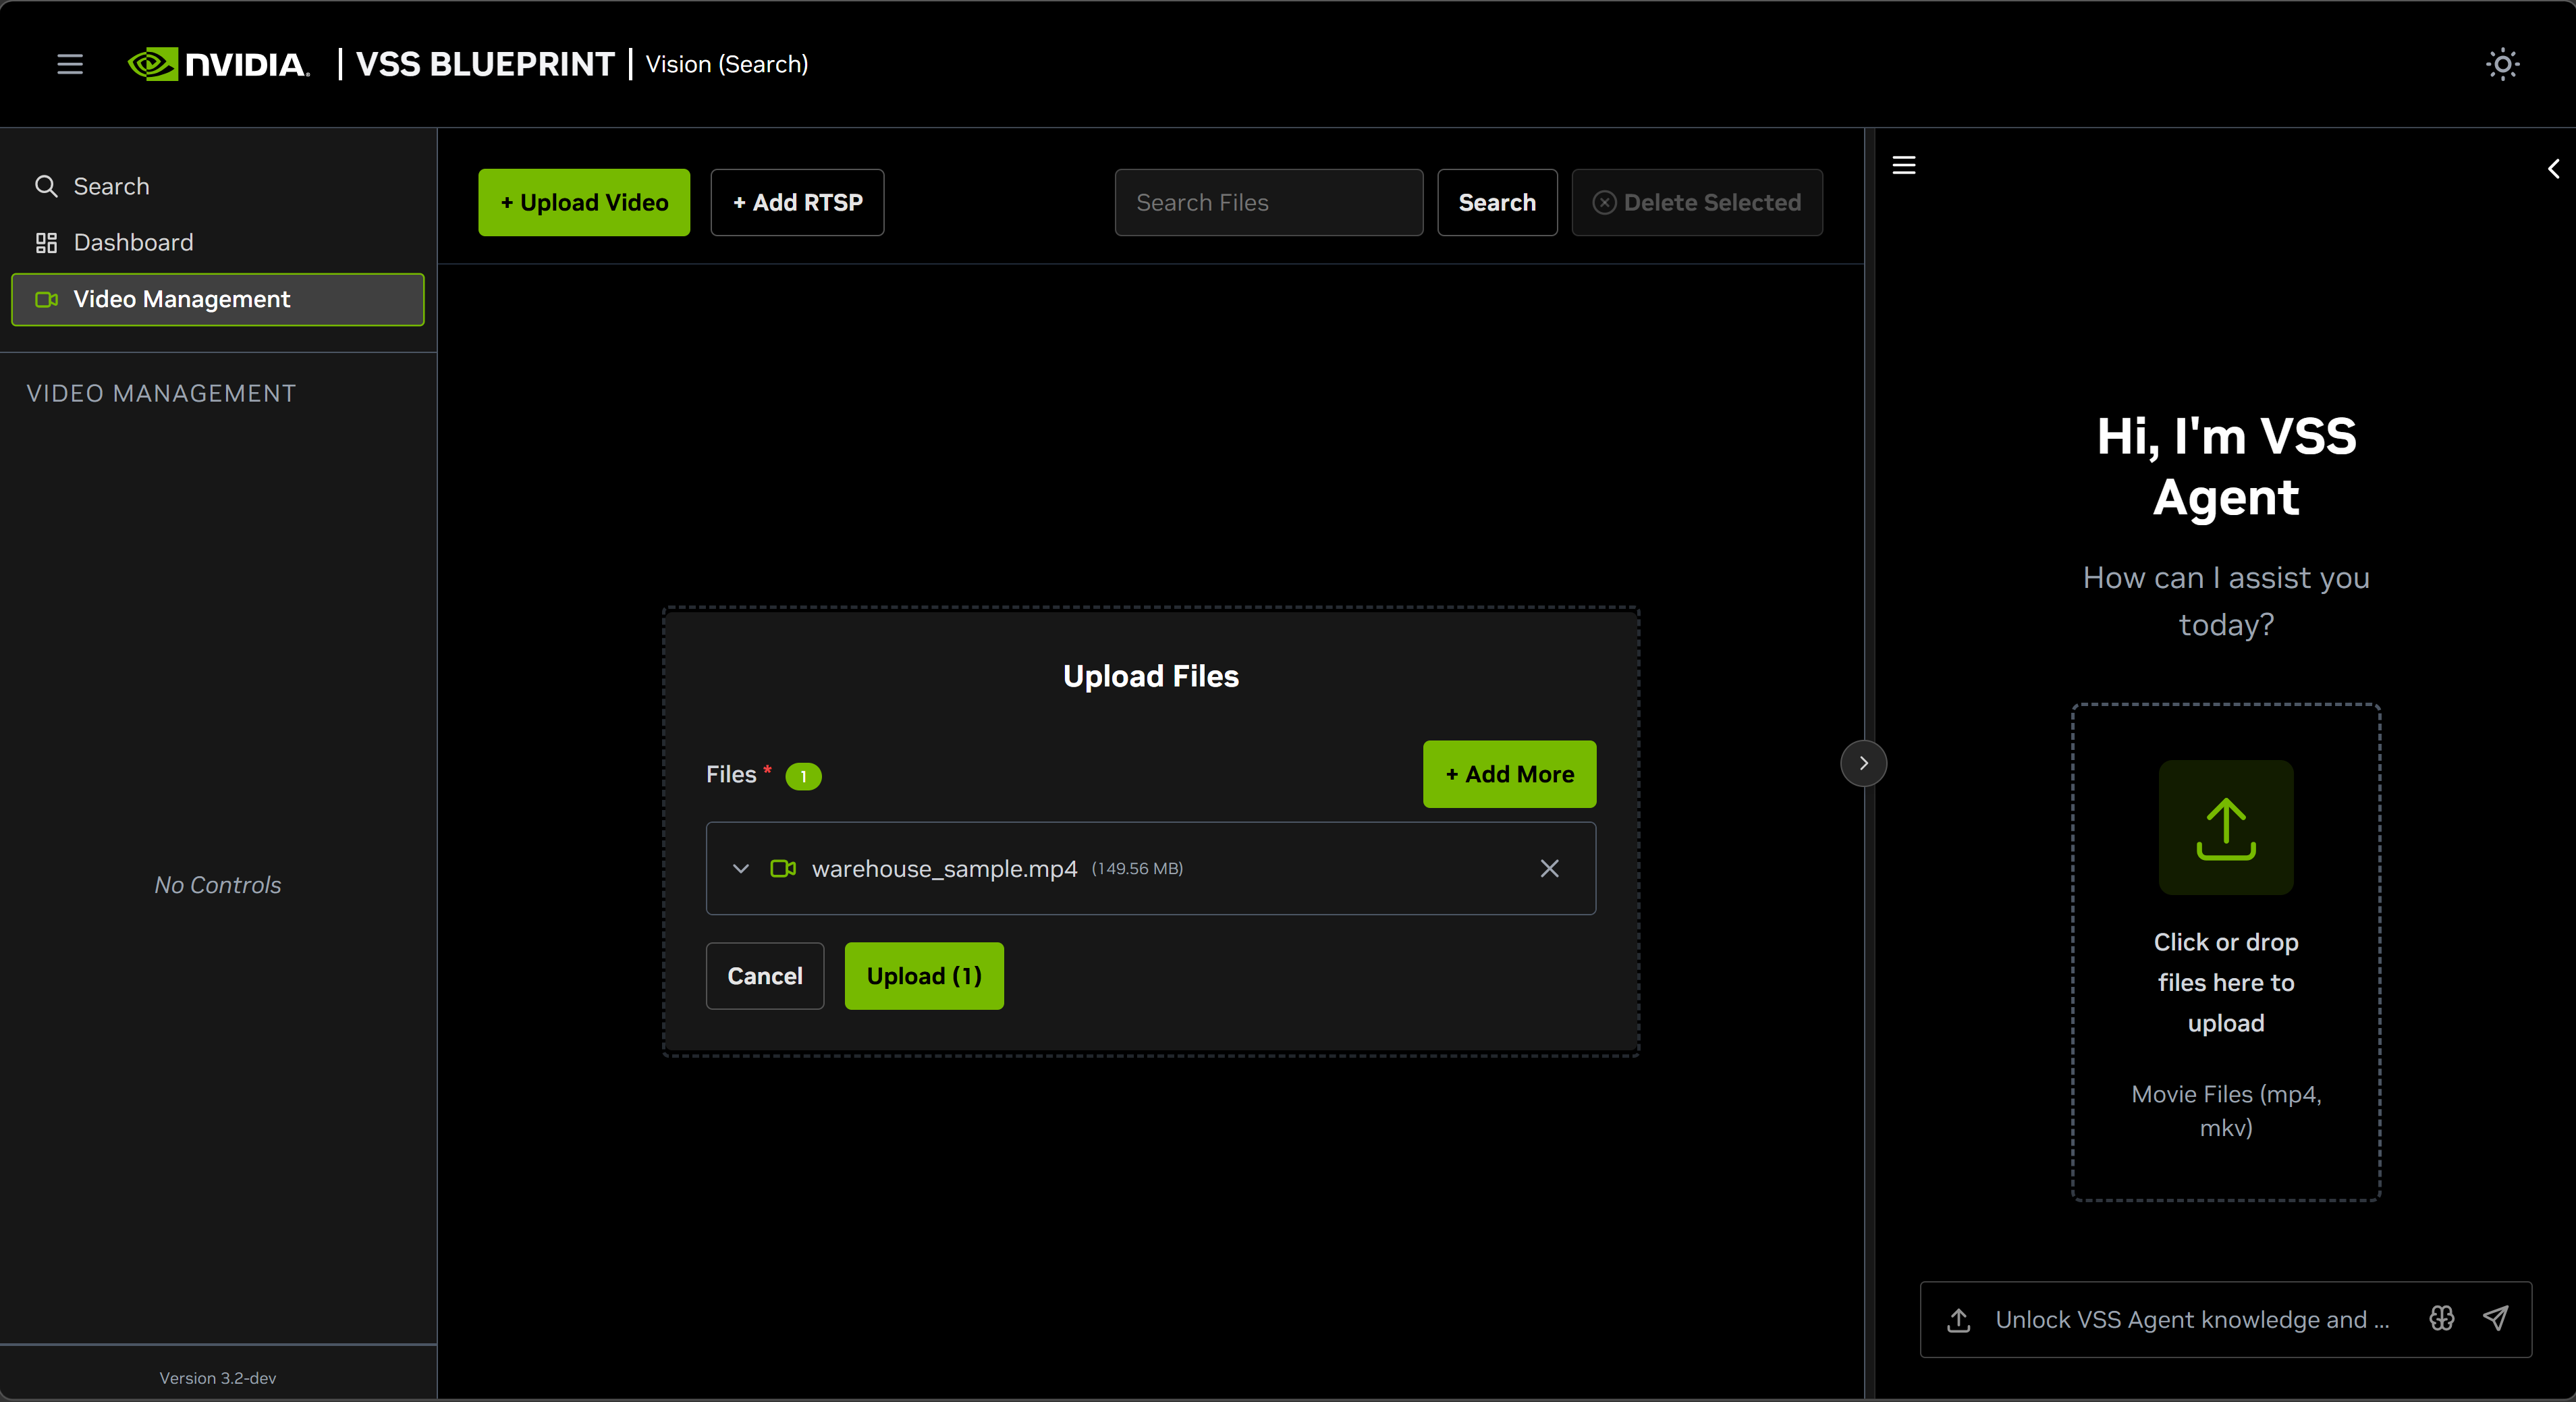
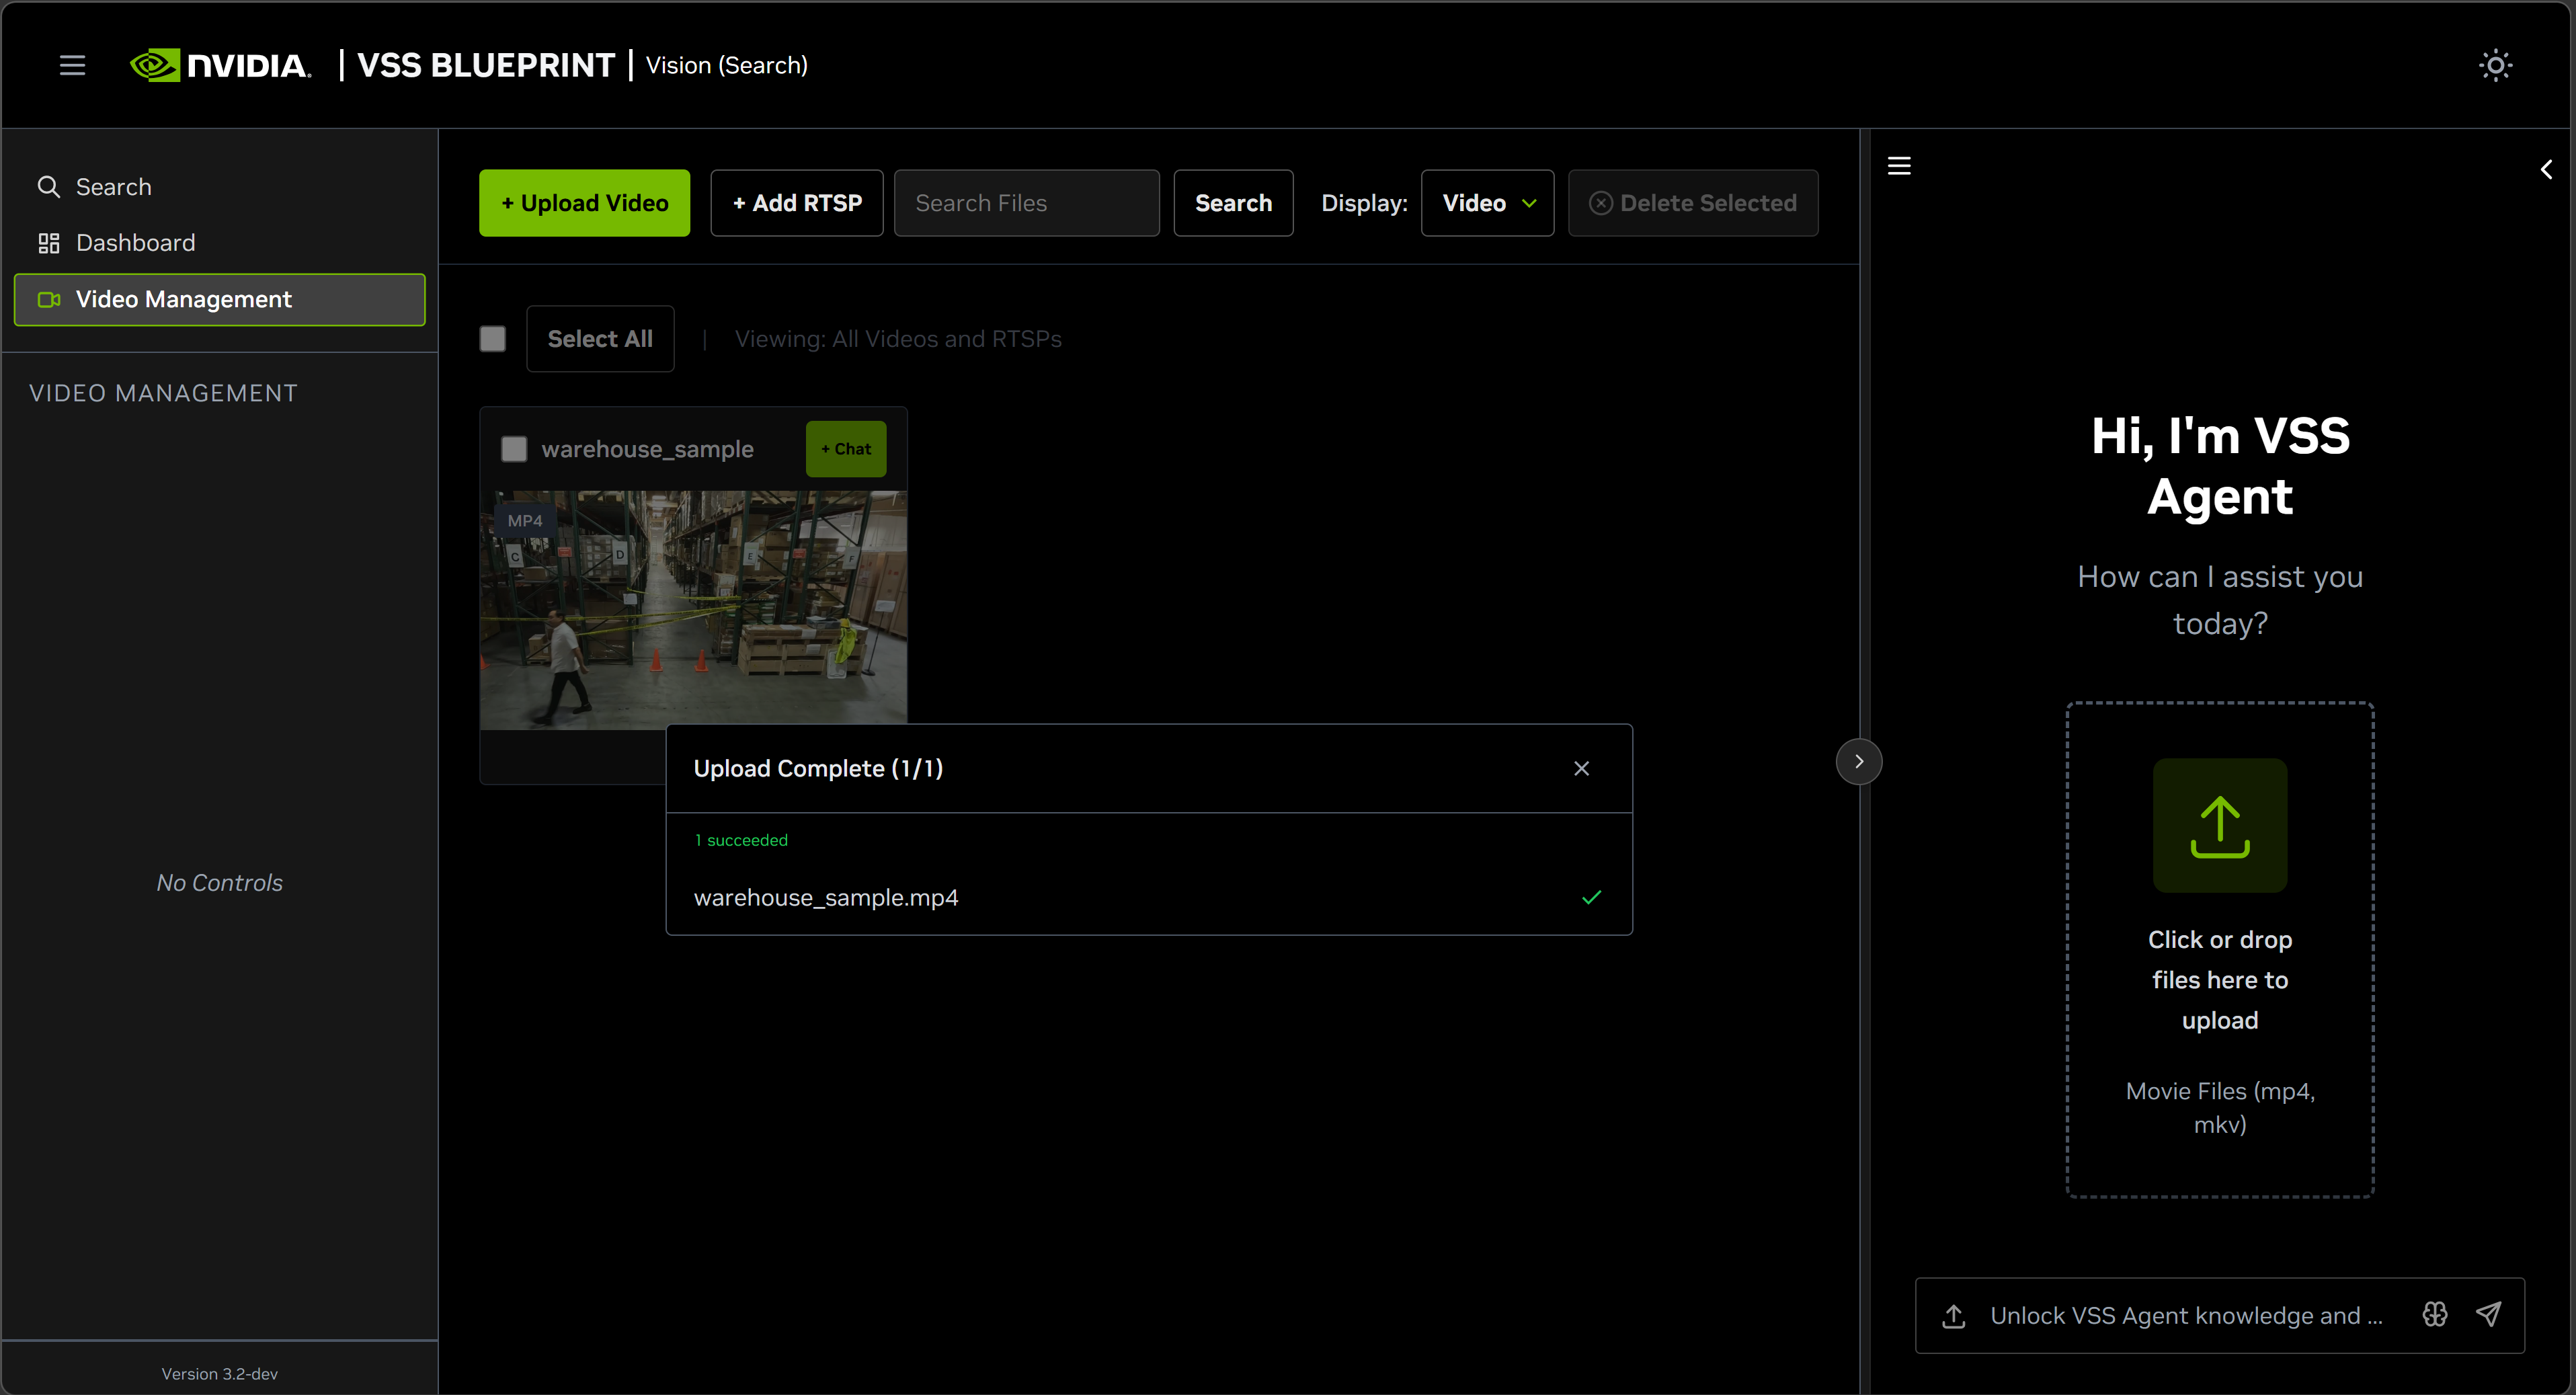
Once the video(s) is/are selected, click the Upload button and wait for the video(s) to be uploaded. It may take a few minutes depending on the size of the video(s). Once the video(s) is successfully uploaded, it will appear in the video list.
The upload path streams the file to VIOS and then runs search post-processing. The agent gets the uploaded stream timeline, requests a playable storage URL, optionally registers the stream with RTVI-CV, and calls RTVI-Embed to generate video embeddings. Uploaded files support video/mp4 and video/x-matroska content types.
Note
Vector embeddings generated for the uploaded videos and streams remain only until minimum index age is reached (from the time of first upload).
After that, the embeddings are deleted and the uploaded videos and streams are no longer searchable.
However, the uploaded videos and streams are still accessible in the video management tab. The videos and streams have to be re-uploaded/added to make them searchable again.
Default minimum index age is 48 hours for the Search Workflow. This can be configured in the ILM (Index Lifecycle Management) policy settings in the Dashboard, before the indices are expired.
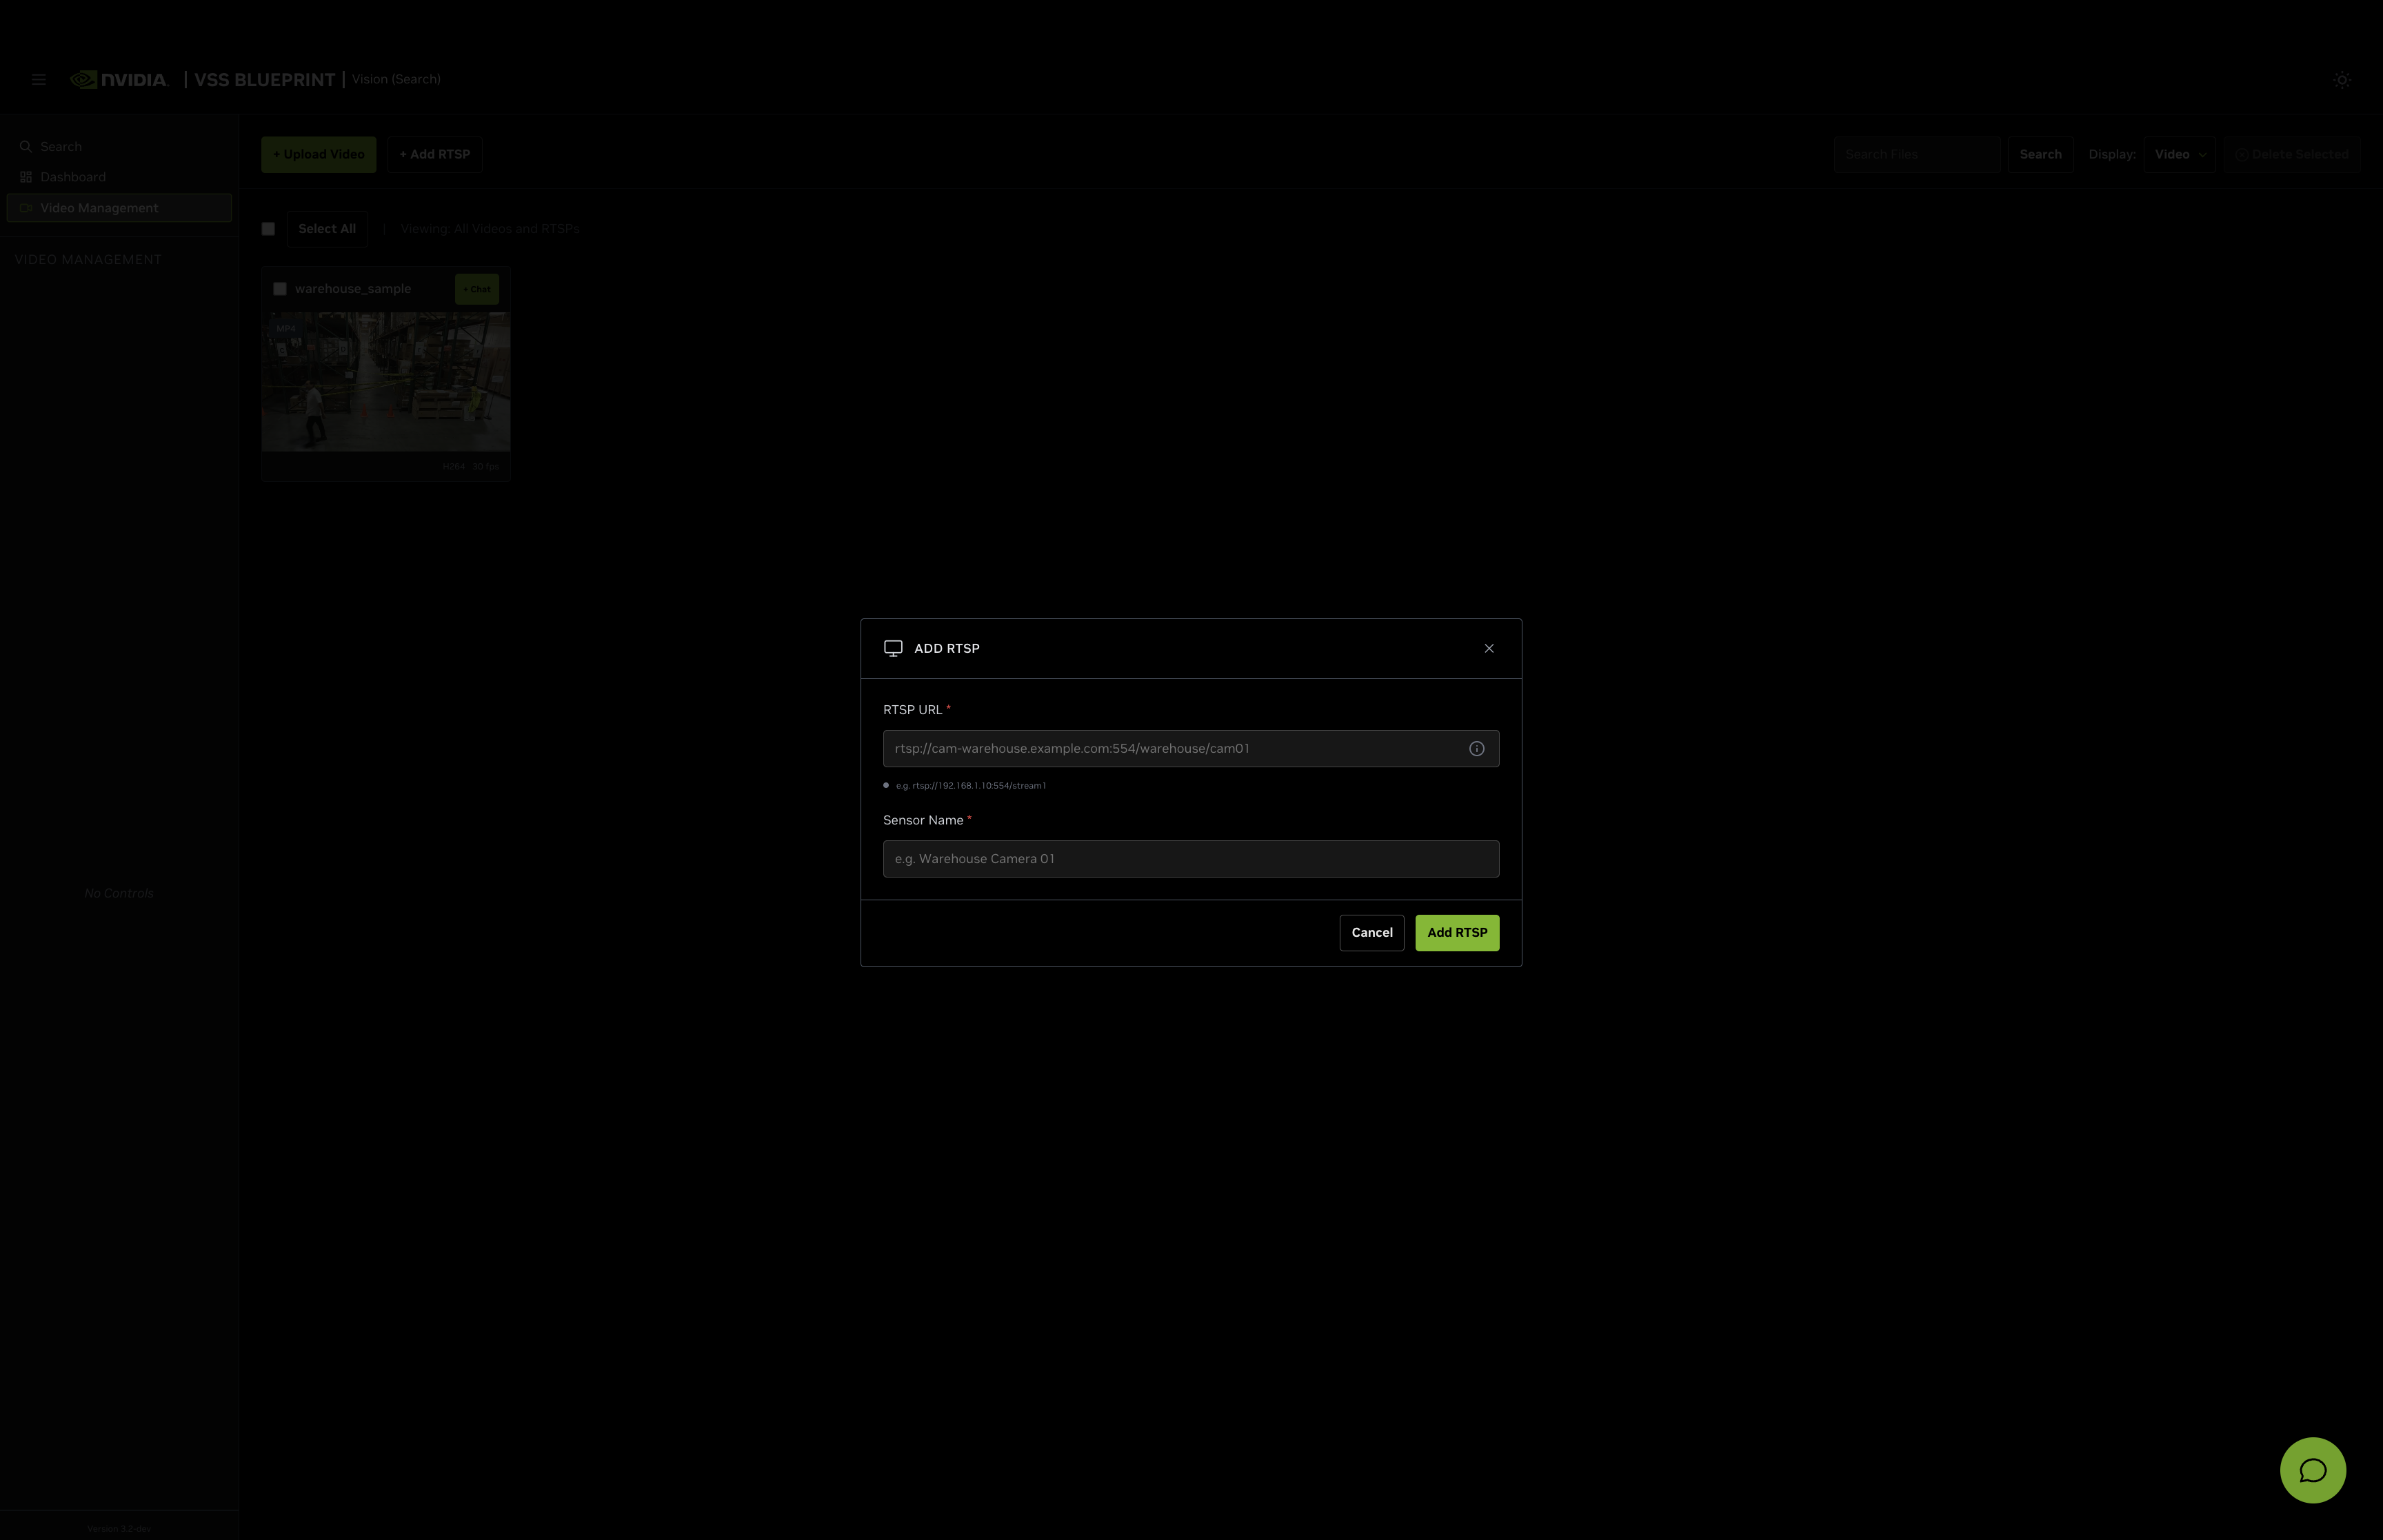
Add an RTSP Stream#
To add a live RTSP stream as a video source:
Click on the Video Management tab.
Click the Add RTSP button.
In the ADD RTSP dialog, enter the following:
RTSP URL (required): The RTSP stream URL (e.g.,
rtsp://<HOST_IP>:<PORT>/nvstream/tmp/nv_streamer/videos/warehouse_sample.mp4)Sensor Name (required): A descriptive name for the camera (e.g.,
warehouse_sample.mp4). This field is automatically populated from the RTSP URL but can be edited.
Click Add RTSP to add the stream, or Cancel to close the dialog.
Once added, the RTSP stream will appear in the video list alongside uploaded videos and can be used for search queries.
When an RTSP stream is added, the agent registers it with VIOS, registers it with RTVI-CV, registers it with RTVI-Embed, and starts embedding generation for search. If any required downstream step fails, the add operation rolls back the steps that already completed.
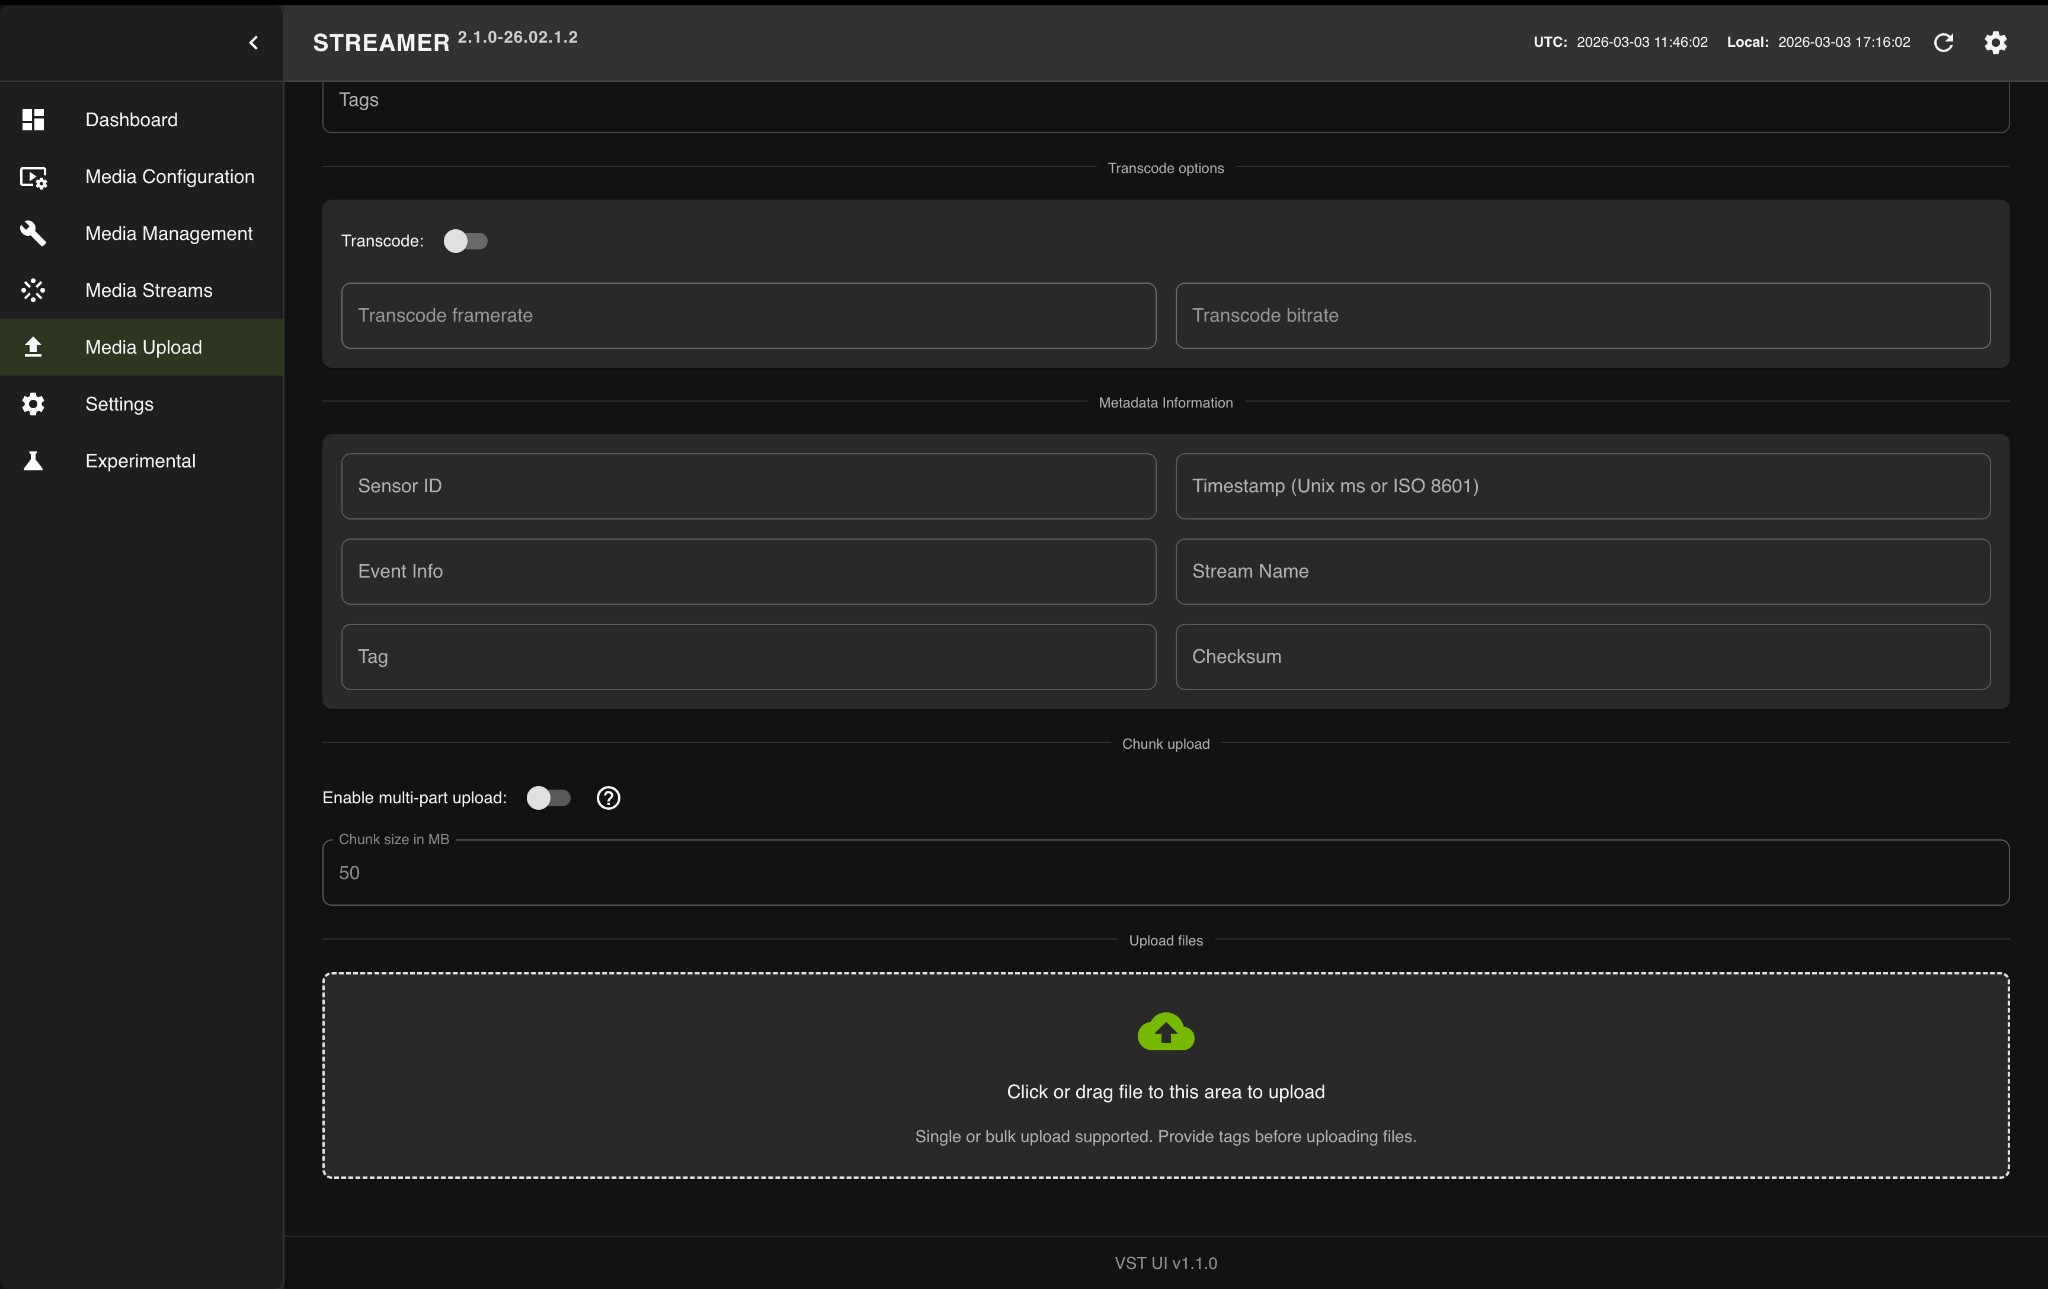
Create an RTSP Stream from a Video Using NVStreamer#
If you have a video file and want to stream it as an RTSP source, you can use the NVStreamer service that is deployed alongside other services.
Access NVStreamer
The NVStreamer UI is available at http://<HOST_IP>:31000, where <HOST_IP> is the same IP address used for the agent UI.
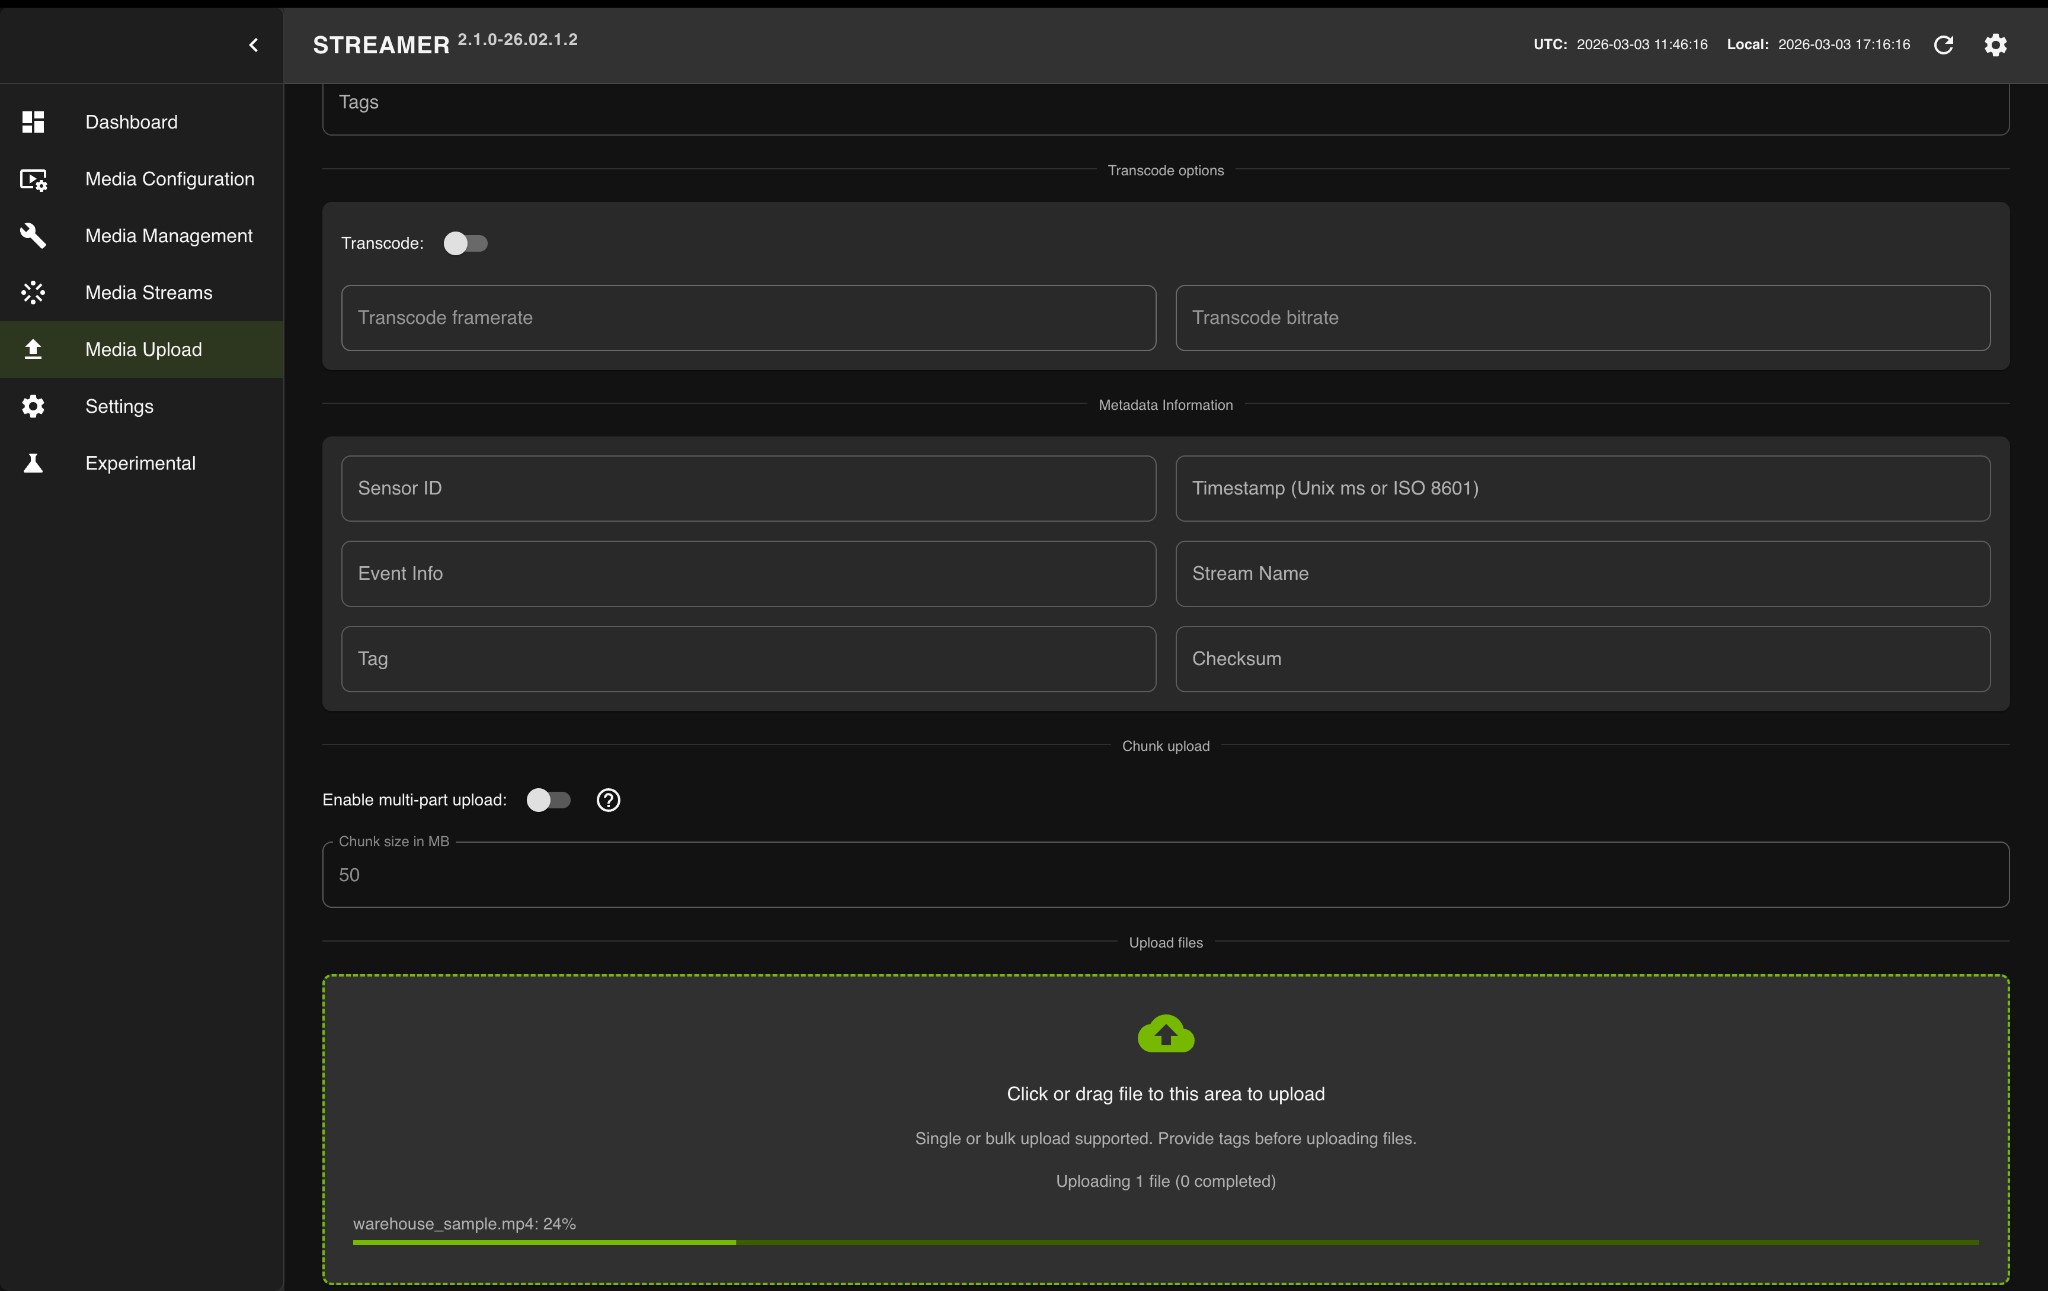
Upload a Video to NVStreamer
Open the NVStreamer UI at
http://<HOST_IP>:31000.Click on the Media Upload tab in the left sidebar.
Click or drag video files to the upload area.
Wait for the upload to complete.
Get the RTSP URL
After the upload completes, click on the Dashboard tab.
Locate your video in the table and copy the RTSP URL using the copy button.
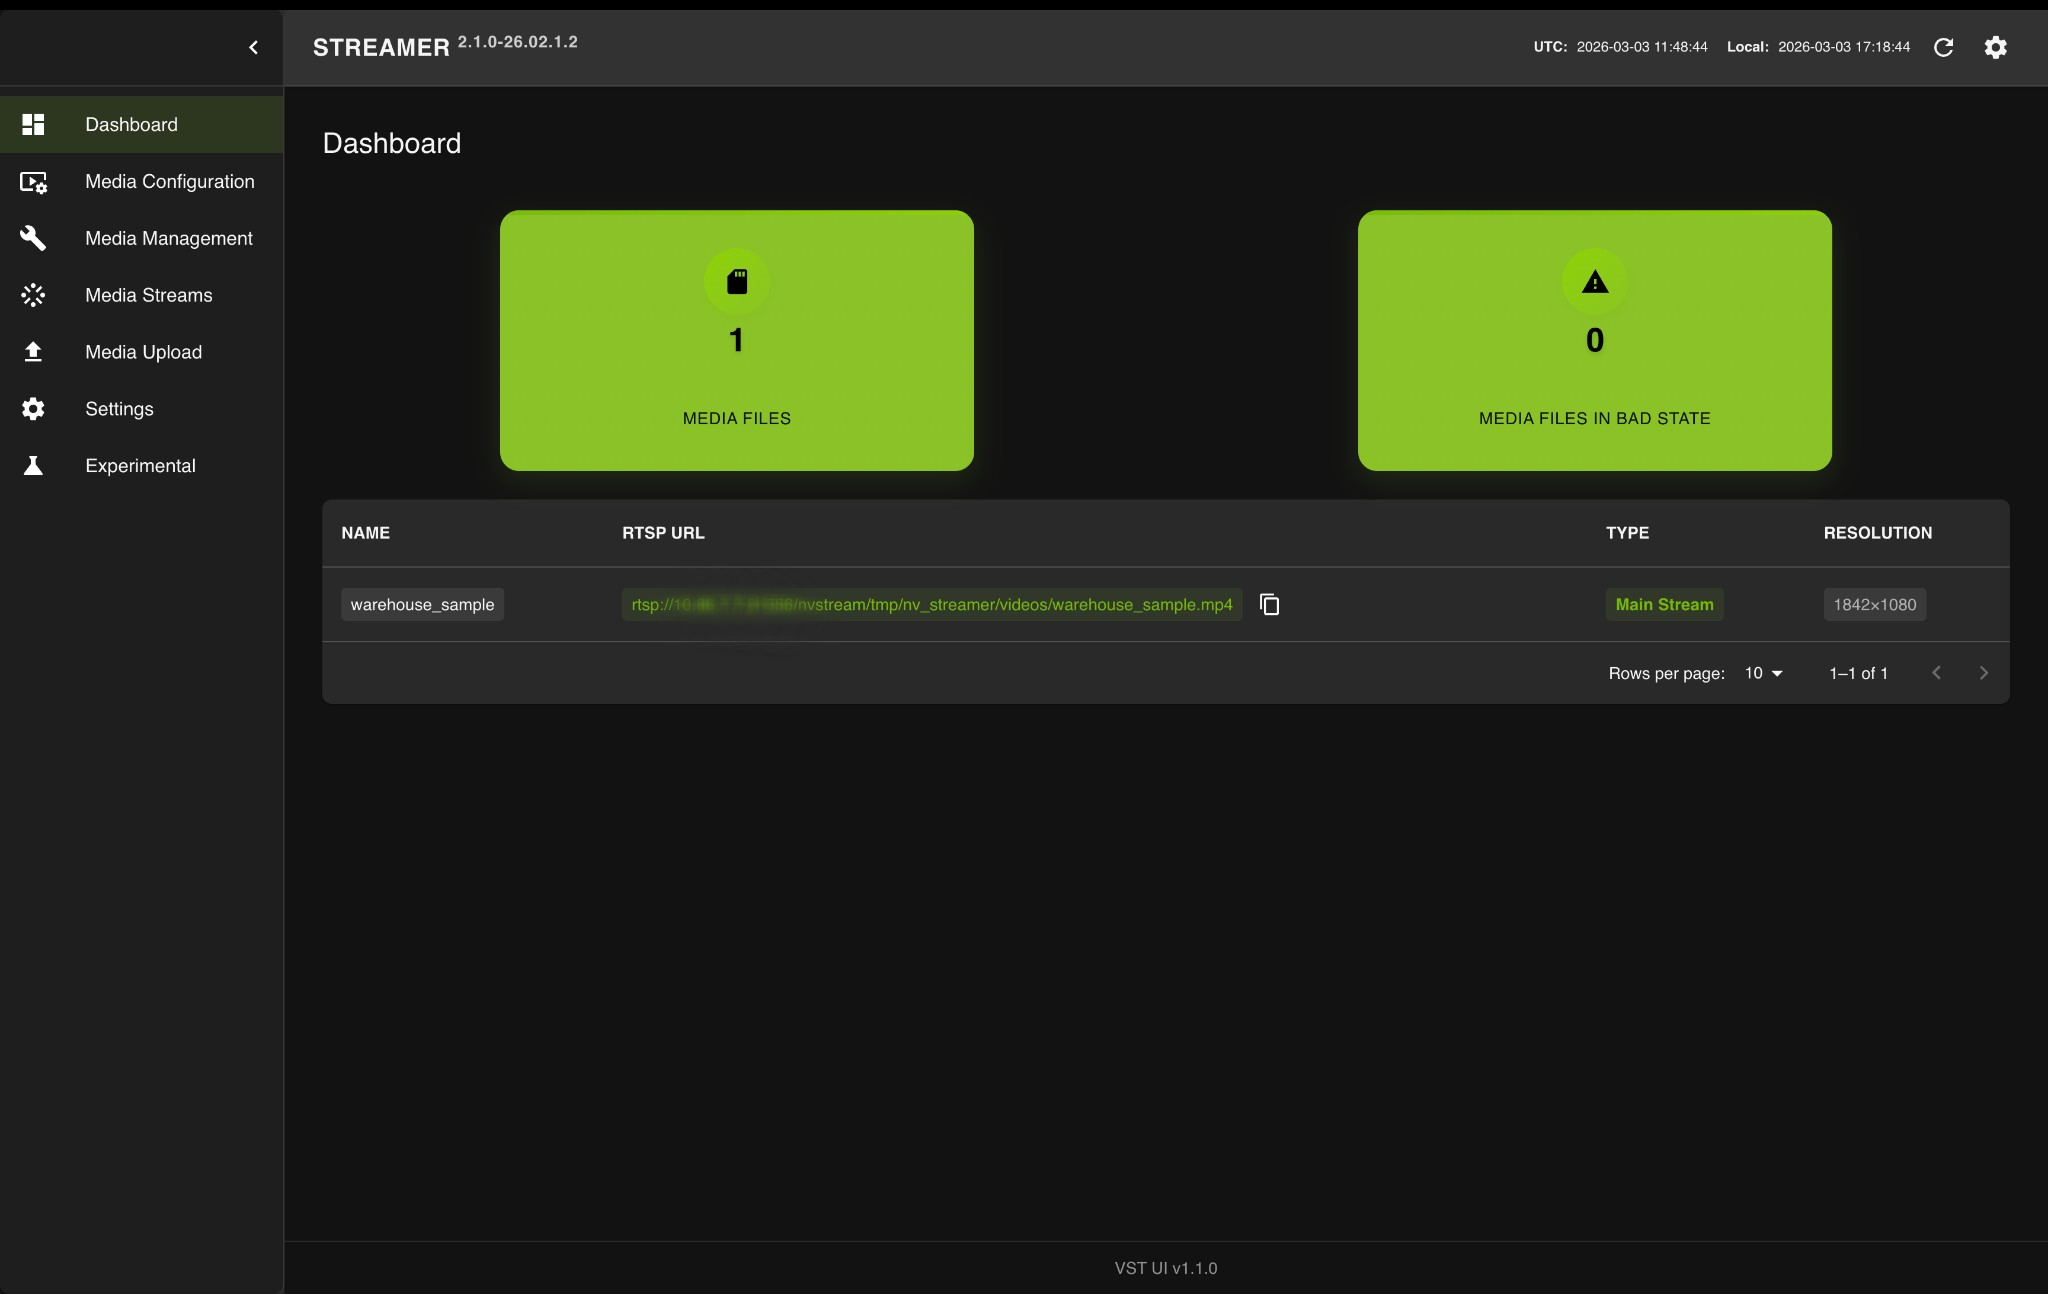
Add the RTSP URL to the Agent
Use the copied RTSP URL (e.g., rtsp://<HOST_IP>:31556/nvstream/tmp/nv_streamer/videos/warehouse_sample.mp4) in the Add RTSP Stream (see above) dialog to add it as a video source for search queries. Click Add RTSP to add the stream, or Cancel to close the dialog.
Note
To avoid duplicate results due to looping of the same video, ensure that the RTSP stream is deleted from the video management tab some time after it has been added to the agent for search queries.
Step 3: Search with a simple query#
Note
To use manual filters, ensure that the Vision Agent chat interface is collapsed.
Navigate to the Search tab and enter a natural language query in the search input box. For example:
a person carrying boxes
Click the Search button to execute the query. The agent will return video clips that match your search description.
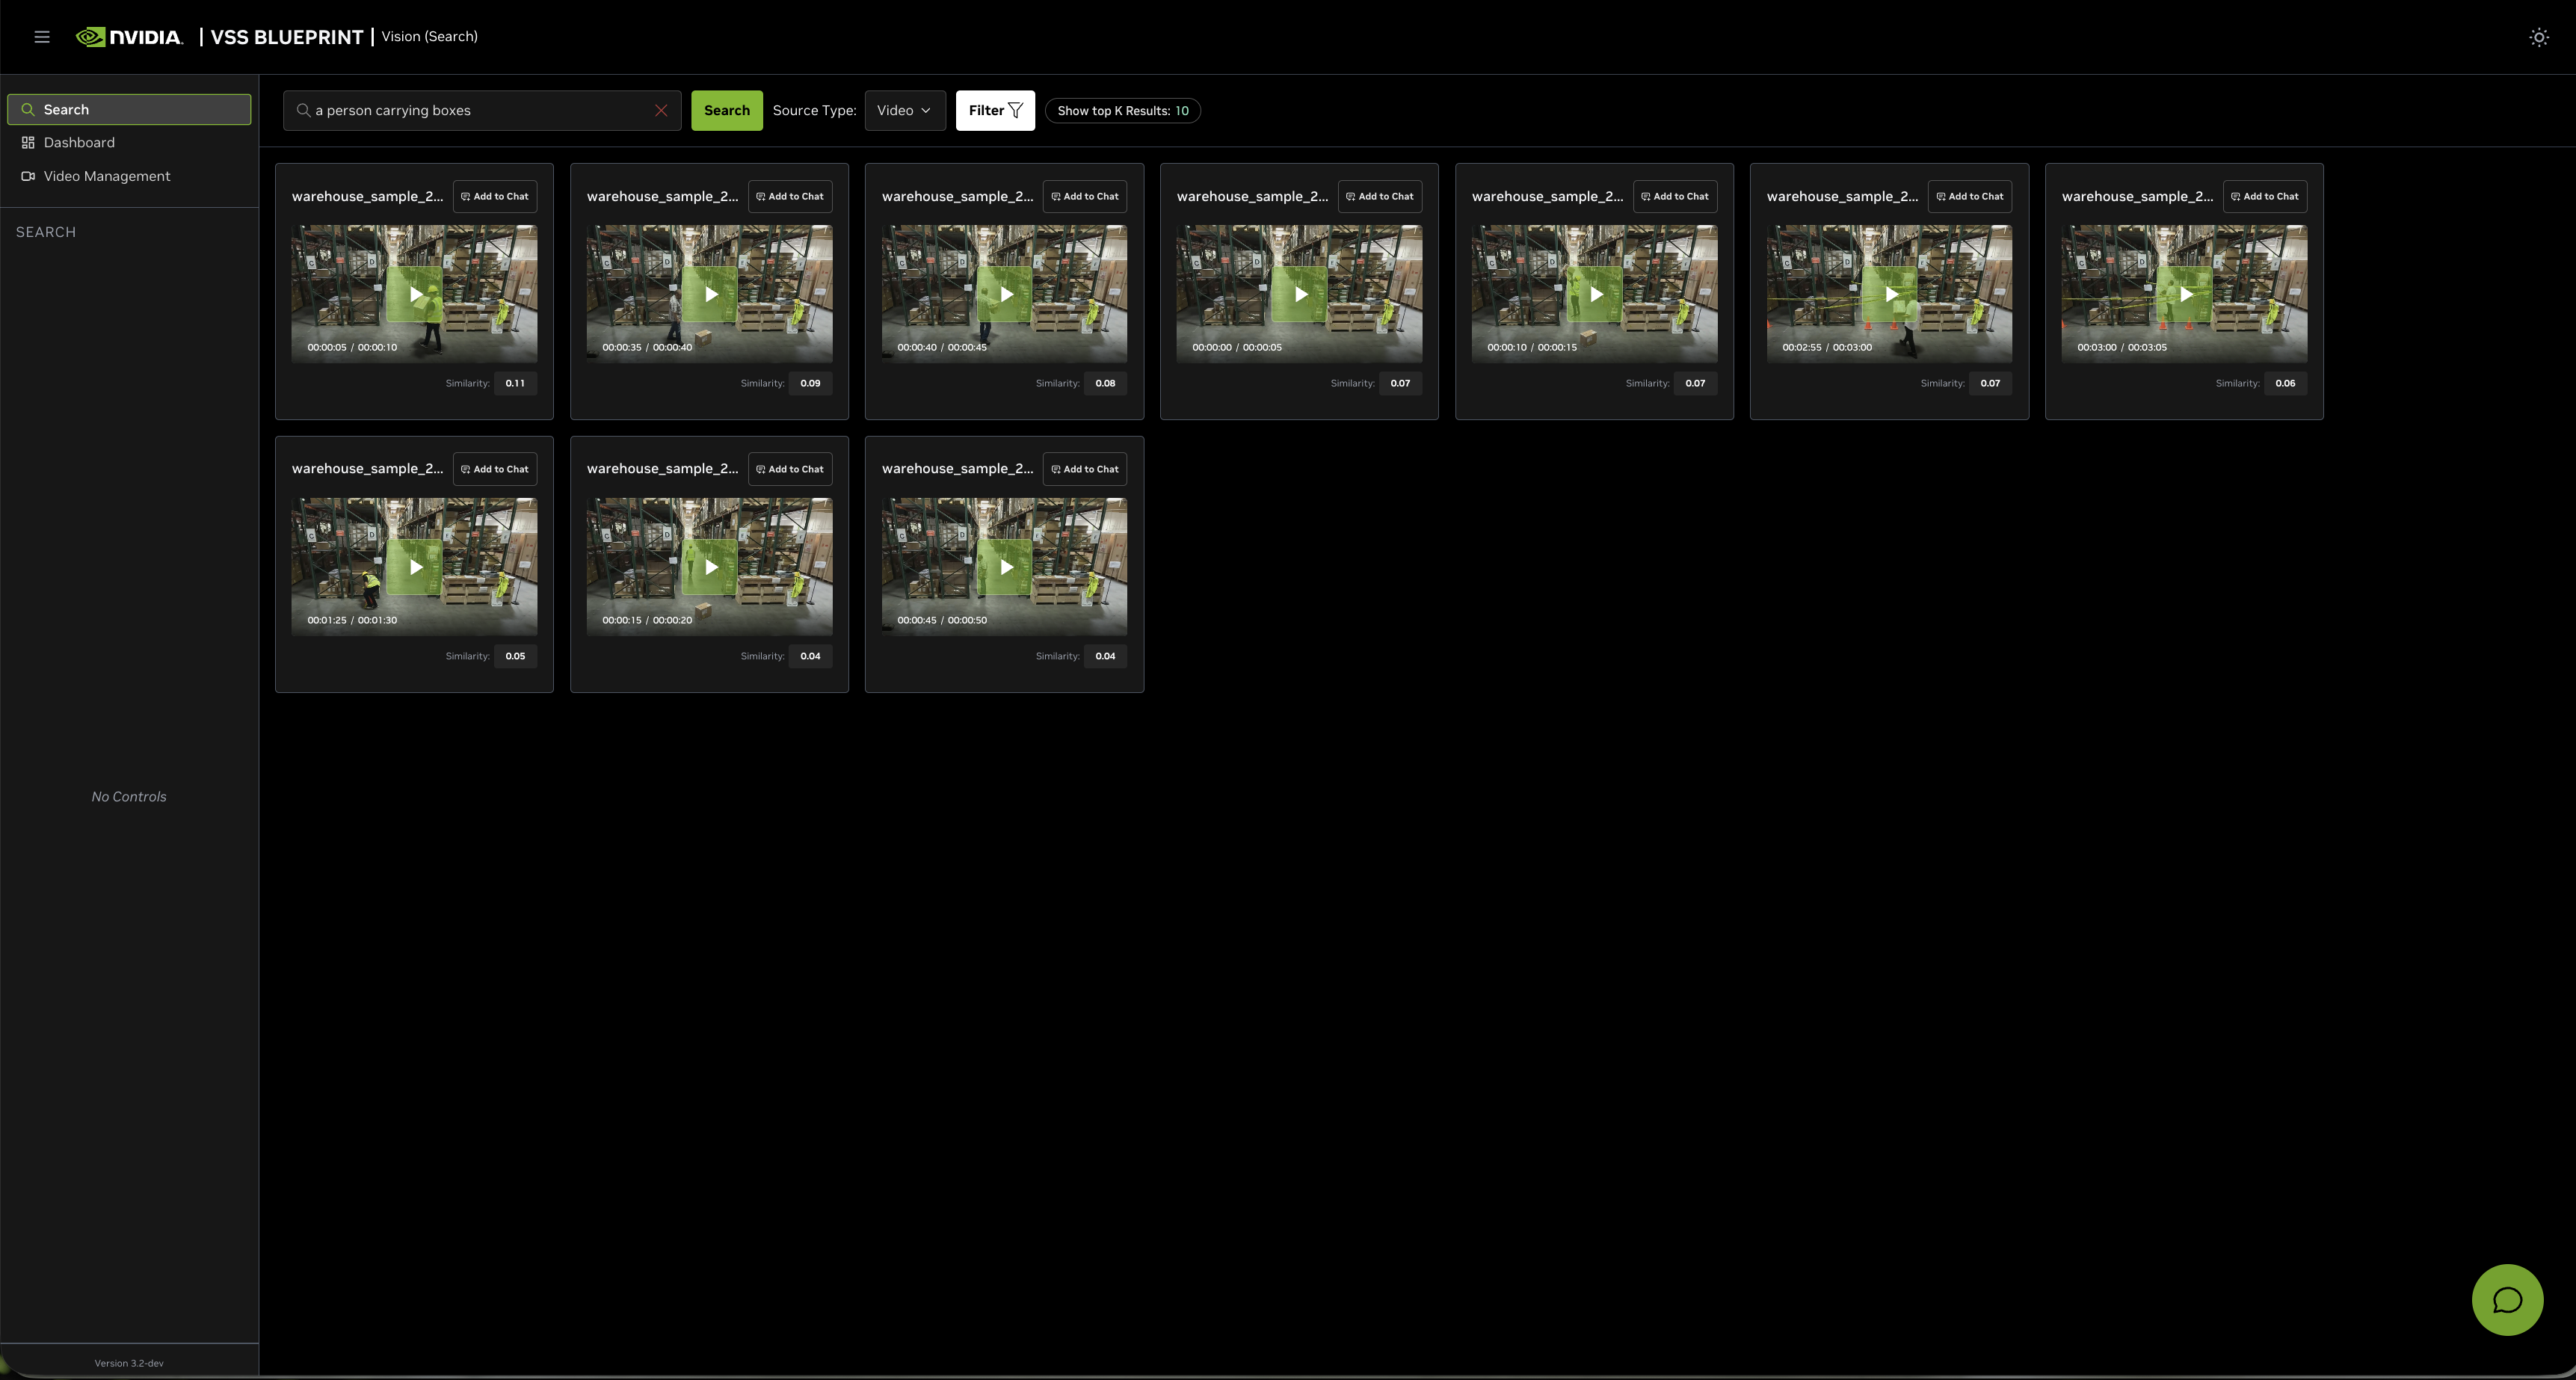
Note
By default, the Show top K Results filter is applied to display the top 10 results. This value can be changed in the filters to show more or fewer results.
Step 4: Search with additional filters#
To try additional filters, upload the video file sample-warehouse-ladder.mp4 (following the steps in Step 2: Upload a video).
Navigate to the Search tab to find the following options:
Source Type: Select the type of media source to search within. Choose between ‘Video’ and ‘RTSP’.
- Click the Filter button to open the filter panel with the following options:
From: Filter results by the start date and time of the video clips
To: Filter results by the start date and time of the video clips
Video sources: Select specific videos to search within
Min Cosine Similarity: Set a minimum similarity threshold (-1.00 to 1.00) to filter results based on how closely they match your query. Set a lower threshold for broader results, or raise it for high-confidence matches. Optimal values vary depending on the video content.
Show top K Results: Set the maximum number of results to display
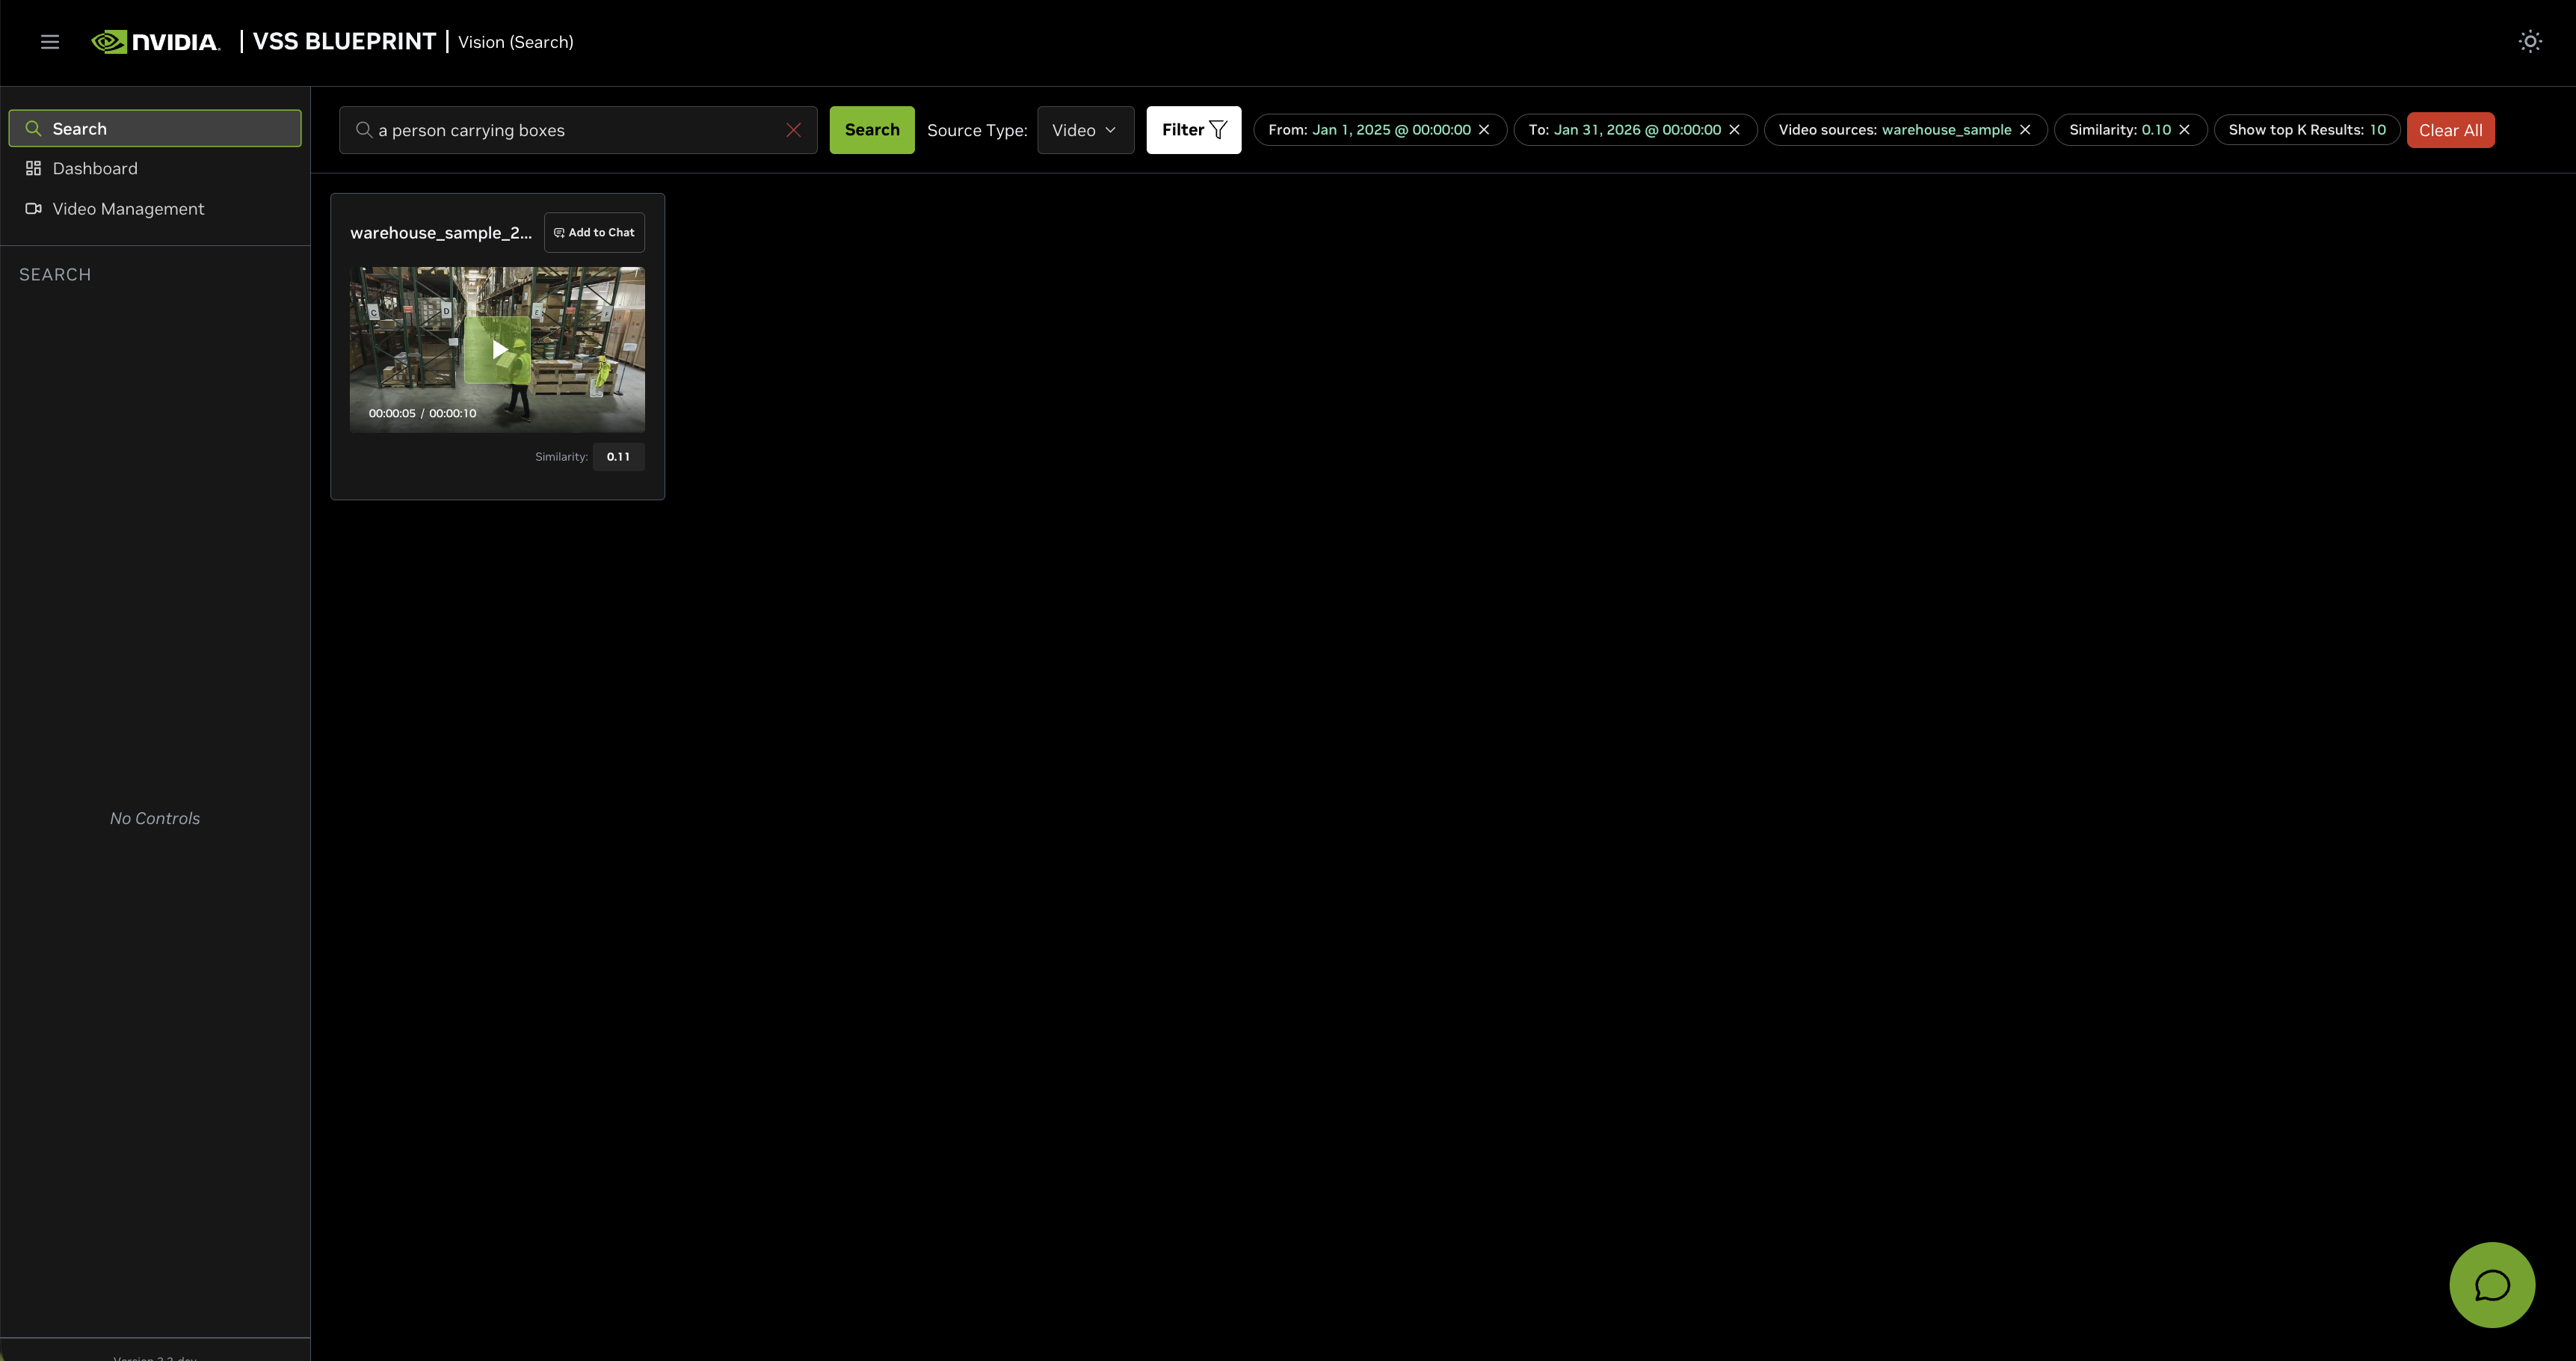
Enter your search query in the Search box, configure the desired filters, and click Apply.
The Search text box uses the direct search API. It applies explicit filters from the UI and uses embedding search for the query text. Use the Vision Agent chat interface when you want automatic query decomposition, attribute search, fusion search, Search by Image, and/or critic verification.
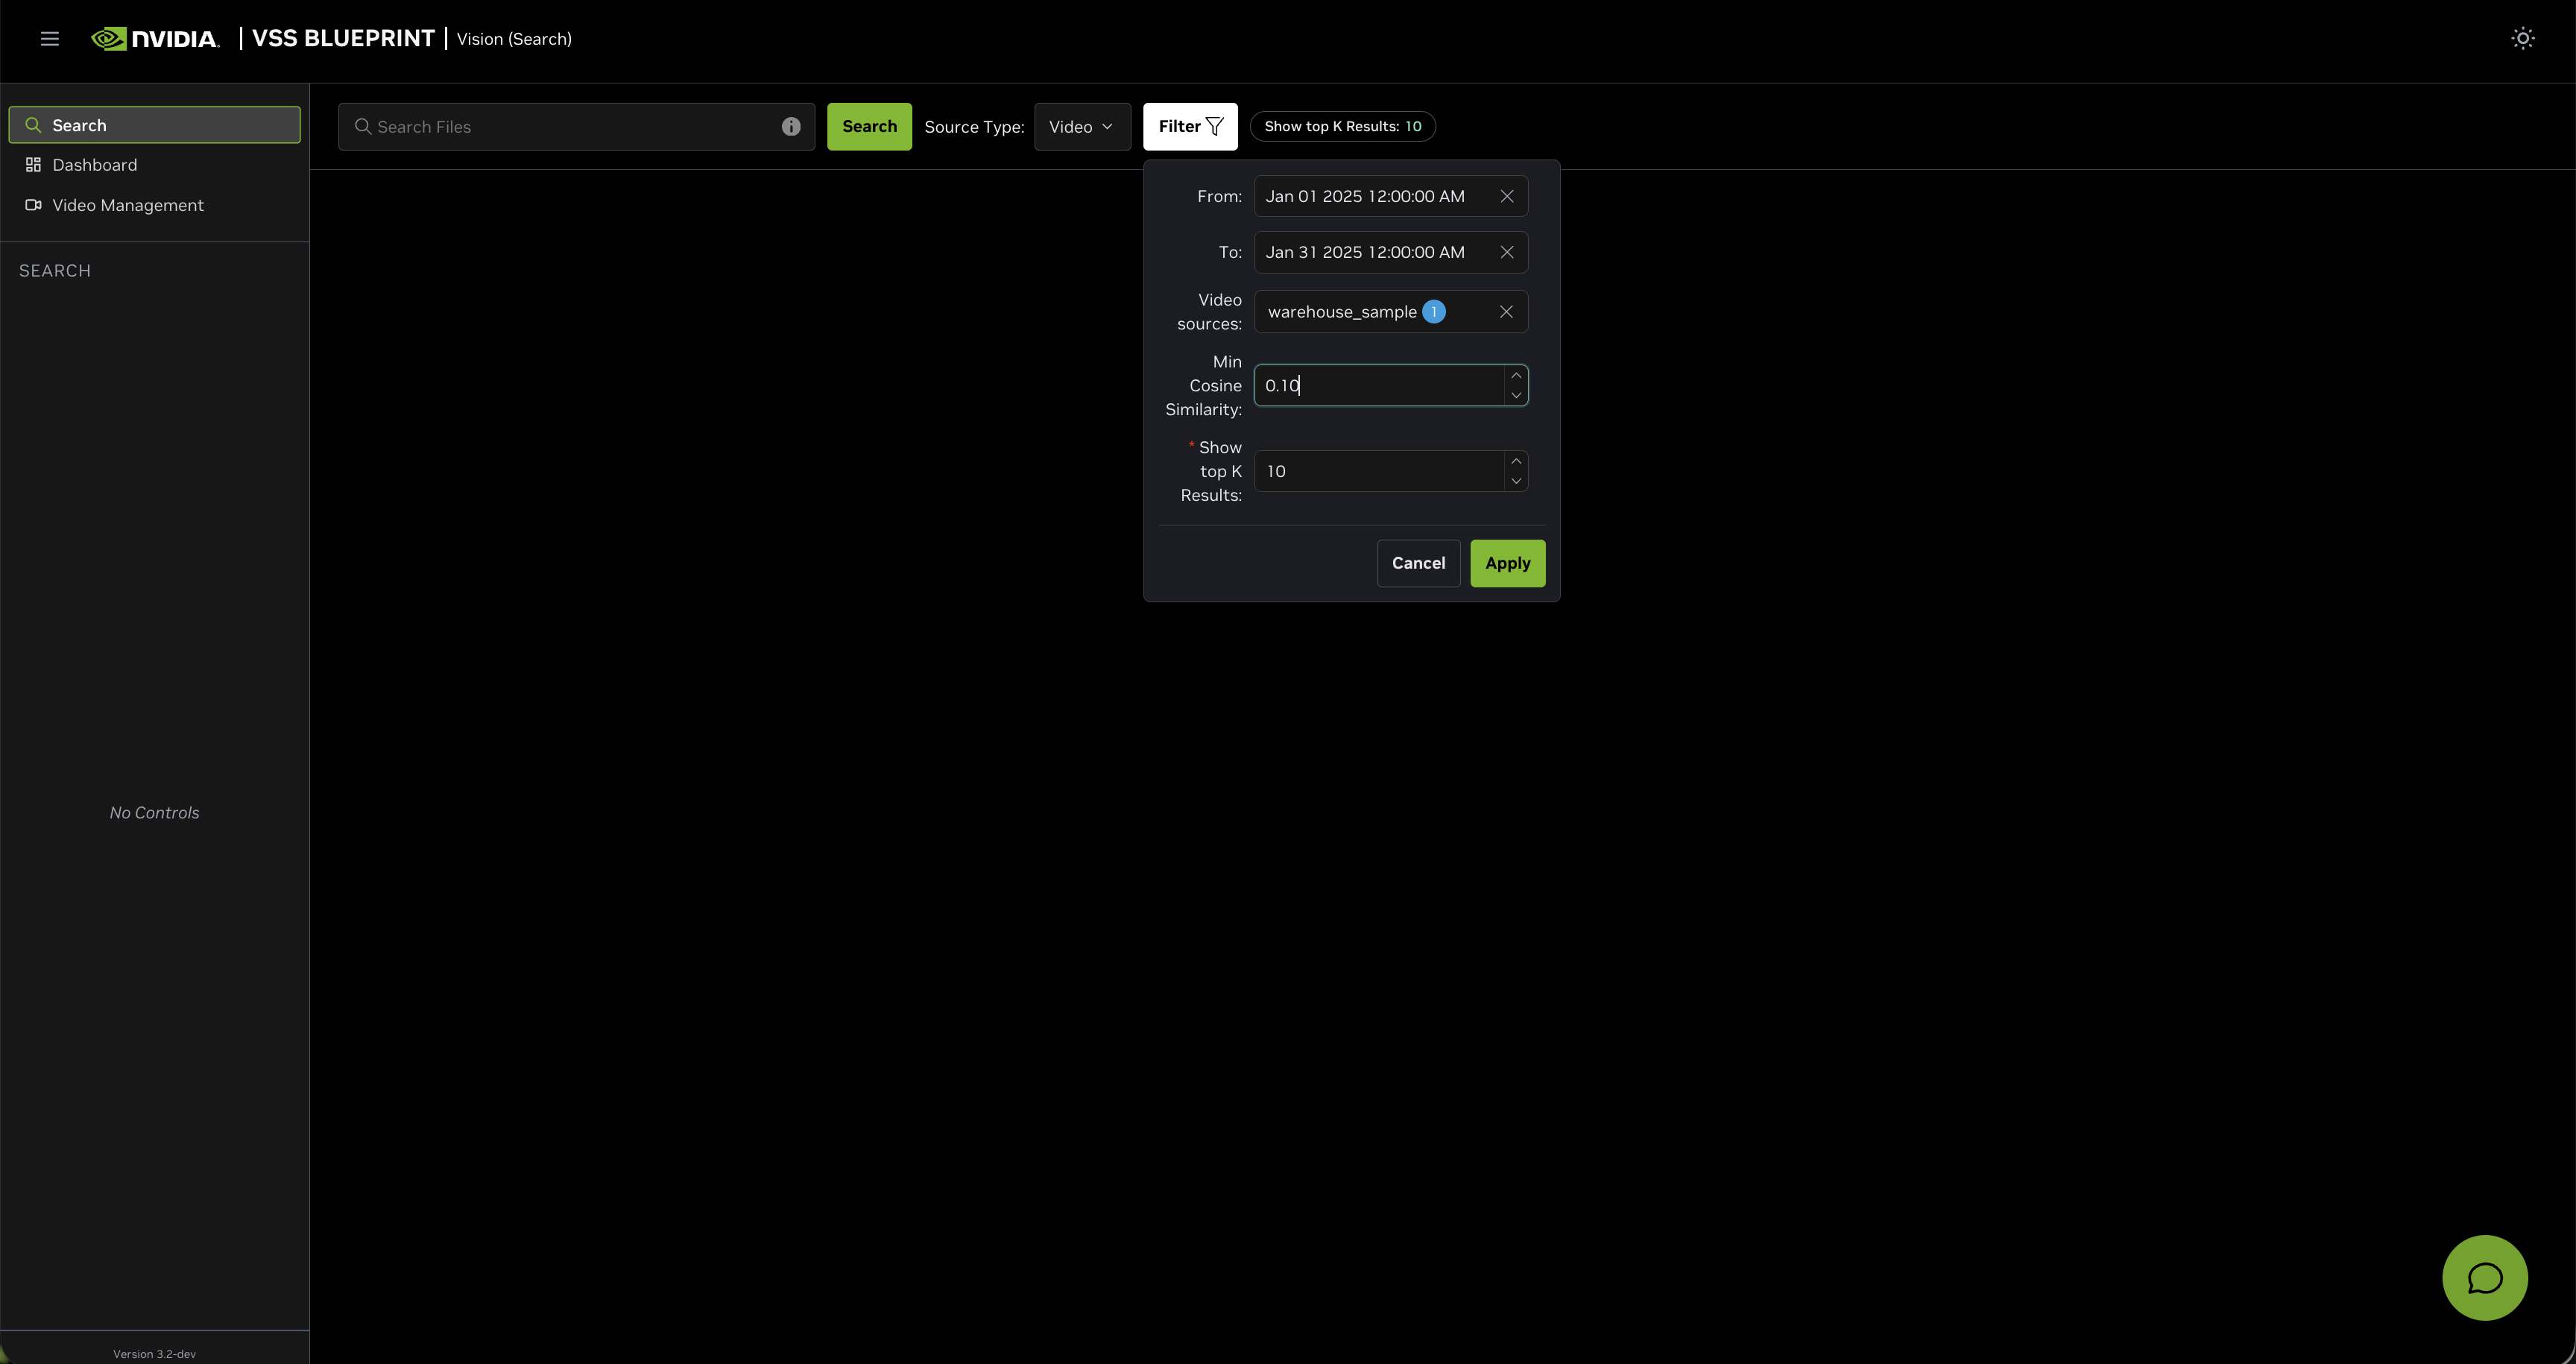
For example, in the filter panel above:
Set From and To timestamps to filter results within a specific time range
Select specific Video sources to search within particular videos
Set Min Cosine Similarity to
0.2to only show results with a similarity score of 0.2 or higherSet Show top K Results to
5to display maximum of top 5 results
After configuring the filters, the search results will be refined based on the applied criteria:
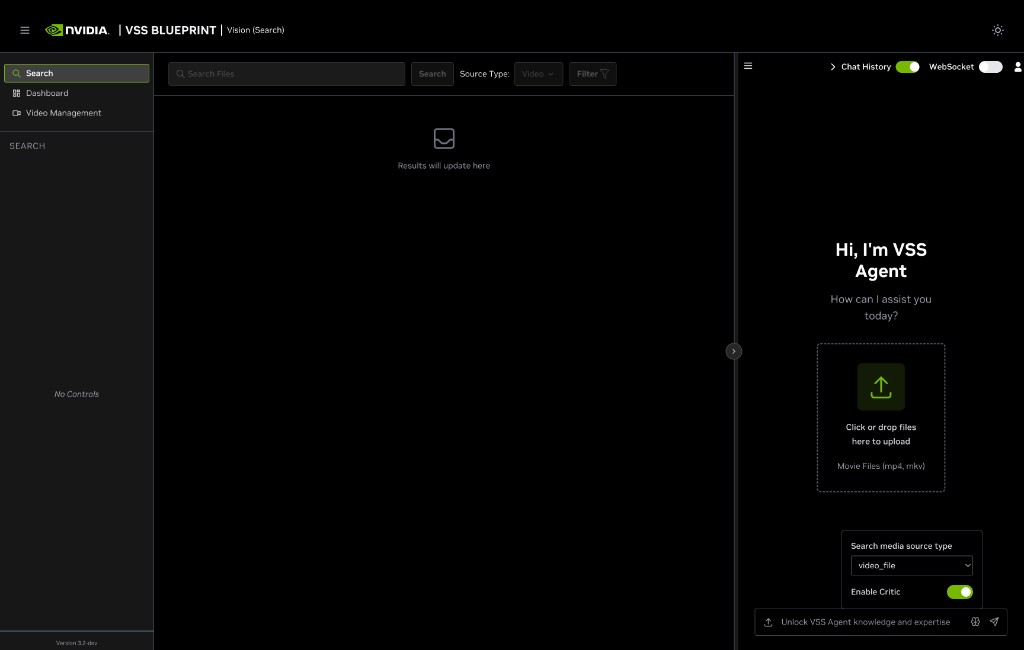
Step 5: Vision Agent Chat#
The Search tab includes a Vision Agent chat interface on the right side that provides an interactive way to search through videos using natural language. The Vision Agent automatically selects the best search method based on your query. You can also specify filters directly within your query instead of using the filter panel.
Using the Chat Interface#
Navigate to the Search tab.
Open the Chat panel on the right side of the screen.
Open the chat settings popover next to the chat input and configure:
Search media source type: Select from the dropdown (for example,
video_fileorrtsp) to specify which source index to search.Enable Critic: Toggle the critic agent on or off for this query. The toggle is on by default; turn it off to skip VLM verification of the results for this request (e.g., for faster responses or when exploring broad results).
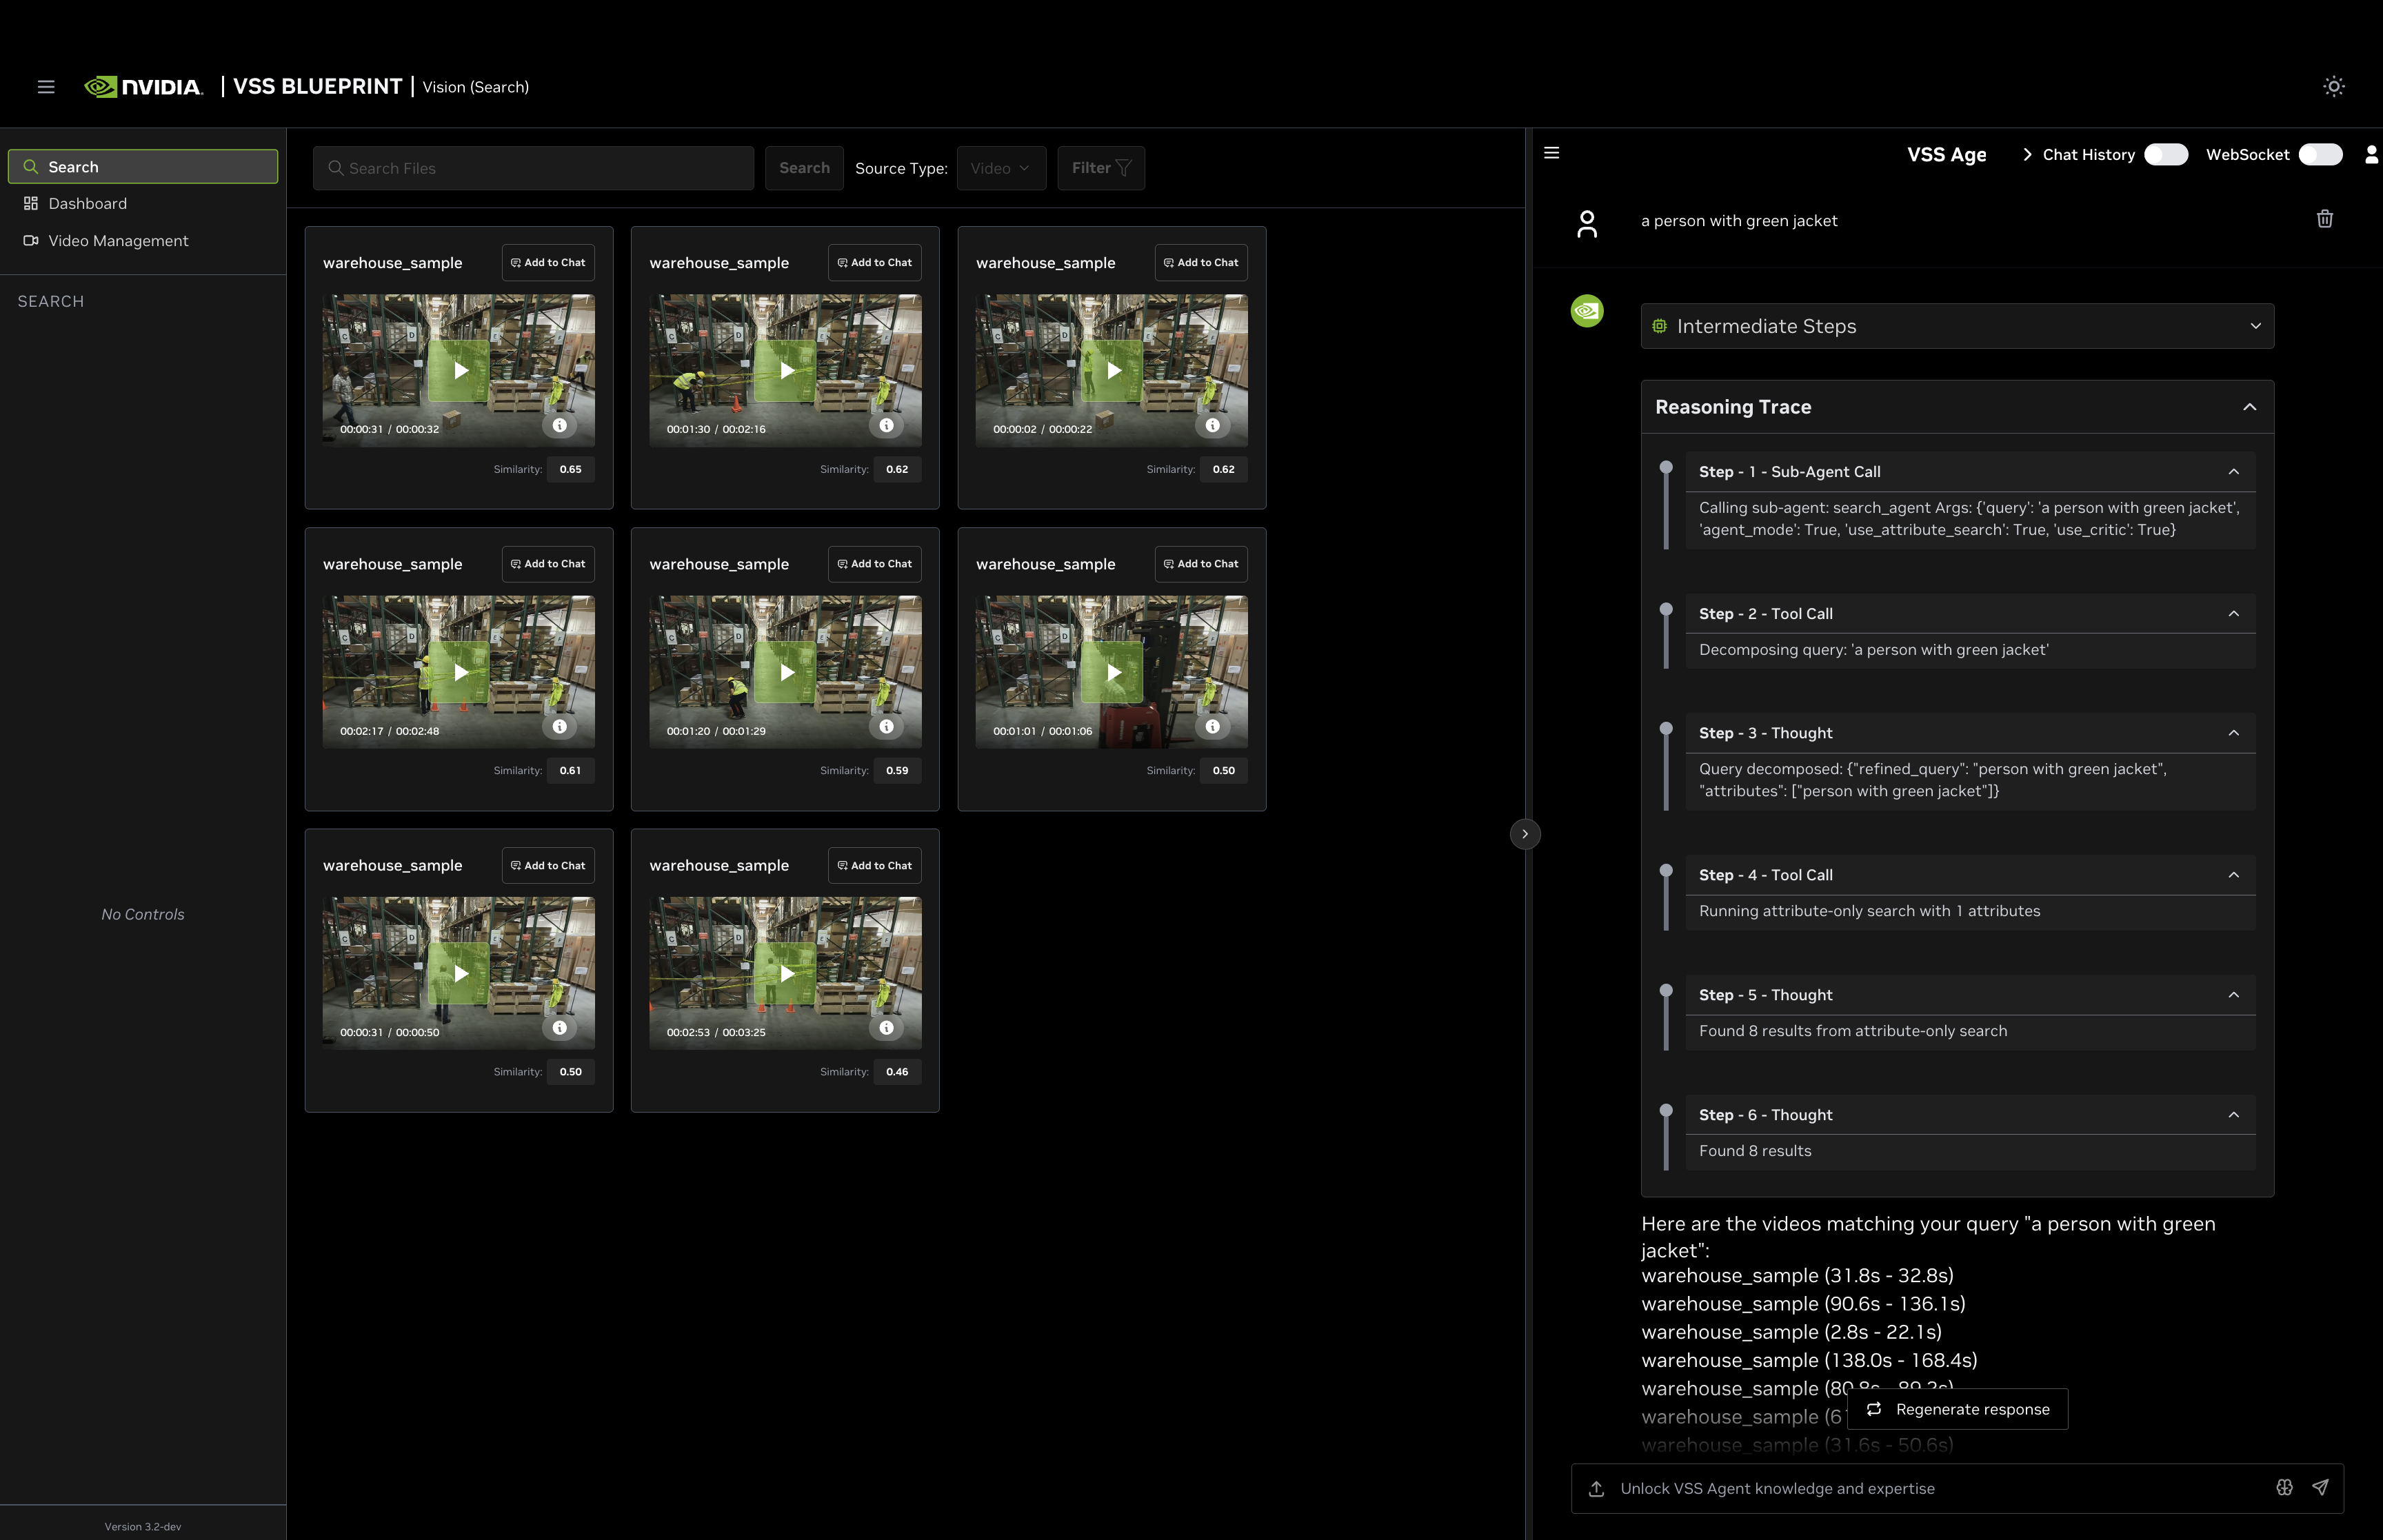
Enter a natural language query in the chat input at the bottom (e.g.,
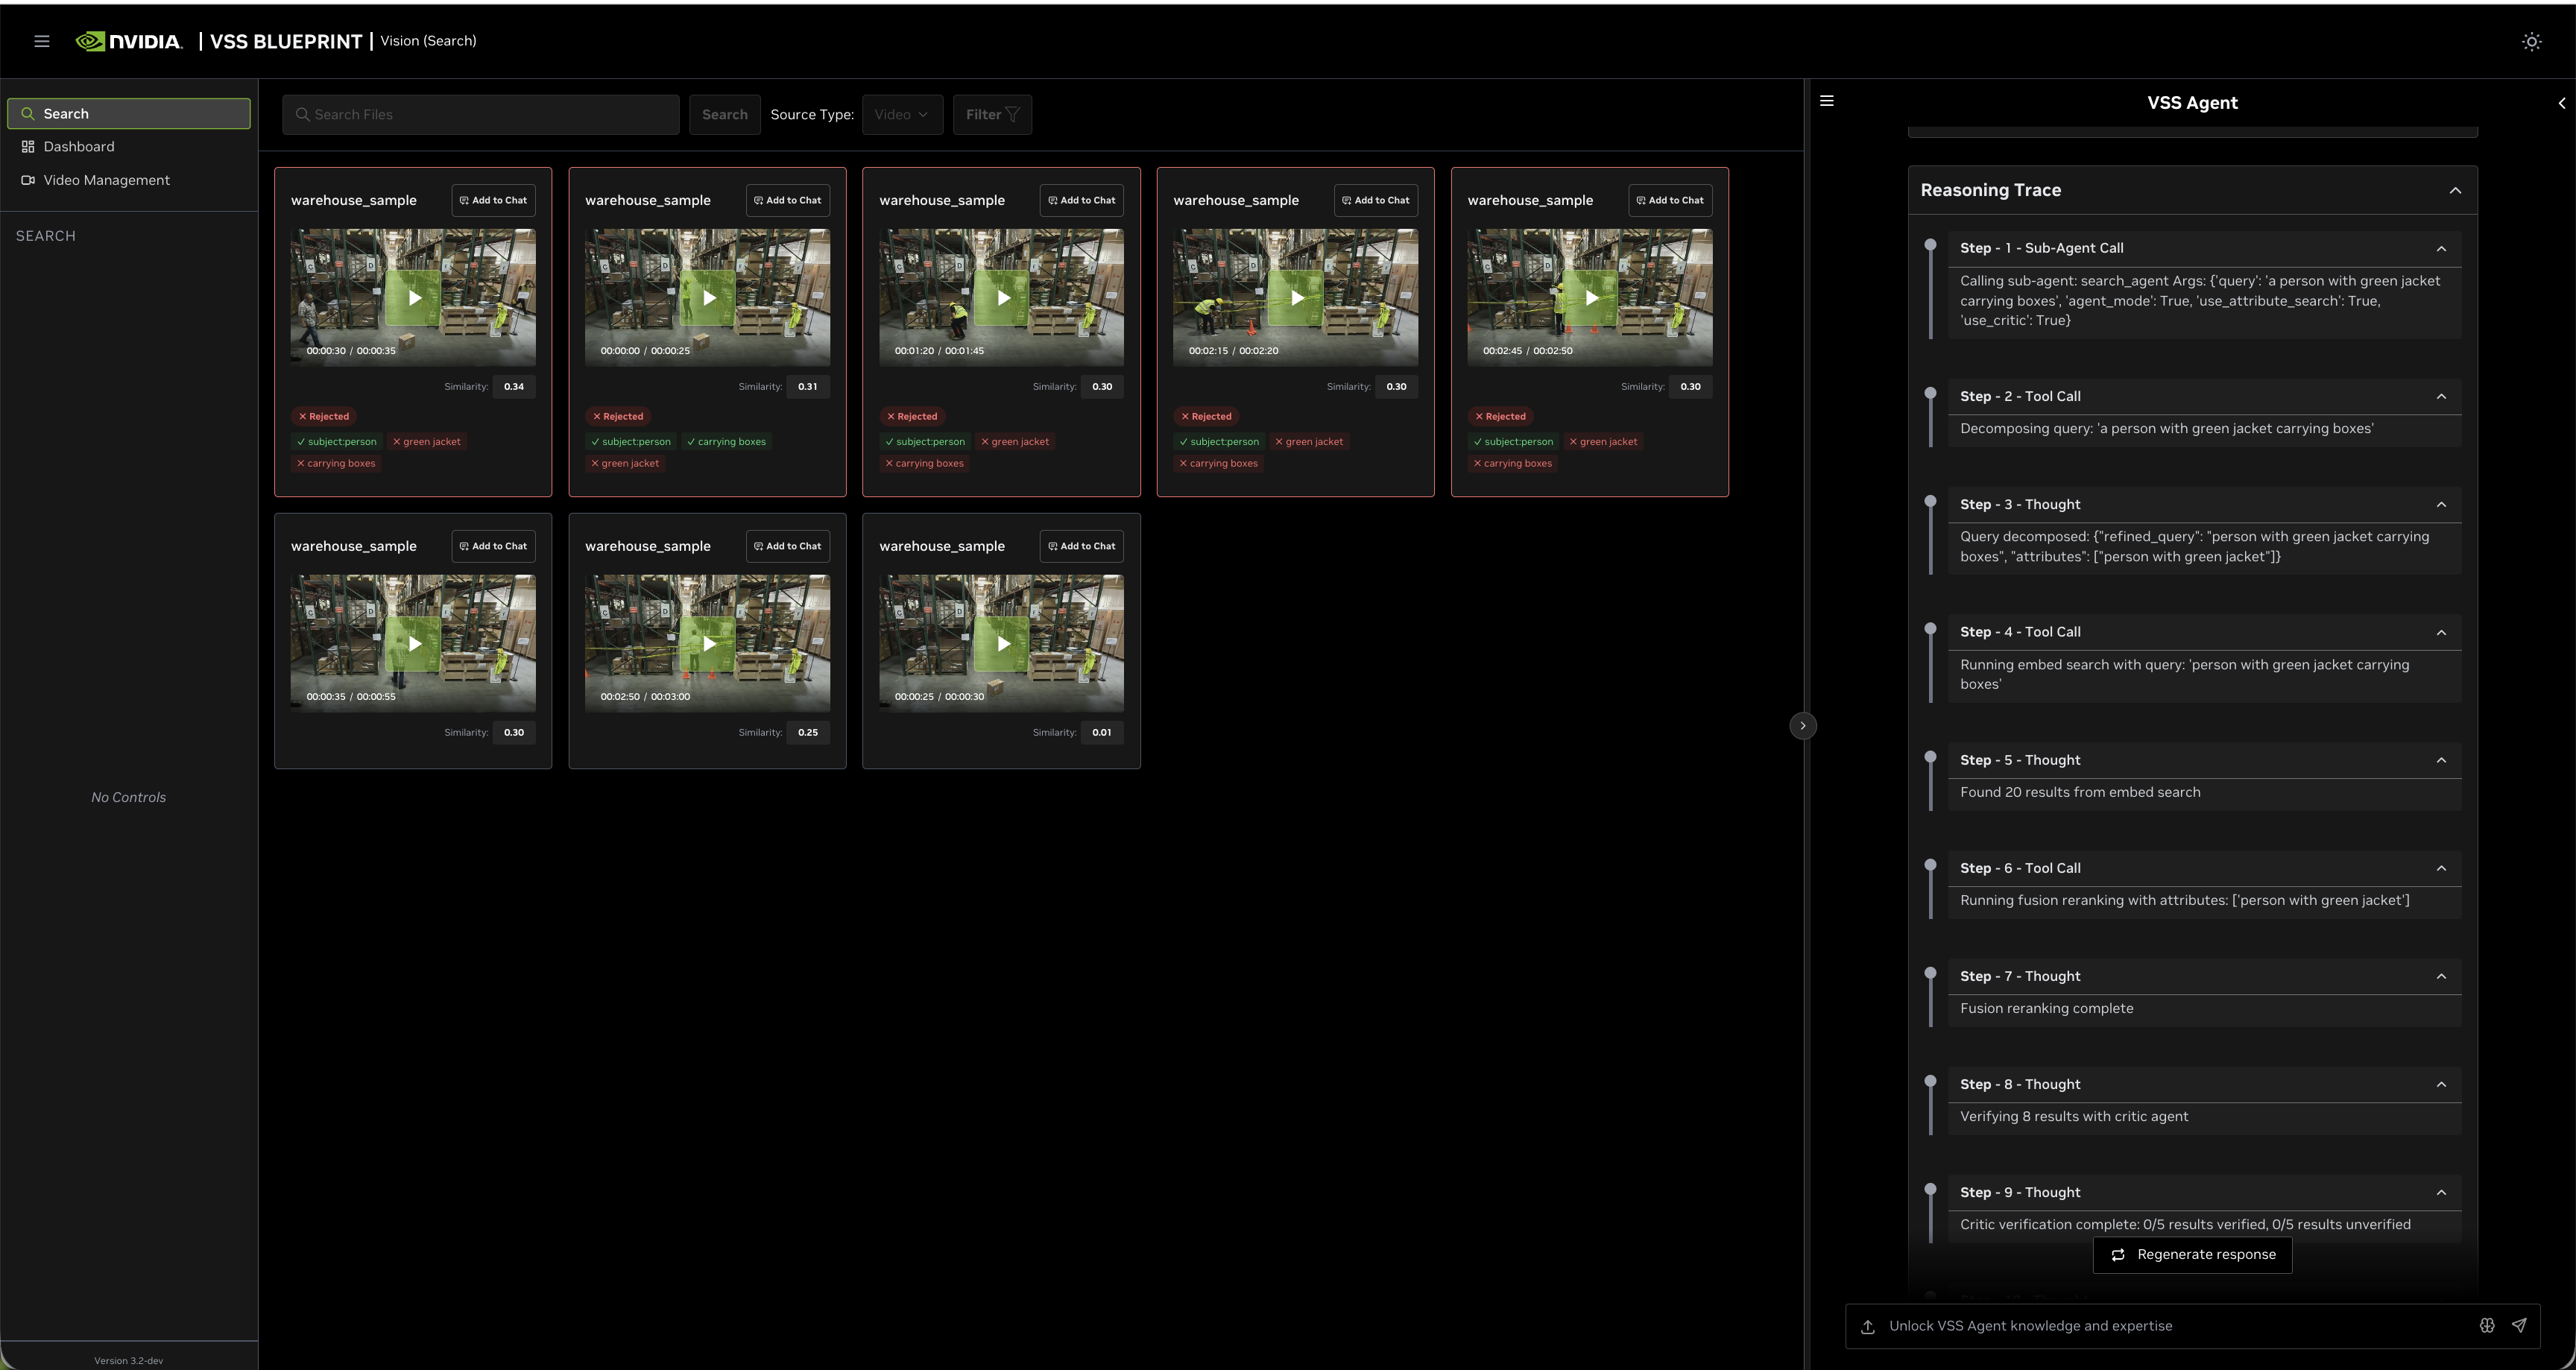
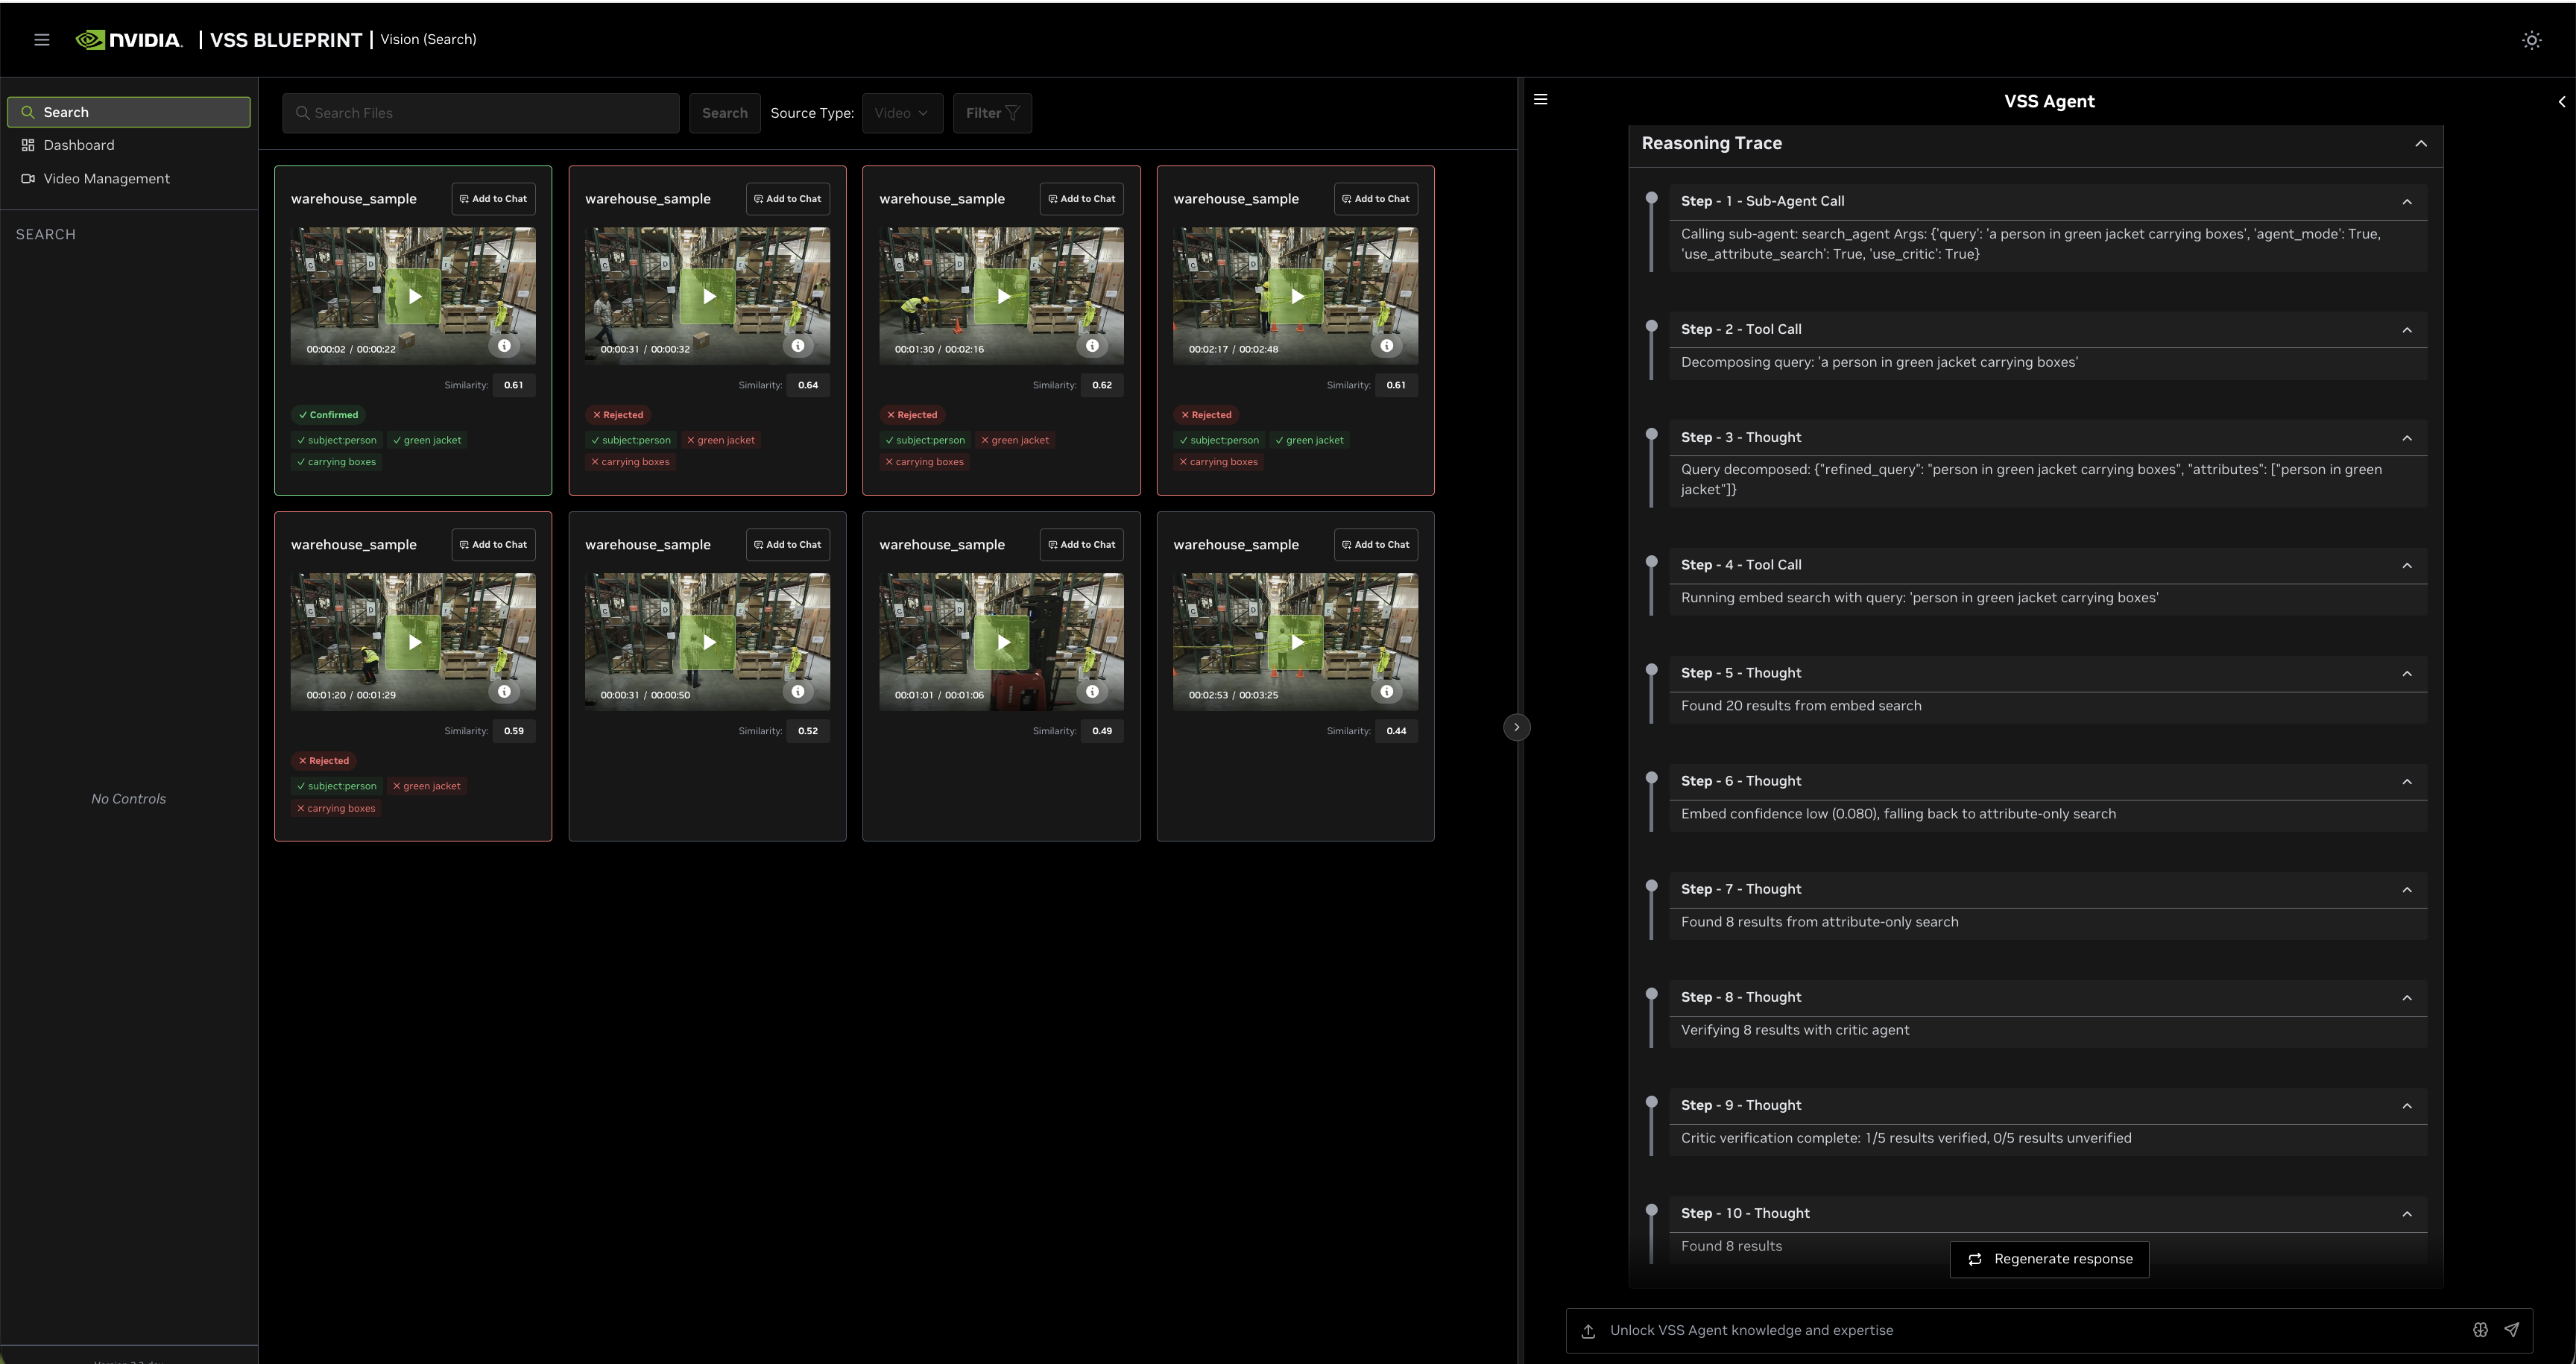
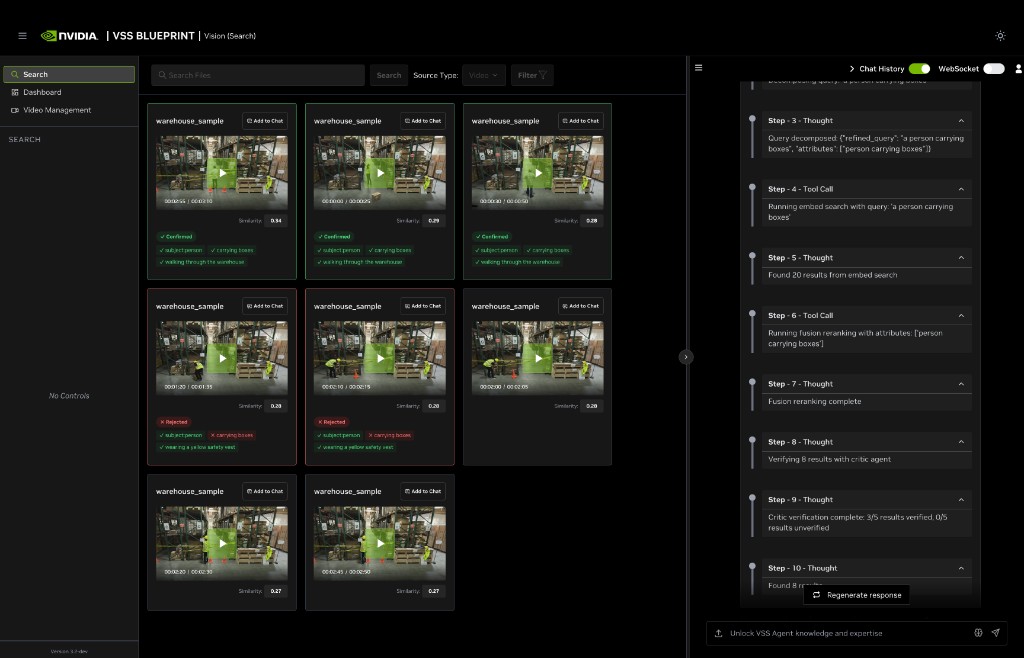
a person with green jacket).Press Enter or click the send button to submit your query.
Result Returned by the Agent#
The Vision Agent processes your query, selects the best search method (Embed, Attribute, Fusion, or Search by Image), and returns matching video clips in the left panel.
Each response in the chat window includes:
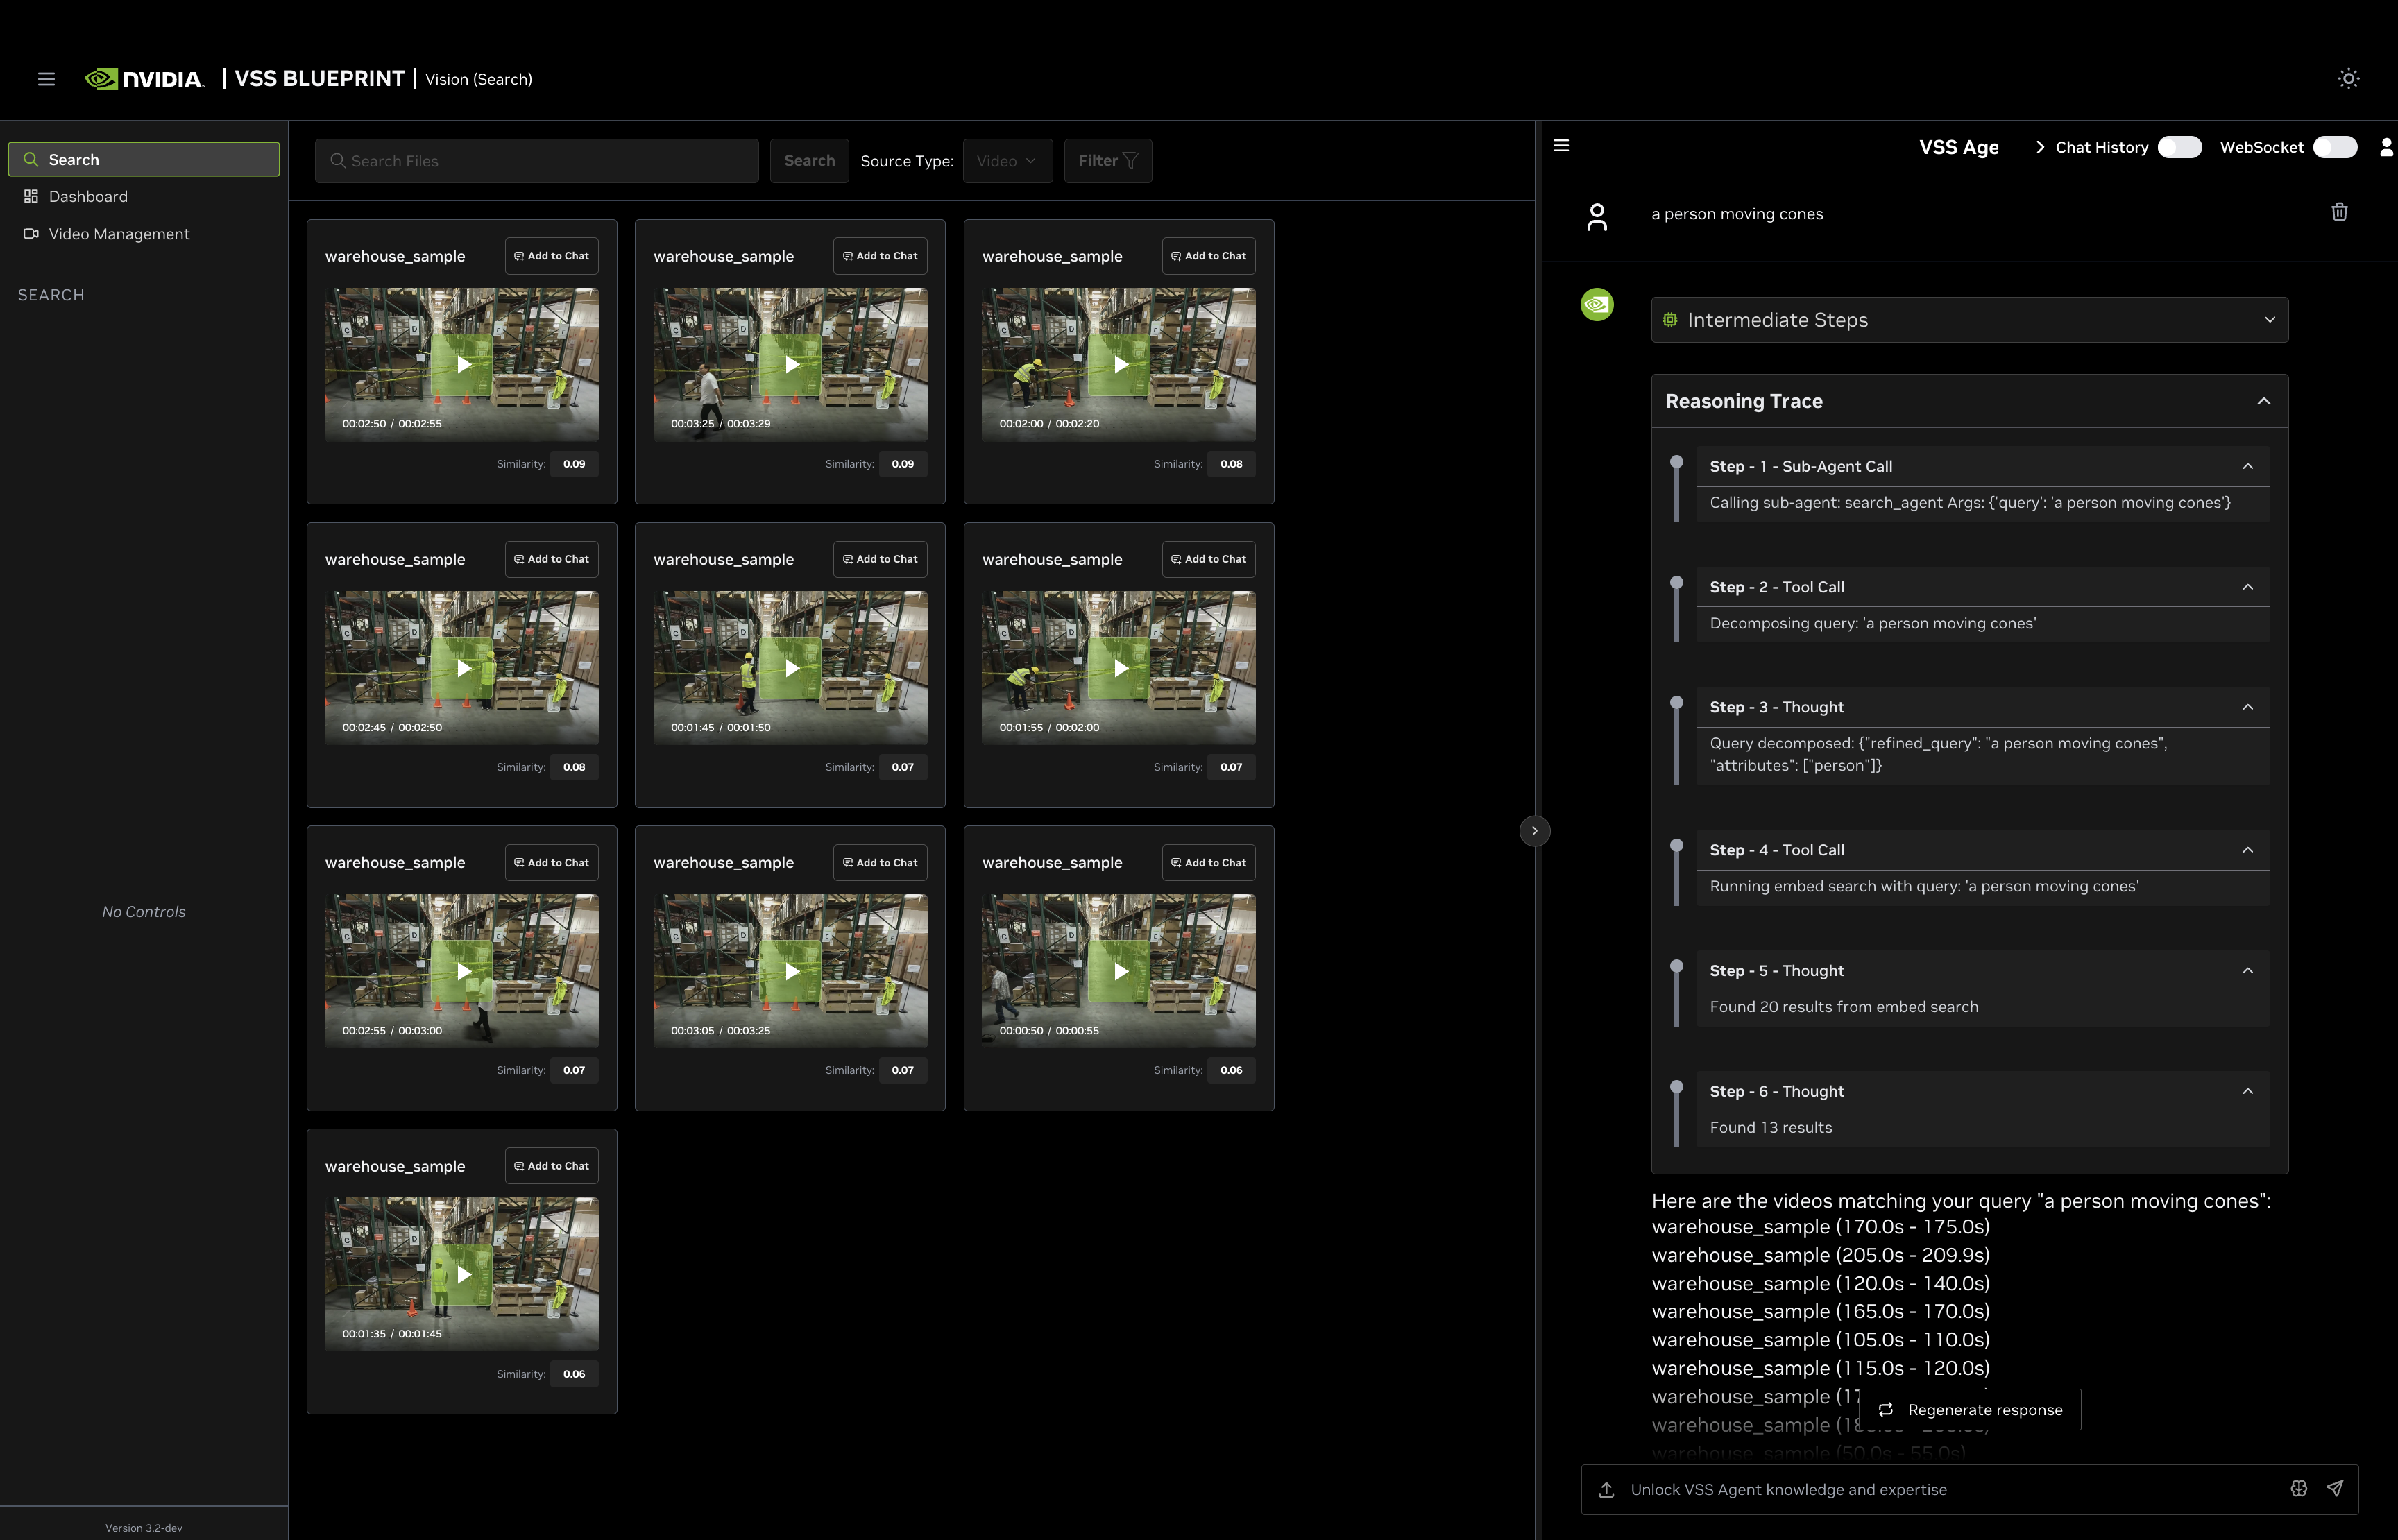
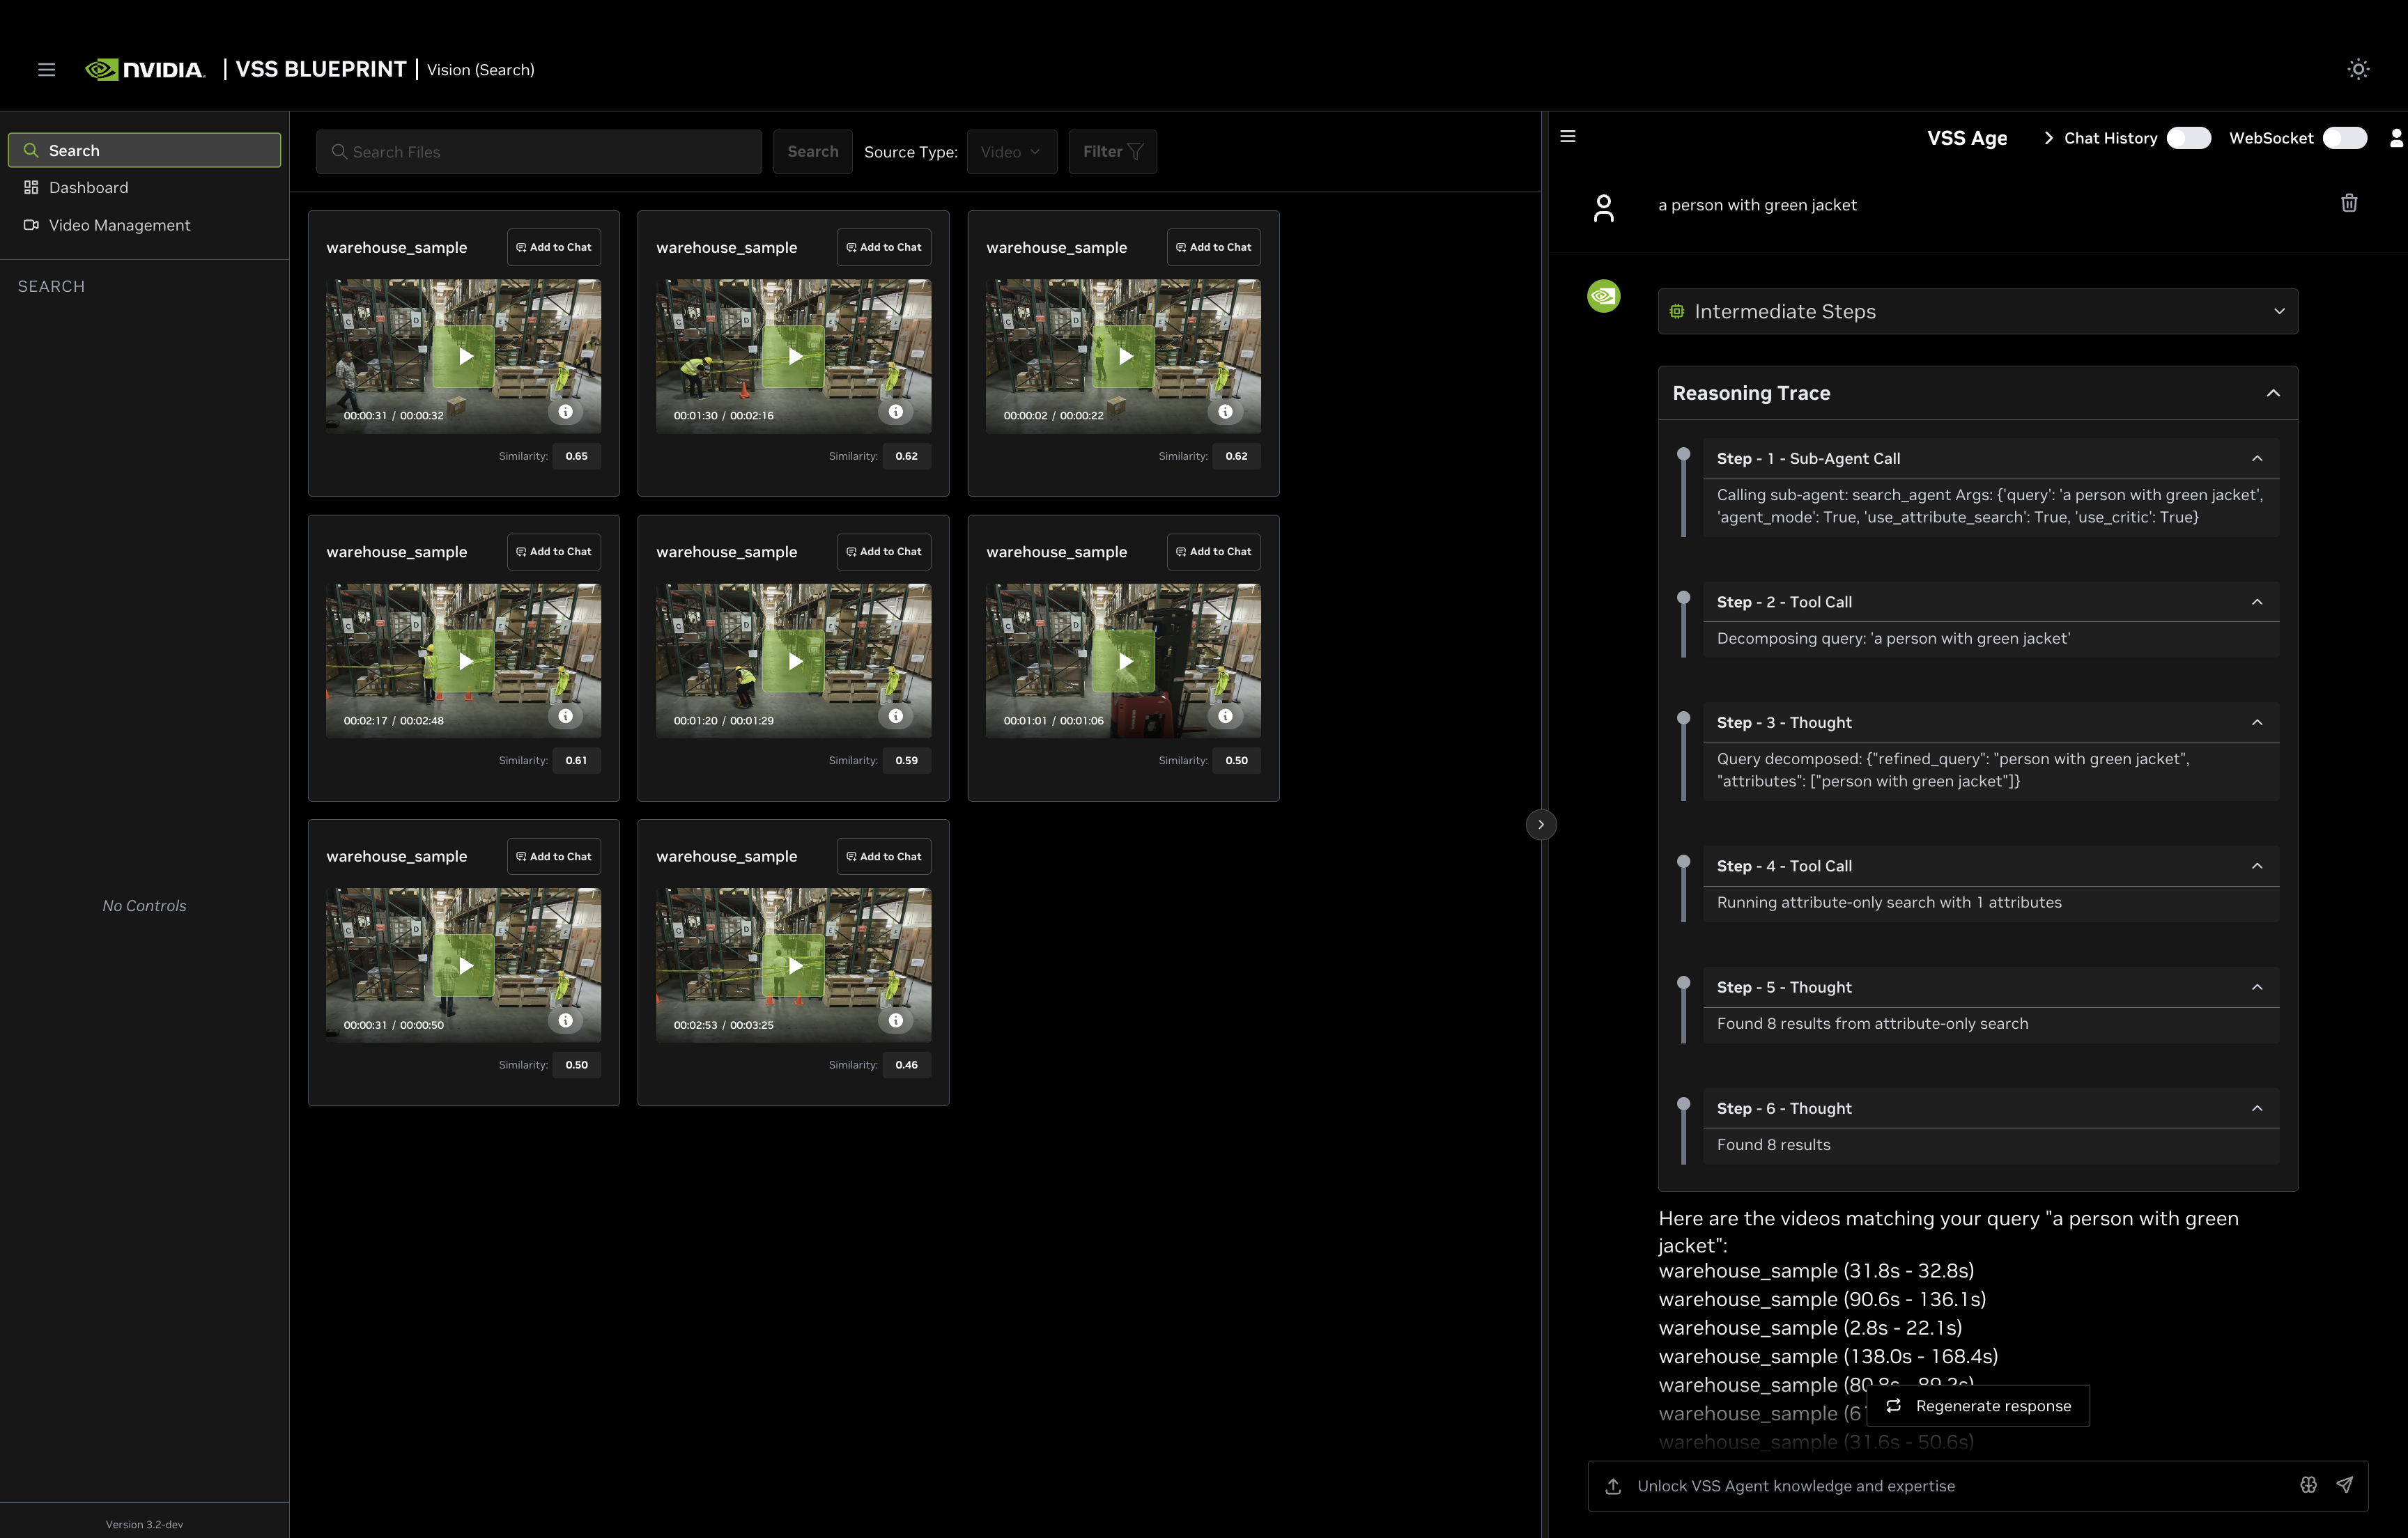
Intermediate Steps — Expandable section showing the sequence of function calls and tool invocations the agent makes to process your query.
Reasoning Trace — Step-by-step breakdown of the agent’s decision-making: query decomposition, search method selection, and result summary. Expand each step for full details.
Search Results Summary — Number of matching videos found (e.g., “Found 10 matching videos”).
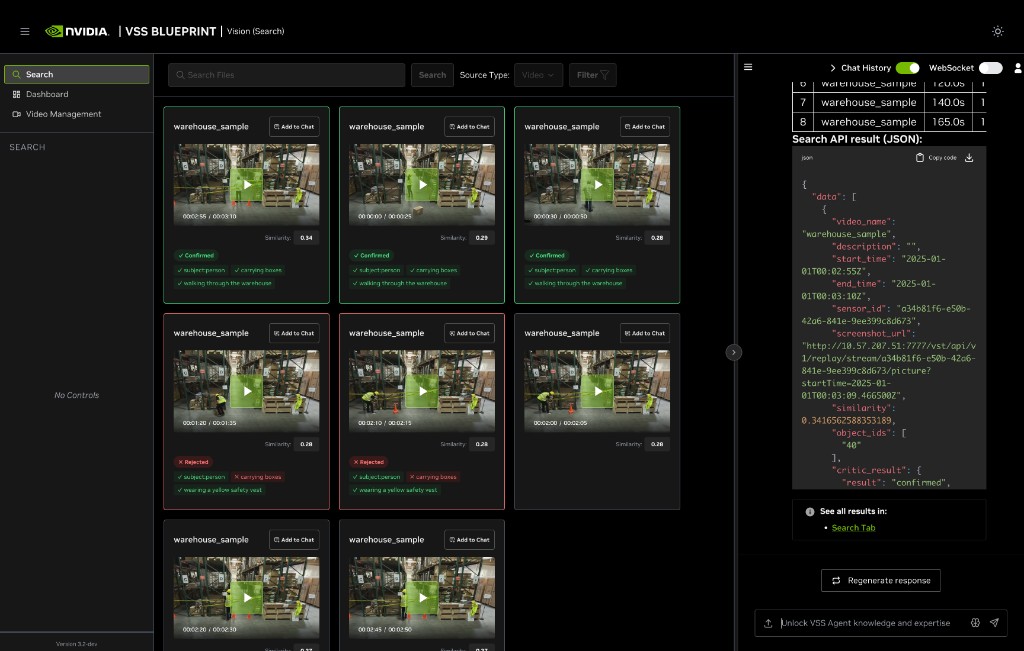
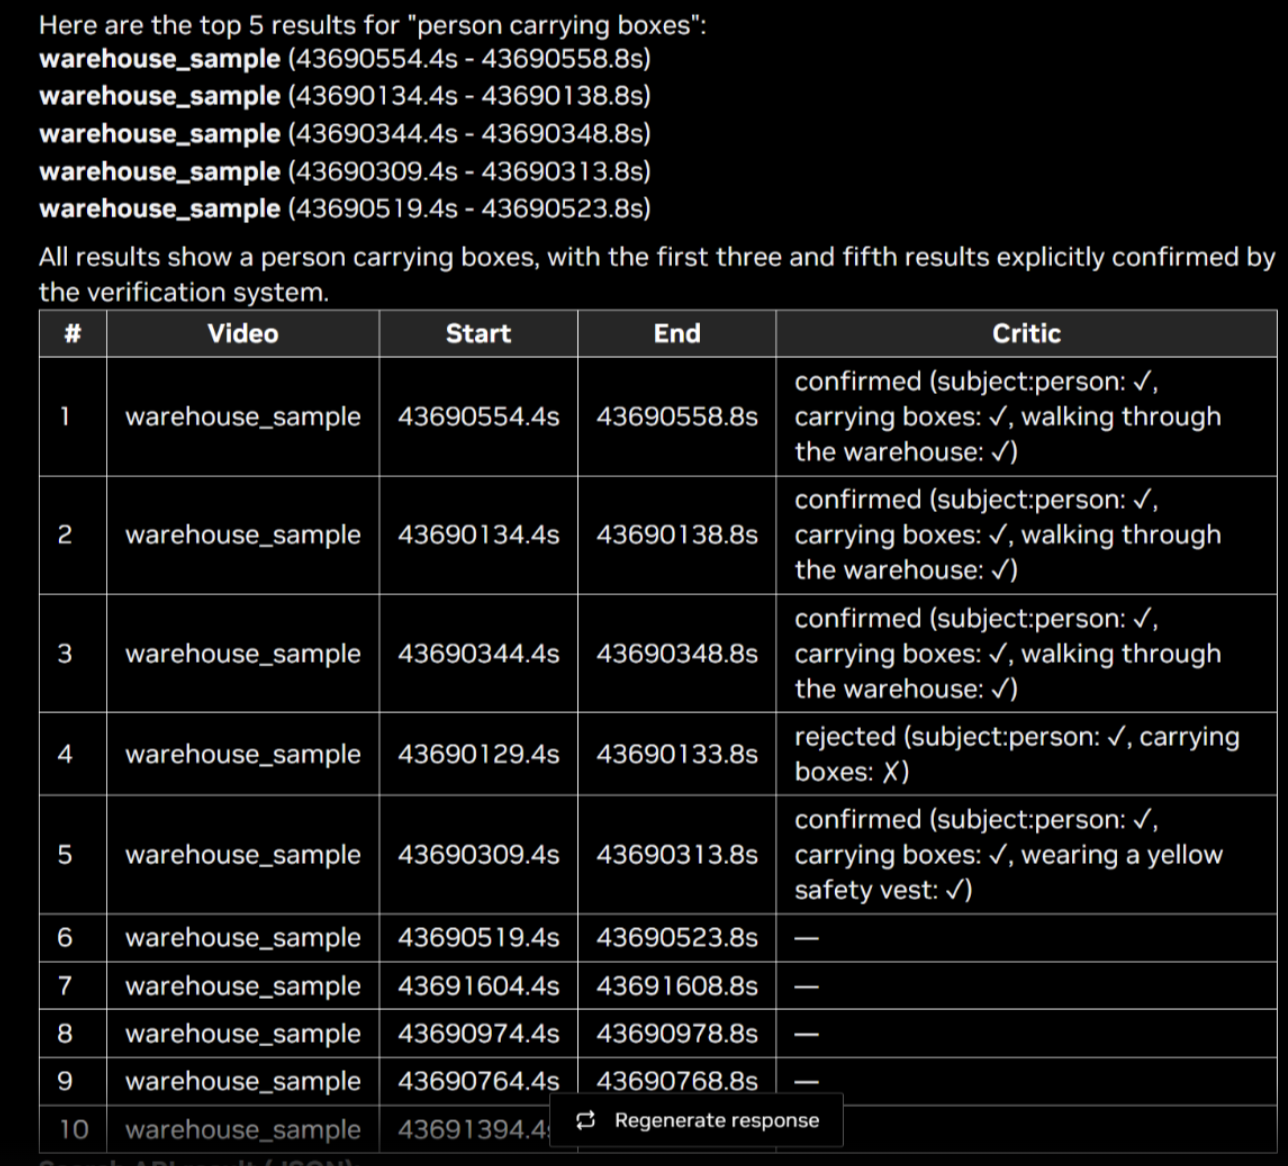
Search API result (JSON) — Raw JSON response with detailed metadata for each result:
video_name: Name of the source videodescription: Match descriptionstart_time/end_time: Clip timestamps in ISO 8601 formatsimilarity: Cosine similarity scoresensor_id: Source sensor identifierscreenshot_url: URL to the clip thumbnailobject_ids: Detected object identifierscritic_result(only present when the critic agent is enabled for the request): Verification details for the clip:result:"confirmed"or"rejected".criteria_met: A map of each criterion extracted from the query to a boolean indicating whether the clip satisfies it (e.g.,{"subject:person": true, "carrying boxes": false, "wearing a yellow safety vest": true}).
Download — Download the JSON response as a file.
Regenerate response — Re-run the query for updated results.
Note
The Vision Agent chat interface in the Search tab only supports searching for events, actions, and object attributes in videos and RTSP streams.
Reasoning Trace
The Reasoning Trace section provides a step-by-step breakdown of the agent’s internal decision-making process. You can see which search method was used and how the agent interpreted your query by expanding the Reasoning Trace in the chat response.
It shows:
Sub-Agent Call — The initial call to the
search_agentwith parameters such asagent_mode,use_attribute_search, and the user query.Tool Call — Query decomposition and search execution steps, such as running embed search, attribute-only search, fusion reranking, Search by Image, or critic verification.
Thought — The agent’s interpretation and progress, including the refined query, extracted attributes, selected time/source filters, image-search context, result counts, fallback decisions, and critic status.
Understanding Search Types in Agent Chat
Follow up questions related to the search results (e.g., What are the durations of the top 5 results?) can also be asked in the chat interface.
The Vision Agent uses four search methods to find relevant video clips and objects. It automatically selects the best method based on the decomposed query:
- Embed Search
Searches for events, actions, and activities in videos (e.g., “carrying boxes”, “walking”, “driving”)
Uses semantic embeddings to understand the context and meaning of actions
Used for queries that describe what is happening in the video
Note: Searching from input text box will only perform embed search.
- Attribute Search
Searches for visual descriptors and object attributes (e.g., “person with green jacket”, “person in a hard hat”)
Uses behavior embeddings to find specific visual characteristics
Used for queries that describe how objects or people look
Note: Results with the same object (same sensor_id and object_id) are automatically merged together, combining their time ranges into a single longer clip. Clips shorter than 1 second are extended to at least 1 second. This means attribute search results can have variable durations depending on how many times the same object appears in the top results.
Multiple Attributes: When multiple attributes are recognized in an attribute-only search, the system uses “append mode” - each attribute is searched independently with the requested top_k, and results from all attributes are combined.
- Fusion Search
Combines both Embed and Attribute search for queries that include both actions and visual descriptors
First finds relevant events using embed search, then reranks the embed results based on attributes to search for
Automatically falls back to attribute-only search if the embed search confidence is low
Used for complex queries like “a person with a green jacket carrying boxes”
Multiple Attributes in Fusion: When multiple attributes are recognized in fusion search, the system uses “fuse mode” - each attribute is searched with top_k=1 in the same video, and object IDs from all matching attributes are combined into a single result with one screenshot. This ensures that fusion results show objects that match all specified attributes together.
- Search by Image
Searches for objects visually similar to a selected object bounding box on a paused video frame
Fetches the selected object’s embedding from the behavior index and runs object-level KNN search
Bypasses embed search and fusion reranking
Used after the user pauses on a video clip from one of the search results (using one of the above search methods) and selects a bounding box on the paused video frame
Using Search by Image:
Click on one of the video clips in the search results and pause the video.
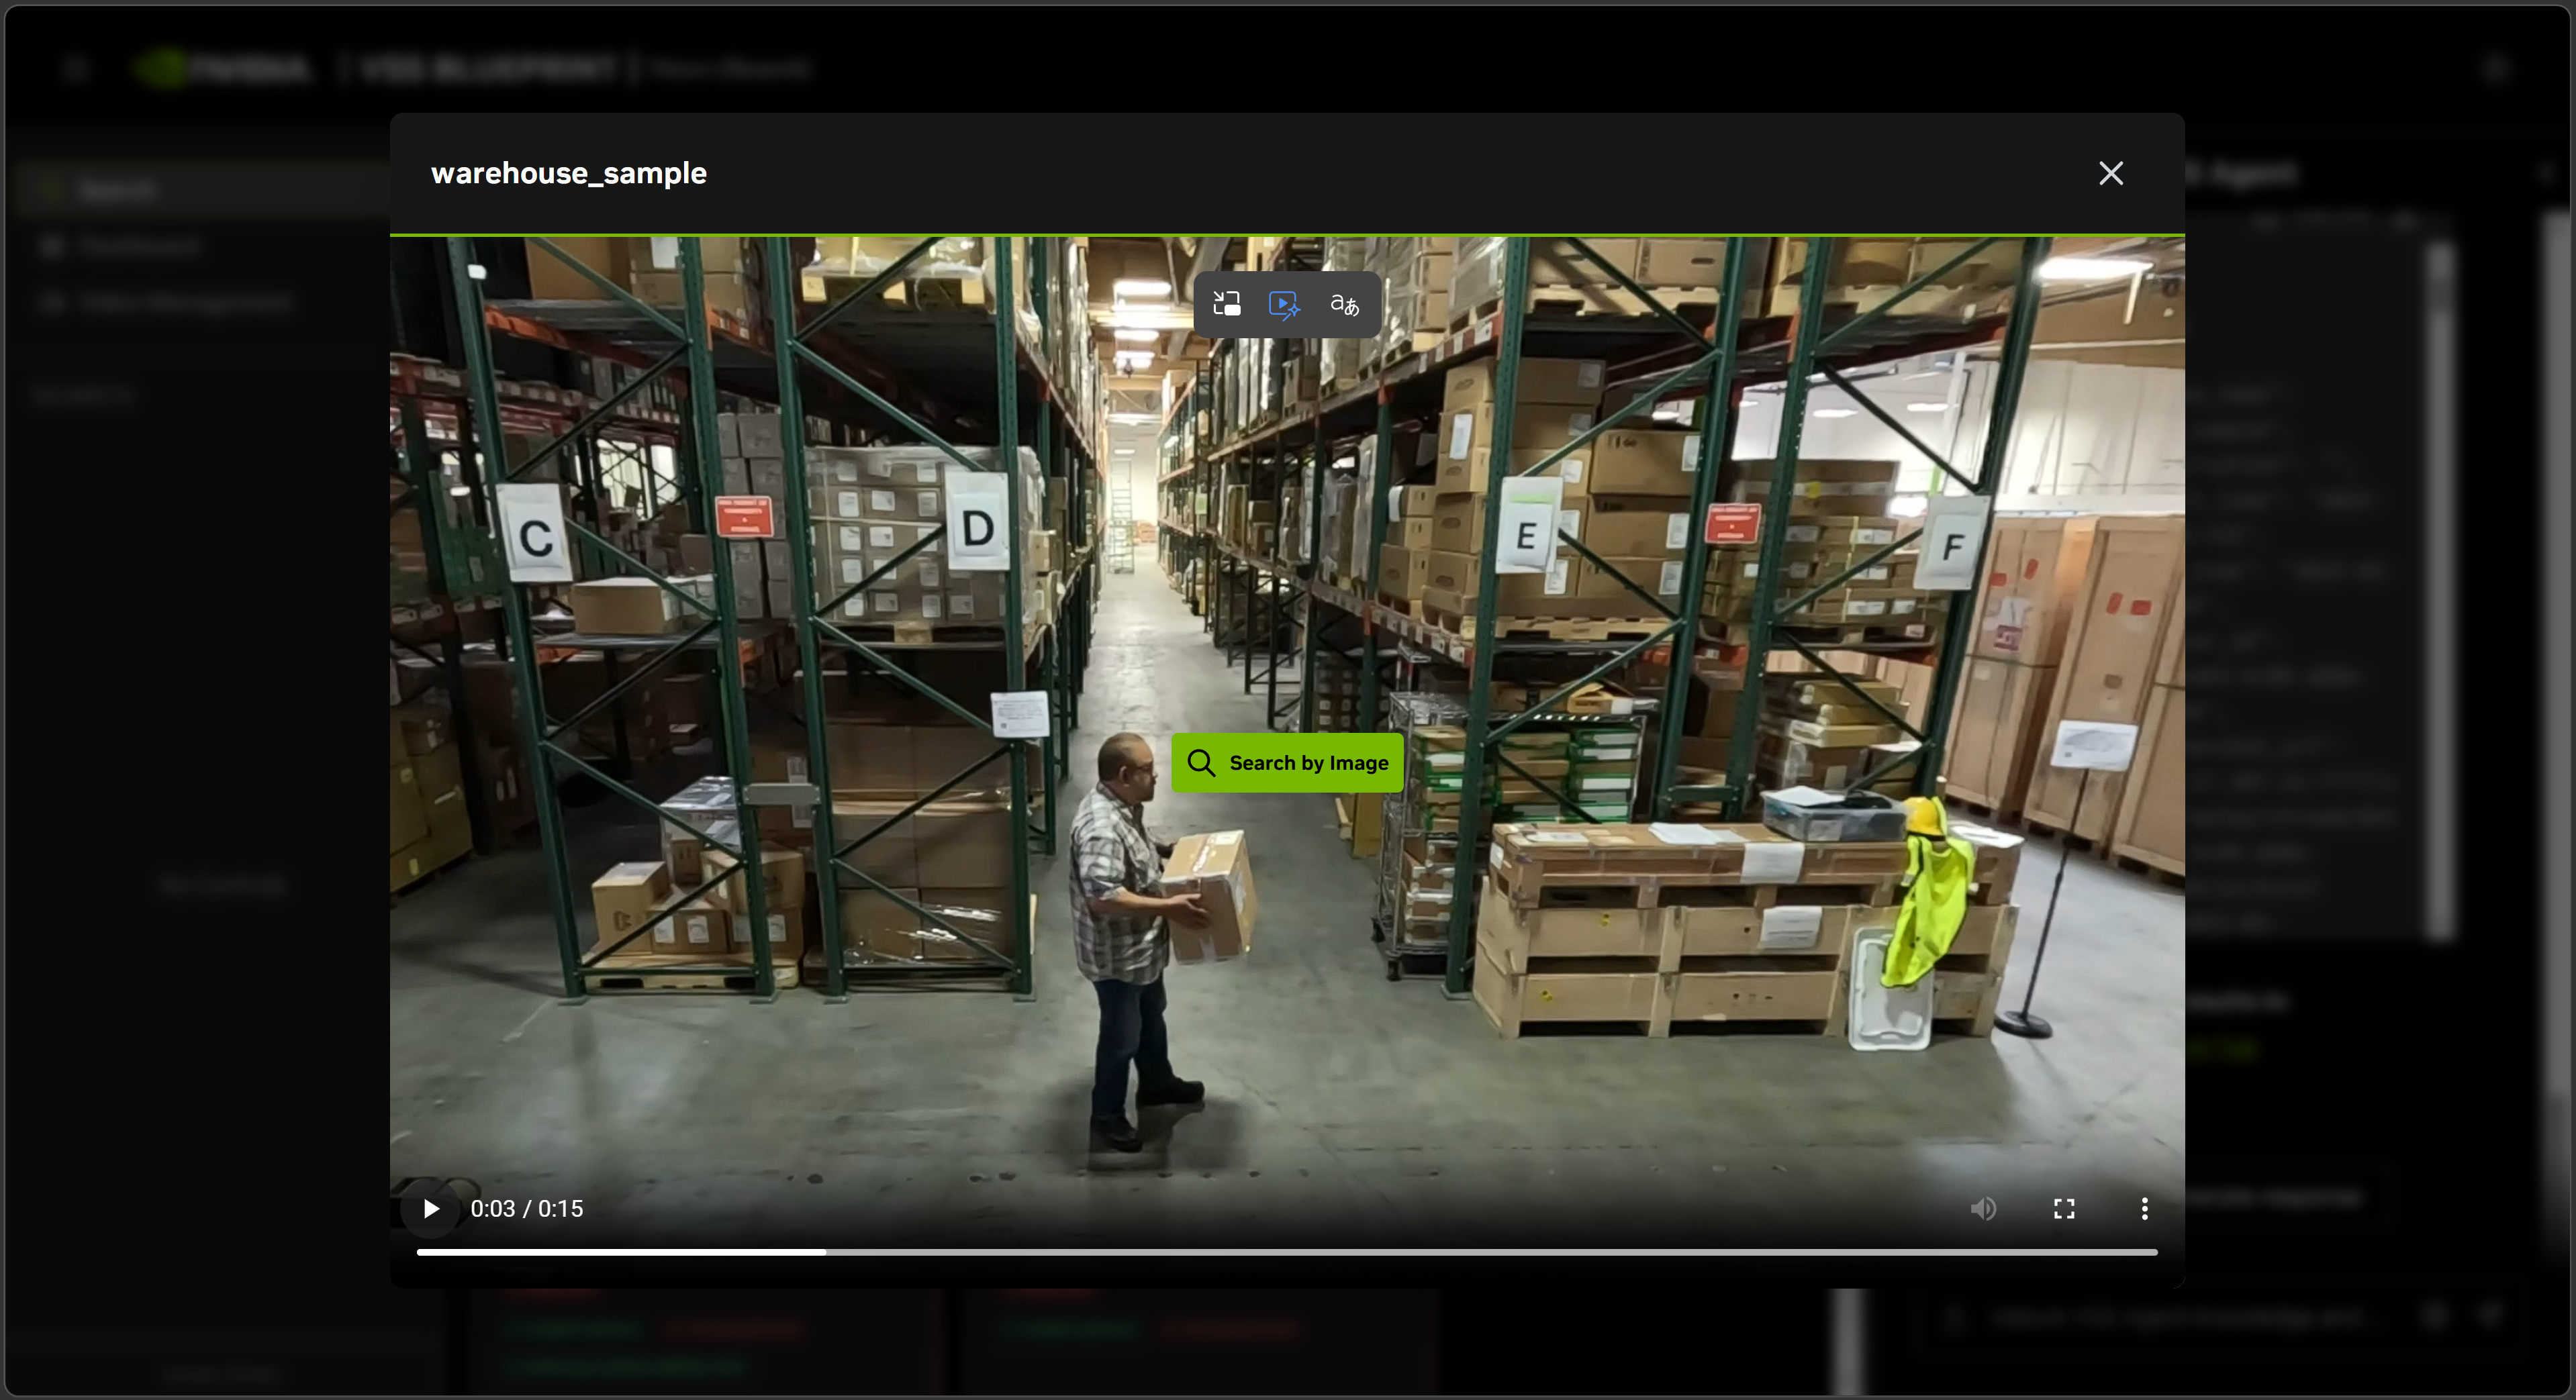
Then click ‘Search by Image’. Wait for interface to load metadata of the paused video frame.
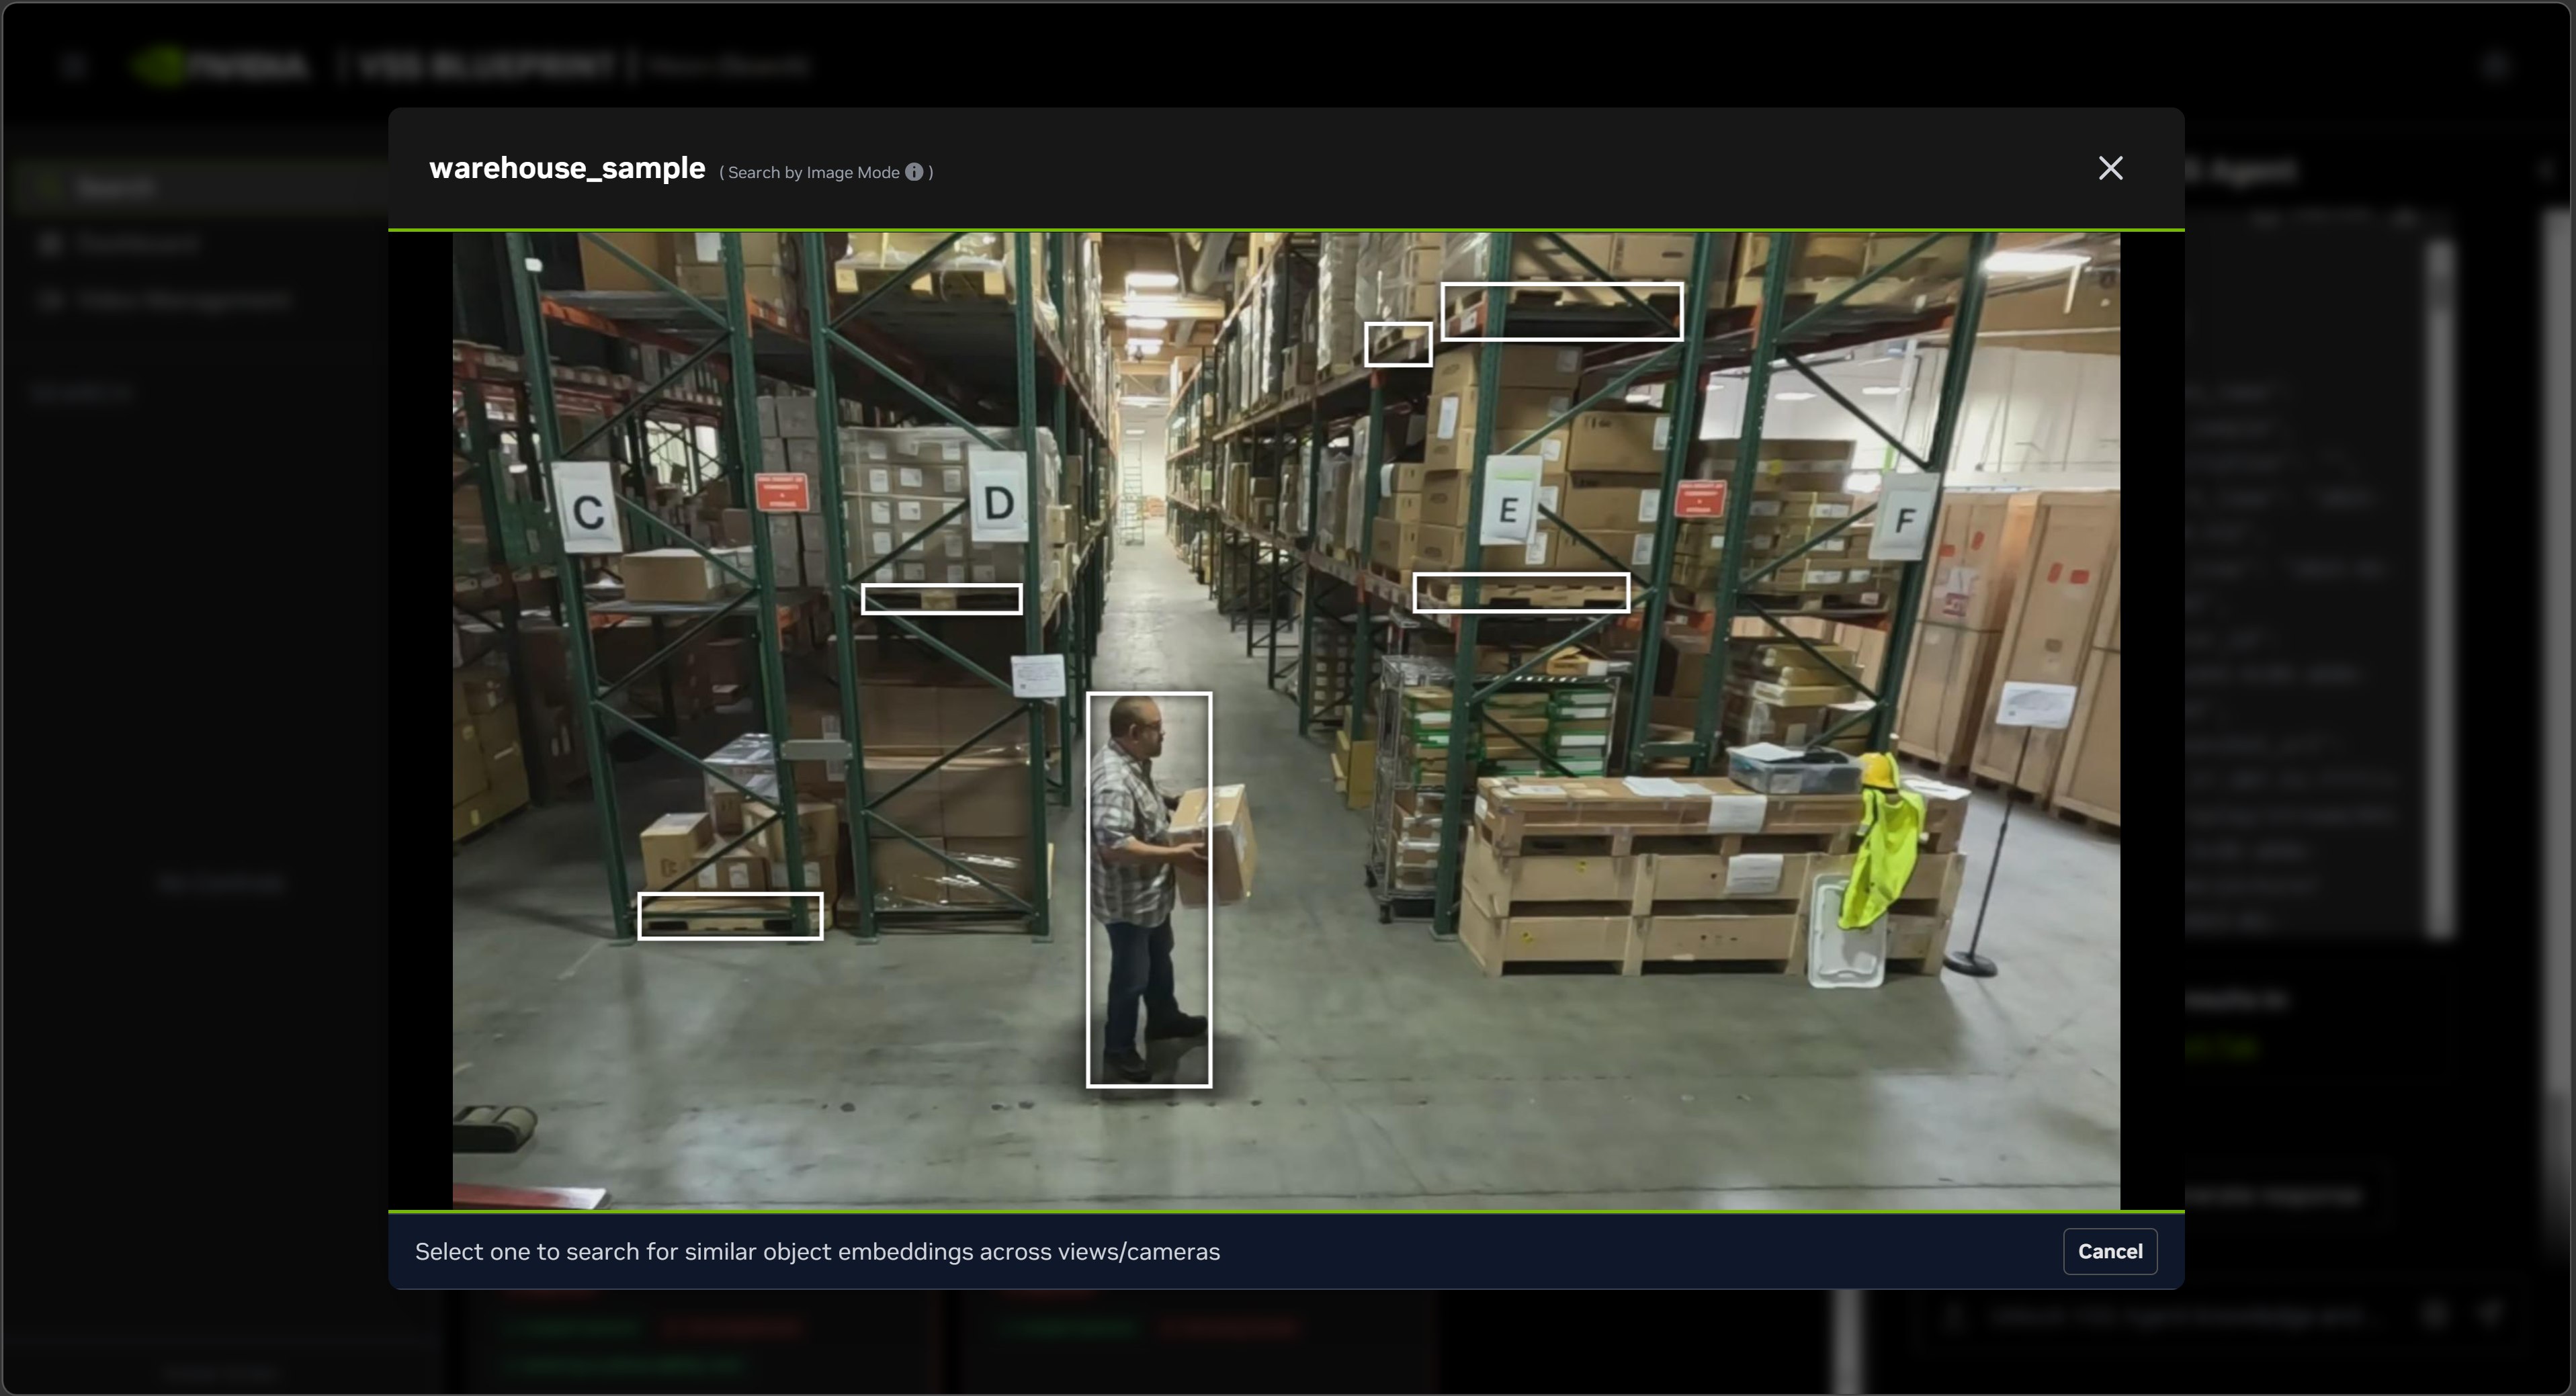
Select one of the bounding boxes overlaid on the video frame and click ‘Search’.
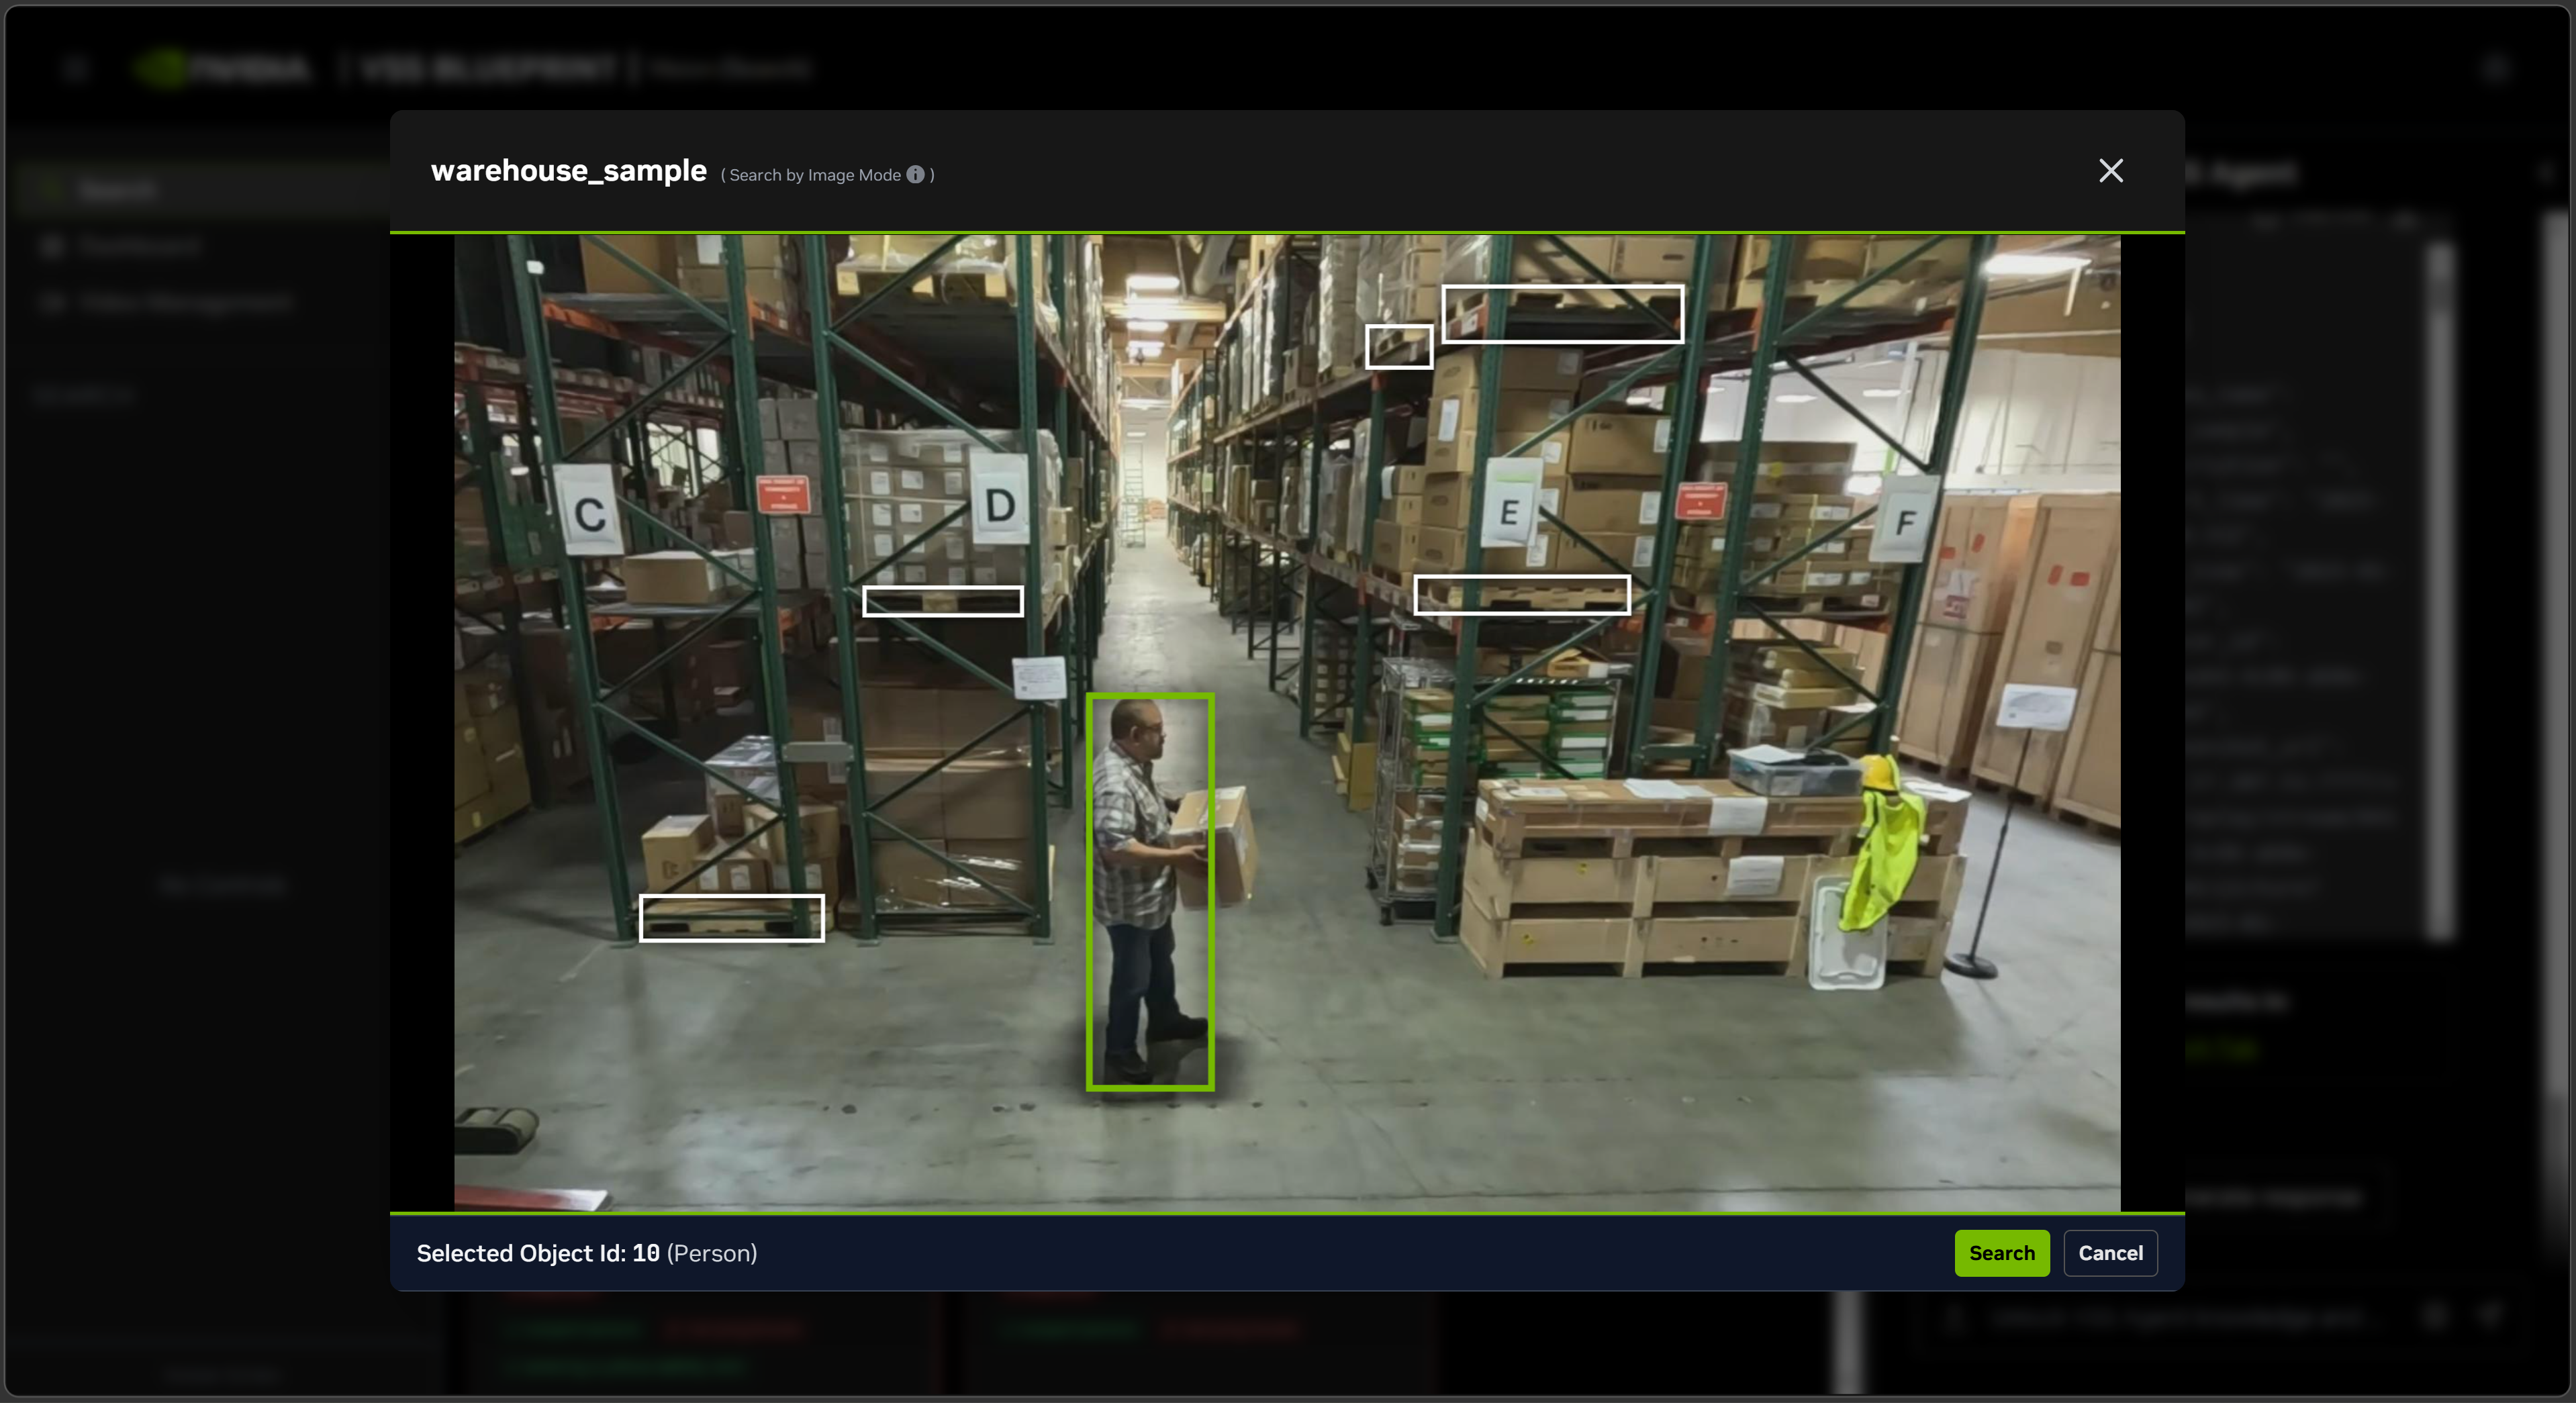
The search results will be returned in the chat interface against the query
Find similar objects matching object_id=<>.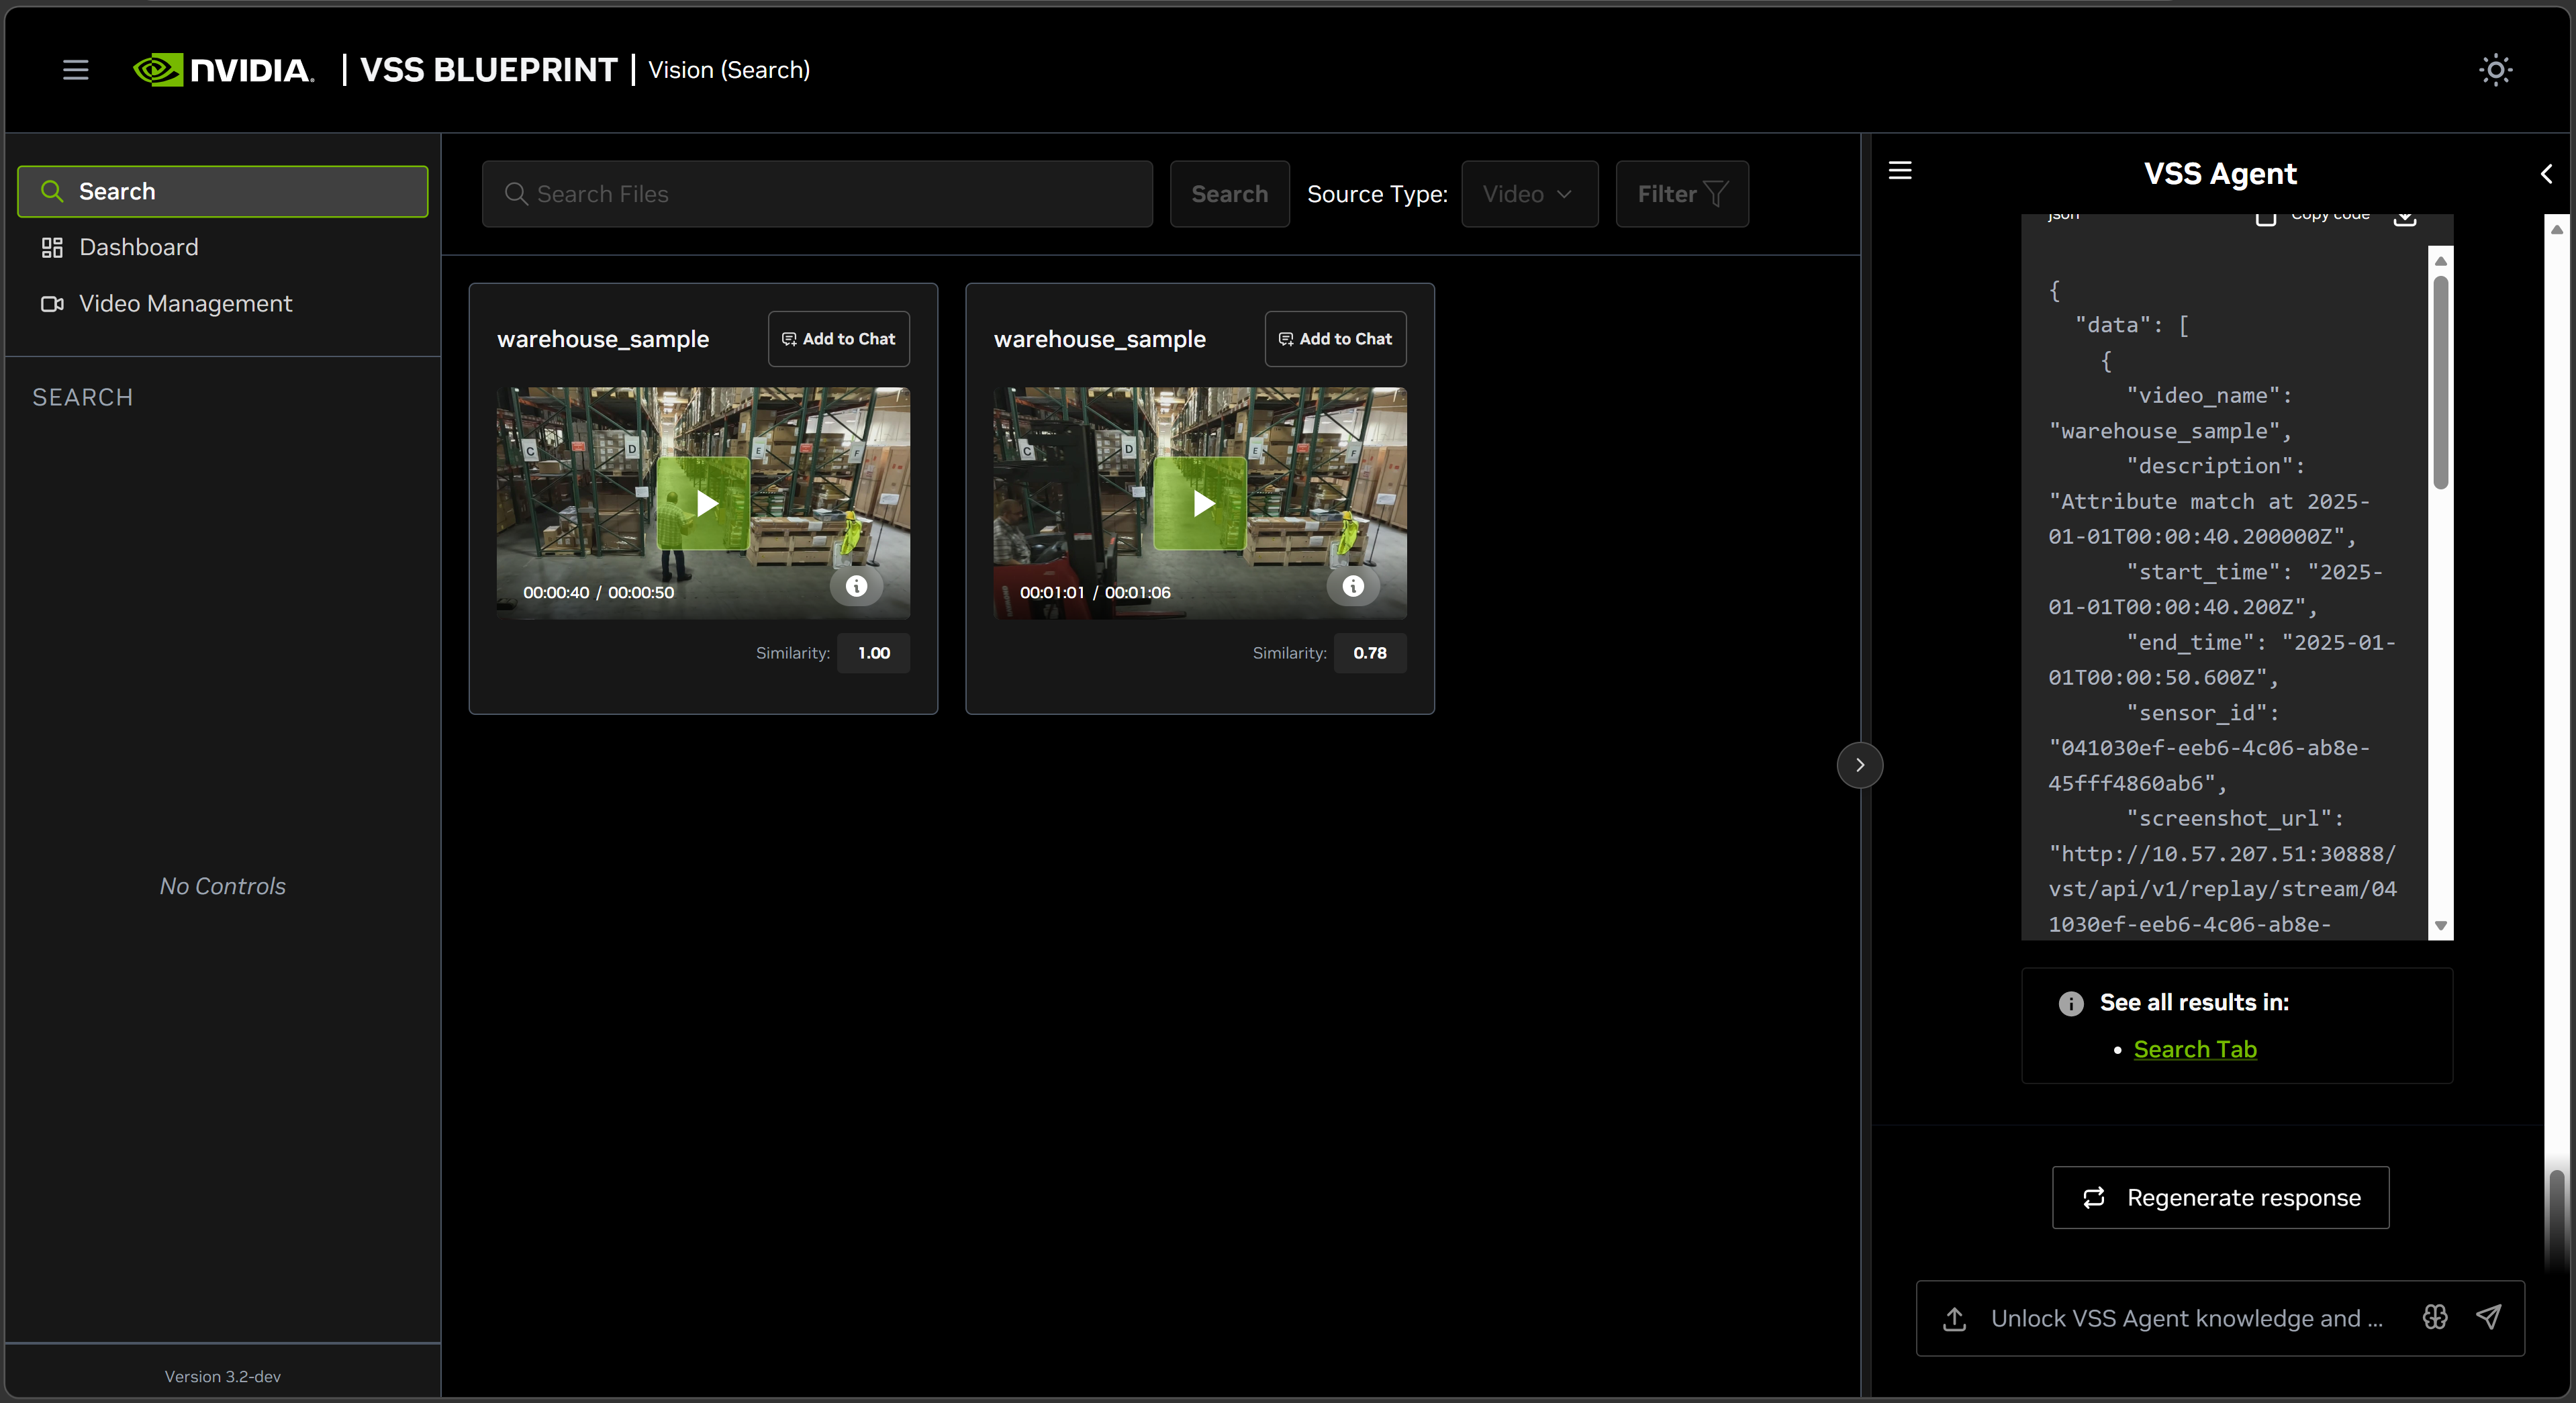
Fusion Algorithm Options
By default, fusion search uses Reciprocal Rank Fusion (RRF) with default weights. No configuration changes are required.
If you need to customize the fusion algorithm, you can modify the settings in the search agent configuration file at deploy/docker/developer-profiles/dev-profile-search/vss-agent/configs/config.yml:
Reciprocal Rank Fusion (RRF) - Default
Formula: rrf_score = 1.0 / (rank_action + rrf_k) + rrf_w * normalised_attribute_score
search_agent:
  fusion_method: rrf
  rrf_k: 60           # RRF constant k
  rrf_w: 0.5          # RRF weight for attribute component
Weighted Linear Fusion
Formula: fusion_score = w_embed * embed_score + w_attribute * normalised_attribute_score
search_agent:
  fusion_method: weighted_linear
  w_embed: 0.35        # Weight for embed score
  w_attribute: 0.55    # Weight for attribute score
RRF with Attribute Rank
This option combines the embed rank and attribute rank instead of combining embed rank with the normalized attribute score.
Formula: rrf_score = 1.0 / (rank_embed + rrf_k) + rrf_w * (1.0 / (rank_attribute + rrf_k))
search_agent:
  fusion_method: rrf_with_attribute_rank
  rrf_k: 60
  rrf_w: 0.5
Embed Confidence Threshold
You can also configure the embed_confidence_threshold parameter to control when fusion search falls back to attribute-only search:
search_agent:
  embed_confidence_threshold: 0.1  # Minimum embed score to proceed with fusion
Top Percent Filter
The optional top_percent_filter setting filters results before consecutive segments are merged. For example, 0.9 keeps only results with similarity greater than or equal to 90 percent of the highest similarity in the current result set.
search_agent:
  top_percent_filter: 0.9
Understanding Search Path Selection
The Vision Agent automatically selects the best search method based on your query. Here’s how different queries are processed:
Example 1: Embed Search Only
- Query: “a person moving cones”
Search Type: Embed Search
Why: The query describes an action/event with no descriptive visual attributes
Process: Searches event embeddings to find clips showing the action
Example 2: Attribute Search Only
- Query: “person in green jacket”
Search Type: Attribute Search
Why: The query contains only visual descriptors (attributes), no actions
Process: Searches behavior embeddings to find objects matching the visual description
Example 3: Fusion Search
- Query: “a person carrying boxes in green jacket”
Search Type: Fusion Search
Why: The query contains both visual attributes (“green jacket”) and an action (“carrying boxes”)
Process: 1. First performs Embed Search to find clips showing “carrying boxes” 2. Then reranks the embed results based on attributes to search for (e.g., “green jacket”) 3. Combines scores from both searches for more accurate results
Example 4: Fallback to Attribute Search
- Query: “person running in green jacket”
Search Type: Attribute Search (fallback from Fusion)
Why: The query contains both attributes and action, but the embed search confidence is too low (below
embed_confidence_threshold)Process: Falls back to Attribute Search only when embed search confidence is insufficient for fusion
Example 5: Search by Image
- Action: Select an image from a previous result and start Search by Image
Search Type: Search by Image
Why: The query starts from a visual example selected in the UI.
Process: 1. Looks up the selected object’s embedding in the behavior index. 2. Uses that embedding as the query vector. 3. Returns similar objects with timestamps, screenshot URLs, and object IDs.
Critic Agent Overview#
The Critic Agent is a specialized agent that reviews search results with a VLM and annotates each evaluated result as confirmed or rejected.
When configured, the critic agent reviews search results and annotates evaluated clips before the final response is assembled. If additional search iterations are enabled, rejected results can cause the backend to fetch more candidates. The default search profile sets search_max_iterations: 1, so the critic verifies the initial result set and the result JSON includes the verdict in critic_result.
Enabling/Disabling the Critic Agent
The critic agent is enabled by default in a fresh deployment. You can control whether it runs at two levels:
Per-query toggle (chat settings) — In the Vision Agent chat, open the chat settings popover next to the chat input and use the Enable Critic toggle to turn the critic agent on or off for each query. The toggle is on by default; turn it off when you want raw search results without VLM verification (for example, for faster responses or when you are exploring broad results). This toggle corresponds to the
use_criticflag in the search request payload and is decided on a query-by-query basis.Server-level configuration — The default server config ships with
enable_critic: true, so the critic agent is available out of the box. To disable it across the entire deployment (so the per-query toggle has no effect), setenable_critic: falsein the search agentconfig.yml. See To configure the Critic Agent for the file location.
Partial Verification (num_videos_to_evaluate)
The num_videos_to_evaluate configuration parameter controls how many of the top search results are sent to the VLM for verification. Results are ordered by relevance score, and only the first N results (determined by this parameter) are evaluated by the critic. The remaining results are returned as-is without verification.
For example, with the default configuration of num_videos_to_evaluate: 5 and a search that returns 10 results:
Results 1–5 (highest relevance) are sent to the VLM and receive a verification status (
confirmed,rejected, orunverified) along with acriteria_metbreakdown.Results 6–10 are included in the final output with a verification status of
--, indicating they were not evaluated.
This means the final response contains a mix of verified and unverified results. Verified results have an explicit pass/fail status, while unverified results have no critic metadata. This trade-off reduces VLM inference cost and latency at the expense of full coverage.
To verify all results, set num_videos_to_evaluate to a value equal to or greater than the expected result count, or remove the parameter entirely (the code default evaluates all results when unset).
# In config.yml under the critic_agent function
critic_agent:
  num_videos_to_evaluate: 5          # Only verify the top 5 results (default in deployment config)
How the Critic Agent Appears in the Reasoning Trace
When the critic agent is enabled for a request, the Vision Agent’s reasoning trace shows the verification flow:
Verifying N results with critic agent — The critic agent is invoked to evaluate the candidate set (for example, “Verifying 9 results with critic agent”).
Critic verification complete — The trace reports how many results were verified and rejected (for example, “Critic verification complete: 2/5 results verified, 3/5 results rejected”).
Found N results — The final count reflects the result set returned after any configured search iteration. Each evaluated result includes a
critic_resultfield in the JSON output.
Critic Agent Input and Output
The critic agent uses a VLM (Vision Language Model) to verify each search result clip against the user query. It receives the query and metadata for multiple video clips, fetches and analyzes each clip via the VLM, then classifies each clip as confirmed or rejected.
Input — For each search result clip, the critic receives:
The user query (e.g., “a person carrying boxes”).
Video metadata for that clip:
sensor_id,start_timestamp, andend_timestamp.
Verification — For each clip:
The query is turned into a verification prompt that asks the VLM to break the query into criteria and judge each as true or false for that video.
A playable URL for the clip is obtained and the clip plus the prompt is sent to the VLM.
The VLM returns a small JSON object per clip, e.g.,
{"subject:person": true, "carrying boxes": false}.
Decision — Each clip is classified as follows:
CONFIRMED — Every criterion is true → keep the result.
REJECTED — Any criterion is false. The result is annotated as rejected, and the system can increment
top_kand run another search iteration if configured.
For each verified clip, the critic output is returned as a critic_result object on that result, with the following fields:
result— One of"confirmed"or"rejected".criteria_met— A map of each criterion extracted from the query to a boolean indicating whether the clip satisfies it (e.g.,{"subject:person": true, "carrying boxes": false, "wearing a yellow safety vest": true}).
How the Critic Result Is Displayed in the UI
When the critic agent has run for a request, the search results panel and chat response display the verification details alongside each clip:
Each evaluated result card shows a colored badge that reflects the critic verdict:
✓ Confirmed — green badge.
✗ Rejected — red badge.
The result card border is colored to match the verdict (green for confirmed, red for rejected). Cards from a search that did not run the critic agent retain the default border.
Below the badge, each criterion extracted from the query is listed as a small chip with a green check (✓) when satisfied or a red cross (✗) when not satisfied.
Search results are sorted by critic verdict before similarity: Confirmed clips appear first, then Rejected. Within each verdict group, clips are ordered by descending similarity score. When the critic did not run for the request, results retain their original similarity ordering.
In the chat response, the same per-result outcome is summarized in a table with a Critic column (e.g.,
confirmed (subject:person: ✓, carrying boxes: ✓, walking through the warehouse: ✓)), and the fullcritic_resultobject is included in the Search API result (JSON) payload.
Temporal Deduplication for Video Embeddings
Temporal deduplication is an optional ingestion optimization that keeps only embeddings for new or changing content and skips those similar to recent ones, yielding a smaller, more meaningful set with less storage and processing. It uses a sliding-window algorithm:
Window — A fixed-size buffer holds the last N vectors (e.g., 60); when full, the oldest is dropped.
Similarity — For each new embedding, count how many consecutive window entries (newest backward) are “similar” (distance or cosine-similarity threshold). Only consecutive similar neighbors are counted.
Decision — Below a minimum count (e.g., 3) → store (novel or transitional). At or above minimum → skip (redundant).
Max interval — If too much time has passed since the last stored point, always store the current point (long gaps are never dropped).
Example (Conceptual)
Suppose the window holds recent embeddings for scenes A, A, B, B, B (oldest to newest).
New point like B Counting backward: B, B, B → 3 consecutive similar neighbors. Result: Skip (redundant—same pattern as recent B’s).
New point like C (different scene) Counting backward: C is not similar to B → 0 consecutive similar neighbors. Result: Store (novel—new pattern).
New point like B, but we’re just coming from A Window: A, A, A, B, B. New point like B. Backward: B, B → 2 similar; then A is not similar → count stays 2. Result: Store (transitional—B is “new” relative to recent A’s).
So the same “B-like” embedding is sometimes stored (when it marks a transition) and sometimes skipped (when it’s just more of the same), which is what you want for temporal deduplication.
Advantages
Fewer embeddings and faster search while preserving scene changes and transitions; loops and repetitive content are deduplicated. Window size, similarity threshold, and minimum-neighbor count are configurable (stricter = more points kept; looser = more compression).
Caveat
Deduplication is lossy — skipped embeddings do not appear in search results. A higher similarity threshold reduces missing important transitions but can lower query recall (e.g., a static 30-second scene may return results covering only part of it). Use this feature when optimizing storage or search performance by reducing embedding volume.
Step 6: Delete Videos or Streams#
To remove uploaded videos or RTSP streams from the agent:
Click on the Video Management tab.
Select the video(s) or stream(s) you want to delete by clicking the checkbox next to each item, or click Select All to select all items.
Click the Delete Selected button in the top-right corner.
The selected videos or streams will be removed from the video list and will no longer appear in search results.
Note
Deleting an uploaded video is best-effort. The agent deletes matching documents from the embed, behavior, and raw Elasticsearch indices when Elasticsearch cleanup is configured, removes the RTVI-CV registration when configured, and deletes the VIOS sensor and storage. Deleting an RTSP stream removes the live stream from VIOS and RTVI services, but the search profile keeps VIOS storage for removed RTSP streams and does not delete previously indexed Elasticsearch data. Previously ingested RTSP data can remain available for chat and search queries until index lifecycle cleanup removes it.
Step 7: Teardown the agent#
To teardown the agent, run the following command:
deploy/docker/scripts/dev-profile.sh down
This command will stop and remove the agent containers.
Service Endpoints#
Once deployed, the following services are available:
Service |
URL |
|---|---|
VSS UI |
|
Kibana UI |
|
NVStreamer UI |
|
VST UI |
|
Phoenix UI |
|
Using Skills#
As an alternative to running the workflow manually, you can use VSS Agent Skills from a coding agent such as Claude Code, Codex, or NemoClaw.
First install the skills as described in Installing Skills and make it accessible to your coding agent.
Step 1: Deploy the Search Agent#
Note
The host must meet the same deployment requirements listed above (supported GPU/hardware for that profile) and must meet the Prerequisites.
Once the agent is loaded with the VSS skills, you can use it to deploy the VSS search agent:
Deploy the VSS search profile.
Note
The skill will choose the <platform> to match your system, as detailed in Development Profile GPU Requirements.
What the agent does:
Reads the skill
vss-deploy-profileand its search profile reference to determine the deployment recipe, GPU layout, sizing, and service list.Runs pre-flight checks — auto-detects the repo path, validates GPU/Docker/NVIDIA runtime, and probes
NGC_CLI_API_KEYagainst NGC auth.Prepares the environment — copies the source
.envtogenerated.env, writes overrides (HOST_IP,EXTERNAL_IP,NGC_CLI_API_KEY,VSS_DATA_DIR,VSS_APPS_DIR), creates the data directory tree with correct permissions.Generates and normalizes the resolved compose — runs
docker compose config, thennormalize_resolved_yml.pyto strip dangling dependencies, and validates the output.Deploys with
docker compose up -dand monitors until all services report healthy.
Step 2: Video Management#
Note
For instructions on downloading sample data, see Download Sample Data From NGC in the Quickstart guide.
The downloaded videos (following the Quickstart guide) are available at ./sample-data/dev-profile-sample-data/.
For this example, you will ask the agent to upload the video warehouse_sample.mp4 by providing the path to the file:
Add the video warehouse_sample.mp4 to search agent
What the agent does:
Reads the skill
vss-search-archiveto determine the agent-backend ingestion flow (not bare VIOS).Gets the upload URL from the agent (
POST /api/v1/videos) and POSTs the video file to that URL (chunked-upload).Calls
/api/v1/videos/{sensorId}/completewhich fans out to RTVI-CV + RTVI-Embed, generating searchable embeddings in Elasticsearch.Verifies the sensor is registered and online in VIOS.
It may take up to a few minutes depending on the size of the video(s).
Step 3: Search with a simple query#
Your agent can search videos given natural-language queries, without requiring a chat UI/interface.
Use its search capability to find all instances of forklifts in the uploaded video warehouse_sample.mp4 by using the following prompt:
Find all instances of forklifts in the sample warehouse video.
What the agent does:
Reads the skill to determine the search API.
Checks if the video is already registered in VIOS (
sensor/list). If not, ingests it using the agent backend’s chunked-upload handshake.Fires the natural-language query via
POST /generateon the agent backend, which decomposes it into embed search and optionally attribute search.The agent’s critic (VLM) verifies top results against decomposed criteria and returns confirmed/rejected verdicts.
Presents results as a table with time ranges, similarity scores, critic verdicts, and per-criteria breakdown.
The Critic column shows the critic agent’s verdict for each result — confirmed or rejected — while the Criteria column lists the individual conditions extracted from the query and whether each was satisfied.
Step 4: Search with additional filters#
To search with additional filters:
I have a video sample-warehouse-ladder.mp4. I need to find instances of a person climbing a ladder with source type video_file, video source sample-warehouse-ladder.mp4, and top 5 results.
Follow-up questions related to the search results can also be asked in the same coding-agent conversation. For example:
What are the durations of the top 5 results?
Step 5: Delete Videos#
To remove an uploaded video:
Delete the video sample-warehouse-ladder.mp4.
Step 6: Teardown the agent#
To teardown the search agent, issue the following prompt:
Teardown the VSS search profile.
This will stop and remove the agent containers.
Changing Embedding Models#
Real-Time Embedding#
The Real-Time Embedding microservice (RT-Embed) supports the Cosmos-Embed1 model, a joint video-text embedder.
Cosmos-Embed1-448p-anomaly-detection is the default variant deployed with the VSS search profile.
To use a different model, for example, Cosmos-Embed1-448p set the environment RTVI_EMBED_MODEL and MODEL_PATH variables as follows:
RTVI_EMBED_MODEL=cosmos-embed1-448p
MODEL_PATH=git:https://huggingface.co/nvidia/Cosmos-Embed1-448p
RTVI_EMBED_MODEL— Identifier for the embedding model used by RT-EmbedMODEL_PATH— HuggingFace repository URL from which RT-Embed downloads the model at startup
Real-Time Object Embedding#
The Real-Time Video Intelligence CV microservice (RTVI-CV) supports CLIP-style image (vision encoder) and text embedder models.
SigLIP2 is the default model deployed with the VSS search profile.
To use a different model, for example, RADIO-CLIP set the environment VISION_ENCODER_MODEL and VISION_ENCODER_VERSION variables as follows:
VISION_ENCODER_MODEL=radio-clip
VISION_ENCODER_VERSION=v1.0
VISION_ENCODER_MODEL— Identifier for the vision encoder model used by RTVI-CVVISION_ENCODER_VERSION— The release version on NGC catalog
Output Embedding Dimension
The object embeddings are stored in elasticsearch as vector embeddings. The dimension must be specified at the time of deployment.
The output embedding model for SigLIP2 is 1152, while it’s 1536 for radio-clip; can be changed using the environment variable ELASTICSEARCH_RTVI_CV_EMBEDDINGS_DIM:
ELASTICSEARCH_RTVI_CV_EMBEDDINGS_DIM=1536
ELASTICSEARCH_RTVI_CV_EMBEDDINGS_DIM— Used by RTVI-CV for object embeddings (default: SigLIP v2, 1152). If you change the RTVI-CV model, set this to the new model’s embedding dimension.
Known Issues#
A race condition between RTVI-embed and LLM NIM during deployment can result in an unhealthy state for the RTVI-embed container. To resolve this:
Stop the LLM NIM.
Wait for RTVI-embed to become healthy.
Restart LLM NIM.
Queries with negative intent (e.g., “people without a yellow hat”) may return the same results as positive intent queries (e.g., “people with a yellow hat”).
Sometimes, the agent may also return false positive results (i.e., results that are not relevant to the query).
Queries with a single word (e.g., “person”) may return no results.
The duration of video clips in search results may be longer than the displayed duration.
‘Description’ is empty in the response generated by the Vision Agent chat interface.
Uploading a video through the Agent chat sidebar in the Search profile returns an
Internal Server Error. During upload through chat sidebar, query is sent to the agent, and the top agent for search currently does not have the necessary support to handle this.By default, the timestamps for uploaded videos start from
2025-01-01 00:00:00.Renaming an uploaded RTSP stream after it has been added is not supported. We would need to delete the existing entry from the Video Management tab and re-add the RTSP stream with the new name.
Deleting an RTSP stream that has ended, may subsequently fail new stream addition or a new video upload.
When a source video is removed from NVStreamer, the corresponding RTSP stream continues to appear as a live input in the VSS UI Video Management tab.
When the critic agent is enabled and VLM service is not available, the search results may not appear in the main window.
For RTSP streams with H265 encoding that have been removed, thumbnail may not be visible in the VSS UI. See Image capture failure for more details.
An ‘Index not found’ error may occur, when there are no videos corresponding to the source type selected.
When uploading a video to VIOS, if the video is larger than the maximum upload size, the upload may fail. See Why do large file uploads to VIOS fail? for more details.