


Installing and Configuring NVIDIA vGPU Manager and the Guest Driver#
Before installing and configuring NVIDIA vGPU Manager and the guest driver, ensure that a VM running a supported Windows guest OS is configured in your chosen hypervisor.
The factory settings of some supported GPU boards are incompatible with NVIDIA vGPU software. Before configuring NVIDIA vGPU software on these GPU boards, you must configure the boards to change these settings.
Switching the Mode of a GPU that Supports Multiple Display Modes#
Some GPUs support display-off and display-enabled modes but must be used in NVIDIA vGPU software deployments in display-off mode.
The GPUs listed in the following table support multiple display modes. As shown in the table, some GPUs are supplied from the factory in display-off mode, but other GPUs are supplied in a display-enabled mode.
GPU |
Mode as Supplied from the Factory |
|---|---|
NVIDIA A40 |
Display-off |
NVIDIA L40 |
Display-off |
NVIDIA L40S |
Display-off |
NVIDIA L20 |
Display-off |
NVIDIA L20 liquid cooled |
Display-off |
NVIDIA RTX 5000 Ada |
Display enabled |
NVIDIA RTX 6000 Ada |
Display enabled |
NVIDIA RTX A5000 |
Display enabled |
NVIDIA RTX A5500 |
Display enabled |
NVIDIA RTX A6000 |
Display enabled |
NVIDIA RTX PRO 6000 Blackwell Server Edition |
Display-off |
NVIDIA RTX PRO 6000 Blackwell Server Edition liquid cooled |
Display-off |
A GPU that is supplied from the factory in display-off mode, such as the NVIDIA A40 GPU, might be in a display-enabled mode if its mode has previously been changed.
To change the mode of a GPU that supports multiple display modes, use the displaymodeselector tool, which you can request from the NVIDIA Display Mode Selector Tool page on the NVIDIA Developer website.
Note
Only the GPUs listed in the table support the displaymodeselector tool. Other GPUs that support NVIDIA vGPU software do not support the displaymodeselector tool and, unless otherwise stated, do not require display mode switching.
Installing the NVIDIA Virtual GPU Manager#
Before guests enabled for NVIDIA vGPU can be configured, the NVIDIA Virtual GPU Manager must be installed in your chosen hypervisor. The process for installing the NVIDIA Virtual GPU Manager depends on the hypervisor that you are using.
If you need more detailed instructions, refer to the appropriate NVIDIA vGPU installation guide.
Installing the NVIDIA Virtual GPU Manager on VMware vSphere#
The NVIDIA Virtual GPU Manager runs on the ESXi host. It is distributed as a number of software components in a ZIP archive.
The NVIDIA Virtual GPU Manager software components are as follows:
A software component for the NVIDIA vGPU hypervisor host driver
A software component for the NVIDIA GPU Management daemon
Before you begin, ensure that the following prerequisites are met:
The ZIP archive that contains NVIDIA vGPU software has been downloaded from the NVIDIA Licensing Portal.
The software components for the NVIDIA Virtual GPU Manager have been extracted from the downloaded ZIP archive.
Copy the NVIDIA Virtual GPU Manager component files to the ESXi host.
Put the ESXi host into maintenance mode.
$ esxcli system maintenanceMode set --enable true
Install the NVIDIA vGPU hypervisor host driver and the NVIDIA GPU Management daemon from their software component files.
Run the
esxclicommand to install the NVIDIA vGPU hypervisor host driver from its software component file.$ esxcli software vib install -d /vmfs/volumes/<datastore>/<host-driver-component>.zip
Run the
esxclicommand to install the NVIDIA GPU Management daemon from its software component file.$ esxcli software vib install -d /vmfs/volumes/<datastore>/<gpu-management-daemon-component>.zip
<datastore>The name of the VMFS datastore to which you copied the software components.
<host-driver-component>The name of the file that contains the NVIDIA vGPU hypervisor host driver in the form of a software component. Ensure that you specify the file that was extracted from the downloaded ZIP archive. For example, for VMware vSphere 8.0.0,
<host-driver-component>isNVD-VMware-x86_64-595.71.03-1OEM.800.1.0.20613240-bundle-<build-number>.<gpu-management-daemon-component>The name of the file that contains the NVIDIA GPU Management daemon in the form of a software component. Ensure that you specify the file that was extracted from the downloaded ZIP archive. For example, for VMware vSphere 8.0.0,
<gpu-management-daemon-component>isVMW-esx-8.0.0-nvd-gpu-mgmt-daemon-1.0-0.0.0001.
Exit maintenance mode.
$ esxcli system maintenanceMode set --enable false
Reboot the ESXi host.
$ rebootVerify that the NVIDIA GPU Management daemon has started.
$ /etc/init.d/nvdGpuMgmtDaemon status
Verify that the NVIDIA kernel driver can successfully communicate with the physical GPUs in your system by running the
nvidia-smicommand without any options.$ nvidia-smiIf successful, the
nvidia-smicommand lists all the GPUs in your system.
Installing the NVIDIA Virtual GPU Manager on XenServer#
The NVIDIA Virtual GPU Manager for XenServer is distributed as a Supplemental Pack ISO.
In XenCenter, select Install Update from the Tools menu.
In the Before You Start section of the update wizard, click Next.
In the Select Update section, click Select update or supplemental pack from disk and open the NVIDIA Virtual GPU Manager Supplemental Pack ISO.
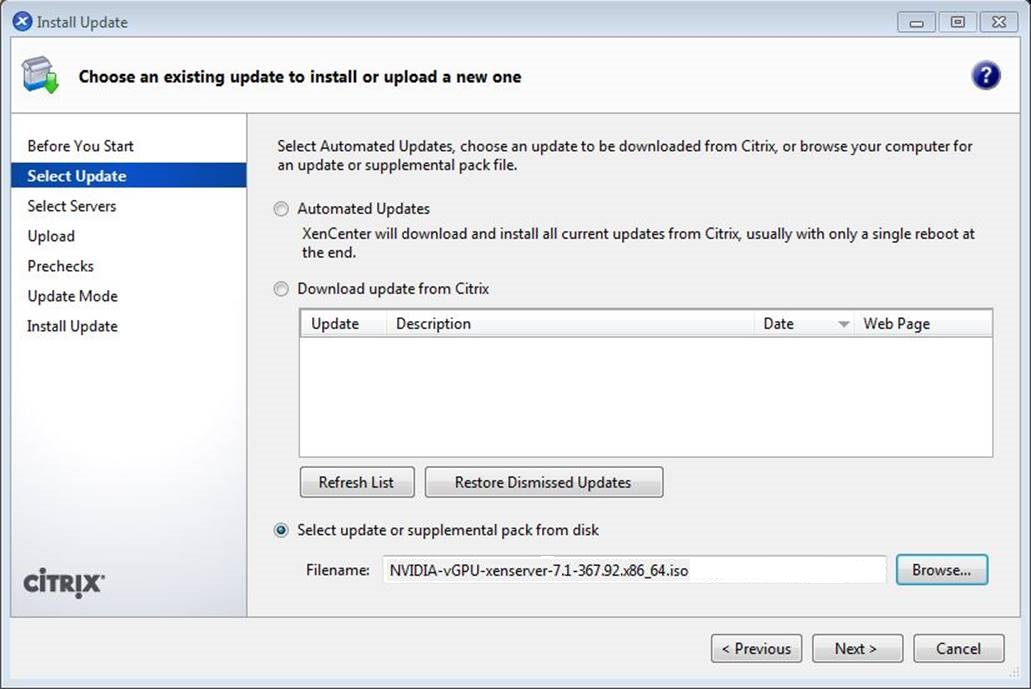
In the Select Update section, click Next.
In the Select Servers section, select all XenServer hosts on which the Supplemental Pack should be installed and click Next.
In the Upload section, after the Supplemental Pack has been uploaded to all selected hosts, click Next.
In the Prechecks section, click Next.
In the Update Mode section, click Install Update.
In the Install Update section, click Finish.
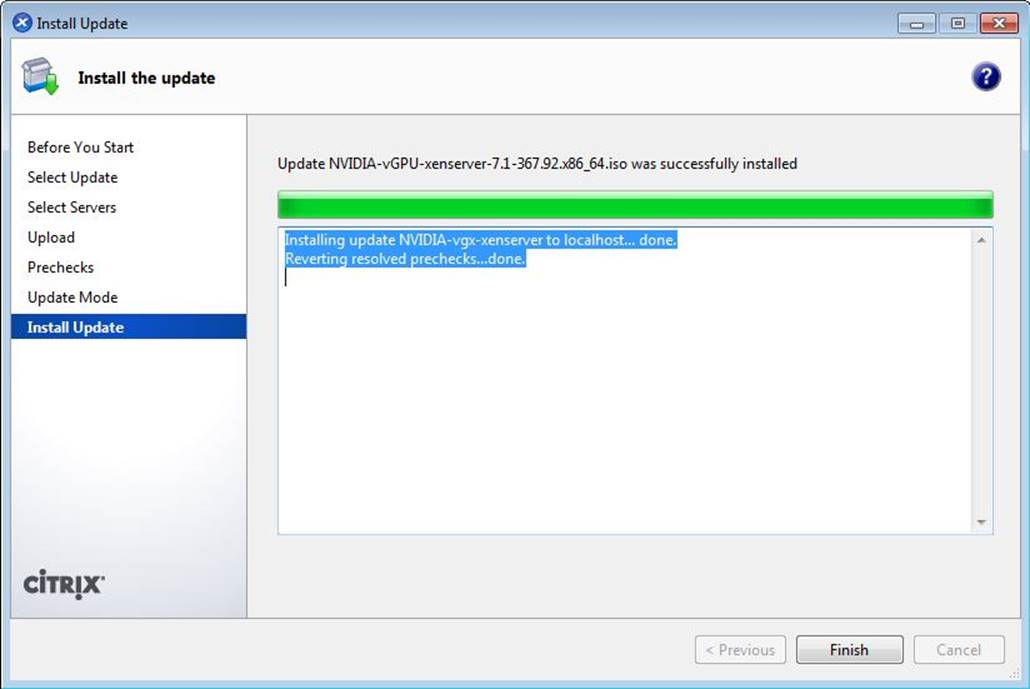
After the installation is complete, verify the installation of the NVIDIA Virtual GPU Manager package for XenServer by checking for the NVIDIA kernel driver in the list of kernel-loaded modules.
[root@xenserver ~]# lsmod |grep nvidia
nvidia 8152994 0
i2c_core 20294 2 nvidia,i2c_
Disabling and Enabling ECC Memory#
Some GPUs that support NVIDIA vGPU software support error correcting code (ECC) memory with NVIDIA vGPU. ECC memory improves data integrity by detecting and handling double-bit errors. However, not all GPUs, vGPU types, and hypervisor software versions support ECC memory with NVIDIA vGPU.
On GPUs that support ECC memory with NVIDIA vGPU, ECC memory is supported with C-series and Q-series vGPUs, but not with A-series and B-series vGPUs. Although A-series and B-series vGPUs start on physical GPUs on which ECC memory is enabled, enabling ECC with vGPUs that do not support it might incur some costs.
On physical GPUs that do not have HBM2 memory, the amount of frame buffer that is usable by vGPUs is reduced. All types of vGPU are affected, not just vGPUs that support ECC memory.
The effects of enabling ECC memory on a physical GPU are as follows:
ECC memory is exposed as a feature on all supported vGPUs on the physical GPU.
In VMs that support ECC memory, ECC memory is enabled, with the option to disable ECC in the VM.
ECC memory can be enabled or disabled for individual VMs. Enabling or disabling ECC memory in a VM does not affect the amount of frame buffer that is usable by vGPUs.
GPUs based on the Pascal GPU architecture and later GPU architectures support ECC memory with NVIDIA vGPU. To determine whether ECC memory is enabled for a GPU, run nvidia-smi -q for the GPU.
Tesla M60 and M6 GPUs support ECC memory when used without GPU virtualization, but NVIDIA vGPU does not support ECC memory with these GPUs. In graphics mode, these GPUs are supplied with ECC memory disabled by default.
Some hypervisor software versions do not support ECC memory with NVIDIA vGPU.
If you are using a hypervisor software version or GPU that does not support ECC memory with NVIDIA vGPU and ECC memory is enabled, NVIDIA vGPU fails to start. In this situation, you must ensure that ECC memory is disabled on all GPUs if you are using NVIDIA vGPU.
Disabling ECC Memory#
If ECC memory is unsuitable for your workloads but is enabled on your GPUs, disable it. You must also ensure that ECC memory is disabled on all GPUs if you are using NVIDIA vGPU with a hypervisor software version or a GPU that does not support ECC memory with NVIDIA vGPU. If your hypervisor software version or GPU does not support ECC memory and ECC memory is enabled, NVIDIA vGPU fails to start.
Where to perform this task depends on whether you are changing ECC memory settings for a physical GPU or a vGPU.
For a physical GPU, perform this task from the hypervisor host.
For a vGPU, perform this task from the VM to which the vGPU is assigned.
Note
ECC memory must be enabled on the physical GPU on which the vGPUs reside.
Before you begin, ensure that NVIDIA Virtual GPU Manager is installed on your hypervisor. If you are changing ECC memory settings for a vGPU, also ensure that the NVIDIA vGPU software graphics driver is installed in the VM to which the vGPU is assigned.
Use
nvidia-smito list the status of all physical GPUs or vGPUs, and check for ECC noted as enabled.# nvidia-smi -q ==============NVSMI LOG============== Timestamp : Mon May 18 18:36:45 2026 Driver Version : 595.91.04 Attached GPUs : 1 GPU 0000:02:00.0 [...] Ecc Mode Current : Enabled Pending : Enabled [...]
Change the ECC status to off for each GPU for which ECC is enabled.
If you want to change the ECC status to off for all GPUs on your host machine or vGPUs assigned to the VM, run this command:
# nvidia-smi -e 0
If you want to change the ECC status to off for a specific GPU or vGPU, run this command:
# nvidia-smi -i <id> -e 0
<id>is the index of the GPU or vGPU as reported bynvidia-smi.This example disables ECC for the GPU with index
0000:02:00.0.# nvidia-smi -i 0000:02:00.0 -e 0
Reboot the host or restart the VM.
Confirm that ECC is now disabled for the GPU or vGPU.
# nvidia-smi -q

==============NVSMI LOG==============

Timestamp                           : Mon May 18 18:37:53 2026
Driver Version                      : 595.91.04

Attached GPUs                       : 1
GPU 0000:02:00.0
[...]

    Ecc Mode
        Current                     : Disabled
        Pending                     : Disabled

[...]
Enabling ECC Memory#
If ECC memory is suitable for your workloads and is supported by your hypervisor software and GPUs, but is disabled on your GPUs or vGPUs, enable it.
Where to perform this task depends on whether you are changing ECC memory settings for a physical GPU or a vGPU.
For a physical GPU, perform this task from the hypervisor host.
For a vGPU, perform this task from the VM to which the vGPU is assigned.
Note
ECC memory must be enabled on the physical GPU on which the vGPUs reside.
Before you begin, ensure that NVIDIA Virtual GPU Manager is installed on your hypervisor. If you are changing ECC memory settings for a vGPU, also ensure that the NVIDIA vGPU software graphics driver is installed in the VM to which the vGPU is assigned.
Use
nvidia-smito list the status of all physical GPUs or vGPUs, and check for ECC noted as disabled.# nvidia-smi -q ==============NVSMI LOG============== Timestamp : Mon May 18 18:36:45 2026 Driver Version : 595.91.04 Attached GPUs : 1 GPU 0000:02:00.0 [...] Ecc Mode Current : Disabled Pending : Disabled [...]
Change the ECC status to on for each GPU or vGPU for which ECC is disabled.
If you want to change the ECC status to on for all GPUs on your host machine or vGPUs assigned to the VM, run this command:
# nvidia-smi -e 1
If you want to change the ECC status to on for a specific GPU or vGPU, run this command:
# nvidia-smi -i <id> -e 1
<id>is the index of the GPU or vGPU as reported bynvidia-smi.This example enables ECC for the GPU with index
0000:02:00.0.# nvidia-smi -i 0000:02:00.0 -e 1
Reboot the host or restart the VM.
Confirm that ECC is now enabled for the GPU or vGPU.
# nvidia-smi -q

==============NVSMI LOG==============

Timestamp                           : Mon May 18 18:37:53 2026
Driver Version                      : 595.91.04

Attached GPUs                       : 1
GPU 0000:02:00.0
[...]

    Ecc Mode
        Current                     : Enabled
        Pending                     : Enabled

[...]
Attaching an NVIDIA vGPU Profile to a VM#
To attach an NVIDIA vGPU profile to a virtual machine (VM), you must configure the VM hardware. The process for attaching an NVIDIA vGPU profile to a VM depends on the hypervisor that you are using.
Changing the Default Graphics Type in VMware vSphere#
After the vGPU Manager VIB for VMware vSphere VIB is installed, the default graphics type is Shared. To enable vGPU support for VMs in VMware vSphere, you must change the default graphics type to Shared Direct.
If you do not change the default graphics type, VMs to which a vGPU is assigned fail to start and the following error message is displayed:
The amount of graphics resource available in the parent resource pool is insufficient for the operation.
Note
Change the default graphics type before configuring vGPU. Output from the VM console in the VMware vSphere Web Client is not available for VMs that are running vGPU.
Before changing the default graphics type, ensure that the ESXi host is running and that all VMs on the host are powered off.
Log in to vCenter Server by using the vSphere Web Client.
In the navigation tree, select your ESXi host and click the Configure tab.
From the menu, choose Graphics and then click the Host Graphics tab.
On the Host Graphics tab, click Edit.
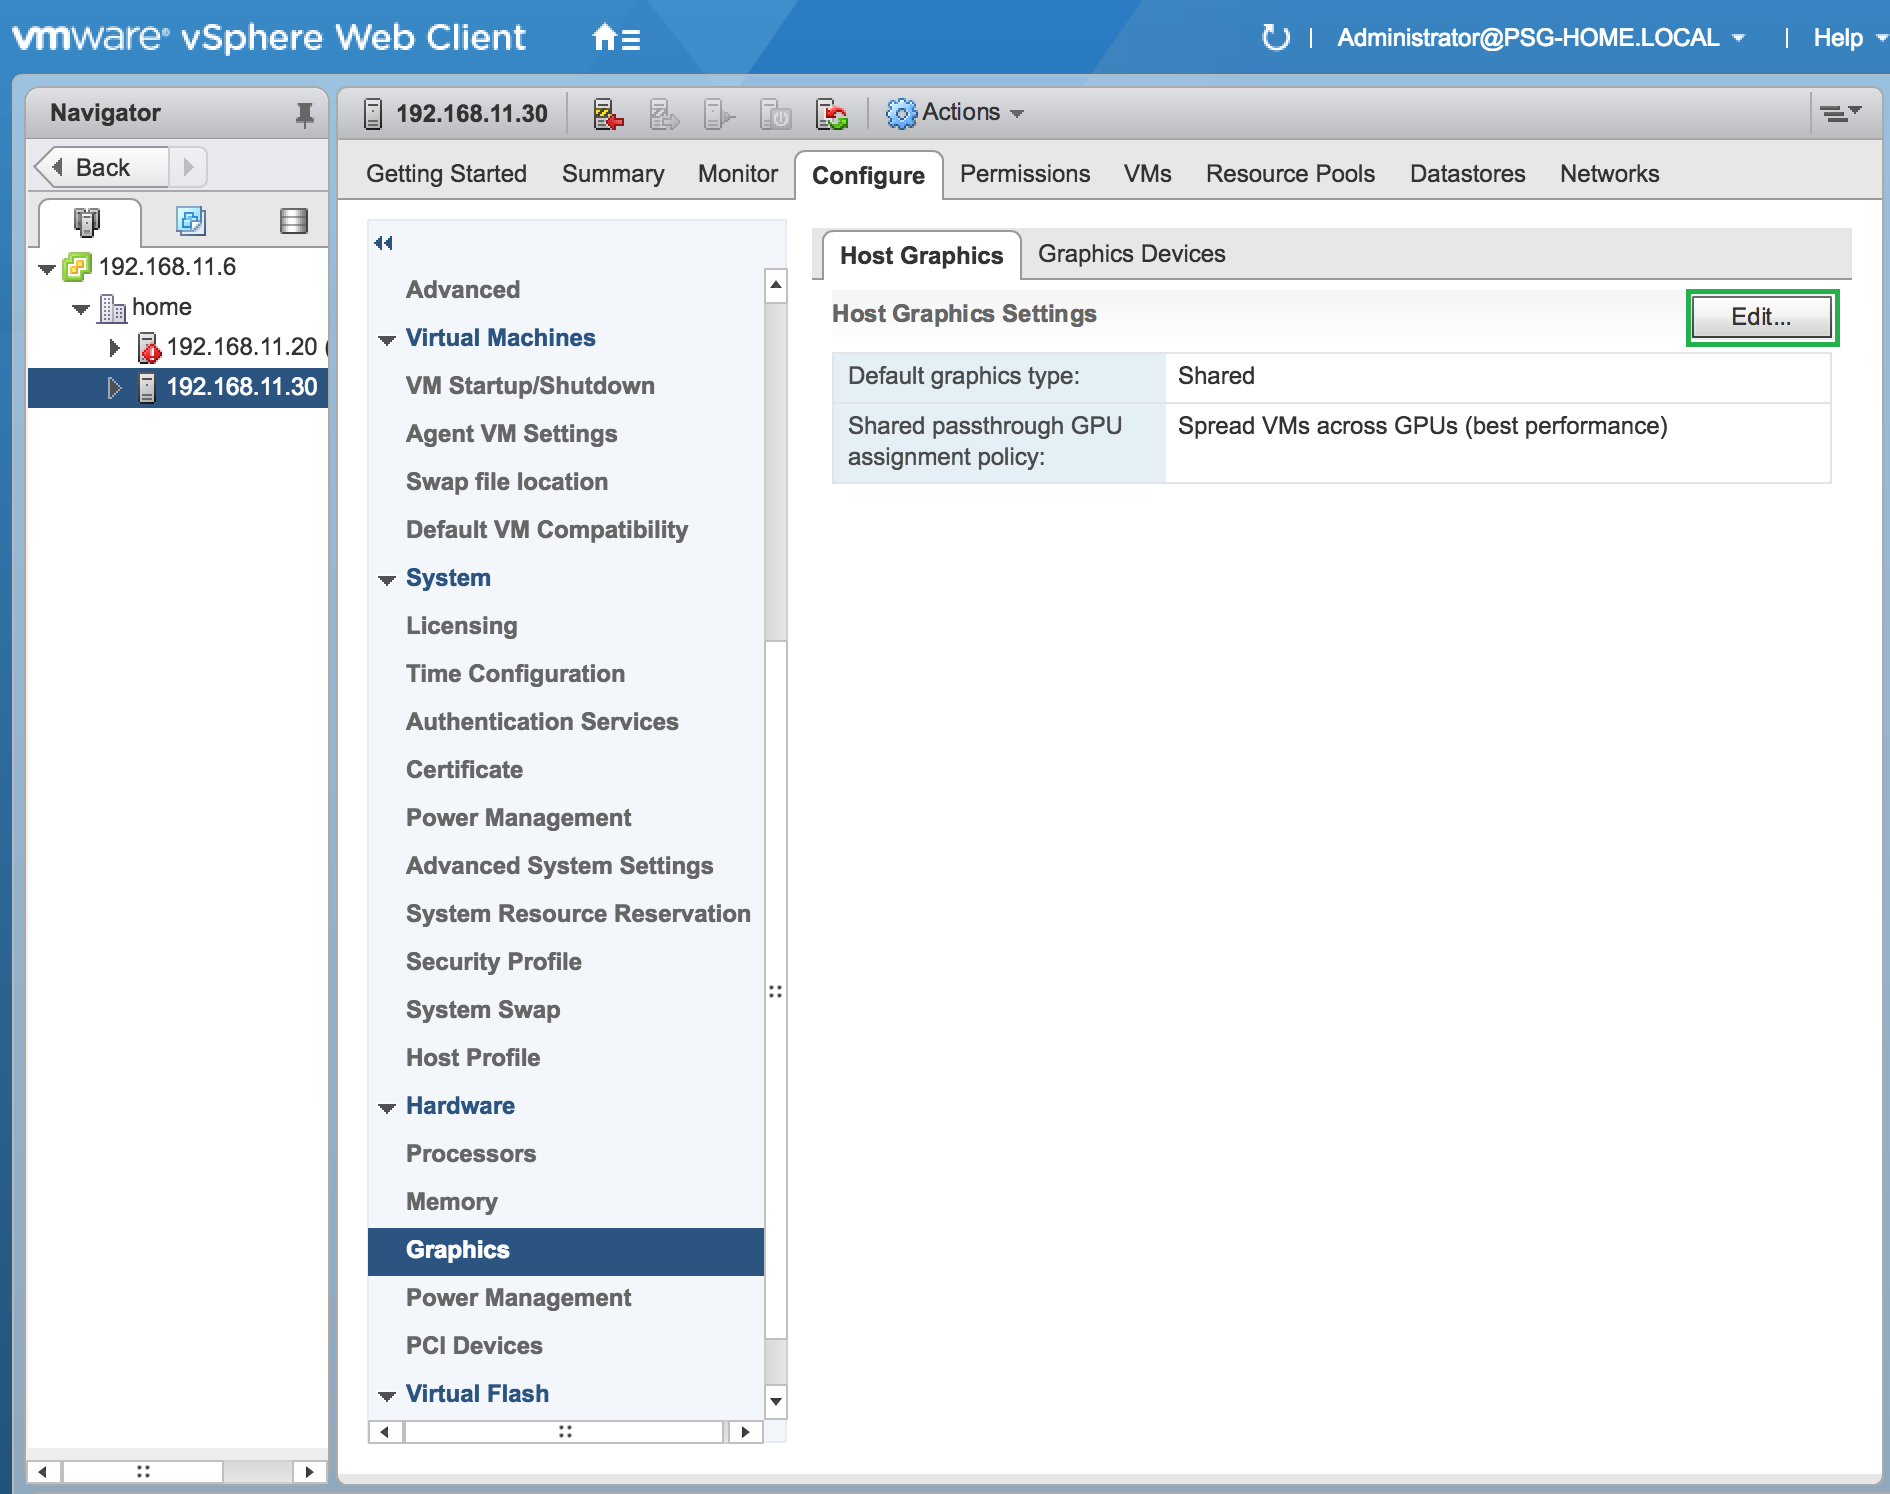
In the Edit Host Graphics Settings dialog box that opens, select Shared Direct and click OK.
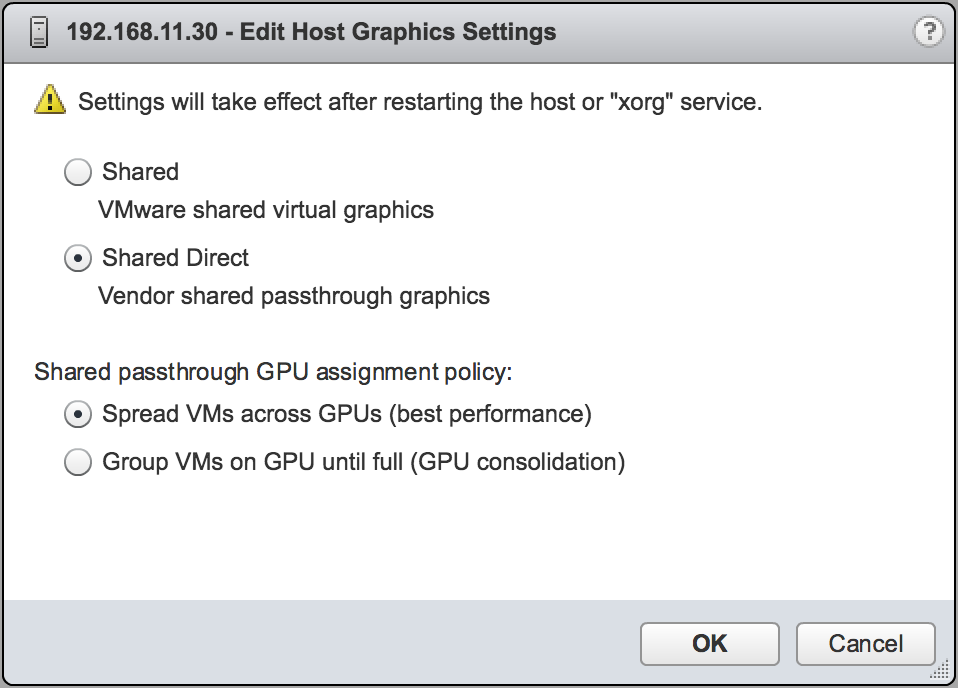
After you click OK, the default graphics type changes to Shared Direct.
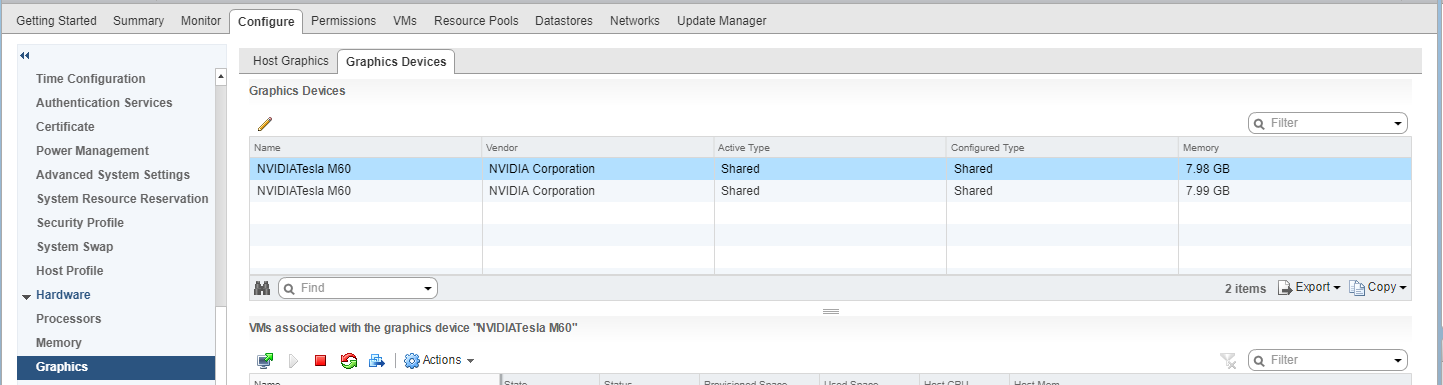
Click the Graphics Devices tab to verify the configured type of each physical GPU on which you want to configure vGPU.
The configured type of each physical GPU must be Shared Direct. For any physical GPU for which the configured type is Shared, change the configured type as follows:
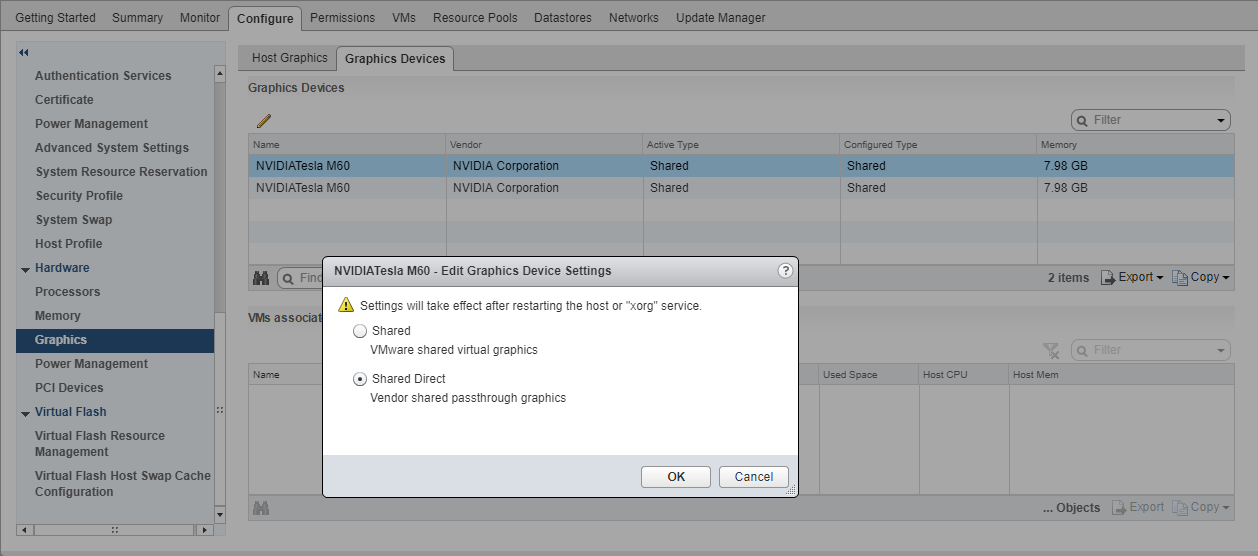
On the Graphics Devices tab, select the physical GPU and click the Edit icon.
In the Edit Graphics Device Settings dialog box that opens, select Shared Direct and click OK.
Restart the ESXi host or stop and restart the Xorg service if necessary and
nv-hostengineon the ESXi host.To stop and restart the Xorg service and
nv-hostengine, perform these steps:Stop
nv-hostengine.[root@esxi:~] nv-hostengine -tWait for 1 second to allow
nv-hostengineto stop.Start
nv-hostengine.[root@esxi:~] nv-hostengine -d
In the Graphics Devices tab of the VMware vCenter Web UI, confirm that the active type and the configured type of each physical GPU are Shared Direct.
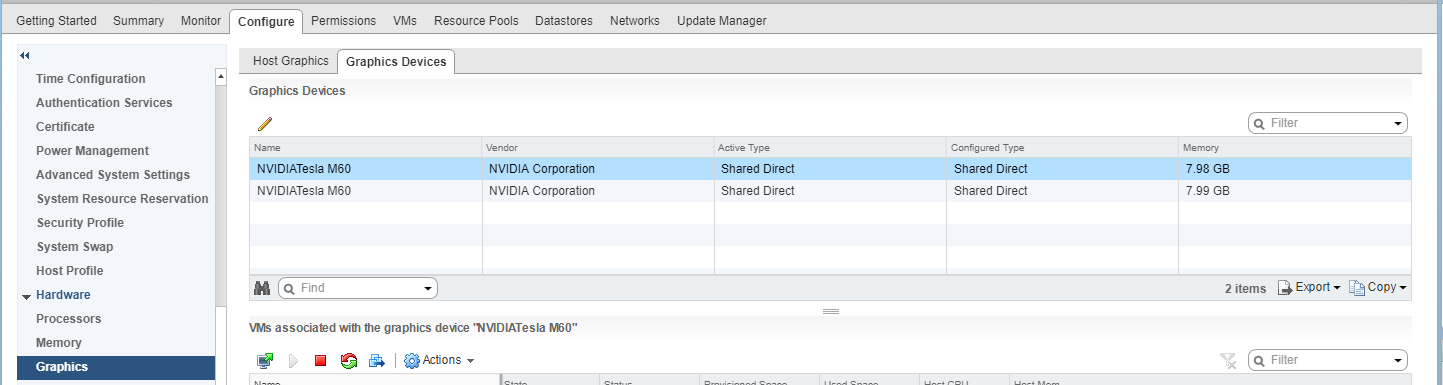
Configuring a vSphere VM with NVIDIA vGPU#
Caution
Output from the VM console in the VMware vSphere Web Client is not available for VMs that are running vGPU. Make sure that you have installed an alternate means of accessing the VM (such as Omnissa Horizon or a VNC server) before you configure vGPU.
VM console in vSphere Web Client will become active again once the vGPU parameters are removed from the VM’s configuration.
Open the vCenter Web UI.
In the vCenter Web UI, right-click the VM and choose Edit Settings.
In the Edit Settings window that opens, configure the vGPUs that you want to add to the VM.
Add each vGPU that you want to add to the VM as follows:
From the ADD NEW DEVICE menu, choose PCI Device.
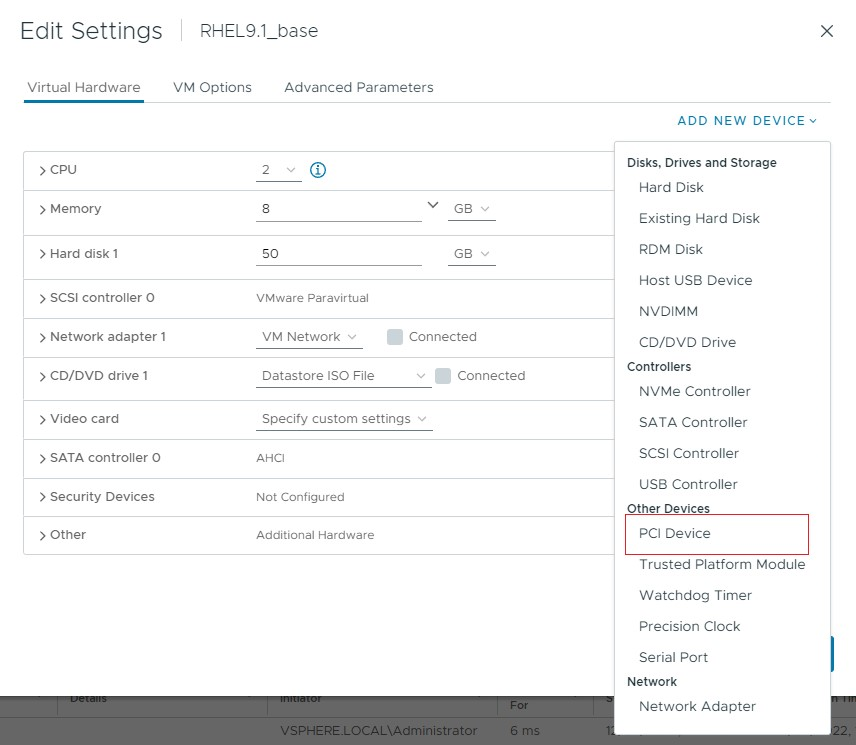
In the Device Selection window that opens, select the type of vGPU you want to configure and click SELECT.
Note
NVIDIA vGPU software does not support NVIDIA vGPU for Compute on VMware vSphere. Therefore, C-series vGPU types are not available for selection in the Device Selection window.
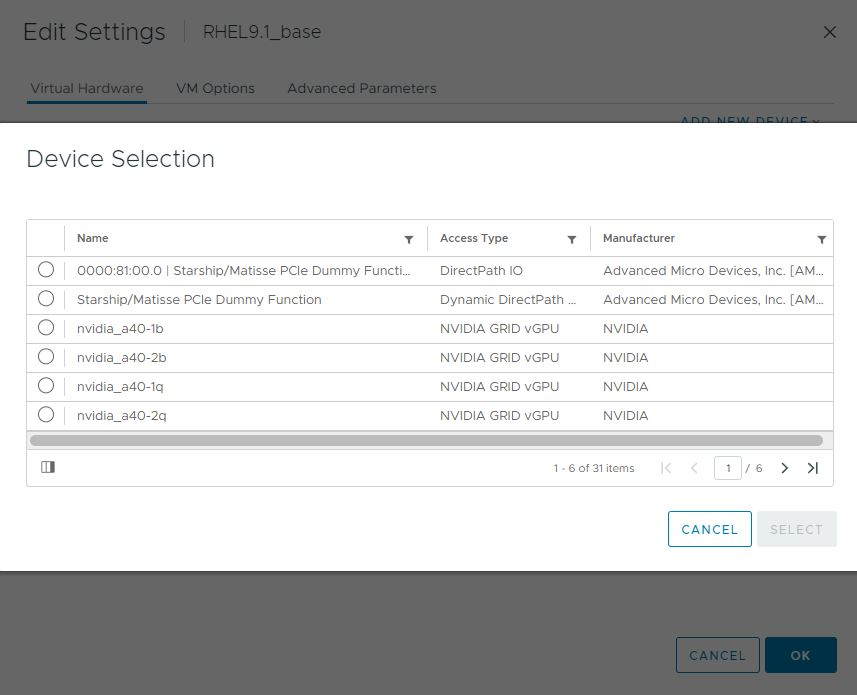
Back in the Edit Settings window, click OK.
After you have configured a vSphere VM with a vGPU, start the VM. VM console in vSphere Web Client is not supported in this vGPU release. Therefore, use Omnissa Horizon or VNC to access the VM’s desktop.
Configuring a XenServer VM with Virtual GPU#
Ensure the VM is powered off.
Right-click the VM in XenCenter, select Properties to open the VM’s properties, and select the GPU property.
The available GPU types are listed in the GPU type drop-down list:
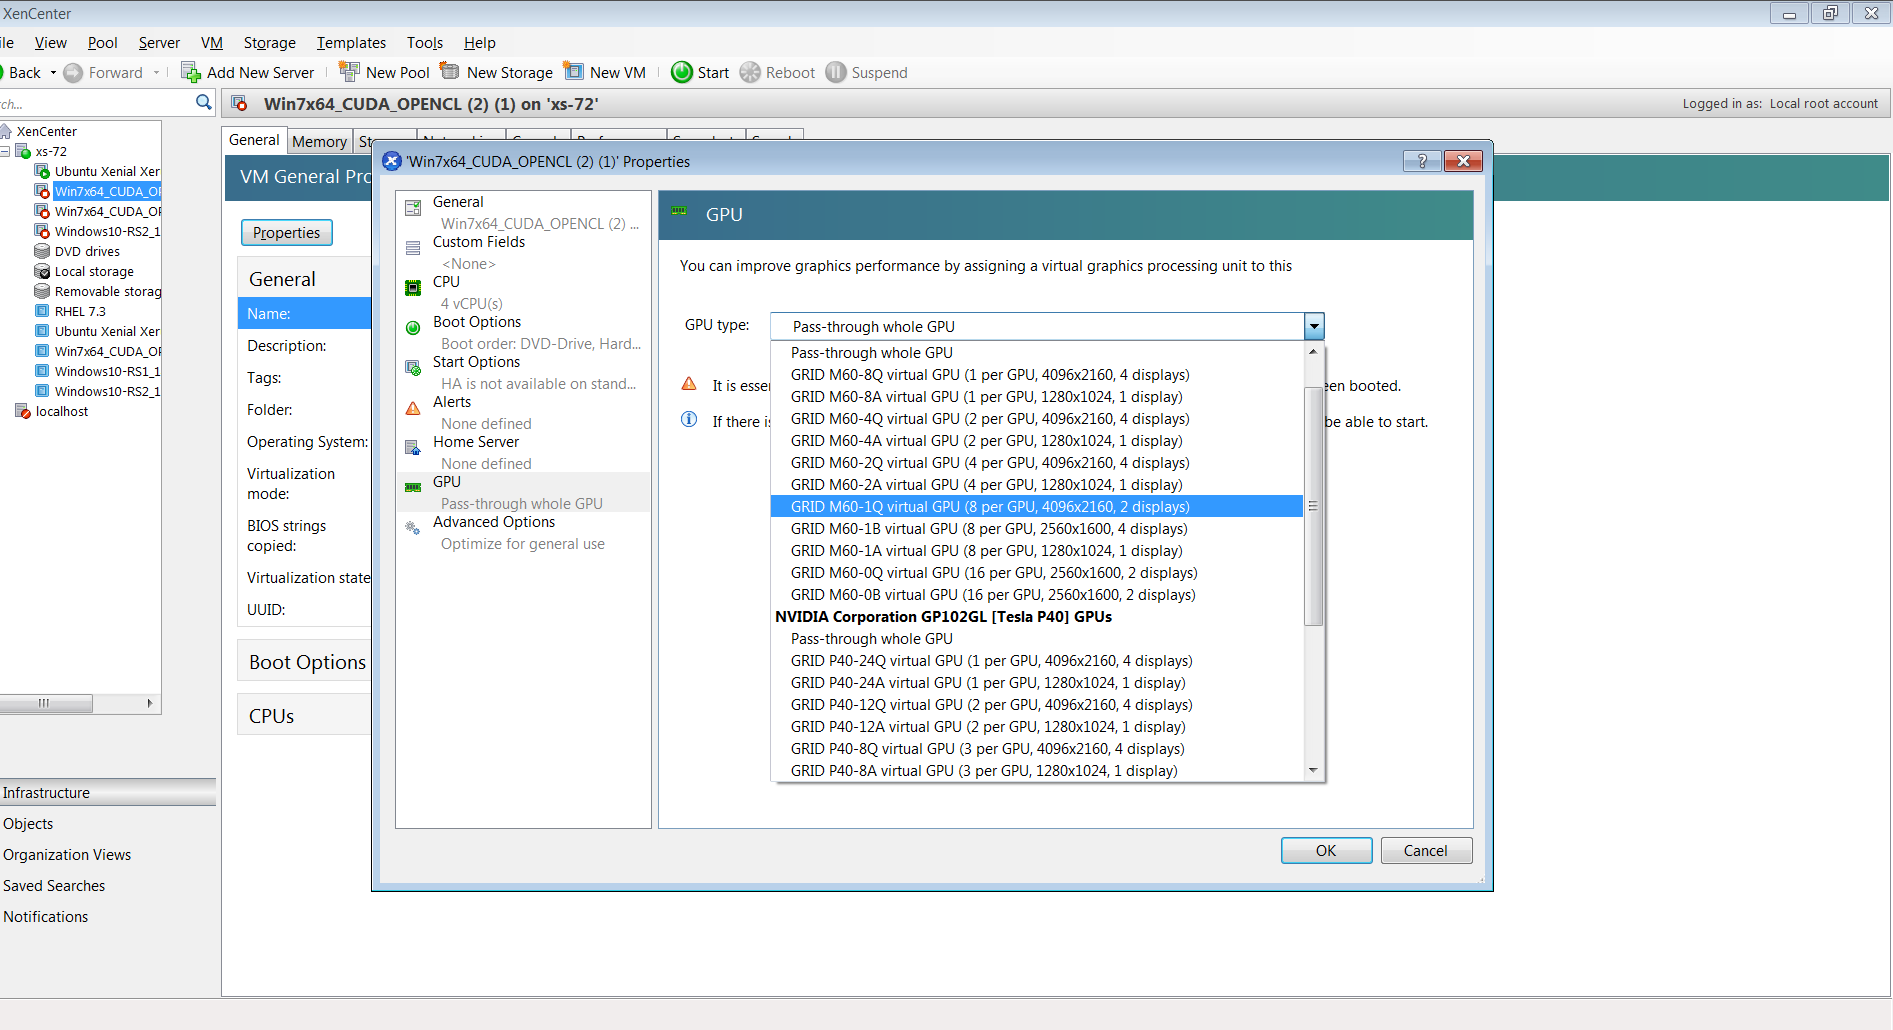
After you have configured a XenServer VM with a vGPU, start the VM, either from XenCenter or by using xe vm-start in a dom0 shell. You can view the VM’s console in XenCenter.
Installing the NVIDIA vGPU Software Graphics Driver#
After you create a Windows VM on the hypervisor and boot the VM, the VM should boot to a standard Windows desktop in VGA mode at 800×600 resolution. You can use the Windows screen resolution control panel to increase the resolution to other standard resolutions, but to fully enable GPU operation, the NVIDIA vGPU software graphics driver must be installed.
Copy the NVIDIA Windows driver package to the guest VM where you are installing the driver.
Execute the package to unpack and run the driver installer.
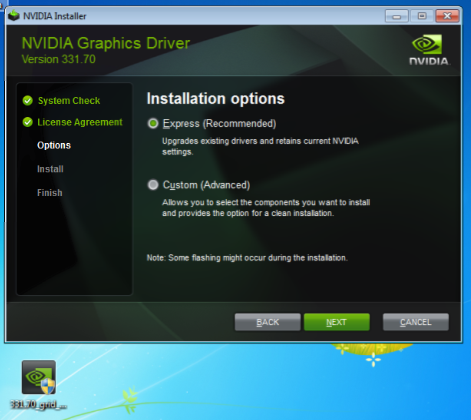
Click through the license agreement.
Select Express Installation and click NEXT.
After the driver installation is complete, the installer may prompt you to restart the platform.
If prompted to restart the platform, do one of the following:
Select Restart Now to reboot the VM.
Exit the installer and reboot the VM when you are ready.
After the VM restarts, it boots to a Windows desktop.
Verify that the NVIDIA driver is running.
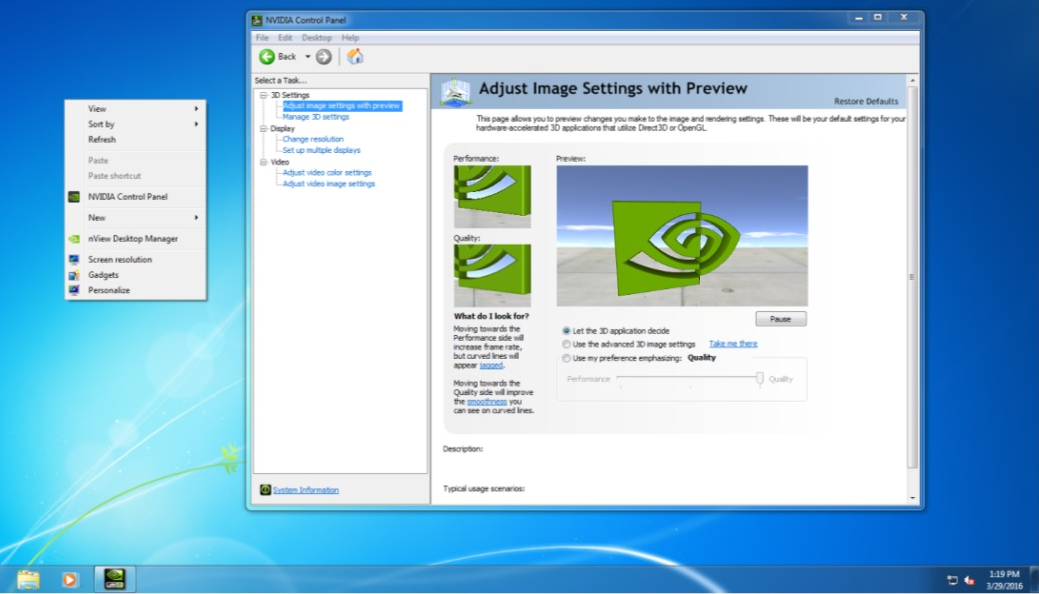
Right-click on the desktop.
From the menu that opens, choose NVIDIA Control Panel.
In the NVIDIA Control Panel, from the Help menu, choose System Information.
NVIDIA Control Panel reports the vGPU that is being used, its capabilities, and the NVIDIA driver version that is loaded.
Configuring a Licensed Client#
A client with a network connection obtains a license by leasing it from a NVIDIA License System service instance. The service instance serves the license to the client over the network from a pool of floating licenses obtained from the NVIDIA Licensing Portal. The license is returned to the service instance when the licensed client no longer requires the license.
The NVIDIA vGPU software graphics driver creates a default location in which to store the client configuration token on the client.
The process for configuring a licensed client is the same for CLS and DLS instances but depends on the OS that is running on the client.
Configuring a Licensed Client on Windows with Default Settings#
Perform this task from the client.
Copy the client configuration token to the
%SystemDrive%\Program Files\NVIDIA Corporation\vGPU Licensing\ClientConfigTokenfolder.Restart the
NvDisplayContainerservice.
The NVIDIA service on the client should now automatically obtain a license from the CLS or DLS instance.
Verifying the NVIDIA vGPU Software License Status of a Licensed Client#
After configuring a client with an NVIDIA vGPU software license, verify the license status by displaying the licensed product name and status.
To verify the license status of a licensed client, run nvidia-smi with the -q or --query option from the licensed client, not the hypervisor host. If the product is licensed, the expiration date is shown in the license status.
nvidia-smi -q
==============NVSMI LOG==============

Timestamp                                 : Wed Nov 23 10:52:59 2022
Driver Version                            : 525.60.06
CUDA Version                              : 12.0

Attached GPUs                             : 2
GPU 00000000:02:03.0
    Product Name                          : NVIDIA A2-8Q
    Product Brand                         : NVIDIA RTX Virtual Workstation
    Product Architecture                  : Ampere
    Display Mode                          : Enabled
    Display Active                        : Disabled
    Persistence Mode                      : Enabled
    MIG Mode
        Current                           : Disabled
        Pending                           : Disabled
    Accounting Mode                       : Disabled
    Accounting Mode Buffer Size           : 4000
    Driver Model
        Current                           : N/A
        Pending                           : N/A
    Serial Number                         : N/A
    GPU UUID                              : GPU-ba5b1e9b-1dd3-11b2-be4f-98ef552f4216
    Minor Number                          : 0
    VBIOS Version                         : 00.00.00.00.00
    MultiGPU Board                        : No
    Board ID                              : 0x203
    Board Part Number                     : N/A
    GPU Part Number                       : 25B6-890-A1
    Module ID                             : N/A
    Inforom Version
        Image Version                     : N/A
        OEM Object                        : N/A
        ECC Object                        : N/A
        Power Management Object           : N/A
    GPU Operation Mode
        Current                           : N/A
        Pending                           : N/A
    GSP Firmware Version                  : N/A
    GPU Virtualization Mode
        Virtualization Mode               : VGPU
        Host VGPU Mode                    : N/A
    vGPU Software Licensed Product
        Product Name                      : NVIDIA RTX Virtual Workstation
        License Status                    : Licensed (Expiry: 2022-11-23 10:41:16 GMT)
    …
    …