


Installing the NVIDIA vGPU Software Graphics Driver#
The process for installing the NVIDIA vGPU software graphics driver depends on the OS that you are using. However, for any OS, the process for installing the driver is the same in a VM configured with vGPU, in a VM that is running pass-through GPU, or on a physical host in a bare-metal deployment.
After you install the NVIDIA vGPU software graphics driver, you can license any NVIDIA vGPU software licensed products that you are using.
Installing the NVIDIA vGPU Software Graphics Driver and NVIDIA Control Panel on Windows#
To fully enable GPU operation in a VM or on a bare-metal host, the NVIDIA vGPU software graphics driver must be installed. If the NVIDIA Control Panel app is not installed when the graphics driver is installed, you can install it separately from the graphics driver.
Installing the NVIDIA vGPU Software Graphics Driver on Windows#
Installation in a VM: After you create a Windows VM on the hypervisor and boot the VM, the VM should boot to a standard Windows desktop in VGA mode at 800×600 resolution. You can use the Windows screen resolution control panel to increase the resolution to other standard resolutions, but to fully enable GPU operation, the NVIDIA vGPU software graphics driver must be installed. Windows guest VMs are supported on all NVIDIA vGPU types, namely: Q-series, B-series, and A-series NVIDIA vGPU types.
Installation on bare metal: When the physical host is booted before the NVIDIA vGPU software graphics driver is installed, boot and the primary display are handled by an on-board graphics adapter. To install the NVIDIA vGPU software graphics driver, access the Windows desktop on the host by using a display connected through the on-board graphics adapter.
The procedure for installing the driver is the same in a VM and on bare metal.
Copy the NVIDIA Windows driver package to the guest VM or physical host where you are installing the driver.
Execute the package to unpack and run the driver installer.
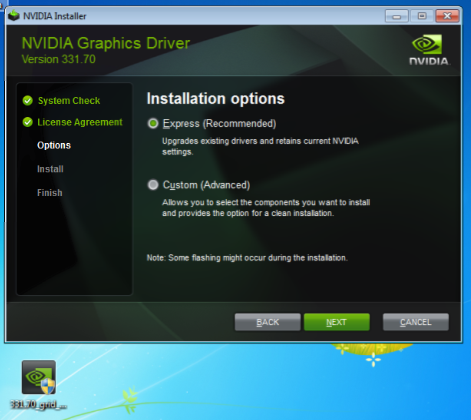
Figure 16 NVIDIA driver installation#
Click through the license agreement.
Select Express Installation and click NEXT.
After the driver installation is complete, the installer may prompt you to restart the platform.
If prompted to restart the platform, do one of the following:
Select Restart Now to reboot the VM or physical host.
Exit the installer and reboot the VM or physical host when you are ready.
After the VM or physical host restarts, it boots to a Windows desktop.
Verify that the NVIDIA driver is running.
Right-click on the desktop.
From the menu that opens, choose NVIDIA Control Panel.
In the NVIDIA Control Panel, from the Help menu, choose System Information.
NVIDIA Control Panel reports the vGPU or physical GPU that is being used, its capabilities, and the NVIDIA driver version that is loaded.
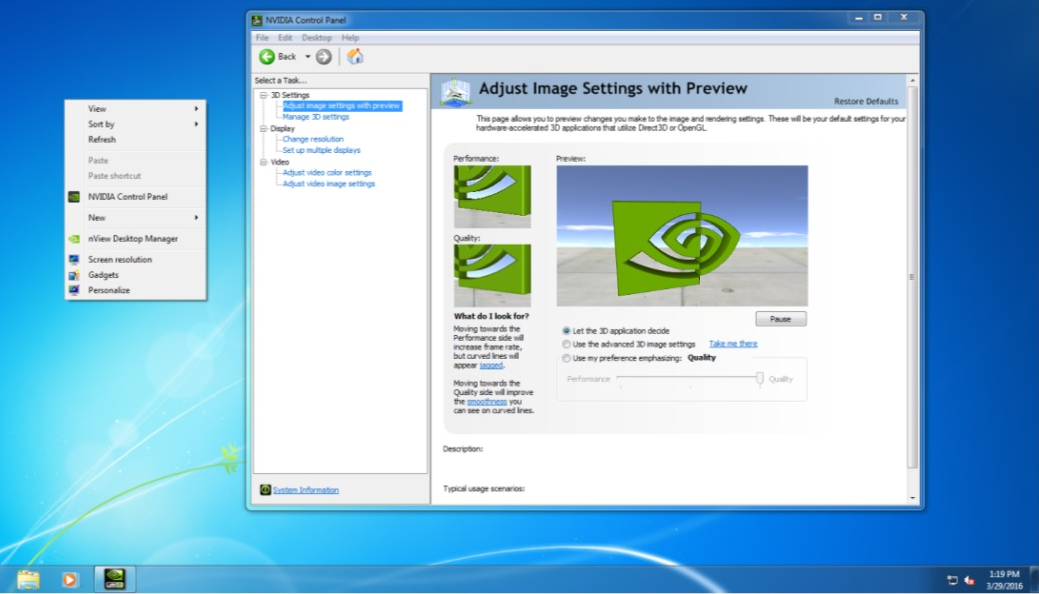
Figure 17 Verifying NVIDIA driver operation using NVIDIA Control Panel#
Installation in a VM: After you install the NVIDIA vGPU software graphics driver, you can license any NVIDIA vGPU software licensed products that you are using. For instructions, refer to Virtual GPU Software Client Licensing User Guide.
Note
The graphics driver for Windows in this release of NVIDIA vGPU software is distributed in a DCH-compliant package. A DCH-compliant package differs from a driver package that is not DCH compliant in the following ways:- The Windows registry key for license settings for a DCH-compliant package is different than the key for a driver package that is not DCH compliant. If you are upgrading from a driver package that is not DCH compliant in a VM that was previously licensed, you must reconfigure the license settings for the VM. Existing license settings are not propagated to the new Windows registry key for a DCH-compliant package.
NVIDIA System Management Interface,
nvidia-smi, is installed in a folder that is in the default executable path.The NVWMI binary files are installed in the Windows Driver Store under
%SystemDrive%\Windows\System32\DriverStore\FileRepository\.NVWMI help information in Windows Help format is not installed with graphics driver for Windows guest OSes.
Installation on bare metal: After you install the NVIDIA vGPU software graphics driver, complete the bare-metal deployment as explained in Bare-Metal Deployment.
Installing the Standalone NVIDIA Control Panel App#
The NVIDIA Control Panel app is now distributed through the Microsoft Store. If your system does not allow the installation apps from the Microsoft Store, the NVIDIA Control Panel app is not installed when the NVIDIA vGPU software graphics driver for Windows is installed.
Your system might not allow the installation apps from the Microsoft Store for any of the following reasons:
The Microsoft Store app is disabled.
Your system is not connected to the Internet
Installation of apps from the Microsoft Store is blocked by your system settings.
You can install the NVIDIA Control Panel app separately from the graphics driver by downloading and running the standalone NVIDIA Control Panel installer that is available from NVIDIA Licensing Portal.
Download and extract the standalone NVIDIA Control Panel installer from NVIDIA Licensing Portal.
Copy the extracted standalone NVIDIA Control Panel installer to the guest VM or physical host where you are installing the NVIDIA Control Panel app.
Double-click the installer executable file to start the installer.
When asked if you want to allow the installer app to make changes to your device, click Yes.
Accept the NVIDA software license agreement.
Select the Express installation option and click NEXT.
When the installation is complete, click CLOSE to close the installer.
The NVIDIA Control Panel app opens.
Installing the NVIDIA vGPU Software Graphics Driver on Linux#
The NVIDIA vGPU software graphics driver for Linux is distributed as a .run file that can be installed on all supported Linux distributions. The driver is also distributed as a Debian package for Ubuntu distributions and as an RPM package for Red Hat distributions.
Installation in a VM: After you create a Linux VM on the hypervisor and boot the VM, install the NVIDIA vGPU software graphics driver in the VM to fully enable GPU operation. Linux guest VMs are supported on all NVIDIA vGPU types, namely: Q-series, B-series, and A-series NVIDIA vGPU types.
Installation on bare metal: When the physical host is booted before the NVIDIA vGPU software graphics driver is installed, the vesa Xorg driver starts the X server. If a primary display device is connected to the host, use the device to access the desktop. Otherwise, use secure shell (SSH) to log in to the host from a remote host.
In addition to the proprietary release of the NVIDIA vGPU software graphics driver for Linux, a release that is based on NVIDIA Linux open GPU kernel modules is also available. The release that is based on NVIDIA Linux open GPU kernel modules is compatible with the following NVIDIA vGPU software deployments:
NVIDIA vGPU deployments on GPUs that are based on the NVIDIA Ada Lovelace GPU architecture or later architectures
Bare-metal deployments on GPUs that are based on the NVIDIA Turing GPU architecture or later architectures
The release that is based on NVIDIA Linux open GPU kernel modules can be installed only from the .run file, not from a Debian package or RPM package.
The procedure for installing the driver is the same in a VM and on bare metal.
Before installing the NVIDIA vGPU software graphics driver, ensure that the following prerequisites are met:
OpenSSL is installed in the VM. If OpenSSL is not installed, the VM will not be able to obtain NVIDIA vGPU software licenses.
NVIDIA Direct Rendering Manager Kernel Modesetting (DRM KMS) is disabled. By default, DRM KMS is disabled. However, if it has been enabled, remove
nvidia-drm.modeset=1from the kernel command-line options.If the VM uses UEFI boot, do one of the following:
Ensure that secure boot is disabled.
Self-sign the driver as explained in the Linux
READMEfile that is included in the.runfile distribution of the driver.
If the Nouveau driver for NVIDIA graphics cards is present, disable it. For instructions, refer to Disabling the Nouveau Driver for NVIDIA Graphics Cards.
If you are using the Wayland display server protocol, refer to Configuring the Wayland Display Server Protocol for Use with NVIDIA vGPU Software for additional prerequisites for installing the NVIDIA vGPU software graphics driver.
If you are using a Linux OS for which the Wayland display server protocol is enabled by default, and either of the following conditions is met, disable it as explained in Disabling the Wayland Display Server Protocol for Red Hat Enterprise Linux.
Wayland isn’t supported on NVIDIA vGPU software with your Linux OS.
You don’t want to use Wayland.
How to install the NVIDIA vGPU software graphics driver on Linux depends on the distribution format from which you are installing the driver. For detailed instructions, refer to:
Installing the NVIDIA vGPU Software Graphics Driver on Linux from a .run File
Installing the NVIDIA vGPU Software Graphics Driver on Ubuntu from a Debian Package
Installing the NVIDIA vGPU Software Graphics Driver on Red Hat Distributions from an RPM Package
Installation in a VM: After you install the NVIDIA vGPU software graphics driver, perform the following tasks:
If you are using the Wayland display server protocol, complete the configuration of Wayland for use with NVIDIA vGPU software as explained in Configuring the Wayland Display Server Protocol for Use with NVIDIA vGPU Software.
License any NVIDIA vGPU software licensed products that you are using as explained in Virtual GPU Software Client Licensing User Guide.
Installation on bare metal: After you install the NVIDIA vGPU software graphics driver, complete the bare-metal deployment as explained in Bare-Metal Deployment.
Installing the NVIDIA vGPU Software Graphics Driver on Linux from a .run File#
You can use the .run file to install the NVIDIA vGPU software graphics driver on any supported Linux distribution.
Installation of the NVIDIA vGPU software graphics driver for Linux from a .run file requires:
Compiler toolchain
Kernel headers
If a driver has previously been installed on the guest VM or physical host from a Debian package or RPM package, uninstall that driver before installing the driver from a .run file.
If Dynamic Kernel Module Support (DKMS) is enabled, ensure that the dkms package is installed.
Copy the NVIDIA vGPU software Linux driver package, for example
NVIDIA-Linux_x86_64-595.71.05-grid.run, to the guest VM or physical host where you are installing the driver.Before attempting to run the driver installer, exit the X server and terminate all OpenGL applications.
On Red Hat Enterprise Linux and CentOS systems, exit the X server by transitioning to runlevel 3:
[nvidia@localhost ~]$ sudo init 3
On Ubuntu platforms, do the following:
Switch to a console login prompt.
If you have access to the terminal’s function keys, press CTRL-ALT-F1.
If you are accessing the guest VM or physical host through VNC or a web browser and do not have access to the terminal’s function keys, run the
chvtcommand of the OS as root.[nvidia@localhost ~]$ sudo chvt 3
Log in and shut down the display manager:
For Ubuntu 18 and later releases, stop the
gdmservice.[nvidia@localhost ~]$ sudo service gdm stop
For releases earlier than Ubuntu 18, stop the
lightdmservice.[nvidia@localhost ~]$ sudo service lightdm stop
From a console shell, run the driver installer as the root user.
To install the proprietary release of the driver, run the driver installer without any additional options.
sudo sh ./NVIDIA-Linux_x86_64-595.91.07-grid.runTo install the release that is based on NVIDIA Linux open GPU kernel modules, run the driver installer with the
-m=kernel-openoption.sudo sh ./NVIDIA-Linux_x86_64-595.91.07-grid.run -m=kernel-open
If DKMS is enabled, set the
-dkmsoption. This option requires thedkmspackage to be installed.sudo sh ./NVIDIA-Linux_x86_64-595.91.07-grid.run -dkmsIn some instances, the installer may fail to detect the installed kernel headers and sources. In this situation, rerun the installer, specifying the kernel source path with the
--kernel-source-pathoption.sudo sh ./NVIDIA-Linux_x86_64-595.91.07-grid.run \ --kernel-source-path=/usr/src/kernels/3.10.0-229.11.1.el7.x86_64
When prompted, accept the option to update the X configuration file (
xorg.conf).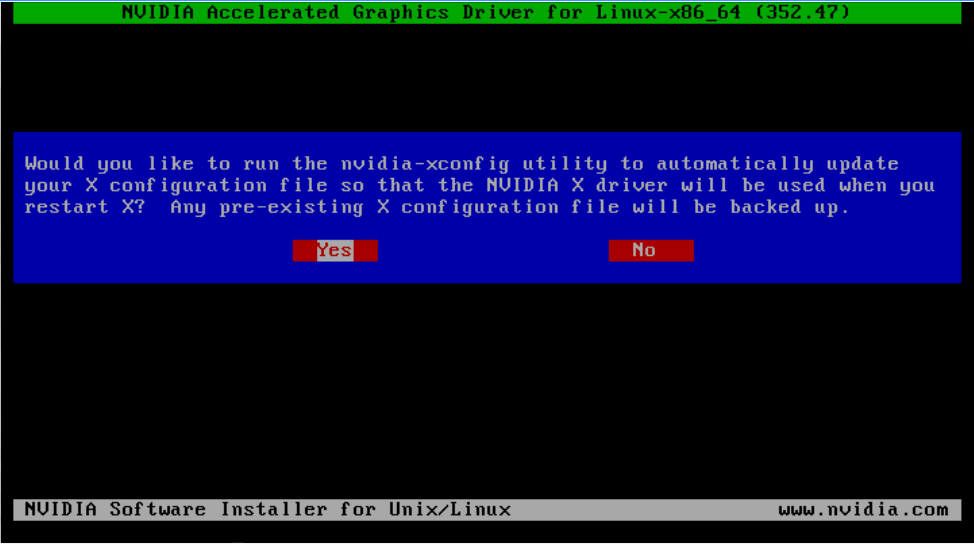
Figure 18 Update
xorg.confsettings#After the installation is complete, select OK to exit the installer.
Verify that the NVIDIA driver is operational.
Reboot the system and log in.
Run
nvidia-settings.[nvidia@localhost ~]$ nvidia-settingsThe NVIDIA X Server Settings dialog box opens to show that the NVIDIA driver is operational.
Installing the NVIDIA vGPU Software Graphics Driver on Ubuntu from a Debian Package#
The NVIDIA vGPU software graphics driver for Ubuntu is distributed as a Debian package file.
This task requires sudo privileges.
Copy the NVIDIA vGPU software Linux driver package, for example
nvidia-linux-grid-595_595.71.05_amd64.deb, to the guest VM where you are installing the driver.Log in to the guest VM as a user with
sudoprivileges.Open a command shell and change to the directory that contains the NVIDIA vGPU software Linux driver package.
From the command shell, run the command to install the package.
$ sudo apt-get install ./nvidia-linux-grid-595_595.91.07_amd64.deb
Verify that the NVIDIA driver is operational.
Reboot the system and log in.
After the system has rebooted, confirm that you can see your NVIDIA vGPU device in the output from the
nvidia-smicommand.$ nvidia-smi
Installing the NVIDIA vGPU Software Graphics Driver on Red Hat Distributions from an RPM Package#
The NVIDIA vGPU software graphics driver for Red Hat Distributions is distributed as an RPM package file.
This task requires root user privileges.
Copy the NVIDIA vGPU software Linux driver package, for example
nvidia-linux-grid-595_595.71.05-1.x86_64.rpm, to the guest VM where you are installing the driver.Log in to the guest VM as a user with
rootuser privileges.Open a command shell and change to the directory that contains the NVIDIA vGPU software Linux driver package.
From the command shell, run the command to install the package.
$ rpm -iv ./nvidia-linux-grid-595_595.91.07-1.x86_64.rpm
Verify that the NVIDIA driver is operational.
Reboot the system and log in.
After the system has rebooted, confirm that you can see your NVIDIA vGPU device in the output from the
nvidia-smicommand.$ nvidia-smi
Disabling the Nouveau Driver for NVIDIA Graphics Cards#
If the Nouveau driver for NVIDIA graphics cards is present, disable it before installing the NVIDIA vGPU software graphics driver.
Note
If you are using SUSE Linux Enterprise Server, you can skip this task because the Nouveau driver is not present in SUSE Linux Enterprise Server.
Run the following command and if the command prints any output, the Nouveau driver is present and must be disabled.
$ lsmod | grep nouveau
Create the file
/etc/modprobe.d/blacklist-nouveau.confwith the following contents:blacklist nouveau options nouveau modeset=0
Regenerate the kernel initial RAM file system (initramfs).
The command to run to regenerate the kernel initramfs depends on the Linux distribution that you are using.
Linux Distribution
Command
CentOS
$ sudo dracut --force
Debian
$ sudo update-initramfs -u
Red Hat Enterprise Linux
$ sudo dracut --force
Ubuntu
$ sudo update-initramfs -u
Reboot the host or guest VM.
Disabling the Wayland Display Server Protocol for Red Hat Enterprise Linux#
Starting with Red Hat Enterprise Linux Desktop 8.0, the Wayland display server protocol is used by default on supported GPU and graphics driver configurations. If you don’t want to use Wayland or if Wayland isn’t supported on NVIDIA vGPU software with your Linux OS, disable Wayland before installing the driver. If supported, the OS reverts to the X Window System. Otherwise, the OS can be used only in console and command-line interface (CLI) mode
Perform this task from the host or guest VM that is running Red Hat Enterprise Linux Desktop.
This task requires administrative access.
In a plain text editor, edit the file
/etc/gdm/custom.confand remove the comment from the optionWaylandEnable=false.Save your changes to
/etc/gdm/custom.conf.Reboot the host or guest VM.
Disabling GSP Firmware#
Some GPUs include a GPU System Processor (GSP), which may be used to offload GPU initialization and management tasks. In GPU pass through and bare-metal deployments on Linux, GSP is supported only for NVIDIA vGPU for Compute. If you are using any other product in a GPU pass through or bare-metal deployment on Linux, you must disable the GSP firmware.
Note
For NVIDIA vGPU deployments on Linux and all NVIDIA vGPU software deployments on Windows, omit this task.
GSP firmware is supported with NVIDIA vGPU deployments on GPUs that are based on the NVIDIA Ada Lovelace GPU architecture. For NVIDIA vGPU deployments on Linux and all NVIDIA vGPU software deployments on Windows on GPUs based on earlier GPU architectures, GSP is also not supported but GSP firmware is already disabled.
For each NVIDIA vGPU software product, the following table lists whether GSP is supported in deployments in which GSP firmware can be enabled. The table also summarizes the behavior of NVIDIA vGPU software if a VM or host requests a license when GSP firmware is enabled. The deployments in which GSP firmware can be enabled are GPU pass through and bare-metal deployments on Linux.
Product |
GSP |
License Request |
Error Message |
|---|---|---|---|
NVIDIA vGPU for Compute |
Supported |
Allowed |
Not applicable |
NVIDIA Virtual Applications |
Not supported |
Blocked |
Printed |
NVIDIA RTX Virtual Workstation |
Not supported |
Blocked |
Printed |
When a license request is blocked, the following error message is written to the licensing event log file at the location given in Virtual GPU Software Client Licensing User Guide:
Invalid feature requested for the underlying GSP firmware configuration.
Disable GSP firmware to use this feature.
Perform this task on the VM to which the GPU is passed through or on the bare-metal host.
Ensure that the NVIDIA vGPU software graphics driver for Linux is installed on the VM or bare-metal host.
Log in to the VM or bare-metal host and open a command shell.
Determine whether GSP firmware is enabled.
$ nvidia-smi -q
If GSP firmware is enabled, the command displays the GSP firmware version, for example:
GSP Firmware Version : 595.91.07Otherwise, the command displays
N/Aas the GSP firmware version.
If GSP firmware is enabled, disable it by setting the NVIDIA module parameter
NVreg_EnableGpuFirmwareto 0.Set this parameter by adding the following entry to the
/etc/modprobe.d/nvidia.conffile:options nvidia NVreg_EnableGpuFirmware=0If the
/etc/modprobe.d/nvidia.conffile does not already exist, create it.Reboot the VM or bare-metal host.
If you later need to enable GSP firmware, set the NVIDIA module parameter NVreg_EnableGpuFirmware to 1.
Configuring the Wayland Display Server Protocol for Use with NVIDIA vGPU Software#
To enable remote desktops to operate with the security protocols in the Wayland display server protocol, you must configure Wayland for use with NVIDIA vGPU software. Perform tasks that require the regular Virtual Network Computing (VNC) console before installing the NVIDIA vGPU software graphics driver.
If you are using Red Hat Enterprise Linux 10.1 or 10.0, upgrade the installed GNOME Remote Desktop packages to their latest versions.
Before installing the NVIDIA vGPU software graphics driver, follow this sequence of instructions:
Then ask each remote desktop user to follow this sequence of instructions:
Remote Desktop User: Enabling Access to GNOME Remote Desktop Over RDP
The first time this task is performed in a VM, the user is prompted for a password that can be provided only through the VNC console. However, after the NVIDIA vGPU software graphics driver is installed, the VNC console is blank. Therefore, each remote desktop user must perform this task once before the NVIDIA vGPU software graphics driver is installed.
After each remote desktop user has completed these tasks, continue with the configuration of Wayland for use with NVIDIA vGPU software as follows:
Ensure that the generic video card is removed from the configuration on the hypervisor host and only NVIDIA GPUs are attached.
Follow the instructions in one of the following topics to install the graphics driver:
If the guest OS is Ubuntu, follow the instructions in Ubuntu OS Only: Configuring the Mutter Compositor.
After installing the graphics driver and, if necessary, configuring the Mutter compositor, complete the configuration of Wayland for use with NVIDIA vGPU software as follows:
MIG-backed vGPUs only: Follow the instructions in Configuring the Wayland Display Server Protocol for MIG-Backed vGPUs.
Ask each remote desktop user to follow the instructions in Remote Desktop User: Enabling Access to GNOME Remote Desktop Over RDP again after every reboot of the VM on which the GNOME Remote Desktop is running.
Enabling Remote Desktop Mode for the GNOME Remote Desktop#
If you are using the Wayland display server protocol, enable remote desktop mode for each user that will use the GNOME Remote Desktop.
Use the regular Virtual Network Computing (VNC) console to perform this task in a VM in which the NVIDIA vGPU software graphics driver has not yet been installed.
In the Settings app, choose System and click Remote Desktop.
Click the Desktop Sharing tab and ensure that the Desktop Sharing and Remote Control options are selected.
In Login Details, set the user name and password of the remote desktop user for whom you are enabling remote desktop mode.
Click the Remote Login tab and ensure that the Remote Login option is deselected.
This option does not use the path that the NVIDIA vGPU software graphics driver supports.
After enabling remote desktop mode, configure GNOME Remote Desktop for use with NVIDIA vGPU as explained in Configuring GNOME Remote Desktop for Use with NVIDIA vGPU.
Configuring GNOME Remote Desktop for Use with NVIDIA vGPU#
Perform this task for each user for whom remote desktop mode was enabled in Enabling Remote Desktop Mode for the GNOME Remote Desktop.
This task requires administrative access.
Ensure that GNOME Desktop Manager is configured to start at boot.
# sudo systemctl set-default graphical.target
If necessary, enable the Wayland display server protocol.
If you are using a Linux OS for which the Wayland display server protocol is enabled by default, such as Red Hat Enterprise Linux, and Wayland hasn’t previously been disabled, skip this step.
In a plain text editor, edit the file
/etc/gdm/custom.confand, under the[daemon]section, add the optionWaylandEnable=true.If Wayland has previously been disabled, delete the uncommented
WaylandEnable=falseoption.Save your changes to
/etc/gdm/custom.conf.
Enable the user for whom you are performing this task to log in automatically to GNOME Desktop Manager.
In a plain text editor, edit the file
/etc/gdm/custom.confand, under the[daemon]section, add the following lines:AutomaticLoginEnable = true AutomaticLogin = <username>
<username>The user name of the user for whom you are performing this task for logging in to the VM on which GNOME Remote Desktop is running.
Save your changes to
/etc/gdm/custom.conf.
Ubuntu OS only: To prevent
udevrules from restricting the use of Wayland with the NVIDIA vGPU software graphics driver, comment out alludevrules from the file/usr/lib/udev/rules.d/61-gdm.rules.Reboot the guest VM.
After configuring GNOME Remote Desktop for use with NVIDIA vGPU, ask each remote desktop user to follow this sequence of instructions:
Remote Desktop User: Enabling Access to GNOME Remote Desktop Over RDP#
Each remote desktop user must unlock the default GNOME keyring and set a new Remote Desktop Protocol (RDP) password. This task must be performed once as part of the initial setup before the NVIDIA vGPU software graphics driver is installed and after every reboot of the VM in which the GNOME Remote Desktop is running.
Perform this task with normal user privileges as the remote desktop user for whom remote desktop mode was enabled in Enabling Remote Desktop Mode for the GNOME Remote Desktop.
Ensure that you have secure shell (SSH) access to the VM in which GNOME Remote Desktop is running.
Use SSH to log in to the VM in which GNOME Remote Desktop is running.
$ ssh <username>@<desktop-vm>
<username>Your user name for logging in to the VM in which GNOME Remote Desktop is running.
<desktop-vm>The host name or IP address of the VM in which GNOME Remote Desktop is running.
Unlock the default keyring by sending your password to the GNOME Keyring daemon and restarting the daemon.
$ echo '<password>' | gnome-keyring-daemon --replace --unlock
<password>Your password for logging in to the VM in which GNOME Remote Desktop is running.
If you are performing this task for the first time in the VM, a pop-up window opens in the VNC console to prompt you for your password.
If you have previously performed this task and are performing it again after the VM has been rebooted, you are not prompted for your password.
If you are prompted for your password, provide it in the pop-up window that opened in the VNC console.
Restart the GNOME Remote Desktop service for only yourself to apply your changes.
$ systemctl --user restart gnome-remote-desktop.service
Set your RDP login credentials for connecting to the remote desktop.
$ grdctl rdp set-credentials <username> '<password>'
<username>Your RDP user name for connecting to the remote desktop.
<password>Your RDP password for connecting to the remote desktop.
Turn on RDP in GNOME Remote Desktop to enable the session to accept incoming RDP connections.
$ grdctl rdp enable
Restart the GNOME Remote Desktop service so that it runs with the new credentials and RDP enabled.
$ systemctl --user restart gnome-remote-desktop.service
Use an RDP client to connect to your remote desktop.
What to do next depends on whether you have just performed this task for the first time in the VM in which the GNOME Remote Desktop is running or after a reboot of the VM:
First time in the VM: Turn off screen lock as explained in Remote Desktop Users: Turning Off Screen Lock.
After a reboot of the VM: No further action is required. Your remote desktop is now ready for use.
Remote Desktop Users: Turning Off Screen Lock#
To prevent being locked out while connected over RDP, each remote desktop user must turn off screen lock. This task is required only as part of the initial setup before the NVIDIA vGPU software graphics driver is installed.
Use a Remote Desktop Protocol (RDP) client to perform this task with normal user privileges as the remote desktop user for whom remote desktop mode was enabled in Enabling Remote Desktop Mode for the GNOME Remote Desktop.
Ensure that you are connected to your remote desktop.
In the Settings app, choose Privacy & Security.
Click Screen Lock and ensure that the Automatic Screen Lock option is deselected.
Set Blank Screen Delay to Never.
The system administrator can now remove the generic video card from the configuration of the hypervisor host and then install the NVIDIA vGPU software graphics driver by following the instructions in one of the following topics:
Installing the NVIDIA vGPU Software Graphics Driver on Linux from a .run File
Installing the NVIDIA vGPU Software Graphics Driver on Ubuntu from a Debian Package
Installing the NVIDIA vGPU Software Graphics Driver on Red Hat Distributions from an RPM Package
If the guest OS is Ubuntu, after installing the NVIDIA vGPU software graphics driver, the system administrator must follow the instructions in Ubuntu OS Only: Configuring the Mutter Compositor.
Ubuntu OS Only: Configuring the Mutter Compositor#
If you are using the Ubuntu OS with the Wayland display server protocol, configure the Mutter compositor to use the NVIDIA GPU as primary display device.
Perform this task for each user for whom remote desktop mode was enabled in Enabling Remote Desktop Mode for the GNOME Remote Desktop.
This task requires administrative access.
Get the main DRM device node of the NVIDIA GPU in the form
card<ID>, for example,card0orcard1.# ls -al /dev/dri/by-path/ total 0 drwxr-xr-x 2 root root 200 Oct 3 15:22 . drwxr-xr-x 3 root root 220 Oct 3 15:22 .. lrwxrwxrwx 1 root root 8 Oct 3 15:22 pci-0000:07:00.0-card -> ../card0 lrwxrwxrwx 1 root root 13 Oct 3 15:22 pci-0000:07:00.0-render -> ../renderD128 lrwxrwxrwx 1 root root 8 Oct 3 15:22 pci-0000:08:00.0-card -> ../card1 lrwxrwxrwx 1 root root 13 Oct 3 15:22 pci-0000:08:00.0-render -> ../renderD129
In a plain text editor, create the file
/etc/udev/rules.d/61-mutter-primary-gpu.rulesand add the following line to the file:ENV{DEVNAME}=="/dev/dri/<drm-device-node>", TAG+="mutter-device-preferred-primary"<drm-device-node>The DRM device node of the NVIDIA GPU in the form
card<ID>that you just obtained.
Save your changes to
/etc/udev/rules.d/61-mutter-primary-gpu.rules.Reboot the guest VM.
Configuring the Wayland Display Server Protocol for MIG-Backed vGPUs#
To use the Wayland display server protocol with MIG-backed vGPUs, you must reload the nvidia-drm and nvidia-modeset kernel modules.
After installing the NVIDIA vGPU software graphics driver, perform this task from the VM to which the MIG-backed vGPUs are assigned.
This task requires administrative access.
Stop the GNOME Display Manager (GDM) service.
# sudo service gdm stop
Unload the
nvidia-drmandnvidia-modesetkernel modules.# sudo rmmod nvidia_drm nvidia_modeset
Load the
nvidia-drmandnvidia-modesetkernel modules again.# sudo modprobe nvidia_drm nvidia_modeset
Start the GDM service again.
# sudo service gdm start