


Installing and Configuring NVIDIA Virtual GPU Manager#
The process for installing and configuring NVIDIA Virtual GPU Manager depends on the hypervisor that you are using. After you complete this process, you can install the display drivers for your guest OS and license any NVIDIA vGPU software licensed products that you are using.
About NVIDIA Virtual GPUs#
NVIDIA vGPU Architecture#
The high-level architecture of NVIDIA vGPU is illustrated in Figure 2. Under the control of the NVIDIA Virtual GPU Manager running under the hypervisor, NVIDIA physical GPUs are capable of supporting multiple virtual GPU devices (vGPUs) that can be assigned directly to guest VMs.
Guest VMs use NVIDIA vGPUs in the same manner as a physical GPU that has been passed through by the hypervisor: an NVIDIA driver loaded in the guest VM provides direct access to the GPU for performance-critical fast paths, and a paravirtualized interface to the NVIDIA Virtual GPU Manager is used for non-performant management operations.
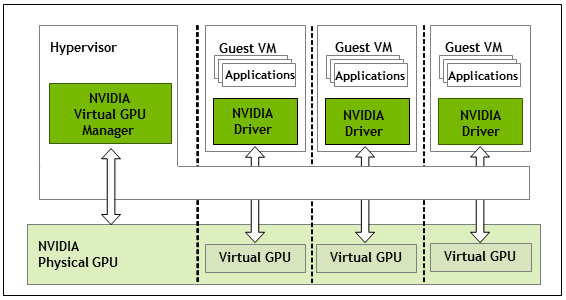
Figure 2 NVIDIA vGPU System Architecture#
Each NVIDIA vGPU is analogous to a conventional GPU, having a fixed amount of GPU framebuffer, and one or more virtual display outputs or “heads”. The vGPU’s framebuffer is allocated out of the physical GPU’s framebuffer at the time the vGPU is created, and the vGPU retains exclusive use of that framebuffer until it is destroyed.
Depending on the physical GPU and the GPU virtualization software, NVIDIA Virtual GPU Manager supports different types of vGPU on a physical GPU:
On all GPUs that support NVIDIA vGPU software, time-sliced vGPUs on a single-GPU instance can be created.
Additionally, on GPUs that support the Multi-Instance GPU (MIG) feature, the following types of MIG-backed vGPU are supported:
MIG-backed vGPUs that vGPUs that occupy an entire GPU instance
Time-sliced, MIG-backed vGPUs
Note
Not all hypervisors support MIG-backed vGPUs on GPUs that support MIG. For information about whether a hypervisor supports MIG-backed vGPUs, refer to the release notes for the hypervisor at NVIDIA Virtual GPU Software Documentation.
Time-Sliced NVIDIA vGPU Internal Architecture for vGPUs on a Single-Instance GPU#
A vGPU on a single-instance GPU is a time-sliced vGPU because it shares access to the GPU’s engines, including the graphics (3D), video decode, and video encode engines, with all other vGPUs on the GPU. A single-instance GPU is a GPU that is not partitioned into multiple GPU instances.
In a time-sliced vGPU, processes that run on the vGPU are scheduled to run in series. Each vGPU waits while other processes run on other vGPUs. While processes are running on a vGPU on a single-instance GPU, the vGPU has exclusive use of the GPU’s engines. You can change the default scheduling behavior as explained in Changing Scheduling Behavior for Time-Sliced vGPUs and MIG-Backed, Time-Sliced vGPUs.
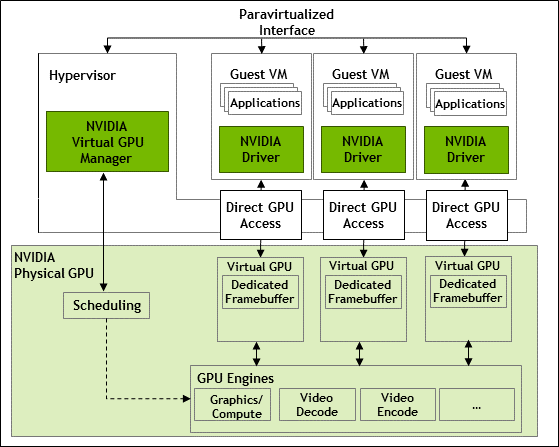
Figure 3 Time-Sliced NVIDIA vGPU Internal Architecture for Single-Instance GPUs#
MIG-Backed NVIDIA vGPU Internal Architecture for vGPUs that Occupy an Entire GPU Instance#
A MIG-backed vGPU is a vGPU that resides on a GPU instance in a MIG-capable physical GPU. Each MIG-backed vGPU that occupies an entire GPU instance has exclusive access to the GPU instance’s engines, including the compute and video decode engines.
In a MIG-backed vGPU, processes that run on the vGPU run in parallel with processes running on other vGPUs in other GPU instances on the GPU. If all the vGPUS resident on a physical GPU occupy an entire GPU instance, processes run on all vGPUs simultaneously.
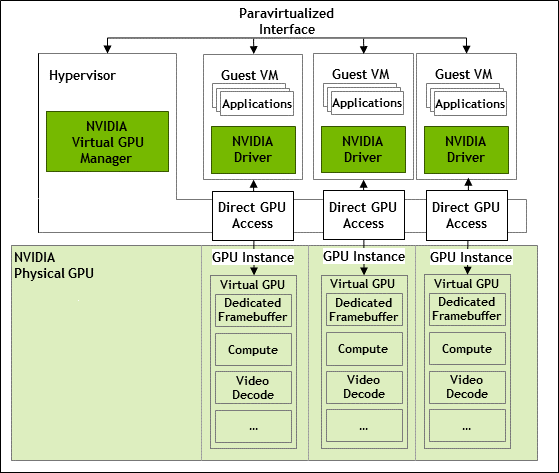
Figure 4 MIG-Backed NVIDIA vGPU Internal Architecture#
Time-Sliced, MIG-Backed NVIDIA vGPU Internal Architecture#
A time-sliced, MIG-backed vGPU is a vGPU that occupies only a fraction of a GPU instance in a MIG-capable physical GPU. Each time-sliced, MIG-backed vGPU shares access to the GPU instance’s engines, including the compute and video decode engines, with all other vGPUs on the GPU instance.
In a time-sliced, MIG-backed vGPU, processes that run on the vGPU are scheduled to run in series. Each vGPU waits while other processes run on other vGPUs on the same GPU instance. While processes are running on a time-sliced, MIG-backed vGPU, the vGPU has exclusive use of the GPU instance’s engines. However, processes that run on the vGPU run in parallel with processes running on other vGPUs in other GPU instances on the GPU. You can change the default scheduling behavior as explained in Changing Scheduling Behavior for Time-Sliced vGPUs and MIG-Backed, Time-Sliced vGPUs.
Note
You can determine whether time-sliced, MIG-backed vGPUs are supported with your GPU on your chosen hypervisor by running the nvidia-smi -q command.
$ nvidia-smi -q
    vGPU Device Capability
        MIG Time-Slicing                  : Supported
        MIG Time-Slicing Mode             : Enabled
If
MIG Time-Slicingis shown asSupported, the GPU supports time-sliced, MIG-backed vGPUs.If
MIG Time-Slicing Modeis shown asEnabled, your chosen hypervisor supports time-sliced, MIG-backed vGPUs on GPUs that also support this feature.
About Virtual GPU Types#
The number of physical GPUs that a board has depends on the board. Each physical GPU can support several different types of virtual GPU (vGPU). vGPU types have a fixed amount of frame buffer, number of supported display heads, and maximum resolutions. They are grouped into different series according to the different classes of workload for which they are optimized. Each series is identified by the last letter of the vGPU type name.
Series |
Optimal Workload |
|---|---|
Q-series |
Virtual workstations for creative and technical professionals who require the performance and features of Quadro technology |
B-series |
Virtual desktops for business professionals and knowledge workers |
A-series |
App streaming or session-based solutions for virtual applications users[1] |
The number after the board type in the vGPU type name denotes the amount of frame buffer that is allocated to a vGPU of that type. For example, a vGPU of type A16-4Q is allocated 4096 Mbytes of frame buffer on an NVIDIA A16 board.
Due to their differing resource requirements, the maximum number of vGPUs that can be created simultaneously on a physical GPU varies according to the vGPU type. For example, an NVDIA A16 board can support up to 4 A16-4Q vGPUs on each of its two physical GPUs, for a total of 16 vGPUs, but only 2 A16-8Q vGPUs, for a total of 8 vGPUs.
When enabled, the frame-rate limiter (FRL) limits the maximum frame rate in frames per second (FPS) for a vGPU as follows:
For B-series vGPUs, the maximum frame rate is 45 FPS.
For Q-series and A-series vGPUs, the maximum frame rate is 60 FPS.
By default, the FRL is enabled for all GPUs. The FRL is disabled when the vGPU scheduling behavior is changed from the default best-effort scheduler on GPUs that support alternative vGPU schedulers. For details, see Changing Scheduling Behavior for Time-Sliced vGPUs and MIG-Backed, Time-Sliced vGPUs. On vGPUs that use the best-effort scheduler, the FRL can be disabled as explained in the release notes for your chosen hypervisor at NVIDIA Virtual GPU Software Documentation.
Note
NVIDIA vGPU is a licensed product on all supported GPU boards. A software license is required to enable all vGPU features within the guest VM. The type of license required depends on the vGPU type.
Q-series vGPU types require a vWS license.
B-series vGPU types require a vPC license but can also be used with a vWS license.
A-series vGPU types require a vApps license.
For details of the virtual GPU types available from each supported GPU, see Virtual GPU Types for Supported GPUs.
Virtual Display Resolutions for Q-series and B-series vGPUs#
Instead of a fixed maximum resolution per display, Q-series and B-series vGPUs support a maximum combined resolution based on the number of available pixels, which is determined by their frame buffer size. You can choose between using a small number of high resolution displays or a larger number of lower resolution displays with these vGPUs.
The number of virtual displays that you can use depends on a combination of the following factors:
Virtual GPU series
GPU architecture
vGPU frame buffer size
Display resolution
Note
You cannot use more than the maximum number of displays that a vGPU supports even if the combined resolution of the displays is less than the number of available pixels from the vGPU. For example, because -0Q and -0B vGPUs support a maximum of only two displays, you cannot use four 1280×1024 displays with these vGPUs even though the combined resolution of the displays (6220800) is less than the number of available pixels from these vGPUs (8192000).
Various factors affect the consumption of the GPU frame buffer, which can impact the user experience. These factors include and are not limited to the number of displays, display resolution, workload and applications deployed, remoting solution, and guest OS. The ability of a vGPU to drive a certain combination of displays does not guarantee that enough frame buffer remains free for all applications to run. If applications run out of frame buffer, consider changing your setup in one of the following ways:
Switching to a vGPU type with more frame buffer
Using fewer displays
Using lower resolution displays
The maximum number of displays per vGPU listed in Virtual GPU Types for Supported GPUs is based on a configuration in which all displays have the same resolution. For examples of configurations with a mixture of display resolutions, see Mixed Display Configurations for B-Series and Q-Series vGPUs.
Valid Time-Sliced Virtual GPU Configurations on a Single GPU#
NVIDIA vGPU software supports a mixture of different types of time-sliced vGPUs on the same physical GPU. Any combination of A-series, B-series, and Q-series vGPUs with any amount of frame buffer can reside on the same physical GPU simultaneously. The total amount of frame buffer allocated to the vGPUs on a physical GPU must not exceed the amount of frame buffer that the physical GPU has.
For example, the following combinations of vGPUs can reside on the same physical GPU simultaneously:
A40-2B and A40-2Q
A40-2Q and A40-4Q
A40-2B and A40-4Q
By default, a GPU or GPU instance supports only vGPUs with the same amount of frame buffer and, therefore, is in equal-size mode. To support vGPUs with different amounts of frame buffer, the GPU or GPU instance must be put into mixed-size mode. In mixed-size mode, the maximum number of some types of vGPU allowed on a GPU or GPU instance is less than in equal-size mode. For more information, refer to the following topics:
Not all hypervisors and GPUs support a mixture of different types of time-sliced vGPUs on the same physical GPU. To determine if your chosen hypervisor supports this feature with your chosen GPU, consult the release notes for your hypervisor at NVIDIA Virtual GPU Software Documentation.
Guest VM Support#
NVIDIA vGPU supports Windows and Linux guest VM operating systems. The supported vGPU types depend on the guest VM OS.
For details of the supported releases of Windows and Linux, and for further information on supported configurations, see the driver release notes for your hypervisor at NVIDIA Virtual GPU Software Documentation.
Windows Guest VM Support#
Windows guest VMs are supported on all NVIDIA vGPU types, namely: Q-series, B-series, and A-series NVIDIA vGPU types.
Linux Guest VM support#
Linux guest VMs are supported on all NVIDIA vGPU types, namely: Q-series, B-series, and A-series NVIDIA vGPU types.
Prerequisites for Using NVIDIA vGPU#
Before proceeding, ensure that these prerequisites are met:
You have a server platform that is capable of hosting your chosen hypervisor and NVIDIA GPUs that support NVIDIA vGPU software.
One or more NVIDIA GPUs that support NVIDIA vGPU software is installed in your server platform.
If you are using GPUs based on the NVIDIA Ampere architecture or later architectures, the following BIOS settings are enabled on your server platform:
VT-D/IOMMU
SR-IOV
Alternative Routing ID Interpretation (ARI)
You have downloaded the NVIDIA vGPU software package for your chosen hypervisor, which consists of the following software:
NVIDIA Virtual GPU Manager for your hypervisor
NVIDIA vGPU software graphics drivers for supported guest operating systems
The following software is installed according to the instructions in the software vendor’s documentation:
Your chosen hypervisor, for example, XenServer, Red Hat Enterprise Linux KVM, or VMware vSphere Hypervisor (ESXi)
The software for managing your chosen hypervisor, for example, Citrix XenCenter management GUI, or VMware vCenter Server
The virtual desktop software that you will use with virtual machines (VMs) running NVIDIA Virtual GPU, for example, Citrix Virtual Apps and Desktops, or Omnissa Horizon
Note
If you are using VMware vSphere Hypervisor (ESXi), the ESXi host on which you configure a VM with NVIDIA vGPU can be a member of a fully automated VMware Distributed Resource Scheduler (DRS) cluster. Earlier restrictions on fully automated DRS clusters no longer apply. For more information, see Requirements for Configuring NVIDIA vGPU in a DRS Cluster.
A VM to be enabled with one or more virtual GPUs is created.
Note
If the VM uses UEFI boot and you plan to install a Linux guest OS in the VM, either ensure that secure boot is disabled or self-sign the NVIDIA vGPU software graphics driver for Linux. For instructions for self-signing the driver, refer to the Linux
READMEfile that is included in the.runfile distribution of the driver.Your chosen guest OS is installed in the VM.
For information about supported hardware and software, and any known issues for this release of NVIDIA vGPU software, refer to the Release Notes for your chosen hypervisor:
Switching the Mode of a GPU that Supports Multiple Display Modes#
Some GPUs support display-off and display-enabled modes but must be used in NVIDIA vGPU software deployments in display-off mode.
The GPUs listed in the following table support multiple display modes. As shown in the table, some GPUs are supplied from the factory in display-off mode, but other GPUs are supplied in a display-enabled mode.
GPU |
Mode as Supplied from the Factory |
|---|---|
NVIDIA A40 |
Display-off |
NVIDIA L40 |
Display-off |
NVIDIA L40S |
Display-off |
NVIDIA L20 |
Display-off |
NVIDIA L20 liquid cooled |
Display-off |
NVIDIA RTX 5000 Ada |
Display enabled |
NVIDIA RTX 6000 Ada |
Display enabled |
NVIDIA RTX A5000 |
Display enabled |
NVIDIA RTX A5500 |
Display enabled |
NVIDIA RTX A6000 |
Display enabled |
NVIDIA RTX PRO 6000 Blackwell Server Edition |
Display-off |
NVIDIA RTX PRO 6000 Blackwell Server Edition liquid cooled |
Display-off |
A GPU that is supplied from the factory in display-off mode, such as the NVIDIA A40 GPU, might be in a display-enabled mode if its mode has previously been changed.
To change the mode of a GPU that supports multiple display modes, use the displaymodeselector tool, which you can request from the NVIDIA Display Mode Selector Tool page on the NVIDIA Developer website.
Note
Only the GPUs listed in the table support the displaymodeselector tool. Other GPUs that support NVIDIA vGPU software do not support the displaymodeselector tool and, unless otherwise stated, do not require display mode switching.
Installing and Configuring the NVIDIA Virtual GPU Manager for XenServer#
The following topics step you through the process of setting up a single XenServer VM to use NVIDIA vGPU. After the process is complete, you can install the graphics driver for your guest OS and license any NVIDIA vGPU software licensed products that you are using.
These setup steps assume familiarity with the XenServer skills covered in XenServer Basics.
Installing and Updating the NVIDIA Virtual GPU Manager for XenServer#
The NVIDIA Virtual GPU Manager runs in the XenServer dom0 domain.
The NVIDIA Virtual GPU Manager for XenServer is supplied as follows:
Since XenServer 9: Supplemental Pack only
XenServer 8.4 only: Supplemental Pack and RPM file
Note
RPM package installation of NVIDIA Virtual GPU Manager for XenServer 8.4 is deprecated. Use Supplemental Pack installation for new deployments and updates.
Caution
NVIDIA Virtual GPU Manager and guest VM drivers must be compatible. If you update vGPU Manager to a release that is incompatible with the guest VM drivers, guest VMs will boot with vGPU disabled until their guest vGPU driver is updated to a compatible version. Consult Virtual GPU Software for XenServer Release Notes for further details.
Installing or Updating the Supplemental Pack for XenServer#
XenCenter can be used to install or update Supplemental Packs on XenServer hosts. The NVIDIA Virtual GPU Manager supplemental pack is provided as an ISO.
Select Install Update from the Tools menu.
Click Next after going through the instructions on the Before You Start section.
Click Select update or supplemental pack from disk on the Select Update section and open NVIDIA’s XenServer Supplemental Pack ISO.
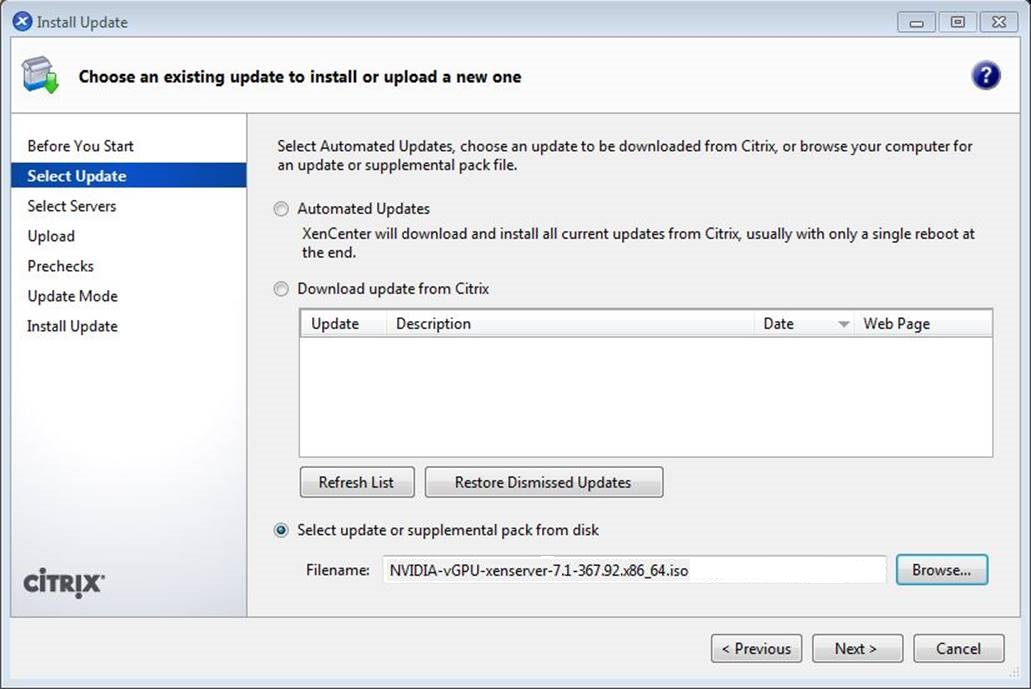
Figure 5 NVIDIA vGPU Manager supplemental pack selected in XenCenter#
Click Next on the Select Update section.
In the Select Servers section select all the XenServer hosts on which the Supplemental Pack should be installed and click Next.
Click Next on the Upload section once the Supplemental Pack has been uploaded to all the XenServer hosts.
Click Next on the Prechecks section.
Click Install Update on the Update Mode section.
Click Finish on the Install Update section.
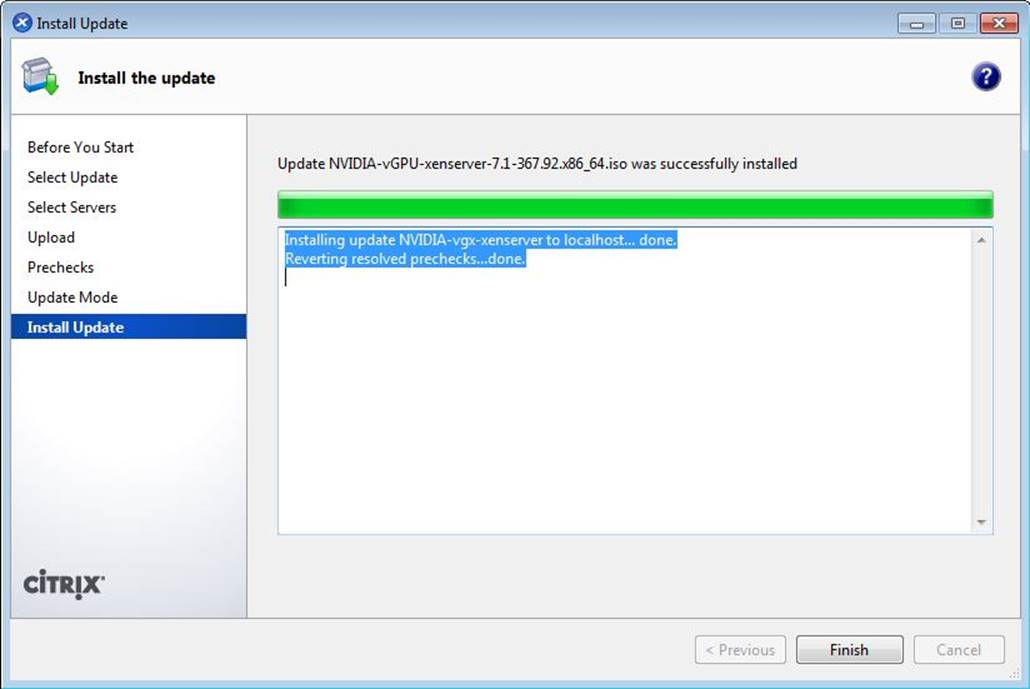
Figure 6 Successful installation of NVIDIA vGPU Manager supplemental pack#
XenServer 8.4 Only: Installing the RPM package for XenServer#
Note
RPM package installation of NVIDIA Virtual GPU Manager for XenServer 8.4 is deprecated. Use Supplemental Pack installation for new deployments and updates.
The RPM file must be copied to the XenServer dom0 domain prior to installation (see Copying files to dom0).
Use the
rpmcommand to install the package:[root@xenserver ~]# rpm -iv NVIDIA-vGPU-NVIDIA-vGPU-CitrixHypervisor-8.2-595.91.04.x86_64.rpm Preparing packages for installation... NVIDIA-vGPU-NVIDIA-vGPU-CitrixHypervisor-8.2-595.91.04 [root@xenserver ~]#
Reboot the XenServer platform:
[root@xenserver ~]# shutdown –r now

Broadcast message from root (pts/1) (Fri May 15 14:24:11 2026):

The system is going down for reboot NOW!
[root@xenserver ~]#
XenServer 8.4 Only: Updating the RPM Package for XenServer#
Note
RPM package installation of NVIDIA Virtual GPU Manager for XenServer 8.4 is deprecated. Use Supplemental Pack installation for new deployments and updates.
If an existing NVIDIA Virtual GPU Manager is already installed on the system and you want to upgrade, follow these steps:
Shut down any VMs that are using NVIDIA vGPU.
Install the new package using the
–Uoption to therpmcommand, to upgrade from the previously installed package:[root@xenserver ~]# rpm -Uv NVIDIA-vGPU-NVIDIA-vGPU-CitrixHypervisor-8.2-595.91.04.x86_64.rpm Preparing packages for installation... NVIDIA-vGPU-NVIDIA-vGPU-CitrixHypervisor-8.2-595.91.04 [root@xenserver ~]#
Note
You can query the version of the current NVIDIA Virtual GPU Manager package using the
rpm -qcommand:[root@xenserver ~]# rpm -q NVIDIA-vGPU-NVIDIA-vGPU-CitrixHypervisor-8.2-595.91.04 [root@xenserver ~]# If an existing NVIDIA GRID package is already installed and you don’t select the upgrade (-U) option when installing a newer GRID package, the rpm command will return many conflict errors. Preparing packages for installation... file /usr/bin/nvidia-smi from install of NVIDIA-vGPU-NVIDIA-vGPU-CitrixHypervisor-8.2-595.91.04.x86_64 conflicts with file from package NVIDIA-vGPU-xenserver-8.2-595.71.03.x86_64 file /usr/lib/libnvidia-ml.so from install of NVIDIA-vGPU-NVIDIA-vGPU-CitrixHypervisor-8.2-595.91.04.x86_64 conflicts with file from package NVIDIA-vGPU-xenserver-8.2-595.71.03.x86_64 ...
Reboot the XenServer platform:
[root@xenserver ~]# shutdown –r now
Broadcast message from root (pts/1) (Fri May 15 14:24:11 2026):

The system is going down for reboot NOW!
[root@xenserver ~]#
Verifying the Installation of the NVIDIA vGPU Software for XenServer Package#
After the XenServer platform has rebooted, verify the installation of the NVIDIA vGPU software package for XenServer.
Verify that the NVIDIA vGPU software package is installed and loaded correctly by checking for the NVIDIA kernel driver in the list of kernel loaded modules.
[root@xenserver ~]# lsmod | grep nvidia
nvidia               9522927  0
i2c_core               20294  2 nvidia,i2c_i801
[root@xenserver ~]#
Verify that the NVIDIA kernel driver can successfully communicate with the NVIDIA physical GPUs in your system by running the
nvidia-smicommand.The
nvidia-smicommand is described in more detail in NVIDIA System Management Interface nvidia-smi.
Running the nvidia-smi command should produce a listing of the GPUs in your platform.
[root@xenserver ~]# nvidia-smi
Fri May 15 18:46:50 2026
+------------------------------------------------------+
| NVIDIA-SMI 595.91.04    Driver Version: 595.91.04    |
|-------------------------------+----------------------+----------------------+
| GPU  Name        Persistence-M| Bus-Id        Disp.A | Volatile Uncorr. ECC |
| Fan  Temp  Perf  Pwr:Usage/Cap|         Memory-Usage | GPU-Util  Compute M. |
|===============================+======================+======================|
|   0  Tesla M60           On   | 00000000:05:00.0 Off |                  Off |
| N/A   25C    P8    24W / 150W |     13MiB /  8191MiB |      0%      Default |
+-------------------------------+----------------------+----------------------+
|   1  Tesla M60           On   | 00000000:06:00.0 Off |                  Off |
| N/A   24C    P8    24W / 150W |     13MiB /  8191MiB |      0%      Default |
+-------------------------------+----------------------+----------------------+
|   2  Tesla M60           On   | 00000000:86:00.0 Off |                  Off |
| N/A   25C    P8    25W / 150W |     13MiB /  8191MiB |      0%      Default |
+-------------------------------+----------------------+----------------------+
|   3  Tesla M60           On   | 00000000:87:00.0 Off |                  Off |
| N/A   28C    P8    24W / 150W |     13MiB /  8191MiB |      0%      Default |
+-------------------------------+----------------------+----------------------+

+-----------------------------------------------------------------------------+
| Processes:                                                       GPU Memory |
|  GPU       PID   Type   Process name                             Usage      |
|=============================================================================|
|  No running processes found                                                 |
+-----------------------------------------------------------------------------+

[root@xenserver ~]#
If nvidia-smi fails to run or doesn’t produce the expected output for all the NVIDIA GPUs in your system, see Troubleshooting for troubleshooting steps.
Configuring a XenServer VM with Virtual GPU#
To support applications and workloads that are compute or graphics intensive, you can add multiple vGPUs to a single VM.
For details about which XenServer versions and NVIDIA vGPUs support the assignment of multiple vGPUs to a VM, see Virtual GPU Software for XenServer Release Notes.
XenServer supports configuration and management of virtual GPUs using XenCenter, or the xe command line tool that is run in a XenServer dom0 shell. Basic configuration using XenCenter is described in the following sections. Command line management using xe is described in XenServer vGPU Management.
Note
If you need to assign plugin configuration parameters, create vGPUs using the xe command as explained in Creating a vGPU Using xe.
Ensure the VM is powered off.
Right-click the VM in XenCenter, select Properties to open the VM’s properties, and select the GPU property.
The available GPU types are listed in the GPU type drop-down list:
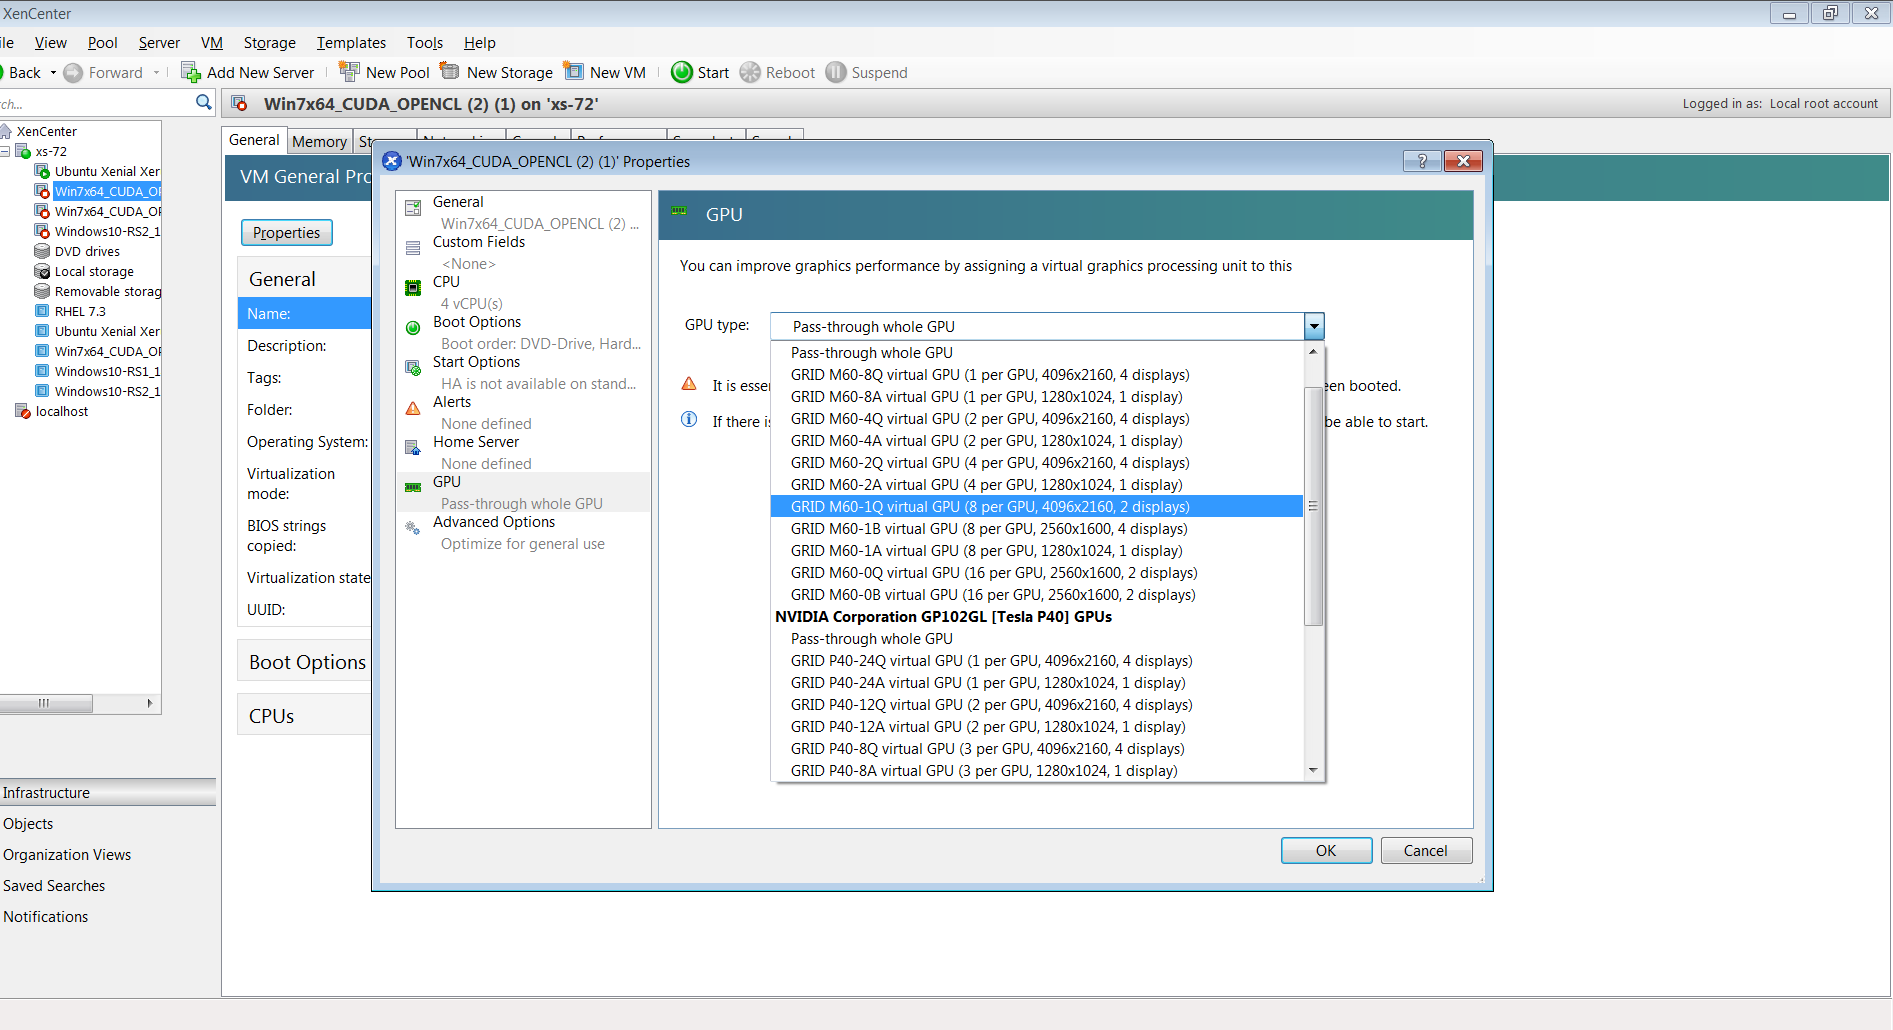
Figure 7 Using Citrix XenCenter to configure a VM with a vGPU#
After you have configured a XenServer VM with a vGPU, start the VM, either from XenCenter or by using xe vm-start in a dom0 shell. You can view the VM’s console in XenCenter.
After the VM has booted, install the NVIDIA vGPU software graphics driver as explained in Installing the NVIDIA vGPU Software Graphics Driver.
Setting vGPU Plugin Parameters on XenServer#
Plugin parameters for a vGPU control the behavior of the vGPU, such as the frame rate limiter (FRL) configuration in frames per second or whether console virtual network computing (VNC) for the vGPU is enabled. The VM to which the vGPU is assigned is started with these parameters. If parameters are set for multiple vGPUs assigned to the same VM, the VM is started with the parameters assigned to each vGPU.
For each vGPU for which you want to set plugin parameters, perform this task in a command shell in the XenServer dom0 domain.
Get the UUIDs of all VMs on the hypervisor host and use the output from the command to identify the VM to which the vGPU is assigned.
[root@xenserver ~] xe vm-list
...
uuid ( RO)           : 7f6c855d-5635-2d57-9fbc-b1200172162f
     name-label ( RW): RHEL8.3
    power-state ( RO): running
...
Get the UUIDs of all vGPUs on the hypervisor host and from the UUID of the VM to which the vGPU is assigned, determine the UUID of the vGPU.
[root@xenserver ~] xe vgpu-list
...
uuid ( RO)              : d15083f8-5c59-7474-d0cb-fbc3f7284f1b
           vm-uuid ( RO): 7f6c855d-5635-2d57-9fbc-b1200172162f
            device ( RO): 0
    gpu-group-uuid ( RO): 3a2fbc36-827d-a078-0b2f-9e869ae6fd93
...
Use the
xecommand to set each vGPU plugin parameter that you want to set.[root@xenserver ~] xe vgpu-param-set uuid=<vgpu-uuid> extra_args='<parameter>=<value>'<vgpu-uuid>The UUID of the vGPU, which you obtained in the previous step.
<parameter>The name of the vGPU plugin parameter that you want to set.
<value>The value to which you want to set the vGPU plugin parameter.
This example sets the
enable_uvmvGPU plugin parameter to 1 for the vGPU that has the UUIDd15083f8-5c59-7474-d0cb-fbc3f7284f1b. This parameter setting enables unified memory for the vGPU.[root@xenserver ~] xe vgpu-param-set uuid=d15083f8-5c59-7474-d0cb-fbc3f7284f1b extra_args='enable_uvm=1'
Installing the Virtual GPU Manager Package for Linux KVM#
NVIDIA vGPU software for Linux Kernel-based Virtual Machine (KVM) (Linux KVM) is intended only for use with supported versions of Linux KVM hypervisors. For details about which Linux KVM hypervisor versions are supported, see Virtual GPU Software for Generic Linux with KVM Release Notes.
Note
If you are using Red Hat Enterprise Linux KVM, follow the instructions in Installing and Configuring the NVIDIA Virtual GPU Manager for Red Hat Enterprise Linux KVM.
Before installing the Virtual GPU Manager package for Linux KVM, ensure that the following prerequisites are met:
The following packages are installed on the Linux KVM server:
The
x86_64build of the GNU Compiler Collection (GCC)Linux kernel headers
The package file is copied to a directory in the file system of the Linux KVM server.
If the Nouveau driver for NVIDIA graphics cards is present, disable it before installing the package.
Change to the directory on the Linux KVM server that contains the package file.
# cd <package-file-directory>
<package-file-directory>The path to the directory that contains the package file.
Make the package file executable.
# chmod +x <package-file-name>
<package-file-name>The name of the file that contains the Virtual GPU Manager package for Linux KVM, for example
NVIDIA-Linux-x86_64-390.42-vgpu-kvm.run.
Run the package file as the root user.
# sudo sh./<package-file-name>
The package file should launch and display the license agreement.
Accept the license agreement to continue with the installation.
When installation has completed, select OK to exit the installer.
Reboot the Linux KVM server.
# systemctl reboot
Installing and Configuring the NVIDIA Virtual GPU Manager for Microsoft Azure Local or Microsoft Windows Server#
Before you begin, ensure that the prerequisites in Prerequisites for Using NVIDIA vGPU are met and the Microsoft Azure Local or Microsoft Windows Server host is configured as follows:
The OS that you are using is installed as explained in the relevant articles on the Microsoft documentation site.
The following BIOS settings are enabled:
Virtualization support, for example, Intel Virtualization Technology (VT-D) or AMD Virtualization (AMD-V)
SR-IOV
Above 4G Decoding
For Supermicro servers: ASPM Support
For servers that have an AMD CPU:
Alternative Routing ID Interpretation (ARI)
Access Control Service (ACS)
Advanced Error Reporting (AER)
Follow this sequence of instructions to set up a single Microsoft Azure Local or Microsoft Windows Server VM to use NVIDIA vGPU.
Installing the NVIDIA Virtual GPU Manager for Microsoft Azure Local or Microsoft Windows Server
Adding a vGPU to a Microsoft Azure Local or Microsoft Windows Server VM
These instructions assume familiarity with the Microsoft Windows PowerShell commands covered in Manage VMs on Azure Local using Windows PowerShell on the Microsoft documentation site.
After the set up is complete, you can install the graphics driver for your guest OS and license any NVIDIA vGPU software licensed products that you are using.
Installing the NVIDIA Virtual GPU Manager for Microsoft Azure Local or Microsoft Windows Server#
The driver package for the Virtual GPU Manager is distributed as an archive file. You must extract the contents of this archive file to enable the package to be added to the driver store from a setup information file.
Perform this task in a Windows PowerShell window as the Administrator user.
Download the archive file in which the driver package for the Virtual GPU Manager is distributed.
Extract the contents of the archive file to a directory that is accessible from the Microsoft Azure Local or Microsoft Windows Server host.
Change to the directory that you extracted from the archive file.
The directory depends on the OS that you are using.
OS
Directory
Microsoft Azure Local
GridSW-Azure-LocalMicrosoft Windows Server
GridSW-Windows-Server-GPU-PUse the
PnPUtiltool to add the driver package for the Virtual GPU Manager to the driver store from the setup information file for your OS.In the command for adding the driver package, also set the options to traverse subdirectories for driver packages and reboot the Microsoft Azure Local or Microsoft Windows Server host if necessary to complete the operation.
Microsoft Azure Local: Add the driver package to the driver store from the
nvgridswhci.infsetup information file.PS C:> pnputil /add-driver nvgridswhci.inf /subdirs /install /rebootMicrosoft Windows Server: Add the driver package to the driver store from the
nvgridswhostserver.infsetup information file.PS C:> pnputil /add-driver nvgridswhostserver.inf /subdirs /install /reboot
After the host has rebooted, verify that the NVIDIA Virtual GPU Manager can successfully communicate with the NVIDIA physical GPUs in your system.
Run the
nvidia-smicommand with no arguments for this purpose. Running thenvidia-smicommand should produce a listing of the GPUs in your platform.Confirm that the Microsoft Azure Local or Microsoft Windows Server host has GPU adapters that can be partitioned by listing the GPUs that support GPU-P.
PS C:> Get-VMHostPartitionableGpuIf the NVIDIA Virtual GPU Manager is correctly installed, each GPU in the host GPU is listed. The numbers of partitions that each GPU supports and the unique name for referencing each GPU are also listed.
For each GPU, set the number of partitions that the GPU should support to the maximum number of vGPUs that can be added to the GPU.
PS C:> Set-VMHostPartitionableGpu -Name "<gpu-name>" -PartitionCount <partitions><gpu-name>The unique name for referencing the GPU that you obtained in the previous step.
<partitions>The maximum number of vGPUs that can be added to the GPU. This number depends on the virtual GPU type. For example, the maximum number of each type of vGPU that can be added to the NVIDIA A16 GPU is as follows:
Virtual GPU Type
Maximum vGPUs per GPU
A16-16Q
A16-16A1
A16-8Q
A16-8A2
A16-4Q
A16-4A4
A16-2Q
A16-2B
A16-2A8
A16-1Q
A16-1B
A16-1A16
Setting the vGPU Series Allowed on a GPU#
The Virtual GPU Manager allows virtual GPUs (vGPUs) to be created on a GPU from only one vGPU series. By default, only Q-series vGPUs may be created on a GPU. You can change the vGPU series allowed on a GPU by setting the GridGpupProfileType value for the GPU in the Windows registry.
This task requires administrator user privileges.
Use Windows PowerShell to get the driver key of the GPU on which you want to set the allowed vGPU series.
You will need this information in the next step to identify the Windows registry key in which information about the GPU is stored.
Get the
InstanceIDproperty of all available NVIDIA GPUs in your system.PS C:\> Get-PnpDevice -PresentOnly | >> Where-Object {$_.InstanceId -like "PCI\VEN_10DE*" } | >> Select-Object -Property FriendlyName,InstanceId | >> Format-List ... FriendlyName : NVIDIA A40 InstanceId : PCI\VEN_10DE&DEV_2235&SUBSYS_145A10DE&REV_A1\6&2D4D2F51&0&00800018 ...
Note
If multiple NVIDIA GPUs are available on the system, analyze the output from this command to get the
InstanceIDproperty of the GPU on which you want to set the allowed vGPU series.Get the
DEVPKEY_Device_Driverproperty of the GPU from theInstanceIDproperty that you got in the previous step.PS C:\> Get-PnpDeviceProperty -InstanceId "<instance-id>" | >> where {$_.KeyName -eq "DEVPKEY_Device_Driver"} | >> Select-Object -Property Data Data ---- {4d36e968-e325-11ce-bfc1-08002be10318}\0001
<instance-id>The
InstanceIDproperty of the GPU that you got in the previous step, for example,PCI\VEN_10DE&DEV_2235&SUBSYS_145A10DE&REV_A1\6&2D4D2F51&0&00800018.
Set the
GridGpupProfileTypeDWord (REG_DWORD) registry value in the Windows registry keyHKEY_LOCAL_MACHINE\SYSTEM\ControlSet001\Control\Class\<driver-key>.<driver-key>The driver key for the GPU that you got in the previous step, for example,
{4d36e968-e325-11ce-bfc1-08002be10318}\0001.
The value to set depends on the vGPU series that you want to be allowed on the GPU.
vGPU Series
Value
Q-series
1
A-series
2
B-series
3
Reboot the Microsoft Azure Local or Microsoft Windows Server host.
Adding a vGPU to a Microsoft Azure Local or Microsoft Windows Server VM#
You add a vGPU to a Microsoft Azure Local or Microsoft Windows Server VM by adding a GPU-P adapter to a VM.
Perform this task in a Windows PowerShell window as the Administrator user.
Set the variable
$vmto the name of the virtual machine to which you are adding a vGPU.PS C:> $vm = "<vm-name>"<vm-name>The name of the virtual machine to which you are adding a vGPU.
Allow the VM to control cache types for MMIO access.
PS C:> Set-VM -GuestControlledCacheTypes $true -VMName $vmSet the lower MMIO space to 1 GB to allow sufficient MMIO space to be mapped.
PS C:> Set-VM -LowMemoryMappedIoSpace 1Gb -VMName $vmThis amount is twice the amount that the device must allow for alignment. Lower MMIO space is the address space below 4 GB and is required for any device that has 32-bit BAR memory.
Set the upper MMIO space to 32 GB to allow sufficient MMIO space to be mapped.
PS C:> Set-VM –HighMemoryMappedIoSpace 32GB –VMName $vmThis amount is twice the amount that the device must allow for alignment. Upper MMIO space is the address space above approximately 64 GB.
Confirm that the Microsoft Azure Local or Microsoft Windows Server host has a GPU that supports the GPU-P adapter that you want to create.
PS C:> get-VMHostPartitionableGpuThe maximum and minimum values that you can specify for the properties of the GPU that you want to create are also listed.
Add a GPU-P adapter to the VM.
PS C:> Add-VMGpuPartitionAdapter –VMName $vm `
–MinPartitionVRAM <min-ram> `
-MaxPartitionVRAM <max-ram> `
-OptimalPartitionVRAM <opt-ram> `
-MinPartitionEncode <min-enc> `
-MaxPartitionEncode <max-enc> `
-OptimalPartitionEncode <opt-enc> `
-MinPartitionDecode <min-dec> `
-MaxPartitionDecode <max-dec> `
-OptimalPartitionDecode <opt-dec> `
-MinPartitionCompute <min-compute> `
-MaxPartitionCompute <max-compute> `
-OptimalPartitionCompute <opt-compute>
Note
Because partitions are resolved only when the VM is started, this command cannot validate that the Microsoft Azure Local or Microsoft Windows Server host has a GPU that supports the GPU-P adapter that you want to create. The values that you specify must be within the maximum and minimum values that were listed in the previous step.
List the adapters assigned to the VM to confirm that the GPU-P adapter has been added to the VM.
PS C:> Get-VMGpuPartitionAdapter –VMName $vmThis command also returns the adapter ID to use for reconfiguring or deleting a GPU partition.
Connect to and start the VM.
Uninstalling the NVIDIA Virtual GPU Manager for Microsoft Azure Local or Microsoft Windows Server#
If you no longer require the Virtual GPU Manager on your Microsoft Azure Local or Microsoft Windows Server server, you can uninstall the driver package for the Virtual GPU Manager.
Perform this task in a Windows PowerShell window as the Administrator user.
Determine the published name of the driver package for the Virtual GPU Manager by enumerating all third-party driver packages in the driver store.
PS C:> pnputil /enum-driversInformation similar to the following example is displayed. In this example, the published name of the driver package for the Virtual GPU Manager is
oem5.inf.Microsoft PnP Utility ... Published name : oem5.inf Driver package provider : NVIDIA Class : Display adapters Driver date and version : 01/01/2023 31.0.15.2807 Signer name : Microsoft Windows Hardware Compatibility Publisher ...
Delete and uninstall the driver package for the Virtual GPU Manager.
PS C:> pnputil /delete-driver <vgpu-manager-package-published-name> /uninstall /reboot<vgpu-manager-package-published-name>The published name of the driver package for the Virtual GPU Manager that you obtained in the previous step, for example,
oem5.inf.
This example deletes and uninstalls the driver package for which the published name is
oem5.inf.PS C:> pnputil.exe /delete-driver oem5.inf /uninstall /reboot Microsoft PnP Utility Driver package uninstalled. Driver package deleted successfully.
If necessary, the Microsoft Azure Local or Microsoft Windows Server host is rebooted.
Installing and Configuring the NVIDIA Virtual GPU Manager for Red Hat Enterprise Linux KVM#
The following topics step you through the process of setting up a single Red Hat Enterprise Linux Kernel-based Virtual Machine (KVM) VM to use NVIDIA vGPU.
Follow this sequence of instructions:
Installing the Virtual GPU Manager Package for Red Hat Enterprise Linux KVM
Verifying the Installation of the NVIDIA vGPU Software for Red Hat Enterprise Linux KVM
MIG-backed vGPUs only: Configuring a GPU for MIG-Backed vGPUs
vGPUs that support SR-IOV only: Preparing the Virtual Function for an NVIDIA vGPU that Supports SR-IOV on a Linux with KVM Hypervisor
Optional: Putting a GPU or GPU Instance into Mixed-Size Mode
Getting the BDF and Domain of a GPU on a Linux with KVM Hypervisor
Optional: Placing a vGPU on a Physical GPU on a Linux with KVM Hypervisor
Setting vGPU Plugin Parameters on a Linux with KVM Hypervisor
After the process is complete, you can install the graphics driver for your guest OS and license any NVIDIA vGPU software licensed products that you are using.
Note
If you are using a generic Linux KVM hypervisor, follow the instructions in Installing the Virtual GPU Manager Package for Linux KVM.
Installing the Virtual GPU Manager Package for Red Hat Enterprise Linux KVM#
The NVIDIA Virtual GPU Manager for Red Hat Enterprise Linux KVM is provided as a .rpm file.
Caution
NVIDIA Virtual GPU Manager and guest VM drivers must be compatible. If you update vGPU Manager to a release that is incompatible with the guest VM drivers, guest VMs will boot with vGPU disabled until their guest vGPU driver is updated to a compatible version. Consult Virtual GPU Software for Red Hat Enterprise Linux with KVM Release Notes for further details.
Before installing the RPM package for Red Hat Enterprise Linux KVM, ensure that the sshd service on the Red Hat Enterprise Linux KVM server is configured to permit root login. If the Nouveau driver for NVIDIA graphics cards is present, disable it before installing the package. For instructions, see How to disable the Nouveau driver and install the Nvidia driver in RHEL 7 (Red Hat subscription required).
Some versions of Red Hat Enterprise Linux KVM have z-stream updates that break Kernel Application Binary Interface (kABI) compatibility with the previous kernel or the GA kernel. For these versions of Red Hat Enterprise Linux KVM, the following Virtual GPU Manager RPM packages are supplied:
A package for the GA Linux KVM kernel
A package for the updated z-stream kernel
To differentiate these packages, the name of each RPM package includes the kernel version. Ensure that you install the RPM package that is compatible with your Linux KVM kernel version.
Securely copy the RPM file from the system where you downloaded the file to the Red Hat Enterprise Linux KVM server.
From a Windows system, use a secure copy client such as WinSCP.
From a Linux system, use the
scpcommand.
Use secure shell (SSH) to log in as root to the Red Hat Enterprise Linux KVM server.
# ssh root@<kvm-server>
<kvm-server>The host name or IP address of the Red Hat Enterprise Linux KVM server.
Change to the directory on the Red Hat Enterprise Linux KVM server to which you copied the RPM file.
# cd <rpm-file-directory>
<rpm-file-directory>The path to the directory to which you copied the RPM file.
Use the
rpmcommand to install the package.# rpm -iv NVIDIA-vGPU-rhel-8.9-595.91.04.x86_64.rpm Preparing packages for installation... NVIDIA-vGPU-rhel-8.9-595.91.04 #
Reboot the Red Hat Enterprise Linux KVM server.
# systemctl reboot
Verifying the Installation of the NVIDIA vGPU Software for Red Hat Enterprise Linux KVM#
After the Red Hat Enterprise Linux KVM server has rebooted, verify the installation of the NVIDIA vGPU software package for Red Hat Enterprise Linux KVM.
Verify that the NVIDIA vGPU software package is installed and loaded correctly by checking for the VFIO drivers in the list of kernel loaded modules.
# lsmod | grep vfio
nvidia_vgpu_vfio       27099  0
nvidia              12316924  1 nvidia_vgpu_vfio
vfio_mdev              12841  0
mdev                   20414  2 vfio_mdev,nvidia_vgpu_vfio
vfio_iommu_type1       22342  0
vfio                   32331  3 vfio_mdev,nvidia_vgpu_vfio,vfio_iommu_type1
#
Verify that the
libvirtdservice is active and running.# service libvirtd status
Verify that the NVIDIA kernel driver can successfully communicate with the NVIDIA physical GPUs in your system by running the
nvidia-smicommand.The
nvidia-smicommand is described in more detail in NVIDIA System Management Interface nvidia-smi.
Running the nvidia-smi command should produce a listing of the GPUs in your platform.
# nvidia-smi
Fri May 15 18:46:50 2026
+------------------------------------------------------+
| NVIDIA-SMI 595.91.04    Driver Version: 595.91.04    |
|-------------------------------+----------------------+----------------------+
| GPU  Name        Persistence-M| Bus-Id        Disp.A | Volatile Uncorr. ECC |
| Fan  Temp  Perf  Pwr:Usage/Cap|         Memory-Usage | GPU-Util  Compute M. |
|===============================+======================+======================|
|   0  Tesla M60           On   | 0000:85:00.0     Off |                  Off |
| N/A   23C    P8    23W / 150W |     13MiB /  8191MiB |      0%      Default |
+-------------------------------+----------------------+----------------------+
|   1  Tesla M60           On   | 0000:86:00.0     Off |                  Off |
| N/A   29C    P8    23W / 150W |     13MiB /  8191MiB |      0%      Default |
+-------------------------------+----------------------+----------------------+
|   2  Tesla P40           On   | 0000:87:00.0     Off |                  Off |
| N/A   21C    P8    18W / 250W |     53MiB / 24575MiB |      0%      Default |
+-------------------------------+----------------------+----------------------+
+-----------------------------------------------------------------------------+
| Processes:                                                       GPU Memory |
|  GPU       PID  Type  Process name                               Usage      |
|=============================================================================|
|  No running processes found                                                 |
+-----------------------------------------------------------------------------+
#
If nvidia-smi fails to run or doesn’t produce the expected output for all the NVIDIA GPUs in your system, see Troubleshooting for troubleshooting steps.
Installing and Configuring the NVIDIA Virtual GPU Manager for Ubuntu#
Follow this sequence of instructions to set up a single Ubuntu VM to use NVIDIA vGPU.
MIG-backed vGPUs only: Configuring a GPU for MIG-Backed vGPUs
Getting the BDF and Domain of a GPU on a Linux with KVM Hypervisor
vGPUs that support SR-IOV only: Preparing the Virtual Function for an NVIDIA vGPU that Supports SR-IOV on a Linux with KVM Hypervisor
Optional: Putting a GPU or GPU Instance into Mixed-Size Mode
Optional: Placing a vGPU on a Physical GPU on a Linux with KVM Hypervisor
Setting vGPU Plugin Parameters on a Linux with KVM Hypervisor
After the process is complete, you can install the graphics driver for your guest OS and license any NVIDIA vGPU software licensed products that you are using.
Installing the NVIDIA Virtual GPU Manager for Ubuntu#
The NVIDIA Virtual GPU Manager for Ubuntu is provided as a Debian package (.deb) file.
Caution
NVIDIA Virtual GPU Manager and guest VM drivers must be compatible. If you update vGPU Manager to a release that is incompatible with the guest VM drivers, guest VMs will boot with vGPU disabled until their guest vGPU driver is updated to a compatible version. Consult Virtual GPU Software for Ubuntu Release Notes for further details.
Installing the Virtual GPU Manager Package for Ubuntu#
Before installing the Debian package for Ubuntu, ensure that the sshd service on the Ubuntu server is configured to permit root login. If the Nouveau driver for NVIDIA graphics cards is present, disable it before installing the package.
Securely copy the Debian package file from the system where you downloaded the file to the Ubuntu server.
From a Windows system, use a secure copy client such as WinSCP.
From a Linux system, use the
scpcommand.
Use secure shell (SSH) to log in as root to the Ubuntu server.
# ssh root@<ubuntu-server>
<ubuntu-server>The host name or IP address of the Ubuntu server.
Change to the directory on the Ubuntu server to which you copied the Debian package file.
# cd <deb-file-directory>
<deb-file-directory>The path to the directory to which you copied the Debian package file.
Use the
aptcommand to install the package.# apt install ./nvidia-vgpu-ubuntu-595.91.04_amd64.deb
Reboot the Ubuntu server.
# systemctl reboot
Verifying the Installation of the NVIDIA vGPU Software for Ubuntu#
After the Ubuntu server has rebooted, verify the installation of the NVIDIA vGPU software package for Ubuntu.
Verify that the NVIDIA vGPU software package is installed and loaded correctly by checking for the VFIO drivers in the list of kernel loaded modules.
# lsmod | grep vfio
nvidia_vgpu_vfio       27099  0
nvidia              12316924  1 nvidia_vgpu_vfio
vfio_mdev              12841  0
mdev                   20414  2 vfio_mdev,nvidia_vgpu_vfio
vfio_iommu_type1       22342  0
vfio                   32331  3 vfio_mdev,nvidia_vgpu_vfio,vfio_iommu_type1
#
Verify that the
libvirtdservice is active and running.# service libvirtd status
Verify that the NVIDIA kernel driver can successfully communicate with the NVIDIA physical GPUs in your system by running the
nvidia-smicommand.The
nvidia-smicommand is described in more detail in NVIDIA System Management Interface nvidia-smi.
Running the nvidia-smi command should produce a listing of the GPUs in your platform.
# nvidia-smi
Fri May 15 18:46:50 2026
+------------------------------------------------------+
| NVIDIA-SMI 595.91.04    Driver Version: 595.91.04    |
|-------------------------------+----------------------+----------------------+
| GPU  Name        Persistence-M| Bus-Id        Disp.A | Volatile Uncorr. ECC |
| Fan  Temp  Perf  Pwr:Usage/Cap|         Memory-Usage | GPU-Util  Compute M. |
|===============================+======================+======================|
|   0  Tesla M60           On   | 0000:85:00.0     Off |                  Off |
| N/A   23C    P8    23W / 150W |     13MiB /  8191MiB |      0%      Default |
+-------------------------------+----------------------+----------------------+
|   1  Tesla M60           On   | 0000:86:00.0     Off |                  Off |
| N/A   29C    P8    23W / 150W |     13MiB /  8191MiB |      0%      Default |
+-------------------------------+----------------------+----------------------+
|   2  Tesla P40           On   | 0000:87:00.0     Off |                  Off |
| N/A   21C    P8    18W / 250W |     53MiB / 24575MiB |      0%      Default |
+-------------------------------+----------------------+----------------------+
+-----------------------------------------------------------------------------+
| Processes:                                                       GPU Memory |
|  GPU       PID  Type  Process name                               Usage      |
|=============================================================================|
|  No running processes found                                                 |
+-----------------------------------------------------------------------------+
#
If nvidia-smi fails to run or doesn’t produce the expected output for all the NVIDIA GPUs in your system, see Troubleshooting for troubleshooting steps.
Installing and Configuring the NVIDIA Virtual GPU Manager for VMware vSphere#
You can use the NVIDIA Virtual GPU Manager for VMware vSphere to set up a VMware vSphere VM to use NVIDIA vGPU.
Note
Some servers, for example, the Dell R740, do not configure SR-IOV capability if the SR-IOV SBIOS setting is disabled on the server. If you are using the Tesla T4 GPU with VMware vSphere on such a server, you must ensure that the SR-IOV SBIOS setting is enabled on the server.
However, with any server hardware, do not enable SR-IOV in VMware vCenter Server for the Tesla T4 GPU. If SR-IOV is enabled in VMware vCenter Server for T4, VMware vCenter Server lists the status of the GPU as needing a reboot. You can ignore this status message.
NVIDIA vGPU Instructions#
Note
The Xorg service is not required for graphics devices in NVIDIA vGPU mode. For more information, see Installing and Updating the NVIDIA Virtual GPU Manager for VMware vSphere.
To set up a VMware vSphere VM to use NVIDIA vGPU, follow this sequence of instructions:
Installing and Updating the NVIDIA Virtual GPU Manager for VMware vSphere
MIG-backed vGPUs only: Configuring a GPU for MIG-Backed vGPUs
After configuring a vSphere VM to use NVIDIA vGPU, you can install the NVIDIA vGPU software graphics driver for your guest OS and license any NVIDIA vGPU software licensed products that you are using.
Requirements for Configuring NVIDIA vGPU in a DRS Cluster#
You can configure a VM with NVIDIA vGPU on an ESXi host in a VMware Distributed Resource Scheduler (DRS) cluster. Any automation level of the cluster is supported.
If the cluster automation level is Fully Automated, see Broadcom Knowledge Base Article: vGPU Virtual Machine automated migration for Host Maintenance Mode in a DRS Cluster for required configuration settings and possible known issues.
For more information about the settings for automation levels in a DRS cluster, see Edit Cluster Settings in the VMware documentation.
Installing and Updating the NVIDIA Virtual GPU Manager for VMware vSphere#
The NVIDIA Virtual GPU Manager runs on the ESXi host. It is distributed as a number of software components in a ZIP archive.
The NVIDIA Virtual GPU Manager software components are as follows:
A software component for the NVIDIA vGPU hypervisor host driver
A software component for the NVIDIA GPU Management daemon
You can install these software components in one of the following ways:
By copying the software components to the ESXi host and then installing them as explained in Installing the NVIDIA Virtual GPU Manager on VMware vSphere
By importing the software components manually as explained in Import Patches Manually in the VMware vSphere documentation
Caution
NVIDIA Virtual GPU Manager and guest VM drivers must be compatible. If you update vGPU Manager to a release that is incompatible with the guest VM drivers, guest VMs will boot with vGPU disabled until their guest vGPU driver is updated to a compatible version. Consult Virtual GPU Software for VMware vSphere Release Notes for further details.
Note
Installing or updating the Virtual GPU Manager for VMware vSphere by using the esxcli software might fail with the following error:
[InstallationError]
The pending transaction requires 524 MB free space, however the maximum supported size is 489 MB.
For information about how to work around this issue, refer to Broadcom Knowledge Base Article: ESXi upgrade or installation failure: Host not compatible with the image. The bootbank partition on the host has a capacity of <size>, the image requires <size>.
Installing the NVIDIA Virtual GPU Manager on VMware vSphere#
To install the NVIDIA Virtual GPU Manager you need to access the ESXi host via the ESXi Shell or SSH. Refer to VMware’s documentation on how to enable ESXi Shell or SSH for an ESXi host.
Before you begin, ensure that the following prerequisites are met:
The ZIP archive that contains NVIDIA vGPU software has been downloaded from the NVIDIA Licensing Portal.
The software components for the NVIDIA Virtual GPU Manager have been extracted from the downloaded ZIP archive.
Copy the NVIDIA Virtual GPU Manager component files to the ESXi host.
Put the ESXi host into maintenance mode.
$ esxcli system maintenanceMode set –-enable true
Install the NVIDIA vGPU hypervisor host driver and the NVIDIA GPU Management daemon from their software component files.
Run the
esxclicommand to install the NVIDIA vGPU hypervisor host driver from its software component file.$ esxcli software vib install -d /vmfs/volumes/<datastore>/<host-driver-component>.zip
Run the
esxclicommand to install the NVIDIA GPU Management daemon from its software component file.$ esxcli software vib install -d /vmfs/volumes/<datastore>/<gpu-management-daemon-component>.zip
<datastore>The name of the VMFS datastore to which you copied the software components.
<host-driver-component>The name of the file that contains the NVIDIA vGPU hypervisor host driver in the form of a software component. Ensure that you specify the file that was extracted from the downloaded ZIP archive. For example, for VMware vSphere 8.0.0,
<host-driver-component>isNVD-VMware-x86_64-595.71.03-1OEM.800.1.0.20613240-bundle-<build-number>.<gpu-management-daemon-component>The name of the file that contains the NVIDIA GPU Management daemon in the form of a software component. Ensure that you specify the file that was extracted from the downloaded ZIP archive. For example, for VMware vSphere 8.0.0,
<gpu-management-daemon-component>isVMW-esx-8.0.0-nvd-gpu-mgmt-daemon-1.0-0.0.0001.
Exit maintenance mode.
$ esxcli system maintenanceMode set –-enable false
Reboot the ESXi host.
$ reboot
Updating the NVIDIA Virtual GPU Manager for VMware vSphere#
Update the NVIDIA Virtual GPU Manager if you want to install a new version of NVIDIA Virtual GPU Manager on a system where an existing version is already installed.
To update the vGPU Manager VIB you need to access the ESXi host via the ESXi Shell or SSH. Refer to VMware’s documentation on how to enable ESXi Shell or SSH for an ESXi host.
Note
Before proceeding with the vGPU Manager update, make sure that all VMs are powered off and the ESXi host is placed in maintenance mode. Refer to VMware’s documentation on how to place an ESXi host in maintenance mode
Stop the NVIDIA GPU Management Daemon.
$ /etc/init.d/nvdGpuMgmtDaemon stop
Update the NVIDIA vGPU hypervisor host driver and the NVIDIA GPU Management daemon.
Run the
esxclicommand to update the NVIDIA vGPU hypervisor host driver from its software component file.$ esxcli software vib update -d /vmfs/volumes/<datastore>/<host-driver-component>.zip
Run the
esxclicommand to update the NVIDIA GPU Management daemon from its software component file.$ esxcli software vib update -d /vmfs/volumes/<datastore>/<gpu-management-daemon-component>.zip
<datastore>The name of the VMFS datastore to which you copied the software components.
<host-driver-component>The name of the file that contains the NVIDIA vGPU hypervisor host driver in the form of a software component. Ensure that you specify the file that was extracted from the downloaded ZIP archive. For example, for VMware vSphere 8.0.0,
<host-driver-component>isNVD-VMware-x86_64-595.71.03-1OEM.800.1.0.20613240-bundle-<build-number>.<gpu-management-daemon-component>The name of the file that contains the NVIDIA GPU Management daemon in the form of a software component. Ensure that you specify the file that was extracted from the downloaded ZIP archive. For example, for VMware vSphere 8.0.0,
<gpu-management-daemon-component>isVMW-esx-8.0.0-nvd-gpu-mgmt-daemon-1.0-0.0.0001.
Reboot the ESXi host and remove it from maintenance mode.
Verifying the Installation of the NVIDIA vGPU Software Package for vSphere#
After the ESXi host has rebooted, verify the installation of the NVIDIA vGPU software package for vSphere.
Verify that the NVIDIA vGPU software package installed and loaded correctly by checking for the NVIDIA kernel driver in the list of kernel loaded modules.
[root@esxi:~] vmkload_mod -l | grep <module>
nvidia                   5    8420
<module>depends on the GPU architecture of your GPU:For the NVIDIA Ada Lovelace GPU architecture and later GPU architectures,
<module>isnvidia-gpu.For GPU architectures before NVIDIA Ada Lovelace,
<module>isnvidia.
If the NVIDIA driver is not listed in the output, check
dmesgfor any load-time errors reported by the driver.Verify that the NVIDIA GPU Management daemon has started.
$ /etc/init.d/nvdGpuMgmtDaemon status
Verify that the NVIDIA kernel driver can successfully communicate with the NVIDIA physical GPUs in your system by running the
nvidia-smicommand.The
nvidia-smicommand is described in more detail in NVIDIA System Management Interface nvidia-smi.
Running the nvidia-smi command should produce a listing of the GPUs in your platform.
[root@esxi:~] nvidia-smi
Fri May 15 17:56:22 2026
+------------------------------------------------------+
| NVIDIA-SMI 595.91.04    Driver Version: 595.91.04    |
|-------------------------------+----------------------+----------------------+
| GPU  Name        Persistence-M| Bus-Id        Disp.A | Volatile Uncorr. ECC |
| Fan  Temp  Perf  Pwr:Usage/Cap|         Memory-Usage | GPU-Util  Compute M. |
|===============================+======================+======================|
|   0  Tesla M60           On   | 00000000:05:00.0 Off |                  Off |
| N/A   25C    P8    24W / 150W |     13MiB /  8191MiB |      0%      Default |
+-------------------------------+----------------------+----------------------+
|   1  Tesla M60           On   | 00000000:06:00.0 Off |                  Off |
| N/A   24C    P8    24W / 150W |     13MiB /  8191MiB |      0%      Default |
+-------------------------------+----------------------+----------------------+
|   2  Tesla M60           On   | 00000000:86:00.0 Off |                  Off |
| N/A   25C    P8    25W / 150W |     13MiB /  8191MiB |      0%      Default |
+-------------------------------+----------------------+----------------------+
|   3  Tesla M60           On   | 00000000:87:00.0 Off |                  Off |
| N/A   28C    P8    24W / 150W |     13MiB /  8191MiB |      0%      Default |
+-------------------------------+----------------------+----------------------+

+-----------------------------------------------------------------------------+
| Processes:                                                       GPU Memory |
|  GPU       PID   Type   Process name                             Usage      |
|=============================================================================|
|  No running processes found                                                 |
+-----------------------------------------------------------------------------+
If nvidia-smi fails to report the expected output for all the NVIDIA GPUs in your system, see Troubleshooting for troubleshooting steps.
Managing the NVIDIA GPU Management Daemon for VMware vSphere#
The NVIDIA GPU Management Daemon for VMware vSphere is a service that is controlled through scripts in the /etc/init.d directory. You can use these scripts to start the daemon, stop the daemon, and get its status.
To start the NVIDIA GPU Management Daemon, enter the following command:
$ /etc/init.d/nvdGpuMgmtDaemon start
To stop the NVIDIA GPU Management Daemon, enter the following command:
$ /etc/init.d/nvdGpuMgmtDaemon stop
To get the status of the NVIDIA GPU Management Daemon, enter the following command:
$ /etc/init.d/nvdGpuMgmtDaemon status
Configuring VMware vMotion with vGPU for VMware vSphere#
NVIDIA vGPU software supports vGPU migration, which includes VMware vMotion and suspend-resume, for VMs that are configured with vGPU. To enable VMware vMotion with vGPU, an advanced vCenter Server setting must be enabled. However, suspend-resume for VMs that are configured with vGPU is enabled by default.
For details about which VMware vSphere versions, NVIDIA GPUs, and guest OS releases support vGPU migration, see Virtual GPU Software for VMware vSphere Release Notes.
Before configuring VMware vMotion with vGPU for an ESXi host, ensure that the current NVIDIA Virtual GPU Manager for VMware vSphere package is installed on the host.
Log in to vCenter Server by using the vSphere Web Client.
In the Hosts and Clusters view, select the vCenter Server instance.
Note
Ensure that you select the vCenter Server instance, not the vCenter Server VM.
Click the Configure tab.
In the Settings section, select Advanced Settings and click Edit.
In the Edit Advanced vCenter Server Settings window that opens, type
vGPUin the search field.When the vgpu.hotmigrate.enabled setting appears, set the Enabled option and click OK.
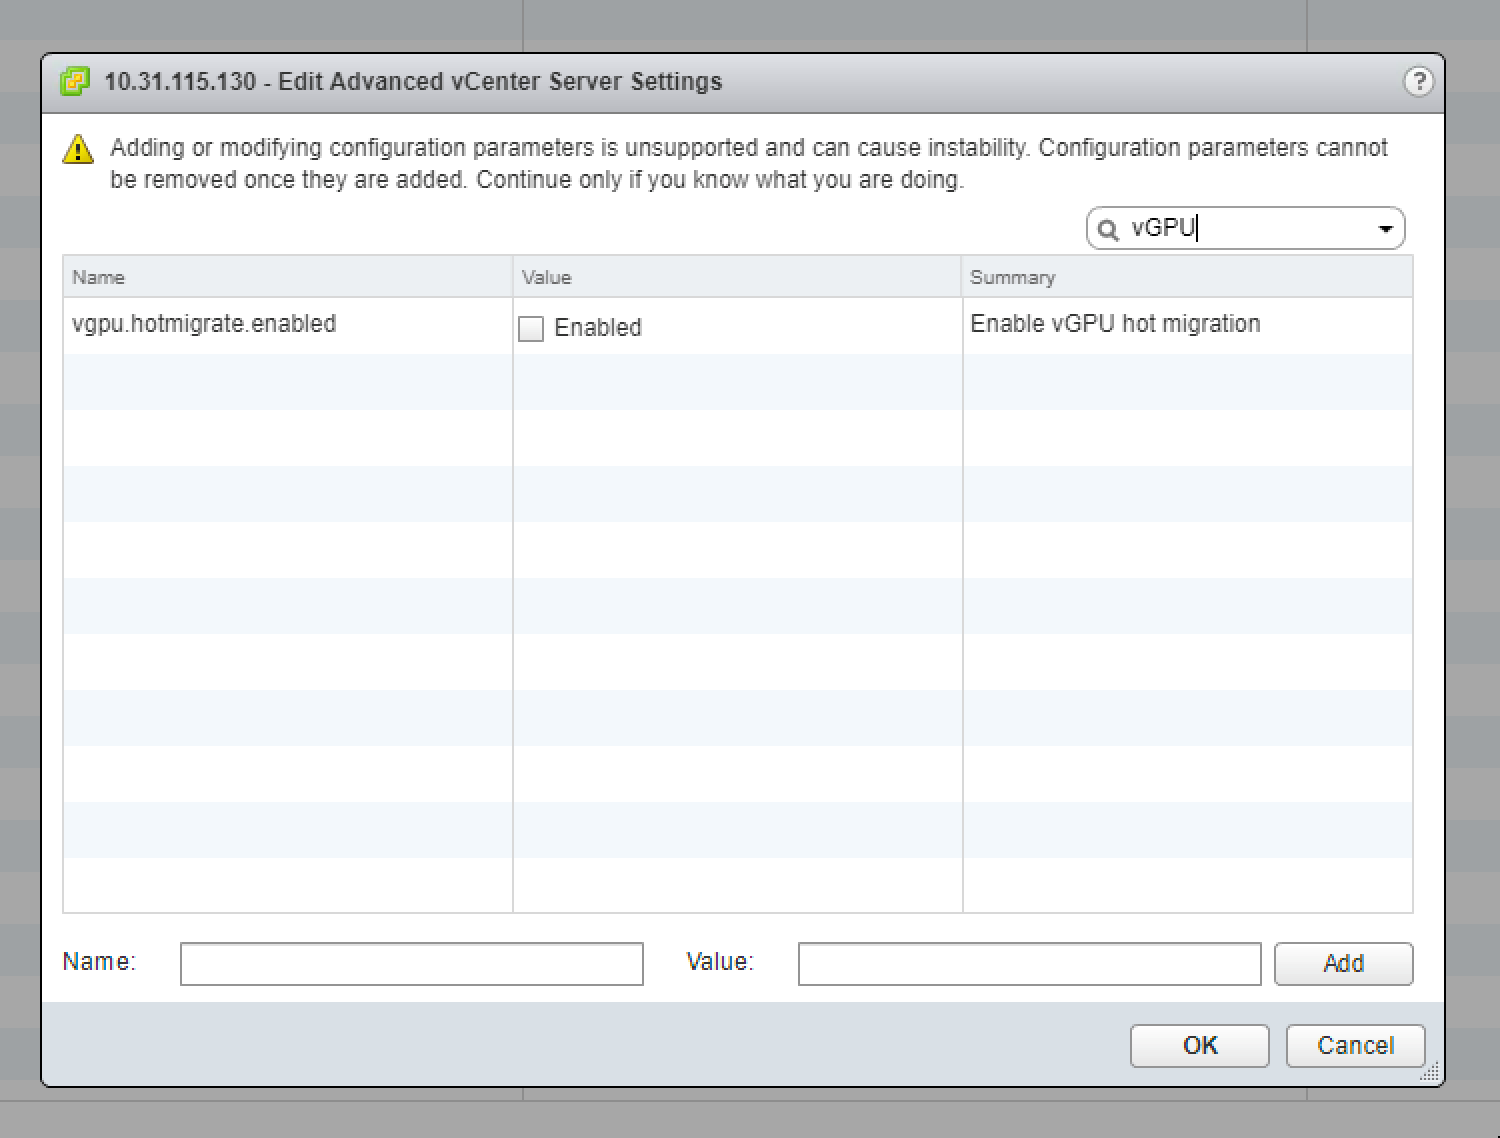
Configuring Fast Suspend-Resume for a VMware vSphere VM#
NVIDIA vGPU software supports Fast Suspend-Resume for VMs that are configured with vGPU. Fast Suspend-Resume enables changes to a VM, such as adding a network adapter, with minimal disruption to the VM. To enable Fast Suspend-Resume for a VMware vSphere VM, an advanced VM setting must be enabled.
For details about which VMware vSphere versions, NVIDIA GPUs, and guest OS releases support Fast Suspend-Resume for VMware vSphere, see Virtual GPU Software for VMware vSphere Release Notes.
Before configuring Fast Suspend-Resume for a VMware vSphere VM, ensure that the current NVIDIA Virtual GPU Manager for VMware vSphere package is installed on the ESXi host.
Log in to vCenter Server by using the vSphere Web Client.
In the inventory, context-click the VM and choose Edit Settings.
Click the Advanced Parameters tab.
Add the
vmiop.allowWarmUpdateattribute with the valueTRUE, click Add and then click OK.Boot the VM.
Changing the Default Graphics Type in VMware vSphere#
After the vGPU Manager VIB for VMware vSphere VIB is installed, the default graphics type is Shared. To enable vGPU support for VMs in VMware vSphere, you must change the default graphics type to Shared Direct.
If you do not change the default graphics type, VMs to which a vGPU is assigned fail to start and the following error message is displayed:
The amount of graphics resource available in the parent resource pool is insufficient for the operation.
Note
Change the default graphics type before configuring vGPU. Output from the VM console in the VMware vSphere Web Client is not available for VMs that are running vGPU.
Before changing the default graphics type, ensure that the ESXi host is running and that all VMs on the host are powered off.
Log in to vCenter Server by using the vSphere Web Client.
In the navigation tree, select your ESXi host and click the Configure tab.
From the menu, choose Graphics and then click the Host Graphics tab.
On the Host Graphics tab, click Edit.
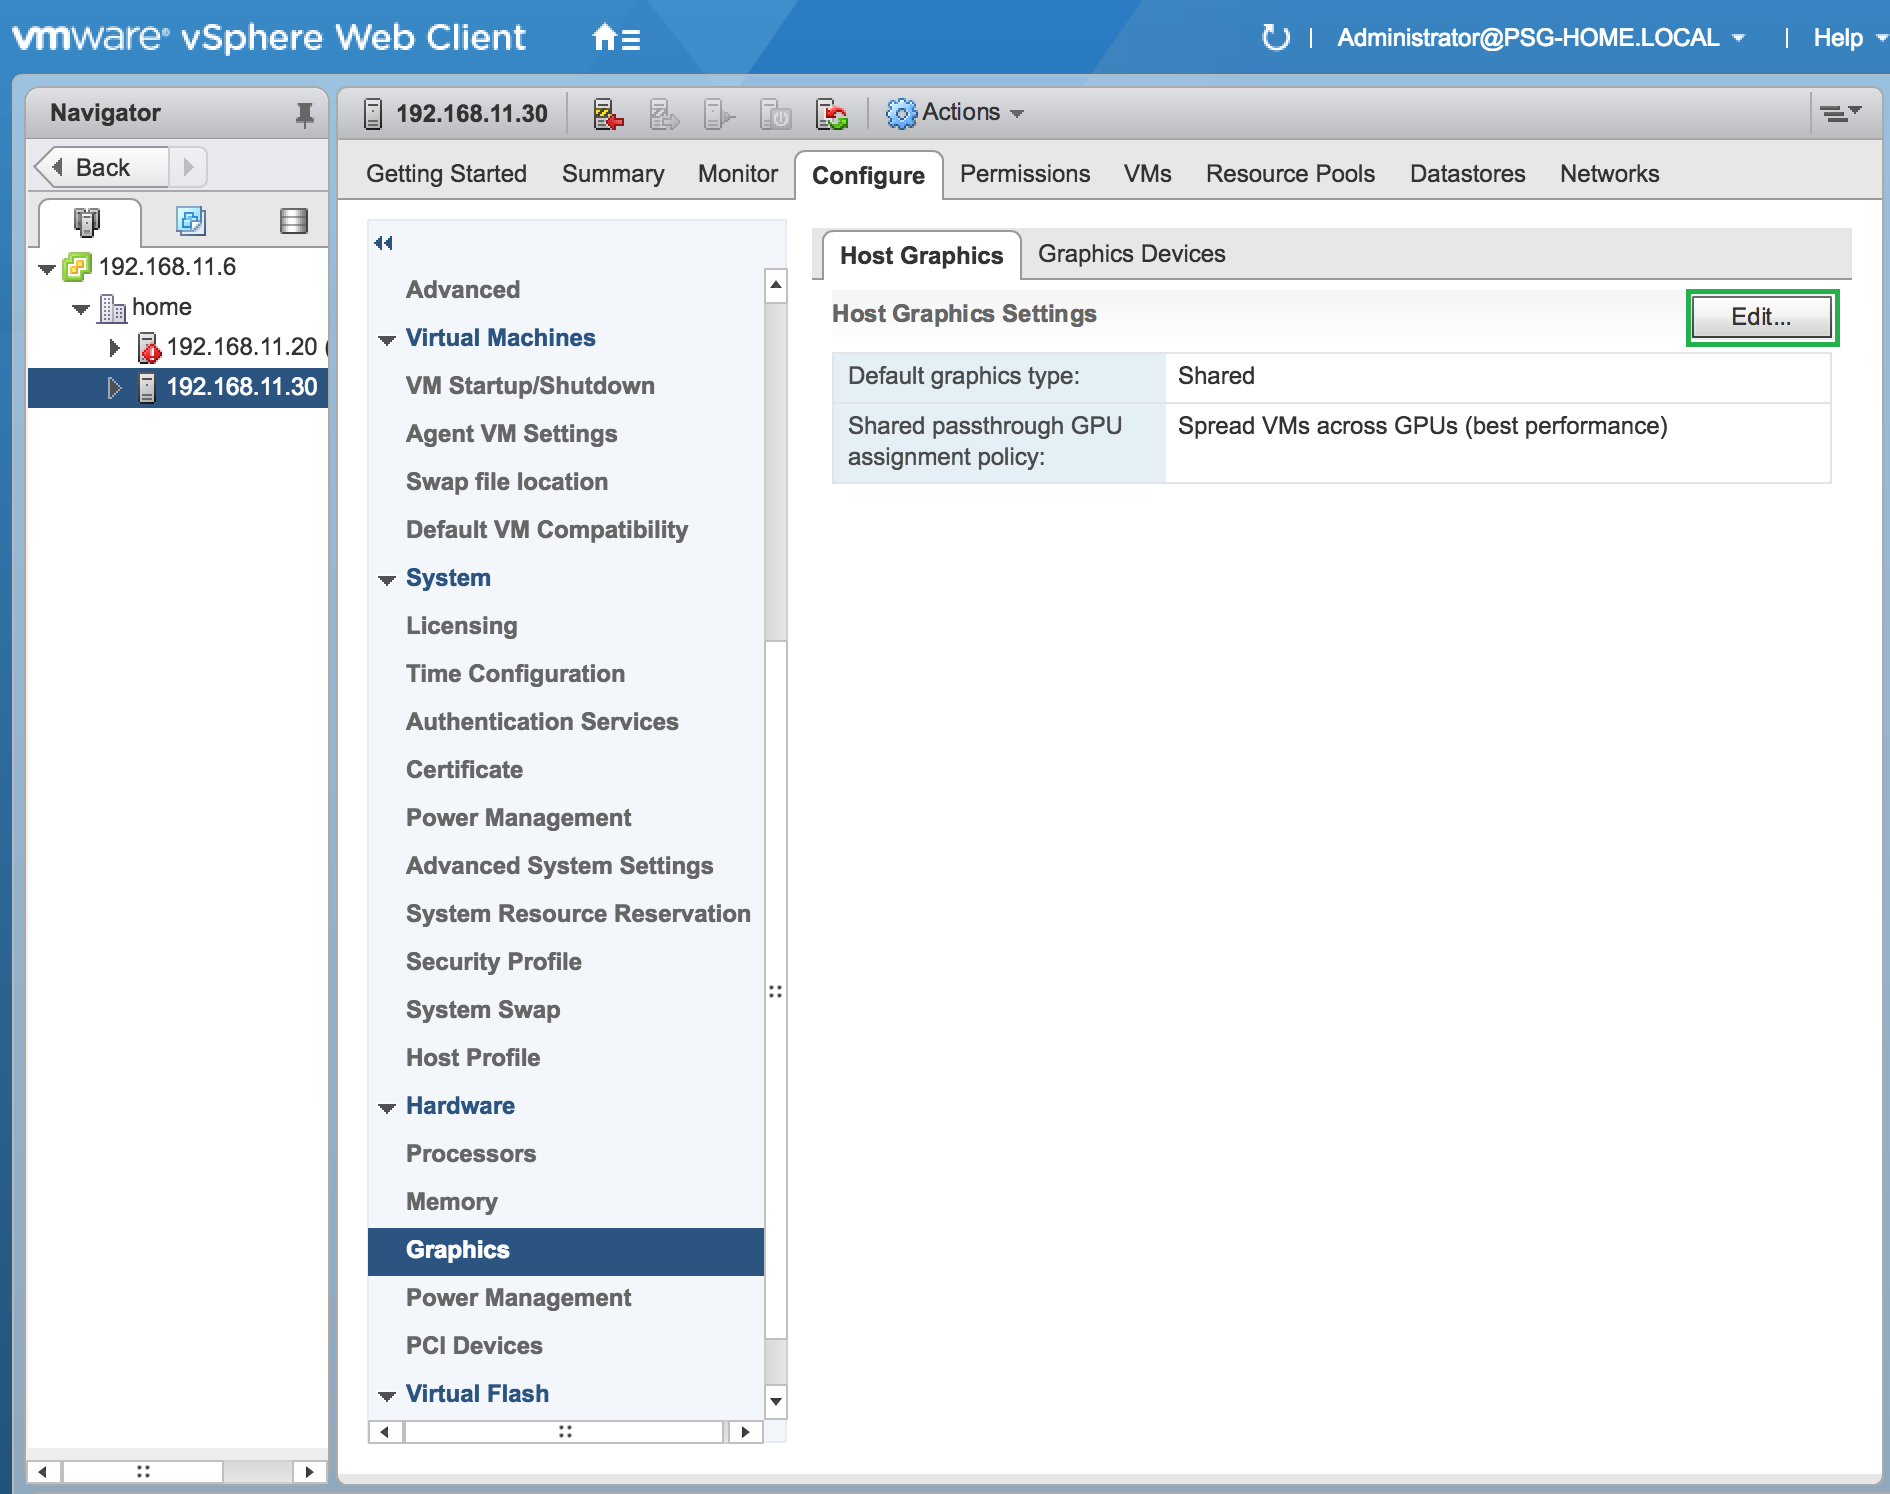
Figure 8 Shared default graphics type#
In the Edit Host Graphics Settings dialog box that opens, select Shared Direct and click OK.
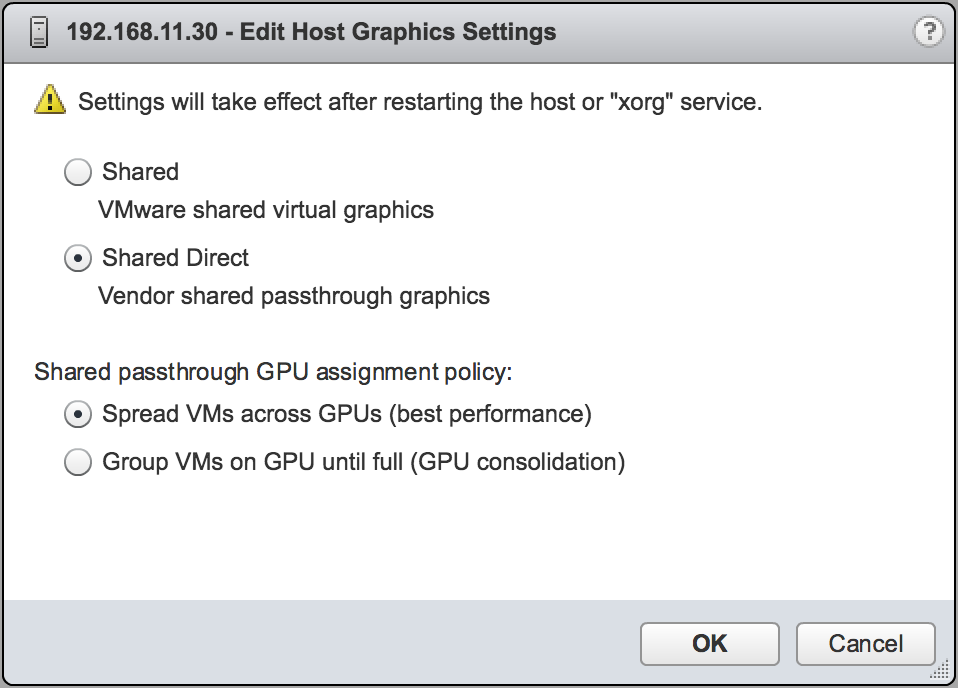
Figure 9 Host graphics settings for vGPU#
Note
In this dialog box, you can also change the allocation scheme for vGPU-enabled VMs. For more information, see Modifying GPU Allocation Policy on VMware vSphere.
After you click OK, the default graphics type changes to Shared Direct.
Click the Graphics Devices tab to verify the configured type of each physical GPU on which you want to configure vGPU.
The configured type of each physical GPU must be Shared Direct. For any physical GPU for which the configured type is Shared, change the configured type as follows:
On the Graphics Devices tab, select the physical GPU and click the Edit icon.
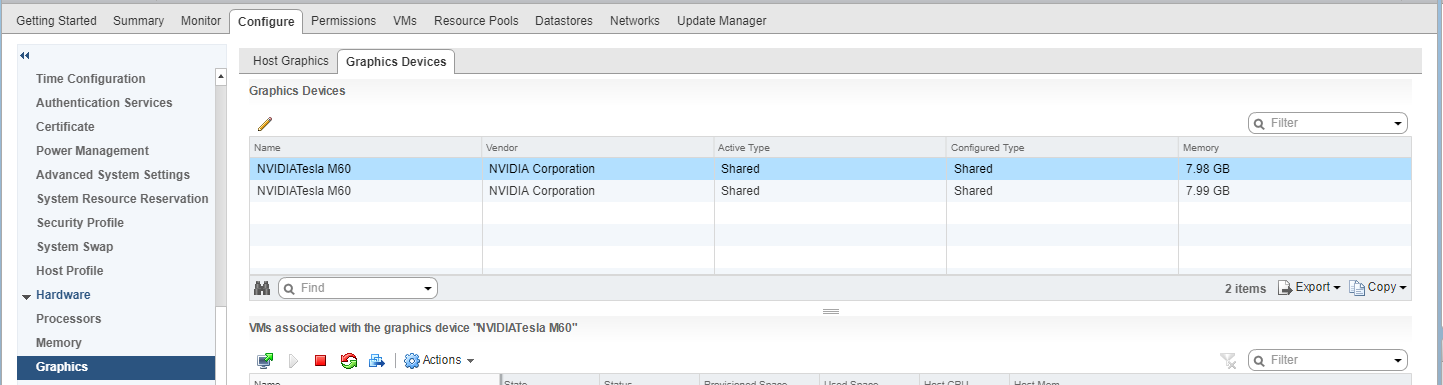
Figure 10 Shared graphics type#
In the Edit Graphics Device Settings dialog box that opens, select Shared Direct and click OK.
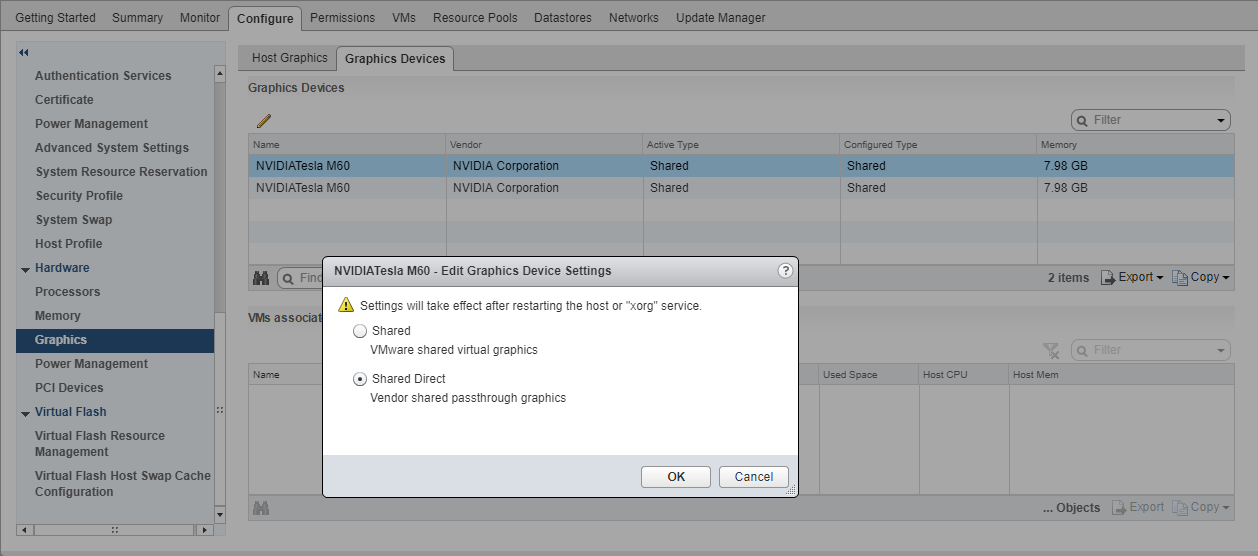
Figure 11 Graphics device settings for a physical GPU#
Restart the ESXi host or stop and restart the Xorg service if necessary and
nv-hostengineon the ESXi host.To stop and restart the Xorg service and
nv-hostengine, perform these steps:Stop
nv-hostengine.[root@esxi:~] nv-hostengine -tWait for 1 second to allow
nv-hostengineto stop.Start
nv-hostengine.[root@esxi:~] nv-hostengine -d
In the Graphics Devices tab of the VMware vCenter Web UI, confirm that the active type and the configured type of each physical GPU are Shared Direct.
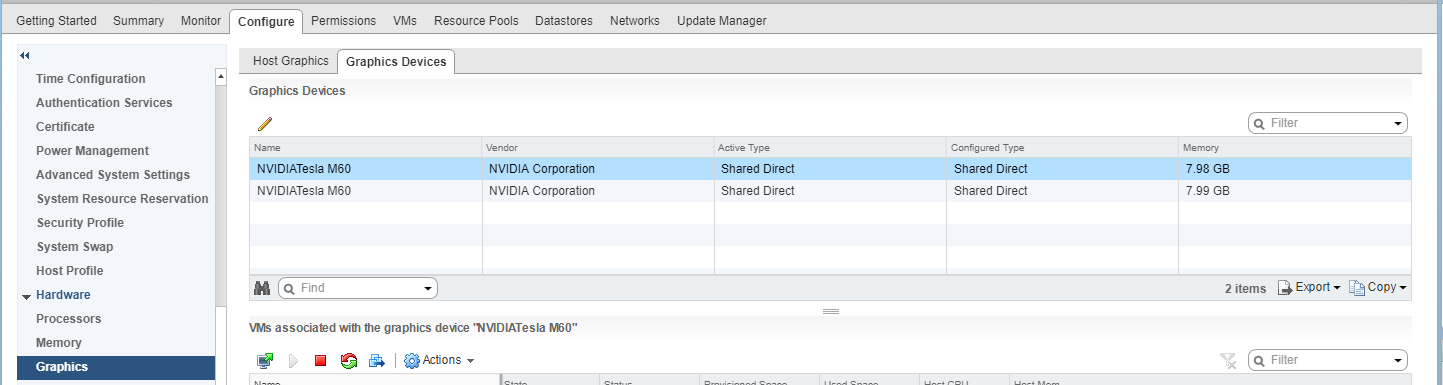
Figure 12 Shared direct graphics type#
After changing the default graphics type, configure vGPU as explained in Configuring a vSphere VM with NVIDIA vGPU.
See also the following topics in the VMware vSphere documentation:
Configuring a vSphere VM with NVIDIA vGPU#
To support applications and workloads that are compute or graphics intensive, you can add multiple vGPUs to a single VM.
For details about which VMware vSphere versions and NVIDIA vGPUs support the assignment of multiple vGPUs to a VM, see Virtual GPU Software for VMware vSphere Release Notes.
Caution
Output from the VM console in the VMware vSphere Web Client is not available for VMs that are running vGPU. Make sure that you have installed an alternate means of accessing the VM (such as Omnissa Horizon or a VNC server) before you configure vGPU.
VM console in vSphere Web Client will become active again once the vGPU parameters are removed from the VM’s configuration.
Open the vCenter Web UI.
In the vCenter Web UI, right-click the VM and choose Edit Settings.
In the Edit Settings window that opens, configure the vGPUs that you want to add to the VM.
Add each vGPU that you want to add to the VM as follows:
From the ADD NEW DEVICE menu, choose PCI Device.
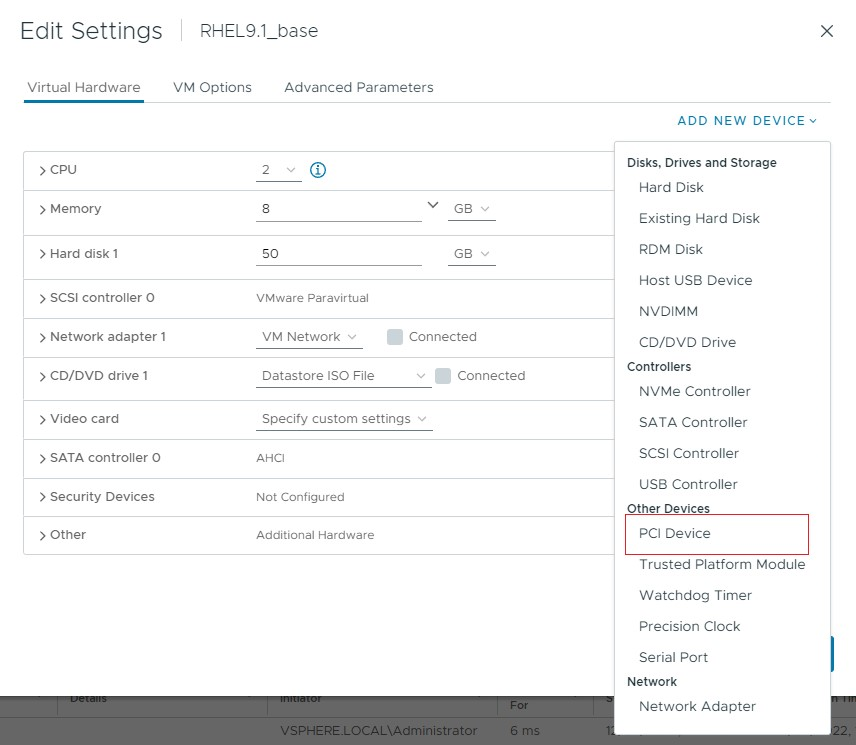
Figure 13 Command for Adding a PCI Device#
In the Device Selection window that opens, select the type of vGPU you want to configure and click SELECT.
Note
NVIDIA vGPU software does not support NVIDIA vGPU for Compute on VMware vSphere. Therefore, C-series vGPU types are not available for selection in the Device Selection window.
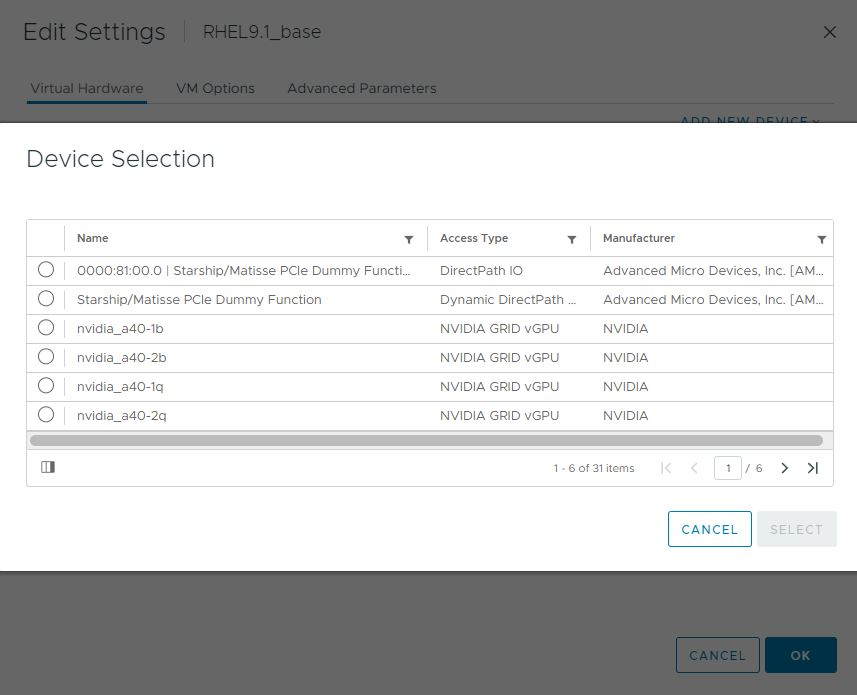
Figure 14 VM Device Selections for vGPU#
Back in the Edit Settings window, click OK.
After you have configured a vSphere VM with a vGPU, start the VM. VM console in vSphere Web Client is not supported in this vGPU release. Therefore, use Omnissa Horizon or VNC to access the VM’s desktop.
After the VM has booted, install the NVIDIA vGPU software graphics driver as explained in Installing the NVIDIA vGPU Software Graphics Driver.
Setting vGPU Plugin Parameters on VMware vSphere#
Plugin parameters for a vGPU control the behavior of the vGPU, such as the frame rate limiter (FRL) configuration in frames per second or whether console virtual network computing (VNC) for the vGPU is enabled. The VM to which the vGPU is assigned is started with these parameters. If parameters are set for multiple vGPUs assigned to the same VM, the VM is started with the parameters assigned to each vGPU.
Ensure that the VM to which the vGPU is assigned is powered off.
For each vGPU for which you want to set plugin parameters, perform this task in the vSphere Client. vGPU plugin parameters are PCI pass through configuration parameters in advanced VM attributes.
In the vSphere Client, browse to the VM to which the vGPU is assigned.
Context-click the VM and choose Edit Settings.
In the Edit Settings window, click the VM Options tab.
From the Advanced drop-down list, select Edit Configuration.
In the Configuration Parameters dialog box, click Add Row.
In the Name field, type the parameter name
pciPassthru<vgpu-id>.cfg.<parameter>, in the Value field type the parameter value, and click OK.<vgpu-id>A positive integer that identifies the vGPU assigned to a VM. For the first vGPU assigned to a VM,
<vgpu-id>is0. For example, if two vGPUs are assigned to a VM and you are setting a plugin parameter for both vGPUs, set the following parameters:pciPassthru0.cfg.<parameter>pciPassthru1.cfg.<parameter>
<parameter>The name of the vGPU plugin parameter that you want to set. For example, the name of the vGPU plugin parameter for enabling unified memory is
enable_uvm.
To enable unified memory for two vGPUs that are assigned to a VM, set
pciPassthru0.cfg.enable_uvmandpciPassthru1.cfg.enable_uvmto 1.
Configuring the vGPU Manager for a Linux with KVM Hypervisor#
NVIDIA vGPU software supports the following Linux with KVM hypervisors: Red Hat Enterprise Linux with KVM and Ubuntu.
If you’re configuring an NVIDIA vGPU that requires a large BAR address space on a UEFI VM, refer to NVIDIA vGPU software graphics driver fails to load on KVM-based hypervisors for a workaround to ensure that BAR resources are mapped into the VM.
Note
This workaround involves setting an experimental QEMU parameter.
Getting the BDF and Domain of a GPU on a Linux with KVM Hypervisor#
Sometimes when configuring a physical GPU for use with NVIDIA vGPU software, you must find out which directory in the sysfs file system represents the GPU. This directory is identified by the domain, bus, slot, and function of the GPU.
For more information about the directory in the sysfs file system that represents a physical GPU, see NVIDIA vGPU Information in the sysfs File System.
Obtain the PCI device bus/device/function (BDF) of the physical GPU.
# lspci | grep NVIDIA
The NVIDIA GPUs listed in this example have the PCI device BDFs
06:00.0and07:00.0.# lspci | grep NVIDIA 06:00.0 VGA compatible controller: NVIDIA Corporation GM204GL [Tesla M10] (rev a1) 07:00.0 VGA compatible controller: NVIDIA Corporation GM204GL [Tesla M10] (rev a1)
Obtain the full identifier of the GPU from its PCI device BDF.
# virsh nodedev-list --cap pci| grep <transformed-bdf>
<transformed-bdf>The PCI device BDF of the GPU with the colon and the period replaced with underscores, for example,
06_00_0.
This example obtains the full identifier of the GPU with the PCI device BDF
06:00.0.# virsh nodedev-list --cap pci| grep 06_00_0 pci_0000_06_00_0
Obtain the domain, bus, slot, and function of the GPU from the full identifier of the GPU.
virsh nodedev-dumpxml <full-identifier>| egrep 'domain|bus|slot|function'<full-identifier>The full identifier of the GPU that you obtained in the previous step, for example,
pci_0000_06_00_0.
This example obtains the domain, bus, slot, and function of the GPU with the PCI device BDF
06:00.0.# virsh nodedev-dumpxml pci_0000_06_00_0| egrep 'domain|bus|slot|function' <domain>0x0000</domain> <bus>0x06</bus> <slot>0x00</slot> <function>0x0</function> <address domain='0x0000' bus='0x06' slot='0x00' function='0x0'/>
Preparing the Virtual Function for an NVIDIA vGPU that Supports SR-IOV on a Linux with KVM Hypervisor#
An NVIDIA vGPU that supports SR-IOV resides on a physical GPU that supports SR-IOV, such as a GPU based on the NVIDIA Ampere architecture. Before creating an NVIDIA vGPU on a GPUthat supports SR-IOV, you must enable the virtual functions of the GPU and obtain the domain, bus, slot, and function of the specific virtual function on which you want to create the vGPU.
Before performing this task, ensure that the GPU is not being used by any other processes, such as CUDA applications, monitoring applications, or the nvidia-smi command.
Enable the virtual functions for the physical GPU in the
sysfsfile system.Note
The virtual functions for the physical GPU in the
sysfsfile system are disabled after the hypervisor host is rebooted or if the driver is reloaded or upgraded.Use only the custom script
sriov-manageprovided by NVIDIA vGPU software for this purpose. Do not try to enable the virtual function for the GPU by any other means.# /usr/lib/nvidia/sriov-manage -e <domain>:<bus>:<slot>.<function>
<domain>,<bus>,<slot>,<function>The domain, bus, slot, and function of the GPU, without the
0xprefix.
Note
Only one
mdevdevice file can be created on a virtual function.This example enables the virtual functions for the GPU with the domain
00, bus41, slot0000, and function0.# /usr/lib/nvidia/sriov-manage -e 00:41:0000.0
Obtain the domain, bus, slot, and function of the available virtual functions on the GPU.
# ls -l /sys/bus/pci/devices/<domain>\:<bus>\:<slot>.<function>/ | grep virtfn
<domain>,<bus>,<slot>,<function>The domain, bus, slot, and function of the GPU, without the
0xprefix.
This example shows the output of this command for a physical GPU with slot
00, bus41, domain0000, and function0.# ls -l /sys/bus/pci/devices/0000:41:00.0/ | grep virtfn lrwxrwxrwx. 1 root root 0 Jul 16 04:42 virtfn0 -> ../0000:41:00.4 lrwxrwxrwx. 1 root root 0 Jul 16 04:42 virtfn1 -> ../0000:41:00.5 lrwxrwxrwx. 1 root root 0 Jul 16 04:42 virtfn10 -> ../0000:41:01.6 lrwxrwxrwx. 1 root root 0 Jul 16 04:42 virtfn11 -> ../0000:41:01.7 lrwxrwxrwx. 1 root root 0 Jul 16 04:42 virtfn12 -> ../0000:41:02.0 lrwxrwxrwx. 1 root root 0 Jul 16 04:42 virtfn13 -> ../0000:41:02.1 lrwxrwxrwx. 1 root root 0 Jul 16 04:42 virtfn14 -> ../0000:41:02.2 lrwxrwxrwx. 1 root root 0 Jul 16 04:42 virtfn15 -> ../0000:41:02.3 lrwxrwxrwx. 1 root root 0 Jul 16 04:42 virtfn16 -> ../0000:41:02.4 lrwxrwxrwx. 1 root root 0 Jul 16 04:42 virtfn17 -> ../0000:41:02.5 lrwxrwxrwx. 1 root root 0 Jul 16 04:42 virtfn18 -> ../0000:41:02.6 lrwxrwxrwx. 1 root root 0 Jul 16 04:42 virtfn19 -> ../0000:41:02.7 lrwxrwxrwx. 1 root root 0 Jul 16 04:42 virtfn2 -> ../0000:41:00.6 lrwxrwxrwx. 1 root root 0 Jul 16 04:42 virtfn20 -> ../0000:41:03.0 lrwxrwxrwx. 1 root root 0 Jul 16 04:42 virtfn21 -> ../0000:41:03.1 lrwxrwxrwx. 1 root root 0 Jul 16 04:42 virtfn22 -> ../0000:41:03.2 lrwxrwxrwx. 1 root root 0 Jul 16 04:42 virtfn23 -> ../0000:41:03.3 lrwxrwxrwx. 1 root root 0 Jul 16 04:42 virtfn24 -> ../0000:41:03.4 lrwxrwxrwx. 1 root root 0 Jul 16 04:42 virtfn25 -> ../0000:41:03.5 lrwxrwxrwx. 1 root root 0 Jul 16 04:42 virtfn26 -> ../0000:41:03.6 lrwxrwxrwx. 1 root root 0 Jul 16 04:42 virtfn27 -> ../0000:41:03.7 lrwxrwxrwx. 1 root root 0 Jul 16 04:42 virtfn28 -> ../0000:41:04.0 lrwxrwxrwx. 1 root root 0 Jul 16 04:42 virtfn29 -> ../0000:41:04.1 lrwxrwxrwx. 1 root root 0 Jul 16 04:42 virtfn3 -> ../0000:41:00.7 lrwxrwxrwx. 1 root root 0 Jul 16 04:42 virtfn30 -> ../0000:41:04.2 lrwxrwxrwx. 1 root root 0 Jul 16 04:42 virtfn31 -> ../0000:41:04.3 lrwxrwxrwx. 1 root root 0 Jul 16 04:42 virtfn4 -> ../0000:41:01.0 lrwxrwxrwx. 1 root root 0 Jul 16 04:42 virtfn5 -> ../0000:41:01.1 lrwxrwxrwx. 1 root root 0 Jul 16 04:42 virtfn6 -> ../0000:41:01.2 lrwxrwxrwx. 1 root root 0 Jul 16 04:42 virtfn7 -> ../0000:41:01.3 lrwxrwxrwx. 1 root root 0 Jul 16 04:42 virtfn8 -> ../0000:41:01.4 lrwxrwxrwx. 1 root root 0 Jul 16 04:42 virtfn9 -> ../0000:41:01.5
Choose the available virtual function on which you want to create the vGPU and note its domain, bus, slot, and function.
On systems configured with NVLink, the sriov-manage script might not be able to enable the virtual functions for the physical GPU because the initialization of the Virtual GPU Manager has not completed. In this situation, the sriov-manage script writes the following error message to the log file on the hypervisor host:
NVRM: Timeout occurred in event processing by vgpu_mgr daemon
If this error message appears in the log file, try again later to run the sriov-manage script to enable the virtual functions for the physical GPU.
Creating an NVIDIA vGPU on a Linux with KVM Hypervisor#
For each vGPU that you want to create, perform this task in a Linux command shell on the a Linux with KVM hypervisor host.
Before you begin, ensure that you have the domain, bus, slot, and function of the GPU on which you are creating the vGPU. For instructions, see Getting the BDF and Domain of a GPU on a Linux with KVM Hypervisor.
How to create an NVIDIA vGPU on a Linux with KVM hypervisor depends on the following factors:
Whether the NVIDIA vGPU supports single root I/O virtualization (SR-IOV)
Whether the hypervisor uses a vendor-specific Virtual Function I/O (VFIO) framework for an NVIDIA vGPU that supports SR-IOV
Note
A hypervisor that uses a vendor-specific VFIO framework uses it only for an NVIDIA vGPU that supports SR-IOV. The hypervisor still uses the mediated VFIO
mdevdriver framework for a legacy NVIDIA vGPU.A vendor-specific VFIO framework does not support the mediated VFIO
mdevdriver framework.
For GPUs that support SR-IOV, use of a vendor-specific VFIO framework is introduced in the following hypervisor software releases:
Red Hat Enterprise Linux with KVM 10.0
Ubuntu 24.04
To determine which instructions to follow for the NVIDIA vGPU that you are creating, refer to the following table.
NVIDIA vGPU Type |
VFIO Framework |
Instructions |
|---|---|---|
Legacy: SR-IOV not supported |
|
Creating a Legacy NVIDIA vGPU on a Linux with KVM Hypervisor |
SR-IOV supported |
|
Creating an NVIDIA vGPU that Supports SR-IOV on a Linux with KVM Hypervisor |
SR-IOV supported |
Vendor specific |
Creating an NVIDIA vGPU on a Linux with KVM Hypervisor that Uses a Vendor-Specific VFIO Framework |
On systems configured with NVLink, the vGPU might not be created because the initialization of the Virtual GPU Manager has not completed. In this situation, the following error message is written to the log file on the hypervisor host:
NVRM: kvgpumgrCreateRequestVgpu: GPU is not initialized yet
If this error message appears in the log file, try again later to create the vGPU.
Creating a Legacy NVIDIA vGPU on a Linux with KVM Hypervisor#
A legacy NVIDIA vGPU does not support SR-IOV.
Change to the
mdev_supported_typesdirectory for the physical GPU.# cd /sys/class/mdev_bus/<domain>\:<bus>\:<slot>.<function>/mdev_supported_types/
<domain>,<bus>,<slot>,<function>The domain, bus, slot, and function of the GPU, without the
0xprefix.
This example changes to the
mdev_supported_typesdirectory for the GPU with the domain0000and PCI device BDF06:00.0.# cd /sys/bus/pci/devices/0000\:06\:00.0/mdev_supported_types/
Find out which subdirectory of
mdev_supported_typescontains registration information for the vGPU type that you want to create.# grep -l "<vgpu-type>" nvidia-*/name
<vgpu-type>The vGPU type, for example,
M10-2Q.
This example shows that the registration information for the M10-2Q vGPU type is contained in the
nvidia-41subdirectory ofmdev_supported_types.# grep -l "M10-2Q" nvidia-*/name nvidia-41/name
Confirm that you can create an instance of the vGPU type on the physical GPU.
# cat <subdirectory>/available_instances
<subdirectory>The subdirectory that you found in the previous step, for example,
nvidia-41.
The number of available instances must be at least 1. If the number is 0, either an instance of another vGPU type already exists on the physical GPU, or the maximum number of allowed instances has already been created.
This example shows that four more instances of the M10-2Q vGPU type can be created on the physical GPU.
# cat nvidia-41/available_instances
4
Generate a correctly formatted universally unique identifier (UUID) for the vGPU.
# uuidgen
aa618089-8b16-4d01-a136-25a0f3c73123
Write the UUID that you obtained in the previous step to the
createfile in the registration information directory for the vGPU type that you want to create.# echo "<uuid>"> <subdirectory>/create
<uuid>The UUID that you generated in the previous step, which will become the UUID of the vGPU that you want to create.
<subdirectory>The registration information directory for the vGPU type that you want to create, for example,
nvidia-41.
This example creates an instance of the M10-2Q vGPU type with the UUID
aa618089-8b16-4d01-a136-25a0f3c73123.# echo "aa618089-8b16-4d01-a136-25a0f3c73123" > nvidia-41/create
An
mdevdevice file for the vGPU is added to the parent physical device directory of the vGPU. The vGPU is identified by its UUID.The
/sys/bus/mdev/devices/directory contains a symbolic link to themdevdevice file.Make the
mdevdevice file that you created to represent the vGPU persistent.# mdevctl define --auto --uuid <uuid>
<uuid>The UUID that you specified in the previous step for the vGPU that you are creating.
Note
Not all Linux with KVM hypervisor releases include the
mdevctlcommand. If your release does not include themdevctlcommand, you can use standard features of the operating system to automate the re-creation of this device file when the host is booted. For example, you can write a custom script that is executed when the host is rebooted.Confirm that the vGPU was created.
Confirm that the
/sys/bus/mdev/devices/directory contains themdevdevice file for the vGPU.# ls -l /sys/bus/mdev/devices/ total 0 lrwxrwxrwx. 1 root root 0 Nov 24 13:33 aa618089-8b16-4d01-a136-25a0f3c73123 -> ../../../devices/pci0000:00/0000:00:03.0/0000:03:00.0/0000:04:09.0/0000:06:00.0/aa618089-8b16-4d01-a136-25a0f3c73123
If your release includes the
mdevctlcommand, list the active mediated devices on the hypervisor host.# mdevctl list aa618089-8b16-4d01-a136-25a0f3c73123 0000:06:00.0 nvidia-41
Creating an NVIDIA vGPU that Supports SR-IOV on a Linux with KVM Hypervisor#
An NVIDIA vGPU that supports SR-IOV resides on a physical GPU that supports SR-IOV, such as a GPU based on the NVIDIA Ampere architecture.
Before performing this task, ensure that the virtual function on which you want to create the vGPU has been prepared as explained in Preparing the Virtual Function for an NVIDIA vGPU that Supports SR-IOV on a Linux with KVM Hypervisor.
If you want to support vGPUs with different amounts of frame buffer, also ensure that the GPU has been put into mixed-size mode as explained in Preparing the Virtual Function for an NVIDIA vGPU that Supports SR-IOV on a Linux with KVM Hypervisor.
Change to the
mdev_supported_typesdirectory for the virtual function on which you want to create the vGPU.# cd /sys/class/mdev_bus/<domain>\:<bus>\:<vf-slot>.<v-function>/mdev_supported_types/
<domain>,<bus>The domain and bus of the GPU, without the
0xprefix.<vf-slot>,<v-function>The slot and function of the virtual function that you noted in Preparing the Virtual Function for an NVIDIA vGPU that Supports SR-IOV on a Linux with KVM Hypervisor.
This example changes to the
mdev_supported_typesdirectory for the first virtual function (virtfn0) for the GPU with the domain0000and bus41. The first virtual function (virtfn0) has slot00and function4.# cd /sys/class/mdev_bus/0000\:41\:00.4/mdev_supported_types
Find out which subdirectory of
mdev_supported_typescontains registration information for the vGPU type that you want to create.# grep -l "<vgpu-type>" nvidia-*/name
<vgpu-type>The vGPU type, for example,
A40-2Q.
This example shows that the registration information for the A40-2Q vGPU type is contained in the
nvidia-558subdirectory ofmdev_supported_types.# grep -l "A40-2Q" nvidia-*/name nvidia-558/name
Confirm that you can create an instance of the vGPU type on the virtual function.
# cat <subdirectory>/available_instances
<subdirectory>The subdirectory that you found in the previous step, for example,
nvidia-558.
The number of available instances must be 1. If the number is 0, a vGPU has already been created on the virtual function. Only one instance of any vGPU type can be created on a virtual function.
This example shows that an instance of the A40-2Q vGPU type can be created on the virtual function.
# cat nvidia-558/available_instances
1
Generate a correctly formatted universally unique identifier (UUID) for the vGPU.
# uuidgen
aa618089-8b16-4d01-a136-25a0f3c73123
Write the UUID that you obtained in the previous step to the
createfile in the registration information directory for the vGPU type that you want to create.# echo "<uuid>"> <subdirectory>/create
<uuid>The UUID that you generated in the previous step, which will become the UUID of the vGPU that you want to create.
<subdirectory>The registration information directory for the vGPU type that you want to create, for example,
nvidia-558.
This example creates an instance of the A40-2Q vGPU type with the UUID
aa618089-8b16-4d01-a136-25a0f3c73123.# echo "aa618089-8b16-4d01-a136-25a0f3c73123" > nvidia-558/create
An
mdevdevice file for the vGPU is added to the parent virtual function directory of the vGPU. The vGPU is identified by its UUID.MIG-backed vGPUs only: Ensure that the vGPU is created on the GPU instance that you want.
If you are creating multiple vGPUs on the same GPU instance, perform this step for each vGPU to ensure that all vGPUs are on the same GPU instance.
Determine the GPU instance on which the vGPU was created.
$ cat /sys/bus/mdev/devices/<uuid>/nvidia/gpu_instance_id
If the vGPU was not created on the GPU instance that you want, write the GPU instance ID that you do want to the
gpu_instance_idfile for the vGPU.$ echo <gpu-instance-id> /sys/bus/mdev/devices/<uuid>/nvidia/gpu_instance_id
If the vGPU was created on the GPU instance that you want, omit this step.
<gpu-instance-id>The ID of the GPU instance on which you want the vGPU to be created.
<uuid>The UUID of the vGPU that you created.
Time-sliced vGPUs only: Make the
mdevdevice file that you created to represent the vGPU persistent.# mdevctl define --auto --uuid <uuid>
<uuid>The UUID that you specified in the previous step for the vGPU that you are creating.
Note
If you are using a GPU that supports SR-IOV, the
mdevdevice file persists after a host reboot only if you enable the virtual functions for the GPU as explained in Preparing the Virtual Function for an NVIDIA vGPU that Supports SR-IOV on a Linux with KVM Hypervisor before rebooting any VM that is configured with a vGPU on the GPU.You cannot use the
mdevctlcommand to make themdevdevice file for a MIG-backed vGPU persistent. Themdevdevice file for a MIG-backed vGPU is not retained after the host is rebooted because MIG instances are no longer available.Not all Linux with KVM hypervisor releases include the
mdevctlcommand. If your release does not include themdevctlcommand, you can use standard features of the operating system to automate the re-creation of this device file when the host is booted. For example, you can write a custom script that is executed when the host is rebooted.
Confirm that the vGPU was created.
Confirm that the
/sys/bus/mdev/devices/directory contains a symbolic link to themdevdevice file.# ls -l /sys/bus/mdev/devices/ total 0 lrwxrwxrwx. 1 root root 0 Jul 16 05:57 aa618089-8b16-4d01-a136-25a0f3c73123 -> ../../../devices/pci0000:40/0000:40:01.1/0000:41:00.4/aa618089-8b16-4d01-a136-25a0f3c73123
If your release includes the
mdevctlcommand, list the active mediated devices on the hypervisor host.# mdevctl list aa618089-8b16-4d01-a136-25a0f3c73123 0000:06:00.0 nvidia-558
Creating an NVIDIA vGPU on a Linux with KVM Hypervisor that Uses a Vendor-Specific VFIO Framework#
A hypervisor uses a vendor-specific VFIO framework only for an NVIDIA vGPU that supports SR-IOV. For a legacy NVIDIA vGPU, the hypervisor uses the standard VFIO framework. A vendor-specific VFIO framework does not support the mediated VFIO mdev driver framework.
For GPUs that support SR-IOV, use of a vendor-specific VFIO framework is introduced in the following hypervisor software releases:
Red Hat Enterprise Linux with KVM 10.0
Ubuntu 24.04
Before performing this task, ensure that the virtual function on which you want to create the vGPU has been prepared as explained in Preparing the Virtual Function for an NVIDIA vGPU that Supports SR-IOV on a Linux with KVM Hypervisor.
If you want to support vGPUs with different amounts of frame buffer, also ensure that the GPU has been put into mixed-size mode as explained in Preparing the Virtual Function for an NVIDIA vGPU that Supports SR-IOV on a Linux with KVM Hypervisor.
Change to the directory in the
sysfsfile system that contains the files for vGPU management on the virtual function on which you want to create the vGPU.# cd /sys/bus/pci/devices/<domain>\:<bus>\:<vf-slot>.<v-function>/nvidia
<domain>,<bus>The domain and bus of the GPU, without the
0xprefix.<vf-slot>,<v-function>The slot and function of the virtual function that you noted in Preparing the Virtual Function for an NVIDIA vGPU that Supports SR-IOV on a Linux with KVM Hypervisor.
This example changes to the
nvidiadirectory for the first virtual function (virtfn0) for the GPU with the domain0000and bus3d. The first virtual function (virtfn0) has slot00and function4.# cd /sys/bus/pci/devices/0000\:3d\:00.4/nvidia
Confirm that the directory contains the files for vGPU management on the virtual function, namely
creatable_vgpu_typesandcurrent_vgpu_type.# ll -r--r--r-- 1 root root 4096 Aug 3 00:39 creatable_vgpu_types -rw-r--r-- 1 root root 4096 Aug 3 00:39 current_vgpu_type ...
Confirm that a vGPU has not already been created on the virtual function.
# cat current_vgpu_type
0
If the current vGPU type is 0, a vGPU has not already been created on the virtual function.
Note
If the current vGPU type is not 0, a vGPU cannot be created on the virtual function because a vGPU has already been created on it and only one vGPU can be created on a virtual function.
Determine the NVIDIA vGPU types that can be created on the virtual function and the integer ID that represents each vGPU type in the
sysfsfile system.# cat creatable_vgpu_types NVIDIA A40-1Q 557 NVIDIA A40-2Q 558 NVIDIA A40-3Q 559 NVIDIA A40-4Q 560 NVIDIA A40-6Q 561
Write the ID that represents the type of the NVIDIA vGPU that you want to create to the
current_vgpu_typefile.# echo <vgpu-type-id> > current_vgpu_type
<vgpu-type-id>The ID that represents the type of the NVIDIA vGPU that you want to create in the
sysfsfile system.
Note
You must specify an valid ID. If you specify an invalid ID, the write operation fails and current vGPU type is set to
0.This example creates an instance of the A40-4Q vGPU type.
# echo 560 > current_vgpu_type
Confirm that current vGPU type on the virtual function matches the type of the vGPU that you created in the previous step.
# cat current_vgpu_type
560
Confirm that the
creatable_vgpu_typesfile is empty, signifying that no vGPUs can be created on the virtual function.# cat creatable_vgpu_types
MIG-backed vGPUs only: Ensure that the vGPU is created on the GPU instance that you want.
If you are creating multiple vGPUs on the same GPU instance, perform this step for each vGPU to ensure that all vGPUs are on the same GPU instance.
Determine the GPU instance on which the vGPU was created.
$ cat gpu_instance_id
If the vGPU was not created on the GPU instance that you want, write the GPU instance ID that you do want to the
gpu_instance_idfile for the vGPU.$ echo <gpu-instance-id> gpu_instance_id
If the vGPU was created on the GPU instance that you want, omit this step.
<gpu-instance-id>The ID of the GPU instance on which you want the vGPU to be created.
To reconfigure the vGPU on a virtual function, the existing vGPU must first be deleted as explained in Deleting a vGPU on a Linux with KVM Hypervisor that Uses a Vendor-Specific VFIO Framework.
Adding One or More vGPUs to a Linux with KVM Hypervisor VM#
To support applications and workloads that are compute or graphics intensive, you can add multiple vGPUs to a single VM.
For details about which hypervisor versions and NVIDIA vGPUs support the assignment of multiple vGPUs to a VM, see Virtual GPU Software for Red Hat Enterprise Linux with KVM Release Notes and Virtual GPU Software for Ubuntu Release Notes.
Ensure that the following prerequisites are met:
The VM to which you want to add the vGPUs is shut down.
The vGPUs that you want to add have been created as explained in Creating an NVIDIA vGPU on a Linux with KVM Hypervisor.
You can add vGPUs to a Linux with KVM hypervisor VM by using any of the following tools:
The
virshcommandThe QEMU command line
After adding vGPUs to a Linux with KVM hypervisor VM, start the VM.
# virsh start <vm-name>
<vm-name>The name of the VM that you added the vGPUs to.
After the VM has booted, install the NVIDIA vGPU software graphics driver as explained in Installing the NVIDIA vGPU Software Graphics Driver.
Adding One or More vGPUs to a Linux with KVM Hypervisor VM by Using virsh#
In
virsh, open for editing the XML file of the VM that you want to add the vGPU to.# virsh edit <vm-name>
<vm-name>The name of the VM to that you want to add the vGPUs to.
For each vGPU that you want to add to the VM, add a device entry in the form of an
addresselement inside thesourceelement to add the vGPU to the guest VM.The content of the device entry depends on whether the hypervisor uses a vendor-specific VFIO framework for an NVIDIA vGPU that supports SR-IOV.
For GPUs that support SR-IOV, use of a vendor-specific VFIO framework is introduced in the following hypervisor software releases:
Red Hat Enterprise Linux with KVM 10.0
Ubuntu 24.04
For a hypervisor that uses the
mdevVFIO framework, add a device entry that identifies the vGPU through its UUID as follows:<device> ... <hostdev mode='subsystem' type='mdev' model='vfio-pci'> <source> <address uuid='<uuid>'/> </source> </hostdev> </device>
<uuid>The UUID that was assigned to the vGPU when the vGPU was created.
This example adds a device entry for the vGPU with the UUID
a618089-8b16-4d01-a136-25a0f3c73123.<device> ... <hostdev mode='subsystem' type='mdev' model='vfio-pci'> <source> <address uuid='a618089-8b16-4d01-a136-25a0f3c73123'/> </source> </hostdev> </device>
This example adds device entries for two vGPUs with the following UUIDs:
c73f1fa6-489e-4834-9476-d70dabd98c403b356d38-854e-48be-b376-00c72c7d119c
<device>
...
  <hostdev mode='subsystem' type='mdev' model='vfio-pci'>
    <source>
      <address uuid='c73f1fa6-489e-4834-9476-d70dabd98c40'/>
    </source>
  </hostdev>
  <hostdev mode='subsystem' type='mdev' model='vfio-pci'>
    <source>
      <address uuid='3b356d38-854e-48be-b376-00c72c7d119c'/>
    </source>
  </hostdev>
</device>
For a hypervisor that uses a vendor-specific VFIO framework, add a device entry that identifies the vGPU through the virtual function on which the vGPU is created as follows:
<hostdev mode='subsystem' type='pci' managed='no'>
  <source>
    <address domain='<domain>' bus='<bus>' slot='<vf-slot>' function='<v-function>'/>
  </source>
</hostdev>
<domain>,<bus>The domain and bus of the GPU, including the
0xprefix.<vf-slot>,<v-function>The slot and function of the virtual function that you noted in Preparing the Virtual Function for an NVIDIA vGPU that Supports SR-IOV on a Linux with KVM Hypervisor.
Note
A vGPU is supported only in unmanaged
libvirtmode. Therefore, ensure that in thehostdevelement, themanagedattribute is set tono.This example adds a device entry for the vGPU that is created on the virtual function
0000:3d:00.4.<device> ... <hostdev mode='subsystem' type='pci' managed='no'> <source> <address domain='0x0000' bus='0x3d' slot='0x00' function='0x4'/> </source> </hostdev> </device>
This example adds device entries for two vGPUs that are created on the following virtual functions:
0000:3d:00.40000:3d:00.5
<device>
...
  <hostdev mode='subsystem' type='pci' managed='no'>
    <source>
      <address domain='0x0000' bus='0x3d' slot='0x00' function='0x4'/>
    </source>
  </hostdev>
  <hostdev mode='subsystem' type='pci' managed='no'>
    <source>
      <address domain='0x0000' bus='0x3d' slot='0x00' function='0x5'/>
    </source>
  </hostdev>
</device>
Add a
videoelement that contains amodelelement in which thetypeattribute is set tonone.<video> <model type='none'/> </video>
Adding this
videoelement prevents the default video device thatlibvirtadds from being loaded into the VM. If you don’t add thisvideoelement, you must configure the Xorg server or your remoting solution to load only the vGPU devices you added and not the default video device.
Adding One or More vGPUs to a Linux with KVM Hypervisor VM by Using the QEMU Command Line#
This task involves adding options to the QEMU command line that identify the vGPUs that you want to add and the VM to which you want to add them.
For each vGPU that you want to add to the VM, add one
-deviceoption that identifies the vGPU.The format of each
-deviceoption depends on whether the hypervisor uses a vendor-specific VFIO framework for an NVIDIA vGPU that supports SR-IOV.For GPUs that support SR-IOV, use of a vendor-specific VFIO framework is introduced in the following hypervisor software releases:
Red Hat Enterprise Linux with KVM 10.0
Ubuntu 24.04
For each vGPU on a hypervisor that uses the
mdevVFIO framework, add a-deviceoption that identifies the vGPU through its UUID.-device vfio-pci,sysfsdev=/sys/bus/mdev/devices/<vgpu-uuid>
<vgpu-uuid>The UUID that was assigned to the vGPU when the vGPU was created.
For each vGPU on a hypervisor that uses a vendor-specific VFIO framework, add a
-deviceoption that identifies the vGPU through the virtual function on which the vGPU is created.-device vfio-pci,sysfsdev=/sys/bus/pci/devices/<domain>\:<bus>\:<vf-slot>.<v-function>/
<domain>,<bus>The domain and bus of the GPU, without the
0xprefix.<vf-slot>,<v-function>The slot and function of the virtual function that you noted in Preparing the Virtual Function for an NVIDIA vGPU that Supports SR-IOV on a Linux with KVM Hypervisor.
Add a
-uuidoption to specify the VM to which you want to add the vGPUs.-uuid <vm-uuid><vm-uuid>The UUID that was assigned to the VM when the VM was created.
Adding One vGPU to a VM on a Hypervisor that Uses the mdev VFIO Framework#
This example adds the vGPU with the UUID aa618089-8b16-4d01-a136-25a0f3c73123 to the VM with the UUID ebb10a6e-7ac9-49aa-af92-f56bb8c65893.
-device vfio-pci,sysfsdev=/sys/bus/mdev/devices/aa618089-8b16-4d01-a136-25a0f3c73123 \
-uuid ebb10a6e-7ac9-49aa-af92-f56bb8c65893
Adding Two vGPUs to a VM on a Hypervisor that Uses the mdev VFIO Framework#
This example adds device entries for two vGPUs with the following UUIDs:
676428a0-2445-499f-9bfd-65cd4a9bd18f6c5954b8-5bc1-4769-b820-8099fe50aaba
The entries are added to the VM with the UUID ec5e8ee0-657c-4db6-8775-da70e332c67e.
-device vfio-pci,sysfsdev=/sys/bus/mdev/devices/676428a0-2445-499f-9bfd-65cd4a9bd18f \
-device vfio-pci,sysfsdev=/sys/bus/mdev/devices/6c5954b8-5bc1-4769-b820-8099fe50aaba \
-uuid ec5e8ee0-657c-4db6-8775-da70e332c67e
Adding One vGPU to a VM on a Hypervisor that Uses a Vendor-Specific VFIO Framework#
This example adds the vGPU that is created on the virtual function 0000:3d:00.4 to the VM with the UUID ebb10a6e-7ac9-49aa-af92-f56bb8c65893.
-device vfio-pci,sysfsdev=/sys/bus/pci/devices/0000\:3d\:00.4 \
-uuid ebb10a6e-7ac9-49aa-af92-f56bb8c65893
Adding Two vGPUs to a VM on a Hypervisor that Uses a Vendor-Specific VFIO Framework#
This example adds device entries for two vGPUs that are created on the following virtual functions:
0000:3d:00.40000:3d:00.5
The entries are added to the VM with the UUID ec5e8ee0-657c-4db6-8775-da70e332c67e.
-device vfio-pci,sysfsdev=/sys/bus/pci/devices/0000\:3d\:00.4 \
-device vfio-pci,sysfsdev=/sys/bus/pci/devices/0000\:3d\:00.5 \
-uuid ec5e8ee0-657c-4db6-8775-da70e332c67e
Setting vGPU Plugin Parameters on a Linux with KVM Hypervisor#
Plugin parameters for a vGPU control the behavior of the vGPU, such as the frame rate limiter (FRL) configuration in frames per second or whether console virtual network computing (VNC) for the vGPU is enabled. The VM to which the vGPU is assigned is started with these parameters. If parameters are set for multiple vGPUs assigned to the same VM, the VM is started with the parameters assigned to each vGPU.
For each vGPU for which you want to set plugin parameters, perform this task in a Linux command shell on the Linux with KVM hypervisor host.
Change to the directory in the
sysfsfile system that contains thevgpu_paramsfile for the vGPU for which you want to set vGPU plugin parameters.The directory depends on whether the hypervisor uses a vendor-specific VFIO framework for an NVIDIA vGPU that supports SR-IOV.
For GPUs that support SR-IOV, use of a vendor-specific VFIO framework is introduced in the following hypervisor software releases:
Red Hat Enterprise Linux with KVM 10.0
Ubuntu 24.04
For a hypervisor that uses the
mdevVFIO framework, change to thenvidiasubdirectory of themdevdevice directory that represents the vGPU.# cd /sys/bus/mdev/devices/<uuid>/nvidia
<uuid>The UUID of the vGPU, for example,
aa618089-8b16-4d01-a136-25a0f3c73123.
For a hypervisor that uses a vendor-specific VFIO framework, change to the directory in the
sysfsfile system that contains the files for vGPU management on the virtual function on which the vGPU was created.# cd /sys/bus/pci/devices/<domain>\:<bus>\:<vf-slot>.<v-function>/nvidia
<domain>,<bus>The domain and bus of the GPU, without the
0xprefix.<vf-slot>,<v-function>The slot and function of the virtual function that you noted in Preparing the Virtual Function for an NVIDIA vGPU that Supports SR-IOV on a Linux with KVM Hypervisor.
This example changes to the
nvidiadirectory for the first virtual function (virtfn0) for the GPU with the domain0000and bus3d. The first virtual function (virtfn0) has slot00and function4.# cd /sys/bus/pci/devices/0000\:3d\:00.4/nvidia
Write the plugin parameters that you want to set to the
vgpu_paramsfile in the directory that you changed to in the previous step.# echo "<plugin-config-params>" > vgpu_params
<plugin-config-params>A comma-separated list of parameter-value pairs, where each pair is of the form
<parameter-name>=<value>.
This example disables frame rate limiting and console VNC for a vGPU.
# echo "frame_rate_limiter=0, disable_vnc=1" > vgpu_params
This example enables unified memory for a vGPU.
# echo "enable_uvm=1" > vgpu_params
This example enables NVIDIA CUDA Toolkit debuggers for a vGPU.
# echo "enable_debugging=1" > vgpu_params
This example enables NVIDIA CUDA Toolkit profilers for a vGPU.
# echo "enable_profiling=1" > vgpu_params
To clear any vGPU plugin parameters that were set previously, write a space to the vgpu_params file for the vGPU.
# echo " " > vgpu_params
Deleting a vGPU on a Linux with KVM Hypervisor#
How to delete a vGPU on a Linux with KVM hypervisor depends on whether the hypervisor uses a vendor-specific VFIO framework for an NVIDIA vGPU that supports SR-IOV.
Note
A hypervisor that uses a vendor-specific VFIO framework uses it only for an NVIDIA vGPU that supports SR-IOV. The hypervisor still uses the mediated VFIO mdev driver framework for a legacy NVIDIA vGPU.
For GPUs that support SR-IOV, use of a vendor-specific VFIO framework is introduced in the following hypervisor software releases:
Red Hat Enterprise Linux with KVM 10.0
Ubuntu 24.04
To determine which instructions to follow for the NVIDIA vGPU that you are deleting, refer to the following table.
NVIDIA vGPU Type |
VFIO Framework |
Instructions |
|---|---|---|
Legacy: SR-IOV not supported |
|
Deleting a vGPU on a Linux with KVM Hypervisor that Uses the mdev VFIO Framework |
SR-IOV supported |
|
Deleting a vGPU on a Linux with KVM Hypervisor that Uses the mdev VFIO Framework |
SR-IOV supported |
Vendor specific |
Deleting a vGPU on a Linux with KVM Hypervisor that Uses a Vendor-Specific VFIO Framework |
Deleting a vGPU on a Linux with KVM Hypervisor that Uses the mdev VFIO Framework#
For each vGPU that you want to delete, perform this task in a Linux command shell on the Linux with KVM hypervisor host.
Before you begin, ensure that the following prerequisites are met:
You have the domain, bus, slot, and function of the GPU where the vGPU that you want to delete resides. For instructions, see Getting the BDF and Domain of a GPU on a Linux with KVM Hypervisor.
The VM to which the vGPU is assigned is shut down.
Change to the
mdev_supported_typesdirectory for the physical GPU.# cd /sys/class/mdev_bus/<domain>\:<bus>\:<slot>.<function>/mdev_supported_types/
<domain>,<bus>,<slot>,<function>The domain, bus, slot, and function of the GPU, without the
0xprefix.
This example changes to the
mdev_supported_typesdirectory for the GPU with the PCI device BDF06:00.0.# cd /sys/bus/pci/devices/0000\:06\:00.0/mdev_supported_types/
Change to the subdirectory of
mdev_supported_typesthat contains registration information for the vGPU.# cd `find . -type d -name <uuid>`
<uuid>The UUID of the vGPU, for example,
aa618089-8b16-4d01-a136-25a0f3c73123.
Write the value
1to theremovefile in the registration information directory for the vGPU that you want to delete.# echo "1" > remove
Deleting a vGPU on a Linux with KVM Hypervisor that Uses a Vendor-Specific VFIO Framework#
A hypervisor uses a vendor-specific VFIO framework only for an NVIDIA vGPU that supports SR-IOV. For a legacy NVIDIA vGPU, the hypervisor uses the mdev VFIO framework. A vendor-specific VFIO framework does not support the mediated VFIO mdev driver framework.
For GPUs that support SR-IOV, use of a vendor-specific VFIO framework is introduced in the following hypervisor software releases:
Red Hat Enterprise Linux with KVM 10.0
Ubuntu 24.04
Before you begin, ensure that the following prerequisites are met:
You have the following information:
The domain and bus of the GPU where the vGPU that you want to delete resides. For instructions, see Getting the BDF and Domain of a GPU on a Linux with KVM Hypervisor.
The slot and function of the virtual function on which the vGPU that you want to delete was created.
The VM to which the vGPU is assigned is shut down.
Change to the directory in the
sysfsfile system that contains the files for vGPU management on the virtual function on which the vGPU was created.# cd /sys/bus/pci/devices/<domain>\:<bus>\:<vf-slot>.<v-function>/nvidia
<domain>,<bus>The domain and bus of the GPU, without the
0xprefix.<vf-slot>,<v-function>The slot and function of the virtual function that you noted in Preparing the Virtual Function for an NVIDIA vGPU that Supports SR-IOV on a Linux with KVM Hypervisor.
This example changes to the
nvidiadirectory for the first virtual function (virtfn0) for the GPU with the domain0000and bus3d. The first virtual function (virtfn0) has slot00and function4.# cd /sys/bus/pci/devices/0000\:3d\:00.4/nvidia
Confirm that the directory contains the files for vGPU management on the virtual function, namely
creatable_vgpu_typesandcurrent_vgpu_type.# ll -r--r--r-- 1 root root 4096 Aug 3 00:39 creatable_vgpu_types -rw-r--r-- 1 root root 4096 Aug 3 00:39 current_vgpu_type ...
Confirm that the current vGPU type on the virtual function is the ID that represents the type of the vGPU that you want to delete.
# cat current_vgpu_type
560
Write
0to thecurrent_vgpu_typefile.# echo 0 > current_vgpu_type
Confirm that current vGPU type on the virtual function is
0, signifying that the vGPU has been deleted.# cat current_vgpu_type 0
Confirm that the
creatable_vgpu_typesfile is no longer empty, signifying that the vGPU has been deleted and that a vGPU can again be created on the virtual function.# cat creatable_vgpu_types NVIDIA A40-1Q 557 NVIDIA A40-2Q 558 NVIDIA A40-3Q 559 NVIDIA A40-4Q 560 NVIDIA A40-6Q 561
Preparing a GPU Configured for Pass-Through for Use with vGPU#
The mode in which a physical GPU is being used determines the Linux kernel module to which the GPU is bound. If you want to switch the mode in which a GPU is being used, you must unbind the GPU from its current kernel module and bind it to the kernel module for the new mode. After binding the GPU to the correct kernel module, you can then configure it for vGPU.
A physical GPU that is passed through to a VM is bound to the vfio-pci kernel module. A physical GPU that is bound to the vfio-pci kernel module can be used only for pass-through. To enable the GPU to be used for vGPU, the GPU must be unbound from vfio-pci kernel module and bound to the nvidia kernel module.
Before you begin, ensure that you have the domain, bus, slot, and function of the GPU that you are preparing for use with vGPU. For instructions, see Getting the BDF and Domain of a GPU on a Linux with KVM Hypervisor.
Determine the kernel module to which the GPU is bound by running the
lspcicommand with the-koption on the NVIDIA GPUs on your host.# lspci -d 10de: -k
The
Kernel driver in use:field indicates the kernel module to which the GPU is bound.The following example shows that the NVIDIA Tesla M60 GPU with BDF
06:00.0is bound to thevfio-pcikernel module and is being used for GPU pass through.06:00.0 VGA compatible controller: NVIDIA Corporation GM204GL [Tesla M60] (rev a1) Subsystem: NVIDIA Corporation Device 115e Kernel driver in use: vfio-pci
Unbind the GPU from
vfio-pcikernel module.Change to the
sysfsdirectory that represents thevfio-pcikernel module.# cd /sys/bus/pci/drivers/vfio-pci
Write the domain, bus, slot, and function of the GPU to the
unbindfile in this directory.# echo <domain>:<bus>:<slot>.<function> > unbind
<domain>,<bus>,<slot>,<function>The domain, bus, slot, and function of the GPU, without a
0xprefix.This example writes the domain, bus, slot, and function of the GPU with the domain
0000and PCI device BDF06:00.0.# echo 0000:06:00.0 > unbind
Bind the GPU to the
nvidiakernel module.Change to the
sysfsdirectory that contains the PCI device information for the physical GPU.# cd /sys/bus/pci/devices/<domain>\:<bus>\:<slot>.<function>
<domain>,<bus>,<slot>,<function>The domain, bus, slot, and function of the GPU, without a
0xprefix.This example changes to the
sysfsdirectory that contains the PCI device information for the GPU with the domain0000and PCI device BDF06:00.0.# cd /sys/bus/pci/devices/0000\:06\:00.0
Write the kernel module name
nvidiato thedriver_overridefile in this directory.# echo nvidia > driver_override
Change to the
sysfsdirectory that represents thenvidiakernel module.# cd /sys/bus/pci/drivers/nvidia
Write the domain, bus, slot, and function of the GPU to the
bindfile in this directory.# echo <domain>:<bus>:<slot>.<function> > bind
<domain>,<bus>,<slot>,<function>The domain, bus, slot, and function of the GPU, without a
0xprefix.This example writes the domain, bus, slot, and function of the GPU with the domain
0000and PCI device BDF06:00.0.# echo 0000:06:00.0 > bind
You can now configure the GPU with vGPU as explained in Installing and Configuring the NVIDIA Virtual GPU Manager for Red Hat Enterprise Linux KVM.
NVIDIA vGPU Information in the sysfs File System#
Information about the NVIDIA vGPU types supported by each physical GPU in a Linux with KVM hypervisor host is stored in the sysfs file system.
How NVIDIA vGPU information is stored in the sysfs file system depends on whether the hypervisor uses a vendor-specific VFIO framework for an NVIDIA vGPU that supports SR-IOV.
Note
A hypervisor that uses a vendor-specific VFIO framework for an NVIDIA vGPU that supports SR-IOV uses the mdev VFIO framework for a legacy NVIDIA vGPU.
For GPUs that support SR-IOV, use of a vendor-specific VFIO framework is introduced in the following hypervisor software releases:
Red Hat Enterprise Linux with KVM 10.0
Ubuntu 24.04
For more detailed information about how NVIDIA vGPU information is stored in the sysfs file system, refer to the following topics:
NVIDIA vGPU Information in the sysfs File System for Hypervisors that Use the mdev VFIO Framework#
All physical GPUs on the host are registered with the mdev kernel module. Information about the physical GPUs and the vGPU types that can be created on each physical GPU is stored in directories and files under the /sys/class/mdev_bus/ directory.
The sysfs directory for each physical GPU is at the following locations:
/sys/bus/pci/devices//sys/class/mdev_bus/
Both directories are a symbolic link to the real directory for PCI devices in the sysfs file system.
The organization of the sysfs directory for each physical GPU is as follows:
/sys/class/mdev_bus/
           |-<parent-physical-device>
             |-mdev_supported_types
               |-nvidia-<vgputype-id>
                 |-available_instances
                 |-create
                 |-description
                 |-device_api
                 |-devices
                 |-name
<parent-physical-device>Each physical GPU on the host is represented by a subdirectory of the
/sys/class/mdev_bus/directory.The name of each subdirectory is as follows:
<domain>\:<bus>\:<slot>.<function><domain>,<bus>,<slot>,<function>are the domain, bus, slot, and function of the GPU, for example,0000\:06\:00.0.Each directory is a symbolic link to the real directory for PCI devices in the
sysfsfile system. For example:# ll /sys/class/mdev_bus/ total 0 lrwxrwxrwx. 1 root root 0 Dec 12 03:20 0000:05:00.0 -> ../../devices/pci0000:00/0000:00:03.0/0000:03:00.0/0000:04:08.0/0000:05:00.0 lrwxrwxrwx. 1 root root 0 Dec 12 03:20 0000:06:00.0 -> ../../devices/pci0000:00/0000:00:03.0/0000:03:00.0/0000:04:09.0/0000:06:00.0 lrwxrwxrwx. 1 root root 0 Dec 12 03:20 0000:07:00.0 -> ../../devices/pci0000:00/0000:00:03.0/0000:03:00.0/0000:04:10.0/0000:07:00.0 lrwxrwxrwx. 1 root root 0 Dec 12 03:20 0000:08:00.0 -> ../../devices/pci0000:00/0000:00:03.0/0000:03:00.0/0000:04:11.0/0000:08:00.0
mdev_supported_typesA directory named
mdev_supported_typesis required under thesysfsdirectory for each physical GPU that will be configured with NVIDIA vGPU. How this directory is created for a GPU depends on whether the GPU supports SR-IOV.For a GPU that does not support SR-IOV, this directory is created automatically after the Virtual GPU Manager is installed on the host and the host has been rebooted.
For a GPU that supports SR-IOV, such as a GPU based on the NVIDIA Ampere architecture, you must create this directory by enabling the virtual function for the GPU as explained in Creating an NVIDIA vGPU on a Linux with KVM Hypervisor. The
mdev_supported_typesdirectory itself is never visible on the physical function.
The
mdev_supported_typesdirectory contains a subdirectory for each vGPU type that the physical GPU supports. The name of each subdirectory isnvidia-<vgputype-id>, where<vgputype-id>is an unsigned integer serial number. For example:# ll mdev_supported_types/ total 0 drwxr-xr-x 3 root root 0 Dec 6 01:37 nvidia-35 drwxr-xr-x 3 root root 0 Dec 5 10:43 nvidia-36 drwxr-xr-x 3 root root 0 Dec 5 10:43 nvidia-37 drwxr-xr-x 3 root root 0 Dec 5 10:43 nvidia-38 drwxr-xr-x 3 root root 0 Dec 5 10:43 nvidia-39 drwxr-xr-x 3 root root 0 Dec 5 10:43 nvidia-40 drwxr-xr-x 3 root root 0 Dec 5 10:43 nvidia-41 drwxr-xr-x 3 root root 0 Dec 5 10:43 nvidia-42 drwxr-xr-x 3 root root 0 Dec 5 10:43 nvidia-43 drwxr-xr-x 3 root root 0 Dec 5 10:43 nvidia-44 drwxr-xr-x 3 root root 0 Dec 5 10:43 nvidia-45
nvidia-<vgputype-id>Each directory represents an individual vGPU type and contains the following files and directories:
available_instancesThis file contains the number of instances of this vGPU type that can still be created. This file is updated any time a vGPU of this type is created on or removed from the physical GPU.
Note
When a time-sliced vGPU is created, the content of the
available_instancesfor all other time-sliced vGPU types on the physical GPU is set to 0. This behavior enforces the requirement that all time-sliced vGPUs on a physical GPU must be of the same type. However, this requirement does not apply to MIG-backed vGPUs. Therefore, when a MIG-backed vGPU is created,available_instancesfor all other MIG-backed vGPU types on the physical GPU is not set to 0createThis file is used for creating a vGPU instance. A vGPU instance is created by writing the UUID of the vGPU to this file. The file is write only.
descriptionThis file contains the following details of the vGPU type:
The maximum number of virtual display heads that the vGPU type supports
The frame rate limiter (FRL) configuration in frames per second
The frame buffer size in Mbytes
The maximum resolution per display head
The maximum number of vGPU instances per physical GPU
For example:
# cat description
num_heads=4, frl_config=60, framebuffer=2048M, max_resolution=4096x2160, max_instance=4
device_apiThis file contains the string
vfio_pcito indicate that a vGPU is a PCI device.devicesThis directory contains all the
mdevdevices that are created for the vGPU type. For example:# ll devices total 0 lrwxrwxrwx 1 root root 0 Dec 6 01:52 aa618089-8b16-4d01-a136-25a0f3c73123 -> ../../../aa618089-8b16-4d01-a136-25a0f3c73123
nameThis file contains the name of the vGPU type. For example:
# cat name
GRID M10-2Q
NVIDIA vGPU Information in the sysfs File System for Hypervisors that Use a Vendor-Specific VFIO Framework#
A vendor-specific VFIO framework does not support the mediated VFIO mdev driver framework. Information about the physical GPUs and the vGPU types that can be created on each physical GPU is stored in directories and files under the /sys/bus/pci/devices/ directory.
The organization of the sysfs directory for each virtual function on a physical GPU is as follows:
/sys/bus/pci/devices/
           |-<virtual-function>
             |-nvidia
               |-creatable_vgpu_types
               |-current_vgpu_type
               |-vgpu_params
<virtual-function>Each virtual function on each physical GPU on the host is represented by a subdirectory of the
/sys/bus/pci/devices/directory.The name of each subdirectory is as follows:
<domain>\:<bus>\:<vf-slot>.<v-function><domain>and<bus>are the domain and bus of the GPU.<vf-slot>and<v-function>are the slot and function of the virtual function. For example:0000\:3d\:00.4.You must create this directory by enabling the virtual function for the GPU as explained in Creating an NVIDIA vGPU on a Linux with KVM Hypervisor. This directory is not created automatically.
nvidiaThe
nvidiadirectory contains the files for vGPU management on the virtual function. These files are as follows:creatable_vgpu_typesThis file contains the NVIDIA vGPU types that can be created on the virtual function and the integer ID that represents each vGPU type in the
sysfsfile system. For example:# cat creatable_vgpu_types NVIDIA A40-1Q 557 NVIDIA A40-2Q 558 NVIDIA A40-3Q 559 NVIDIA A40-4Q 560 NVIDIA A40-6Q 561
This file is not a static list of all the NVIDIA vGPU types that the GPU supports. It is updated dynamically in response to changes to the
current_vgpu_typefile for this virtual function and for other virtual functions on the same GPU.If a vGPU has been created on this virtual function, this file is empty.
If a vGPU has been created on another virtual function on the same GPU, this file contains only the vGPU types that can reside on the same GPU as the existing vGPU.
If the maximum number of vGPUs that the GPU supports has been created on other virtual functions for the GPU, this file is empty.
Note
When a time-sliced vGPU is created on a GPU in equal-size mode, the content of the
creatable_vgpu_typesfor all virtual functions on the physical GPU is set to only the vGPU types with the same amount of frame buffer as the vGPU that was created. This behavior enforces the requirement that all time-sliced vGPUs on the physical GPU must have the same amount of frame buffer. However, this requirement does not apply to time-sliced vGPUs created on a GPU in mixed-size mode or to MIG-backed vGPUs.current_vgpu_typeThis file contains the integer ID that represents the vGPU type in the
sysfsfile system of the vGPU that is created on this virtual function. For example, if an NVIDIA A40-4Q vGPU has been created on this virtual function, this file contains the integer560:# cat current_vgpu_type 560
If no vGPU is created on the virtual function, this file contains the integer 0. When this file is created, its contents are set to the default value of 0.
This file is used for creating and deleting a vGPU on the virtual function.
A vGPU is created by writing the integer ID that represents the vGPU type in the
sysfsfile system to this file.A vGPU is deleted by writing 0 to this file.
vgpu_paramsThis file is used for setting plugin parameters for the vGPU on the virtual function to control its behavior. Plugin parameters are set by writing a list of parameter-value pairs to this file. For more information, refer to Setting vGPU Plugin Parameters on a Linux with KVM Hypervisor.
Putting a GPU or GPU Instance into Mixed-Size Mode#
By default, a GPU or GPU instance supports only vGPUs with the same amount of frame buffer and, therefore, is in equal-size mode. To support vGPUs with different amounts of frame buffer, the GPU or GPU instance must be put into mixed-size mode. In mixed-size mode, the maximum number of some types of vGPU allowed on a GPU or GPU instance is less than in equal-size mode.
Note
How a GPU or GPU instance in mixed-size mode behaves if the hypervisor host is rebooted, the NVIDIA Virtual GPU Manager is reloaded, or the GPU is reset depends on the hypervisor:
On a Linux with KVM hypervisor, a GPU or GPU instance in mixed-size mode reverts to its default mode.
On VMware vSphere, a GPU in mixed-size mode remains in mixed-size mode. The GPU doesn’t revert to its default mode
When a GPU or GPU instance is in mixed-size mode, only the best effort and equal share schedulers are supported. The fixed share scheduler is not supported.
Before performing this task, ensure that no vGPUs are created on the GPU and that the GPU is not being used by any other processes, such as CUDA applications, monitoring applications, or the nvidia-smi command.
How to put a GPU or GPU instance into mixed-size mode depends on the hypervisor that you are using as explained in the following topics:
Putting a GPU into Mixed-Size Mode on a Linux with KVM Hypervisor
Putting a GPU Instance into Mixed-Size Mode on a Linux with KVM Hypervisor
Putting a GPU into Mixed-Size Mode on a Linux with KVM Hypervisor#
Perform this task only for a single-instance GPU. If you try to perform this task for a GPU instance on a MIG-enabled GPU, the nvidia-smi commands fail or might not return meaningful information.
For a GPU instance on a MIG-enabled GPU, perform the task in Putting a GPU Instance into Mixed-Size Mode on a Linux with KVM Hypervisor.
If you are using a GPU that supports SR-IOV, ensure that the virtual functions for the physical GPU in the sysfs file system are enabled as explained in Preparing the Virtual Function for an NVIDIA vGPU that Supports SR-IOV on a Linux with KVM Hypervisor.
Use
nvidia-smito list the status of all physical GPUs, and check that heterogeneous time-sliced vGPU sizes are noted as supported.# nvidia-smi -q ... Attached GPUs : 1 GPU 00000000:41:00.0 ... Heterogeneous Time-Slice Sizes : Supported ...
Put each GPU that you want to support vGPUs with different amounts of frame buffer into mixed-size mode.
# nvidia-smi vgpu -i <id> -shm 1
<id>The index of the GPU as reported by
nvidia-smi.
Note
To put a GPU into equal size mode, run this command with the
-shm 0option.This example puts the GPU with index
00000000:41:00.0into mixed-size mode.# nvidia-smi vgpu -i 0 -shm 1 Enabled vGPU heterogeneous mode for GPU 00000000:41:00.0
Confirm that the GPU is now in mixed-size mode by using
nvidia-smito check that vGPU heterogeneous mode is enabled.# nvidia-smi -q ... vGPU Heterogeneous Mode : Enabled ...
Putting a GPU Instance into Mixed-Size Mode on a Linux with KVM Hypervisor#
Perform this task only for a GPU instance on a MIG-enabled GPU. If you try to perform this task for a single-instance GPU, the nvidia-smi vgpu commands fail or do not return meaningful information.
For a single instance GPU, perform the task in Putting a GPU into Mixed-Size Mode on a Linux with KVM Hypervisor.
Before you begin, ensure that the following prerequisites are met:
MIG mode has been enabled for the GPU as explained in Enabling MIG Mode for a GPU.
The GPU instance that you want to put into mixed-size mode has been created as explained in Creating GPU Instances on a MIG-Enabled GPU.
If you are using a GPU that supports SR-IOV, ensure that the virtual functions for the physical GPU in the
sysfsfile system are enabled as explained in Preparing the Virtual Function for an NVIDIA vGPU that Supports SR-IOV on a Linux with KVM Hypervisor.
Use
nvidia-smito list the status of all physical GPUs, and check that heterogeneous time-sliced vGPU sizes are noted as supported.# nvidia-smi -q ... Attached GPUs : 1 GPU 00000000:C7:00.0 ... Heterogeneous Time-Slice Sizes : Supported ...
Put each GPU instance that you want to support vGPUs with different amounts of frame buffer into mixed-size mode.
# nvidia-smi vgpu -i <id> –gi <gpu-instance-id> -shm 1
<id>The index of the GPU as reported by
nvidia-smi.<gpu-instance-id>The identifier of the GPU instance that you want to put into mixed-size mode.
Note
To put a GPU instance into equal size mode, run this command with the
-shm 0option.This example puts the GPU instance 3 on the GPU with index
00000000:C7:00.0into mixed-size mode.# nvidia-smi vgpu -i 0 -gi 3 -shm 1 Enabled vGPU heterogeneous mode on GI Id 3
Confirm that the GPU instance is now in mixed-size mode by using
nvidia-smito check that vGPU heterogeneous mode is enabled.# nvidia-smi vgpu -i <id> –gi <gpu-instance-id> -ghm
<id>The index of the GPU as reported by
nvidia-smi.<gpu-instance-id>The identifier of the GPU instance that you want to put into mixed-size mode.
This example confirms that GPU instance 3 on the GPU with index
00000000:C7:00.0is in mixed-size mode.# nvidia-smi vgpu -i 0 -gi 3 -ghm GPU 00000000:C7:00.0 GPU Instance ID: 3 vGPU Heterogeneous Mode : Enabled
Putting a GPU Into Mixed-Size Mode on VMware vSphere#
On VMware vSphere, you can put a GPU into mixed-size mode either by using vCenter Server or by using the esxcli command.
For instructions, refer to the following topics:
Putting a GPU Into Mixed-Size Mode on VMware vSphere by Using vCenter Server
Putting a GPU Into Mixed-Size Mode on VMware vSphere by Using the esxcli Command
Putting a GPU Into Mixed-Size Mode on VMware vSphere by Using vCenter Server#
Log in to vCenter Server by using the vSphere Web Client.
In the navigation tree, select your ESXi host and click the Configure tab.
From the navigation tree in the Configure tab, select Hardware > Graphics.
Select the GPU and click Edit.
In the pop-up window that opens, set vGPU Mode to Mixed Size.
Note
Do not set the option to restart the Xorg server. This option is required only when the device type is changed, not when the vGPU mode of a GPU is changed.
Putting a GPU Into Mixed-Size Mode on VMware vSphere by Using the esxcli Command#
Perform this task from ESXi Shell on the hypervisor host.
Run the
esxclicommand to change the vGPU mode of the GPU to mixed size.$ esxcli graphics device set --device-id=<slot>:<bus>:<domain>.<function> --type SharedPassthru --vgpu-mode=MixedSize
<slot>,<bus>,<domain>,<function>The domain, bus, slot, and function of the GPU, without the
0xprefix.
Note
To put a GPU into equal size mode, run this command with the
--vgpu-mode=SameSizeoption.Refresh the host and rebuild the assignable hardware tree.
$ esxcli graphics host refresh
Confirm that the vGPU mode of the GPU has been changed.
$ esxcli graphics device list
Placing a vGPU on a Physical GPU or a GPU Instance on a Linux with KVM Hypervisor#
By default, the Virtual GPU Manager determines where a vGPU is placed on a GPU or GPU instance by assigning a placement ID when the mdev that represents the vGPU is created. On a Linux with KVM hypervisor, you can control the placement of vGPUs on a GPU or GPU instance. The benefits of controlling the placement of vGPUs depend on whether the GPU or GPU instance is in mixed-size mode or equal-size mode.
In mixed-size mode, you can fit as many vGPUs as possible on the GPU or GPU instance by ensuring that no gaps that can be occupied by a vGPU are left in the placement region.
In equal-size mode, you can fix the location in the frame buffer at which the vGPU’s virtual frame buffer is allocated so that you can verify that frame buffer content is cleared when a vGPU is shut down and restarted.
The vGPU placements that a GPU supports depend on the total amount of frame buffer that the GPU has and whether the GPU is in mixed-size mode or equal-size mode. For details, refer to vGPU Placements for GPUs.
Note
This task is optional. If you want the Virtual GPU Manager to determine where a vGPU is placed on a GPU or GPU instance, omit this task.
Before performing this task, ensure that the following prerequisites are met:
The vGPU that you want to place on the physical GPU or GPU instance has been created as explained in Creating an NVIDIA vGPU on a Linux with KVM Hypervisor.
The VM to which the vGPU is assigned is not running. If the VM is running when you try to place the vGPU, an error occurs.
For detailed instructions, refer to the following topics:
Placing a vGPU on a Physical GPU on a Linux with KVM Hypervisor
Placing a vGPU on a GPU Instance on a Linux with KVM Hypervisor
Placing a vGPU on a Physical GPU on a Linux with KVM Hypervisor#
Perform this task only for a single-instance GPU. If you try to perform this task for a GPU instance on a MIG-enabled GPU, the commands fail or might not return meaningful information.
For a GPU instance on a MIG-enabled GPU, perform the task in Placing a vGPU on a GPU Instance on a Linux with KVM Hypervisor.
Perform this task in a command shell on the hypervisor host.
If you want to place a vGPU on a GPU in equal-size mode, confirm that the GPU supports Homogeneous Placements.
# nvidia-smi -q | grep -A 4 "vGPU Device Capability"
    vGPU Device Capability
        Fractional Multi-vGPU             : Supported
        ...
        Homogeneous Placements            : Supported
Confirm that the GPU is in the mode that you want (mixed-size mode or equal-size mode).
# nvidia-smi -q | grep "vGPU Heterogeneous Mode"
        vGPU Heterogeneous Mode           : Disabled
If necessary, change the mode to mixed-size mode or equal-size mode as explained in Putting a GPU into Mixed-Size Mode on a Linux with KVM Hypervisor.
Use
nvidia-smito list the placement size and available placement IDs for the type of the vGPU.# nvidia-smi vgpu -c -v ... vGPU Type ID : 0x392 Name : NVIDIA L4-6Q ... Placement Size : 6 Creatable Placement IDs : 6 18 ...
Note
Some supported placement IDs for the vGPU type might be unavailable because they are already in use by another vGPU. To list the placement size and all supported placement IDs for the type of the vGPU, run the following command:
# nvidia-smi vgpu -s -v
...
    vGPU Type ID                          : 0x392
        Name                              : NVIDIA L4-6Q
...
        Placement Size                    : 6
        Supported Placement IDs           : 0 6 12 18
...
The number of supported placement IDs is the maximum number of vGPUs of the type that are allowed on the GPU.
Determine the current placement ID of the vGPU by viewing the contents of the
sysfsfile that represents the placement ID of the vGPU.For hypervisors that use the
mdevVFIO framework, run the following command:# cat /sys/bus/mdev/devices/<uuid>/nvidia/placement_id
<uuid>The UUID of the vGPU, for example,
aa618089-8b16-4d01-a136-25a0f3c73123.
For hypervisors that use a vendor-specific VFIO framework, run the following command:
# cat /sys/bus/pci/devices/<domain>:<bus>:<slot>.<function>/nvidia/placement_id
<domain>,<bus>,<slot>,<function>The domain, bus, slot, and function of the vGPU, without the
0xprefix, for example,0000\:3d\:00.4.
Write the new placement ID that you want to the
sysfsfile that represents the placement ID of the vGPU.For hypervisors that use the
mdevVFIO framework, run the following command:# echo <placement-id> > /sys/bus/mdev/devices/<uuid>/nvidia/placement_id
For hypervisors that use a vendor-specific VFIO framework, run the following command:
# echo <placement-id> > /sys/bus/pci/devices/<domain>:<bus>:<slot>.<function>/nvidia/placement_id
<placement-id>The placement ID that you want to set for the vGPU.
<uuid>The UUID of the vGPU, for example,
aa618089-8b16-4d01-a136-25a0f3c73123.<domain>,<bus>,<slot>,<function>The domain, bus, slot, and function of the vGPU, without the
0xprefix, for example,0000\:3d\:00.4.
This example sets the placement ID for the vGPU that has the UUID
aa618089-8b16-4d01-a136-25a0f3c73123to 6.# echo 6> /sys/bus/mdev/devices/aa618089-8b16-4d01-a136-25a0f3c73123/nvidia/placement_id
This example sets the placement ID for the vGPU that has the domain, bus, slot, and function
0000\:3d\:00.4to 6.# echo 6> /sys/bus/pci/devices/0000\:3d\:00.4/nvidia/placement_id
After the VM to which the vGPU is assigned has been booted, you can confirm that the vGPU has been assigned the correct placement ID.
# nvidia-smi vgpu -q
GPU 00000000:41:00.0
    Active vGPUs                          : 1
    vGPU ID                               : 3251719533
        VM ID                             : 2150987
        ...
        Placement ID                      : 6
        ...
Placing a vGPU on a GPU Instance on a Linux with KVM Hypervisor#
Perform this task only for a GPU instance on a MIG-enabled GPU. If you try to perform this task for a single-instance GPU, the commands fail or might not return meaningful information.
For a single instance GPU, perform the task in Placing a vGPU on a Physical GPU on a Linux with KVM Hypervisor.
Perform this task in a command shell on the hypervisor host.
If you want to place a vGPU on a GPU instance in equal-size mode, confirm that the underlying physical GPU supports Homogeneous Placements.
# nvidia-smi -q | grep -A 4 "vGPU Device Capability"
    vGPU Device Capability
        Fractional Multi-vGPU             : Supported
        ...
        Homogeneous Placements            : Supported
Confirm that the GPU instance is in the mode that you want (mixed-size mode or equal-size mode).
# nvidia-smi vgpu -i <id> –gi <gpu-instance-id> -ghm
<id>The index of the GPU.
<gpu-instance-id>The identifier of the GPU instance on which you want to place a vGPU.
If necessary, change the mode to mixed-size mode or equal-size mode as explained in Putting a GPU Instance into Mixed-Size Mode on a Linux with KVM Hypervisor.
This example confirms that GPU instance 3 on the GPU with index
00000000:C7:00.0is in mixed-size mode.# nvidia-smi vgpu -i 0 -gi 3 -ghm GPU 00000000:C7:00.0 GPU Instance ID: 3 vGPU Heterogeneous Mode : Enabled
Use
nvidia-smito list the placement size and available placement IDs for the type of the vGPU.# nvidia-smi vgpu -i <id> –gi <gpu-instance-id> -c -v
<id>The index of the GPU.
<gpu-instance-id>The identifier of the GPU instance on which you want to place a vGPU.
The number of supported placement IDs is the maximum number of vGPUs of the type that are allowed on the GPU instance.
This example lists the placement size and available placement IDs for the NVIDIA RTX Pro 6000 Blackwell DC-1-2Q vGPU type on GPU instance 3 on the GPU with index
00000000:C7:00.0.# nvidia-smi vgpu -i 0 -gi 3 -c -v GPU 00000000:C7:00.0 GPU Instance ID 3 vGPU Type ID : 0x60a Name : NVIDIA RTX Pro 6000 Blackwell DC-1-2Q ... Placement Size : 2 Placement IDs : 0 2 4 6 8 10 12 14 16 18 20 22
Determine the current placement ID of the vGPU on the GPU instance by viewing the contents of the
sysfsfile that represents the placement ID of the vGPU.For hypervisors that use the
mdevVFIO framework, run the following command:# cat /sys/bus/mdev/devices/<uuid>/nvidia/gpu_instance_id/placement_id
<uuid>The UUID of the vGPU, for example,
aa618089-8b16-4d01-a136-25a0f3c73123.
For hypervisors that use a vendor-specific VFIO framework, run the following command:
# cat /sys/bus/pci/devices/<domain>:<bus>:<slot>.<function>/gpu_instance_id/nvidia/placement_id
<domain>,<bus>,<slot>,<function>The domain, bus, slot, and function of the vGPU, without the
0xprefix, for example,0000\:3d\:00.4.
Write the new placement ID that you want to the
sysfsfile that represents the placement ID of the vGPU.For hypervisors that use the
mdevVFIO framework, run the following command:# echo <placement-id> > /sys/bus/mdev/devices/<uuid>/nvidia/gpu_instance_id/placement_id
For hypervisors that use a vendor-specific VFIO framework, run the following command:
# echo <placement-id> > /sys/bus/pci/devices/<domain>:<bus>:<slot>.<function>/nvidia/gpu_instance_id/placement_id
<placement-id>The placement ID that you want to set for the vGPU.
<uuid>The UUID of the vGPU, for example,
aa618089-8b16-4d01-a136-25a0f3c73123.<domain>,<bus>,<slot>,<function>The domain, bus, slot, and function of the vGPU, without the
0xprefix, for example,0000\:3d\:00.4.
This example sets the placement ID for the vGPU that has the UUID
aa618089-8b16-4d01-a136-25a0f3c73123to 6.# echo 6> /sys/bus/mdev/devices/aa618089-8b16-4d01-a136-25a0f3c73123/nvidia/gpu_instance_id/placement_id
This example sets the placement ID for the vGPU that has the domain, bus, slot, and function
0000\:3d\:00.4to 6.# echo 6> /sys/bus/pci/devices/0000\:3d\:00.4/nvidia/gpu_instance_id/placement_id
After the VM to which the vGPU is assigned has been booted, you can confirm that the vGPU has been assigned the correct placement ID.
# nvidia-smi vgpu -i <id> –gi <gpu-instance-id> -q
<id>The index of the GPU.
<gpu-instance-id>The identifier of the GPU instance on which you placed the vGPU.
For example:
# nvidia-smi vgpu -i 0 -gi 3 -q
GPU 00000000:41:00.0
    Active vGPUs                          : 1
    vGPU ID                               : 3251634224
        VM UUID                           : 604de595-d65c-4e6f-acb5-b178dec1da0d
        ...
        Placement ID                      : 6
        ...
Configuring a GPU for MIG-Backed vGPUs#
To support GPU instances with NVIDIA vGPU, a GPU must be configured with MIG mode enabled and GPU instances must be created and configured on the physical GPU. Optionally, you can create compute instances within the GPU instances. If you don’t create compute instances within the GPU instances, they can be added later for individual vGPUs from within the guest VMs.
Ensure that the following prerequisites are met:
The NVIDIA Virtual GPU Manager is installed on the hypervisor host.
You have root user privileges on your hypervisor host machine.
You have determined which GPU instances correspond to the vGPU types of the MIG-backed vGPUs that you will create.
To get this information, consult the table of MIG-backed vGPUs for your GPU in Virtual GPU Types for Supported GPUs.
The GPU is not being used by any other processes, such as CUDA applications, monitoring applications, or the
nvidia-smicommand.
To configure a GPU for MIG-backed vGPUs, follow these instructions:
-
Note
For VMware vSphere, only enabling MIG mode is required because VMware vSphere creates the GPU instances and, after the VM is booted and guest driver is installed, one compute instance is automatically created in the VM.
After configuring a GPU for MIG-backed vGPUs, create the vGPUs that you need and add them to their VMs.
Enabling MIG Mode for a GPU#
Perform this task in your hypervisor command shell.
Open a command shell as the root user on your hypervisor host machine.
On all supported hypervisors, you can use secure shell (SSH) for this purpose. Individual hypervisors may provide additional means for logging in. For details, refer to the documentation for your hypervisor.
Determine whether MIG mode is enabled.
Use the
nvidia-smicommand for this purpose. By default, MIG mode is disabled.This example shows that MIG mode is disabled on GPU 0.
$ nvidia-smi -i 0
+-----------------------------------------------------------------------------+
| NVIDIA-SMI 595.91.04   Driver Version: 595.91.04    CUDA Version:  13.2     |
|-------------------------------+----------------------+----------------------+
| GPU  Name        Persistence-M| Bus-Id        Disp.A | Volatile Uncorr. ECC |
| Fan  Temp  Perf  Pwr:Usage/Cap|         Memory-Usage | GPU-Util  Compute M. |
|                               |                      |               MIG M. |
|===============================+======================+======================|
|   0 NVIDIA RTX PRO 6000...On  | 00000000:9B:00.0 Off |                  Off |
| N/A  35C  P8     40W /  600W  |     0MiB /  97887MiB |       0%     Default |
+-------------------------------+----------------------+----------------------+
|                               |                      |             Disabled |
+-------------------------------+----------------------+----------------------+
If MIG mode is disabled, enable it.
$ nvidia-smi -i [<gpu-ids>] -mig 1
<gpu-ids>A comma-separated list of GPU indexes, PCI bus IDs or UUIDs that specifies the GPUs on which you want to enable MIG mode. If
<gpu-ids>is omitted, MIG mode is enabled on all GPUs on the system.
This example enables MIG mode on GPU 0.
$ nvidia-smi -i 0 -mig 1
Enabled MIG Mode for GPU 00000000:9B:00.0
All done.
Note
If the GPU is being used by another process, this command fails and displays a warning message that MIG mode for the GPU is in the pending enable state. In this situation, stop all processes that are using the GPU and retry the command.
VMware vSphere ESXi with GPUs based on the NVIDIA Ampere architecture only: Reboot the hypervisor host.
If you are using any other hypervisor or GPUs that are based on the NVIDIA Hopper™ GPU architecture or a later architecture, omit this step.
Query the GPUs on which you enabled MIG mode to confirm that MIG mode is enabled.
This example queries GPU 0 for the PCI bus ID and MIG mode in comma-separated values (CSV) format.
$ nvidia-smi -i 0 --query-gpu=pci.bus_id,mig.mode.current --format=csv
pci.bus_id, mig.mode.current
00000000:9B:00.0, Enabled
Creating GPU Instances on a MIG-Enabled GPU#
Note
If you are using VMware vSphere, omit this task. VMware vSphere creates the GPU instances automatically.
Perform this task in your hypervisor command shell.
If necessary, open a command shell as the root user on your hypervisor host machine.
List the GPU instance profiles that are available on your GPU.
You will need to specify the profiles by their IDs, not their names, when you create them.
$ nvidia-smi mig -lgip
+-----------------------------------------------------------------------------+
| GPU instance profiles:                                                      |
| GPU   Name              ID   Instances   Memory     P2P    SM    DEC   ENC  |
|                              Free/Total   GiB              CE    JPEG  OFA  |
|=============================================================================|
|   0  MIG 1g.24gb        14   4/4         23.12      No     46     1     1   |
|                                                             1     1     0   |
+-----------------------------------------------------------------------------+
|   0  MIG 1g.24gb+me     21   1/1         23.12      No     46     1     1   |
|                                                             1     1     1   |
+-----------------------------------------------------------------------------+
|   0  MIG 1g.24gb+gfx    47   4/4         23.12      No     46     1     1   |
|                                                             1     1     0   |
+-----------------------------------------------------------------------------+
|   0  MIG 1g.24gb+me.all 65   1/1         23.12      No     46     4     4   |
|                                                             1     4     1   |
+-----------------------------------------------------------------------------+
|   0  MIG 1g.24gb-me     67    4/4        23.12      No     46     0     0   |
|                                                             1     0     0   |
+-----------------------------------------------------------------------------+
|   0  MIG 2g.48gb         5    2/2        46.50      No     94     2     2   |
|                                                             2     2     0   |
+-----------------------------------------------------------------------------+
|   0  MIG 2g.48gb+gfx    35    2/2        46.50      No     94     2     2   |
|                                                             2     2     0   |
+-----------------------------------------------------------------------------+
|   0  MIG 2g.48gb+me.all 64    1/1        46.50      No     94     4     4   |
|                                                             2     4     1   |
+-----------------------------------------------------------------------------+
|   0  MIG 2g.48gb-me     66    2/2        46.50      No     94     0     0   |
|                                                             2     0     0   |
+-----------------------------------------------------------------------------+
|   0  MIG 4g.96gb         0    1/1        93.38      No     188    4     4   |
|                                                             4     4     1   |
+-----------------------------------------------------------------------------+
|   0  MIG 4g.96gb+gfx    32    1/1        93.38      No     188    4     4   |
|                                                             4     4     1   |
+-----------------------------------------------------------------------------+
Note
On GPUs that support the Multi-Instance GPU (MIG) feature, NVIDIA vGPU software supports only GPU instance profiles for graphics. GPU instance profiles for graphics are denoted by the
+gfxsuffix, for example,MIG 4g.96gb+gfx.Create the GPU instances with the default compute instance that correspond to the vGPU types of the MIG-backed vGPUs that you will create.
$ nvidia-smi mig -cgi <gpu-instance-profile-ids> -C
<gpu-instance-profile-ids>A comma-separated list of GPU instance profile IDs that specifies the GPU instances that you want to create.
Note
NVIDIA vGPU software supports only the default compute instance, which spans the complete GPU instance.If you omit the
-Coption from the command to create the GPU instances, they are created without compute instances. In this situation, you must add the compute instances manually as explained in Creating Compute Instances in a GPU instance.This example creates one GPU instance of type
2g.48gb+gfx, which has profile ID 35, with the default compute instance.$ nvidia-smi mig -cgi 35 -C Successfully created GPU instance ID 1 on GPU 0 using profile MIG 2g.48gb+gfx (ID 35) Successfully created compute instance ID 0 on GPU 0 GPU instance ID 1 using profile MIG 2g.48gb (ID 1)
Creating Compute Instances in a GPU instance#
If you did not create GPU instances with the default compute instance, you must add the default compute instance explicitly. Otherwise, omit this task. The default compute instance spans the complete GPU. If you plan to use MIG-backed vGPUs that occupy the entire GPU instance, you can reconfigure the compute instances later for individual vGPUs from within the guest VMs.
Note
If you are using VMware vSphere, omit this task. After the VM is booted and guest driver is installed, one compute instance is automatically created in the VM.
Perform this task in your hypervisor command shell.
If necessary, open a command shell as the root user on your hypervisor host machine.
List the available GPU instances.
$ nvidia-smi mig -lgi
+-------------------------------------------------------+
| GPU instances:                                        |
| GPU   Name             Profile  Instance   Placement  |
|                          ID       ID       Start:Size |
|=======================================================|
|   0  MIG 2g.48gb+gfx     35        1          0:6     |
+-------------------------------------------------------+
List the compute instance profiles that are available in the GPU instances within which you want to create the compute instances.
$ nvidia-smi mig -lcip -gi <gpu-instance-ids>
<gpu-instance-ids>A comma-separated list of GPU instance IDs that specifies the GPU instances within which you want to create the compute instances.
If a compute instance has already been created, an asterisk (
*) is displayed against the the profile ID.This example lists the compute instance profiles that are available in GPU instance 1.
$ nvidia-smi mig -lcip -gi 1
+------------------------------------------------------------------------------+
| Compute instance profiles:                                                   |
| GPU    GPU       Name       Profile Instances   Exclusive       Shared       |
|      Instance                 ID    Free/Total     SM       DEC   ENC   OFA  |
|        ID                                                   CE    JPEG       |
|==============================================================================|
|   0     1       MIG 1c.2g.48gb 0     2/2           46        2     2     0   |
|                                                              2     2         |
+------------------------------------------------------------------------------+
|   0      1      MIG 1c.2g.48gb 7     1/1           80        2     2     0   |
|                                                              2     2         |
+------------------------------------------------------------------------------+
|   0      1      MIG 2g.48gb    1*    1/1           94        2     2     0   |
|                                                              2     2         |
+------------------------------------------------------------------------------+
Create the compute instances that you need within each GPU instance.
$ nvidia-smi mig -cci -gi <gpu-instance-ids>
<gpu-instance-ids>A comma-separated list of GPU instance IDs that specifies the GPU instances within which you want to create the compute instances.
NVIDIA vGPU software supports only the default compute instance, which spans the complete GPU instance.
Caution
To avoid an inconsistent state between a guest VM and the hypervisor host, do not create compute instances from the hypervisor on a GPU instance on which an active guest VM is running. Instead, create the compute instances from within the guest VM as explained in Modifying a MIG-Backed vGPU’s Configuration from a Guest VM.
This example creates the default compute instance on GPU instance 1.
$ nvidia-smi mig -cci -gi 1
Successfully created compute instance ID  0 on GPU  0 GPU instance ID  1 using profile MIG 2g.48gb (ID  1)
Verify that the compute instances were created within each GPU instance.
$ nvidia-smi
+-----------------------------------------------------------------------------+
| NVIDIA-SMI 595.91.04   Driver Version: 595.91.04    CUDA Version:  13.2     |
|-------------------------------+----------------------+----------------------+
| GPU  Name        Persistence-M| Bus-Id        Disp.A | Volatile Uncorr. ECC |
| Fan  Temp  Perf  Pwr:Usage/Cap|         Memory-Usage | GPU-Util  Compute M. |
|                               |                      |               MIG M. |
|===============================+======================+======================|
|   0 NVIDIA RTX PRO 6000...On  | 00000000:9B:00.0 Off |                  Off |
| N/A  35C  P8     40W /  600W  |     0MiB /  97887MiB |       0%     Default |
+-------------------------------+----------------------+----------------------+
|                               |                      |              Enabled |
+-------------------------------+----------------------+----------------------+

+-----------------------------------------------------------------------------+
| MIG devices:                                                                |
+------------------+----------------------+-----------+-----------------------+
| GPU  GI  CI  MIG |  Shared Memory-Usage |        Vol|         Shared        |
|      ID  ID  Dev |    Shared BAR1-Usage | SM     Unc| CE  ENC  DEC  OFA  JPG|
|                  |                      |        ECC|                       |
|==================+======================+===========+=======================|
|  0    1   0   0  | 144MiB / 47616MiB    | 94    N/A |  2   2    2    0    2 |
|                  |   0MiB / 17736MiB    |           |                       |
+------------------+-- -------------------+-----------+-----------------------+

+-----------------------------------------------------------------------------+
| Processes:                                                                  |
|  GPU   GI   CI        PID   Type   Process name                  GPU Memory |
|        ID   ID                                                   Usage      |
|=============================================================================|
|  No running processes found                                                 |
+-----------------------------------------------------------------------------+
Note
Additional compute instances that have been created in a VM are destroyed when the VM is shut down or rebooted. After the shutdown or reboot, only one compute instance remains in the VM. This compute instance is created automatically after the NVIDIA vGPU software graphics driver is installed.
Disabling MIG Mode for One or More GPUs#
If a GPU that you want to use for time-sliced vGPUs or GPU pass through has previously been configured for MIG-backed vGPUs, disable MIG mode on the GPU.
Ensure that the following prerequisites are met:
The NVIDIA Virtual GPU Manager is installed on the hypervisor host.
You have root user privileges on your hypervisor host machine.
The GPU is not being used by any other processes, such as CUDA applications, monitoring applications, or the
nvidia-smicommand.
Perform this task in your hypervisor command shell.
Open a command shell as the root user on your hypervisor host machine.
You can use secure shell (SSH) for this purpose.
Determine whether MIG mode is disabled.
Use the
nvidia-smicommand for this purpose. By default, MIG mode is disabled, but might have previously been enabled.This example shows that MIG mode is enabled on GPU 0.
$ nvidia-smi -i 0
+-----------------------------------------------------------------------------+
| NVIDIA-SMI 595.91.04    Driver Version: 595.91.04   CUDA Version:  13.2     |
|-------------------------------+----------------------+----------------------+
| GPU  Name        Persistence-M| Bus-Id        Disp.A | Volatile Uncorr. ECC |
| Fan  Temp  Perf  Pwr:Usage/Cap|         Memory-Usage | GPU-Util  Compute M. |
|                               |                      |               MIG M. |
|===============================+======================+======================|
|   0 NVIDIA RTX PRO 6000...On  | 00000000:9B:00.0 Off |                  Off |
| N/A  35C  P8     40W /  600W  |   144MiB /  97887MiB |      N/A     Default |
+-------------------------------+----------------------+----------------------+
|                               |                      |              Enabled |
+-------------------------------+----------------------+----------------------+
If MIG mode is enabled, disable it.
$ nvidia-smi -i [<gpu-ids>] -mig 0
<gpu-ids>A comma-separated list of GPU indexes, PCI bus IDs or UUIDs that specifies the GPUs on which you want to disable MIG mode. If
<gpu-ids>is omitted, MIG mode is disabled on all GPUs on the system.
This example disables MIG mode on GPU 0.
$ sudo nvidia-smi -i 0 -mig 0
Disabled MIG Mode for GPU 00000000:9B:00.0
All done.
Confirm that MIG mode was disabled.
Use the
nvidia-smicommand for this purpose.This example shows that MIG mode is disabled on GPU 0.
$ nvidia-smi -i 0
+-----------------------------------------------------------------------------+
| NVIDIA-SMI 595.91.04    Driver Version: 595.91.04   CUDA Version:  13.2     |
|-------------------------------+----------------------+----------------------+
| GPU  Name        Persistence-M| Bus-Id        Disp.A | Volatile Uncorr. ECC |
| Fan  Temp  Perf  Pwr:Usage/Cap|         Memory-Usage | GPU-Util  Compute M. |
|                               |                      |               MIG M. |
|===============================+======================+======================|
|   0 NVIDIA RTX PRO 6000...On  | 00000000:9B:00.0 Off |                  Off |
| N/A  35C  P8     40W /  600W  |   144MiB /  97887MiB |      0%      Default |
|                               |                      |             Disabled |
+-------------------------------+----------------------+----------------------+
Disabling and Enabling ECC Memory#
Some GPUs that support NVIDIA vGPU software support error correcting code (ECC) memory with NVIDIA vGPU. ECC memory improves data integrity by detecting and handling double-bit errors. However, not all GPUs, vGPU types, and hypervisor software versions support ECC memory with NVIDIA vGPU.
On GPUs that support ECC memory with NVIDIA vGPU, ECC memory is supported with C-series and Q-series vGPUs, but not with A-series and B-series vGPUs. Although A-series and B-series vGPUs start on physical GPUs on which ECC memory is enabled, enabling ECC with vGPUs that do not support it might incur some costs.
On physical GPUs that do not have HBM2 memory, the amount of frame buffer that is usable by vGPUs is reduced. All types of vGPU are affected, not just vGPUs that support ECC memory.
The effects of enabling ECC memory on a physical GPU are as follows:
ECC memory is exposed as a feature on all supported vGPUs on the physical GPU.
In VMs that support ECC memory, ECC memory is enabled, with the option to disable ECC in the VM.
ECC memory can be enabled or disabled for individual VMs. Enabling or disabling ECC memory in a VM does not affect the amount of frame buffer that is usable by vGPUs.
GPUs based on the Pascal GPU architecture and later GPU architectures support ECC memory with NVIDIA vGPU. To determine whether ECC memory is enabled for a GPU, run nvidia-smi -q for the GPU.
Tesla M60 and M6 GPUs support ECC memory when used without GPU virtualization, but NVIDIA vGPU does not support ECC memory with these GPUs. In graphics mode, these GPUs are supplied with ECC memory disabled by default.
Some hypervisor software versions do not support ECC memory with NVIDIA vGPU.
If you are using a hypervisor software version or GPU that does not support ECC memory with NVIDIA vGPU and ECC memory is enabled, NVIDIA vGPU fails to start. In this situation, you must ensure that ECC memory is disabled on all GPUs if you are using NVIDIA vGPU.
Disabling ECC Memory#
If ECC memory is unsuitable for your workloads but is enabled on your GPUs, disable it. You must also ensure that ECC memory is disabled on all GPUs if you are using NVIDIA vGPU with a hypervisor software version or a GPU that does not support ECC memory with NVIDIA vGPU. If your hypervisor software version or GPU does not support ECC memory and ECC memory is enabled, NVIDIA vGPU fails to start.
Where to perform this task depends on whether you are changing ECC memory settings for a physical GPU or a vGPU.
For a physical GPU, perform this task from the hypervisor host.
For a vGPU, perform this task from the VM to which the vGPU is assigned.
Note
ECC memory must be enabled on the physical GPU on which the vGPUs reside.
Before you begin, ensure that NVIDIA Virtual GPU Manager is installed on your hypervisor. If you are changing ECC memory settings for a vGPU, also ensure that the NVIDIA vGPU software graphics driver is installed in the VM to which the vGPU is assigned.
Use
nvidia-smito list the status of all physical GPUs or vGPUs, and check for ECC noted as enabled.# nvidia-smi -q ==============NVSMI LOG============== Timestamp : Mon May 18 18:36:45 2026 Driver Version : 595.91.04 Attached GPUs : 1 GPU 0000:02:00.0 [...] Ecc Mode Current : Enabled Pending : Enabled [...]
Change the ECC status to off for each GPU for which ECC is enabled.
If you want to change the ECC status to off for all GPUs on your host machine or vGPUs assigned to the VM, run this command:
# nvidia-smi -e 0
If you want to change the ECC status to off for a specific GPU or vGPU, run this command:
# nvidia-smi -i <id> -e 0
<id>is the index of the GPU or vGPU as reported bynvidia-smi.This example disables ECC for the GPU with index
0000:02:00.0.# nvidia-smi -i 0000:02:00.0 -e 0
Reboot the host or restart the VM.
Confirm that ECC is now disabled for the GPU or vGPU.
# nvidia-smi -q

==============NVSMI LOG==============

Timestamp                           : Mon May 18 18:37:53 2026
Driver Version                      : 595.91.04

Attached GPUs                       : 1
GPU 0000:02:00.0
[...]

    Ecc Mode
        Current                     : Disabled
        Pending                     : Disabled

[...]
If you later need to enable ECC on your GPUs or vGPUs, follow the instructions in Enabling ECC Memory.
Enabling ECC Memory#
If ECC memory is suitable for your workloads and is supported by your hypervisor software and GPUs, but is disabled on your GPUs or vGPUs, enable it.
Where to perform this task depends on whether you are changing ECC memory settings for a physical GPU or a vGPU.
For a physical GPU, perform this task from the hypervisor host.
For a vGPU, perform this task from the VM to which the vGPU is assigned.
Note
ECC memory must be enabled on the physical GPU on which the vGPUs reside.
Before you begin, ensure that NVIDIA Virtual GPU Manager is installed on your hypervisor. If you are changing ECC memory settings for a vGPU, also ensure that the NVIDIA vGPU software graphics driver is installed in the VM to which the vGPU is assigned.
Use
nvidia-smito list the status of all physical GPUs or vGPUs, and check for ECC noted as disabled.# nvidia-smi -q ==============NVSMI LOG============== Timestamp : Mon May 18 18:36:45 2026 Driver Version : 595.91.04 Attached GPUs : 1 GPU 0000:02:00.0 [...] Ecc Mode Current : Disabled Pending : Disabled [...]
Change the ECC status to on for each GPU or vGPU for which ECC is disabled.
If you want to change the ECC status to on for all GPUs on your host machine or vGPUs assigned to the VM, run this command:
# nvidia-smi -e 1
If you want to change the ECC status to on for a specific GPU or vGPU, run this command:
# nvidia-smi -i <id> -e 1
<id>is the index of the GPU or vGPU as reported bynvidia-smi.This example enables ECC for the GPU with index
0000:02:00.0.# nvidia-smi -i 0000:02:00.0 -e 1
Reboot the host or restart the VM.
Confirm that ECC is now enabled for the GPU or vGPU.
# nvidia-smi -q

==============NVSMI LOG==============

Timestamp                           : Mon May 18 18:37:53 2026
Driver Version                      : 595.91.04

Attached GPUs                       : 1
GPU 0000:02:00.0
[...]

    Ecc Mode
        Current                     : Enabled
        Pending                     : Enabled

[...]
If you later need to disable ECC on your GPUs or vGPUs, follow the instructions in Disabling ECC Memory.
Configuring a vGPU VM for Use with NVIDIA GPUDirect Storage Technology#
To use NVIDIA® GPUDirect Storage® technology with NVIDIA vGPU, you must install all the required software in the VM that is configured with NVIDIA vGPU.
Ensure that the prerequisites in Prerequisites for Using NVIDIA vGPU are met.
Install and configure the NVIDIA Virtual GPU Manager as explained in Installing and Configuring the NVIDIA Virtual GPU Manager for Red Hat Enterprise Linux KVM.
As root, log in to the VM that you configured with NVIDIA vGPU in the previous step.
Install the Mellanox OpenFabrics Enterprise Distribution for Linux (MLNX_OFED) in the VM as explained in Installation Procedure in Installing Mellanox OFED.
In the command to run the installation script, specify the following options:
--with-nvmf--with-nfsrdma--enable-gds--add-kernel-support
Install the NVIDIA vGPU software graphics driver for Linux in the VM from a distribution-specific package.
Note
GPUDirect Storage technology does not support installation of the NVIDIA vGPU software graphics driver for Linux from a
.runfile.Follow the instructions for the Linux distribution that is installed in the VM:
Install NVIDIA CUDA Toolkit from a
.runfile, deselecting the CUDA driver when selecting the CUDA components to install.Note
To avoid overwriting the NVIDIA vGPU software graphics driver that you installed in the previous step, do not install NVIDIA CUDA Toolkit from a distribution-specific package.
For instructions, refer to Runfile Installation in NVIDIA CUDA Installation Guide for Linux.
Use the package manager of the Linux distribution that is installed in the VM to install the GPUDirect Storage technology packages, omitting the installation of the NVIDIA CUDA Toolkit packages.
Follow the instructions in NVIDIA CUDA Installation Guide for Linux for the Linux distribution that is installed in the VM:
-
In the step to install CUDA, execute only the command to include all GPUDirect Storage technology packages:
sudo dnf install nvidia-gds -
In the step to install CUDA, execute only the command to include all GPUDirect Storage technology packages:
sudo apt-get install nvidia-gds
-
After you configure a vGPU VM for use with NVIDIA GPUDirect Storage technology, you can license the NVIDIA vGPU software licensed products that you are using. For instructions, refer to Virtual GPU Software Client Licensing User Guide.