


Using GPU Pass-Through#
GPU pass-through is used to directly assign an entire physical GPU to one VM, bypassing the NVIDIA Virtual GPU Manager. In this mode of operation, the GPU is accessed exclusively by the NVIDIA driver running in the VM to which it is assigned; the GPU is not shared among VMs.
In pass-through mode, all GPUs that support NVIDIA vGPU software support error-correcting code (ECC).
GPU pass-through can be used in a server platform alongside NVIDIA vGPU, with some restrictions:
A physical GPU can host NVIDIA vGPUs, or can be used for pass-through, but cannot do both at the same time. Some hypervisors, for example VMware vSphere ESXi, require a host reboot to change a GPU from pass-through mode to vGPU mode.
A single VM cannot be configured for both vGPU and GPU pass-through at the same time.
The performance of a physical GPU passed through to a VM can be monitored only from within the VM itself. Such a GPU cannot be monitored by tools that operate through the hypervisor, such as XenCenter or
nvidia-smi(see Monitoring GPU Performance).The following BIOS settings must be enabled on your server platform:
VT-D/IOMMU
SR-IOV in Advanced Options
All GPUs directly connected to each other through NVLink must be assigned to the same VM.
You can assign multiple physical GPUs to one VM. The maximum number of physical GPUs that you can assign to a VM depends on the maximum number of PCIe pass-through devices per VM that your chosen hypervisor can support. For more information, refer to the documentation for your hypervisor, for example:
XenServer: Configuration limits
Red Hat Enterprise Linux:
Red Hat Enterprise Linux 9 releases: Assigning a GPU to a virtual machine, Known Issues
Red Hat Enterprise Linux 8 releases: Assigning a GPU to a virtual machine, Known Issues
Red Hat Enterprise Linux 7 releases: GPU PCI Device Assignment
VMware vSphere: VMware Configuration Maximums
Note
If you intend to configure all GPUs in your server platform for pass-through, you do not need to install the NVIDIA Virtual GPU Manager.
Display Resolutions for Physical GPUs#
The display resolutions supported by a physical GPU depend on the NVIDIA vGPU software license that is applied to the GPU.
NVIDIA RTX Virtual Workstation Physical GPU Resolutions#
GPUs that are licensed with an NVIDIA RTX Virtual Workstation license support a maximum combined resolution based on the number of available pixels. You can choose between using a small number of high resolution displays or a larger number of lower resolution displays with these GPUs.
The following table lists the maximum number of displays per GPU at each supported display resolution for configurations in which all displays have the same resolution.
Available Pixels |
Display Resolution |
Displays per GPU |
|---|---|---|
66355200 |
7680×4320 |
2 |
5120×2880 or lower |
4 |
The following table provides examples of configurations with a mixture of display resolutions.
Available Pixels |
Available Pixel Basis |
Maximum Displays |
Sample Mixed Display Configurations |
|---|---|---|---|
66355200 |
2 7680×4320 displays |
4 |
1 7680×4320 display plus 2 5120×2880 displays |
1 7680×4320 display plus 3 4096×2160 displays |
Note
You cannot use more than four displays even if the combined resolution of the displays is less than the number of available pixels from the GPU. For example, you cannot use five 4096×2160 displays even though the combined resolution of the displays (44236800) is less than the number of available pixels from the GPU (66355200).
NVIDIA Virtual Applications or NVIDIA vGPU for Compute Physical GPU Resolutions#
GPUs that are licensed with an NVIDIA Virtual Applications or an NVIDIA vGPU for Compute license support a single display with a fixed maximum resolution. The maximum resolution depends on the following factors:
The NVIDIA vGPU software license that is applied to the GPU
The operating system that is running on the system to which the GPU is assigned
License |
Operating System |
Maximum Display Resolution |
Displays per GPU |
|---|---|---|---|
NVIDIA Virtual Applications |
Linux |
2560×1600 |
1 |
Windows |
1280×1024 |
1 |
Using GPU Pass-Through on XenServer#
You can configure a GPU for pass-through on XenServer by using XenCenter or by using the xe command.
The following additional restrictions apply when GPU pass-through is used in a server platform alongside NVIDIA vGPU:
The performance of a physical GPU passed through to a VM cannot be monitored through XenCenter.
nvidia-smiin dom0 no longer has access to the GPU.Pass-through GPUs do not provide console output through XenCenter’s VM Console tab. Use a remote graphics connection directly into the VM to access the VM’s OS.
Configuring a VM for GPU Pass Through by Using XenCenter#
Select the Pass-through whole GPU option as the GPU type in the VM’s Properties:
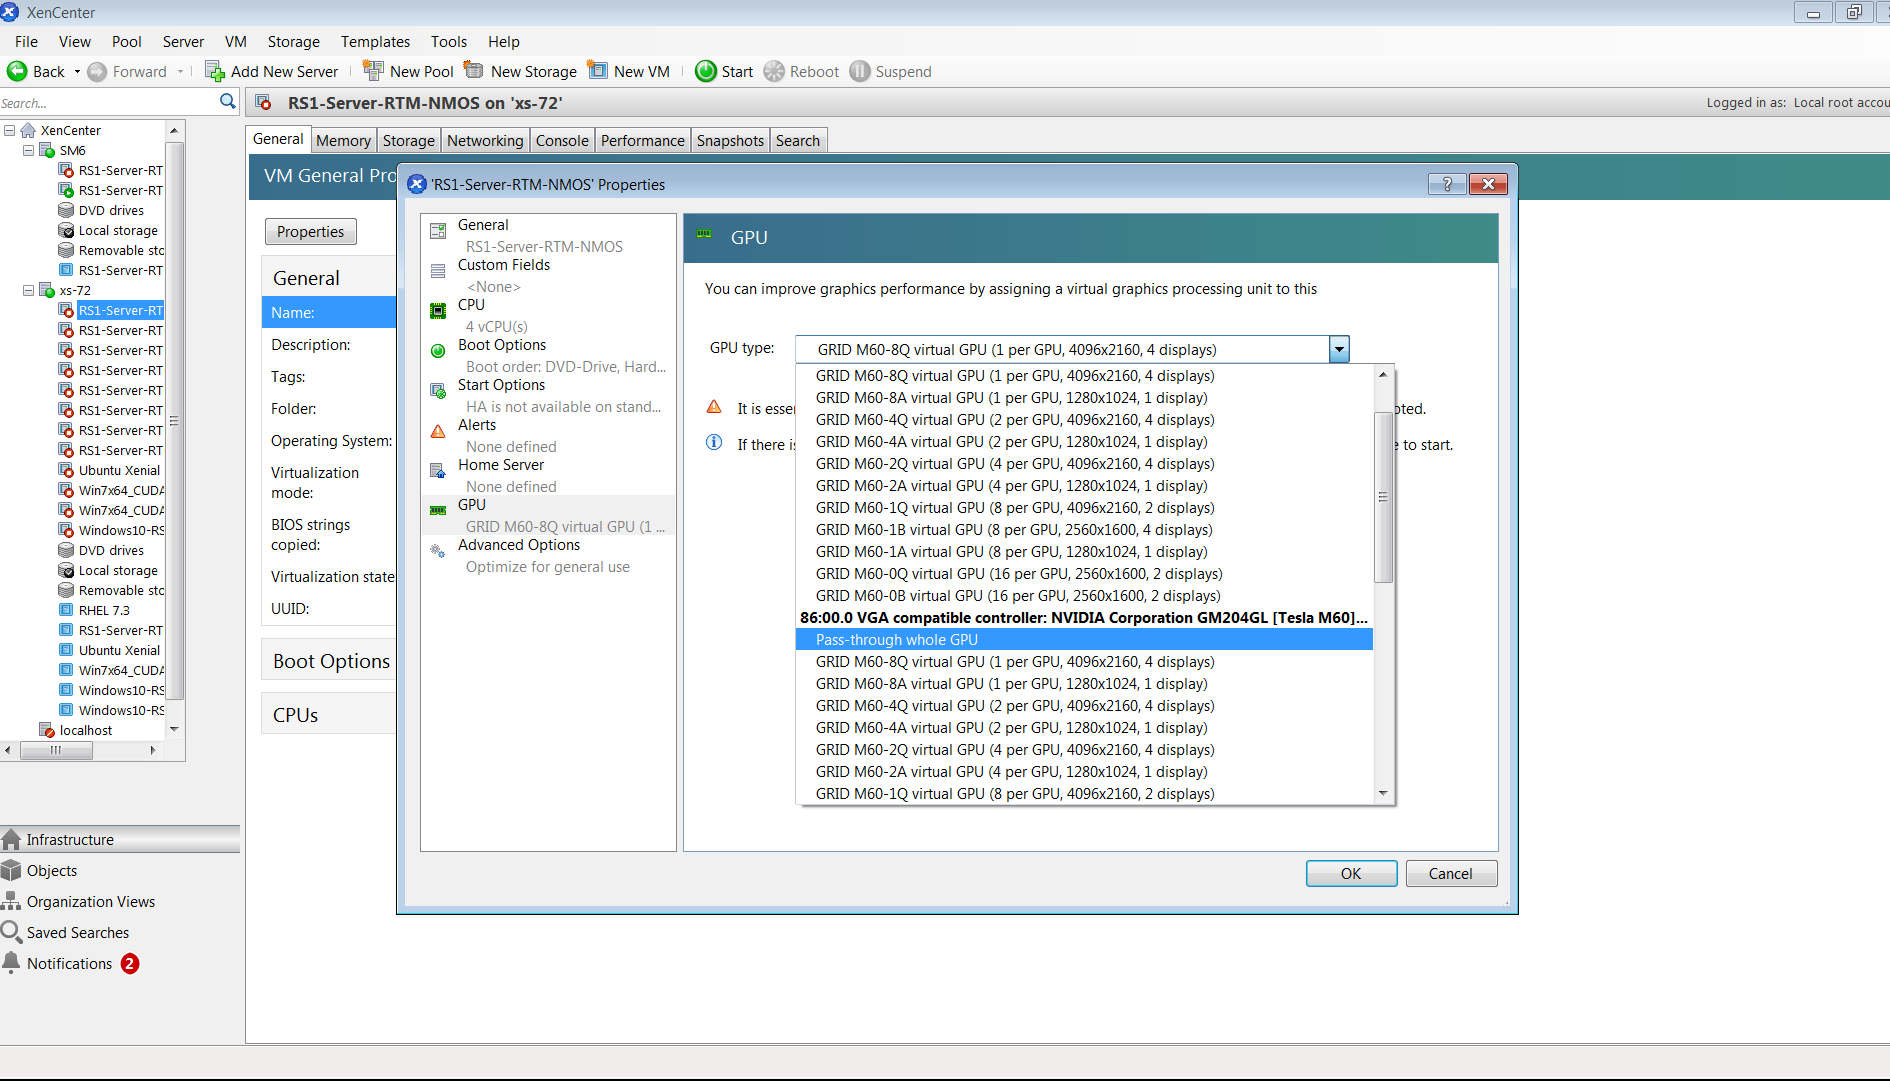
Figure 15 Using XenCenter to configure a pass-through GPU#
After configuring a XenServer VM for GPU pass through, install the NVIDIA graphics driver in the guest OS on the VM as explained in Installing the NVIDIA vGPU Software Graphics Driver.
Configuring a VM for GPU Pass Through by Using xe#
Create a vgpu object with the passthrough vGPU type:
[root@xenserver ~]# xe vgpu-type-list model-name="passthrough"
uuid ( RO)                : fa50b0f0-9705-6c59-689e-ea62a3d35237
         vendor-name ( RO):
          model-name ( RO): passthrough
    framebuffer-size ( RO): 0

[root@xenserver ~]# xe vgpu-create vm-uuid=753e77a9-e10d-7679-f674-65c078abb2eb vgpu-type-uuid=fa50b0f0-9705-6c59-689e-ea62a3d35237 gpu-group-uuid=585877ef-5a6c-66af-fc56-7bd525bdc2f6
6aa530ec-8f27-86bd-b8e4-fe4fde8f08f9
[root@xenserver ~]#
Caution
Do not assign pass-through GPUs using the legacy other-config:pci parameter setting. This mechanism is not supported alongside the XenCenter UI and xe vgpu mechanisms, and attempts to use it may lead to undefined results.
After configuring a XenServer VM for GPU pass through, install the NVIDIA graphics driver in the guest OS on the VM as explained in Installing the NVIDIA vGPU Software Graphics Driver.
Using GPU Pass-Through on a Linux with KVM Hypervisor#
NVIDIA vGPU software supports the following Linux with KVM hypervisors: Red Hat Enterprise Linux with KVM and Ubuntu.
You can configure a GPU for pass-through on a Linux with KVM hypervisor by using any of the following tools:
The Virtual Machine Manager (
virt-manager) graphical toolThe
virshcommandThe QEMU command line
Before configuring a GPU for pass-through on Red Hat Enterprise Linux KVM or Ubuntu, ensure that the following prerequisites are met:
Red Hat Enterprise Linux KVM or Ubuntu is installed.
A virtual disk has been created.
Note
Do not create any virtual disks in
/root.A virtual machine has been created.
If you’re configuring a pass-through GPU that requires a large BAR address space on a UEFI VM, refer to NVIDIA vGPU software graphics driver fails to load on KVM-based hypervisors for a workaround to ensure that BAR resources are mapped into the VM.
Note
This workaround involves setting an experimental QEMU parameter.
Configuring a VM for GPU Pass-Through by Using Virtual Machine Manager (virt-manager)#
For more information about using Virtual Machine Manager, see the following topics in the documentation for Red Hat Enterprise Linux 7:
Start
virt-manager.In the
virt-managermain window, select the VM that you want to configure for pass-through.From the Edit menu, choose Virtual Machine Details.
In the virtual machine hardware information window that opens, click Add Hardware.
In the Add New Virtual Hardware dialog box that opens, in the hardware list on the left, select PCI Host Device.
From the Host Device list that appears, select the GPU that you want to assign to the VM and click Finish.
If you want to remove a GPU from the VM to which it is assigned, in the virtual machine hardware information window, select the GPU and click Remove.
After configuring the VM for GPU pass through, install the NVIDIA graphics driver in the guest OS on the VM as explained in Installing the NVIDIA vGPU Software Graphics Driver.
Configuring a VM for GPU Pass-Through by Using virsh#
For more information about using virsh, see the following topics in the documentation for Red Hat Enterprise Linux 7:
Verify that the
vfio-pcimodule is loaded.# lsmod | grep vfio-pci
Obtain the PCI device bus/device/function (BDF) of the GPU that you want to assign in pass-through mode to a VM.
# lspci | grep NVIDIA
The NVIDIA GPUs listed in this example have the PCI device BDFs
85:00.0and86:00.0.# lspci | grep NVIDIA 85:00.0 VGA compatible controller: NVIDIA Corporation GM204GL [Tesla M60] (rev a1) 86:00.0 VGA compatible controller: NVIDIA Corporation GM204GL [Tesla M60] (rev a1)
Obtain the full identifier of the GPU from its PCI device BDF.
# virsh nodedev-list --cap pci| grep <transformed-bdf>
<transformed-bdf>The PCI device BDF of the GPU with the colon and the period replaced with underscores, for example,
85_00_0.
This example obtains the full identifier of the GPU with the PCI device BDF
85:00.0.# virsh nodedev-list --cap pci| grep 85_00_0 pci_0000_85_00_0
Obtain the domain, bus, slot, and function of the GPU.
virsh nodedev-dumpxml <full-identifier>| egrep 'domain|bus|slot|function'<full-identifier>The full identifier of the GPU that you obtained in the previous step, for example,
pci_0000_85_00_0.
This example obtains the domain, bus, slot, and function of the GPU with the PCI device BDF
85:00.0.# virsh nodedev-dumpxml pci_0000_85_00_0| egrep 'domain|bus|slot|function' <domain>0x0000</domain> <bus>0x85</bus> <slot>0x00</slot> <function>0x0</function> <address domain='0x0000' bus='0x85' slot='0x00' function='0x0'/>
In
virsh, open for editing the XML file of the VM that you want to assign the GPU to.# virsh edit <vm-name>
<vm-name>The name of the VM to that you want to assign the GPU to.
Add a device entry in the form of an
addresselement inside thesourceelement to assign the GPU to the guest VM.You can optionally add a second address element after the
sourceelement to set a fixed PCI device BDF for the GPU in the guest operating system.<hostdev mode='subsystem' type='pci' managed='yes'> <source> <address domain='<domain>' bus='<bus>' slot='<slot>' function='<function>'/> </source> <address type='pci' domain='0x0000' bus='0x00' slot='0x05' function='0x0'/> </hostdev>
<domain>,<bus>,<slot>,<function>The domain, bus, slot, and function of the GPU, which you obtained in the previous step.
This example adds a device entry for the GPU with the PCI device BDF
85:00.0and fixes the BDF for the GPU in the guest operating system.<hostdev mode='subsystem' type='pci' managed='yes'> <source> <address domain='0x0000' bus='0x85' slot='0x00' function='0x0'/> </source> <address type='pci' domain='0x0000' bus='0x00' slot='0x05' function='0x0'/> </hostdev>
Start the VM that you assigned the GPU to.
# virsh start <vm-name>
<vm-name>The name of the VM that you assigned the GPU to.
After configuring the VM for GPU pass through, install the NVIDIA graphics driver in the guest OS on the VM as explained in Installing the NVIDIA vGPU Software Graphics Driver.
Configuring a VM for GPU Pass-Through by Using the QEMU Command Line#
Obtain the PCI device bus/device/function (BDF) of the GPU that you want to assign in pass-through mode to a VM.
# lspci | grep NVIDIA
The NVIDIA GPUs listed in this example have the PCI device BDFs
85:00.0and86:00.0.# lspci | grep NVIDIA 85:00.0 VGA compatible controller: NVIDIA Corporation GM204GL [Tesla M60] (rev a1) 86:00.0 VGA compatible controller: NVIDIA Corporation GM204GL [Tesla M60] (rev a1)
Add the following option to the QEMU command line:
-device vfio-pci,host=<bdf><bdf>The PCI device BDF of the GPU that you want to assign in pass-through mode to a VM, for example,
85:00.0.
This example assigns the GPU with the PCI device BDF
85:00.0in pass-through mode to a VM.-device vfio-pci,host=85:00.0
After configuring the VM for GPU pass through, install the NVIDIA graphics driver in the guest OS on the VM as explained in Installing the NVIDIA vGPU Software Graphics Driver.
Preparing a GPU Configured for vGPU for Use in Pass-Through Mode#
The mode in which a physical GPU is being used determines the Linux kernel module to which the GPU is bound. If you want to switch the mode in which a GPU is being used, you must unbind the GPU from its current kernel module and bind it to the kernel module for the new mode. After binding the GPU to the correct kernel module, you can then configure it for pass-through.
When the Virtual GPU Manager is installed on a Red Hat Enterprise Linux KVM or Ubuntu host, the physical GPUs on the host are bound to the nvidia kernel module. A physical GPU that is bound to the nvidia kernel module can be used only for vGPU. To enable the GPU to be passed through to a VM, the GPU must be unbound from nvidia kernel module and bound to the vfio-pci kernel module.
Before you begin, ensure that you have the domain, bus, slot, and function of the GPU that you are preparing for use in pass-through mode. For instructions, see Getting the BDF and Domain of a GPU on a Linux with KVM Hypervisor.
If you are using a GPU that supports SR-IOV, such as a GPU based on the NVIDIA Ampere architecture, disable the virtual function for the GPU in the
sysfsfile system.If your GPU does not support SR-IOV, omit this step.
Note
Before performing this step, ensure that the GPU is not being used by any other processes, such as CUDA applications, monitoring applications, or the
nvidia-smicommand.Use the custom script
sriov-manageprovided by NVIDIA vGPU software for this purpose.# /usr/lib/nvidia/sriov-manage -d <domain>:<bus>:<slot>.<function>
<domain>,<bus>,<slot>,<function>The domain, bus, slot, and function of the GPU, without the
0xprefix.
This example disables the virtual function for the GPU with the domain
00, bus06, slot0000, and function0.# /usr/lib/nvidia/sriov-manage -d 00:06:0000.0
Determine the kernel module to which the GPU is bound by running the
lspcicommand with the-koption on the NVIDIA GPUs on your host.# lspci -d 10de: -k
The
Kernel driver in use:field indicates the kernel module to which the GPU is bound.The following example shows that the NVIDIA Tesla M60 GPU with BDF
06:00.0is bound to thenvidiakernel module and is being used for vGPU.06:00.0 VGA compatible controller: NVIDIA Corporation GM204GL [Tesla M60] (rev a1) Subsystem: NVIDIA Corporation Device 115e Kernel driver in use: nvidia
To ensure that no clients are using the GPU, acquire the unbind lock of the GPU.
Ensure that no VM is running to which a vGPU on the physical GPU is assigned and that no process running on the host is using that GPU.
Processes on the host that use the GPU include the
nvidia-smicommand and all processes based on the NVIDIA Management Library (NVML).Change to the directory in the
procfile system that represents the GPU.# cd /proc/driver/nvidia/gpus/<domain>\:<bus>\:<slot>.<function>
<domain>,<bus>,<slot>,<function>The domain, bus, slot, and function of the GPU, without a
0xprefix.This example changes to the directory in the
procfile system that represents the GPU with the domain0000and PCI device BDF06:00.0.# cd /proc/driver/nvidia/gpus/0000\:06\:00.0
Write the value
1to theunbindLockfile in this directory.# echo 1 > unbindLock
Confirm that the
unbindLockfile now contains the value1.# cat unbindLock 1
If the
unbindLockfile contains the value0, the unbind lock could not be acquired because a process or client is using the GPU.
Unbind the GPU from
nvidiakernel module.Change to the
sysfsdirectory that represents thenvidiakernel module.# cd /sys/bus/pci/drivers/nvidia
Write the domain, bus, slot, and function of the GPU to the
unbindfile in this directory.# echo <domain>:<bus>:<slot>.<function> > unbind
<domain>,<bus>,<slot>,<function>The domain, bus, slot, and function of the GPU, without a
0xprefix.This example writes the domain, bus, slot, and function of the GPU with the domain
0000and PCI device BDF06:00.0.# echo 0000:06:00.0 > unbind
Bind the GPU to the
vfio-pcikernel module.Change to the
sysfsdirectory that contains the PCI device information for the physical GPU.# cd /sys/bus/pci/devices/<domain>\:<bus>\:<slot>.<function>
<domain>,<bus>,<slot>,<function>The domain, bus, slot, and function of the GPU, without a
0xprefix.This example changes to the
sysfsdirectory that contains the PCI device information for the GPU with the domain0000and PCI device BDF06:00.0.# cd /sys/bus/pci/devices/0000\:06\:00.0
Write the kernel module name
vfio-pcito thedriver_overridefile in this directory.# echo vfio-pci > driver_override
Change to the
sysfsdirectory that represents thenvidiakernel module.# cd /sys/bus/pci/drivers/vfio-pci
Write the domain, bus, slot, and function of the GPU to the
bindfile in this directory.# echo <domain>:<bus>:<slot>.<function> > bind
<domain>,<bus>,<slot>,<function>The domain, bus, slot, and function of the GPU, without a
0xprefix.This example writes the domain, bus, slot, and function of the GPU with the domain
0000and PCI device BDF06:00.0.# echo 0000:06:00.0 > bind
Change back to the
sysfsdirectory that contains the PCI device information for the physical GPU.# cd /sys/bus/pci/devices/<domain>\:<bus>\:<slot>.<function>
Clear the content of the
driver_overridefile in this directory.# echo > driver_override
You can now configure the GPU for use in pass-through mode as explained in Using GPU Pass-Through on a Linux with KVM Hypervisor.
Using GPU Pass-Through on Microsoft Windows Server#
On supported versons of Microsoft Windows Server with Hyper-V role, you can use Discrete Device Assignment (DDA) to enable a VM to access a GPU directly.
Assigning a GPU to a VM on Microsoft Windows Server with Hyper-V#
Perform this task in Windows PowerShell. If you do not know the location path of the GPU that you want to assign to a VM, use Device Manager to obtain it.
If you are using an actively cooled NVIDIA Quadro graphics card such as the RTX 8000 or RTX 6000, you must also pass through the audio device on the graphics card.
Ensure that the following prerequisites are met:
Windows Server with Desktop Experience and the Hyper-V role are installed and configured on your server platform, and a VM is created.
For instructions, refer to the following articles on the Microsoft technical documentation site:
The guest OS is installed in the VM.
The VM is powered off.
Obtain the location path of the GPU that you want to assign to a VM.
In the device manager, context-click the GPU and from the menu that pops up, choose Properties.
In the Properties window that opens, click the Details tab and in the Properties drop-down list, select Location paths.
An example location path is as follows:
PCIROOT(80)#PCI(0200)#PCI(0000)#PCI(1000)#PCI(0000)If you are using an actively cooled NVIDIA Quadro graphics card, obtain the location path of the audio device on the graphics card and disable the device.
In the device manager, from the View menu, choose Devices by connection.
Navigate to ACPI x64-based PC > Microsoft ACPI-Compliant System > PCI Express Root Complex > PCI-to-PCI Bridge.
Context-click High Definition Audio Controller and from the menu that pops up, choose Properties.
In the Properties window that opens, click the Details tab and in the Properties drop-down list, select Location paths.
Context-click High Definition Audio Controller again and from the menu that pops up, choose Disable device.
Dismount the GPU and, if present, the audio device from host to make them unavailable to the host so that they can be used solely by the VM.
For each device that you are dismounting, type the following command:
Dismount-VMHostAssignableDevice -LocationPath <gpu-device-location> -force<gpu-device-location>The location path of the GPU or the audio device that you obtained previously.
This example dismounts the GPU at the location path
PCIROOT(80)#PCI(0200)#PCI(0000)#PCI(1000)#PCI(0000).Dismount-VMHostAssignableDevice -LocationPath "PCIROOT(80)#PCI(0200)#PCI(0000)#PCI(1000)#PCI(0000)" -forceAssign the GPU and, if present, the audio device that you dismounted in the previous step to the VM.
For each device that you are assigning, type the following command:
Add-VMAssignableDevice -LocationPath <gpu-device-location> -VMName <vm-name><gpu-device-location>The location path of the GPU or the audio device that you dismounted in the previous step.
<vm-name>The name of the VM to which you are attaching the GPU or the audio device.
Note
You can assign a pass-through GPU and, if present, its audio device to only one virtual machine at a time.
This example assigns the GPU at the location path
PCIROOT(80)#PCI(0200)#PCI(0000)#PCI(1000)#PCI(0000)to the VMVM1.Add-VMAssignableDevice -LocationPath "PCIROOT(80)#PCI(0200)#PCI(0000)#PCI(1000)#PCI(0000)" -VMName VM1Power on the VM.
The guest OS should now be able to use the GPU and, if present, the audio device.
After assigning a GPU to a VM, install the NVIDIA graphics driver in the guest OS on the VM as explained in Installing the NVIDIA vGPU Software Graphics Driver.
Returning a GPU to the Host OS from a VM on Windows Server with Hyper-V#
Perform this task in the Windows PowerShell.
If you are using an actively cooled NVIDIA Quadro graphics card such as the RTX 8000 or RTX 6000, you must also return the audio device on the graphics card.
List the GPUs and, if present, the audio devices that are currently assigned to the virtual machine (VM).
Get-VMAssignableDevice -VMName <vm-name><vm-name>The name of the VM whose assigned GPUs and audio devices you want to list.
Shut down the VM to which the GPU and any audio devices are assigned.
Remove the GPU and, if present, the audio device from the VM to which they are assigned.
For each device that you are removing, type the following command:
Remove-VMAssignableDevice –LocationPath <gpu-device-location> -VMName <vm-name><gpu-device-location>The location path of the GPU or the audio device that you are removing, which you obtained previously.
<vm-name>The name of the VM from which you are removing the GPU or the audio device.
This example removes the GPU at the location path
PCIROOT(80)#PCI(0200)#PCI(0000)#PCI(1000)#PCI(0000)from the VMVM1.Remove-VMAssignableDevice –LocationPath "PCIROOT(80)#PCI(0200)#PCI(0000)#PCI(1000)#PCI(0000)" -VMName VM1After the GPU and, if present, its audio device are removed from the VM, they are unavailable to the host operating system (OS) until you remount them on the host OS.
Remount the GPU and, if present, its audio device on the host OS.
For each device that you are remounting, type the following command:
Mount-VMHostAssignableDevice –LocationPath <gpu-device-location><gpu-device-location>The location path of the GPU or the audio device that you are remounting, which you specified in the previous step to remove the GPU or the audio device from the VM.
This example remounts the GPU at the location path
PCIROOT(80)#PCI(0200)#PCI(0000)#PCI(1000)#PCI(0000)on the host OS.Mount-VMHostAssignableDevice -LocationPath "PCIROOT(80)#PCI(0200)#PCI(0000)#PCI(1000)#PCI(0000)"The host OS should now be able to use the GPU and, if present, its audio device.
Using GPU Pass-Through on VMware vSphere#
On VMware vSphere, you can use Virtual Dedicated Graphics Acceleration (vDGA) to enable a VM to access a GPU directly. vDGA is a feature of VMware vSphere that dedicates a single physical GPU on an ESXi host to a single virtual machine.
Before configuring a vSphere VM with vDGA, ensure that these prerequisites are met
The VM and the ESXi host are configured as explained in Preparing for vDGA Capabilities in the VMware Horizon documentation.
The VM is powered off.
Open the vCenter Web UI.
In the vCenter Web UI, right-click the ESXi host and choose Configure.
From the Hardware menu, choose PCI Devices.
On the PCI Devices page that opens, click ALL PCI DEVICES and in the table of devices, select the GPU.
Note
When selecting the GPU to pass through, you must select only the physical device. To list only NVIDIA physical devices, set the filter on the Vendor Name field to
NVIDIAand filter out any virtual function devices of the GPU by setting the filter on the ID field to00.0.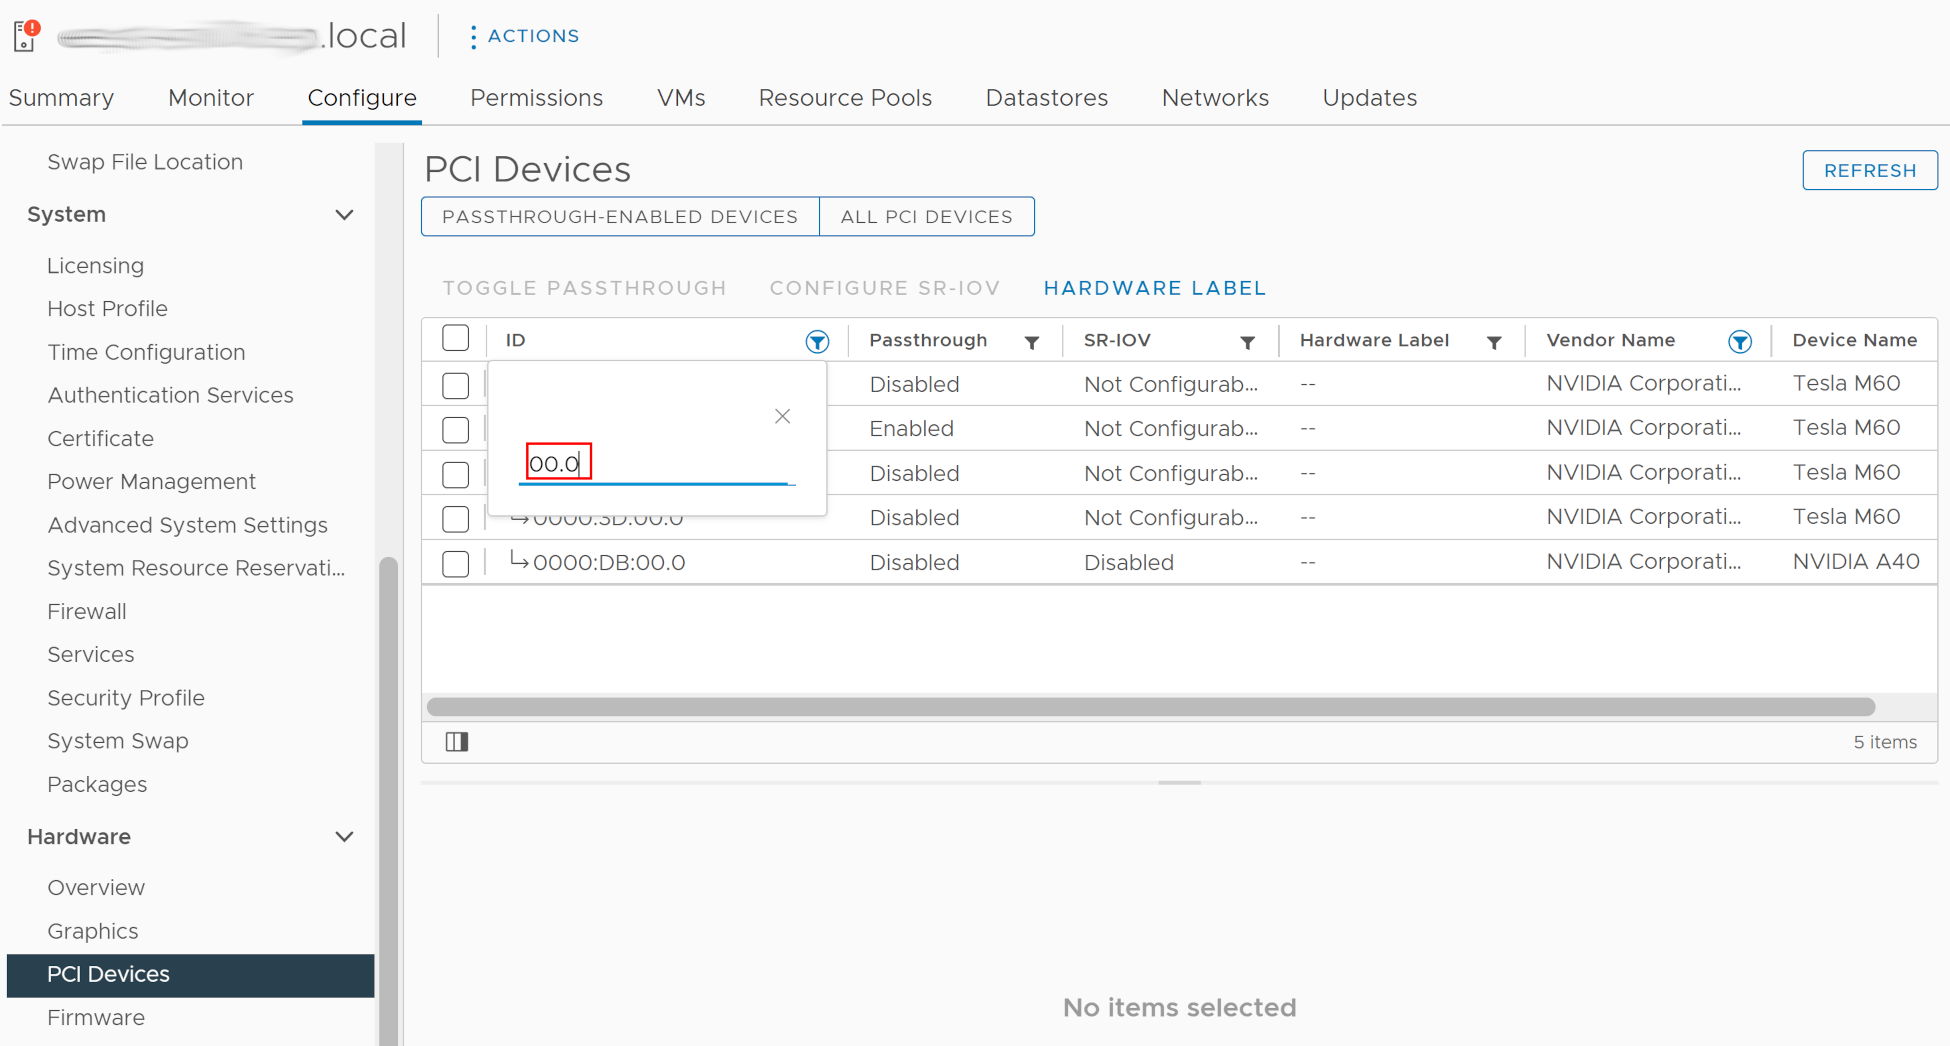
Click TOGGLE PASSTHROUGH.
Reboot the ESXi host.
After the ESXi host has booted, right-click the VM and choose Edit Settings.
From the New Device menu, choose PCI Device and click Add.
On the page that opens, from the New Device drop-down list, select the GPU.
Click Reserve all memory and click OK.
Start the VM.
For more information about vDGA, see the following topics in the VMware Horizon documentation:
After configuring a vSphere VM with vDGA, install the NVIDIA graphics driver in the guest OS on the VM as explained in Installing the NVIDIA vGPU Software Graphics Driver.