


XenServer Basics#
To install and configure NVIDIA vGPU software and optimize XenServer operation with vGPU, some basic operations on XenServer are needed.
Opening a dom0 shell#
Most configuration commands must be run in a command shell in the XenServer dom0 domain. You can open a shell in the XenServer dom0 domain in any of the following ways:
Using the console window in XenCenter
Using a standalone secure shell (SSH) client
Accessing the dom0 shell through XenCenter#
In the left pane of the XenCenter window, select the XenServer host that you want to connect to.
Click on the Console tab to open the XenServer console.
Press Enter to start a shell prompt.
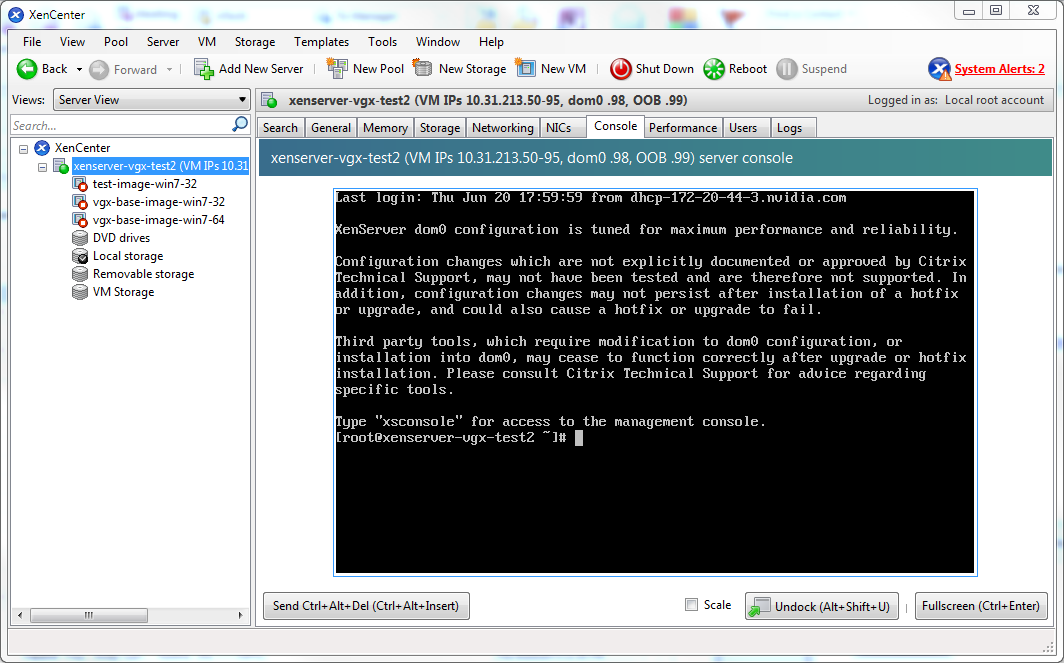
Figure 31 Connecting to the dom0 shell by using XenCenter#
Accessing the dom0 shell through an SSH client#
Ensure that you have an SSH client suite such as PuTTY on Windows, or the SSH client from OpenSSH on Linux.
Connect your SSH client to the management IP address of the XenServer host.
Log in as the root user.
Copying files to dom0#
You can easily copy files to and from XenServer dom0 in any of the following ways:
Using a Secure Copy Protocol (SCP) client
Using a network-mounted file system
Copying files by using an SCP client#
The SCP client to use for copying files to dom0 depends on where you are running the client from.
If you are running the client from dom0, use the secure copy command
scp.The
scpcommand is part of the SSH suite of applications. It is implemented in dom0 and can be used to copy from a remote SSH-enabled server:[root@xenserver ~]# scp root@10.31.213.96:/tmp/somefile . The authenticity of host '10.31.213.96 (10.31.213.96)' can't be established. RSA key fingerprint is 26:2d:9b:b9:bf:6c:81:70:36:76:13:02:c1:82:3d:3c. Are you sure you want to continue connecting (yes/no)? yes Warning: Permanently added '10.31.213.96' (RSA) to the list of known hosts. root@10.31.213.96's password: somefile 100% 532 0.5KB/s 00:00 [root@xenserver ~]#
If you are running the client from Windows, use the
pscpprogram.The
pscpprogram is part of the PuTTY suite and can be used to copy files from a remote Windows system to XenServer:C:\Users\nvidia>pscp somefile root@10.31.213.98:/tmp root@10.31.213.98's password: somefile | 80 kB | 80.1 kB/s | ETA: 00:00:00 | 100% C:\Users\nvidia>
Copying files by using a CIFS-mounted file system#
You can copy files to and from a CIFS/SMB file share by mounting the share from dom0.
The following example shows how to mount a network share \\myserver.example.com\myshare at /mnt/myshare on dom0 and how to copy files to and from the share. The example assumes that the file share is part of an Active Directory domain called example.com and that user myuser has permissions to access the share.
Create the directory
/mnt/myshareon dom0.[root@xenserver ~]# mkdir /mnt/myshare
Mount the network share
\\myserver.example.com\myshareat/mnt/myshareon dom0.[root@xenserver ~]# mount -t cifs -o username=myuser,workgroup=example.com //myserver.example.com/myshare /mnt/myshare Password: [root@xenserver ~]#
When prompted for a password, enter the password for
myuserin theexample.comdomain.After the share has been mounted, copy files to and from the file share by using the
cpcommand to copy them to and from/mnt/myshare:[root@xenserver ~]# cp /mnt/myshare/NVIDIA-vGPU-NVIDIA-vGPU-CitrixHypervisor-8.2-595.91.04.x86_64.rpm . [root@xenserver ~]#
Determining a VM’s UUID#
You can determine a virtual machine’s UUID in any of the following ways:
Using the
xe vm-listcommand in a dom0 shellUsing XenCenter
Determining a VM’s UUID by using xe vm-list#
Use the xe vm-list command to list all VMs and their associated UUIDs or to find the UUID of a specific named VM.
To list all VMs and their associated UUIDs, use
xe vm-listwithout any parameters:[root@xenserver ~]# xe vm-list uuid ( RO) : 6b5585f6-bd74-2e3e-0e11-03b9281c3ade name-label ( RW): vgx-base-image-wind-64 power-state ( RO): halted uuid ( RO) : fa3d15c7-7e88-4886-c36a-cdb23ed8e275 name-label ( RW): test-image-wind-64 power-state ( RO): halted uuid ( RO) : 501bb598-a9b3-4afc-9143-ff85635d5dc3 name-label ( RW): Control domain on host: xenserver power-state ( RO): running uuid ( RO) : 8495adf7-be9d-eee1-327f-02e4f40714fc name-label ( RW): vgx-base-image-wind-64 power-state ( RO): halted
To find the UUID of a specific named VM, use the
name-labelparameter toxe vm-list:[root@xenserver ~]# xe vm-list name-label=test-image-wind-64 uuid ( RO) : fa3d15c7-7e88-4886-c36a-cdb23ed8e275 name-label ( RW): test-image-wind-64 power-state ( RO): halted
Determining a VM’s UUID by using XenCenter#
In the left pane of the XenCenter window, select the VM whose UUID you want to determine.
In the right pane of the XenCenter window, click the General tab.
The UUID is listed in the VM’s General Properties.
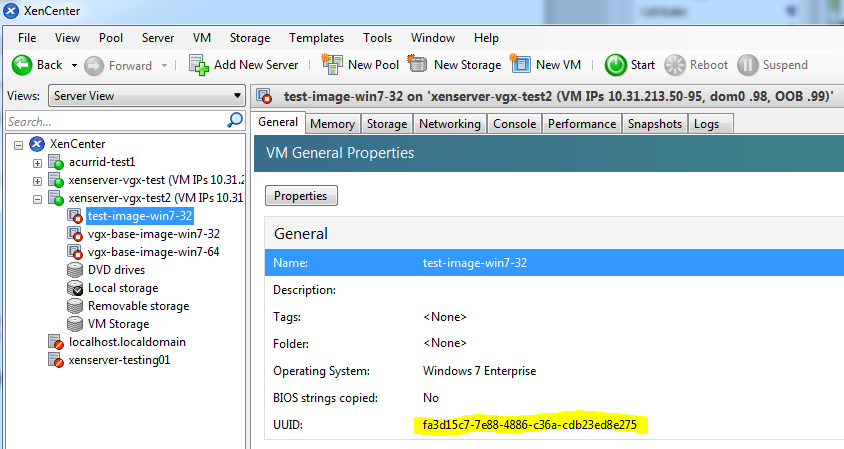
Figure 32 Using XenCenter to determine a VM’s UUID#
Using more than two vCPUs with Windows client VMs#
Windows client operating systems support a maximum of two CPU sockets. When allocating vCPUs to virtual sockets within a guest VM, XenServer defaults to allocating one vCPU per socket. Any more than two vCPUs allocated to the VM won’t be recognized by the Windows client OS.
To ensure that all allocated vCPUs are recognized, set platform:cores-per-socket to the number of vCPUs that are allocated to the VM:
[root@xenserver ~]# xe vm-param-set uuid=<vm-uuid> platform:cores-per-socket=4 VCPUs-max=4 VCPUs-at-startup=4
<vm-uuid> is the VM’s UUID, which you can obtain as explained in Determining a VM’s UUID.
Pinning VMs to a specific CPU socket and cores#
Use
xe host-cpu-infoto determine the number of CPU sockets and logical CPU cores in the server platform.In this example the server implements 32 logical CPU cores across two sockets:
[root@xenserver ~]# xe host-cpu-info
cpu_count                : 32
             socket_count: 2
                   vendor: GenuineIntel
                    speed: 2600.064
                modelname: Intel(R) Xeon(R) CPU E5-2670 0 @ 2.60GHz
                   family: 6
                    model: 45
                 stepping: 7
                    flags: fpu de tsc msr pae mce cx8 apic sep mtrr mca cmov pat clflush acpi mmx fxsr sse sse2 ss ht nx constant_tsc nonstop_tsc aperfmperf pni pclmulqdq vmx est ssse3 sse4_1 sse4_2 x2apic popcnt aes hypervisor ida arat tpr_shadow vnmi flexpriority ept vpid
                 features: 17bee3ff-bfebfbff-00000001-2c100800
    features_after_reboot: 17bee3ff-bfebfbff-00000001-2c100800
        physical_features: 17bee3ff-bfebfbff-00000001-2c100800
                 maskable: full
Set
VCPUs-params:maskto pin a VM’s vCPUs to a specific socket or to specific cores within a socket.This setting persists over VM reboots and shutdowns. In a dual socket platform with 32 total cores, cores 0-15 are on socket 0, and cores 16-31 are on socket 1. In the examples that follow,
<vm-uuid>is the VM’s UUID, which you can obtain as explained in Determining a VM’s UUID.To restrict a VM to only run on socket 0, set the mask to specify cores 0-15:
[root@xenserver ~]# xe vm-param-set uuid=<vm-uuid> VCPUs-params:mask=0,1,2,3,4,5,6,7,8,9,10,11,12,13,14,15
To restrict a VM to only run on socket 1, set the mask to specify cores 16-31:
[root@xenserver ~]# xe vm-param-set uuid=<vm-uuid> VCPUs-params:mask=16,17,18,19,20,21,22,23,24,25,26,27,28,29,30,31
To pin vCPUs to specific cores within a socket, set the mask to specify the cores directly:
[root@xenserver ~]# xe vm-param-set uuid=<vm-uuid> VCPUs-params:mask=16,17,18,19
Use
xl vcpu-listto list the current assignment of vCPUs to physical CPUs:[root@xenserver ~]# xl vcpu-list Name ID VCPU CPU State Time(s) CPU Affinity Domain-0 0 0 25 -b- 9188.4 any cpu Domain-0 0 1 19 r-- 8908.4 any cpu Domain-0 0 2 30 -b- 6815.1 any cpu Domain-0 0 3 17 -b- 4881.4 any cpu Domain-0 0 4 22 -b- 4956.9 any cpu Domain-0 0 5 20 -b- 4319.2 any cpu Domain-0 0 6 28 -b- 5720.0 any cpu Domain-0 0 7 26 -b- 5736.0 any cpu test-image-wind-64 34 0 9 -b- 17.0 4-15 test-image-wind-64 34 1 4 -b- 13.7 4-15
Changing dom0 vCPU Default configuration#
By default, dom0 vCPUs are configured as follows:
The number of vCPUs assigned to dom0 is 8.
The dom0 shell’s vCPUs are unpinned and able to run on any physical CPU in the system.
Changing the number of dom0 vCPUs#
The default number of vCPUs assigned to dom0 is 8.
Modify the
dom0_max_vcpusparameter in the Xen boot line.For example:
[root@xenserver ~]# /opt/xensource/libexec/xen-cmdline --set-xen dom0_max_vcpus=4
After applying this setting, reboot the system for the setting to take effect by doing one of the following:
Run the following command:
shutdown –rReboot the system from XenCenter.
Pinning dom0 vCPUs#
By default, dom0’s vCPUs are unpinned, and able to run on any physical CPU in the system.
To pin dom0 vCPUs to specific physical CPUs, use
xl vcpu-pin.For example, to pin dom0’s vCPU 0 to physical CPU 18, use the following command:
[root@xenserver ~]# xl vcpu-pin Domain-0 0 18
CPU pinnings applied this way take effect immediately but do not persist over reboots.
To make settings persistent, add
xl vcpu-pincommands into/etc/rc.local.For example:
xl vcpu-pin 0 0 0-15
xl vcpu-pin 0 1 0-15
xl vcpu-pin 0 2 0-15
xl vcpu-pin 0 3 0-15
xl vcpu-pin 0 4 16-31
xl vcpu-pin 0 5 16-31
xl vcpu-pin 0 6 16-31
xl vcpu-pin 0 7 16-31
How GPU locality is determined#
As noted in NUMA Considerations, current multi-socket servers typically implement PCIe expansion slots local to each CPU socket and it is advantageous to pin VMs to the same socket that their associated physical GPU is connected to.
For current Intel platforms, CPU socket 0 typically has its PCIe root ports located on bus 0, so any GPU below a root port located on bus 0 is connected to socket 0. CPU socket 1 has its root ports on a higher bus number, typically bus 0x20 or bus 0x80 depending on the specific server platform.