


Modifying a VM’s NVIDIA vGPU Configuration#
You can modify a VM’s NVIDIA vGPU configuration by removing the NVIDIA vGPU configuration from a VM or by modifying GPU allocation policy.
Removing a VM’s NVIDIA vGPU Configuration#
Remove a VM’s NVIDIA vGPU configuration when you no longer require the VM to use a virtual GPU.
Removing a Citrix Virtual Apps and Desktops VM’s vGPU configuration#
You can remove a virtual GPU assignment from a VM, such that it no longer uses a virtual GPU, by using either XenCenter or the xe command.
Note
The VM must be in the powered-off state in order for its vGPU configuration to be modified or removed.
Removing a VM’s vGPU configuration by using XenCenter#
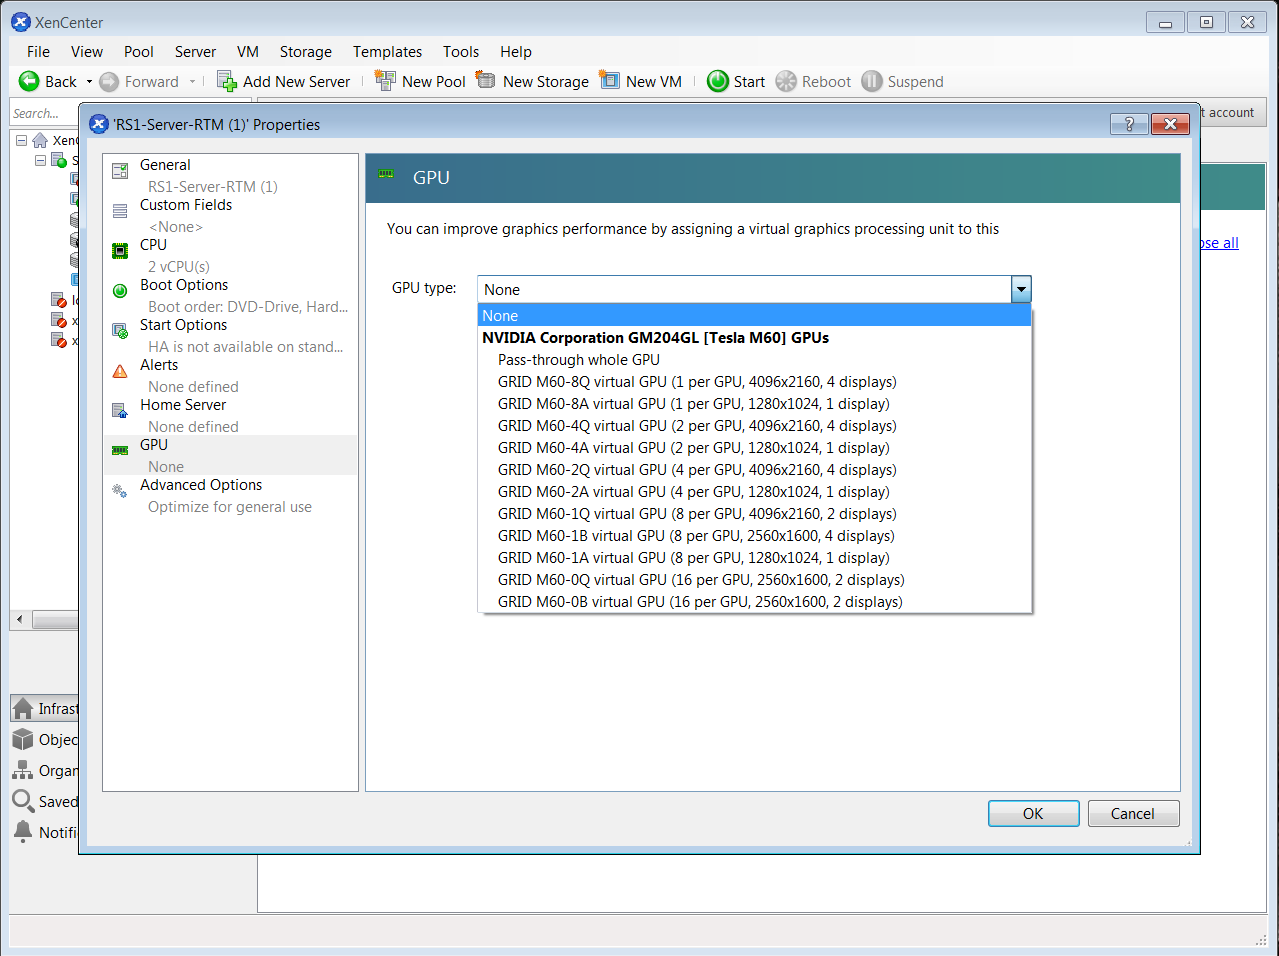
Removing a VM’s vGPU configuration by using xe#
Use
vgpu-listto discover the vGPU object UUID associated with a given VM:[root@xenserver ~]# xe vgpu-list vm-uuid=e71afda4-53f4-3a1b-6c92-a364a7f619c2 uuid ( RO) : c1c7c43d-4c99-af76-5051-119f1c2b4188 vm-uuid ( RO): e71afda4-53f4-3a1b-6c92-a364a7f619c2 gpu-group-uuid ( RO): d53526a9-3656-5c88-890b-5b24144c3d96
Use
vgpu-destroyto delete the virtual GPU object associated with the VM:[root@xenserver ~]# xe vgpu-destroy uuid=c1c7c43d-4c99-af76-5051-119f1c2b4188 [root@xenserver ~]#
Removing a vSphere VM’s vGPU Configuration#
To remove a vSphere vGPU configuration from a VM:
Select Edit settings after right-clicking on the VM in the vCenter Web UI.
Select the Virtual Hardware tab.
Mouse over the PCI Device entry showing NVIDIA GRID vGPU and click on the (X) icon to mark the device for removal.
Click OK to remove the device and update the VM settings.
Modifying GPU Allocation Policy#
XenServer and VMware vSphere both support the breadth first and depth-first GPU allocation policies for vGPU-enabled VMs.
- breadth-first
The breadth-first allocation policy attempts to minimize the number of vGPUs running on each physical GPU. Newly created vGPUs are placed on the physical GPU that can support the new vGPU and that has the fewest vGPUs already resident on it. This policy generally leads to higher performance because it attempts to minimize sharing of physical GPUs, but it may artificially limit the total number of vGPUs that can run.
- depth-first
The depth-first allocation policy attempts to maximize the number of vGPUs running on each physical GPU. Newly created vGPUs are placed on the physical GPU that can support the new vGPU and that has the most vGPUs already resident on it. This policy generally leads to higher density of vGPUs, particularly when different types of vGPUs are being run, but may result in lower performance because it attempts to maximize sharing of physical GPUs.
Each hypervisor uses a different GPU allocation policy by default.
XenServer uses the depth-first allocation policy.
VMware vSphere ESXi uses the breadth-first allocation policy.
If the default GPU allocation policy does not meet your requirements for performance or density of vGPUs, you can change it.
Modifying GPU Allocation Policy on XenServer#
You can modify GPU allocation policy on XenServer by using XenCenter or the xe command.
Modifying GPU Allocation Policy by Using xe#
The allocation policy of a GPU group is stored in the allocation-algorithm parameter of the gpu-group object.
To change the allocation policy of a GPU group, use gpu-group-param-set:
[root@xenserver ~]# xe gpu-group-param-get uuid=be825ba2-01d7-8d51-9780-f82cfaa64924 param-name=allocation-algorithmdepth-first
[root@xenserver ~]# xe gpu-group-param-set uuid=be825ba2-01d7-8d51-9780-f82cfaa64924 allocation-algorithm=breadth-first
[root@xenserver ~]#
Modifying GPU Allocation Policy GPU by Using XenCenter#
You can modify GPU allocation policy from the GPU tab in XenCenter.
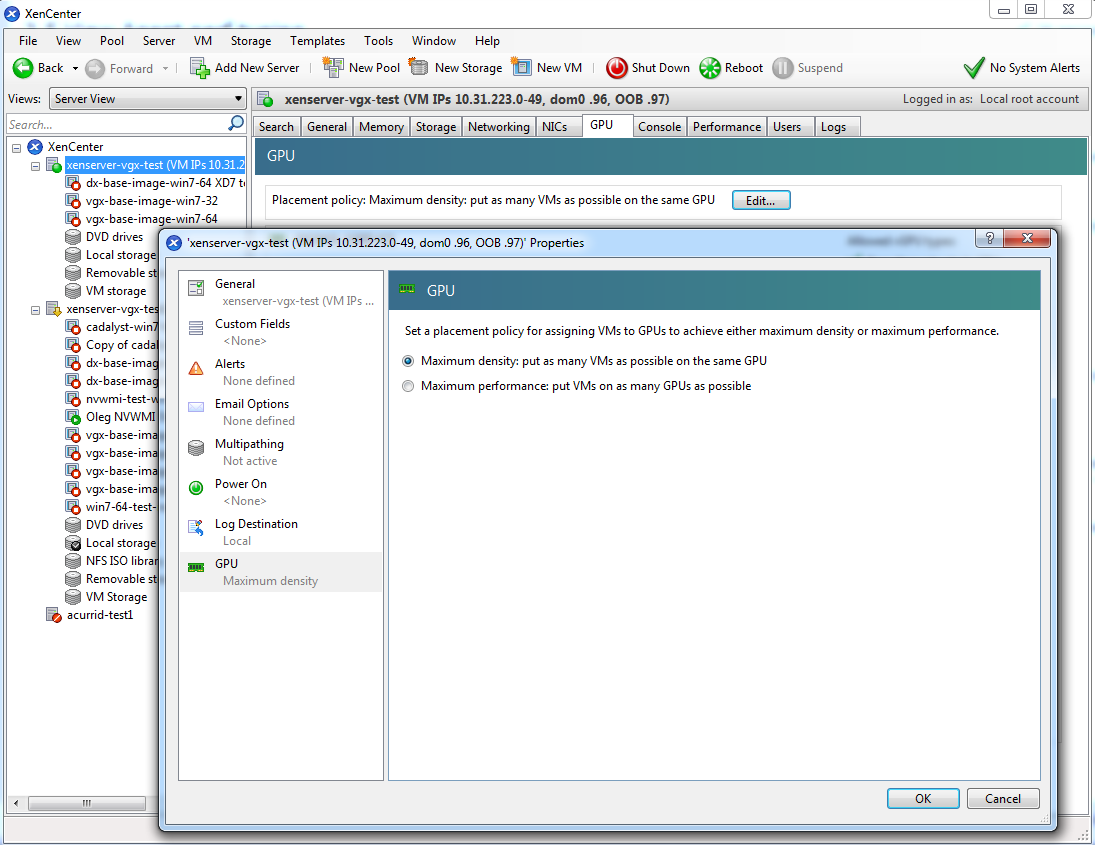
Figure 20 Modifying GPU placement policy in XenCenter#
Modifying GPU Allocation Policy on VMware vSphere#
Before using the vSphere Web Client to change the allocation scheme, ensure that the ESXi host is running and that all VMs on the host are powered off.
Log in to vCenter Server by using the vSphere Web Client.
In the navigation tree, select your ESXi host and click the Configure tab.
From the menu, choose Graphics and then click the Host Graphics tab.
On the Host Graphics tab, click Edit.
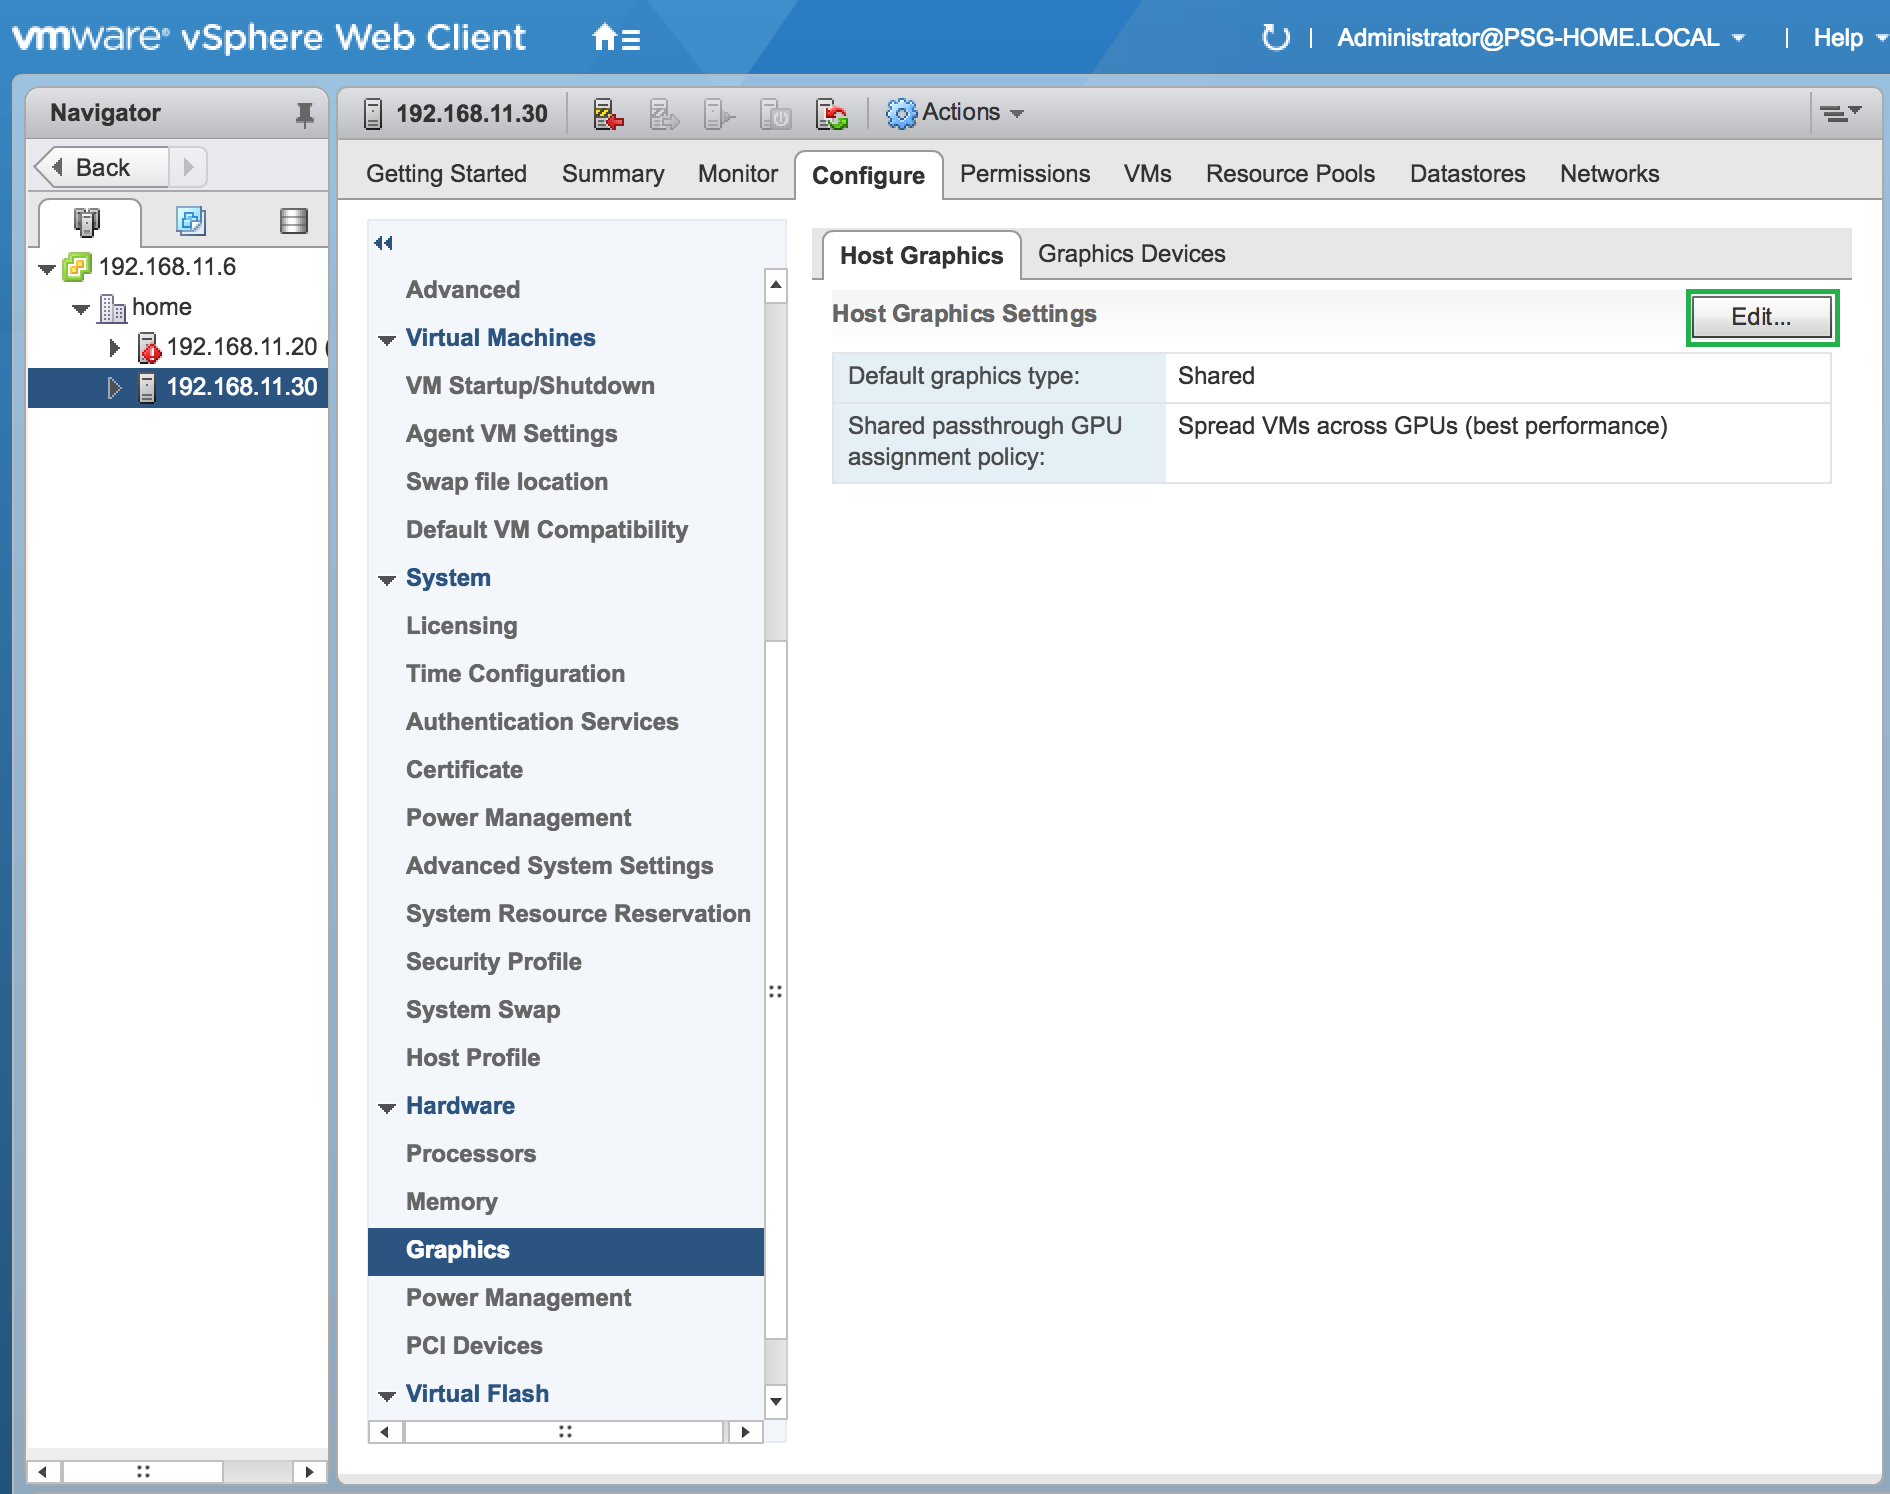
Figure 21 Breadth-first allocation scheme setting for vGPU-enabled VMs#
In the Edit Host Graphics Settings dialog box that opens, select these options and click OK.
If not already selected, select Shared Direct.
Select Group VMs on GPU until full.
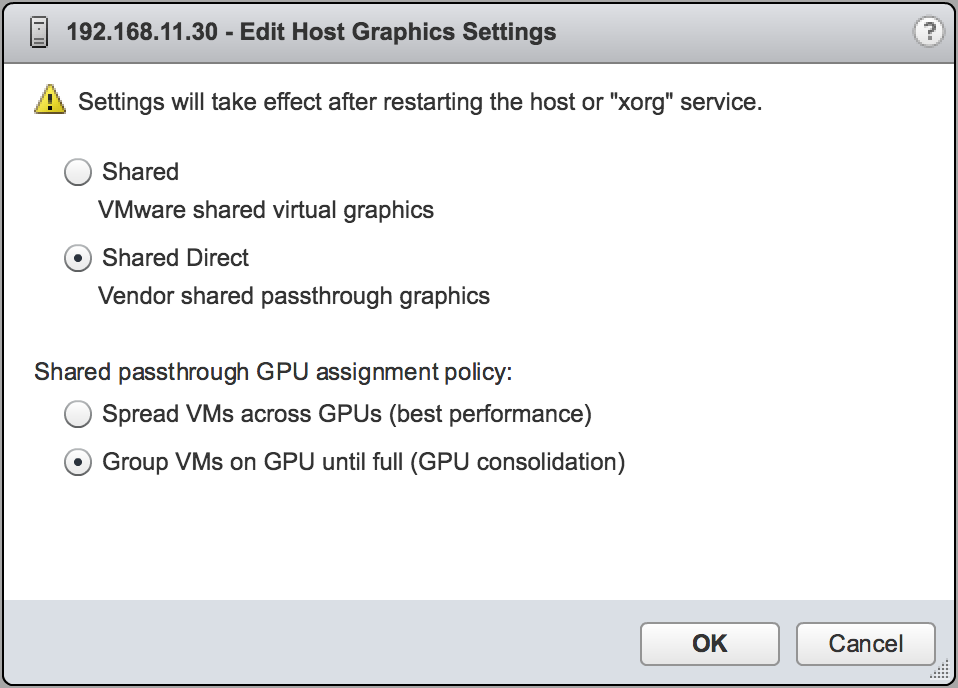
Figure 22 Host graphics settings for vGPU#
After you click OK, the default graphics type changes to Shared Direct and the allocation scheme for vGPU-enabled VMs is breadth-first.
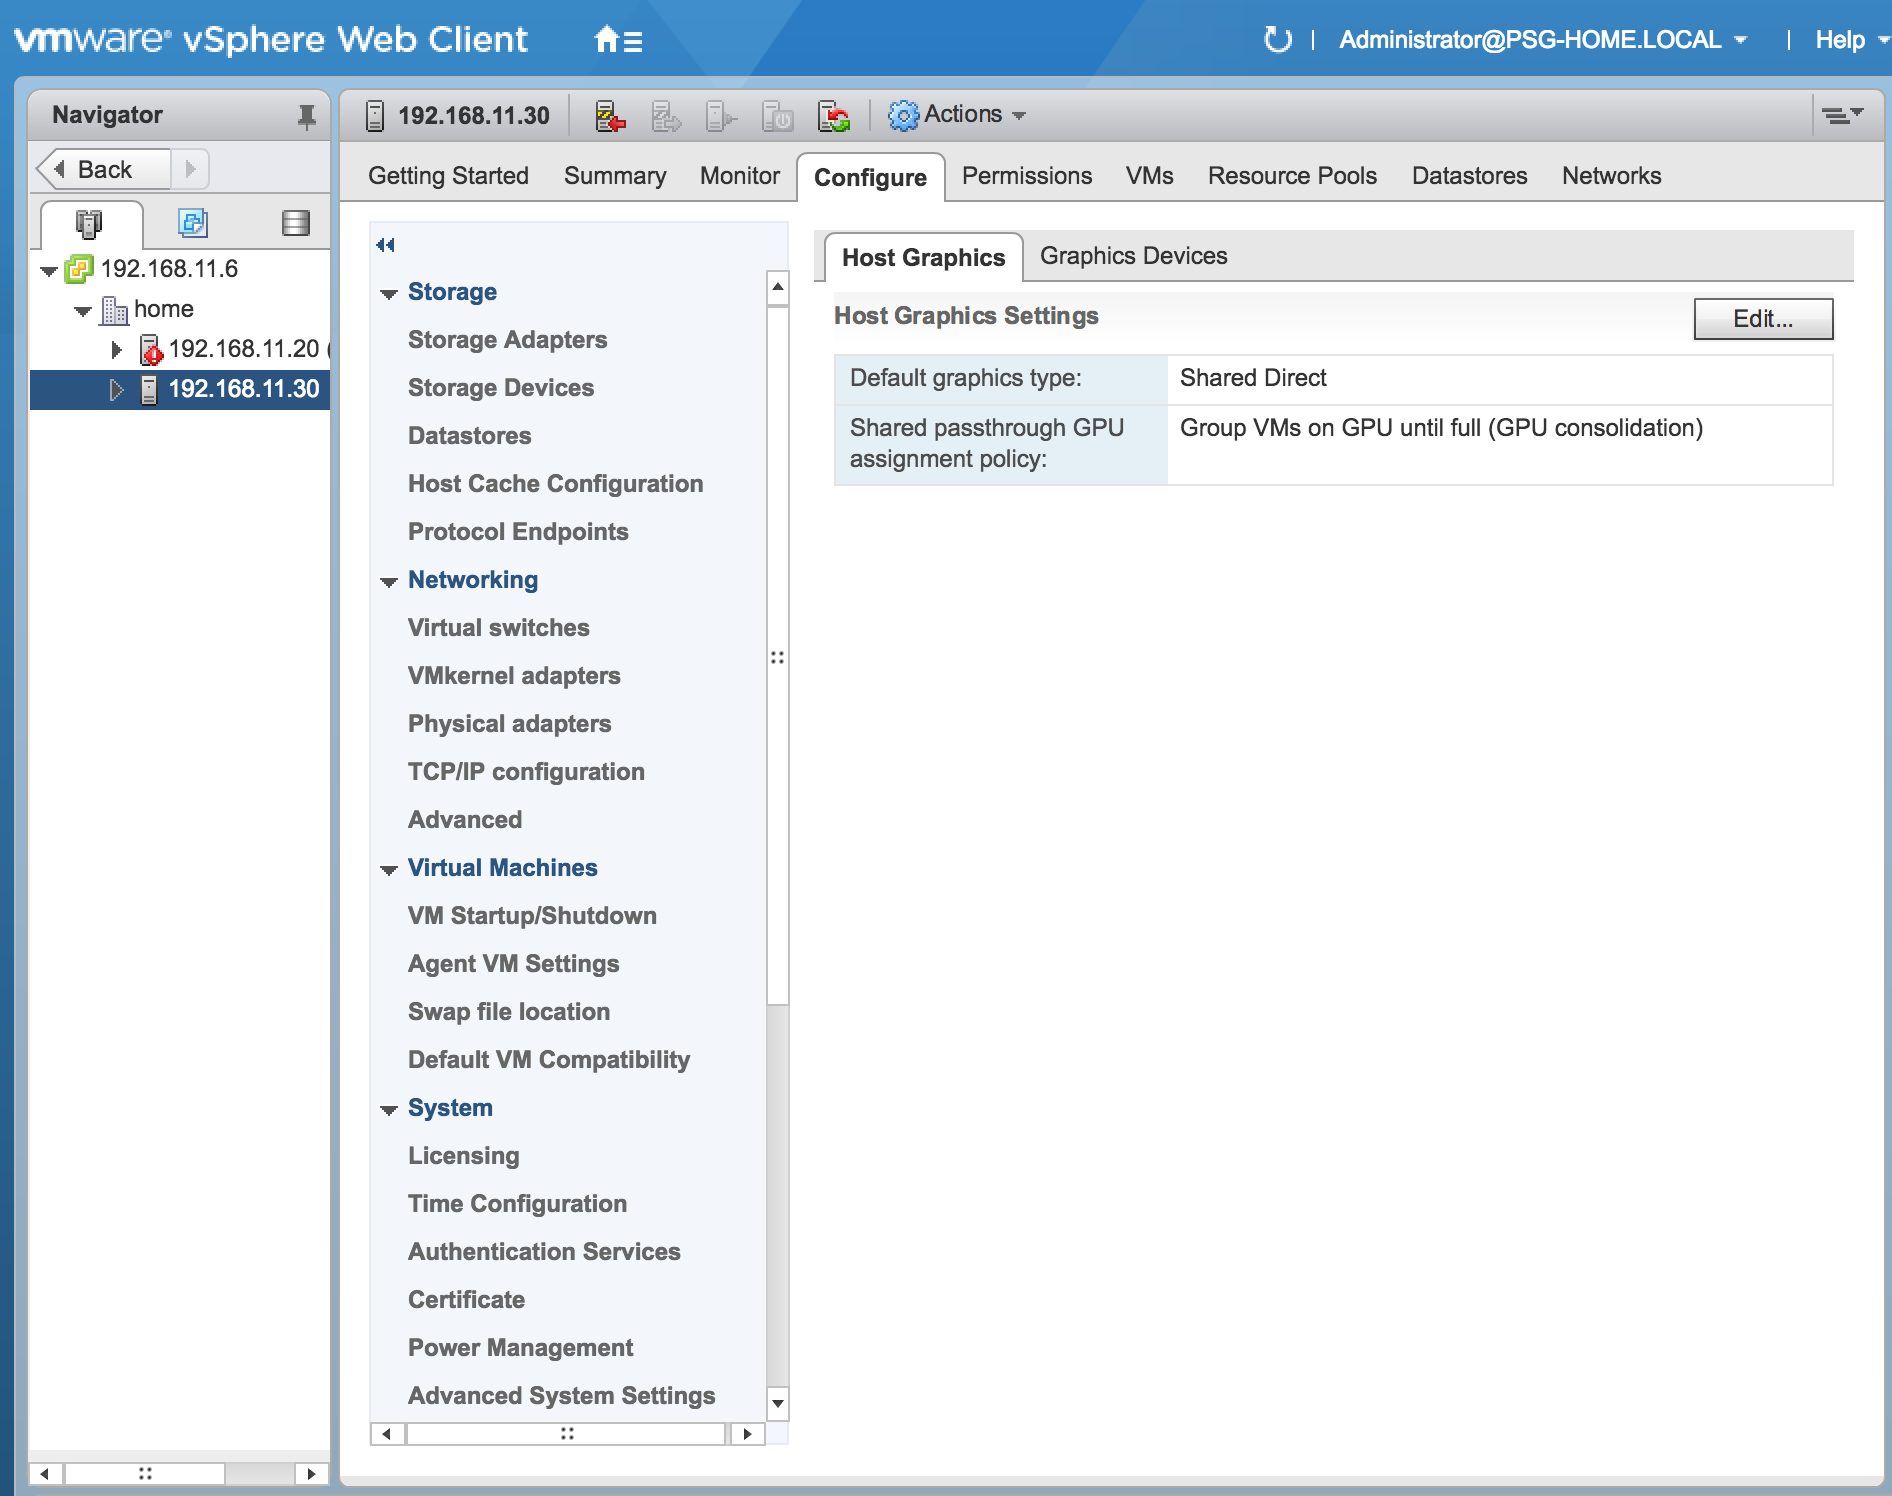
Figure 23 Depth-first allocation scheme setting for vGPU-enabled VMs#
Restart the ESXi host or the Xorg service on the host.
See also the following topics in the VMware vSphere documentation:
Migrating a VM Configured with vGPU#
On some hypervisors, NVIDIA vGPU software supports migration of VMs that are configured with vGPU.
Before migrating a VM configured with vGPU, ensure that the following prerequisites are met:
The VM is configured with vGPU.
The VM is running.
The destination host has a physical GPU of the same type as the GPU where the vGPU currently resides.
ECC memory configuration (enabled or disabled) on both the source and destination hosts must be identical.
The GPU topologies (including NVLink widths) on both the source and destination hosts must be identical.
Note
vGPU migration is disabled for a VM for which any of the following NVIDIA CUDA Toolkit features is enabled:
Unified memory
Debuggers
Profilers
How to migrate a VM configured with vGPU depends on the hypervisor that you are using.
After migration, the vGPU type of the vGPU remains unchanged.
The time required for migration depends on the amount of frame buffer that the vGPU has. Migration for a vGPU with a large amount of frame buffer is slower than for a vGPU with a small amount of frame buffer.
Migrating a VM Configured with vGPU on XenServer#
NVIDIA vGPU software supports XenMotion for VMs that are configured with vGPU. XenMotion enables you to move a running virtual machine from one physical host machine to another host with very little disruption or downtime. For a VM that is configured with vGPU, the vGPU is migrated with the VM to an NVIDIA GPU on the other host. The NVIDIA GPUs on both host machines must be of the same type.
For details about which XenServer versions, NVIDIA GPUs, and guest OS releases support XenMotion with vGPU, see Virtual GPU Software for XenServer Release Notes.
For best performance, the physical hosts should be configured to use the following:
Shared storage, such as NFS, iSCSI, or Fiberchannel
If shared storage is not used, migration can take a very long time because vDISK must also be migrated.
10 GB networking.
In Citrix XenCenter, context-click the VM and from the menu that opens, choose Migrate.
From the list of available hosts, select the destination host to which you want to migrate the VM.
The destination host must have a physical GPU of the same type as the GPU where the vGPU currently resides. Furthermore, the physical GPU must be capable of hosting the vGPU. If these requirements are not met, no available hosts are listed.
Migrating a VM Configured with vGPU on a Linux with KVM Hypervisor#
NVIDIA vGPU software supports vGPU Migration for VMs that are configured with vGPU. vGPU Migration enables you to move a running virtual machine from one physical host machine to another host with very little disruption or downtime. For a VM that is configured with vGPU, the vGPU is migrated with the VM to an NVIDIA GPU on the other host. The NVIDIA GPUs on both host machines must be of the same type.
NVIDIA vGPU software supports the following Linux with KVM hypervisors: Red Hat Enterprise Linux with KVM and Ubuntu.
For details about which Linux with KVM hypervisor versions, NVIDIA GPUs, and guest OS releases support vGPU Migration, refer to the following documentation:
Perform this task in a Linux command shell on the Linux with KVM hypervisor host on which the VM to be migrated is running.
Before migrating a VM configured with vGPU on a Linux with KVM hypervisor, ensure that the prerequisites listed for all supported hypervisors in Migrating a VM Configured with vGPU are met.
Set the maximum downtime of the VM to a length of time that is greater than the time required to complete the migration.
If the VM is heavily loaded, migration might not be completed within the default maximum downtime. To ensure that migration of the VM is completed, ensure that the maxim downtime exceeds the time required to complete the migration.
# virsh migrate-setmaxdowntime --domain <vm-name> --downtime <length>
<vm-name>The name of the VM on the local host that you want to migrate.
<length>The maximum downtime of the VM in milliseconds.
This example sets the maximum downtime of the VM named
guestvmon the local host to 10 s (10,000 ms).# virsh migrate-setmaxdowntime --domain guestvm --downtime 10000
Run the
virsh migratecommand for migrating the VM.The command to run depends on whether the hypervisor on the local host and the hypervisor on remote host both use the same VFIO framework for an NVIDIA vGPU that supports SR-IOV.
If both hypervisors use the same VFIO framework, run the following command:
# virsh migrate --live <vm-name> <destination-url> --verbose
If one hypervisor uses the
mdevVFIO framework and the other hypervisor uses a vendor-specific VFIO framework, run the following command:# virsh migrate --live <vm-name> <destination-url> --verbose \ --xml <remote-libvirt-xml-file>
For GPUs that support SR-IOV, use of a vendor-specific VFIO framework is introduced in the following hypervisor software releases:
Red Hat Enterprise Linux with KVM 10.0
Ubuntu 24.04
<vm-name>The name of the VM on the local host that you want to migrate.
<destination-url>The URL of the connection to the remote host to which you want to migrate the VM. For example, to migrate the VM to the system connection of the remote host at IP v4 address 192.0.2.12 by using an SSH tunnel, specify
<destination-url>asqemu+ssh://root@192.0.2.12/system.<remote-libvirt-xml-file>The full path to the
libvirtXML file on the remote host, for example,/root/destinationvm.xml.
This example uses an SSH tunnel to migrate the VM named
guestvmon the local host to the system connection of the remote host at IP v4 address 192.0.2.12.# virsh migrate --live guestvm qemu+ssh://root@192.0.2.12/system --verbose
This example uses an SSH tunnel to migrate the VM named
guestvmon the local host to the system connection of the remote host at IP v4 address 192.0.2.14. The hypervisor on the remote host uses a different VFIO framework. The full path to thelibvirtXML file on the remote host is/root/destinationvm.xml.# virsh migrate --live guestvm qemu+ssh://root@192.0.2.14/system --verbose \ --xml /root/rhel9.4-vgpu-base_dest.xml
For more information, refer to Migrating virtual machines in the product documentation for Red Hat Enterprise Linux 9.
Suspending and Resuming a VM Configured with vGPU on a Linux with KVM Hypervisor#
NVIDIA vGPU software supports suspend and resume for VMs that are configured with vGPU.
NVIDIA vGPU software supports the following Linux with KVM hypervisors: Red Hat Enterprise Linux with KVM and Ubuntu.
For details about which Linux with KVM hypervisor versions, NVIDIA GPUs, and guest OS releases support suspend and resume, refer to the following documentation:
Perform this task in a Linux command shell on the Linux with KVM hypervisor host on which the VM to be suspended is running or on which the VM to be resumed will run.
To suspend a VM, use the
virsh savecommand to save the state of the VM to a file.# virsh save <vm-name> <vm-state-file>
<vm-name>The name of the VM on the local host that you want to suspend.
<vm-state-file>The name of the file to which you want to save the state of the VM.
This example suspends the VM named
guestvmon the local host to by saving its state to the fileguestvm-state.save.# virsh save guestvm guestvm-state.save
To resume a VM, use the
virsh restorecommand to restore the VM from a file to which the state of the VM has previously been saved.# virsh restore <vm-state-file>
<vm-state-file>The name of the file to which the state of the VM has previously been saved.
This example resumes the VM named
guestvmon the local host to by restoring its state from the fileguestvm-state.save.# virsh restore guestvm-state.save
Migrating a VM Configured with vGPU on Microsoft Azure Local or Microsoft Windows Server#
NVIDIA vGPU software supports vGPU Migration for VMs that are configured with vGPU. vGPU Migration enables you to move a running virtual machine from one physical host machine to another host with very little disruption or downtime. For a VM that is configured with vGPU, the vGPU is migrated with the VM to an NVIDIA GPU on the other host. The NVIDIA GPUs on both host machines must be of the same type.
For details about which Microsoft Azure Local or Microsoft Windows Server versions, NVIDIA GPUs, and guest OS releases support vGPU Migration, refer to the following documentation:
Virtual GPU Software for Microsoft Azure Local Release Notes
Virtual GPU Software for Microsoft Windows Server Release Notes
Before migrating a VM configured with vGPU on Microsoft Azure Local or Microsoft Windows Server, ensure that the following prerequisites are met:
Your hosts are correctly configured for vGPU Migration. Refer to the following articles on the Microsoft technical documentation site:
The prerequisites listed for all supported hypervisors in Migrating a VM Configured with vGPU are met.
Use Hyper-V Manager or Windows PowerShell to migrate the VM as explained in Failover Clustering in Windows Server and Azure Local on the Microsoft technical documentation site.
Migrating a VM Configured with vGPU on VMware vSphere#
NVIDIA vGPU software supports VMware vMotion for VMs that are configured with vGPU. VMware vMotion enables you to move a running virtual machine from one physical host machine to another host with very little disruption or downtime. For a VM that is configured with vGPU, the vGPU is migrated with the VM to an NVIDIA GPU on the other host. The NVIDIA GPUs on both host machines must be of the same type.
For details about which VMware vSphere versions, NVIDIA GPUs, and guest OS releases support suspend and resume, see Virtual GPU Software for VMware vSphere Release Notes.
Perform this task in the VMware vSphere web client by using the Migration wizard.
Before migrating a VM configured with vGPU on VMware vSphere, ensure that the following prerequisites are met:
Your hosts are correctly configured for VMware vMotion. See Host Configuration for vSphere vMotion in the VMware documentation.
The prerequisites listed for all supported hypervisors in Migrating a VM Configured with vGPU are met.
NVIDIA vGPU migration is configured. See Configuring VMware vMotion with vGPU for VMware vSphere.
Context-click the VM and from the menu that opens, choose Migrate.
For the type of migration, select Change compute resource only and click Next.
If you select Change both compute resource and storage, the time required for the migration increases.
Select the destination host and click Next.
The destination host must have a physical GPU of the same type as the GPU where the vGPU currently resides. Furthermore, the physical GPU must be capable of hosting the vGPU. If these requirements are not met, no available hosts are listed.
Select the destination network and click Next.
Select the migration priority level and click Next.
Review your selections and click Finish.
For more information, see the following topics in the VMware documentation:
If NVIDIA vGPU migration is not configured, any attempt to migrate a VM with an NVIDIA vGPU fails and a window containing the following error message is displayed:
Compatibility Issue/Host
Migration was temporarily disabled due to another
migration activity.
vGPU hot migration is not enabled.
The window appears as follows:
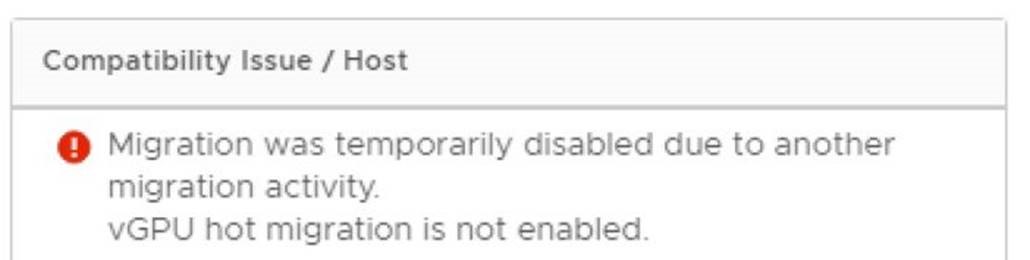
If you see this error, configure NVIDIA vGPU migration as explained in Configuring VMware vMotion with vGPU for VMware vSphere.
If your version of VMware vSpehere ESXi does not support vMotion for VMs configured with NVIDIA vGPU, any attempt to migrate a VM with an NVIDIA vGPU fails and a window containing the following error message is displayed:
Compatibility Issues
...
A required migration feature is not supported on the "Source" host '<host-name>'.

A warning or error occurred when migrating the virtual machine.
Virtual machine relocation, or power on after relocation or cloning can fail if
vGPU resources are not available on the destination host.
The window appears as follows:
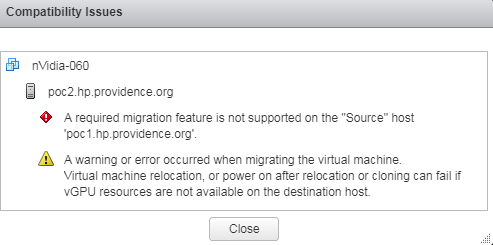
For details about which VMware vSphere versions, NVIDIA GPUs, and guest OS releases support suspend and resume, see Virtual GPU Software for VMware vSphere Release Notes.
Suspending and Resuming a VM Configured with vGPU on VMware vSphere#
NVIDIA vGPU software supports suspend and resume for VMs that are configured with vGPU.
For details about which VMware vSphere versions, NVIDIA GPUs, and guest OS releases support suspend and resume, see Virtual GPU Software for VMware vSphere Release Notes.
Perform this task in the VMware vSphere web client.
To suspend a VM, context-click the VM that you want to suspend, and from the context menu that pops up, choose Power > Suspend.
To resume a VM, context-click the VM that you want to resume, and from the context menu that pops up, choose Power > Power On.
Modifying a MIG-Backed vGPU’s Configuration from a Guest VM#
From within a Linux guest VM, you can modify the configuration only of MIG-backed vGPUs that occupy an entire GPU instance. You cannot modify the configuration of time-sliced, MIG-backed vGPUs. Furthermore, from within a Windows guest VM, you cannot modify the configuration of any vGPUs, irrespective of whether they occupy an entire GPU instance.
Note
A MIG-backed vGPU that occupies an entire GPU instance is assigned all of the instance’s frame buffer. For such vGPUs, the maximum vGPUs per GPU instance in the tables in Virtual GPU Types Reference is always 1.
Ensure that the following prerequisites are met:
You have root user privileges in the guest VM.
The GPU instance is not being used by any other processes, such as CUDA applications, monitoring applications, or the
nvidia-smicommand.
Perform this task in a guest VM command shell.
Open a command shell as the root user in the guest VM.
You can use secure shell (SSH) for this purpose.
Ensure that console virtual network computing (VNC) is disabled for the vGPU.
To disable VNC, set the
disable_vncvGPU plugin parameter to 1 as explained in Setting vGPU Plugin Parameters on a Linux with KVM Hypervisor.List the available GPU instance.
$ nvidia-smi mig -lgi
+----------------------------------------------------+
| GPU instances:                                     |
| GPU   Name          Profile  Instance   Placement  |
|                       ID       ID       Start:Size |
|====================================================|
|   0  MIG 2g.48gb+gfx  32        0          1:0     |
+----------------------------------------------------+
Delete any instances were created when the GPU was configured for MIG-backed vGPUs.
$ nvidia-smi mig -dci -ci <compute-instance-id> -gi <gpu-instance-id>
<compute-instance-id>The ID of the compute instance that you want to delete.
<gpu-instance-id>The ID of the GPU instance from which you want to delete the compute instance.
Note
If the GPU instance is being used by another process, this command fails. In this situation, stop all processes that are using the GPU instance and retry the command.
This example deletes compute instance 0 from GPU instance 0 on GPU 0.
$ nvidia-smi mig -dci -ci 0 -gi 0
Successfully destroyed compute instance ID  0 from GPU  0 GPU instance ID  0
List the compute instance profiles that are available for your GPU instance.
$ nvidia-smi mig -lcip
This example shows that one
MIG 2g.48gbcompute instance or twoMIG 1c.2g.48gb(profile ID 0) compute instances can be created within the GPU instance.$ nvidia-smi mig -lcip +-------------------------------------------------------------------------------+ | Compute instance profiles: | | GPU GPU Name Profile Instances Exclusive Shared | | Instance ID Free/Total SM DEC ENC OFA | | ID CE JPEG | |===============================================================================| | 0 0 MIG 1c.2g.48gb 0 2/2 46 2 2 0 | | 2 2 | +-------------------------------------------------------------------------------+ | 0 0 MIG 1c.2g.48gb 7 1/1 80 2 2 0 | | 2 2 | +-------------------------------------------------------------------------------+ | 0 0 MIG 2g.48gb 1* 1/1 94 2 2 0 | | 2 2 | +-------------------------------------------------------------------------------+
Create the compute instances that you need within the available GPU instance.
Create each compute instance individually by running the following command.
$ nvidia-smi mig -cci <compute-instance-profile-id> -gi <gpu-instance-id>
<compute-instance-profile-id>The compute instance profile ID that specifies the compute instance.
<gpu-instance-id>The GPU instance ID that specifies the GPU instance within which you want to create the compute instance.
Note
If the GPU instance is being used by another process, this command fails. In this situation, stop all processes that are using the GPU and retry the command.
This example creates a
MIG 2g.48gbcompute instance on GPU instance 0.$ nvidia-smi mig -cci 1 -gi 0 Successfully created compute instance ID 0 on GPU 0 GPU instance ID 0 using profile MIG 2g.48gb (ID 1)
This example creates two
MIG 1c.2g.48gbcompute instances on GPU instance 0 by running the same command twice.$ nvidia-smi mig -cci 0 -gi 0 Successfully created compute instance ID 0 on GPU 0 GPU instance ID 0 using profile MIG 1c.2g.48gb (ID 0) $ nvidia-smi mig -cci 0 -gi 0 Successfully created compute instance ID 1 on GPU 0 GPU instance ID 0 using profile MIG 1c.2g.48gb (ID 0)
Verify that the compute instances were created within the GPU instance.
Use the
nvidia-smicommand for this purpose.This example confirms that a
MIG 2g.48gbcompute instance was created on GPU instance 0.nvidia-smi Mon May 18 19:01:24 2026 +-----------------------------------------------------------------------------+ | NVIDIA-SMI 595.91.04 Driver Version: 595.91.04 CUDA Version: 13.2 | |-------------------------------+----------------------+----------------------+ | GPU Name Persistence-M| Bus-Id Disp.A | Volatile Uncorr. ECC | | Fan Temp Perf Pwr:Usage/Cap| Memory-Usage | GPU-Util Compute M. | | | | MIG M. | |===============================+======================+======================| | 0 NVIDIA RTX PRO 6000... On| 00000000:07:00.0 Off | N/A | | N/A N/A P8 N/A / N/A | 1MiB / 49152MiB | N/A Default | | | | Enabled | +-------------------------------+----------------------+----------------------+ +-----------------------------------------------------------------------------+ | MIG devices: | +------------------+----------------------+-----------+-----------------------+ | GPU GI CI MIG | Shared Memory-Usage | Vol| Shared | | ID ID Dev | Shared BAR1-Usage | SM Unc| CE ENC DEC OFA JPG| | | | ECC| | |==================+======================+===========+=======================| | 0 0 0 0 | 1MiB / 46741MiB | 94 N/A | 2 2 2 0 2 | | | 0MiB / 256MiB | | | +------------------+----------------------+-----------+-----------------------+ +-----------------------------------------------------------------------------+ | Processes: | | GPU GI CI PID Type Process name GPU Memory | | ID ID Usage | |=============================================================================| | No running processes found | +-----------------------------------------------------------------------------+
This example confirms that two
MIG 1c.2g.48gbcompute instances were created on GPU instance 0.$ nvidia-smi Mon May 18 19:01:24 2026 +-----------------------------------------------------------------------------+ | NVIDIA-SMI 595.91.04 Driver Version: 595.91.04 CUDA Version: 13.2 | |-------------------------------+----------------------+----------------------+ | GPU Name Persistence-M| Bus-Id Disp.A | Volatile Uncorr. ECC | | Fan Temp Perf Pwr:Usage/Cap| Memory-Usage | GPU-Util Compute M. | | | | MIG M. | |===============================+======================+======================| | 0 NVIDIA RTX PRO 6000... On| 00000000:07:00.0 Off | N/A | | N/A N/A P8 N/A / N/A | 1MiB / 49152MiB | N/A Default | | | | Enabled | +-------------------------------+----------------------+----------------------+ +-----------------------------------------------------------------------------+ | MIG devices: | +------------------+----------------------+-----------+-----------------------+ | GPU GI CI MIG | Memory-Usage | Vol| Shared | | ID ID Dev | BAR1-Usage | SM Unc| CE ENC DEC OFA JPG| | | | ECC| | |==================+======================+===========+=======================| | 0 0 0 0 | 1MiB / 46741MiB | 46 N/A | 2 2 2 0 2 | | | 0MiB / 4096MiB | | | +------------------+----------------------+-----------+-----------------------+ | 0 0 1 1 | 1MiB / 46741MiB | 46 N/A | 2 2 2 0 2 | | | 0MiB / 256MiB | | | +------------------+----------------------+-----------+-----------------------+ +-----------------------------------------------------------------------------+ | Processes: | | GPU GI CI PID Type Process name GPU Memory | | ID ID Usage | |=============================================================================| | No running processes found | +-----------------------------------------------------------------------------+
Enabling Unified Memory for a vGPU#
Unified memory is disabled by default. If used, you must enable unified memory individually for each vGPU that requires it by setting a vGPU plugin parameter. How to enable unified memory for a vGPU depends on the hypervisor that you are using.
Enabling Unified Memory for a vGPU on XenServer#
On XenServer, enable unified memory by setting the enable_uvm vGPU plugin parameter.
Perform this task for each vGPU that requires unified memory by using the xe command.
Set the enable_uvm vGPU plugin parameter for the vGPU to 1 as explained in Setting vGPU Plugin Parameters on XenServer.
This example enables unified memory for the vGPU that has the UUID d15083f8-5c59-7474-d0cb-fbc3f7284f1b.
[root@xenserver ~] xe vgpu-param-set uuid=d15083f8-5c59-7474-d0cb-fbc3f7284f1b extra_args='enable_uvm=1'
Enabling Unified Memory for a vGPU on Red Hat Enterprise Linux KVM#
On Red Hat Enterprise Linux KVM, enable unified memory by setting the enable_uvm vGPU plugin parameter.
Ensure that the mdev device file that represents the vGPU has been created as explained in Creating an NVIDIA vGPU on a Linux with KVM Hypervisor.
Perform this task for each vGPU that requires unified memory.
Set the enable_uvm vGPU plugin parameter for the mdev device file that represents the vGPU to 1 as explained in Setting vGPU Plugin Parameters on a Linux with KVM Hypervisor.
Enabling Unified Memory for a vGPU on VMware vSphere#
On VMware vSphere, enable unified memory by setting the pciPassthru<vgpu-id>.cfg.enable_uvm configuration parameter in advanced VM attributes.
Ensure that the VM to which the vGPU is assigned is powered off.
Perform this task in the vSphere Client for each vGPU that requires unified memory.
In advanced VM attributes, set the pciPassthru<vgpu-id>.cfg.enable_uvm vGPU plugin parameter for the vGPU to 1 as explained in Setting vGPU Plugin Parameters on VMware vSphere.
<vgpu-id>A positive integer that identifies the vGPU assigned to a VM. For the first vGPU assigned to a VM,
<vgpu-id>is0. For example, if two vGPUs are assigned to a VM and you are enabling unified memory for both vGPUs, setpciPassthru0.cfg.enable_uvmandpciPassthru1.cfg.enable_uvmto 1.
Enabling NVIDIA CUDA Toolkit Development Tools for NVIDIA vGPU#
By default, NVIDIA CUDA Toolkit development tools are disabled on NVIDIA vGPU. If used, you must enable NVIDIA CUDA Toolkit development tools individually for each VM that requires them by setting vGPU plugin parameters. One parameter must be set for enabling NVIDIA CUDA Toolkit debuggers and a different parameter must be set for enabling NVIDIA CUDA Toolkit profilers.
Enabling NVIDIA CUDA Toolkit Debuggers for NVIDIA vGPU#
By default, NVIDIA CUDA Toolkit debuggers are disabled. If used, you must enable them for each vGPU VM that requires them by setting a vGPU plugin parameter. How to set the parameter to enable NVIDIA CUDA Toolkit debuggers for a vGPU VM depends on the hypervisor that you are using.
You can enable NVIDIA CUDA Toolkit debuggers for any number of VMs configured with vGPUs on the same GPU. When NVIDIA CUDA Toolkit debuggers are enabled for a VM, the VM cannot be migrated.
Perform this task for each VM for which you want to enable NVIDIA CUDA Toolkit debuggers.
Enabling NVIDIA CUDA Toolkit Debuggers for NVIDIA vGPU on XenServer#
Set the enable_debugging vGPU plugin parameter for the vGPU that is assigned to the VM to 1 as explained in Setting vGPU Plugin Parameters on XenServer.
This example enables NVIDIA CUDA Toolkit debuggers for the vGPU that has the UUID d15083f8-5c59-7474-d0cb-fbc3f7284f1b.
[root@xenserver ~] xe vgpu-param-set uuid=d15083f8-5c59-7474-d0cb-fbc3f7284f1b extra_args='enable_debugging=1'
The setting of this parameter is preserved after a guest VM is restarted and after the hypervisor host is restarted.
Enabling NVIDIA CUDA Toolkit Debuggers for NVIDIA vGPU on Red Hat Enterprise Linux KVM#
Set the enable_debugging vGPU plugin parameter for the mdev device file that represents the vGPU that is assigned to the VM to 1 as explained in Setting vGPU Plugin Parameters on a Linux with KVM Hypervisor.
The setting of this parameter is preserved after a guest VM is restarted. However, this parameter is reset to its default value after the hypervisor host is restarted.
Enabling NVIDIA CUDA Toolkit Debuggers for NVIDIA vGPU on on VMware vSphere#
Ensure that the VM for which you want to enable NVIDIA CUDA Toolkit debuggers is powered off.
In advanced VM attributes, set the pciPassthru<vgpu-id>.cfg.enable_debugging vGPU plugin parameter for the vGPU that is assigned to the VM to 1 as explained in Setting vGPU Plugin Parameters on VMware vSphere.
<vgpu-id>A positive integer that identifies the vGPU assigned to the VM. For the first vGPU assigned to a VM,
<vgpu-id>is0. For example, if two vGPUs are assigned to a VM and you are enabling debuggers for both vGPUs, setpciPassthru0.cfg.enable_debuggingandpciPassthru1.cfg.enable_debuggingto 1.
The setting of this parameter is preserved after a guest VM is restarted. However, this parameter is reset to its default value after the hypervisor host is restarted.
Enabling NVIDIA CUDA Toolkit Profilers for NVIDIA vGPU#
By default, only GPU workload trace is enabled. If you want to use all NVIDIA CUDA Toolkit profiler features that NVIDIA vGPU supports, you must enable them for each vGPU VM that requires them.
Note
Enabling profiling for a VM gives the VM access to the GPU’s global performance counters, which may include activity from other VMs executing on the same GPU. Enabling profiling for a VM also allows the VM to lock clocks on the GPU, which impacts all other VMs executing on the same GPU.
Supported NVIDIA CUDA Toolkit Profiler Features#
You can enable the following NVIDIA CUDA Toolkit profiler features for a vGPU VM:
NVIDIA Nsight™ Compute
NVIDIA Nsight Systems
CUDA Profiling Tools Interface (CUPTI)
Clock Management for a vGPU VM for Which NVIDIA CUDA Toolkit Profilers Are Enabled#
Clocks are not locked for periodic sampling use cases such as NVIDIA Nsight Systems profiling.
Clocks are locked for multipass profiling such as:
NVIDIA Nsight Compute kernel profiling
CUPTI range profiling
Clocks are locked automatically when profiling starts and are unlocked automatically when profiling ends.
Limitations on the Use of NVIDIA CUDA Toolkit Profilers with NVIDIA vGPU#
The following limitations apply when NVIDIA CUDA Toolkit profilers are enabled for NVIDIA vGPU:
NVIDIA CUDA Toolkit profilers can be used on only one VM at a time.
Multiple CUDA contexts cannot be profiled simultaneously.
Profiling data is collected separately for each context.
A VM for which NVIDIA CUDA Toolkit profilers are enabled cannot be migrated.
Because NVIDIA CUDA Toolkit profilers can be used on only one VM at a time, you should enable them for only one VM assigned a vGPU on a GPU. However, NVIDIA vGPU software cannot enforce this requirement. If NVIDIA CUDA Toolkit profilers are enabled on more than one VM assigned a vGPU on a GPU, profiling data is collected only for the first VM to start the profiler.
Enabling NVIDIA CUDA Toolkit Profilers for a vGPU VM#
You enable NVIDIA CUDA Toolkit profilers for a vGPU VM by setting a vGPU plugin parameter. How to set the parameter to enable NVIDIA CUDA Toolkit profilers for a vGPU VM depends on the hypervisor that you are using.
Perform this task for the VM for which you want to enable NVIDIA CUDA Toolkit profilers.
Enabling NVIDIA CUDA Toolkit Profilers for NVIDIA vGPU on XenServer#
Set the enable_profiling vGPU plugin parameter for the vGPU that is assigned to the VM to 1 as explained in Setting vGPU Plugin Parameters on XenServer.
This example enables NVIDIA CUDA Toolkit profilers for the vGPU that has the UUID d15083f8-5c59-7474-d0cb-fbc3f7284f1b.
[root@xenserver ~] xe vgpu-param-set uuid=d15083f8-5c59-7474-d0cb-fbc3f7284f1b extra_args='enable_profiling=1'
The setting of this parameter is preserved after a guest VM is restarted and after the hypervisor host is restarted.
Enabling NVIDIA CUDA Toolkit Profilers for NVIDIA vGPU on Red Hat Enterprise Linux KVM#
Set the enable_profiling vGPU plugin parameter for the mdev device file that represents the vGPU that is assigned to the VM to 1 as explained in Setting vGPU Plugin Parameters on a Linux with KVM Hypervisor.
The setting of this parameter is preserved after a guest VM is restarted. However, this parameter is reset to its default value after the hypervisor host is restarted.
Enabling NVIDIA CUDA Toolkit Profilers for NVIDIA vGPU on on VMware vSphere#
Ensure that the VM for which you want to enable NVIDIA CUDA Toolkit profilers is powered off.
In advanced VM attributes, set the pciPassthru<vgpu-id>.cfg.enable_profiling vGPU plugin parameter for the vGPU that is assigned to the VM to 1 as explained in Setting vGPU Plugin Parameters on VMware vSphere.
<vgpu-id>A positive integer that identifies the vGPU assigned to the VM. For the first vGPU assigned to a VM,
<vgpu-id>is0. For example, if two vGPUs are assigned to a VM and you are enabling profilers for the second vGPU, setpciPassthru1.cfg.enable_profilingto 1.
The setting of this parameter is preserved after a guest VM is restarted. However, this parameter is reset to its default value after the hypervisor host is restarted.
Enabling the TCC Driver Model for a vGPU#
The Tesla Compute Cluster (TCC) driver model supports CUDA C/C++ applications. This model is optimized for compute applications and reduces kernel launch times on Windows. By default, the driver model of a vGPU that is assigned to a Windows VM is Windows Display Driver Model (WDDM). If you want to use the TCC driver model, you must enable it explicitly.
This task requires administrator privileges.
Perform this task from the VM to which the vGPU is assigned.
Note
Only Q-series vGPUs support the TCC driver model.
Log on to the VM to which the vGPU is assigned.
Set the driver model of the vGPU to the TCC driver model.
nvidia-smi -g <vgpu-id> -dm 1<vgpu-id>The ID of the vGPU for which you want to enable the TCC driver model. If the
-gis omitted, the TCC driver model is enabled for all vGPUs that are assigned to the VM.
Reboot the VM.